Fast Track to Rack Installation and Power
This procedure guides you through the simplest steps for the most common installation to get your EX9208 switch in a rack and connect it to power. Have more complex installation needs? See Installing and Connecting an EX9208 Switch
Installing the EX9208 Switch in a Rack
Before beginning installation of the EX9204 switch in a rack or cabinet, follow instructions in Unpacking the EX9200 Switch.
You can mount the switch in a rack or cabinet using a mechanical lift or without using a mechanical lift.
- Mounting an EX9208 Switch on a Rack or Cabinet Using a Mechanical Lift
- Mounting an EX9208 Switch on a Rack or Cabinet Without Using a Mechanical Lift
Mounting an EX9208 Switch on a Rack or Cabinet Using a Mechanical Lift
Before you install the switch:
-
Prepare the site for installation as described in Site Preparation Checklist for an EX9208 Switch.
-
Ensure the site has adequate clearance for both airflow and hardware maintenance as described in Clearance Requirements for Airflow and Hardware Maintenance for an EX9208 Switch.
-
Ensure you understand how to prevent electrostatic discharge (ESD) damage. See Prevention of Electrostatic Discharge Damage.
-
Unpack the switch as described in Unpacking the EX9200 Switch.
-
In a four-post rack or open-frame rack, install the mounting shelf. See Installing a Mounting Shelf in a Rack or Cabinet for an EX9208 Switch.
-
Review chassis lifting guidelines described in Chassis Lifting Guidelines for EX9200 Switches.
Ensure that you have the following parts and tools available to install the switch:
-
A mechanical lift
-
7/16-in. (11-mm) nut driver
-
Phillips (+) screwdrivers, number 1 and 2
-
ESD grounding wrist strap
Because of the size and weight of the switch, we strongly recommend using a mechanical lift to install the switch.
Do not install line cards in the chassis until after you mount the chassis securely on a rack or cabinet.
Before front-mounting the switch on a rack or cabinet, have a qualified technician verify that the rack or cabinet is strong enough to support the weight of the switch and is adequately supported at the installation site.
If you are installing more than one switch in a rack or cabinet, install the first switch at the bottom of the rack.
To install the switch using a mechanical lift:
Attach the ESD grounding strap to your bare wrist and connect the strap to the ESD point on the chassis.
Ensure that the rack or cabinet is placed in its permanent location and is secured to the building. Ensure that the installation site allows adequate clearance for both airflow and maintenance.
Load the switch onto the lift, making sure it rests securely on the lift platform.
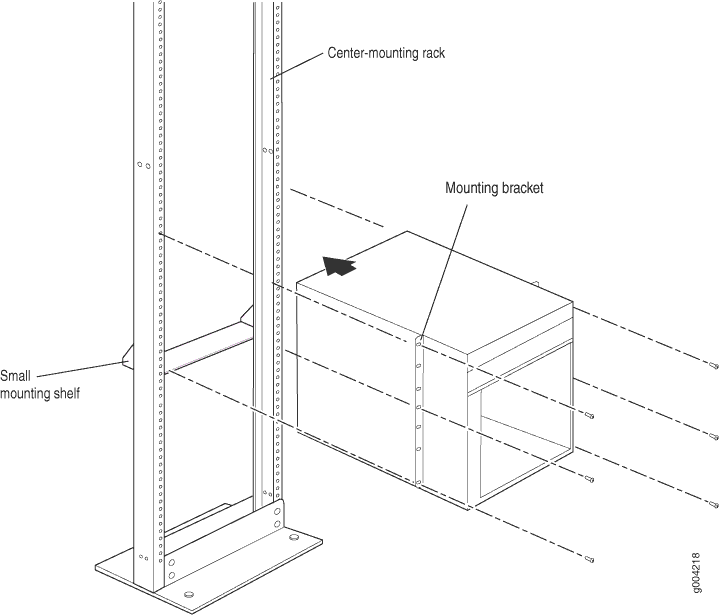
Using the lift, position the switch in front of the rack or cabinet, centering it in front of the mounting shelf installed in the rack.
Lift the chassis approximately 0.75 in. (1.9 cm) above the surface of the mounting shelf and position it as close as possible to the shelf.
Carefully slide the switch onto the mounting shelf so that the bottom of the chassis and the mounting shelf overlap by approximately two inches.
Slide the switch onto the mounting shelf until the mounting brackets contact the rack rails. The shelf ensures that the holes in the mounting brackets of the chassis align with the holes in the rack rails.
Move the lift away from the rack.
Install a mounting screw into each of the open front-mounting holes aligned with the rack, starting from the bottom.
Visually inspect the alignment of the switch. If the switch is installed properly in the rack, all the mounting screws on one side of the rack are aligned with the mounting screws on the opposite side and the switch is level.
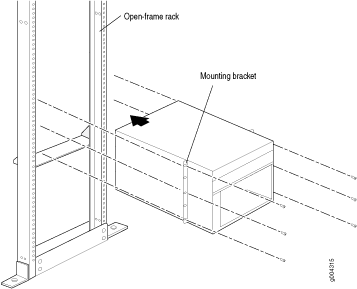
The following Figure 1 shows installing an EX9208 switch in an open-frame rack. The procedure is the same for all EX9200 switches.
Figure 1: Installing the Switch in an Open-Frame Rack
Mounting an EX9208 Switch on a Rack or Cabinet Without Using a Mechanical Lift
Before you install the switch:
-
Prepare the site for installation as described in Site Preparation Checklist for an EX9208 Switch.
-
Ensure the site has adequate clearance for both airflow and hardware maintenance as described in Clearance Requirements for Airflow and Hardware Maintenance for an EX9208 Switch.
-
Unpack the switch as described in Unpacking the EX9200 Switch.
If you are installing more than one switch in a rack, install the lowest one first. Installing a switch in an upper position in a rack or cabinet requires a lift
Before front mounting the switch in a rack, have a qualified technician verify that the rack is strong enough to support the weight of the switch and is adequately supported at the installation site.
Lifting the chassis and mounting it in a rack requires two people. The empty chassis weighs approximately 65.5 lb (29.7 kg).
To mount an EX9208 Switch on a rack or cabinet without using a mechanical lift.
Remove all components except the midplane from the chassis. See:
Ensure that the rack is in its permanent location and is secured to the building. Ensure that the installation site allows adequate clearance for both airflow and maintenance.
Position the switch in front of the rack or cabinet, centering it in front of the mounting shelf. Use a pallet jack if one is available.
With one person on each side, hold onto the bottom of the chassis and carefully lift it onto the mounting shelf.
Warning:To prevent injury, keep your back straight and lift with your legs, not your back. Avoid twisting your body as you lift. Balance the load evenly, and be sure that your footing is solid.
Slide the switch onto the mounting shelf until the mounting brackets contact the rack rails. The shelf ensures that the holes in the mounting brackets of the chassis align with the holes in the rack rails.
Install a mounting screw into each of the open mounting holes aligned with the rack, starting from the bottom.
Visually inspect the alignment of the switch. If the switch is installed properly in the rack, all the mounting screws on one side of the rack must be aligned with the mounting screws on the opposite side and the switch must be level. See the following Figure 2.
Figure 2: Installing the Switch in an Open-Frame Rack
After you install the mounting screws and securely bolt the chassis to the rack, reinstall the components in the chassis. See:
Connect to Power
Ground the EX9208 Switch
To connect earth ground to an EX9208 series switch:
Verify that a licensed electrician has attached the cable lug to the grounding cable.
Connect one end of the grounding cable to a proper earth ground, such as the rack in which the switch is mounted.
Attach an ESD grounding strap to your bare wrist, and connect the strap to the ESD grounding point on the switch.
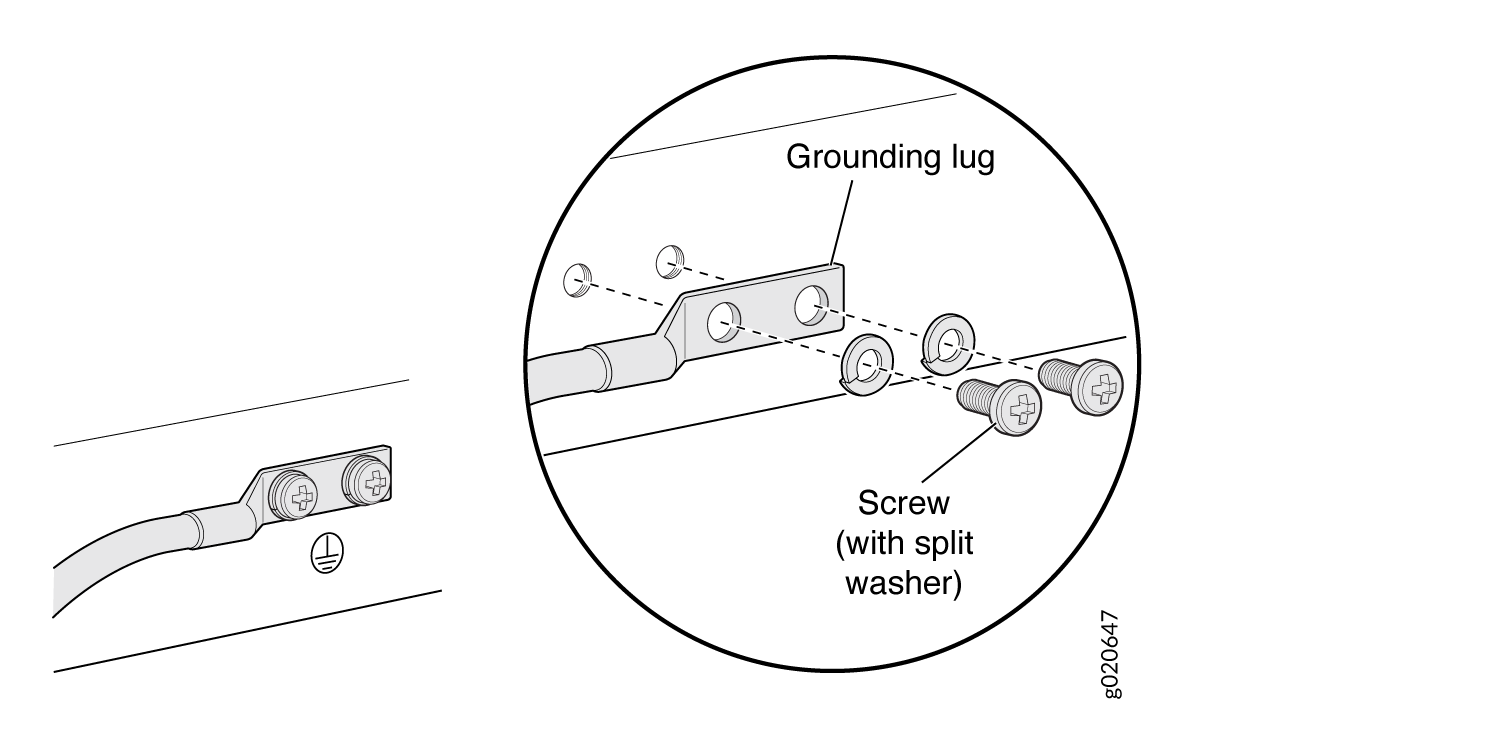
Place the grounding lug attached to the grounding cable over the protective earthing terminal, see Figure 3.
Figure 3: Connecting a Grounding Cable to an EX Series Switch
Secure the grounding lug to the protective earthing terminal with the washers and screws.
Dress the grounding cable and ensure that it does not touch or block access to other switch components and that it does not drape where people could trip over it.
Connect the EX9208 Switch to Power
Depending on the requirements as appropriate for your site, connect AC or DC power to the EX9208 switch. The following section instructs you how to connect the switch to an AC power source. Read Connecting DC Power to an EX9208 Switch to read on how to connect DC power to the EX9208 switch.
Connecting AC Power to an EX9208 Switch
Before you begin to connect power to the switch:
-
Ensure you understand how to prevent electrostatic discharge (ESD) damage. See Prevention of Electrostatic Discharge Damage.
-
Ensure that you have connected the device chassis to earth ground.
CAUTION:For installations that require a separate grounding conductor to the chassis, have a licensed electrician complete this connection before you connect the switch to power. For instructions on connecting earth ground, see Connect Earth Ground to an EX Series Switch.
-
Install power supplies in the switch. See Installing an AC Power Supply in an EX9208 Switch.
Ensure that you have the following parts and tools available to connect power to the switch:
-
ESD grounding strap (provided)
-
Power cords appropriate for your geographical location (not provided)
EX9208 switches can be configured with up to four AC power supplies.
Do not mix AC and DC power supplies in the same chassis.
Each power supply must be connected to a dedicated AC power source outlet.
Ensure that the power cords do not block access to switch components or drape where people can trip on them.
To connect AC power to an EX9208 switch:
Attach the ESD grounding strap to your bare wrist, and connect the strap to the ESD point on the chassis.
Ensure that the power supply is fully inserted and latched securely in the chassis. See Installing an AC Power Supply in an EX9208 Switch.
If needed, move the AC input switch next to the appliance inlet on the power supply faceplate, to the off (O) position.
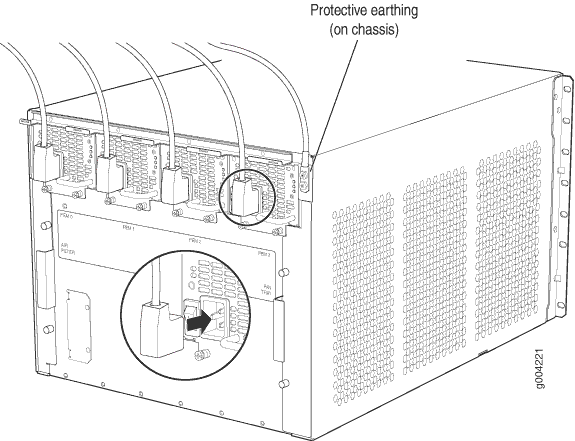
Insert the coupler end of the power cord into the AC appliance inlet on the AC power supply faceplate.
If the AC power source outlet has a power switch, set it to the off (O) position.
Insert the power cord plug into an AC power source outlet.
If the AC power source outlet has a power switch, set it to the on (|) position.
Move the AC input switch next to the appliance inlet on the power supply to the on( | ) position and observe the status LEDs on the power supply faceplate. If the power supply is correctly installed and functioning normally, the AC OK and DC OK LEDs glow steady green, and the PS FAIL LED is not lit.
Repeat steps 2 through 9 for the remaining power supplies.
Figure 4: Connecting the Power Supply Cord to an EX9208 Switch
Powering on the Switch
Before you power on the switch, ensure that:
-
You have installed all required switch components.
-
You have installed the required number of power supplies to support redundant operation for the switch configuration.
-
You understand how to protect the switch from electrostatic discharge (ESD) damage. See Prevention of Electrostatic Discharge Damage.
Ensure that you have the following parts and tools available:
-
An ESD wrist strap
-
An external management device such as a PC
-
A cable to connect the external management device to the CONSOLE port or the Ethernet management <...> port on the primary Routing Engine module (RE module).
-
For connecting a management device to the console port, see Connecting an EX9200 Switch to a Management Console or an Auxiliary Device. For connecting a management device to the Ethernet management port, see Connecting an EX9200 Switch to a Network for Out-of-Band Management.
To power on the switch:
Wrap and fasten one end of the ESD wrist strap around your bare wrist, and connect the other end of the strap to the ESD point on the switch.
Connect the external management device to the Ethernet management (<...>) port on the primary RE module.
Turn on the power to the external management device.
Ensure that the power supplies are fully inserted in the chassis and that each of their handles is flush against the faceplate.
Ensure that the source power cord is inserted securely into the appliance inlet for each AC power supply.
Switch on the dedicated customer site circuit breakers for the power supplies. Follow the ESD and safety instructions for your site.
Flip the AC input switch on the power supply to the On (|) position. Observe the power supply faceplate LEDs. If the power supply is installed correctly and functioning normally, the AC OK and DC OK LEDs glow steady green. The PS FAIL LED does not glow.
Repeat Step 7 for the remaining power supplies installed in the switch.
If any of the status LEDs indicates that the power supply is not functioning normally, repeat the installation and cabling procedures. See Connecting AC Power to an EX9208 Switch.
On the external management device, monitor the startup process to ensure that the system boots properly.
After you power on a power supply, wait for at least 60 seconds before you turn it off. After you power off a power supply, wait for at least 60 seconds before you turn it back on.
If the system is completely powered off when you switch on a power
supply, the RE module boots as the power supply completes its startup
sequence. If the Routing Engine finishes booting and you need to power
off the system again, first issue the CLI request system
halt command.
After you power on a power supply, it can take up to 60 seconds for
status indicators such as power supply LEDs and the show
chassis operational mode CLI command display to indicate
that the power supply is functioning normally. Ignore any error
indicators that might appear during the first 60 seconds.
