Maintaining Alarm Relay Wire
Disconnecting the Alarm Relay Wires from the Craft Interface in an EX9200 Switch
Ensure that you have the following parts and tools available:
Electrostatic discharge (ESD) grounding strap
2.5-mm flat-blade (–) screwdriver
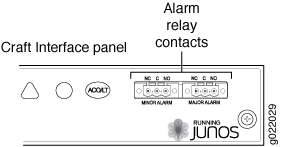
The craft interface has two alarm relay contacts for connecting the switch to external alarm devices (see Figure 1).
To disconnect the alarm relay wires from the switch and the alarm-reporting device:
- Disconnect the wire at the external device.
- Wrap and fasten one end of the ESD wrist strap around your bare wrist, and connect the other end of the strap to the ESD point on the switch.
- Loosen the small screws on the face of the terminal block using a screwdriver and remove the block from the relay contact.
- Loosen the small screws on the side of the terminal block using a screwdriver. Remove existing wires from the slots in the front of the block.

Connecting the Alarm Relay Wires to the Craft Interface in an EX9200 Switch
Before you connect the alarm relay wires between a switch and an alarm-reporting device:
Ensure you understand how to prevent electrostatic discharge (ESD) damage. See Prevention of Electrostatic Discharge Damage.
Ensure that you have the following parts and tools available:
An ESD wrist strap
2.5 mm flat-blade screwdriver
To connect the alarm relay wires between a switch and an alarm-reporting device (see Figure 2):
- Prepare the required length of replacement wire with gauge between 28 AWG (0.08 mm2) and 14 AWG (2.08 mm2).
- Insert the replacement wires into the slots in the front of the block. Use the screwdriver to tighten the screws and secure the wire.
- Wrap and fasten one end of the ESD wrist strap around your bare wrist, and connect the other end of the strap to the ESD point on the switch.
- Plug the terminal block into the relay contact, and use the screwdriver to tighten the screws on the face of the block.
- Attach the other end of the wires to the external device.

