Installing the Juniper ATP Appliance Collector Open Virtual Appliance (OVA)
Juniper ATP Appliance’s extensible deployment options include a Virtual Collector (vCollector) product, as an Open Virtual Appliance, or OVA, that runs in virtual machines. Specifically, a Juniper ATP Appliance OVA-packaged image is available for VMware Hypervisor for vSphere 6.5, 6.0, 5.5 and 5.0. Virtual Collector models supporting 25 Mbps, 100 Mbps, 500 Mbps and a 1.0 Gbps are available.
An OVF package consists of several files contained in a single directory with an OVF descriptor file that describes the Juniper ATP Appliance virtual machine template and package: metadata for the OVF package, and a Juniper ATP Appliance software image. The directory is distributed as an OVA package (a tar archive file with the OVF directory inside).

RECOMMENDATION: Juniper advises use of a dedicated physical NIC assigned to the vCollector for best collection results.
Virtual Collector Deployment Options
Two types of vCollector deployments are supported for a network switch SPAN/TAP:
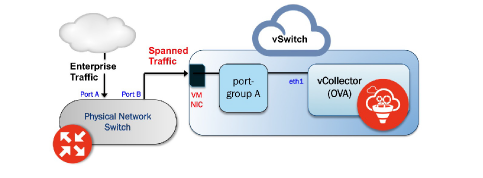
Traffic that is spanned to a vCollector from a physical switch. In this case, traffic is spanned from portA to portB. ESXi containing the Juniper ATP Appliance vCollector OVA is connected to portB. This deployment scenario is shown in the figure above.
Traffic from a virtual machine that is on the same vSwitch as the vCollector. In this deployment scenario, because the vSwitch containing the vCollector is in promiscuous mode, by default all port-groups created will also be in promiscuous mode. Therefore, 2 port groups are recommended wherein port-groupA (vCollector) in promiscuous mode is associated with the vCollector, and port-groupB (vTraffic) represents traffic that is not in promiscuous mode.
Traffic from a virtual machine that is not on the same vSwitch as the vCollector is not supported. Also, a dedicated NIC adapter is required for the vCollector deployment; attach the NIC to a virtual switch in promiscuous mode (to collect all traffic). If a vSwitch is in promiscuous mode, by default all port-groups are put in promiscuous mode and that means other regular VMs are also receiving unnecessary traffic. A workaround for that is to create a different port-group for the other VMs and configure without promiscuous mode.
Provisioning Requirements and Sizing Options
VM vCenter Version Support |
vCollector CPUs |
vCollector CPUs |
vCollector Memory |
|---|---|---|---|
VM vCenter Server Version: 6.5, 6.0, 5.5 and 5.0 vSphere Client Version: 6.5, 6.0, 5.5 and 5.0 ESXi version: 5.5.0 and 5.5.1 |
Processor speed 2.3-3.3 GHz As many physical CORES as virtual CPUs Hyperthreading: either enable or disable |
CPU Reservation: Default CPU Limit: Unlimited Hyperthreaded Core Sharing Mode: None (if Hyperthreading is enabled on the ESXi) |
Memory Reservation: Default Memory Limit: Unlimited |
Model |
Performanc e |
Number of vCPUs |
Memory |
Disk Storage |
|---|---|---|---|---|
vC--v500M |
500 Mbps |
4 |
16 GB |
512 GB |
vC--v1G |
1 Gbps |
8 |
32 GB |
512 GB |
vC-v2.5G |
2.5 Gbps |
24 |
64 GB |
512 GB |
OVA Deployment vSwitch Setup
- Identify the physical network adapter from which the spanned traffic is received, then create a new VMware Virtual Switch and associate it with the physical network adapter.
- Click on Virtual Switch Properties. On the Ports tab, select vSwitch and click on the Edit button.
- Select the Security tab and change Promiscuous Mode to accept, then click OK. Click OK again to exit.
- Create a new port-group “vtraffic” in the Virtual Switch. This new port-group will be assigned to your vCollector later. See vSwitch Tip below for information about troubleshooting this setup.
Install the ATP Appliance OVA to a VM
To install the ATP Appliance Appliance OVA to a VM
Obtain requisite login information from your sales representative, then download the Juniper ATP Appliance ISO file [JATP.iso] and the Juniper ATP Appliance Collector image file [img.zip] to your Linux system’s local directory.
Start a terminal session then plug in the first USB drive (Kingston USB flash drives are recommended) to the Linux system and identify its drive ID (ls /dev/sd*).
Use the Linux “dd” utility to write the local ISO content to the first USB flash drive; we refer to drive “sdb” in our example below but your drive ID will likely be different:
dd if=JATP.iso of=/dev/sdb
Note:It is very important that you take note of the drive ID and install the ISO only to that correct USB drive or the dd utility will overwrite all data on the drive selected.
OPTIONAL: To view status, use the pv utility [you may need to install the pv utility first]; for example: dd if=JATP.iso | pv | dd of=/dev/sdb
When the ISO is fully copied to the bootable USB drive, remove USB drive1 and insert USB drive2.
Copy the zipped Collector image file img.zip to the 2nd USB drive:
You are now ready to install the Collector ISO from the bootable USB drive. The ISO will unzip and install the Collector image file.
Note:There are Windows Utilities that are also available for creating bootable USB drives from the ISO image.
