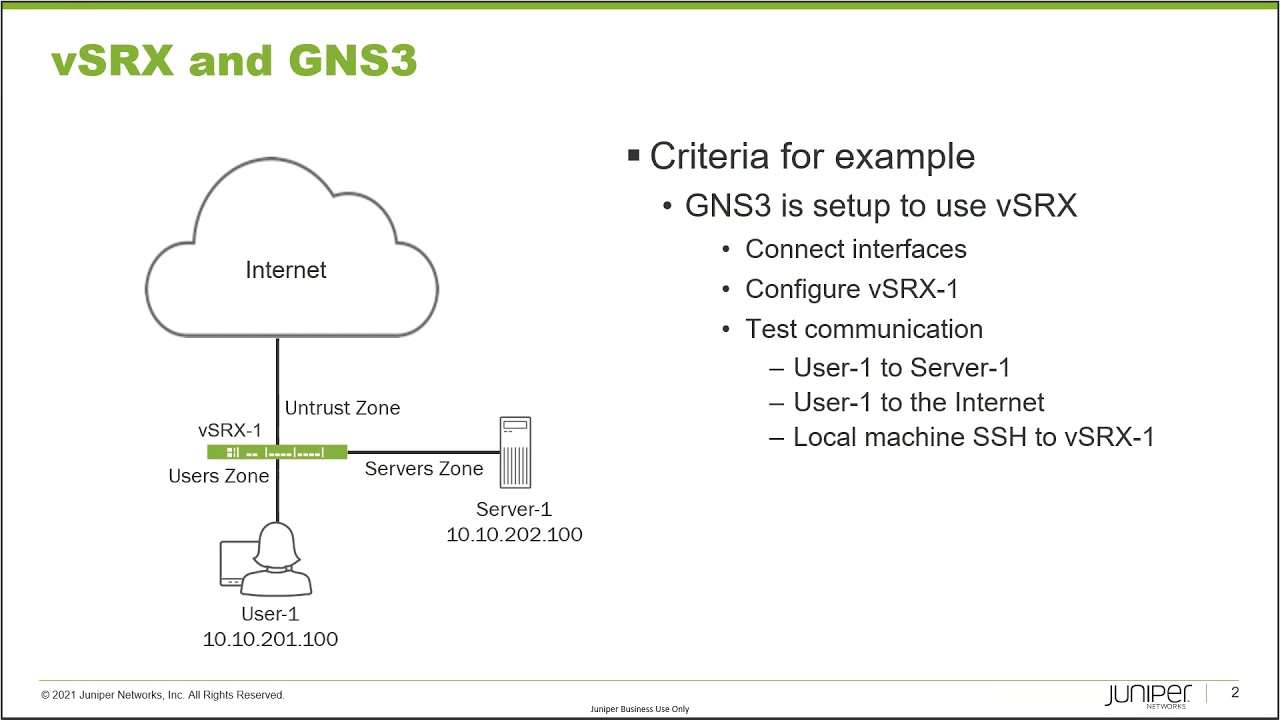
vSRX and GNS3

Juniper Learning Bytes: How to set up vSRX with GNS3
If you’re new to working with vSRX, check out this step-by-step demo from Juniper’s Zach Gibbs on how to set up GNS3 to use with Juniper vSRX for educational purposes.
You’ll learn
How to configure the GNS3 VM with the proper resources
How to use the vSRX GNS3 appliance template
How to route user traffic and connect to the correct interfaces
Who is this for?
Host
Transcript
0:00 [Music]
0:11 hello my name is zach gibbs
0:13 and i'm a content developer within
0:16 education services
0:17 inside juniper networks and today we
0:20 will be going through the
0:21 vsrx and gns3 part 1
0:24 learning byte alright so in the topology
0:28 we have a few different devices we have
0:30 vs or x1 which
0:31 is the vsrx that we'll be using with
0:33 gns3
0:35 and then we have user one that uses that
0:37 ip address and connects in on the user
0:40 zone
0:40 and then we have server one which uses
0:42 that ip address and connects and on the
0:44 servers
0:45 zone and then vsrx1 connects to the
0:47 internet on the untrust zone and so with
0:50 this
0:50 learning byte what are we doing well we
0:52 are going to be focusing on
0:53 setting up gns3 to use vsrx
0:57 and we'll do a few different things but
0:59 the major highlights are we're going to
1:01 deploy the gns3 vm
1:03 with using the free vm player and then
1:05 we'll configure the gns3 vm with the
1:07 proper resources so we can
1:09 start up a vsrx device and then we'll
1:12 use the vsrx gns3 appliance template and
1:15 what we'll do is we'll download that
1:16 from the gns3 website
1:18 and then we'll use the vsrx qcal2 image
1:22 with that template so with that being
1:23 said let's go ahead and get started
1:27 alright so here is gns3 and here is
1:30 vmware player and gns3
1:34 is starting up and it's connecting to
1:36 the local server that i have on this
1:38 laptop
1:38 and it wants us to create a new project
1:40 we'll call this bsrx
1:44 gns3 lb
1:46 we'll create that project and if we go
1:48 to our devices
1:50 you see in routers there's nothing we
1:51 got some switches
1:53 we got some end devices nothing in
1:55 security devices
1:56 and this is where vsrx is going to show
1:59 up once we put it in here
2:00 and so the first thing we want to do is
2:02 we want to get
2:03 the gns3 vm going because what happens
2:07 is
2:08 we're going to be able to deploy vsrx
2:11 inside the gns3 vm which we'll be
2:14 running
2:14 in vm player and so that means that the
2:17 gns3 vm
2:18 will be running kvm and will launch the
2:21 vsrx qca2
2:22 image which is 4kvm inside that
2:25 gns3 vm which is in vm player so we're
2:28 going to be doing some nested
2:30 deployment with the vsrx vm
2:33 so keep that in mind and since this is a
2:36 lab scenario that you'll just be using
2:37 for testing
2:38 it's not going to matter with
2:39 performance now where you will see a
2:41 problem is
2:42 with boot up times and that can take
2:43 anywhere from 15 minutes to an
2:45 hour depending on your system resources
2:47 so if we go to
2:49 edit preferences on gns3
2:52 and then we go to gns3 vm we'll see here
2:55 that there's nothing we can select
2:58 and that's because we haven't actually
3:00 fired up the vm yet
3:01 we can go the gns3 website select this
3:04 link here that will take you right to
3:06 the website where you can download it
3:08 let's go ahead and click that and my
3:11 browser opened up on my other monitor
3:12 but you can see here we can download a
3:14 zip file that contains that and i've
3:16 already done that so i'm not going to
3:17 download that again
3:18 so let's go ahead and cancel that and
3:20 then go back to vm player
3:21 and once you've downloaded that zip file
3:23 and extracted the ova file
3:25 you want to select the open a virtual
3:27 machine option in vmware player
3:30 so let's select that option and then we
3:32 want to select the gns3 vm.ova
3:35 file that would be in that zip file and
3:38 import it and that'll take just a minute
3:41 to import
3:43 all right so it is imported and it is
3:45 powered off you don't want to power it
3:46 on here or
3:47 edit the virtual machine settings at
3:49 this point you may think to yourself
3:50 well i know
3:51 vsrx needs at least four gigabytes of
3:54 ram it's set to two gigabytes of ram
3:56 and so okay i'll go ahead and edit the
3:58 vm settings and change that right
4:00 no you don't want to do that because
4:02 gns3 will configure the vm for you
4:04 if you change it here then gns3 will
4:07 change it back and you'll be
4:08 completely confused and not to mention
4:10 it has one cpu as well
4:12 you need more than one cpu for vsrx
4:15 so let's go ahead and click cancel there
4:16 and you want to close this because gns3
4:18 will start at vm player and then try to
4:20 start the virtual machine and if you
4:21 have this open
4:22 you're going to run into some ownership
4:24 problems by doing that so let's go ahead
4:26 and close vm player
4:29 and then we go to edit preferences
4:32 gns3 vm we can see that okay we have it
4:35 enabled
4:36 that looks good and i already have it
4:38 configured the default is actually one
4:41 and i think it's uh two gigs
4:45 and i already had that configured from
4:46 before so you want to set that higher
4:49 you need at least two but this laptop
4:51 i'm using has four cores so let's go
4:53 ahead and do that
4:54 and then you might think to yourself
4:55 well let's go ahead and set it to four
4:57 gigs right and no the actual vm will
5:01 need some
5:01 ram itself and if you fire up anything
5:04 else that uses the vm it'll need more as
5:06 well
5:07 so you want to set that at a gig higher
5:09 what you actually really need
5:11 because the host vm is going to use a
5:13 gig itself
5:14 and so if we set that at five gigs we'll
5:16 be okay so we'll click
5:18 apply click ok there then let's go ahead
5:20 and close gns3 and reopen it
5:24 and it's open and connecting to the
5:27 local host for the server
5:28 and let's go ahead and cancel that and
5:30 we'll open up our project
5:32 that we created just a few minutes ago
5:34 and what it's doing right now is i'm
5:35 going to pull up the vmware player that
5:37 gns3 launched
5:39 it's starting that uh gns3
5:42 vm right now so we'll have to wait for
5:44 that to start and you'll see here in
5:45 gns3
5:46 you'll want this gns3 vm is starting
5:49 you'll see it turn green over here so
5:50 it'll give you a little status update on
5:51 what it's doing and we want to see this
5:53 turn green before we can actually use it
5:56 and so what i'll do here is this will
5:57 take a minute or so so i'm going to
5:59 pause the video
6:00 and i'll start it back up after the vm
6:02 is done booting and you'll be able to
6:03 see here on the left and
6:04 actually that booted up really quick so
6:07 forgot how quickly that did boot up
6:09 and so great it turned green as well
6:10 over here so we can see it's running we
6:12 can see the usage as well
6:13 and things look good so didn't need to
6:15 pause the video that actually starts up
6:16 really quick
6:17 and so okay great so what do we need to
6:19 do next
6:20 what we need to do is we need to open a
6:22 web browser and i've got one right here
6:24 we're going to go to the gns3 website
6:28 and then we need to go to the
6:29 marketplace up top you'll see the links
6:31 and let's go to marketplace and then
6:33 appliances
6:35 and it should be under the most popular
6:36 section pretty close to the top i'm just
6:38 going to do
6:39 oh there it is i was going to do a quick
6:40 search on the page but no need to do
6:41 that
6:42 it's right here juniper vs rex you can
6:44 see it was last updated march 21st 2020
6:47 so
6:48 that is was yesterday for me so this
6:50 gets updated pretty frequently
6:52 so we can select that and you can see
6:54 some information here you can see
6:55 required ram
6:56 is set to four gigs and remember we
6:58 needed to set the
7:00 gns3 vm to five gigs
7:03 and then it gives you some links to
7:05 where you can go download the files
7:07 and notice how it's the qcal2 files we
7:09 talked about that
7:10 and so you can use those links you'll
7:12 need to sign in to do that
7:14 and this is for vsrx2 this is for vsrx3
7:17 i highly recommend you use vsrx3
7:19 it'll run a lot better especially since
7:21 we're doing nested
7:22 uh vsrx2 already does this kind of weird
7:25 nesting thing
7:26 so you'll be doing double nesting if you
7:28 use vsrx2 so use vsx3 so you want to use
7:30 this link down here with the qcad 2 file
7:33 and so just click download
7:37 and we just save that file
7:40 and one thing to keep in mind here is
7:42 when you download this you can leave
7:43 this in the downloads folder gns3 will
7:45 look in there for that image file
7:47 so keep that in mind okay so we
7:49 downloaded that let's go ahead and go
7:50 back to gns3
7:51 and then we'll go to file import
7:54 appliance
7:57 and then we'll import that gns3
8:00 appliance and the only option we can
8:02 select here is to install the appliance
8:04 on gns3 vm
8:05 we talked about that earlier why we need
8:07 to do that because the nest in nature
8:09 and it uses kvm with that and so it's
8:11 scanning directories are
8:12 for files and this scans the downloads
8:14 directory and also the gns3
8:16 directory and anything that pops up is
8:19 ready to install
8:20 these are the different versions it
8:21 supports so great we have the 28.4 r1
8:24 vsrx 3.0 so you just go ahead and select
8:26 that click
8:27 next and it asks us if we want to
8:29 actually install this yes we do
8:31 and then it goes ahead and uploads the
8:34 qca
8:35 2 file to gns3 so it's going to take a
8:38 little bit of time to do that
8:40 and you can see here in the template
8:41 it's giving some information
8:43 it says here it'll be available in the
8:44 firewall category and that was the case
8:46 with older versions of gns3
8:49 however it's in the security category
8:52 now they've changed that the template
8:54 obviously hasn't been
8:55 updated for the vsrx appliance with that
8:58 information
8:59 but just keep that in mind and then we
9:01 have the information of
9:02 initial username as root with no
9:03 password that's important to know
9:05 because when we fire that up we'll want
9:06 to be able to log in to be able to
9:07 configure this thing and
9:09 we need to know what we need to log in
9:11 with right so
9:12 and that's just vs rex in general and so
9:15 yeah we're almost done here
9:16 and look at that it's done well it's
9:18 almost done just goes
9:19 finishing up some tasks all right so you
9:22 can see up top here it's been
9:23 successfully uploaded that's great
9:25 let's click finish and it lets us know
9:28 that it created the template
9:30 and that's going to be under security
9:31 devices here we can see it under
9:33 security devices
9:34 and now we're ready to use this in a
9:36 gns3 topology
9:38 all right so here is our topology let's
9:40 go over our devices real quick
9:43 in here we have vsrx1 and that connects
9:45 to the users
9:46 zone and we have user one at the
9:48 10.10.201
9:50 ip address and then it connects to
9:52 server one in the servers
9:54 zone and server one has an ip address of
9:58 10.10.202.100
9:59 and then vsrx1 connects into the
10:01 internet on the untrust
10:03 zone and the criteria on the right we
10:05 see that gns3 is set up to use the s or
10:08 x1
10:08 we did that in the previous learning
10:10 byte that is a part of this learning
10:12 byte series and so what we need to do is
10:14 we need to connect
10:15 interfaces we need to configure vs or x1
10:18 and then we'll test communication and so
10:20 with that let's go ahead and jump to
10:22 gns3 and get this going
10:26 all right so here is gns3 and you can
10:29 see here we have vsrx
10:31 20.4 r1 3.0 already added we did that
10:35 with the last learning byte we did that
10:38 is a part of this learning byte series
10:40 and then we have the gns3 vm running in
10:44 vmware player and again that was done in
10:46 the last learning byte of this learning
10:48 byte series
10:49 and so let's go ahead and start doing
10:52 this let's move vsrx
10:54 out to the middle and we can rename that
10:57 called vsrx-1
11:00 and then let's add some in hosts
11:03 add one we'll add a second one
11:07 let's name these we'll call this user1
11:12 call this server one and then we need to
11:16 add
11:16 an internet cloud and we'll just rename
11:21 this to
11:22 call this internet and then let's click
11:24 on the connections
11:25 button and start connecting these we
11:27 have ethernet 0 on user 1. let's connect
11:29 it to vs or x1
11:31 now we have a list of interfaces we have
11:33 fxp0 which we know
11:35 as the management interface we don't
11:37 want to connect it to that we want to be
11:38 able to route this traffic so let's go
11:39 ahead and connect it to gige00
11:43 and then same thing with server1 we'll
11:46 connect that to gigi001
11:49 and then we'll connect gigi002
11:52 to the internet now notice we have two
11:54 different interfaces here so you might
11:56 be unsure of which interface to connect
11:58 to
11:59 in this scenario we want to connect it
12:01 to ethernet 3.
12:02 i don't know what happened to ethernet 1
12:04 2 or whatever but we have ethernet and
12:06 ethernet 3.
12:08 and so we want to connect it to ethernet
12:09 3 and i'll show you the reason behind
12:11 that
12:12 so remember that there was two
12:13 interfaces here on the internet cloud
12:16 and that is actually the interfaces on
12:19 the gns3 vm
12:21 and so we jump back to the gns3 vm and
12:24 we look at the settings
12:26 of this vm we can see here we have two
12:29 network adapters
12:31 network adapter and then network adapter
12:33 2.
12:34 the first network adapter is set to a
12:37 host only network which is a private
12:39 network we don't want to use that
12:40 that is used to route traffic for
12:43 anything internally in our topology
12:46 the second adapter you see here is set
12:49 to net
12:50 now that is that ethernet 3 adapter and
12:52 that will allow us
12:54 to get out of our local topology and
12:57 reach
12:57 hosts on the local network or host on
13:00 the internet
13:01 and it will also allow us to
13:04 go in to our topology from our local
13:07 machine here and that'll
13:08 allow us to use something like ssh and
13:11 manage it
13:12 through ssh manage the vsrx1 device
13:14 through ssh instead of using the console
13:16 to manage the
13:17 srx1 device or any other devices in our
13:19 topology for that matter
13:21 okay so with that let's go ahead and
13:22 cancel that and go back to gns3
13:24 and the first thing we want to do is we
13:26 want to start
13:27 vs or x1 and so we just right click
13:31 select start there
13:32 saw that i did that earlier and we have
13:34 a whole bunch of different options
13:37 and one thing i want to point out is now
13:38 that we've started it
13:40 it's booting right and it takes some
13:42 time to boot
13:43 and so we'll go into the console select
13:45 the console option
13:46 and that'll pop up the console and the
13:48 thing i want to point out as we're doing
13:49 this
13:50 is that this is going to take a little
13:52 bit of time in the last learning bite i
13:54 talked about
13:55 how this is a nested vm environment
13:59 the gns3 vm is a vmware running in vm
14:02 player
14:03 and then we're deploying the
14:06 vsrx qcal2 file in kvm
14:10 in the gns3 vm and so we're having a
14:13 nested vm scenario
14:14 and that means it's going to take a
14:15 little bit longer to boot and it will
14:17 take anywhere between
14:19 uh 15 minutes to an hour to
14:22 boot this vsrx device and so
14:26 this is a great time if you're doing
14:27 this to go take a break
14:30 go walk the dog do something else it
14:32 will take some time to boot
14:34 and so but once it's booted it runs fast
14:37 commits fast there's no problem so
14:40 it's just the long wait time when
14:42 booting so with that being said
14:44 i'm going to pause this video right now
14:46 and
14:47 start it back up once the vs1 has booted
14:53 alright so the vsrx
14:56 device has booted let's go ahead and log
14:59 in just root no password
15:02 and the first thing we want to check is
15:04 to make sure that
15:06 the fpc is up and running that we can
15:09 see the pic
15:10 and we don't see anything yet just show
15:12 slot zero
15:13 present that's not what we want to see
15:15 but that just means it's still booting
15:17 we can just look at the fpc we see
15:19 nothing's there and we can see
15:21 some other messages showing up it's just
15:24 still going even though we can log in
15:26 we can't actually do much with that
15:29 yet and if we do show interface test
15:32 gigi
15:32 there'll be nothing and because there's
15:35 no fpc
15:36 that is online it shows fpc xero present
15:39 but it doesn't show anything online and
15:41 we could do the show
15:43 chassis hardware command
15:46 and you can see here that it shows an
15:49 fpc
15:50 and yeah you know that's that's fine we
15:52 just got to wait a little longer for it
15:54 to finish
15:54 completely booting so i'm gonna pause
15:56 this video again
15:58 and then once it's finished completely
16:00 booting i'll start it back up
16:04 all right it's been about five minutes
16:06 let's go ahead and check that again
16:10 and much better slot zero shows online
16:12 for fpc
16:13 and then pick zero shows online as well
16:16 and we see vs or xdp
16:17 dk ge for that and we look at chassis
16:20 hardware you can see fpc
16:22 0 and pixel underneath that that looks
16:25 good
16:26 and just look at the fpc we can see that
16:30 it's online
16:31 things look good there so if we do show
16:34 interface gigi
16:35 star terse we can see we have
16:38 gigi 0 through 2 up
16:41 and those are the interfaces we've
16:43 connected so perfect that's exactly what
16:45 we want to see
16:46 and so let's start configuring vs or x1
16:50 set the hostname to v srx-1
16:54 set uh root authentication
17:02 we'll need to set uh the services
17:06 ssh root login allow
17:10 that way we can log in with root with
17:13 using ssh
17:14 and then we'll need to configure
17:16 interfaces and first i want to delete
17:18 what we have for interfaces delete what
17:20 we have for security we'll be
17:21 configuring that separately
17:22 and so let's go ahead and go into
17:24 interfaces
17:25 and set gige00.0 family inet
17:30 and we're going to set the address
17:36 that puts us in the same subnet as user
17:38 one
17:44 and then same subnet as server one
17:50 then we want to set gigi to
17:55 with an iip address that is going to be
17:57 on the same network as our local network
17:59 that our device
18:00 is running on this will allow us to be
18:01 able to communicate with hosts on the
18:03 local network and host on the internet
18:05 and things like that
18:10 and then let's configure the security
18:12 zones
18:20 very set the interface for that user
18:22 security zone
18:29 and then for the servers the geeky001
18:33 and we'll set some host inbound traffic
18:35 so we can communicate
18:37 with the interface directly and then the
18:40 security zone on trust
18:43 interface is gigi002 and here we would
18:47 want to at least set
18:49 system services ssh we could say any
18:51 services this is just a lab but i'm just
18:53 going to do ssh because we will be
18:55 coming in
18:56 on this device using ssh
19:00 everything looks good there and for ti
19:03 saket time
19:06 i'm just going to set the default policy
19:08 to permit all let's go
19:10 ahead and commit that and we should be
19:12 done configuring vsrx1
19:14 and that's committed so let's go back to
19:15 gns3 topology
19:17 and we do need to start
19:20 user1 and server1
19:23 and then we go to the console for user
19:26 one and we'll configure it
19:28 so here is user one we'll configure the
19:30 ip
19:33 slash 24 then specify the gateway
19:38 then we'll specify a dns server as well
19:43 and then let's go ahead and do the same
19:44 for server one
19:49 so here is server one we'll set the ip
19:55 and subnet mask and then the gateway
20:02 and then we'll set the dns
20:06 and we should be good there so let's go
20:08 ahead and let's jump back to user1
20:11 and oh there's one other quick thing i
20:13 forgot to configure not
20:15 on srx1 so let's do that real quick
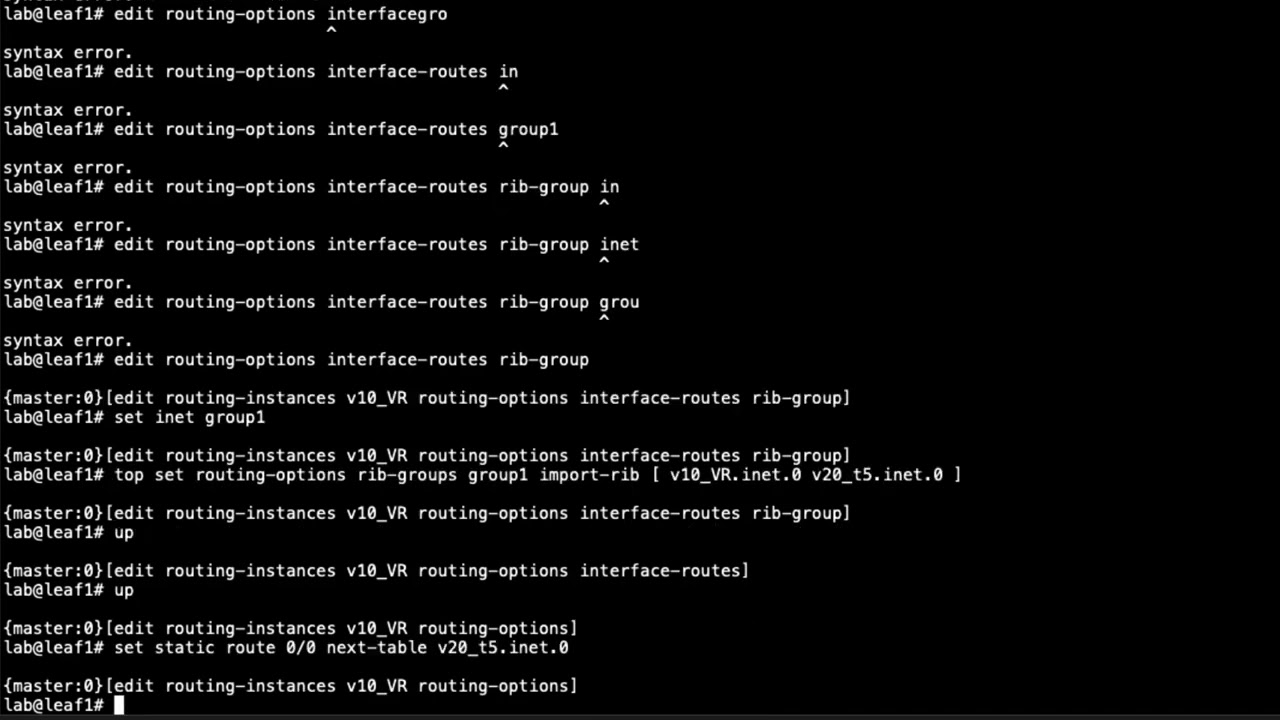
20:36 we'll configure the rule
20:43 figure any source address
20:46 and configure source net of interface
20:49 and that will allow
20:50 uh these user one and server one to be
20:53 added when
20:54 going out towards the internet or
20:57 anything on the local network
20:58 okay so let's go ahead and attempt to
21:01 ping let's say
21:02 google market type
21:08 and i did forget one other thing on vs
21:10 or x1 we need to configure the default
21:14 route
21:21 this should help all right so let's go
21:23 back to user one let's try that again
21:25 ah much better much better so we can
21:27 reach stuff on the internet perfect
21:29 now can we ping
21:34 server one
21:38 all right and let's try that again it
21:39 might have just been something like an
21:41 arp resolution issue
21:44 and great it's working now so the art
21:47 just had to resolve
21:48 things are looking good uh let's go
21:49 ahead and attempt
21:51 to open an ssh session to
21:54 vsrx1 now that we've set that up
21:56 correctly and one thing i do want to
21:57 point
21:58 out is that the console session is also
22:00 available
22:02 using the information seen on the right
22:04 here you can open a talent session to
22:06 192 168 178.128 with port 5000 to get to
22:10 vsrx1
22:11 and also console sessions to these other
22:13 devices if you want to use
22:15 say secure crt or something so let's go
22:19 ahead and pull
22:20 up secure crt and attempt to connect
22:23 with ssh to vsrx1 we'll go ahead and
22:26 grab
22:27 a secure crt window and start a new
22:30 connection
22:31 and that was 10.10.1.50
22:35 username of root and we could configure
22:37 a separate username
22:39 and instead of root but yeah things work
22:41 great wherever the login is root
22:43 and we could configure it using secure
22:46 crt with ssh
22:47 from our local machine
22:51 so that does bring us to the end of this
22:53 learning byte series
22:54 and in this learning byte series we
22:56 demonstrated how to set up and configure
22:58 vsrx with gns3 so as always
23:02 thanks for watching visit the juniper
23:06 education
23:06 services website to learn more about
23:09 courses
23:10 view our full range of classroom online
23:13 and e-learning courses learning paths
23:17 industry segment and technology specific
23:19 training paths
23:21 juniper networks certification program
23:24 the ultimate
23:25 demonstration of your confidence and the
23:27 training community
23:29 from forums to social media join the
23:34 discussion
23:38 you