Juniper Apstra Demo: How to Add and Remove Networks and Services
See first-hand how to remove networks using Apstra.
In the course of your day as a network operator, you may have to add and remove networks frequently. This brief but important demo will show you how easy it is to remove networks using Juniper’s network management tool Apstra.
You’ll learn
How to remove previously deployed networks, including the port assignments
How to delete the connectivity template and remove the routing zone or the VRF
How to ensure the virtual network no longer exists
Who is this for?
Transcript
0:01 [Music]
0:06 in the course of your day as network
0:08 operator you may have to add and remove
0:10 networks frequently so we can see how
0:13 appstra makes it easier to do
0:15 we'll look at how to remove previously
0:17 deployed networks including the port
0:19 assignments which are created via
0:21 connectivity templates the routing zone
0:24 or vrf and virtual network
0:27 first we'll enter the connectivity
0:29 template
0:31 and remove the individual port
0:32 assignments
0:37 then we can delete the connectivity
0:39 template
0:46 and then we can remove the routing zone
0:47 or the vrf
0:50 called green routing zone
0:55 and finally to clean up we can make sure
0:58 that the virtual network doesn't exist
1:00 any longer
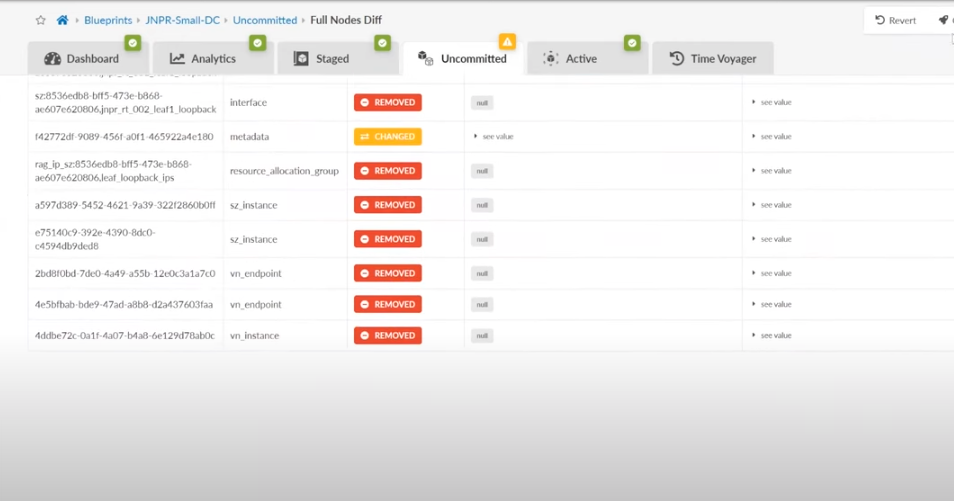
1:06 now abstract keeps track of all the
1:08 changes you make
1:10 so we can take a look at all of the
1:11 individual things that are going to be
1:13 removed when we click on commit
1:15 at this point none of the changes have
1:18 been committed so when we click commit
1:20 we will take all those changes from
1:22 staged to an active configuration
1:26 and this will remove all the associated
1:28 configuration that you saw in the
1:30 previous screen from the devices and it
1:32 is highly recommended to write a note so
1:34 that we have a log of what we did in our
1:36 time voyager time voyager is a feature
1:39 that allows you to roll back to previous
1:41 revisions of a blueprint just like a
1:43 control z
1:45 i'd suggest you watch the time voyager
1:47 demo
1:48 [Music]
1:56 you