Juniper Apstra Demo: Add a New Rack to Existing Data Center Fabric
Follow these simple steps to add a new rack in minutes.
Take a look at how easy it is to add a new rack to your data center fabric using Juniper Apstra, and get it all ready to start hosting workloads. This demo will show you all the steps from start to finish.
You’ll learn
How to add more capacity by adding another rack and more servers
When to use the stage tab vs. when to use the active tab
What yellow alerts and red alerts may indicate in the process
Who is this for?
Transcript
0:01 [Music]
0:07 in this demo we're going to take a look
0:09 at how you can easily add a new rack to
0:12 your data center fabric
0:14 here we have a data center in
0:15 philadelphia
0:17 you can see that we have two spines and
0:19 a pair of leaf switches in this use case
0:21 we'd like to add more capacity by adding
0:24 another rack and more servers
0:27 if we go to devices tab on the left
0:29 under manage devices we have a leaf
0:32 device that is ready but is not active
0:34 yet
0:35 next i am going to show how easy it is
0:37 to add a new rack to your data center
0:39 and get it all ready to start hosting
0:42 workloads let's go back to the
0:44 philadelphia dc blueprint
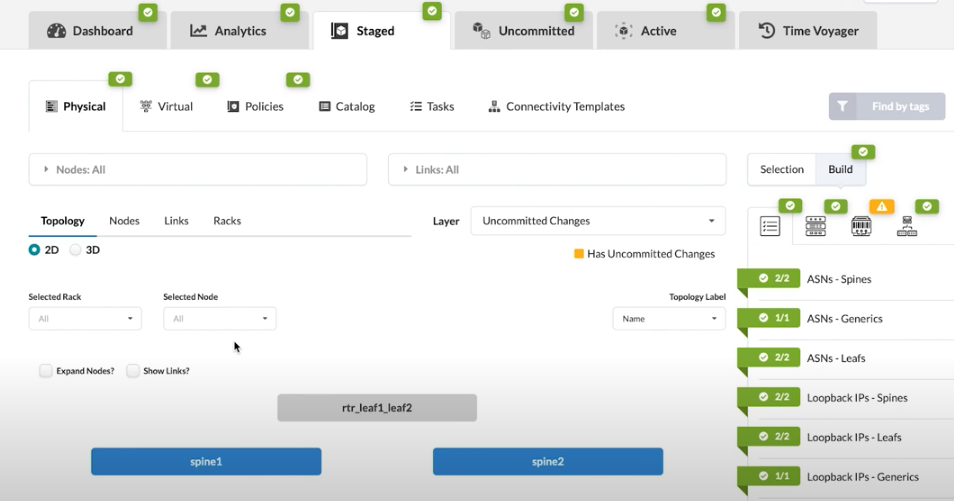
0:47 let's click on staged
0:49 the stage tab is where you set up and or
0:51 make configuration changes whereas the
0:54 active tab is where you can view the
0:56 already active configuration now let's
0:59 go to physical
1:01 and racks tab
1:04 so let's add a rack by clicking on this
1:06 plus sign icon
1:08 we're going to add a single evpn rack
1:11 with a single leaf switch and a single
1:13 server
1:16 and we'll click add
1:19 we can add more servers later if we'd
1:21 like to
1:23 so click add
1:25 and we'll give it a sec
1:29 you can see appstra has already added
1:31 our rack shown under both racks tab
1:34 and also at the topology tab with visual
1:37 you can see it here in yellow
1:41 next to finish the setup appstra
1:43 indicates there are uncommitted changes
1:44 in yellow and some alerts in red
1:53 first you need to assign a device
1:54 profile here
2:00 click on change icon
2:03 and we'll pick juniper vqfx
2:06 click update assignments
2:15 let's take a look at this yellow alert
2:17 here
2:18 and it shows that we need to assign
2:20 system id for the new device
2:27 so we'll come over here and we'll choose
2:29 the available system id i showed you
2:31 before in the manage devices
2:39 we'll tell it that the switch should be
2:41 made ready
2:47 now appstr shows that all is configured
2:50 properly shown in green and the changes
2:52 are ready for our review under the
2:54 uncommitted tab which is indicated in
2:57 yellow
3:03 so i'll add a note for our record
3:08 and click commit
3:13 we will see some tabs turn red in our
3:15 dashboard while we wait for the fabric
3:17 to converge
3:18 eventually they will turn green as bgp
3:20 peers that are established in the fabric
3:23 converges
3:24 thank you for watching
3:27 [Music]
3:34 you