Configuring Juniper Secure Connect – J Web

Juniper Learning Bytes: How to configuring Juniper Secure Connect
If you’re new to working with Juniper Secure Connect, you’ll want to check out this episode of Learning Bytes for a step-by-step demo on how to configure and verify this client-based SSL-VPN application that lets you securely connect and access protected resources on your network.
You’ll learn
How to configure Juniper Secure Connect using J-Web
The way to create remote access users on Juniper Secure Connect
How Secure Connect works on remote user devices
Who is this for?
Host
Transcript
00:05 [Music]
00:11 hello my name is zach gibbs and
00:13 i'm a content developer within education
00:16 services
00:17 inside juniper networks and today we
00:20 will be going through the configuring
00:22 juniper secure connect
00:23 jweb learning byte all right so here is
00:27 our example
00:28 in this example we have a few different
00:30 things to talk about let's first look at
00:31 the topology here on the topology we
00:33 have srx1 it has a connection to the
00:35 user zone which is just your everyday
00:37 employees doing their jobs then we have
00:39 the server zone where
00:40 we have different servers that users
00:43 need to access whether they're
00:44 inside the user's zone or they are a
00:46 remote worker
00:48 so you can see here that srx1 is
00:49 connected to the internet as well
00:52 through the untrust zone and then we
00:53 have the remote worker
00:55 that is connected to the internet that
00:57 needs to access
00:58 server one in the server's zone all
01:01 right so how
01:02 are we going to do this well we're going
01:03 to use juniper secure connect
01:05 to provide that access and we're going
01:07 to use jweb to configure it
01:09 with this we're going to use local
01:11 authentication and also as i mentioned
01:13 earlier the remote worker needs access
01:15 to server one
01:16 but that remote worker should not be
01:18 able to access devices in the user's
01:20 zone so with that being said let's go
01:22 ahead and jump to the j web of
01:24 srx1 and get this going all right so
01:27 here is
01:28 srx1 in the jweb and there's a few
01:31 things we need to do first
01:32 first we need to create a local
01:34 certificate
01:35 and we'll use this certificate when
01:38 users connect
01:39 that is remote workers connect to the
01:41 srx device
01:42 so let's go to certificate management
01:44 device certificates and this is under
01:46 device administration
01:48 and there's nothing here so let's click
01:49 the create button
01:51 and we need to call this something let's
01:52 call this juniper edu
01:56 we'll set this rsa encryption is fine
01:58 248 bits
02:00 we'll set the domain component juniper
02:03 common name edu you have to at least do
02:06 that there
02:07 and then domain name we're going to say
02:11 edu.juniper.net and then we have to set
02:12 the ip address and this ip address here
02:15 now this is the external ip address of
02:17 the srx1 device
02:22 so that is the interface ip address that
02:24 is pointing towards the
02:26 internet and this will just take a few
02:28 seconds to create the certificate
02:30 all right so the certificate has been
02:32 created successfully
02:34 great so let's go ahead and tell the srx
02:35 to use it so we need to go to basic
02:37 settings
02:38 and then system services and then if we
02:41 scroll down we'll see
02:42 https we need to enable that and under
02:45 here we need to select that certificate
02:46 and that's going to be pki certificate
02:49 and then we select this certificate we
02:50 just created and then we need to scroll
02:52 back up
02:53 and hit save now it asks us to commit
02:57 but we don't need to do that right now
02:58 let's go ahead and finish the rest of
02:59 the configuration
03:00 okay so next we need to go to vpn
03:04 and you can see here that there are no
03:05 vpns so let's click create
03:07 vpn and then select the remote access
03:10 and then juniper secure connect
03:13 and first we need to give the vpn a name
03:15 we'll call this
03:16 ra lb for remote access learning byte
03:20 and then we need to click the remote
03:21 user to configure down here
03:24 so we click that section and we have a
03:26 few different things we can use here we
03:27 can use the default profile
03:28 now you can hover over this to find out
03:30 more information and
03:32 of all these different settings but for
03:34 what we're doing here
03:36 the default settings of the default
03:38 profile manual connection things like
03:39 that is going to work perfect so we
03:41 don't need to make any changes here for
03:42 this basic setup
03:43 just click ok and then you can see here
03:46 this change we got a green check mark
03:48 and we see a blue line going out to the
03:51 internet so we're good with that
03:52 configuration we can go back here and
03:53 change it if we really want
03:55 but now we need to click the local
03:58 gateway icon
03:59 and configure the srx device how we want
04:02 it
04:03 okay we need to specify an ike id going
04:06 to call this
04:07 lab at edu.juniper.net
04:11 and we need to next select the external
04:13 interface and that's going to be if you
04:15 recall we marked on the
04:17 certificate the 101111.1 ip
04:20 and so that's going to be this gigi001
04:22 interface that's very important that
04:24 that lines up and then we need to select
04:25 the tunnel interface
04:26 and there's nothing configured so we can
04:28 click the add button and we're going to
04:30 use the default unit of zero and we need
04:32 to select a zone
04:34 and here we're going to select the vpn
04:36 zone this has been something that i've
04:37 created beforehand
04:39 so you'll need to create the zone you
04:40 want beforehand of course and we can
04:42 specify the routing instance we just
04:44 have the default master configured so
04:45 that's fine
04:47 and we need to specify a pre-shared key
04:49 we'll say lab123 for that
04:52 ascii is fine you have the option of
04:53 ascii or hexadecimal and then user
04:56 authentication
04:57 nothing configured already so we need to
04:59 click the add button
05:01 and remember we're doing local
05:02 authentication here
05:08 give it a name and address assignment
05:10 there's nothing configured so we need to
05:11 create
05:11 address poll or click the create address
05:13 pull link and we'll name this poll we'll
05:15 just call this ra
05:17 pull dash lb network address
05:21 select that network address and we'll
05:23 give it a 24 mask
05:25 and we need to specify at least a
05:27 primary dns server and then we need to
05:29 specify the range we want to use
05:30 in that network and so we're going to
05:32 call this ra
05:34 pull dash range dash
05:37 lb specify lower limit of 10.77.77.10
05:42 high limit of 10.77.77 dot
05:45 say 50 click the check mark to save that
05:49 and then click ok and we're not done yet
05:52 we need to select
05:53 local authentication if we were doing
05:55 radius authentication we would select
05:57 that
05:57 but we don't need to do that for this
05:58 learning byte then we need to create
06:00 some users
06:02 so here we're just going to say lab lab
06:05 for our remote worker of course that
06:08 would be
06:08 much different in a production network
06:11 then click ok here
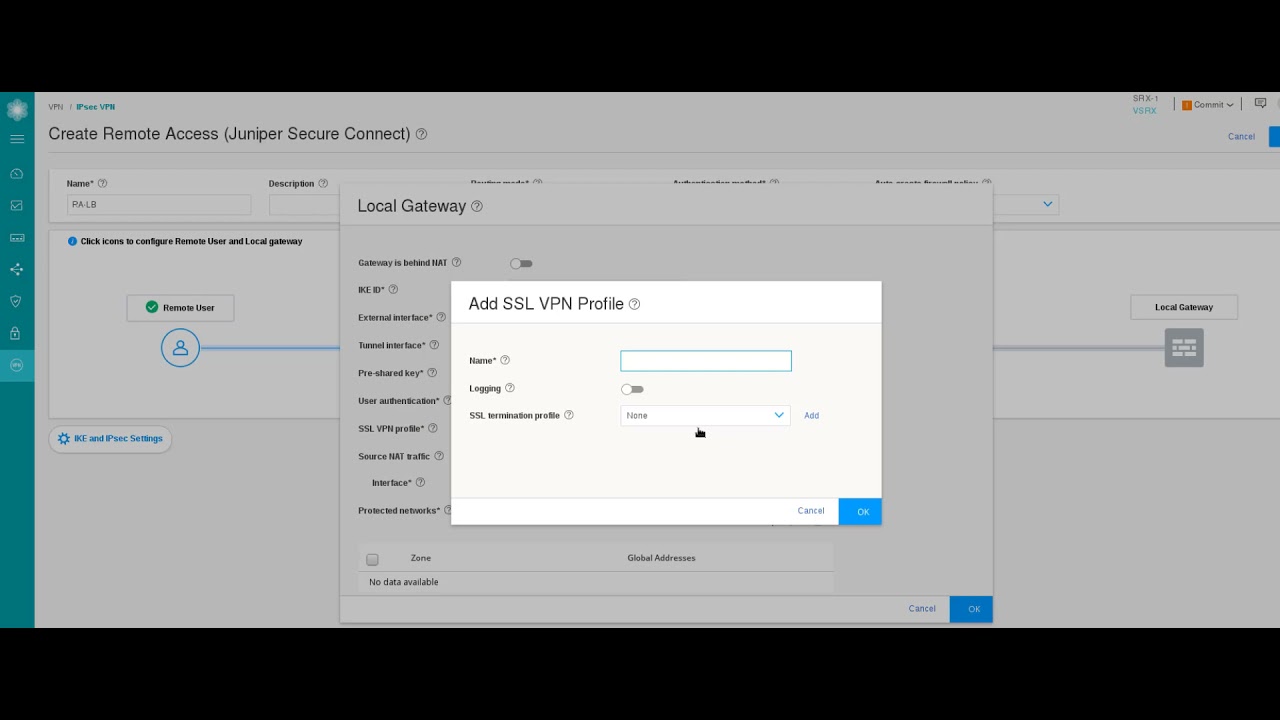
06:14 and then we need to specify an ssl vpn
06:17 profile again there's nothing configured
06:18 so we need to click the add button
06:20 and we'll call this ssl
06:24 pro learningbyte for the profile name
06:26 and we need to specify an ssl
06:27 termination profile of course that's not
06:29 configured so let's click the add button
06:31 and create one
06:33 and here we just specify the name
06:37 and then we select the certificate that
06:40 we created and here we can see that
06:42 it auto selects the only one we have and
06:44 so that's that juniper edu
06:46 rsa certificate and we can click the add
06:48 button here to
06:49 jump us back to that other screen in
06:51 which we would create a certificate or
06:53 you could
06:53 import a certificate as well
06:57 and we'll just click ok again to finish
07:00 creating that
07:01 and specifying that ssl vpn profile now
07:03 this next one is really cool
07:06 source nat traffic now what does that do
07:08 well when the traffic comes in
07:09 it's going to use that range of
07:12 10.77.77.0 or that network
07:15 and so right now the other devices in
07:17 the network don't know how to get to
07:19 that subnet
07:21 and so what we can do is we can do two
07:23 things we can create a static route for
07:24 that or we can use sourcenet and
07:27 add it to one of the internal interfaces
07:29 net this traffic that is to one of the
07:30 internal interfaces on the srx device
07:33 and we're going to specify the ip
07:35 address that is associated with gigi002
07:37 which is shown there on the screen
07:39 and then we need to specify protected
07:40 networks now what networks
07:43 should the remote workers have access to
07:46 we need to specify the zone
07:47 of course it's the servers zone we
07:49 talked about that earlier
07:50 and then we have server one we have the
07:52 ip address here this is something that's
07:54 just in the address book we could click
07:55 the add button to add
07:57 another entry in the address book and
07:59 right now
08:00 it's set to any so any is selected so
08:03 that means that
08:04 anything's going to be accessible for
08:07 the remote access workers remember we
08:09 didn't want that we didn't want them to
08:10 access the user's network
08:12 and so what we need to do here is we
08:14 need to select that address move it over
08:17 and notice this little information
08:19 pop-up up top it says split tunnel is
08:20 enabled when specific addresses
08:22 other than any are selected so now what
08:25 this does by selecting that this enables
08:27 split tunneling as well how cool is that
08:29 now we're only going to have traffic
08:30 that is going to the 10.60.60.100
08:33 address
08:34 which is server one that's the only
08:36 traffic that's going to go through a
08:37 tunnel
08:37 now that's great because in this day and
08:40 age where there's so many remote workers
08:42 you may not want
08:43 all their internet bound traffic going
08:45 through your srx device
08:47 so let's go ahead and click ok finish
08:50 that off there
08:51 and click ok again that is the local
08:54 gateway configuration
08:55 now we can do some additional
08:56 configurations by selecting that
08:58 settings icon down there but it's
09:00 unnecessary and we have some advanced
09:02 configuration as well but
09:03 for what we're doing it's totally
09:05 unnecessary i'll just
09:07 expand that so you can see what's in
09:08 there uh but we don't need to do that
09:11 and so i can go ahead and collapse that
09:13 again and so we're basically done with
09:15 the setup
09:16 and also we're using pre-shared key i
09:19 didn't mention that before and
09:20 also one other thing is the auto create
09:22 firewall policy option
09:24 we can say nowhere yes if we say yes
09:25 it's going to create some firewall
09:27 policies
09:28 that will permit this traffic so that's
09:30 kind of cool
09:32 let's go ahead and save that and then
09:35 tells us we need to commit
09:36 again and again it tells us multiple
09:38 times so let's go ahead and
09:40 follow through with that and commit the
09:41 configuration all right so that
09:43 configuration committed successfully
09:45 awesome we see our new vpn that is
09:47 configured here
09:48 so let's go ahead and then jump to that
09:50 remote worker device
09:52 and see how this works all right so here
09:55 is
09:56 the remote worker device and we have
09:58 juniper secure connect
10:00 the client application already open and
10:02 so before we do that let's
10:04 first attempt to ping that server one
10:07 device just to show you that
10:08 we can't reach it without first
10:10 connecting with juniper secure connect
10:14 and yeah this is not working it's just
10:17 going to time out
10:18 you can see request timeout i'm just
10:19 going to kill that ping
10:21 so let's go ahead and connect so let's
10:23 say new connection
10:25 and you would need to type in the
10:26 gateway address here using https and
10:29 i've already done that previously so it
10:30 just remembers my last configuration so
10:32 i don't have to type that again
10:34 and then let's hit the connection button
10:36 and it wants us to enter the user id
10:39 and password that's gonna be our lab and
10:41 lab123
10:44 and we get presented with a warning and
10:46 why are we being presented with this
10:48 well
10:48 this is that certificate that we created
10:51 on the srx device so it's saying whoa
10:53 this is not a globally trusted
10:56 certificate and that's okay we created
10:58 we know it's okay
10:59 we click accept and that's going to
11:01 install that certificate locally so the
11:03 users will not have to do that again
11:05 after doing this once now alternatively
11:07 you could
11:09 go and buy a certificate that is
11:12 a trusted certificate and use that
11:14 instead but here
11:15 we're just going to use the self
11:17 generate certificate since you know it's
11:19 it's free which is great
11:22 so we accepted that and you can see the
11:25 name change to ra
11:26 lb that's our remote access learning
11:28 byte and the tunnel is being set up
11:30 and great we see that connection
11:31 established now i'm going to pull that
11:32 back up it just auto
11:33 minimizes you can restore that and you
11:37 can see great that looks good
11:38 nothing in nothing out let's go ahead
11:40 and try to ping that
11:42 server and fantastic we have
11:45 communication with server one that's
11:47 great
11:49 and you can see here data transmit data
11:52 received
11:53 we have 240 on both going in and out so
11:55 that's bytes not packets of course
11:58 and so you can simply just disconnect by
12:01 clicking that button again that
12:02 connection button
12:03 and actually hit the reconnect again
12:05 fast and if we reconnect
12:09 you can see here again that we're not
12:11 going to get prompted about that
12:12 certificate since we accepted it earlier
12:14 and the connection is there again it
12:16 auto hides and i'll bring that back up
12:21 and so one other thing we could do which
12:22 i'm not going to do because for the sake
12:24 of time
12:24 is we could go back into srx1 and
12:28 look at the ike and ipsec information
12:31 for the security associations as well as
12:34 statistics
12:35 but for the sake of time i'm not going
12:37 to do that and
12:38 yeah everything's working great here we
12:40 have remote access as
12:41 we want to have with the criteria of
12:43 this learning by
12:45 so that brings us to the end of this
12:47 learning byte in this learning byte we
12:49 demonstrated how to configure and verify
12:50 juniper secure connect
12:52 so as always thanks for watching
12:55 visit the juniper education services
12:58 website
12:58 to learn more about courses view our
13:01 full range of classroom
13:03 online and e-learning courses
13:06 learning paths industry segment and
13:09 technology specific
13:10 training paths juniper networks
13:13 certification program
13:14 the ultimate demonstration of your
13:16 confidence and
13:18 the training community from forums to
13:20 social media
13:21 join the discussion