Configuring Juniper Secure Connect: CLI

Juniper Learning Bytes: How to configure Secure Connect using Junos CLI
New to Juniper Secure Connect? Then you’ll want to check out this Learning Byte with Juniper’s Zach Gibbs to see firsthand how to configure it using the Junos CLI. This is part one.
You’ll learn
Criteria for the setup, including local authentication and remote workers
How to tell the SRX-1 device to use the certificate for web management
Configure a net policy for VPN traffic coming from remote worker
Who is this for?
Host
Transcript
00:00 [Music]
00:11 hello
00:12 my name is zach gibbs and i'm a content
00:15 developer
00:15 with n education services inside juniper
00:19 networks
00:20 and today we will be going through the
00:22 configuring
00:23 juniper secure connect cli part one
00:26 learning byte
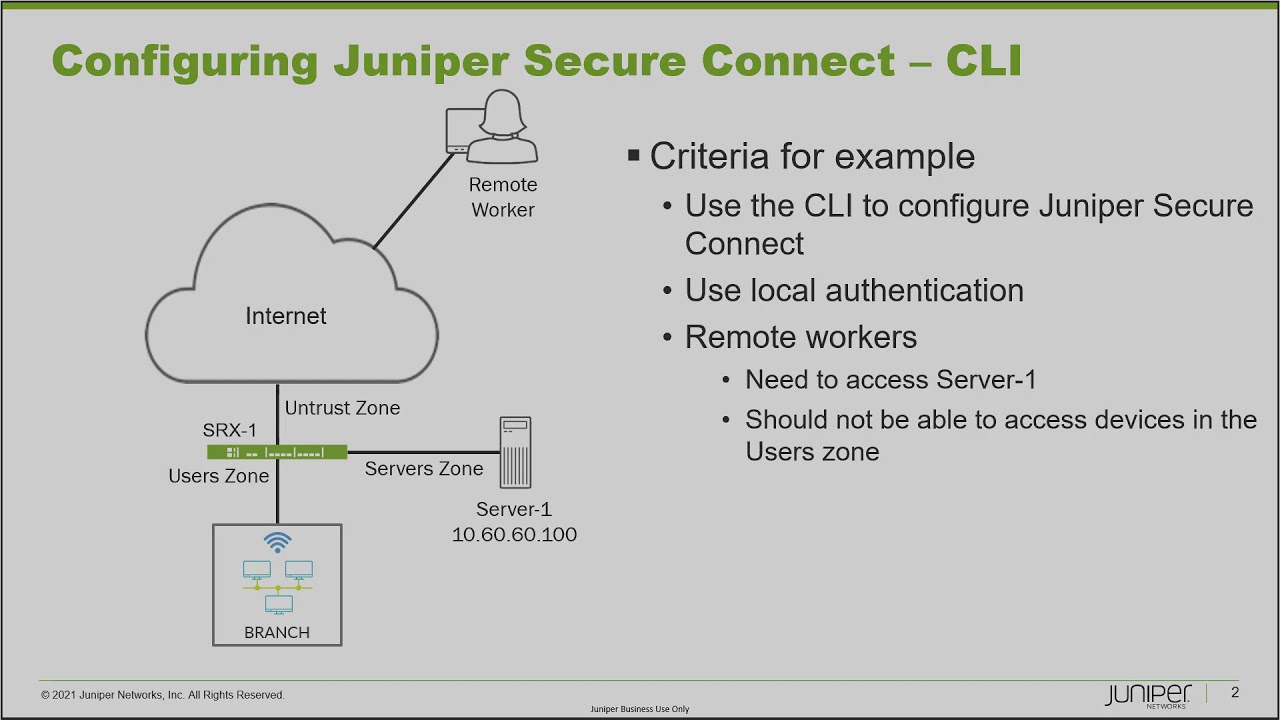
00:27 okay so here is our example and first
00:29 let's look at the
00:30 topology we have on the left and here we
00:33 have srx1
00:34 and srx1 it is the perimeter firewall
00:38 for our business and we have two zones
00:40 we have the users
00:41 zone and the servers zone and the user's
00:44 zone
00:44 is the zone that anybody who comes into
00:47 work into the office
00:49 that's going to be the zone they're in
00:51 and then we have the
00:52 servers zone which has a server probably
00:55 more than one server
00:56 but in our example we just have server
00:58 one and that is going to have services
01:01 that the workers need to use whether
01:03 they're in at the office or they're
01:05 working remotely
01:06 and so with that server one it has an ip
01:08 address of 10.60.100 and that's going to
01:11 be important
01:12 because what we want to do is we want to
01:14 set juniper secure connect up
01:16 to allow remote access for remote
01:18 workers we can see the remote worker
01:20 there at the top
01:21 and we need to allow remote access in to
01:24 the server one ip address
01:26 now with that we don't want the remote
01:28 worker to be able to access
01:30 hosts in the user zone and so we're
01:33 going to have to do some split tunneling
01:34 and so with this we're going to use the
01:36 cli to configure juniper secure connect
01:39 we're going to use
01:40 local authentication and then kind of
01:43 as we talked about beforehand we'll need
01:45 access to server one for the remote
01:47 workers
01:47 and they shouldn't be able to access
01:49 anything in the user's zone and one
01:51 thing i want to point out before we jump
01:53 to the cli
01:54 of srx1 is that this is a two-part
01:57 learning byte and so we'll go through
01:59 part of the configuration in this
02:01 learning byte
02:02 and then in the follow-up learning bytes
02:03 we'll go through a second configuration
02:06 all right so without further delay let's
02:07 go ahead and jump to srx1 and get this
02:10 started
02:12 all right so here is srx1 and to begin
02:15 we need to configure a local certificate
02:17 we're going to need to use this local
02:19 certificate for our remote worker to
02:21 connect into and they'll be able to use
02:23 that local certificate now you could
02:25 import a trusted cert
02:26 instead but yeah since we're a small
02:29 little mom and pop shop i guess you
02:31 could say in this example we're going to
02:32 do the free way of doing it
02:35 okay so first to begin we need to create
02:38 the key pairs
02:40 and generate key pairs size
02:43 i will go 248 for the size
02:47 type rsa and certificate id we're gonna
02:50 go with juniper
02:52 it'll be let's say one two three
02:55 and that'll take just a second and we're
02:57 done there
02:58 now we need to create the certificate
03:00 using those certificate keys
03:02 so we'll do request security pki local
03:05 certificate
03:06 generate self-signed certificate id
03:09 we'll say juniper lb-123 it's got to be
03:13 the name of that key pair
03:15 and then we'll specify a subject we're
03:16 just going to say dc equals
03:19 juniper cn equals edu
03:23 and then domain name pdu.juniper.net
03:27 ip address now this is actually very
03:30 important that we add an ip address here
03:31 and this needs to be the ip address
03:33 of the external facing interface and i
03:35 didn't tell you that beforehand but the
03:37 ip address that is the external facing
03:39 ip address is 10.111.111.1
03:44 and that'll just take a second and we're
03:45 done there so we could do the
03:47 show security pki local certificate
03:51 all or just enter there we go
03:54 and we can see our new certificate here
03:56 and so great
03:57 that's exactly what we should see it's
03:59 good for five years before we have to do
04:01 this again so
04:02 and this will last a little while okay
04:04 next let's go ahead and jump into
04:05 configuration mode
04:06 and tell the srx1 device to use that
04:10 certificate
04:10 for web management it's going to be on
04:14 our system
04:15 services web management https
04:18 and then we're going to specify it as
04:20 the pki local certificate
04:22 and then the next thing we want to do is
04:24 we want to configure
04:26 a nat policy and this is not a net
04:28 policy for hosts coming
04:29 out of the trusted network the user zone
04:32 to the internet zone
04:34 this is going to be a policy that is
04:37 going to be applied
04:38 to the vpn traffic that's coming from
04:40 their remote worker
04:42 and the reason behind that well we could
04:43 actually set up a static route but the
04:45 remote
04:46 worker is going to be using a different
04:48 subnet than what we have in our network
04:50 and so the hosts aren't going to know
04:51 how to get to that they won't know that
04:53 they need to put that traffic
04:55 that is or the return traffic that is
04:56 safe for the server one device
04:59 it won't know that we need to put that
05:00 in the vpn tunnel for this to work
05:03 correctly
05:04 and so we could do a static route for
05:06 that traffic or the easy way to do it is
05:08 to create a
05:09 source nat rule that sourcenaps it to a
05:11 local interface
05:13 and so we're going to go to security net
05:16 source
05:17 ruleset we'll just call this ra lb
05:19 remote access learningbyte
05:21 and we're going to say fromzone it's
05:22 going to come in from the vpn zone
05:24 that's already configured
05:27 then we're going to say two zone servers
05:31 and then we need to create a rule called
05:33 ra lb
05:35 dash rule and we're saying match
05:38 source address just anything that'll
05:40 match it
05:41 because we're only going to have that
05:43 specific traffic coming
05:45 in through the vpn zone going to the
05:48 servers
05:48 zone and then we'll say set then
05:51 sourcenet interface so it'll
05:53 net the traffic to the interface
05:56 that is in the server zone
06:04 we actually have a couple different
06:05 interfaces there so which interface is
06:07 it going to use
06:10 i think it's gige002 yes that's the
06:12 interface that it will use to get
06:14 to the server one device since that
06:16 server one ip address is 10.60.60.100
06:19 and that other interface is actually my
06:20 mistake i put an interface in there that
06:22 i didn't mean to have in there so
06:24 please just ignore that okay so next
06:26 let's go ahead and configure the
06:27 security policies
06:33 we need to configure something from the
06:35 servers
06:36 zone to the vpn zone policy we'll just
06:39 call this
06:41 ri-lb-1 just kind of generic there
06:45 then we need to set some match criteria
06:49 or set any any any and then
06:53 set then permit actually i made a small
06:55 mistake there i do
06:56 want to make this a little more specific
07:00 and so we want to say source address
07:04 get rid of the match on any there
07:07 and we want to have this match on the
07:09 server one source address now that's an
07:11 address book entry that i created
07:12 earlier
07:13 and so that's just going to match on
07:14 that server one address so it's coming
07:16 from server one
07:18 from the server zone going to the vpn
07:20 zone then allow the traffic
07:22 and this will allow the server to
07:25 initiate traffic
07:26 to the remote worker
07:31 we're going to say from zone vpn so this
07:34 is going to be the remote worker going
07:35 to the server
07:36 zone
07:40 let's call this rlb2 for the policy
07:44 we're gonna say the source address of
07:46 any now we could actually specify the
07:48 network that we're using for the pool
07:50 but that's not necessary in this regards
07:52 destination address server one
07:56 and then application any
08:02 then we'll permit that and then next
08:05 we need to configure the security zones
08:08 with some host inbound traffic
08:12 so we need to configure the untrust zone
08:15 which is the zone pointed towards the
08:17 internet
08:18 system services we need to have ike and
08:22 then
08:22 tcp encapsulation and then https
08:26 and then you can see that we have that
08:28 configuration everything looks good
08:30 there
08:31 and then we need to set the
08:34 vpn zone to use the st0
08:38 interface and we don't need to enable
08:41 any sort of inbound traffic host inbound
08:43 traffic on that
08:44 interface or that zone and the next we
08:46 need to go to the access hierarchy
08:49 and we need to configure an address
08:51 assignment pool
08:52 and this is the pool we're going to use
08:53 to hand out ip addresses
08:55 for users using that tunnel so remote
08:57 workers using that tunnel
08:59 just call this ra pull dash lb
09:03 just have to specify pool first
09:08 and set family inet specify a network
09:16 you want to specify a range of what
09:18 we're going to use in that network for
09:19 the pool
09:23 and we're going to say a low range of
09:27 10.77.77.10 and a high range of
09:30 10.77.77.50 and then we'll say family i
09:32 net we need to set one more thing the x
09:34 auth attributes we need to set a primary
09:36 dns
09:38 we're just going to use google dns and
09:40 next we need to
09:41 create a profile that we'll be using now
09:43 this is where we're going to house the
09:45 usernames and passwords
09:47 remember we're using local
09:48 authentication this is great if you
09:50 don't have some sort of radius server or
09:52 some other sort of authentication that
09:54 happens off the box so this would be a
09:56 small mom-and-pop shop
09:57 maybe a few dozen workers or whatnot you
09:59 really wouldn't want to use this
10:01 solution
10:01 if you had hundreds of workers
10:09 i'll say client so this is the username
10:11 say lab that's our
10:13 username we always use in ed services
10:15 i'm gonna say firewall user
10:17 we're going to specify a password and
10:19 then we need to
10:20 specify the address assignment pool that
10:22 was ra-pull
10:25 lb and then we need to
10:28 set the firewall authentication web
10:30 authentication we need to set the
10:32 default profile to what we just
10:33 configured there
10:37 and oh i did forget one thing real quick
10:39 we need to configure the sd0 interface
10:42 easy to forget part of this
10:43 configuration just family inet no i p
10:46 address let's go ahead and commit that
10:47 again
10:48 and commit and quit
10:52 okay so with this we have the topology
10:55 you see here and srx1 is connected to
10:58 the internet we have the users
11:00 zone and the servers zone and
11:03 recall what we want to do is have the
11:05 remote worker have
11:06 access to server one using juniper
11:09 secure connect and we're using the cli
11:11 to configure this
11:12 and in the previous learning byte we set
11:15 up
11:16 the local certificate we then configured
11:19 source nat for the vpn traffic coming
11:22 into server one
11:23 and then we configured the security
11:25 policies as well as the security zones
11:28 the sd0 interface and then the access
11:31 profile which
11:32 contains our users and user names and
11:34 also the
11:35 ip information that we will be assigning
11:38 to those remote workers
11:39 as they access the vpn so with that
11:42 let's go ahead and jump back to
11:44 srx1 and get this going
11:47 all right so here is srx1 and we first
11:50 need to jump into configuration mode
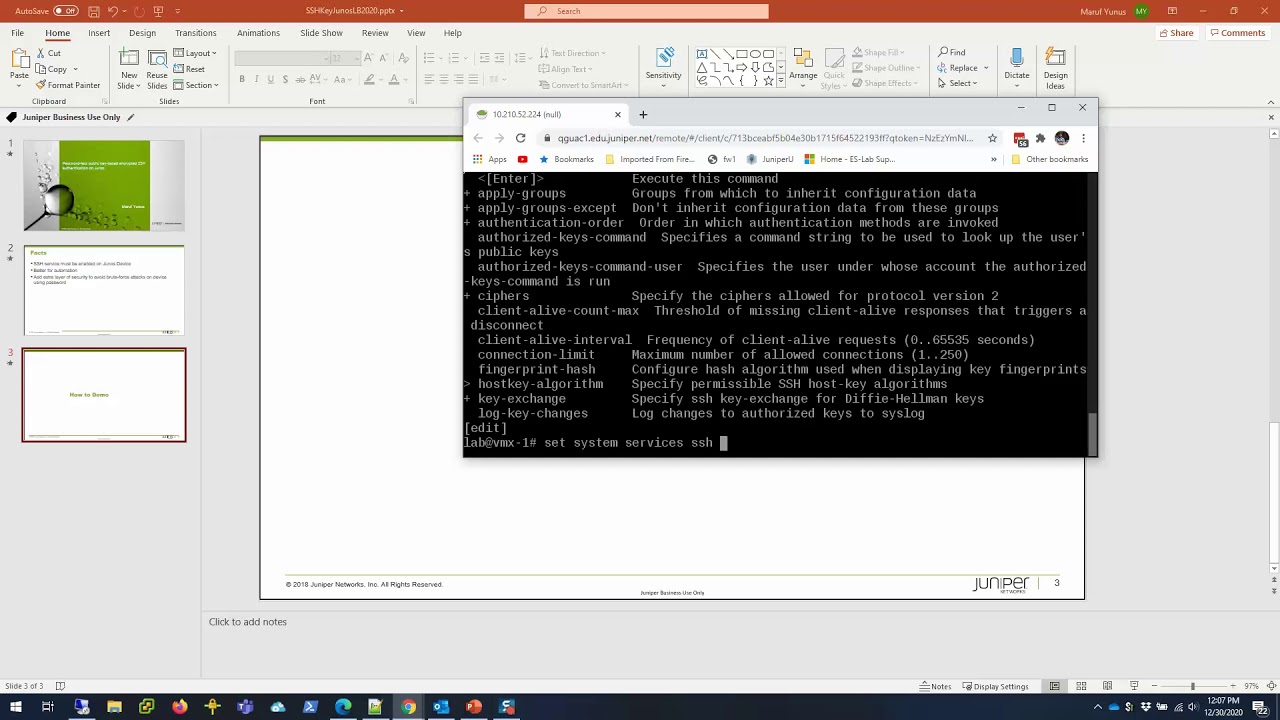
11:53 and then go to services and configure
11:54 the ssl termination profile
11:59 and we're going to configure i will call
12:02 this
12:02 srs term lb and then we have to
12:05 reference the server certificate
12:07 that we created in the last learning
12:09 byte
12:10 and then we need to
12:14 configure the tcp encapsulation to use
12:17 that ssl termination profile
12:20 and we'll call this profile ssl dash
12:23 pro lb and we'll specify the ssl profile
12:28 and then next we need to jump into
12:31 the ike configuration and configure what
12:34 we need to do here
12:34 now when we do this we can configure a
12:37 proposal and then reference that
12:39 proposal in a policy but we don't need
12:41 to do that and for the sake of time
12:43 i'm just going to use a proposal set
12:45 inside a
12:46 policy and so we'll go policy
12:49 r a lv and we'll say mode
12:52 we need to set this to aggressive mode
12:55 set proposal
12:57 set we can use the compatible and
12:59 standard
13:00 those two work fine we cannot use the
13:02 basic and the prime 128
13:04 prime 256 and suite b gcm 128 and suite
13:08 b gcm 256
13:10 will not work with this type of vpn so
13:12 let's go ahead and use the
13:14 standard proposal set and then we need
13:17 to set a pre-shared key
13:18 so say ascii text specify lab123
13:22 and then we need to configure the
13:23 gateway
13:29 then we can specify the ike policy that
13:32 we just created
13:34 and then we have to say dynamic user at
13:37 host name
13:38 say lab at edu.juniper.net
13:42 then also under dynamic we need to set
13:44 the ike
13:45 user type we have to set the shared ike
13:48 id
13:50 and then let's go ahead and set some
13:51 dead peer detection this is not
13:53 strictly needed but it's good to have
13:56 say optimized
13:57 interval 10 threshold 5.
14:01 we'll set the external interface and
14:02 this is going to be gigi001
14:06 set the local address 10.111.111.1
14:10 now you might remember in the last
14:12 learning byte when we configured
14:14 the certificate we had to set an ip
14:17 address of 10.111.111.1
14:20 and that needs to match with what we're
14:21 doing here that's very important
14:24 then for aaa authentication we're going
14:25 to set the access profile that we
14:27 configured
14:28 and then we're gonna say version one
14:31 only
14:33 and then we're gonna specify that tcp
14:34 encapsulation profile
14:37 and then we need to configure ipsec
14:41 and just like with ike we could specify
14:44 our
14:44 our own proposal but we don't need to do
14:46 that and for the sake of time we'll just
14:48 specify a proposal set and so
14:51 edit policy we'll configure the policy
14:54 called relb
14:56 ipsec and then we need to configure the
14:59 vpn
15:00 i mean the say perfect forward secrecy
15:08 group 19 for the keys and we'll set the
15:11 proposal
15:12 set to use as standard
15:18 and then we create the vpn or the vpn
15:21 parameters set the byte interface to st0
15:25 set the df fit to clear
15:29 and that's not necessary but it is
15:31 helpful so it's recommended
15:33 and then we can set the
15:36 ike gateway as well as the ipsec
15:40 policy and then we need to set a traffic
15:43 selector we'll have a traffic selector
15:45 local ip we need to call it something
15:48 first we'll say ts1
15:50 localip 10.60.60.100
15:54 and remote ip
15:57 uh 0.0.0 and this will
16:00 only allow traffic that is destined and
16:03 coming from
16:04 the server to go through this tunnel and
16:07 then we need to configure the remote
16:08 access information
16:14 first we configure the client config
16:18 and connection mode we'll set that to
16:20 manual dead pair detection
16:23 interval 60 threshold 5
16:26 and then we set the remote access
16:28 profile
16:29 and we're going to call this ra-lv-123
16:33 and we're going to say the ipsec vpn
16:34 we're going to be using
16:37 and then the access profile that we
16:40 configured earlier
16:42 and then the client configuration
16:47 and then we have to set the default
16:49 profile
16:50 and that's that profile we just
16:52 configured and actually i just realized
16:55 i made a mistake with the configuration
16:56 in this
16:57 friendly configuration warning lets us
16:59 know that yeah i made that mistake so
17:01 what we need to do is we need to adjust
17:04 the ike proposal and it actually needs
17:07 to be a custom proposal not a proposal
17:08 set
17:09 and so what we need to do is jump up to
17:13 security ike proposal and we're going to
17:16 call this re-lv
17:18 dash ike pro
17:21 and then we need to set the
17:22 authentication method
17:25 to pre-shared keys the dh group to group
17:27 19
17:29 and then the authentication
17:32 algorithm to say
17:36 sha256 encryption algorithm to aes
17:41 256 cbc
17:44 and then uh we can set a lifetime this
17:47 is not totally necessary but it's
17:49 good practice and then uh go up one
17:52 go to the policy ralb for the policy
17:55 name
17:56 and then we're gonna delete those
17:57 proposals set that we're using
18:00 and then set the proposal that we just
18:02 configured
18:05 and then let's commit that configuration
18:06 jump out to operational mode
18:08 and now let's go ahead and jump to the
18:11 remote worker device and see how this
18:14 works
18:15 all right so here is our remote worker
18:18 device
18:18 and to begin let's see if we can
18:20 actually reach that server without first
18:23 logging into the vpn
18:28 and looks like it's not going to work
18:30 and that's okay that's what we want we
18:32 don't want
18:32 anyone on the internet to be able to
18:34 access our local server right
18:36 so let's go ahead and kill that ping and
18:38 then we'll go ahead and start up the vpn
18:42 you can see here on your connection
18:43 profile i've done this before so we're
18:45 going to create a new connection though
18:48 and normally you'd have to fill out this
18:49 gateway address but since i've done this
18:51 before on this device it's already
18:53 pre-populated but
18:54 normally we need to type all that out
18:57 and notice how this is the external ip
18:59 address
19:00 of that interface that we configured and
19:02 so let's go ahead and do this and click
19:04 the connection button
19:05 and we're asked to sign in
19:08 and see here we are presented with a
19:10 security certificate warning
19:12 and that's because our local certificate
19:14 that we configured is not a
19:16 trusted certificate but we know we
19:18 configured it so we can trust it so
19:20 we'll accept this
19:26 you can see it's attempting to connect
19:27 tunnel is set up
19:30 and now it is established let's go ahead
19:33 and pull that back out
19:36 we can see here that this looks good we
19:38 can see that we're online nothing's
19:40 being transmitted yet
19:41 and that's okay because we haven't sent
19:43 anything so let's go ahead and pull up
19:45 this command window and attempt to ping
19:47 the server
19:48 and that looks a lot better we can
19:50 actually reach the server so
19:52 great so let's look at the client
19:55 and we can see that we have some
19:56 transmitted bytes and some received
19:58 bytes and that's exactly what we want to
19:59 see and and those aren't bytes not
20:01 packets so it's the cumulative
20:03 bytes that were sent and received and
20:04 that's perfect and one other quick thing
20:06 is i want to show you if i disconnect
20:10 then reconnect we have to first enter
20:13 our
20:14 credentials and then we don't have to
20:17 accept that certificate since it's
20:19 already been
20:20 accepted so we're good there and one
20:22 last quick thing let's jump back to
20:24 vsrx1 and look
20:26 at a few verification commands
20:29 so here let's go ahead and show the
20:31 security ike security associations
20:34 and we can see here that we do have one
20:37 client connecting and we can see that
20:38 the remote address is 10.50.50.101 so
20:42 that's the actual ip address
20:43 that the remote client is connecting
20:45 from and then we can show the
20:47 show security ipsec security
20:49 associations and we'll see
20:50 similar type of output but we can see
20:53 the ike
20:54 and ipsec security associations are up
20:57 and functioning
20:58 and then one last quick thing you can
21:00 look at the ipsec statistics
21:02 and we can see that some packets were
21:04 sent and received and
21:05 everything looks good things are working
21:07 as expected
21:09 so that brings us to the end of this
21:11 learning byte and in this learning byte
21:13 we talked about how to configure and
21:15 verify
21:16 juniper secure connect using the junos
21:18 cli
21:19 so as always thanks for watching visit
21:22 the juniper education services website
21:25 to learn more about courses view our
21:28 full range of classroom
21:30 online and e-learning courses
21:33 learning paths industry segment and
21:35 technology specific
21:37 training paths juniper networks
21:40 certification program
21:41 the ultimate demonstration of your
21:43 confidence and
21:45 the training community from forums to
21:47 social media
21:48 join the discussion