Using the Juniper/PyEZ Container and the jnpr.junos.facts Library

Juniper Learning Byte: Up close with the Juniper/PyEZ Container.
If you want to learn how to automate Junos with PyEZ, then don’t miss this Juniper Learning Byte demo. You’ll discover how to quickly get PyEZ scripts up and running and test them to ensure they work properly.
You’ll learn
How to use the Juniper/PyEZ Docker container to execute PyEZ scripts
How to use the Device.facts function to retrieve specific device properties
How to use f-print in Python 3 to make it easier to input information by combining text and variables
Who is this for?
Host
Transcript
0:00 [Music]
0:12 hello
0:13 and welcome to the pie easy using the
0:15 juniper
0:16 junos facts library learning byte
0:20 in this learning byte we've got really
0:24 two goals
0:25 the first one is to show you how to use
0:28 the juniper pie easy container it's a
0:31 great way
0:32 to quickly get up and up and running and
0:35 test
0:36 out scripts pi easy scripts
0:40 the second objective is to show you
0:42 about the juniper junos facts library
0:46 it's used in a lot of our courseware and
0:49 in a lot of beginning scripts but
0:50 there's a lot of stuff you can do at
0:51 this facts library that you might not be
0:53 aware of
0:54 that make it extremely useful so that's
0:57 kind of where we're going
0:59 so to use the docker container that's
1:02 really
1:02 easy to get up and running i've got my
1:05 lab set up using
1:06 ubuntu and so to install docker it's as
1:09 simple as
1:10 issuing the sudo apt-get install docker
1:13 command
1:15 once you install docker then you need to
1:18 get the container
1:19 pull it down from the docker hub to do
1:22 that
1:22 it's the simple docker pull juniper pi
1:26 ez that you see here on your screen the
1:27 second bullet point
1:29 once you've pulled down that container
1:31 it's ready to go
1:33 then to actually run a script you use
1:36 the docker run
1:38 the it option which means interactivity
1:41 and so it's actually going to use that
1:43 docker
1:45 command the rm is an option that says
1:48 hey once you're done
1:50 running this command go ahead and
1:53 shut down and delete this container and
1:56 you can also optionally give that
1:58 container a name
2:00 and then the v option here
2:04 says hey rather than having to copy our
2:07 scripts
2:08 into the container we're going to
2:11 actually
2:12 map our present working dub directory
2:15 pwd
2:16 we're going to map that present working
2:18 directory into the scripts
2:20 folder inside the container so
2:24 the idea is is that if you run this
2:26 docker command inside the folder
2:29 where you have your scripts they're
2:31 automatically going to be inside that
2:32 docker container
2:34 and then this is the name of the
2:37 container we're running
2:38 juniper pi easy and then you would place
2:41 the name of the script
2:42 after that and and i'm going to show you
2:44 how to do that it's going to be part of
2:45 our demonstration
2:46 but it's that easy to get a working
2:50 environment up with pi ez
2:53 and you can do the same thing on centos
2:56 and other
2:57 uh linux operating systems as well all
3:00 right
3:00 so the juniper.junosfacts module
3:04 is really probably the first one anybody
3:07 learning automation learns
3:09 because it goes in and automatically
3:11 pulls out different properties and
3:13 information about the device
3:15 and it really you can pull up to 35
3:18 different pieces of information
3:20 and if you do a search on the
3:22 juniper.judo's facts module
3:24 it'll pull up what all of those are in
3:26 the documentation
3:27 so to see all of those the most common
3:30 call is to make a call to this fax
3:32 function
3:34 all right but if you want to see
3:36 specific pieces of information
3:38 you can actually call that out using the
3:41 host name command
3:43 all right and again to see which ones
3:45 are available if you go
3:46 do a search it's for the juniper dot
3:49 juno's fax module
3:51 it'll show a list of all of these
3:53 different ones that you can pull out
3:56 and so that's kind of the introduction
3:58 now let's go in and let's see how it all
4:00 works how it all puts together
4:02 what i've got is i have an ubuntu
4:07 vm and in this ubuntu vm
4:11 i've installed microsoft code
4:15 that's their free visual studio
4:18 type editor it works really well in
4:20 linux
4:21 it's probably my favorite editor for
4:23 doing this kind of coding now
4:26 and i've also got a have a
4:29 a vsrx and i've got this in my home lab
4:32 environment they're both virtualized
4:34 and and so what i've done here
4:38 in my ubuntu is i've have this script
4:40 here that
4:42 and it's a basic script to probably
4:45 about as simple as you're going to get
4:47 for connecting to a juniper device now
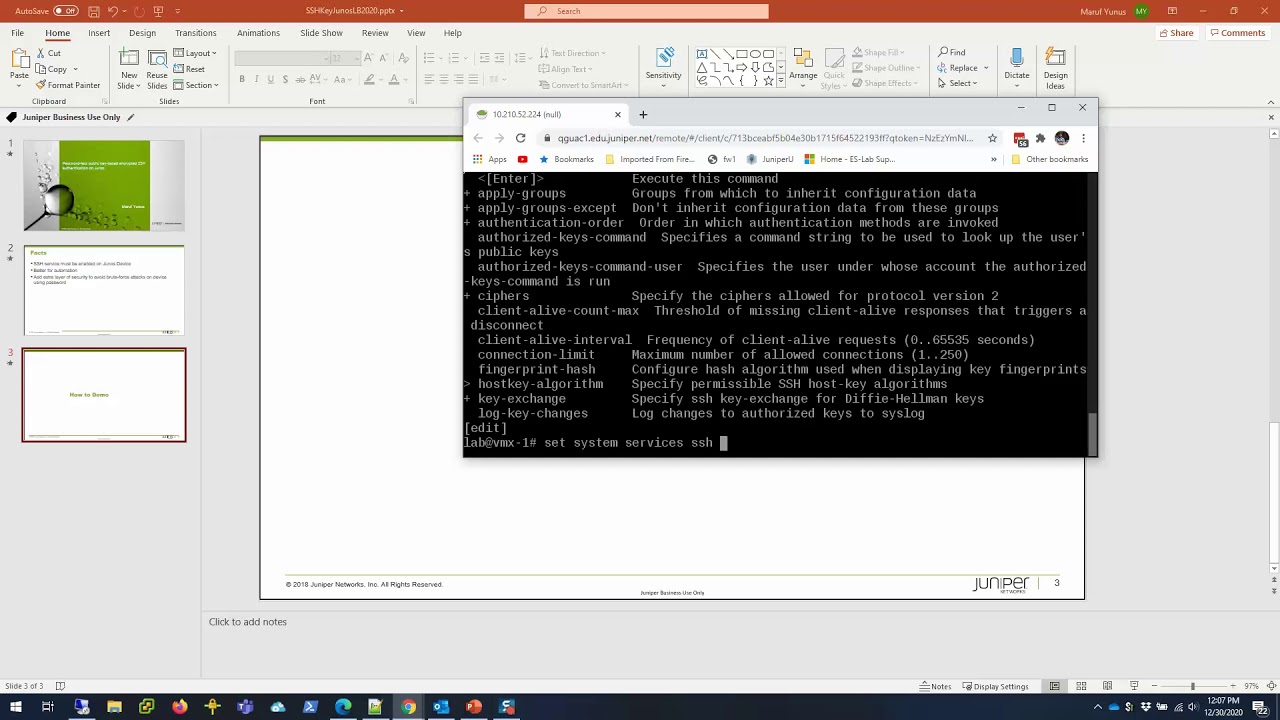
4:50 on the juniper device if i switch over
4:53 to the juniper device really quick
4:57 what you want to worry about on the
4:59 device is this
5:01 show system services and you want to
5:04 make sure you have
5:04 netcomp ssh setup
5:08 without that you're not going to be able
5:10 to connect to the device
5:12 so we've got that so our juniper device
5:14 is prepared
5:16 and let's switch back to our development
5:19 environment
5:20 and in the development environment our
5:22 first line of code here
5:24 is standard for again this this
5:27 learning byte is for beginners so i'm
5:28 kind of starting at the very beginning
5:31 we've got the shebang here the pound and
5:33 the exclamation point
5:34 and the path to our python 3 interpreter
5:38 now this will also work with python 2 if
5:40 that's what you've got installed
5:43 some of the i think this first script is
5:46 going to work for both of them
5:47 i think some of the later ones we'll
5:49 look at is probably going to be more
5:50 specific to python 3
5:53 but very similar so we you have to make
5:56 sure you
5:57 import the juniper.junos library
6:01 and import device class now
6:04 this with statement at the beginning
6:06 allows us to connect up to the juniper
6:08 device
6:09 without having to open the connection
6:11 and close the connection the width is
6:13 called the with
6:14 context and it allows you to connect to
6:17 the device without
6:18 specifically opening the connection and
6:20 closing the connection
6:21 it's very useful so we say device and we
6:25 say
6:25 the host we have an ip address we could
6:28 if your dns is
6:30 is running just put in the host name and
6:32 we put in the username and password
6:34 this is not as secure as using a
6:36 certificate and
6:37 in later learning bytes and in the
6:39 course uh
6:40 you know the our automation courses we
6:42 show you how to
6:43 use certificates all right and the
6:47 typical way this done is to just
6:49 print dev.fax so it's going to go out to
6:52 the device
6:53 retrieve the fax and print them out
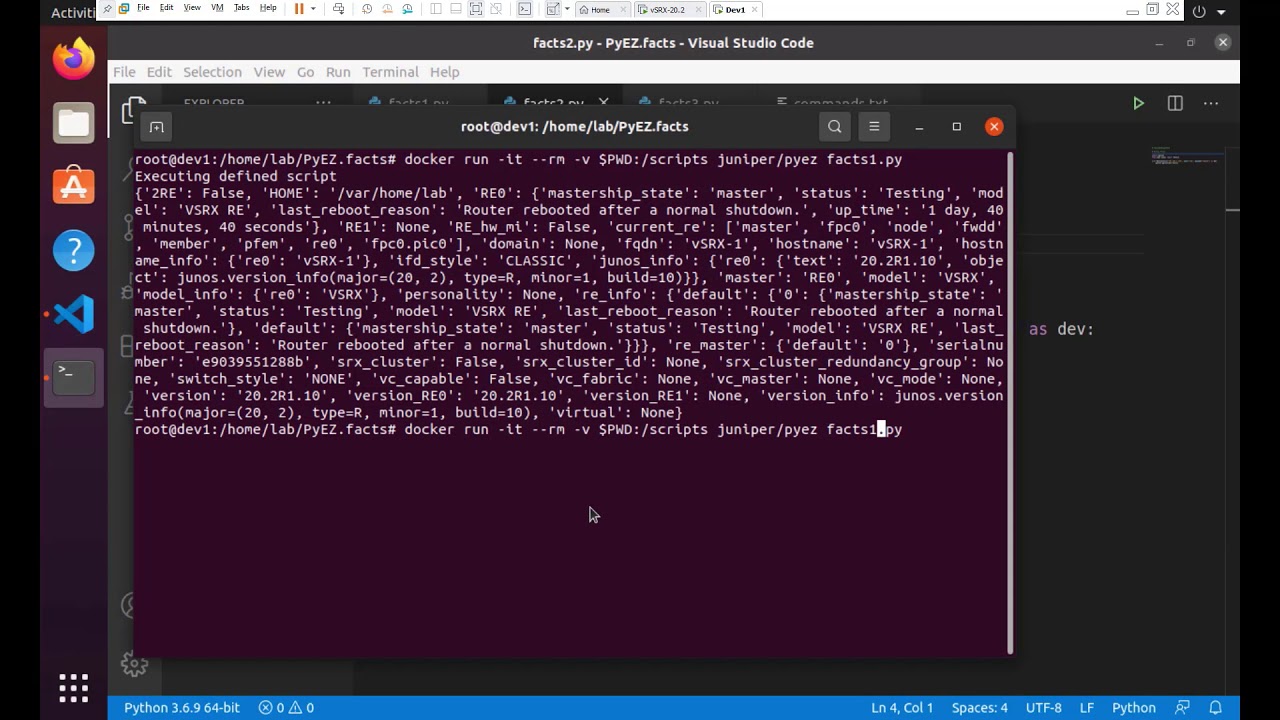
6:56 all right so if we go to the command
6:58 line and this file is called facts1 dot
7:01 py
7:03 so if i go to the command line and
7:07 here's that same docker run command i
7:09 showed you in the slide presentation
7:12 and so it's docker run with the
7:15 interactivity
7:16 we're going to remove the container
7:18 after it's done we're going to map our
7:20 present working directory to the scripts
7:22 directory
7:23 and we're running the juniper pi easy
7:25 container and we're going to pass to it
7:27 this facts1.py so we hit enter it runs
7:32 it takes it just a minute just because
7:34 it's bringing up that container
7:36 and then passes it to it but like you
7:38 saw it's not very long
7:40 this is the default of what you get when
7:42 you run that um
7:44 yeah that facts function not really well
7:47 organized
7:48 so there's some things we can do to make
7:50 that prettier
7:52 i've got another script here so to save
7:54 and typing
7:55 really all i've done is added in
7:58 what is called this import p
8:01 print or pretty print and it enables you
8:05 to print
8:06 in a more pretty fashion and so we have
8:11 print dot dev dot fax
8:15 now we can do that and let me show you
8:18 what it does differently so let's go
8:20 back to our command line
8:24 and this time we're just going to change
8:25 this to fax two
8:32 and it's going to run it again
8:35 what pretty print does is it says oh i
8:37 recognize this
8:38 as being a python dictionary so let's
8:41 try and give it some structure
8:44 and now you can see all of the different
8:46 pieces of
8:47 information that you can get through
8:50 this
8:52 pretty print and through this facts
8:53 module all right you can see the uptime
8:56 here you can see the model the status
9:00 lots of different interesting pieces of
9:02 information and
9:03 you may not want all that information
9:05 you might be just looking for
9:06 very specific pieces of information and
9:09 if you are
9:10 you can customize that as well and our
9:13 courses don't go into this much depth
9:15 but i thought it was a really
9:16 interesting
9:17 application now here we're still
9:22 using the juniper.junos import device
9:25 just i don't think we need the pretty
9:27 print anymore because we're just going
9:28 to use a print statement
9:30 but our connection is still the same
9:32 nothing's changed there
9:33 but we're using print but as part of
9:36 python 3
9:37 we now have this what's called fprint
9:39 and you can do this in python 2 but
9:42 python 2 doesn't have this fprint what
9:44 fprint does
9:45 is it makes it easier to put in what it
9:48 is your
9:49 text as well as this dev doc facts
9:52 all on the same line and so it's more
9:55 intuitive
9:56 as far as in my opinion from a program
9:59 perspective
10:00 of being able to combine text and
10:01 variables together
10:03 so it's going to print out hostname it's
10:05 going to run dev.fax
10:07 and it's going to pull just the hostname
10:10 field
10:11 out of that big python dictionary of fax
10:14 the next line is going to pull out the
10:15 serial number the next line is going to
10:17 pull out the version
10:19 and the last one is is notice there's
10:22 two sets of square brackets
10:24 in the dev.fax down here at the bottom
10:27 line
10:28 first it's going to go and pull out the
10:31 re0
10:33 which stands for routing engine 0 and
10:36 that is a dictionary in and of itself
10:39 nested within that dictionary
10:41 is another dictionary that has this
10:44 field of last reboot reason
10:47 and so if you just try and pull out last
10:50 reboot reason
10:51 it's going to say oh i can't find it
10:53 well it can't find it because it's
10:55 nested within
10:56 another dictionary the re0 and so to
10:59 pull
11:00 out a field that's nested within another
11:01 field you have to do a square bracket
11:04 nested with this another square bracket
11:06 here or next to another square bracket
11:09 and you'll see these forward slash ends
11:11 at the beginning here
11:13 and at the begins of the lines these are
11:15 just simple ways to insert
11:16 a new blank line a new hard return
11:20 if you will so let's go try this one and
11:23 show you the return on this
11:25 come back to our command line
11:28 and i'm going to hit enter a few times
11:32 let's clear it
11:35 and run this time number three
11:43 it's going to run it and now it's just
11:46 going to pull out the pieces of
11:47 information
11:48 and show the ones that we wanted to me
11:50 if i were writing a script
11:51 i this is a much more useful if i wanted
11:54 to know about you know see
11:55 certain pieces of information about a
11:57 particular device
11:59 so i hope this is useful for you to take
12:01 this a step further
12:02 what you can do is you can in your
12:04 python script
12:06 is you can pass in maybe an ip address
12:09 or a whole series of ip addresses and
12:12 then run this script
12:14 against all of the those different
12:16 devices
12:17 and so that would be the next step and
12:19 take this learning byte further but
12:20 that's for another day
12:22 so thank you for being here and let me
12:25 see if i can
12:26 get back to our slide here and i think
12:30 yeah so to sum it up hopefully at the
12:34 end of this now you have
12:36 feel confident in being able to download
12:37 the container
12:39 and use it and then maybe sell a few
12:41 tricks on using this junos.fax
12:43 pi easy library thank you and
12:47 that's it visit the juniper education
12:50 services website
12:52 to learn more about courses view our
12:55 full range of classroom
12:56 online and e-learning courses
12:59 learning paths industry segment and
13:02 technology specific
13:03 training paths juniper networks
13:06 certification program
13:08 the ultimate demonstration of your
13:10 competence and
13:11 the training community from forums to
13:14 social media
13:15 join the discussion
13:22 you