cSRX Docker Fundamentals
Juniper Learning Byte: Sharpen your cSRX Docker skills
Do you have the skills to manage Docker cSRX instances? You will after watching this detailed educational video with Juniper’s Gordon Mosley.
You’ll learn
How to use Docker to launch a cSRX instance and the steps required
About the Juniper cSRX container firewall: what it is and what it can be used for
Example use cases of cSRX instances
Who is this for?
Host
Transcript
0:00 [Music]
0:13 welcome to the csrx docker fundamentals
0:16 learning byte i'm gordon mosley with the
0:18 education services department at juniper
0:20 networks let's get started
0:22 after completing this learning byte you
0:24 will be able to use docker to launch a
0:26 csrx instance
0:28 the csrx is a containerized version of
0:31 our srx series services gateway designed
0:34 primarily to protect container workloads
0:37 so the example use case i have
0:39 demonstrated at the bottom is i have an
0:42 application it's a containerized web
0:44 application and so i have several you
0:46 know web containers and every web
0:49 application always talks to a database
0:51 back in well since these are
0:52 containerized resources that i need to
0:54 secure i have traffic coming in from the
0:56 internet i want to protect my web
0:57 containers
0:58 when those web containers communicate
1:00 with my back-end database services i
1:01 also want to secure that track
1:03 and so this is a perfect example of
1:05 spinning up when i spin up these web
1:07 front ends and my database back ends i
1:09 can also orchestrate and instantiate
1:12 some csrx instances to protect secure
1:15 traffic from the internet reaching my
1:16 front-end web application and then the
1:18 communications going back to my database
1:20 back-end so full you know layer seven
1:23 advanced security services available in
1:25 a containerized format that i can deploy
1:27 in a couple of seconds
1:30 now to deploy a csrx instance
1:33 i used i have a windows laptop i
1:35 installed docker desktop for windows
1:37 there's a version for mac there's also a
1:39 linux version
1:40 and then i downloaded the csrx image
1:42 from the juniper support downloads
1:44 website i'll show you the image in a
1:45 minute
1:46 and then we will use docker commands to
1:48 create the necessary networks and launch
1:51 the csrx instance then once the csrxs is
1:54 launched to get all the functionality
1:56 out of it you're going to need a
1:57 software license and then you're going
1:59 to need to apply some configuration
2:03 here's the example csrx container we're
2:05 going to build we're going to launch a
2:07 use docker to launch a csrx instance and
2:09 we're going to create three docker
2:11 networks one of them will be the
2:13 management network we'll create use the
2:15 docker network create command we'll
2:17 create a management network
2:19 then i'm going to have two transit
2:20 networks i'm going to create one of them
2:22 i'm going to call the untrust network
2:24 you can call the network whatever you'd
2:26 like but we'll use docker network create
2:28 and create a untrust network
2:30 and a trust network and a management
2:33 network now on the interfaces that are
2:35 going to process transit traffic if you
2:37 want the csrx to perform nat functions
2:40 which is a common feature
2:42 when you create the docker networks you
2:44 must enable ipmasquerating so the csrx
2:47 is capable or it enables the csrx to
2:50 perform map functions we'll use the
2:52 docker run command to launch the
2:55 container and then we'll use the docker
2:57 network connect command to connect the
2:59 transit networks to the vsrx instance
3:02 and assign ip addresses to these two
3:04 transit interfaces
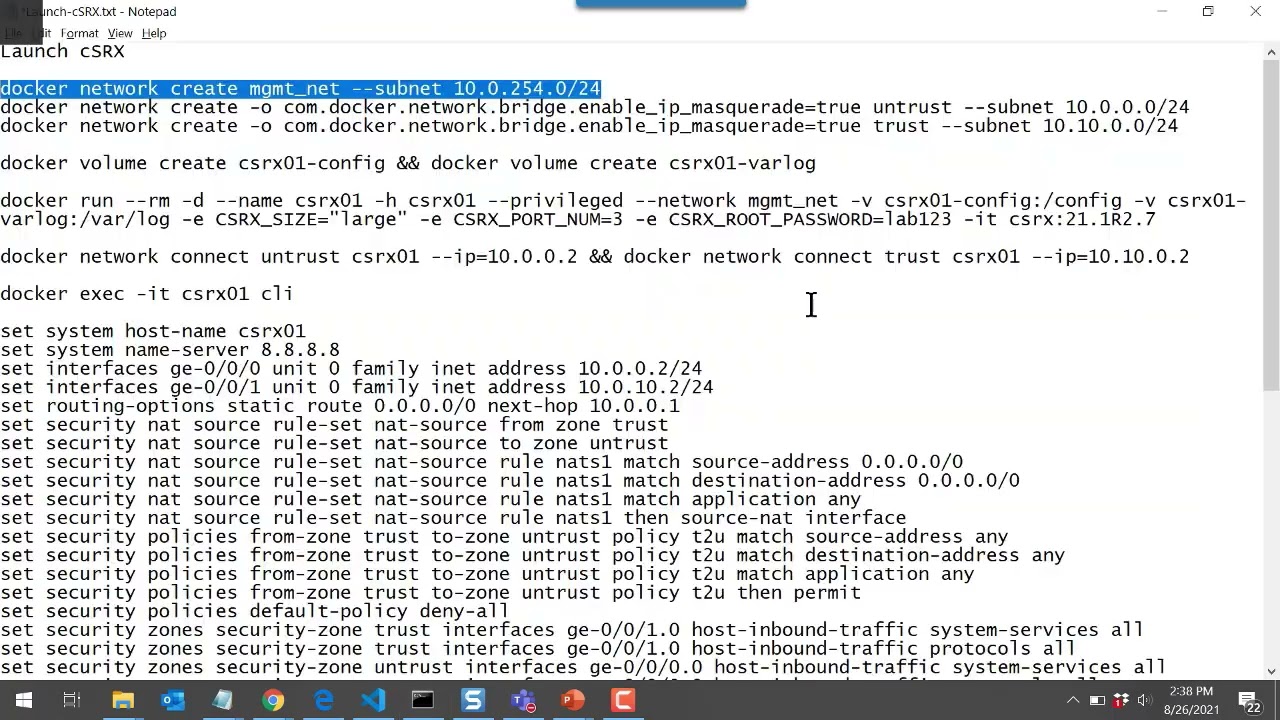
3:07 i have the commands we're going to use
3:09 to create or launch the csrx container
3:12 in this notepad document these are the
3:14 three networks where we use the docker
3:16 network create command we can create a
3:18 network called in this case mgmt
3:21 underscore net this is a variable you
3:23 can create the network you can name the
3:25 network however you choose you do not
3:27 have to specify a subnet to be
3:29 associated docker will automatically
3:31 generate or assign a
3:33 172.17
3:35 subnet to the first network that you
3:37 create but i wanted a little more
3:38 control so we're going to define the
3:40 actual management subnet range
3:43 these then i will create two transit
3:45 networks this would be the untrust
3:47 network and again you could name the
3:49 networks whatever you'd like
3:51 this is the subnet i want associated
3:53 with that untrust network here's my
3:54 trust network and the associated subnet
3:56 and since these are transit interfaces i
3:59 won't want to enable ip masquerading on
4:02 those interfaces and this will again
4:03 enable the csrx instance to perform nat
4:06 functions
4:08 the csrx instance requires a couple of
4:11 docker volumes for storage one to store
4:14 its configuration information you can
4:16 name we'll use the docker volume create
4:18 you'll name the config volume whatever
4:20 you'd like and we also need another
4:22 volume for the csrx log information so
4:25 we'll use two docker volume create
4:27 commands for that
4:28 and then we use docker run and this will
4:30 launch the container instance it'll run
4:33 in detached mode which means once you
4:35 run this command you get your prompt
4:37 back
4:38 the name of the container will be csrx01
4:41 the host name in the juno cli will
4:43 automatically be set to the same value
4:46 it runs in privileged mode
4:48 when it launches it will connect itself
4:50 the management interface on this
4:51 container instance will connect to the
4:53 management network that we defined
4:55 earlier in the process
4:57 the dash v option will attach the two
5:00 volumes the config volume and the log
5:02 volume to the container this is the only
5:05 allowed
5:06 csrx image size or container size that's
5:09 permitted it's large
5:11 now this is a nice option this csrx port
5:14 number i only need three interfaces on
5:16 this container instance i need a
5:17 management interface
5:19 and a gigi zero zero zero interface that
5:22 i want to attach to the untrust network
5:25 and a gige001 interface that i want to
5:27 attach to the trust network you can
5:30 specify up to 15 transit interfaces on
5:33 each container csrx container instance
5:36 so there's a lot there but i only need
5:38 to connect to a couple of networks here
5:40 transit wise in a management network so
5:42 that's the number of ports i want in my
5:44 container instance the root password
5:46 will automatically be set to to this
5:48 value and there will be a console that
5:50 i'll be able to connect to and and then
5:52 look around low config you know perform
5:54 operations on the container once it's
5:56 launched and once it's launched i
5:58 connect my untrust network that we
6:00 defined a little bit earlier and i also
6:02 assign an ip address to the first
6:04 container interface on that network
6:07 10.0 the first ip address is reserved by
6:10 docker for the gateway ip address to
6:12 drop traffic out of this subnet and so
6:15 the first ip address available to me to
6:17 to assign to a csrx interface is dot two
6:21 and so
6:22 the we'll connect the container to the
6:23 untrust network and we'll assign the
6:25 gigi zero zero zero interface that ip
6:27 address and then we'll also connect the
6:29 trust network to that container and
6:31 we'll assign
6:32 10.10.0.2 is the ip address for the
6:35 first interface the gigi001 interface on
6:38 that container and then we'll use the
6:40 docker exec command to connect to the
6:42 container instance and look around
6:45 so first let's make the network
6:48 let me copy this
6:50 docker network create command
6:52 and we'll go to the command prompt and
6:54 we'll begin the process
6:57 here's my command prompt i already as i
6:59 mentioned earlier downloaded the docker
7:01 image
7:02 from our support website this is the
7:04 name of the image it's about 250 megs in
7:06 size
7:08 then once i've downloaded the image you
7:10 will use the docker
7:12 load dash i command
7:15 and and the image name and this will
7:17 uncompress that downloaded image
7:19 and store it in your local docker image
7:22 repository i've already done the docker
7:25 load step it took about a minute and so
7:28 it's not very fun to watch during a
7:30 learning byte but i can run the docker
7:32 image ls command to list all of my
7:34 images
7:35 and here's the csrx image that was
7:38 uncompressed and placed in my local
7:41 docker image repository so this is the
7:43 container image that we will launch
7:46 right so first i wanted to
7:51 i lost the docker network command there
7:53 let me
7:54 copy this
7:56 we'll go back and we'll create the
7:57 management network
8:01 then i'll come back and create we copy
8:03 eclipse we copy this line
8:07 and we'll create the untrust network
8:10 prompt
8:14 let's go back and get our trust network
8:18 docker network create command
8:23 paste that back in there
8:26 so now i've created the management
8:27 network the untrust network the trust
8:30 network so those are the three networks
8:31 and the three subnets i wanted to create
8:34 now i want to go back and create the
8:35 volumes there's two commands to save
8:38 time i use the double ampersands to
8:40 combine these two docker volume create
8:42 commands together so i can just copy
8:44 this line
8:46 and paste it in
8:48 to the prompt to the command prompt and
8:50 it'll automatically run both of those
8:52 for me just to save us some time there's
8:53 the config
8:55 and the var log volume
8:57 now once the networks and the volumes
8:59 are created we can run which means we're
9:01 going to launch
9:03 our container so we'll copy this
9:07 paste that command in
9:12 and it takes a about a second or two for
9:14 the container to launch and it's up and
9:15 running you can run a docker
9:18 container ls it's how you can see your
9:21 running containers
9:23 and here's our csr csrx01 you know
9:26 container instance here's the id here's
9:28 the image that was used to to load it
9:30 you know it's been up about seven
9:31 seconds right
9:33 and then now i need to
9:35 now that it's up and running i can
9:36 attach those two transit networks to
9:38 this csrx01 container so let's go back
9:42 to the
9:43 notepad document and i've got two
9:45 commands connected here two docker
9:47 network connect commands
9:50 join together with the double ampersand
9:52 let's just paste that in there and this
9:54 will you know connect
9:55 the csrx01 instance to the untrust
9:58 network and this will be the ip address
10:00 assigned to the first interface in that
10:02 network and the same thing with the
10:03 trust network
10:05 so let's connect it
10:08 and now i have a running instance that's
10:10 connected to networks so there's one
10:12 other command i mentioned where we'll do
10:14 the docker exec
10:18 and this command will connect us to our
10:20 running container and we'll log in as
10:22 root the password was lab 123 and the
10:25 hostname was set to csrx01 for me so now
10:28 for example if i run a show
10:31 interfaces here's my gigi00 right this
10:35 was assigned to the trust
10:38 the untrust excuse me docker network and
10:40 it's up and running i know i don't have
10:42 any configuration
10:44 i can do configure if if you'd like
10:48 load set
10:51 you know terminal
10:52 and then i have some configuration that
10:54 will work
10:56 it's in set commands in this file
10:59 it'll create a you know it'll assign the
11:01 same ip addresses to the interfaces that
11:04 the docker used it sets a a nat rule
11:07 that gnats you know from the trust zone
11:09 to the untrust zone it'll perform source
11:11 nat and destination that there's you
11:13 know some security policies
11:16 so i can copy that
11:18 come back
11:21 paste it in
11:24 use the control d and then i do a commit
11:29 and then so now my interface is well i
11:31 forgot to set system often you have to
11:33 set the root password uh set system
11:36 root authentication plain text password
11:40 set the root password you you have to
11:42 when you load a config on there set the
11:44 root password before it'll accept a
11:45 commit
11:48 okay my commit process is complete now
11:50 if i do uh
11:54 i'll put a run in front of that since
11:55 i'm in configuration mode i'll actually
11:57 see more information about the
11:59 interfaces that i have configured on the
12:00 platform here's the logical unit here's
12:02 the ip address that's been assigned to
12:04 it i should have internet
12:08 connectivity you have to type it right
12:10 every time let me let me try that ping
12:12 command again
12:20 there's my ping replies coming back
12:22 now when i'm done i can exit you know
12:25 configuration mode i use exit to get
12:27 back to my local command prompt
12:29 and i can run a docker stop
12:32 c
12:33 srx01 command and stop that container i
12:37 still have the existing volumes i still
12:39 have the networks created so then once i
12:42 launch more containers i can simply
12:43 attach them to those existing objects i
12:45 don't have to build the network every
12:47 time and create the volumes every time i
12:49 do have to attach them once the
12:51 container is running now the uh when you
12:55 stop the container it seems to take
12:56 around 10 to 11 seconds for the
12:58 container to fully shut down they spin
13:00 up really quickly a second or two the
13:02 containers up and running
13:04 it does take a few seconds for it to
13:05 successfully stop
13:07 and then that's this learning bite
13:10 so in this learning by we used docker to
13:13 launch a csrx instance thank you very
13:15 much
13:18 visit the juniper education services
13:20 website to learn more about courses
13:23 view our full range of classroom online
13:26 and e-learning courses
13:28 learning paths
13:30 industry segment and technology-specific
13:32 training paths
13:34 juniper networks certification program
13:37 the ultimate demonstration of your
13:39 competence and the training community
13:42 from forums to social media join the
13:44 discussion
13:51 you