Prepare for Chassis Cluster Formation
This topic explains the prerequisites and step-by-step procedure for creating a chassis cluster and to maintain traffic on the primary node while the secondary node is connected to the cluster.
Use Feature Explorer to confirm platform and release support for specific features.
See the Additional Platform Information section for more information about the slot numbering offsets.
Review the Platform-Specific Chassis Cluster Prerequisites Behavior section for notes related to your platform.
Chassis Cluster Workflow
Review the Platform-Specific Chassis Cluster Formation Behavior for notes related to your platform.
Prerequisites
The following prerequisites must be set before configuring a chassis cluster:
-
Ensure that that both devices have identical hardware and software configurations.
-
Licenses are unique to each device and cannot be shared between devices. Both devices that form a chassis cluster must have identical features enabled and the same license keys installed. If the devices do not have an identical set of licenses, certain licensed features might not function after a failover, or the configuration might fail to synchronize during chassis cluster formation.
Workflow
Firewalls must meet the following requirements to be included in a chassis cluster.
-
A pair of identical, supported Firewalls running the same Junos OS version is combined to operate as a single system that enforces the same overall security.
-
Network node redundancy is achieved by grouping a pair of identical, supported Firewalls into a cluster.
-
All Services Processing Cards (SPCs), Network Processing Cards (NPCs), and Input/Output Cards (IOCs) on applicable Firewalls must be of the same type and installed in the same slot positions on both devices. Use the
show chassis hardwarecommand to identify the card types. -
When using dual fabric link functionality, connect the two pairs of Ethernet interfaces that you will use on each device.
Figure 1 shows a chassis cluster flow diagram for Firewalls.
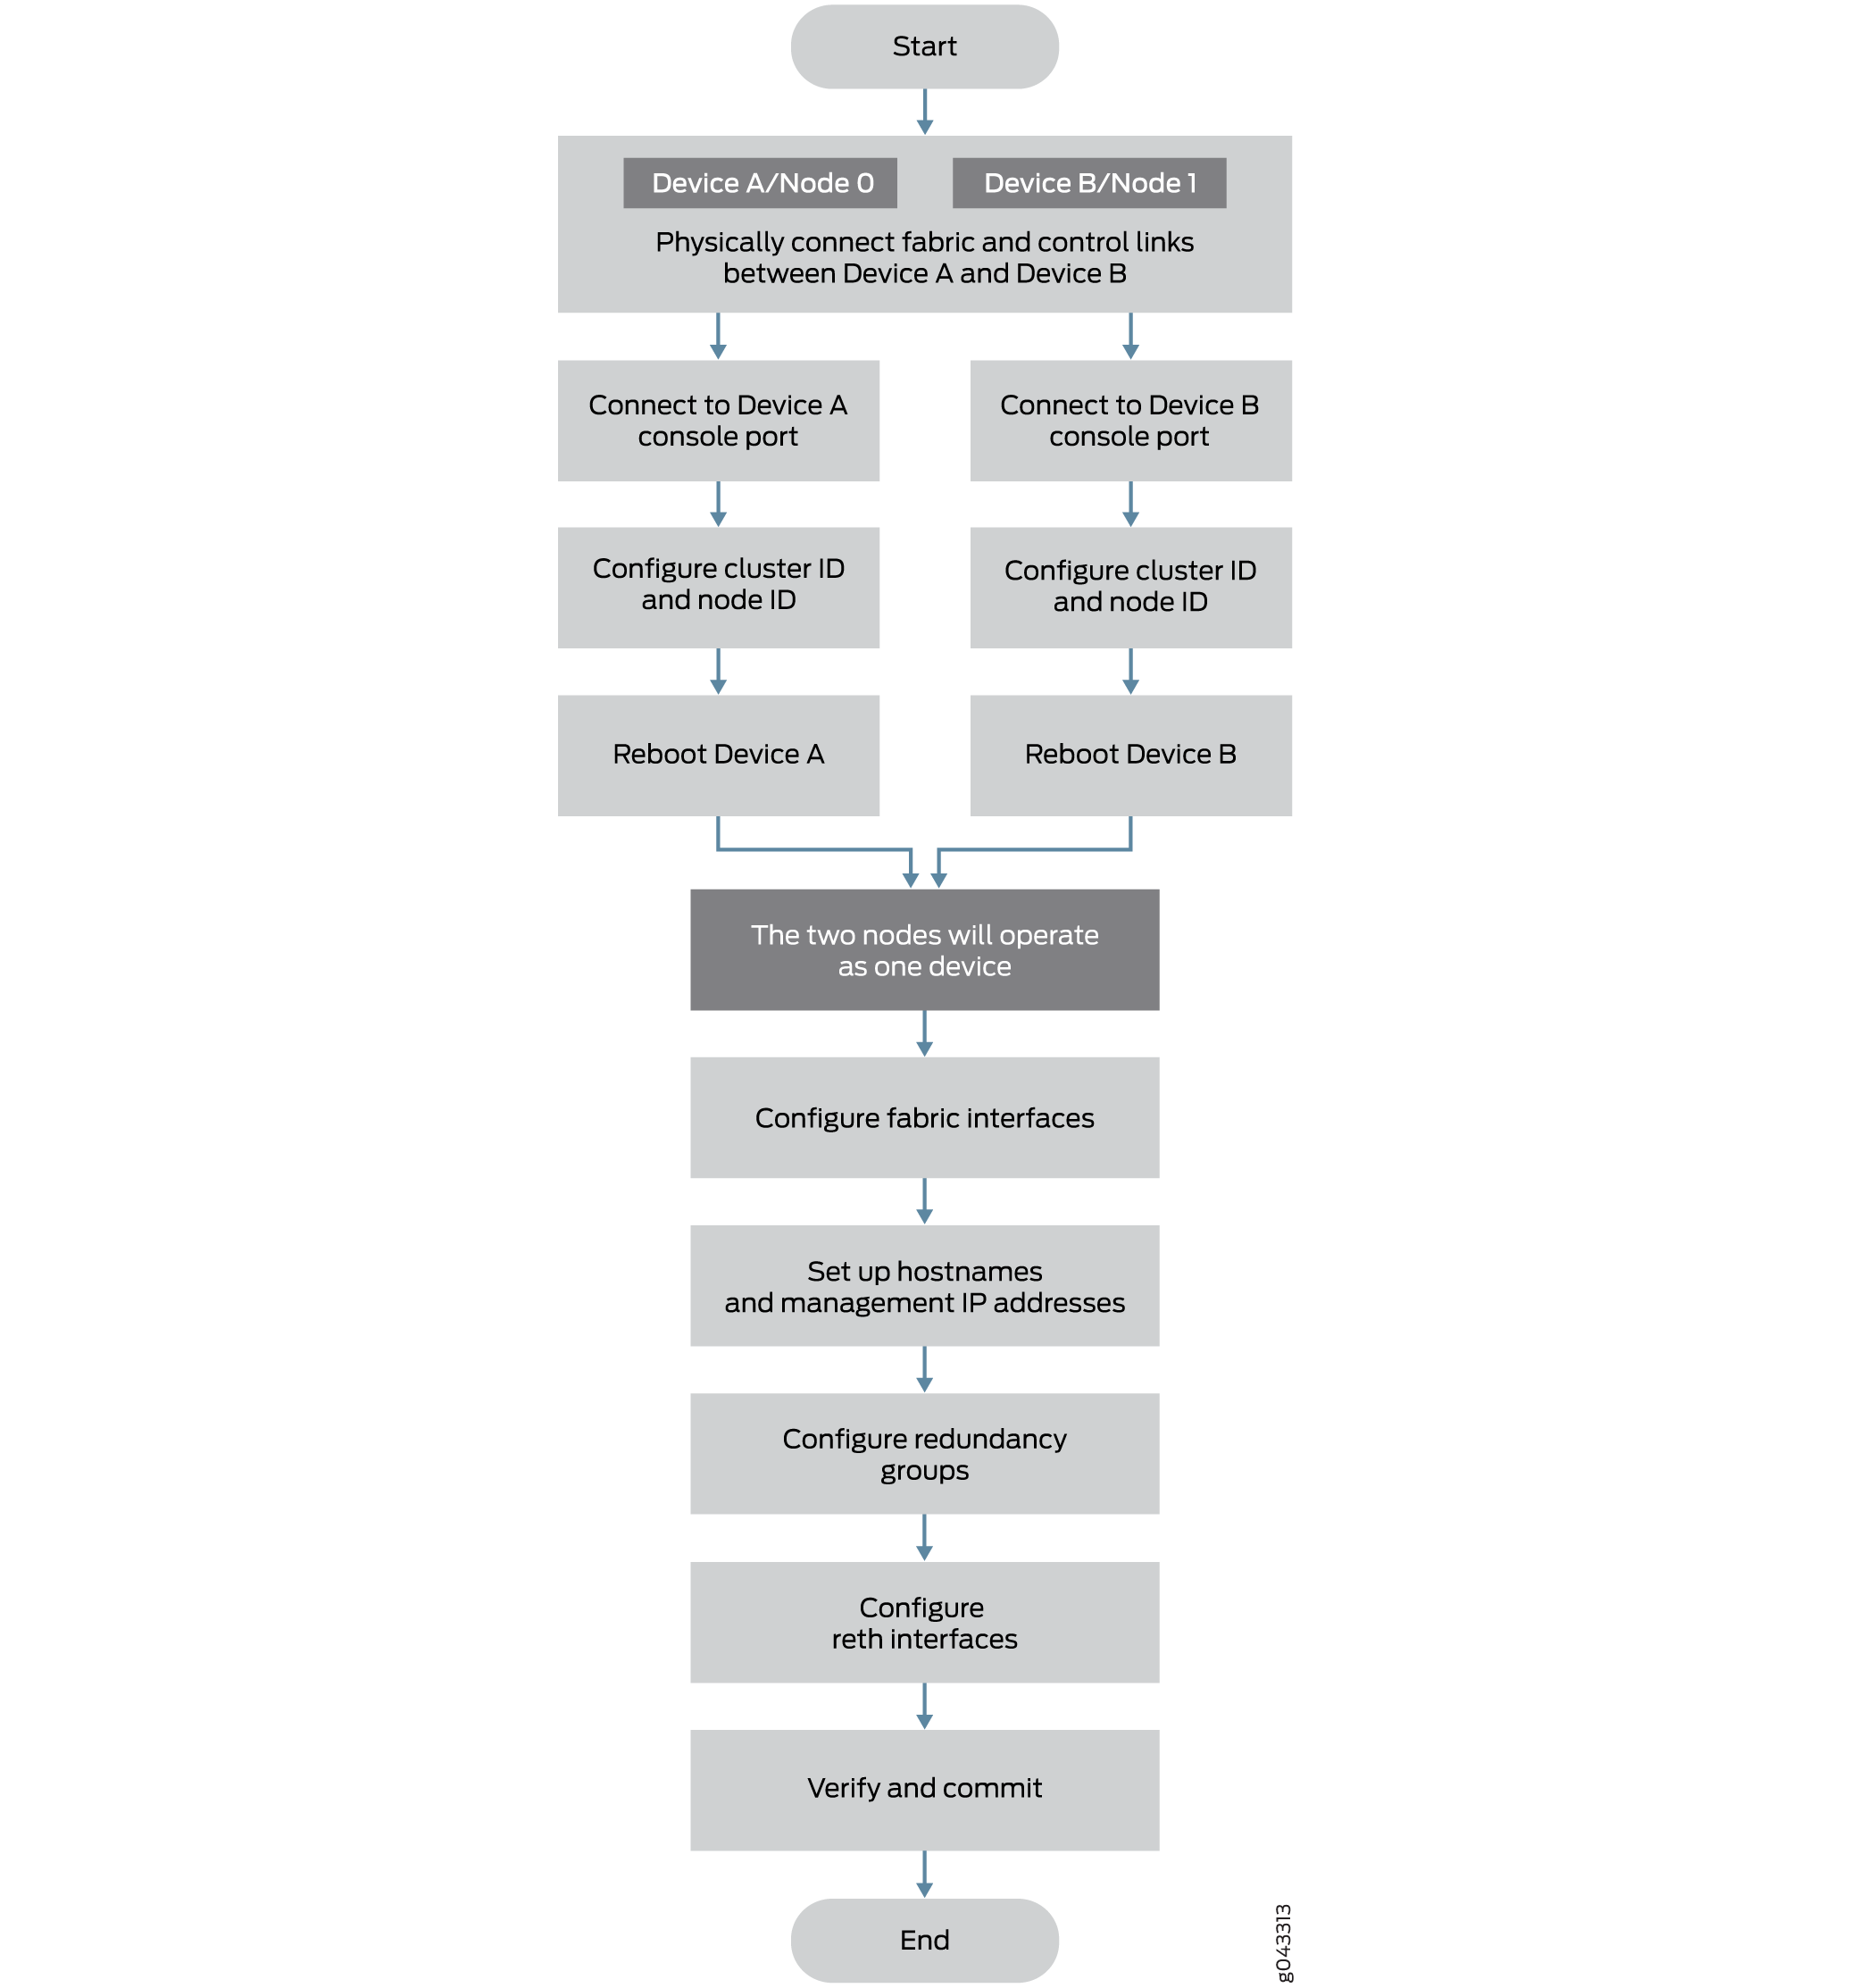
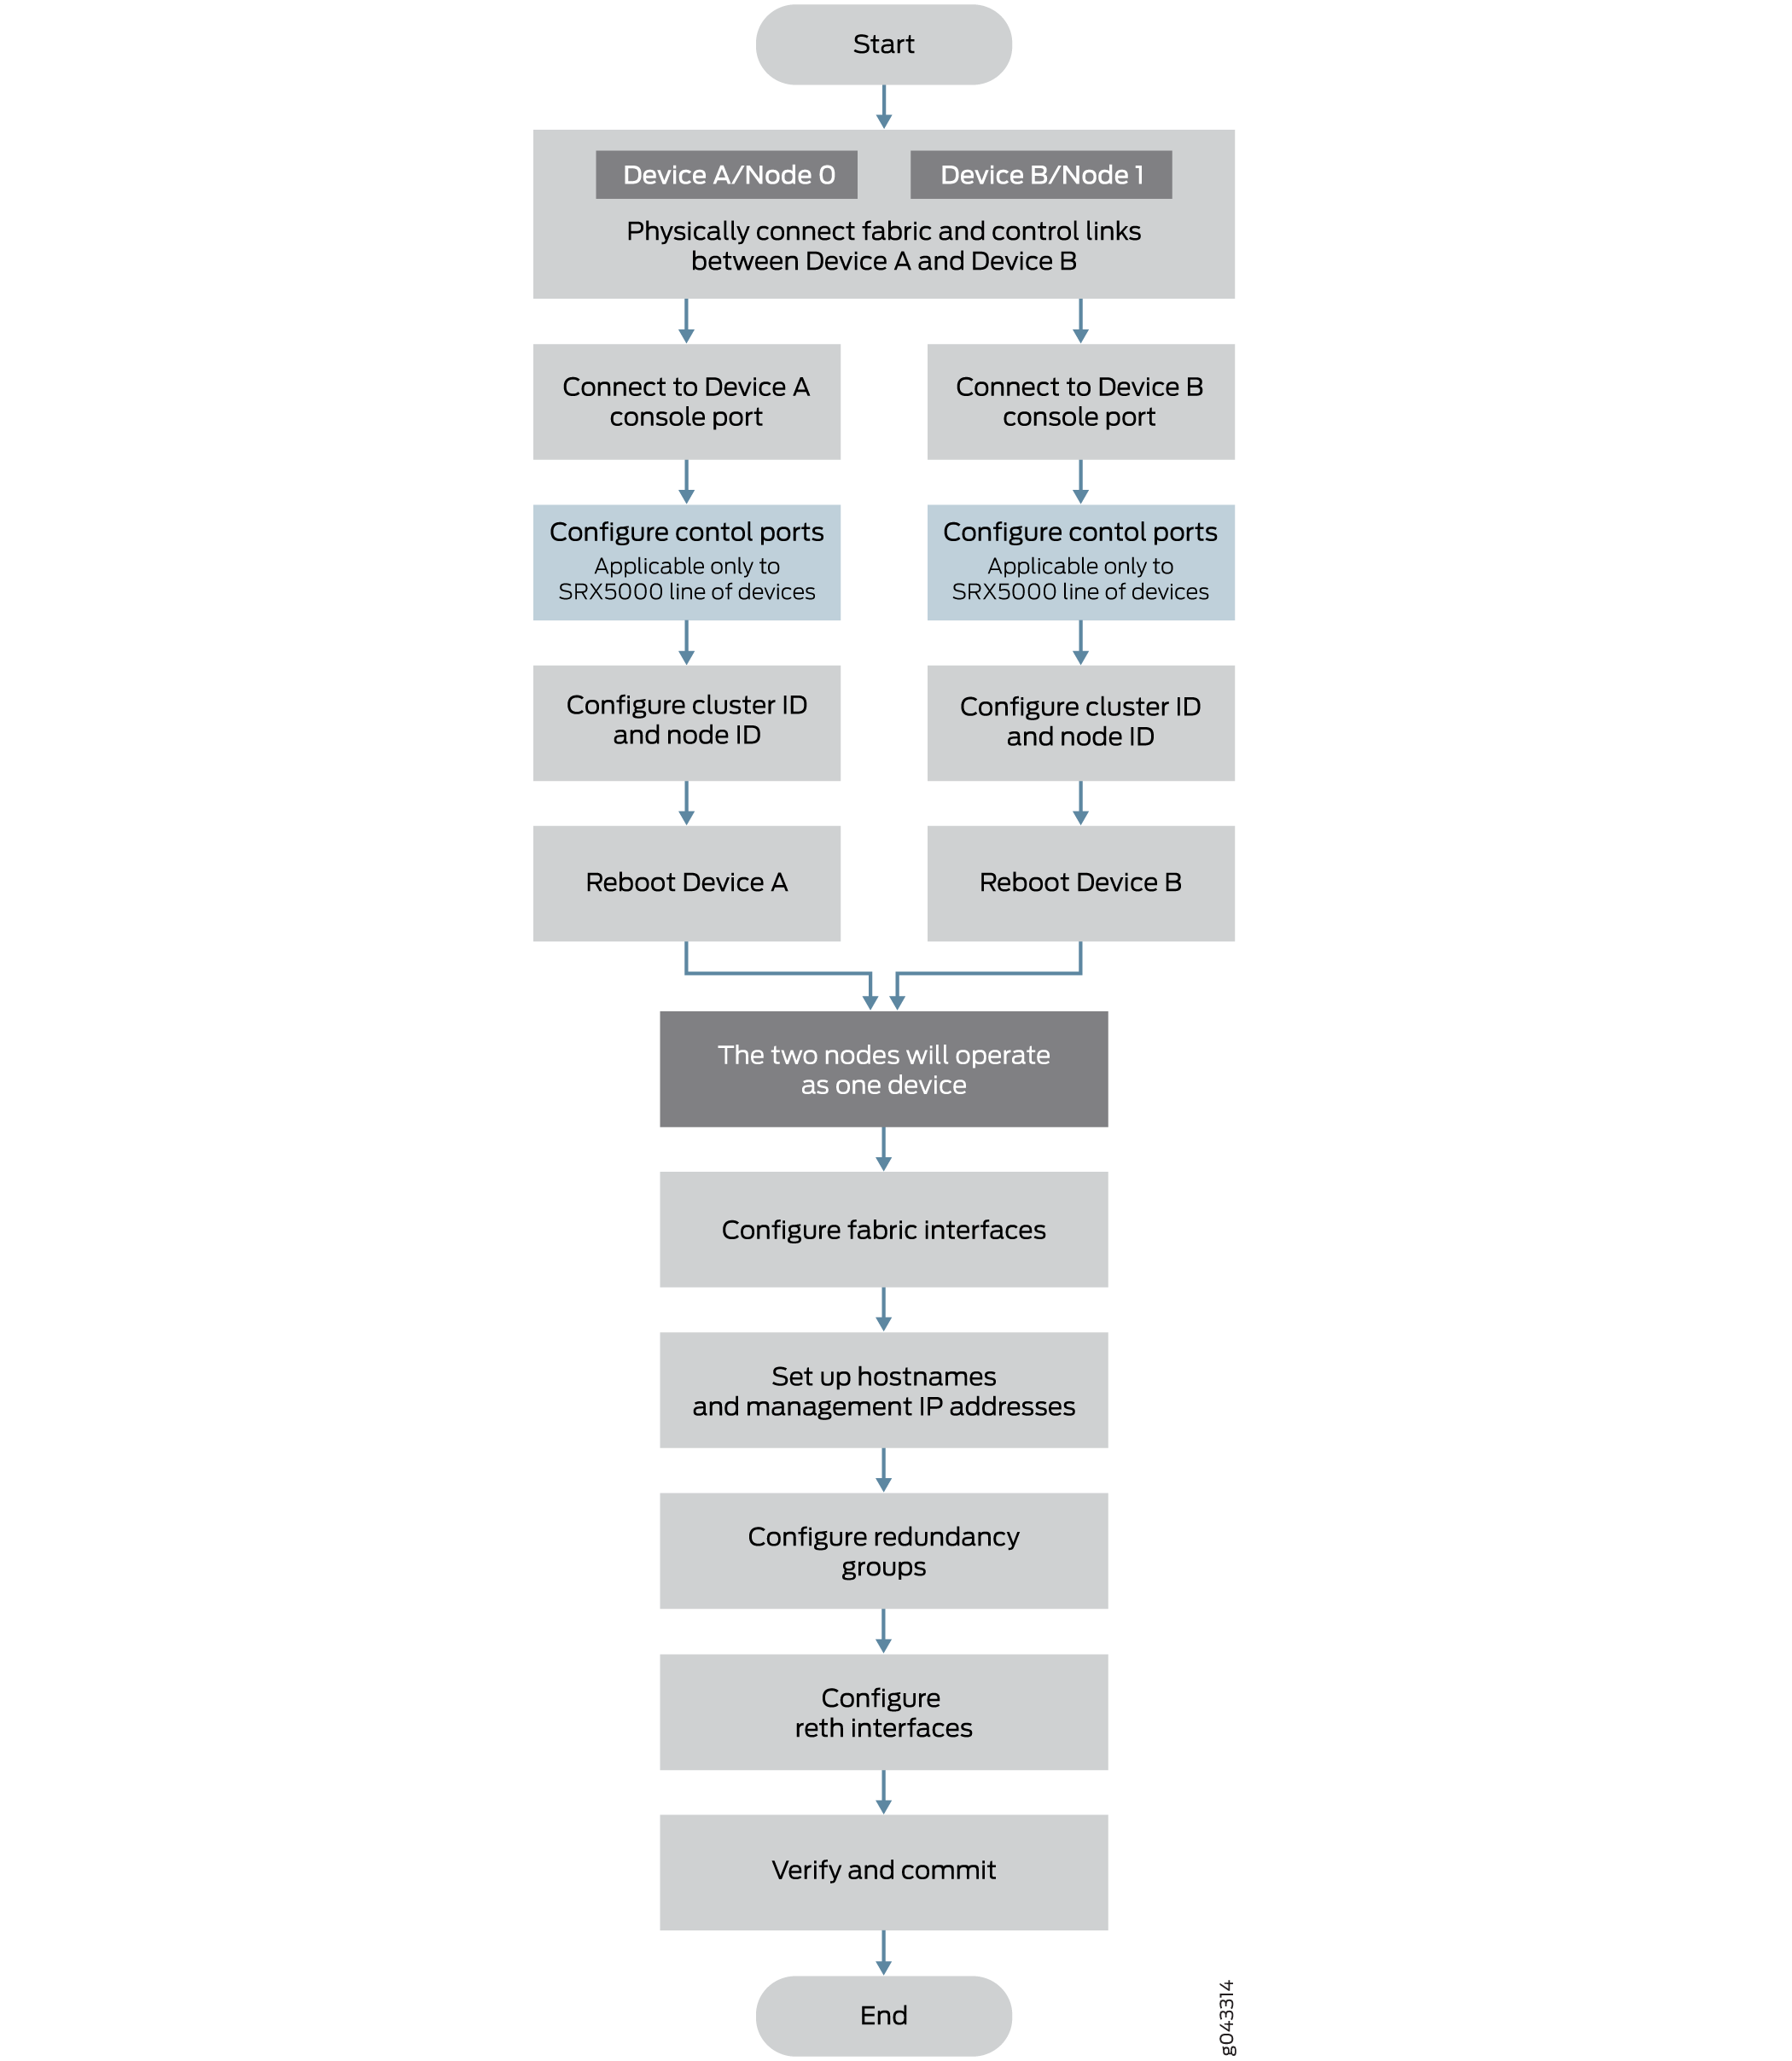
Create a Chassis Cluster
Use the following steps to create a chassis cluster:
Physically connect a pair of identical, supported Firewalls. See Connecting SRX Series Devices to Create a Chassis Cluster.
-
Create the fabric link between the two cluster nodes by connecting any supported pair of Ethernet interfaces. On most Firewalls, the only requirement is that both interfaces are Gigabit Ethernet or 10-Gigabit Ethernet interfaces.
If dual fabric links are used, connect two pairs of Ethernet interfaces on each device. See Understanding Chassis Cluster Dual Fabric Links.
-
Configure the control ports on SRX5000 line of Firewalls. See Example: Configuring Chassis Cluster Control Ports.
-
Connect the first device to be initialized in the cluster to the console port. This device becomes node 0 and forms the cluster. Use CLI operational mode commands to enable clustering:
-
Identify the cluster by giving it the cluster ID.
-
Identify the node by giving it its own node ID and then reboot the system.
See Example: Setting the Node ID and Cluster ID for Security Devices in a Chassis Cluster . For connection instructions, see the Getting Started Guide for your device
-
Connect to the console port on the other device (node 1) and use CLI operational mode commands to enable clustering:
-
Identify the cluster that the device is joining by configuring the same cluster ID used on the first node.
-
Identify the node by assigning it a unique node ID, and then reboot the system.
-
Configure the management interfaces on the cluster. See Example: Configuring the Chassis Cluster Management Interface.
Configure the cluster with the CLI. See the following topics:
- (Optional) Initiate manual failover. See Initiating a Chassis Cluster Manual Redundancy Group Failover.
- (Optional) Configure conditional route advertisement over redundant Ethernet interfaces. See Understanding Conditional Route Advertising in a Chassis Cluster.
- Verify the configuration.
When two nodes are connected in cluster, one node is elected as the primary, and its Routing Engine operated in primary mode. The Routing Engine on the secondary node operates in client mode. All FPCs in the cluster, whether located on the primary or secondary node, connect to the primary Routing Engine. FPCs on the secondary node communicate with the primary Routing Engine over the HA control link. If the cluster enters an invalid state in which two primaries are detected, the IOC receives trafffic from multiple primary Routing Engines and automatically reboots to recover from the error condition.
To prevent the IOC from rebooting, the secondary node must be powered off before it is connected to the cluster.
To preserve traffic on primary node while connecting the secondary node to the cluster, it is recommended to configure cluster mode on node 1 and then power it down before physically connecting it to the cluster. This approach prevents any impact on the active primary node.
This precaution is necessary because the control networks used by a high-availability (HA) cluster differ from those used by a standalone system.
When the control ports are connected, both devices join the same control network and begin exchanging control messages.
Restore a Backup Node
This section provides an overview of the steps required to restore a backup (secondary) node after a failure, when the primary node is already operational.
-
Connect to the console port on the other device (node 1) and use CLI operational mode commands to enable clustering:
-
Identify the cluster that the device is joining by configuring the same cluster ID used on the first node.
-
Identify the node by assigning it a unique node ID, and then reboot the system. See Example: Setting the Node ID and Cluster ID for Security Devices in a Chassis Cluster .
-
-
Power off the secondary node.
-
Connect the HA control ports between two nodes.
-
Power on the secondary node.
-
The cluster is re-formed, and sessions are synchcronized to the secondary node.
See Also
Platform-Specific Chassis Cluster Prerequisites Behavior
Use Feature Explorer to confirm platform and release support for specific features.
Use the following table to review platform-specific behaviors for your platform.
|
Platform |
Difference |
|---|---|
|
SRX Series |
|
Platform-Specific Chassis Cluster Formation Behavior
Use Feature Explorer to confirm platform and release support for specific features.
Use the following table to review platform-specific behaviors for your platform.
|
Platform |
Difference |
|---|---|
|
SRX Series |
|
Additional Platform Information
Use Feature Explorer to confirm platform and release support for specific features.
Additional Platforms may be supported.
|
Platform |
Slot Numbering Offsets |
|---|---|
|
SRX5800 |
12 (for example, fpc3 and fpc15) |
|
SRX5600 |
6 (for example, fpc3 and fpc9) |
|
SRX5400 |
3 (for example, fpc3 and fpc6) |
|
SRX4600 |
7 (for example, fpc1 and fpc8) |