Demo - Deploying Campus Fabric at Scale with Juniper Mist


Hands on: Deploying a campus fabric at scale with Mist.
This demo by Juniper’s Rohan Chadha takes you step by step through the process of deploying a campus fabric. You'll learn how to build a pod, add an existing network, use templates to import and reuse VLANs, segregate networks into different routing tables, and select different ports between different devices.
You’ll learn
How you can deploy a campus fabric in five simple steps
How to choose the campus topology to construct and configure related options
Who is this for?
Host
Guest speakers

Transcript
0:08 Rick my name is Rohan and Rick's going to be controlling the screen yeah so
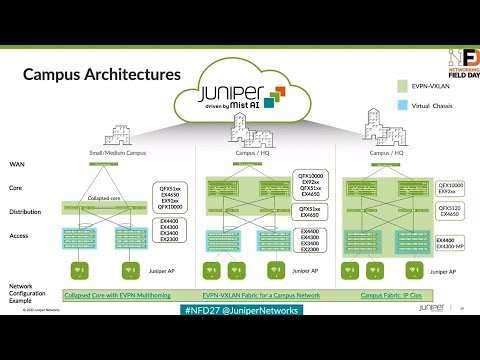
0:13 here's the architecture real quick folks this is this is a lab hosted out of our Sunnyvale campus a couple miles down the
0:19 road uh we have our five stage cloths so very popular in in the concept of Campus
0:24 fabric so a couple of axis switches terminating v-teps vxline tunnels on our
0:29 4400s okay we have our layer 3 boundary at the axis layer and then we've got a lean distribution layer at the 5120 just
0:36 very high speed router in and out equal costs multipath qos and then our core which is a 9204 is acting as a border
0:44 Gateway so it's terminating vxline tunnels and talking to a Northbound SRX firewall in a cluster
0:50 okay so that's what we're going to build so let me pop out of here
0:55 awesome so so we have uh the two ex9200s uh we are no longer in the business of
1:01 just access switches you know we've transitioned from our small pizza boxes
1:06 ex which is all the way to modelers which is ex9200s gear fix 10ks you can
1:12 onboard them all of those are cloud ready devices so ztp works as flawlessly
1:17 as it would work on a pizza box right so I'm going to go ahead and bring up a
1:24 session into our virtual desktops here right so we have new desktops connected
1:29 to each of the two axis switches these access switches think of them as idfs we
1:34 have an access point a missed AP connected to one of the desktop one of the access switches and in this demo
1:40 we'll be focusing on a standalone access switch but they might as well be a a stack you know like maximum you can do
1:48 10 members so the the latest ex 4100 that we introduced over the summer that can do up to 10 members in a stack so so
1:56 you you might as well use that in in the access foreign
2:12 ourselves for the demo uh we'll basically be talking about we'll be
2:18 showing you uh all topologies today as Rick was mentioning earlier so here what we have on the screen are
2:25 are six different nodes that you know we showcased you earlier uh these will be a part of the fabric two course two
2:31 distributions to axis and um Rick do you want to jump into the
2:37 campus fabric uh here so basically we want to what we want to show you today is is how seamless these things are
2:44 right we don't if we don't we don't we don't claim to be the first ones to do
2:49 this in the industry but what we do claim is that it's brain that's simple literally anyone can do it as long as
2:56 you provide it's just a basic values like vlance and do you want to segment your network it's just step by step five
3:02 steps and that's pretty much it so Rick before you jump into the organization level I want you to go back to the uh
3:08 the site topology uh
3:14 so what we have here are two kinds of topologies octopologies and site topology so so you had a question
3:19 earlier can you do ipclow GBP on site volume yes nothing changes a site
3:25 topology is a site it's a fluid concept right think of this Santa Clara Hilton as one site right you can run an IP
3:31 clone Network in this but what if you had multiple Hilton buildings
3:36 you know there are probably you know in a in a radius of five miles with each other and you have two core devices and
3:43 you wanna have each Hilton as one pod that's what we're trying to achieve through octopology so when we came here
3:50 last year when we met with the delegates uh we took some learnings we took some learnings from the customers so we
3:55 transitioned from not only just site topologies but we added a layer of arc topologies on top of that so Rick if you
4:02 don't mind clicking on site apologies for me I just want to share the three options that we have Within
4:07 within actually configure yeah configure campus fabric so we so we showcase you
4:13 three topologies EV pin multi-homing for the you know the small use case
4:18 um you want to transition from a proprietary technology you're going to transition from a plain L2 span entry
4:25 technology or an MC lag evpin multi-humming is for you so you have two devices in collapsed code and then a
4:31 bunch of access layer that's not running EV pinwxlan then we have campus fabric
4:37 code distribution and IP Club So within site topologies you have all three options but our Focus for today will be
4:42 octopologies but I just wanted to sort of differentiate there that it doesn't really matter all topologies are built
4:49 for scale so here you have two options uh topology types one is campus fabric core distribution we've spoken about it
4:56 multiple times already um you know if your your core and distribution
5:02 um in campus fabric core distribution are running EVP and vx9 but your access is is plain vanilla running just pure
5:09 lacp so um if if you have and that's where that's where the boatload of what the
5:15 devices are right so you can have those access devices as non-juniper devices and that is campus fabric code
5:20 distribution the last one is ipclow which is uh the the focus for today and
5:26 uh all of these devices will be running EVP and weeks then you're extending your vxlan all the way to the edge so your
5:31 cameras your your your your your wired Network everything your access
5:36 points are connected to the to the access devices uh two options here uh routed a
5:42 distribution a routed Edge by default we're routing at the edge at the axis what does that mean well the gateways
5:48 for those n hosts for those APS for those desktops are at the edge but as Rick mentioned earlier if you
5:56 have devices at the edge that are you know that cannot scale to an extent let's say you want hundred
6:02 thousand clients uh your access devices may not scale so you can move the gateways and Notch up to uh distribution
6:10 and you can have the gateways for those n hosts at the at the middle layer which
6:15 is the distribution uh topology settings a very standard uh what's the what's the bgps uh we use
6:22 that for underlay and overlay you can do two byte or four byte and then very important subnet again all of these
6:30 values are default you don't have to change it uh if you wouldn't like to most customers do not but it's totally
6:37 up to you the subnet is essentially uh you give us one subnet we take that and
6:42 slice into multiple slash 30 ones for your underlay IP addresses so today we
6:47 are going to show you six devices you might as well do 60 and you don't have to worry about any of your underlay IP
6:53 address peering there just a quick question uh AJ Murray here
6:58 um for for this demo and for any deployment are these switches clean out
7:03 of the box they are to do any bootstrapping they are absolutely so one one thing that we're not showing you here but that doesn't change anything is
7:10 all of these devices are cloud-ready devices as I said right so you literally take out your mobile app missed AI app
7:16 scan the QR code and just you know onboard them that's pretty much and once
7:22 they're on boarded you're not touching them you're not doing anything uh on those devices you're not adding a single line of configuration in there they are
7:28 basically in non-configured mode so you're not by default they're not managed and and you can go hit apply the
7:36 configuration review the configuration and then maybe apply manage configuration what's also important to
7:43 understand is that the the devices just need to be part of the organization they actually don't have to be online so if
7:49 if in in the world of supply chain where you know you might not be able to have the devices uh readily available as long
7:56 as they've been pulled into the org you can build the fabric so you could have your templates built you could build the fabric and you apply it when you're
8:02 ready right so they they don't actually don't have to be online for this function to
8:07 work and and I'll touch upon this point in a second again uh but here uh you
8:13 know playing that simple select two core devices and then we're talking all topology so we're talking pods right a
8:20 pod is essentially one site one building um it is realistically not possible to
8:28 have 20 buildings 20 sites and have the access connect to all the distribution
8:34 devices in those 20 sites because that's not how you scale right that's what the Pod concept comes in right so you're
8:41 connecting two axis devices or 20-axis devices all you have to worry about is
8:46 just peering them up to the distribution in that pod in that site so as an
8:52 example I gave earlier in this Santa Clara Hilton you're connecting your idfs to your mdfs and that's pretty much it
8:57 you're not spanning them across the campus so give it a name assign um
9:05 select two distributions we will start with one axis and then we'll we'll go from there
9:10 uh Rick can you show us the service block here on this Hub yeah if you if you scroll up we spoke about service
9:17 block earlier so what what exactly is service blocking why do you need it right well service block has traditionally been a data center concept
9:23 right we are expecting these core devices to encapsulate and decapsulate the traffic
9:28 remember we talk about vxline headers so when the traffic actually hits the axis it is encapsulated the plane Layer Two
9:36 packet is encapsulated in a vxline header that header is Decap has to be decapsulated somewhere if you're talking
9:42 public internet right that happens by default on the core right so you're
9:47 talking everything or you're basically talking all the load on the core devices but if
9:52 you want to offload that if you want keep the core devices lean we call them
9:57 lean spines in the data center world uh you want to keep them lean you want to offload that functionality over to
10:03 another uh pod or service block you can have up to two border leaves there so
10:10 Rick if you click on them it doesn't change anything on select switches um
10:16 it doesn't change anything from a customer's perspective they're just selecting two more devices as a service
10:21 block we take care of all of the configuration that means that is meant to be on the on the border leaf and uh
10:27 that exact that exactly just leaves the core devices as lean they're just responsible for passing traffic between
10:33 between the leaf devices and between the end host right but to keep things simple we're not going to do the service block
10:39 today and and we're going to proceed with uh with what we have right now step three
10:45 configure your networks tell us what uh VLAN definitions you have right there are there are two ways to go about it a
10:52 a very simple way is to build a template uh outside of the campus fabric workflow
10:58 and we'll show you how simple that is build a template configure as many vlans
11:03 as many networks as you have there and then reuse them in as many places as you'd like right so that's exactly what
11:09 Rick did here he clicked on ADD existing Network import the vlans or you can go
11:15 and create new networks and go from there um one thing that you would have noticed
11:21 is that um there's there's a Blog called other ipconfiguration we're not asking you to
11:27 do any IP addressing all we're asking is just give us a subnet we take care of the IP addressing so your IRB svi is as
11:35 they call it on your uh so so your n hosts need a Gateway those gateways right now where
11:42 because we told them route at the axis at the edge we automatically do the IP addressing
11:48 for you all you gave us was a subnet so if you click on vlan1033 rig for me
11:55 you provided a subnet there um and and that's pretty much we took care of the IP addressing so we are
12:00 doing any cast IP addressing which is basically one IP address on all the leaves in the axis so we're
12:07 saving you the address space right so think if you had 254 axis leaves we're
12:13 not consuming a slash 24 we're just taking one IP address for VLAN 10 as an example and spanning
12:19 that across the entire Leafs all the leaves and if and if you had different if you use a DOT 254 as a gateways
12:25 versus dot one you could change this yeah as well you have full control over that uh but
12:31 for most of the users do you worry about that probably not so uh we're doing some
12:39 defaults for you but we you can come and change that the last and final step here is vrf do you care about segmentation on
12:45 your network on a layer 3 level right we're not talking micro segmentation we're talking segmentation between vlans
12:51 right think of a of a healthcare environment privacy and securities of the utmost
12:57 importance right we really want our corporate traffic to be segmented from our guest traffic right
13:04 um if you've if anything you've gone through Juno's configuration you can understand it is complicated because you
13:10 have to add interfaces you have to add vlans we're making it simple for you just create an instance add different vlans
13:17 to different instances if you'd like to add extra routes to it um like a default route or something
13:23 that option is available for you as well in this case uh we are routing between the the campus Fabric and the firewall
13:31 right we're using bgp to route but if the firewall was the default router for the entire subnet for the for the
13:36 network which is very possible that that layer three boundaries at the firewall we would just put the default route here
13:43 and just pass the traffic up through as Layer Two yeah
13:49 last and final step right each step leads to the next one and as I said earlier it's it's it's
13:55 pretty simple right so in this step we're asking you to basically tell us how your connections are right uh you've
14:03 built the core distribution and axis you've wrapped and stacked them so there are two ways to go about it one is what
14:10 we have here we have the devices in the lab we've racked and stacked them Rick knows how the cables are connected so he's plugging in the the ports right now
14:19 the other way something that we touched on upon earlier and I'll go back there is supply chain problems right we we've
14:26 gone through them for the last two years right let's say you purchased Juniper gear you purchased uh you you had a
14:33 purchase order what you get on that is an activation code for the entire order you plug that into the missed dashboard
14:39 what it does is brings up 6 or 60 how many devices you had it creates an
14:45 instance of each of those devices with that exact platform so while the devices haven't even shipped
14:51 you can come ahead and build a fabric and because the the fabric isn't even
14:58 dragged and stacked you can choose your own ports whatever you'd like you can do that and then once the devices are
15:05 shipped and racked and stacked you know you can hit apply configuration and go from there
15:10 last step verification pretty standard right
15:16 Rick can you actually go and uh start the Ping from
15:22 the desktop to to um access to it yes sure
15:27 from an access layer standpoint in device onboarding are the are the ports essentially the the device facing ports
15:35 are they essentially unconfigured and then when the device gets onboarded if you're using radius or whatever it'll
15:41 push whatever VLAN and Etc absolutely okay absolutely so uh the
15:47 uh end device facing ports can be configured using chemicalization uh we spoke a little bit about Dynamic Port
15:53 configurations uh in in the in the start of the session where we said if there
15:59 are devices that we can identify we can put them on the right configuration for you automatically uh we can go into the
16:04 switch templates uh briefly in our breakout session as well so this will help you bring the fabric up the
16:10 templates are already built and that can either be your standardized saying my ports one to ten our AP ports 11 to 20
16:16 camera or you can say whenever you you see this condition give it the camera so
16:22 yeah that's what I was wanting I've got it yeah so as we saw here if you show us the the secure CRT there before the
16:30 configuration was pushed Rick here is trying to Ping from his desktop which is already hooked up to the access switch
16:36 that we just brought in to 1.1 right uh we saw that the pings weren't working
16:42 all the configuration from the core to the distribution to the axis was push
16:47 the only thing that we did not show you here that something that we already predated and we will review the configuration was the configuration
16:53 between the core and the the router itself the MX router which is something we can show you all of that is again
16:59 done through the through the UI no CLI configuration required here at least for all the devices that are managed by for
17:06 the fabric right so we can see here that you know the the desktop 2 can ping the the internet and at this point uh what I
17:14 want to showcase is Rick if you click on the axis 2 for me uh on on the on the uh
17:20 the configuration can we if you click on access if you scroll down so click on access to and scroll down we
17:28 can see the the bgp uh neighborship all of that is established you can see the the the stats here uh you can log into
17:36 the remote shell so for all the CLI Savvy users we don't stop you from logging into the shell you can click on
17:42 the remote shell you can do whatever you'd like right from the missed UI and as you can see here
17:48 um of course bgp is up and running uh can you do a show configuration pipe display inheritance pipe display set and
17:55 we want to show you all the configuration that was pushed through the UI without the user typing a single
18:01 CLI statement in there all right let's go to the other switch here if you want to do that thank you nope no problem
18:09 um we also have an AP connected to access one so we're gonna we're gonna pull access one into the build we've got access to build
18:14 access to is pinging the internet routing through the fabric we have an AP that's connected waiting
18:21 for accessibility so there's a full stack because we also have by the way our our SRX managed right through
18:27 through the so it's a full stack type of approach here we don't spend a lot of time on SRX here um you know that is our our Wan
18:34 Assurance product obviously um but if you want you want me to add second access right so can we review the
18:40 configuration and I just want to showcase uh everything that a user did not have to
18:46 touch upon so if you click on access to do a download generous config you can download the junos config from from the
18:52 uh you know from the UI and and we can review the configuration that was pushed
18:58 um over into the device through the missed UI so if you if you expand that if you just maximize that screen here uh
19:06 we see all of the you know the underlay configuration we're using uh evpn for
19:12 your control plane we're using vxlan for your data plane uh the IRB configuration IRB svi the routing instances the
19:20 policies a user didn't have to worry about all of that stuff here uh if you scroll down to the bottom we
19:25 have the vlans and the VLAN definition so as a user for the 80 percent 70
19:30 percent use case do you care about what's your VLAN to vni mapping is can we make things so simple that anyone can
19:36 actually go and spin a fabric that was our entire agenda and and that's that's what exactly what we show you here so
19:42 we've added one axis switch now what we're going to do as as the second thing is uh go add another access switch so
19:50 this is a day two operation right Network needs grow and you want to go add a new access switch you want to add
19:57 a new new new let's say new VLAN so
20:03 can you add Rick can we can we create a new network let's call it uh let's call it uh NFD let's give it a
20:12 let's give the VLAN ID 200 and let's let's give it a subnet um
20:17 200.1.1 0 24. this is the the other way of creating networks the the first way
20:23 we showed you using templates
20:29 and notice how it automatically applies the configuration to both devices right
20:34 if you click cross on that and let's hit continue
20:40 and uh We've selected a new access switch here let's just cable them up and
20:46 uh life will be good after that we hope we also want to show the connection
20:51 table absolutely so um as I was speaking earlier your devices let's say haven't even shipped
20:58 right you've built a campus fabric topology here what you can do is you can
21:04 build a fabric here cable them up send it to your installers in the
21:09 wherever your your physical Network environment and uh download a connection table from
21:15 there and you can send them the CSV file that basically tells them
21:21 how to connect the devices perfect perfect for the you know building the building the fabric without
21:27 the the systems online build the fabric hand the hand the Excel spreadsheet over to the deployment team and we're good to
21:33 go right absolutely so now let's look at the axis one that we just connected and
21:39 let's see if the access one all the configuration that was needed has been applied oh look at that that's good timing is that access one or is that
21:45 access two this is access two this is access to can we can we ping uh from
21:51 access to to access one sure we should be able to which is which is desktop one by the way
21:56 that's connected to to access one so it hasn't oh it has it is it has come up and as we can see it was as seamless as
22:03 that plugging in a access switch at any point and everything's working at this point right
22:09 um yeah so this is access one talking to
22:16 access two now let's now we all of course spoke about the campus fabric configuration but you know it's really
22:22 important for us to show you how do you actually route to the internet right the configuration from the fabric all the
22:28 way to the to the to the van or to the firewall sorry can you take us to core one and core to uh configuration uh
22:36 switch detail page and we want to show uh if you scroll down to the bgp section
22:42 there we want to show you some UI configuration that we we predid
22:47 before we came here so we have the bgp neighbors here so if you click on any of them all of that is is built in the UI
22:54 the routing policies are built in the UI again this is between the core and the van or the core and the SRX right so all
23:03 of the routing policies are built in there uh everything that we sh you know we showcased you goes through all the
23:09 policies there and um yeah that's that's pretty much it from a fabric perspective so you can see
23:15 the fabric the entire campus Network came up and this was us building uh one
23:21 quad but Rick if you take us back to campus fabric there for a second again foreign
23:34 configuration and let's take us to the final step there in which you basically can span new pods
23:42 as you'd like right so you can build a new pod you can
23:47 build new access switches and doesn't really require a lot of effort from
23:53 our perspective okay quick question on this Demo's all
23:58 the V4 I heard V6 before what's the state of V6 in all of this V6 is uh
24:05 we're actually relatively good shape with V6 so underlay full underlay support for V6 full overlays for overlay
24:11 support for V6 um MLD a modicum of V6 multicast that's where
24:20 we're spending most of our time this year in V6 multicast in the overlay all right so standard V6 underlay V6 overlay
24:27 yeah fully supported and getting some additional capabilities around multicast yes okay yep
24:34 yeah we're beginning to see uh much more V6 now in the Enterprise believe it or not yeah I don't bet you guys but we're
24:39 beginning to see that I wish I was I can't say I'm seeing the same thing well I think it depends on on the use
24:47 case but yes you're able to log in to the command line as well and you ran some show
24:53 commands there are you also able to to modify your configuration at the command line absolutely so the recommendation uh
25:01 is that you use uh for all practical purposes everything that you need is
25:06 delivered from the cloud uh that you can do all the show commands troubleshoot debugging Trace logs to name it uh the
25:13 recommendation for you is for you to be able to run all the commands uh directly on the cloud the good news is every
25:19 single switch detail page that you have all the way at the bottom of the screens let's say you have a knob that we have
25:25 not turned on on the UI uh for example I think we've given new bft timers let's just say for example that you did not
25:31 have and you want to implement it you have a way to push that CLI directly from the from the UI so it's still one
25:39 source of Truth uh this is primarily run for whenever you're running really large campuses you can start deviating very
25:47 easily and that becomes a very big problem to manage and maintaining one
25:52 source of Truth is primarily where we're getting to but you have the option to push whatever CLI you would like to
25:57 through the UI yeah I did want to ask that too if somebody if there is a setting that is available in the missed
26:04 Ai and somebody just goes in and changes the configuration on on a switch port I'm assuming that then that
26:10 configuration will then reflect in missed AI that that change has been made or yes we absolutely tell you we have a
26:17 way to say that this was CLI driven and it'll be nice and red for you to see this was not done by you somebody done
26:24 from out of band if you were considering Us in band and that's that's visible not
26:29 only on a per switch level but on a per site level so you can see which switches are deviating from uh your standard of
26:35 config and then as a follow-up can you have remediation policies in missed AI
26:40 so you know that you don't want somebody to make a configuration change via the CLI on something can you oh from that
26:48 yeah right Administration uh we have really granular uh uh you know our back
26:54 or roll back not like role-based yeah policy Administration we also introduced
27:00 a a unique role let's say for example uh you wouldn't want people who are just
27:06 touching your layer two switches to change the config on on a put a board basis to go make changes to the core for
27:11 example there is a unique role it's called Port admin all they can do is
27:16 they can go administer ports that are allowed by you as a super admin let's say you don't want them to touch the Uplink ports even on the apps going to
27:22 say that right so we we and this was again some of it uh was our thought
27:28 process but most of it is driven by customers saying I don't want them touching my Uplink ports yes I want them
27:33 access uh to the access layer but only to change a VLAN from you know a camera port to an AP Port but nothing beyond
27:40 that and that that's where we get to a granular place to solve the problems that are there in the field
27:46 okay yeah well the changes are synced then from CLI changes to miss changes no you
27:53 can do all of the changes directly from the UI CLI changes are reflected saying there's a change uh it should not have
27:58 been there and then we'll tell you that there's a problem that needs to be limited so this deviation from but hold
28:03 on what if the deviation was uh legitimate what do you do in the tool
28:10 you have this button to accept it or just oh kill it no you you just do a reconfiguration from the UI for it
28:17 so let's say whatever config you did uh you would want to be administered from the UI and you you want to be able to do
28:25 say the source of Truth is merged here so you reconfigure it from the UI if you think it's legitimate and warranty okay
28:31 but suppose somebody does not changed and it's legitimate once again so are you able just to take that piece of
28:37 configuration and add it to your template from that notification where you just have to go somewhere else and
28:43 copy and paste and then yeah now it's good not automated but you
28:48 can do it we'll tell you that this was exactly the line of config change okay if you're interested you can put that into this brilliant so would it be safe
28:55 to say once you're managing via the the UI you should no longer go go back and configure vs we'll configure that's
29:02 that's best practice that's what we would want to increase now what I do just personally what I do is if I'm in a
29:08 UI I'll throw a config against the device just to see if it works and then I'll roll it back so it's for for those
29:16 of us who like that who like getting into the UI it does take a little bit of time to to pull back and Trust Miss but
29:22 it is a single source of Truth so everything you could do from a configuration perspective is done through the Miss Cloud everything and
29:28 then it could be templates as well right so um so to follow up on that I think my
29:34 experience has been a lot of customers that the maturity of their the engineering and operations teams is and there's a certain degree of fear as well
29:40 moving from the CLI that they want both and so particularly in like a troubleshooting scenario you end up with
29:46 with you know some of the situations we talked about today where configuration change was made to a device that may
29:52 have resolved the issue and now is legitimate but if you're saying we can't essentially accept that in I now have to
29:58 recreate the same change from the UI and push it out how does that change mechanism take
30:04 place is there any potential downtime now going to be incurred by making that switch from from CLI to no okay no so
30:10 it's non-disruptive like the same config will be pushed Juno's understand it's the same config there'll be no I wanted
30:17 to uh actually uh after this because there are some other tools that you have a configuration template and you push it
30:23 to the device and the way that they do the changes that they do something like no config and then they Bomb It whole
30:29 thing again so then the OS units in this case is able
30:34 to do a smart div and then just put the things that needs right it's not that it's
30:40 going to bought me the whole thing again and then even if the Box will flick for two seconds doesn't matter but there
30:45 will be an interruption so the good news with us is we go through the process of commit and then commit confirm then uh
30:52 we don't the beauty of cloud you will see one thing is that there was a tiny
30:57 button called as configurable timer under the management section let's say we did a configuration we shot ourselves
31:03 in the foot and said we put the wrong subnet for your management address you lost connectivity yeah we will bring
31:09 back those because we're true Cloud minute switch right we don't you should never lose connectivity to the switch
31:14 whatever the case may be we will bring the switch back to you in whatever minutes you said is the configurable
31:20 timer by default it's set to 10 you can change it to five five minutes later the switch is back to the cloud your uh even
31:27 though there were mistakes happen and we'll bring it back and we'll say configuration failed with the last
31:33 config this was the reason can you please fix it it so you can we can actually write one okay so the way this happens is that the box is gonna well if
31:41 you have this two-stage commit system it means that it's going to roll back to the previous and configuration commit
31:46 that was working in which you had virtual related to the cloud that well it can be five minutes doesn't matter
31:52 but that's what you're gonna do then correct yes if it can't if it can't communicate with the cloud it's going to
31:57 roll back awesome I hate that oh let me just add two new lines of commands and
32:04 suddenly assume you have 1500 lines of commands because I have seen this is sure horrible especially be explained we
32:10 can go over that and you added probably two lines and then it's gonna vomit 1500 two lines of
32:18 comfort so actually I'm gonna get only two lines that is correct so one one thing that I
32:24 want to add going back to configuration management is that it is totally up to you if you want the device to be config
32:30 managed you can always turn it off turn it on the connectivity is never lost to the cloud and you know let's say you get
32:37 into a time where you want to do extensive troubleshooting and you want to make a lot of changes on the device turn off the configuration management do
32:43 whatever you want with the device just know that when you turn it back on the Mist is a source of Truth awesome
32:49 now this config so the config the way you push the conflict is it using navconf in which way are you pushing the
32:55 company towards the Box yeah thank you so I have such a question via
33:01 Twitter um so one of your competitors uses lisp to address endpoint Mobility is that
33:07 required endpoint Mobility for us you know it's a part of the bgp transaction so you can
33:13 actually see a bgp ROM from a wireless I'm assuming that's that's the use case that they're talking about to say there
33:19 was a room from uh you know vtep a to VTEC B uh how does v type B know about that and we type A knows and BCP is our
33:27 con list is a controller based again another control plane that sets to actually manage this we use a standard
33:34 space VPN to exactly do the same right so we don't we don't require a lisp no we don't require we just require the
33:39 standard multi-protocol bgp extensions when when Max move back and forth between locations type type 2 max