Jumpstart Juniper—Fundamentals

Get started with Junos® operating system essentials.
Ready to reduce new service deployment times and lower network operation costs? Watch this introductory course in Juniper Networks’ Jumpstart Juniper series on Junos OS learn how your network engineering team can simplify the network to become more efficient and effective.
You’ll learn
An introduction to Junos OS’s functionality, including basic configuration and operation
Powerful troubleshooting and configuration tips and tricks
Operating system and hardware design features and benefits
Who is this for?
Host
Experience More


Transcript
0:00 even as wired and wireless devices sort the network Edge today's business critical Services require more
0:06 predictable reliable and measurable networks users demand a seamless personalized experience based on user
0:13 type and location it's no longer enough to Simply keep the network up and running it's about ensuring a great
0:19 experience across the network for every user and network device addressing problems before clients are even aware
0:25 of them how is this accomplished with an AI driven Enterprise only from juniper
0:30 Mist Juniper Mist transforms the network experience and simplifies operations with artificial intelligence while
0:37 delivering on strategic initiatives with virtual Bluetooth location-based services and Analytics now you can
0:44 report when users or devices are unhappy or analyze traffic patterns through a retail store alerting shoppers with
0:50 location-based special offers in real time all network data is ingested into the missed AI engine for continuous
0:57 learning and Improvement and Marvis the virtual Network assistant is the Alexa for it teams Marvis helps keep the
1:04 network running seamlessly and simplifies troubleshooting with recommended or self-driving actions across the WLAN Lan Wan and security
1:12 domains this is true AI driven Enterprise for Wired and wireless networks Juniper mist
1:19 is leading a new era of I.T that uses AI to save time and money deliver unprecedented scale and provide
1:26 unparalleled user experiences let us know when you have 15 minutes to learn more
1:32 welcome to jumpstart Juniper my name is John Lusk and I'm with the
1:37 Juniper University Education Services Department
1:43 and today we're going to talk about Juno's fundamentals now Juno's fundamentals is the first course in a
1:51 three Core Series so we have Juno's fundamentals uh intermediate junos and
1:57 advanced junos and so you'll want to go through all of those to get the full
2:03 routing package from the jumpstart Juniper package on the routing devices
2:12 but in this course we're going to start off with just an intro to junos
2:17 so our agenda here is we're going to talk a little bit about our junos operating system and some of the
2:23 operating Concepts that go along with the Juniper Networks devices
2:31 so Juno's operating system goes across all the platforms whether
2:37 it's a switch a firewall or a router and so once you learn junos you can run any
2:42 of those devices without having to learn a new operating system there are some different commands with of course
2:49 firewalls and switching and different things but for the most part it's all the same operating system
2:56 uh when junos was first started it was started as a way to create a better
3:03 operating system for service providers the people who started it they wanted
3:09 they worked a lot with the service provider industry and they wanted to
3:14 come up and find a way to make it simpler to both change configurations
3:19 get back out of a configuration let's say you did something and broke something I wanted to be able to get it
3:24 back out and they want to be able to find the the configuration stuff quicker and better
3:30 and so junos as we go through this you're going to find out that it's got this modular software architecture it's
3:37 made to stay up it's made to you know heal itself if things go wrong like all
3:43 modern operating systems do today uh of course it works with high availability because we can't have a service provider
3:51 with his links to go down right and just say oh well we'll get to it when we can get to it that doesn't fly so it's all
3:56 high availability the it has configuration hierarchy so
4:02 when we go to configure this you we will find that everything is built into hierarchies so we have a hierarchy for
4:08 interfaces and all the interface information goes in there we have a hierarchy for protocols and all the
4:15 protocol information goes in there for like bgp ospf and all the other ones it's it's all in that one spot so if you
4:22 have a problem with with ospf you know exactly where to go to look to see where you might have misconfigured that
4:29 there's also a simple routing policy management they wanted to be able to
4:34 manage the routing policies uh for bgp for the internet and they made a very
4:39 simple but powerful way to to configure all of those for all the users
4:45 and so there's also an open and programmable automation built into Juniper or into Juno excuse me but we
4:53 won't get into that there's a whole course for Juniper automation uh later and we'll talk about how you can use
5:00 outside programs and inside uh programming languages on the junos
5:05 devices to automate your device so as I said
5:12 um there's one OS it starts in one place and then they split it up they put all
5:18 the additions they need to all the enhancements that they need to and they split that up one goes over to like the
5:24 ex the PTX the MX and the SRX they split that up between all the different groups and they add the code that they need to
5:31 add in but if you get any switch so if you get an ex like say uh 3300 switch
5:38 and a 4300 switch you know that if they're running the same version of code the same options will be on there it
5:45 makes it really nice to be able to keep track of that a little easier across your whole portfolio of juniper network
5:51 devices
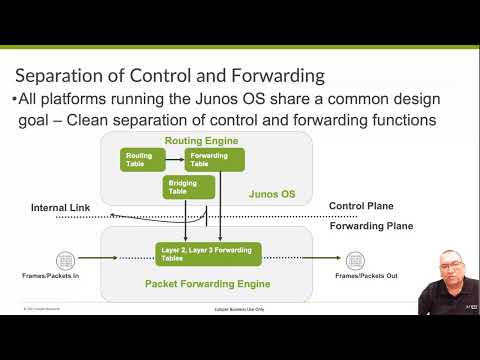
5:56 one of the great things that they designed back in the day to make this a great service provider router was the
6:03 idea to separate the routing engine and the packet forwarding engine because we could make Hardware that was
6:10 specifically designed for the packet 40 engine to make it move traffic faster and we can make Hardware specifically
6:18 designed for the routing engine to be able to have it uh do the route lookups
6:24 and figure out the route tables and things so as you see here in the little diagram we have this routing engine up
6:30 at the top and inside there we have a routing table and of course from that routing table we're gonna we're gonna
6:36 create a forwarding table and we see that the bridging table in the forwarding table they get created up
6:41 there in the routing engine get pushed down into the packet forwarding engine and that way we can move the traffic
6:47 along we don't have to go back up and talk to the routing engine at all
6:55 so again this routing engine it maintains those tables whenever something changes right a route changes
7:02 or a route uh packet comes in we got to look at it figure it out what are what
7:08 are we going to do with the routing we can go ahead and maintain those tables and recopy those or sync those back down
7:14 to the packet forwarding engine it also controls the the chassis so the
7:20 chassis contains all the wine cards it contains power supplies it contains fans
7:25 it contains all the different pieces to make this device work and that routing
7:31 engine is the device that manages and maintains all of that and then it manages of course the packet forwarding
7:38 engine it maintains those tables down in there so that it could quickly move traffic in and out of the device
7:49 so here's that packet 40 engine this is the muscle of the device this is what
7:55 we're talking about when we're trying to move traffic through the devices packet forwarding engine
8:00 and it's in most of the devices it's created in Hardware inside of an Asic so
8:07 that it's very quick when traffic comes in it quickly knows where to send it and pushes it back out never has to go back
8:14 up to the routing engine to ask it information what am I doing with this it already has all the information it needs
8:20 to pass the traffic that is there it also implements all the policing the
8:25 firewall filters and class of service and in the in the case of security it
8:31 also implements all the security features down in this pack of 40 inch engine again we never jump back up into
8:37 the routing engine to ask questions after it all gets set up and it's and it's running
8:46 so we need to make a distinguisher between between different types of traffic this will get brought up uh and
8:53 you need to know the difference here one of the things is called Transit traffic Transit traffic is the normal traffic
9:00 this is why we put the network together it's traffic that's going through the firewall so it comes in let's say from
9:07 the outside and goes over to web server and then back this is Transit traffic this is the usable traffic that we want
9:14 to use um so whenever we talk about Transit traffic know that this is traffic going
9:20 through the device not to the device the next type of traffic we call exception
9:27 traffic now exception traffic is traffic that comes in but it gets sent up to the
9:33 routing engine so it comes up to the routing engine gets processed and then gets pushed back down to the packet 40
9:39 engine to get sent back out some of these might be like icmp messages for
9:45 the ttls uh SSH all of your routing protocols would be part of this traffic
9:52 that goes back and forth so one thing we want to bring out though
9:58 is we have this interface it goes between the routing engine and the packet forwarding engine
10:04 and there's a built-in rate limiter on there and this helps us from a denial
10:09 service attack that might come and and try to take out the device so it's we
10:16 can I don't know if you've ever had that situation but if you've ever been in a situation where there's an attack on the
10:21 device even if you're on the console of that device the routing engine won't respond it's just it's just overran and
10:30 you can't get any processing done on it and what this does is it makes sure that however much traffic we send up into the
10:36 routing engine that it won't take that routing engine up to a hundred percent CPU utilization that Engineers have
10:43 figured out how much each box can handle and they've said that accordingly and when it goes in there and and runs it
10:51 never breaks let's say like 70 percent so that you always have enough processing power to get in the device
10:57 troubleshoot and find out what's going on to maintain the Integrity of your network
11:05 so junos started back in the 1990s and when it started out it was it was a
11:13 monolithic monolithic program um and it was a 32-bit program but it
11:19 ran on top of FreeBSD and because of FreeBSD we got our protected memory
11:24 space and different things which was great so like if the management Damon crashed that management Damon
11:32 um would just restart it wouldn't restart the whole device there were many devices back in the day uh back in the
11:39 90s that if some little piece of it crashed the entire device would crash and the the founders of Juniper Networks
11:48 was like look we don't want to do that we want if something crashes let it crash and we'll start it back up but
11:53 most of the things that crash really aren't um affecting the traffic going through
11:58 the device so why crash the entire box so that was one of the great things when they put on top of FreeBSD was those
12:04 protected memory space of the Demons could run all in their own space it came with the CLI so that you could
12:11 configure it and we still have that today of course but it also had an XML interface and we can use that today also
12:18 and we'll talk a little bit about that in the automation uh class that is with
12:23 jumpstart Juniper and so we had that um one program that
12:30 combined both the control plane and the platform code and that ran for a great
12:36 quite a while right up until 2012 and then at 2012 they're like look we need
12:42 to move this forward and so we moved it forward to a 64-bit um free BSD kernel and on top of that we
12:52 were able to take Linux and Supply this with a virtual machine and we were able
12:57 to make the SRX into a virtual machine to run virtually on VMS uh anywhere on a
13:05 hypervisor wherever you might need those so it really helped us be able to make a
13:12 a strong presence in places and spin up devices anywhere in the world we might
13:17 need to at that time netconf and yang were applied and netconf became a
13:24 standard that can be used to configure and change things on a device through
13:30 automation a little later on 2017
13:36 uh they've added a bunch of apis to make it more uh the automation but work
13:42 better with it they created a so you could add more CPUs and they separated
13:48 the control plane and the platform code out from each other so that we could have update little pieces of it uh
13:56 individually and today everything is basically its own program
14:02 those Damons that were running in the very beginning have now become their own actual programs that run and so there
14:10 everything's a small program it's got and we use a distributed State interface uh infrastructure to keep track of
14:19 all the states of all the individual programs that are running so that we can distribute this across and and use that
14:27 much better so anyway it's a uses some great application Level
14:35 uh High availability so we can have multiple instances of a program running
14:40 in case one crashes or breaks and and we support third-party software now uh
14:48 through all those apis that we've added on to there
14:55 all right here we have an overview of devices running the Juniper operating system
15:00 so here we show that we have switching routing and security that are all built
15:07 in uh to junos so let's look at our routing devices we
15:12 have our ACX series our MX series and our PTX series uh
15:18 very popular is the MX series with service providers the ACX series is
15:25 more popular with um uh mobile providers and the PTX series is
15:34 your backbone uh backhaul the the really high density uh big pipes is our PTX and
15:43 all these run Juno so if you know junos you can get onto any of these devices and troubleshoot and configure and get
15:52 working the next one is our switching devices we
15:57 have the ex series switches and the qfx series switches the qfx series switches is more
16:04 data center oriented and the ex series is more Enterprise oriented for
16:11 different work loads then we have our security devices
16:17 running the junos operating system we have srxs and we have srx's that could
16:22 actually go into the core and then we have little branch srx's and everything
16:28 in between so here again you're still running the junos operating system so if
16:33 you know how to run a router which you know you can quickly jump onto this device even though it's a little
16:39 different and we have to worry about security rules you can get on this device and configure
16:46 it and troubleshoot and and be able to operate with this device
16:52 and now we also have virtual devices we talked a little bit about that already but we have a virtual SRX which is a
17:01 virtual machine that hooks up to almost any hypervisor and will allow you to run
17:07 the complete uh services from an SRX there is no difference between this one
17:14 and a branch SRX except that you don't have a hardware device to actually run
17:20 it runs inside of your hypervisor we also have a virtual MX where you're
17:25 going to have the carrier grade virtual routing uh out in your cloud and and
17:31 different places to be able to run those services and then we have a q a virtual qfx is
17:38 which is a switch this one is not um uh really for sale but it's out there
17:46 and you can download it if you want to play with uh but it we don't really use
17:52 that too often uh in production but we do use them a lot in labs and to
17:58 demonstrate different things so in the next piece we have as junos is
18:07 running in containers and so here we have a csrx and the csrx does all the
18:13 security features except for those features that create that that need routing to be able to operate and so you
18:21 can see here we can do the uh intrusion prevention systems you have your UTM you
18:27 have your app secure so all those different pieces the csrx can do and we
18:34 basically do micro segmentation now with this csrx and help out we also have
18:40 another one that's a routing engine the crpd which is a container based routing
18:45 engine uh that we can run on any Linux based system uh to control routing
18:52 protocols on those devices
18:57 and if you're not sure which product to use we have a uh a website called
19:05 pathfinder.juniper.net and this website will help you go through and ask some
19:10 questions of you and you answer some things and it will show you the products that would probably write for you
19:18 all right the two main ways we are going to talk about for our user interface
19:23 option today is how to use the Juno CLI and how to use
19:30 the junos J web so the Juno CLI uh was one of the
19:37 original ways to interface with the Juniors the Juno's devices
19:44 it's a text-based command shell I you you basically make a configuration by
19:49 using commands you can get to that either through a console Port which is a
19:55 port that's a Serial Port tied right to the device itself or of course you can
20:00 use telnet or SSH we do not recommend telnet but you can SSH there and open up
20:07 a shell and remotely configure the devices so the other way is the J web then a j
20:15 web is a newer addition and it is constantly changing and so we're going
20:22 to give you a demo of that here in a little bit but just know that it could look a little different on yours
20:27 depending on which version of code you're running uh the J web does change
20:33 um here and there a little bit but it's basically just a graphical user interface like any other web interface
20:38 you'd have and so you can jump in there and uh configure it up it makes it a
20:44 little bit nicer sometimes to configure that with a web browser especially if
20:49 you're not if you're new to the junos operating system all right so let's just talk a little
20:56 bit about the the CLI so we're going to get a hold of the CLI either through a
21:02 uh console port or an SSH session and we
21:07 gotta log in right it's going to make us log in the user that comes with Juno junos is
21:15 root so if you if it's never been configured before uh you have to log in
21:21 as root so when we log in as root um we'll put that in there it goes ahead
21:28 and logs Us in but there's a little caveat with the root user the root user
21:34 puts us into the shell prompt now we said that this operating system the junos operating system runs on uh
21:42 FreeBSD and so this is the free BSD prompt right so this is your Unix shell
21:48 and you can run unix commands here right I could I could list my files I could
21:55 change directories I could ask you which directory I'm in things like that now it doesn't have all the commands because
22:01 it's been hardened but it does have quite a few of the the unix commands
22:06 that we can use here to move things around and take a look at things so what
22:12 we need to do here oh let me let's one more thing that on the newer devices on
22:19 the virtual machines the root prompt looks like this so you're either going to have just a
22:25 percent sign on and that's usually on the hardware or you're going to have this root uh
22:31 Ampersand colon tilde and with the pound sign and so either one of those we have
22:37 to get out of the shell prompt and move into the actual junos
22:43 um CLI so we're going to type in CLI at that
22:49 point to get there and you'll notice here now that we have the the username
22:54 root and that's what we logged in with at and then the name of the device where
22:59 we've logged into in this instance it's router
23:04 so a non-root user when they log into this operational mode they're going to
23:10 jump right into that CLI prompt they don't get to go to the shell directly so
23:16 these are just two differences when you log in as root or you log in a user and
23:21 normally you're going to log in as a username right the roots there to set things up and to do a few things but
23:27 hopefully you're going to create some accounts and log in to
23:32 um that with your name and and here we have a username to user
23:37 so all right we also have some CLI modes
23:44 um and in these modes we have an operational mode and we have a configuration mode in the operational
23:50 mode this is where we're gonna ask the device questions for the most part right
23:55 we're going to ask you to do things hey show me the interfaces and it's going to show you all the interfaces whether up
24:01 or down and what's tied to them you're going to use this command to troubleshoot you know I need to find out
24:08 hey what's going on with the with the machine and and get information from it
24:13 uh so this is all up in the operational mode uh from the on the Juno CLI the
24:20 other mode is the configuration mode and I think that's pretty self-explanatory this is where you're going to go ahead
24:25 and configure the device to do what you want it to do and so if you look at the
24:32 differences the the main difference is that last character we have either a greater than sign or a pound sign uh
24:40 delineating the two but you'll also notice that we get a little Banner over top of the prompt in configuration mode
24:47 and that little Banner Over the Top in configuration mode is what lets us know
24:52 which hierarchy we're in and we're going to see that as we go through the process here but let's talk a little bit more
24:59 about how these this this configuration mode works uh on the junos devices
25:07 so when we jump into configuration mode we have a bunch of different
25:13 uh configurations that we need to talk about so the first thing is an active
25:20 configuration the active configuration is the configuration that is running
25:25 currently at the time and so when we jump into configuration mode we have what we call a candidate
25:33 configuration and that candidate configuration is what you're changing right now and since we have this batch model
25:41 configuration that what happens is we have to put in all the text and then
25:47 we're going to commit it and we're going to send a commit command in and that's going to take all our changes and add
25:53 them in all at once so anytime you'd make a configuration change and you hit enter it's not going live at that moment
26:00 remember we talked about that this was made for service providers and we might
26:07 want to add a lot of text we don't want all that text to go live individually we want to do a live all at once and this
26:13 allows us to like pre-stage a lot of configuration and then send it in all at once
26:19 but this can fit this candidate configuration is basically just a like a
26:25 notepad it takes a copy of the active configuration puts it into this notepad and you can make changes to it if you
26:32 don't like the changes you can throw it away if you like the changes you can save it and turn it into the active
26:38 configuration so it's really powerful on how you can control uh the
26:43 configurations as you're going through these devices so we talked a little bit about the
26:50 committing so we're going to use just the commit command when we're all done we type in
26:55 what we want we're happy with our configuration we can type in the commit command and this commit command then
27:01 takes all the changes we've made and turns it into the active configuration at this point our candidate
27:08 configuration and our active configuration are exactly identical they're in sync with each other
27:15 we also have a an option if we have multiple res that
27:21 we can sync that commit across all of our routing engines so we can do a
27:26 commit synchronize and this will allow us to synchronize across all the routing engines on our device
27:34 we also have a commit chat command this commit check command allows us to run
27:41 the commit now when we run this commit command what happens is we're going to go and check the code and make sure that
27:47 the code is is valid right make sure we
27:52 didn't do any mistakes and the junos knows how to run the commands that we put on there uh for instance we might be
28:00 we might put an interface into two different routing instances and we can't
28:05 do that the junos goes well I don't know I can't compute that that doesn't make sense it's against the rules and so you
28:13 you'll get an error and we see that here we got an error here just as an example down here but you'll get an error and so
28:20 you'll have to go fix that one of those you have to remove one of the interfaces out of the routing instance or in the instance on the screen here we have
28:28 um a family for ethernet switching on there but we also have
28:34 inet configured or something else and so it says hey look we we can't have both
28:39 of those configured at the same time we can't run them both at the same time so you get an error and what this commit
28:45 check does is it allows us to check to make sure our configurations are okay but it doesn't actually commit them into
28:52 the active configuration it just runs all the checks that the commit command will run to Vero to do the verification
29:00 and this is really handy uh let's say we're trying to move over and and change
29:06 a bunch of configurations all at the same time we want the least amount of downtime as possible then what we could
29:13 do is we could do a commit check and make sure it works first before we go do that because that that has happened to
29:20 me I I wrote a command and I messed up one of the commands and when I want to
29:26 do my commit it wouldn't work and everybody else is already committed and
29:31 uh so I'm furiously trying to make my changes so that it would would commit right and so you don't want to be in
29:38 that situation so that's what the commit check does for us it helps us run those commit
29:43 um checking parameters to make sure what we have written uh is valid for junos to
29:48 run and commit confirmed is got to be one of
29:54 the best commands that junos came up with back in the 90s and what this
29:59 commit command does is commit confirmed command is it starts a timer and so if you lose contact with the
30:09 device what it does is if this timer will time out because you don't have
30:14 contact with it and you are going to come back and it'll come back and put
30:21 the old configuration that you had in there previously so now you should be
30:26 able to get contact with it again so let's just give an example here so
30:32 I'm configuring something remotely and I'm changing some of the IP addresses
30:37 and I mess up the IP address that I'm connected to I didn't mean to but I I
30:42 made some changes or whatever maybe I put a firewall filter on and it's not going to
30:48 um allow my communication from my device to reach the Juno's device but I do this
30:53 commit confirmed and when I hit enter I lose contact because the my configuration that I just made goes live
31:00 and I have an error in that configuration I just have to wait for the timer to
31:05 come off to the timer to count down and once that timer counts down it will take
31:12 the backup configuration that I that I that used to be the active one that's the one I logged in with it'll take that
31:19 configuration and move it back in as the active configuration and it moves my configuration that was bad into a backup
31:27 um list so I can get back to that one and then once that happens then I can go
31:33 ahead and SSH to the device again and get back in this saves a tremendous
31:39 amount of time when things go bad and and you lose contact with your devices because of a configuration there
31:46 so all you have to do is do another commit so once I do a commit confirmed and I still have access to the device I
31:54 will just write commit again and hit enter and that will turn the timer off
31:59 but this can make confirm command is a fantastic command uh that that I would
32:05 recommend everybody use as when they're doing remote configuration if you're on
32:10 the console it doesn't matter right because you can't lose contact with the device from the console so that's not a
32:18 concern it's when you're remotely administrating uh the devices here
32:23 all right I just talked about that the configuration can be backed up and
32:31 sometimes we'll put in a configuration and we'll notice that something broke and we go oh we don't we broke it we
32:38 want to get it back right well Junior junos saves all of these configurations
32:44 that we have we can save up to 50 of them um on the machine itself and so at any
32:51 time you go oh look I I've made like changes five times and I'd need to get
32:57 back to that original configuration because everything I'm doing is just breaking it more you can go back and
33:03 grab that last device and here we use this command called rollback to do that
33:08 now the configurations are all numbered and the active configuration is numbered
33:14 at zero so the one that's running right now is configuration zero the last one
33:20 so if I just did a commit my new one that I just committed is is configuration zero the one that was
33:27 running there just previously now is configuration one and so if I write roll
33:32 back one I can get back to that so let's say I make a configuration and I mess it
33:38 up and it drops some some segments of our my network and I was like well that's not what I wanted I can just type
33:45 in rollback one I hit enter it loads that back in as my active configuration
33:51 and now I need to hit commit I type commit again and now I'm back to running
33:56 on the configuration I was just running on before I did the commit so now what I
34:01 can do is I can say roll back one again and this will load back in my configuration that was bad
34:09 and now as my candidate configuration I know that's bad I need to go figure out
34:14 what I did to drop those segments of my network was it an IP address issue was
34:20 it whatever that issue was I will go figure out what that is and fix it and then I can type commit again and it'll
34:27 go ahead and get pushed into there so as we see on the screen we have our
34:34 rollback one up to roll back and right we have up to rollback 49 0 to 49 is 50.
34:39 configurations that we can save on the device at any one time uh this allows us to get back to any of
34:47 those configurations and and load those back in there now what we want to know is well we have
34:54 all these configurations but we got to figure out the differences between them all well do you know the guy's running
35:01 the Juno's system that wrote it came up with that plan and here we do a show
35:07 Pipe compare command and the show Pipe command compare command will show the
35:12 difference between two files now just the first one there the show Pipe
35:17 compare without any parameters on the end will give you the differences between the active configuration and the
35:26 um the the first backup the configuration so it'll say hey look show
35:31 well it'll let me let me back that up it's going to show you the difference between the candidate configuration and
35:38 the active configuration um so as you're making changes you can make some changes and then you can type
35:44 show Pipe compare and it's going to compare your act your candidate configuration with the active
35:50 configuration this is a great way to see the changes that you've made and also there's a time
35:57 sometimes when I might make configuration changes and my buddy says hey let's go to lunch and I didn't
36:03 finish what I was doing and I run off to lunch and let's say one of my co-workers logs in when they log in it's going to
36:10 say hey there's already changes made do you really want to to run with this candidate configuration and you'll be
36:17 like oh well what changes did he make and so you can do a show Pipe compare and you can see the changes that I put
36:24 in but I never committed them because I ran off to lunch and uh and and so there's a very
36:31 powerful command that we can can look at here now we can also use this
36:36 um compare command to show the configurations of different roll backs
36:42 so you can do like a show com you can do a a show Pipe compare uh rollback uh
36:49 five and that's going to compare your uh candidate configuration to roll back five so you can look at the difference
36:56 between what you have going on and any of the rollbacks that are sitting there
37:01 now you can also use this to compare two files so you do a file compare files and
37:08 you can put the two file names in now these file names would actually be on
37:13 the drive uh so anytime you want to you can go to the the root of the
37:20 configuration you can type save space and give it a name and it's going to save the entire configuration to the
37:26 drive this is not part of the rollback scheme uh that this this file is just
37:33 one that we're saving off to the the hard drive basically so that we can go in there and and save off copies along
37:42 the way and this is comparing two files that might be on the Drives together
37:47 so we have a lot of tools here to figure out what we're going to do
37:53 so next we're going to run and show you a demo of some of these different things
37:59 that we can do here's our CLI demo we just want to go over a few of the features of the CLI to
38:07 give you an overview of it here I'm logged in as root into a device called vsrx-1 you can see that because
38:15 of the prompt there I'll highlight that and because of the prompt it says I'm
38:22 logged in as root at vsrx-1 that's my device and we see that I'm logged in as root so
38:30 I'm inside of the shell right now so if I typed LS I should get a list of
38:38 uh the directory structure and I can type PWD and see where I'm at inside the
38:44 root and just inside the directory structure so we can move around and do
38:52 different things inside of there just like you could in in any Linux so but what I want to do is I want to
38:58 get out of that I want to get into the CLI so I'm going to type in the word CLI hit enter and now I move to a greater
39:05 than prompt at the end showing me that I'm in the operational mode of the device that I am on at this time
39:14 so inside of this operation mode I have a bunch of commands I can run so there's
39:22 the show commands one of the most important commands at this point so I could do show interfaces terse and it's
39:29 just going to give me a list of my interfaces we're not going to get into too much of it right now we'll get into
39:35 that more later I could do show route foreign
39:43 that I have so I can do the show commands and it goes in and asks junos
39:49 hey can you give me this information and it gives you the information that junos is running on right now
39:55 so if I don't know what to type in I can always type in a question mark and the
40:01 question mark will give me the uh all the commands that I could type in no
40:06 matter where I'm at so if I if I sit get here and I say hey no I want to type in a show command but I don't remember what
40:13 it is I can put a question mark after that and now it shows me all the commands I can put in after show which
40:20 are quite a few of them right so um we could do show
40:25 SMTP show rip uh I'm just looking at some of the things on the screen right
40:31 now so we could do all sorts of show commands there we can back up again we can put another
40:37 question mark in there uh we can actually ping so if we ping I know we can get one
40:43 addressed for sure um we can ping there and we got a
40:49 response coming we'll hit Ctrl C to break out of that and uh so we have these commands and
40:56 that you can test with and troubleshoot with and work with and this is all in that operation mode now once we have
41:05 that figured out a little bit we want to get into configuration mode so we can change some of the configuration here so
41:11 we type in the word configure and we enter configuration mode we notice that we're in configuration
41:17 mode one because we have the hashtag at the end of The Prompt instead of the
41:22 greater than sign and we have a banner now that says edit over the top and that
41:28 edit says that I am at the top of the hierarchy we talked a little bit about that that there's a hierarchy for for
41:35 junos and so I can use this edit command it's kind of like a change directory
41:40 command to jump into one of the hierarchies so one of the hierarchies is system
41:47 so we can jump into system here and now we see my banner has edit system over
41:54 top of the prompt and so I am in there if I do a show command I'm only going to
42:00 see what's inside of that hierarchy right so we have a few things there one
42:05 of the things we do have in there was right at the front was we have our hostname and if we want to set things or
42:14 add things to our configuration we use the set command so
42:19 I can do set host host name and we can give it a new name let's say
42:26 router and so now we have this router hostname and I got that set but remember
42:33 we don't do anything until we commit so you notice that it's still vsrx-1 as
42:40 my host name but now if I do a commit and we talked about different commits
42:47 let's do a commit confirm just to show you how that works a little better
42:52 so I do a commit confirmed and it says oh my commit is complete but I'm on a 10
42:59 minute timer unless it's confirmed so you see down at the very bottom my my
43:05 device is called router now because I changed it in the com in my candy
43:11 configuration I did a commit and made that into my active configuration
43:17 so once I have that that timer still going down so what I need to do is I need to
43:23 do another commit to get that timer to stop counting down now again that commit confirmed is great
43:30 to help you in situations where you're remote and you don't want to lock yourself out from the device save you
43:37 driving off into uh the remote recesses of wherever you
43:42 got Network equipment late at night um all right so we've shown you that the
43:49 commit there uh we can also do a roll back um so let's look at the rollback real
43:56 quick we can do like a roll back five
44:05 um oh yep I gotta be at the top of my uh system and so that's this is a good time
44:11 to talk about the hierarchy a little bit so let's edit um let's get out of here real quick and
44:19 so we're going to say up but I'm going to edit into interfaces and now I'm
44:24 inside of interfaces and I'm going to edit ge-0 and now I'm inside of that hierarchy and
44:33 we can keep going we said edit unit zero and we could keep going down into this
44:40 hierarchy as before we have to actually put some information in it's kind of like that directory
44:45 structure and so if I want to come back out of that I can say up and that will
44:52 remove me and bring me back up one level if I want to change and go all the way
44:59 back to the root I can type top so edit and the name will take me down
45:05 and up will bring me back one top will bring me back all the way to the top or to the root of the hierarchy each time
45:14 so now that I'm back at the the the top we can type roll back
45:20 five so I have this rollback five and we can
45:25 say well what did we what is rollback five so we could do a show Pipe compare
45:32 and this is going to show me all the differences between rollback five and
45:37 where I'm at now which there's not a lot but you see there's an encrypted password that changed uh there's a and
45:44 then that interface that we played around in to to show you how to edit in and stuff it added uh that the the
45:52 hierarchies into our configuration and so so there's not much difference
45:58 there we could say let's do a uh show type compare rollback uh six
46:08 so there we changed our hostname uh in and out we could try roll back seven and
46:17 so it's just showing us different uh configurations that we might have on our system uh that are that are saved in
46:24 those rollbacks and we can compare what we have in our candidate configuration to what we have in the rollback
46:31 all right so um let's just do a show Pipe compare what let's see what we have there all
46:38 right I don't want to change any of this here so I'm going to say roll back zero and rollback zero will take a copy of my
46:45 active configuration and put it back as in my candidate configuration for me and
46:51 so now it's I'm exactly in the same spot as when I first started um here so if I do a show Pipe compare
46:58 now is there's no differences it's exactly the same so my candidate configure my
47:04 active config are exactly the same so these are some of the things that we
47:10 just wanted to show you real quick uh the CLI interface is very powerful it
47:16 allows us to make changes and add configurations into the
47:22 system with ease and being able to keep track of things we're going to show you later
47:29 on how to make changes and and set some more information in here but uh that is
47:35 the end for our demo on our CLI
47:42 we'll now do a quick demo of the J web to control a Juno's device here's a
47:48 login screen we're going to log in as root we'll go ahead and put in the password Here
48:00 as we log in we see a little bit of an information screen we see about our interfaces and how many users are logged
48:07 in and then we see our basic settings we'll talk about these basic settings in the
48:12 next section so I'm going to go ahead and just close out of that but we see over here we have our main
48:19 menu for the J web and so then we have our dashboard
48:24 monitor device Administration network security policies and objects Security
48:29 Services and VPN so let's go to the dashboard real quick
48:35 the dashboard allows us to quickly view data that's going on either on the
48:42 device or through the device uh I don't know this this box does not have a lot
48:48 of data on it but here's our resource utilization and let's say we come up
48:53 here and we see we want to look at our security resources we can just drag this down and add it to our our
49:01 um our dashboard uh we can manage the dashboard by using
49:09 different tabs so we can put one tab here hit the plus we can say security
49:18 and so we have device security and so then we could put like threats here
49:25 um where you put firewall now like I said these aren't even set up yet to look at
49:33 these we're just barely getting this set up I just was trying to show off the dashboard here so we can go back to the
49:38 device and look at some of the devices that the resources and things that the the code which software version it's
49:45 running things like that and then under monitor we can go ahead
49:51 and basically this does like a lot of the show commands that we would do in operational mode so we can come here and
49:58 look at statistics um and see how things are working there we also have our device Administration
50:07 so we'll we'll look like I said we'll look at this a little bit more here in the next demo but we have our basic
50:13 settings certificate management license management software management
50:18 then we can go to network we can figure up our Network our interfaces our uh
50:25 firewall filters DHCP routing all of this can be take can take place here
50:31 under this menu option security and policy objects will work
50:37 not worry about these until we get to the security class but uh so this is the J web just wanted
50:45 to go through real quick and if we made a change let's go real quick uh no let's
50:51 go to device Administration and we go to system identity and let's say we do make
50:57 a change just like we did on the last one let's now call it my router
51:05 my router we're going to hit save there now that doesn't do anything until we
51:10 commit still and then up here in the right hand corner we have a commit so we can say then I can make the
51:17 configuration so that'll go ahead and commit
51:32 all right so we say thank you we're done and we changed it to my router now
51:39 so that's the J web just quick and
51:44 um easy a way to go through and look at the different options and be able to
51:49 configure and monitor from a GUI or graphical user interface instead of a
51:55 CLI all right our next section is initial configuration tasks
52:05 by default the junos devices all come with a configuration we call the factory
52:12 default configuration now this factory default configuration uh has a root name
52:18 built into it so that you can log in it also has all the the
52:24 syslog set up so that it gets logged and things to the messages file but then each device has other uh
52:32 configurations so there's a switch there's a router there's firewalls each
52:37 one comes with a different setup at the very beginning as a default configuration
52:42 but they all have this factory default configuration when they come from the factory and you can revert back to that
52:49 if you want to so we're going to go over the initial configuration here the first thing we
52:57 need to do is add a password to the root uh username we cannot commit until there
53:03 is a password set for the root username this is the one requirement to do a commit is that the route has a password
53:12 attached to it so we're also going to talk about the host name setting the hostname for the
53:17 device so that you know which device you're working on we're going to talk about the system time we're going to
53:23 talk about non-root users right you want to add other users so that you don't
53:28 have to use the root user all the time these syslog options and we're going to
53:33 talk about remote access protocols how are we going to manage this device and
53:39 then the management interface and static routes for that management interface so let's get into those really quick
53:46 so the host name and the root password are gonna both be in what we call the
53:51 system hierarchy so we use this edit command edit system and that puts us
53:57 into this hierarchy I like to think of it when I first started was is like your
54:04 hard drive everybody's familiar with a hard drive where you have your your let's say your root or your C drive and
54:12 then inside of there you might have some configuration or you might have some files and then you might have folders
54:18 and each one of those folders would be a hierarchy and then inside of that folder
54:23 you might have another folder or you might have submit you might have some files and some folders right and junos
54:31 is very similar to this kind of layout so we use the edit to jump in kind of like you would use the change directory
54:38 command to jump into a directory structure on your hard drive so we say edit system and then once we're inside a
54:45 system everything we're going to add to junos is put in there by a set command so we
54:52 do set hostname router or whatever you want to name your device right we're very generic here for this training but
54:59 we could use uh anything um right usually you're going to give it
55:04 a name to describe the device and the location where it's at so when you see that name you know exactly which device
55:11 you're on and then underneath of that we're going to do set root authentication you hit
55:17 type in plain text password and then you're going to hit the enter key when
55:23 you hit the enter key that actually runs a little program and it comes up and asks you for the password twice so you
55:30 gets asked for the password you type it in hit enter it asks you to type it in again and so the password is not shown
55:36 on the screen so it gives you the the two authentication the the second authentication there to make sure you
55:42 typed it in correctly and you know what that password really is
55:48 passwords don't match of course you'll get an error and you'll have to run the command again from the beginning
55:55 the next one is uh time zones and system services so the time zone is important
56:01 to run I different companies run in different ways you can either set all
56:07 your equipment so it's all on the same time zone or you can set it up to to actually be the time zones where the the
56:13 devices are at it depends on how you're trying to run it and the logs you're trying to get out of the device
56:19 so we find our time zone here we pick America Los Angeles since Juniper is in
56:25 the Pacific time zone and we set a date so we do run set date and we with we run
56:33 we put that run command in the front because if you see we're in configuration mode but to set the date
56:39 is actually not a piece of configuration it's a command we're going to tell junos
56:44 to run so we run that command and it puts in the date and then time into our
56:51 device and so now we have that all set up and running now we want to figure out what we how do
56:58 we want to manage this device do we want to run it through telnet SSH maybe both so we're going to set both of those up
57:04 again we do not recommend telnet as a service to use since it is not encrypted
57:10 but it is still on there you still could use it so we do set those Services up underneath the system
57:19 now we also want to set up other users right if everybody logged in as root for
57:26 one you have permissions to everything on the device and somebody might mess something up to them when they didn't
57:32 mean to secondly is if something happens on that device you'd like to know who
57:37 was actually on that device that might have caused the problem so that we could rectify the problem and get it fixed and
57:44 make sure it doesn't happen again and so you want to have user names for all the different devices for all the different
57:51 people on those devices so here we do set login username or user and then we
57:58 give it the username here we're going to use the word demo um in the in the demos you'll see the
58:04 word lab we use lab a lot for um our user at Juniper and then we have
58:11 a group what what Security Group are we going to hand them to now we have some predefined groups and you can also make
58:18 your own groups but these groups tell them what pieces of the configuration and which pieces of the device can we
58:24 actually allow them to run right and and it's very configurable you can set up uh
58:30 very detailed options uh maybe you have a group of people you don't want them to ever touch the configuration but they
58:36 need to get in and manage it look for interfaces look for problems but they're never going to configure so you can set
58:42 up users like that here we're going to set up the super user account and allow
58:48 them all basically all access to the device and then we say authentication
58:54 plain text password just like we did before now we hit enter it's going to run a program you're going to type the
59:00 password in twice again and now we have a user demo created
59:09 now we want to set up an interface so that we can manage this device right so
59:15 right now we're working off of the console and we have it on our desk but we want to go set this box somewhere and
59:22 actually put some cables into it and get it working and so we need to set up a
59:28 interface so that when it gets out there we can then communicate with it and put a configuration onto it and then manage
59:34 the device so here we go we're inside of system
59:39 which says edit system right because we were inside there we said edit system to get into there we want to get back out
59:45 of there we can use top which takes us back to the root of the hierarchy or we could use the word up either one of
59:52 those would have moved us back to the top of that system now up will take us
59:59 back one level but since we're only in one level top and up would basically do the same thing and get us back to the
1:00:04 root now if we were in four or five levels into the into the hierarchy then
1:00:10 up would just take us back to the next level but top would always take us back to the root level on this hierarchy
1:00:18 so here we got an interface we're going to do a set an interface so we do set interfaces and we have an interface name
1:00:25 right we haven't really talked about those we'll talk about those more here in a minute um in the next section but the interface
1:00:33 name would go in there and then we say unit zero and we'll talk more about how
1:00:38 these units and the different things operate but here we're just adding an IP address so we're giving you an example
1:00:44 of how to add an IP address to a certain interface and so we're going to add that in and we put an interface on the back
1:00:51 of that or an IP address on the back of that uh command for for our interface and then
1:00:58 once we have that done we need to be able to Route off of that device so whatever interface we're plugging in we
1:01:06 need to make sure we're on the same subnet as wherever that's plugged in at and then we need a default gateway to
1:01:12 send our our traffic to so here we're going to set a routing option static route and we use 1001 now 10 0 1 is my
1:01:21 network where I'm managing the device from and I'm saying Hey to get back to my network the next hop is 1001 129 so
1:01:30 we're going to go over this 129 address wherever that's at it's a router somewhere that's going to take that
1:01:36 information and route that back to me so now when I am all done with typing this
1:01:41 in I'm going to hit commit now remember if I don't commit it none of these changes take effect so I've been typing
1:01:48 in all these commands to set up the users to set up the time time zones to set everything up but none of it's taken
1:01:55 effect yet it's not running on the device yet until I do this commit command and so here's another commit
1:02:01 command commit and quit and what that does is it commits my configuration it
1:02:06 takes my candidate configuration puts it into the active configuration and then
1:02:11 what it's going to do is going to take me out of configuration mode and move me back inside operational mode so that I'm
1:02:18 ready to do some testing or do some commands maybe once I get out I want to
1:02:23 Ping and make sure I can actually ping off the device or whatever I want to do at that point but that's what the commit
1:02:30 and quit takes me out of configuration mode back to operational mode all right so that's our initial
1:02:37 configuration once we have this much this much information set up on the
1:02:42 device we can go ahead and and put that device in place out on the network and
1:02:48 now manage it through our Network okay for our initial configuration demo
1:02:55 we're going to log back into our device and we logged in as root and so we're in
1:03:02 that shell so we want to type in CLI to get out of that shell so we'll type in
1:03:09 CLI we will then go into configuration mode
1:03:16 and one of the first things we need to do is we need to set up the root password
1:03:22 so let's go ahead and do that now let's do set system
1:03:28 root authentication plain text password and then I hit enter and then I'm just
1:03:34 going to type in the password that I want
1:03:40 type it in twice and now that's set so another thing is our host name I
1:03:46 already showed that one in the last demo but we'll do that one again set hostname
1:03:54 system hostname here we're going to just add it into there because we're going to be in this we're going to edit system
1:04:01 set hostname and we'll name it back to just router
1:04:07 and then we're going to set up our time
1:04:12 servers right so we need to do set um time zone and we're gonna do
1:04:22 um from there what we're gonna do let's see
1:04:28 yeah America
1:04:34 um LA Los Angeles there we go
1:04:39 we'll set that up and I just hit my tab there to complete that in my question
1:04:45 mark to come up with all the the options it's like we did in the help
1:04:50 and then we're gonna do we're gonna set the time so we need to run set time
1:04:57 and nope sorry set date and then we're gonna put
1:05:02 2021 and then it's uh the 18th of
1:05:08 November and 15. 30 it's about 3 30. there we go
1:05:16 so we got that set up good and now what we want to do is we want to look at the services so we're going to
1:05:22 say edit and we're going to do show services and we see here that we got SSH
1:05:29 we got web management set up so let's say we wanted to add telnet right we all
1:05:34 agree that we really don't want telnut on there but we do Set uh services
1:05:41 tell them that and now if we do a show services we see that we have telnet there right
1:05:48 under SSH and before web management okay so what else can we look at really
1:05:56 quick um we got syslog so we do show
1:06:02 syslog and we see we have a syslog set up for
1:06:07 messages now if we want if we had a syslog server we could set that up we
1:06:13 could do set um syslog host
1:06:19 and then we give it an IP address let's say it's 10 10 20.5
1:06:25 and we'd say any any and this would give any of the facilities any of the levels
1:06:31 of severity code uh out to this syslog host there so now we're gonna do show
1:06:37 syslog again and we see we have both a file messages and a host so that the
1:06:45 file messages and the hosts are going to get basically the same information inside of those for the most part except
1:06:52 for the authorization level okay now
1:06:57 Let's see we want to also add in a new user so we're going to say up and get
1:07:04 out of the system and we're going to do set login
1:07:11 oh no I thought we were in one more set system login
1:07:19 and then we're going to put in user give it a username let's name this user user
1:07:29 just say user and then we gotta add a class to it
1:07:37 and that class will be super user and then we can say authentication claim
1:07:45 text password and then we're going to add another password here for this user
1:07:52 and now we have another users created there
1:07:58 and then we need to make sure we have our management interface so we're going to go ahead and go into interfaces
1:08:07 so we're going to do set interface or interface FX P0 because that's our
1:08:13 management interface and we're going to say unit zero
1:08:18 family inet address and we're going to say 172
1:08:23 25.11.1 slash 24 that's on my management Network
1:08:32 here we're going to go ahead and add that in there and I don't need a route
1:08:38 but let's say we did need a route we could say up we're going to do set
1:08:44 routing option static route and let's say all of my host computers
1:08:53 or my management computers are on the 10.10.5.0 network
1:08:59 and so we'll Define that and say next top
1:09:05 and we need to give it a real next up 172.25.11.254 would work for me
1:09:12 and now let's do a show interfaces
1:09:18 we see we have my interface error fxp0 is set up show routing options
1:09:25 and we see we have a route now for the 1010.5 network
1:09:31 we have our hostname set up our user setup and so that is everything we would
1:09:39 need we have our SSH set up so that we can get into that so now what we'd want to do is we want to do a commit so we
1:09:45 could do a commit let's go commit check first now this time we'll do a commit check and everything's good now
1:09:53 nothing's changed right because we changed our host name you see this host name still my router instead of just
1:09:58 router because the commit check only lets you know if junos is happy with your configuration
1:10:04 here we're gonna go ahead and just do the Commit This Time
1:10:09 and it's all good so that is our initial configuration demo
1:10:17 we're now going to look at our initial configuration with the J web interface so we're going to go ahead and log back
1:10:23 in here we'll log in as root
1:10:34 and uh our initial configuration is over here on the right hand side for the most part
1:10:42 under getting started but so we have our configure interfaces configure security
1:10:48 zones configure firewall policies configure Nat manage your license now this is an SRX and a lot of that's about
1:10:55 security so we're going to not look at that 100 right now but under our basic
1:11:01 settings right device Administration basic settings we have our system
1:11:07 identification right we talked about the host name that we want to set up and so
1:11:12 we have our my router and then we have our root password and our and and they confirm the root password so we could
1:11:18 change that um we also have under our basic settings
1:11:25 we're going to scroll down we have our time right do we have a Time server set up or do we have it uh where where it's
1:11:33 running so here we have an actual time server setup
1:11:39 for us here to to work we can go to manual and then go ahead and type in a
1:11:47 time and a date and go ahead and save that in in there now again this this
1:11:53 piece does not become part of the configuration right because we don't want it every time it reads the configuration and go back to this time
1:11:58 it just does a one-time set but you do need to set up your time zone uh this is
1:12:04 set to UTC right now usually we usually go to us
1:12:09 um uh uh like there it is
1:12:15 uh us Pacific is where we would set that normally for for Juniper
1:12:22 um our management address so we have our management address that
1:12:28 we have set up uh 172 25
1:12:36 11.124 and here we do not have a default gateway because our management machine
1:12:43 is on the same network uh but we could set up a default gateway for that if we wanted to
1:12:51 and then the next thing we need to make sure we get is our system services
1:12:58 here we have telnet turned on SSH turned on and HTTP turned on
1:13:06 https let's scroll up just a little bit more there we go
1:13:13 so on the HTTP and https you can actually select which interfaces you
1:13:20 want the the request to come in on and that adds a little bit more security saying look I
1:13:27 only wanted to come in on these specific interfaces and don't put it on any external facing interfaces of course so
1:13:35 there's a little bit of security there again we would probably turn telling that off we really do not want telnet to
1:13:41 be on there and then we can go to our security logging
1:13:46 and uh that would turn on logging for
1:13:51 our security systems that is not the syslog per se and then we have our SNMP options that
1:13:59 we could set up if we wanted to and see what else we have
1:14:06 our our um non-root users so we can come down here to the next step user management
1:14:15 um now let's go ahead and save those where's my save button there we go you
1:14:21 want to save those when we leave oh I got some errors
1:14:29 let's go back to there
1:14:36 that must have been my air right there I just put the time in when I open that up
1:14:41 there we go and then our user management if we wanted to create a new user we
1:14:48 could just click up here on plus and we can make a username user
1:14:54 and
1:15:02 and put in a name my user and a password right
1:15:13 and then here's what are we gonna have uh rights for this person we got a super user he has rights to everything read
1:15:21 only is self-explanatory right you can just look at things you can't make any changes uh and then an operator can make
1:15:29 changes to certain things um and like reset interfaces and do a
1:15:34 few things like that we're going to switch that to super user and hit OK
1:15:43 um oh the combination of mixed letters
1:15:54 all right I didn't make my password complex enough I guess all right so now
1:16:01 we added a user so those are our initial configurations that we need to go
1:16:06 through and do most of them are under basic settings and then our user management
1:16:13 all right our next section is interface configuration so we bought this device
1:16:19 because of all the interfaces that it has on it so we can move traffic so here we're going to start going over how
1:16:25 we're going to set these different interfaces up talk about a little bit of the differences between some of them
1:16:31 here we have just an overview slide of some interface here we have a bunch of
1:16:36 different types of interfaces that we want to just put some groundwork under and so we have management interfaces and
1:16:43 these management interfaces will connect back to the management Network now some devices have an actual management
1:16:50 interface that runs right off of the routing engine while other devices do
1:16:56 not but more and more they're becoming we're having an interface right on the routing engine so that you can have a
1:17:02 management Network so far your networks go down hopefully you can still have that management Network to manage the
1:17:08 device by we have internal we've talked about that internal connection it connects the
1:17:14 routing engine to the packet forwarding engine and it has that built-in limiter
1:17:20 on it and so that's our internal interface and usually and we can we can
1:17:26 reference that interface by the loopback interface
1:17:31 network interfaces now these this is why we bought the device in the first place right we we have uh we can put networks
1:17:38 on there so these are ethernet networks there's other types of um interfaces that we can have here we
1:17:46 have sonnet and ATM um but we have t1s t3s a lot of those
1:17:52 are going away from and most of them are moving over to ethernet at this time
1:17:58 um Services we have Services interfaces now Services interfaces uh allow us to
1:18:05 perform a service so we have a router and let's say we want to encrypt traffic
1:18:11 onto that on from an interface going out from our device using ipsec we can use a
1:18:18 Services interface to send traffic to that will then route that traffic back
1:18:25 out encrypted and send it to its destination and so that's what a service
1:18:30 is it just provides us a way to get Services onto a router then we have a
1:18:36 loopback interface and that loopback interface is that always on interface that we can use you can get to it from
1:18:43 any of the other interfaces uh and then the reference to that also basically connects back to that internal interface
1:18:53 so on an interface we have two sets of properties we have physical properties
1:18:58 and we have logical properties we have physical property right that's the type of network it is the type of
1:19:04 interface it is is it an Ethernet interface and or what what's the type of interface it is we have different
1:19:11 information for those right so we have like an MTU of the maximum transmission unit how big of a data packet can we
1:19:19 send down on that on that wire we have link speed and duplex these are all
1:19:24 physical attributes of that interface and then we move to logical properties Now The Logical properties are the
1:19:32 address right we have an IP address we have uh whether maybe we don't have it
1:19:38 maybe it's not IP maybe it's an mpls interface or an Ethernet switching
1:19:43 interface so these are what we would program in there to to configure that
1:19:48 device to run the way we want it to run and then we have addresses and things that would go on that or virtual circuit
1:19:56 tags that would go on there so like a VLAN tag things like that
1:20:01 huh so once we get it configured this is what it would look like inside the
1:20:08 configuration when we take a look at it and you can see the different levels of hierarchy in there we have interfaces
1:20:13 and that interfaces our top level hierarchy and all the interfaces will be inside of that hierarchy and so we have
1:20:20 an interface name and then we have at the next level we have the physical properties and all the physical
1:20:25 properties would be right underneath that interface name and then what we're
1:20:30 going to do is we're going to add a unit number and that unit number is like a sub interface and that sub interface
1:20:37 will have all the logical properties under the IP address and different things and so we put that all right
1:20:44 underneath of that unit number there as The Logical properties so this is will
1:20:50 be easy to get used to and it's really nice to see them in this hierarchical form to be able to understand what the
1:20:57 interface is and where it's what it's working on for like one instance you can have an MTU on phys physical interface
1:21:04 and an MTU on a logical interface and this the way it breaks it out into the hierarchy it's really easy to see which
1:21:11 interface or which NTU goes with which the physical or The Logical interface which is sometimes can be difficult on
1:21:19 on some configurations to be able to understand the name of the interface is is starts
1:21:28 with the two letter or a two character reference to the type of interface it is so we have GE for Gig ethernet we have
1:21:36 XE for 10 gig ethernet we have T1 for T1 lines T3 for T3 lines so the the
1:21:43 beginning part is going to be what type of an interface it is for the most part on a lot of devices it's going to be GE
1:21:50 or XE right now those are the the two main ones um but but for any device out there for
1:21:58 any type of interface we have a two letter uh designator for that type of interface now we gotta reference where that
1:22:06 interface is we have this device and we have a whole bunch of interfaces and we got to make sure we're talking about the
1:22:11 right interface and so it's basically talking about a physical location for the most part for the next few numbers
1:22:17 we've got three numbers and those numbers get put in as the line card right you we maybe we could put five
1:22:24 line cards in and each one of those line cards might hold uh multiple
1:22:30 um interface cards or physical interface cards a pick and in the beginning those were
1:22:37 removable but now most of those picks are fastened right to the the board we
1:22:43 can add some picks uh to some places but a lot of them are for the ethernet cards
1:22:48 anyway they're added right to the board uh already and so we have a an interface
1:22:53 card number and then we have a port number and so each one of those interface cards could have let's say 16
1:23:01 ports eight to 16 ports hooked to them and so you need to be able to find which
1:23:06 one you have and our numbers always start at zero so we have interface ge000
1:23:13 that's the first line card it's the first pick and the first port on that
1:23:18 line card and so we always start at zero so if you have a card with 16 ports it's
1:23:24 going to go from 0 to 15 on all the numbers so there's also other interface names
1:23:31 that are built in that aren't really physical we have our loopback our lozero our VLAN interfaces and our AE
1:23:39 interfaces which are our aggregate ethernet interfaces and so anyway we
1:23:44 have a bunch of different interfaces that we can do and and this naming convention is very easy to understand
1:23:49 but you need to understand it to make sure you understand which interface you're working on
1:23:57 we talked about these unit numbers these logical unit numbers a little bit these
1:24:02 logical unit numbers are like a sub interface some vendors don't require you
1:24:07 to have the sub interface number uh if you only have one logical interface but
1:24:14 Juno's requires you to always have a logical unit number and that logical
1:24:19 unit number usually will be zero especially it's required if the type of
1:24:26 network protocol you're working with only allows a single sub interface it
1:24:32 has to be zero so unless you know a reason why it shouldn't be zero it
1:24:38 should always be zero for instance we have in this example we have a DOT 51
1:24:44 right so we have an interface ge-0 0 0 14.51 now that's a physical interface
1:24:52 right that's a There's an actual physical plug on that you can plug a cable into on the front of the device
1:24:58 for that interface and the dot 51 is a logical interface on there so it's a sub
1:25:04 interface I would assume it's going to be VLAN 51 right since it's dot 51 let's
1:25:11 say we have vlans on this ethernet interface and so we're going to make different vlans on there so I don't know
1:25:18 how many vlans we have but we know we at least have one here that's dot 51 and so we put that on there
1:25:25 and so now we can put those on there now another thing is is we can support
1:25:30 multiple addresses so we can put four five six IP addresses on a single unit
1:25:38 and so you we need to be aware of that especially when you go to add a new one
1:25:44 uh some vendors allow you when you type in an IP address and you let's say you
1:25:50 messed it up you just type it over again and fix it and it'll overwrite it well in Juno she won't override it we'll just
1:25:56 add both of them so you'd have the wrong IP address and the right IP address sitting on that interface so you just
1:26:02 got to be aware of what you're doing when you're configuring those to make sure you don't have uh making one
1:26:08 mistake into bigger mistakes I guess so here's our interface uh after we've
1:26:15 configured it so we we have our ge005 interface that we have configured up
1:26:21 here and in this one we have multiple VLAN so we have unit 100 and unit 200 which
1:26:28 would go normally with VLAN 100 and VLAN 200. now there's nothing that requires
1:26:36 VLAN ID 100 to be under unit 100 right there's no internal tie there but for
1:26:42 humans we like the numbers to be the same so VLAN 100 is always going to be unit 100 and so on
1:26:49 so we see that we have this all written out here so we have multiple addresses
1:26:54 but we have two different sub interfaces so we don't have an interface with two IP addresses we have a physical
1:27:00 interface with two logical interfaces attached to it for VLAN 100 and one for
1:27:06 VLAN 200.
1:27:12 interfaces allows us to take multiple physical interfaces and tie them
1:27:18 together into a single logical interface and this gives us a few advantages it
1:27:25 allows us to move more data across a single interface but it also helps for
1:27:31 redundancy if we lose a physical interface you still might have one or two interfaces tied to this logical
1:27:37 interface as aggregated ethernet interface to move that traffic across
1:27:43 there so when we go to configure up this aggregated ethernet interface the first thing we have to do is we have to tell
1:27:49 junos hey we want an aggregated Ethernet interface and so here we do under
1:27:55 chassis we do we do a set command set chassis aggregated devices ethernet
1:28:01 device count one and what this does it creates a single aggregated ethernet interface called ae0
1:28:10 and if we wanted two aggregated ethernet we'd put device count two there and we'd
1:28:16 have ae0 and ae1 and so on right we can have I there's limits I I think we can
1:28:24 have at least 32 aggregated ethernets on on a device that's probably higher than
1:28:30 that um I would have to look up for each device it probably
1:28:35 um is is independent depending on the device you have how many aggregated ethernets you can have on that device
1:28:43 so then we once we get the device count set up we go over to our physical
1:28:49 interfaces so here we have ge001 through ge003 and we're going to say hey look we
1:28:56 want to tie these physical interfaces to a logical interface called ae0
1:29:02 and so here we see the configuration there we said underneath of the physical properties of the interface we say gig
1:29:10 ether options and say 802.3ad since that's the standard for aggregated
1:29:15 ethernet and say and then put the interface name we're going to tie it to so if it's ae0 we'll put ae0 on all
1:29:22 those so we see we got three members on this one aggregated ethernet now once we have
1:29:30 that done now we actually have to go configure up the aggregated ethernet interface
1:29:36 so here is our aggregated ethernet interface and it's under interfaces also so we do say interfaces ae0 so we edit
1:29:44 it into there and we have our lacp we need to set that
1:29:50 up to send command and control signals back and forth between the two devices
1:29:56 to keep the three interfaces operating correctly now one of the sides has to be
1:30:02 active so here we said passive if we would set both sides to active one side
1:30:09 would would they'd have a negotiation and one side would step down into passive mode even if they both said
1:30:14 active but a lot of network operators like to control who's active and who's
1:30:20 passive so one would be active one would be passive here we set it up to be passive so the other side must be active
1:30:26 and we set a unit number on there and here we're saying Port mode trunk because we're doing a family ethernet
1:30:33 switching on this aggregated ethernet so let's say this is between two switches
1:30:38 we have two switches and we want to create a bundle of interfaces to go between these two switches so that we
1:30:45 can move a lot of data between these two switches maybe it's two different core switches and we want to move a lot of
1:30:51 data between those and then we then you see we added the members of the VLAN and in this instance we use the names of the
1:30:57 VLAN we got orange purple and blue and so instead of having just a number we
1:31:03 gave them a name and and use those names to identify them
1:31:10 so we also have the opportunity to use IPv6 right it's not such a new protocol
1:31:16 anymore it's been around quite a while and so we can add IPv6 interfaces to
1:31:23 logical interfaces to our physical interfaces and we can run IP ipv4 and
1:31:28 IPv6 on the same physical interface at the same time so here we have an interface and we're
1:31:35 going to do the exact same thing we did before but instead of saying inet to put the address on we're going to say inet 6
1:31:42 and then we're going to add the address now we still have a prefix that we're
1:31:47 going to put on the back side of this and that prefix length is usually going
1:31:54 to be a slash 64 for for your normal networks but there are there's caveats
1:32:00 for this for a loopback address for IPv6 is going to be a slash 128. now there's 128 bits in the address so that's saying
1:32:08 hey look there's one address in this subnet right and all of our loopbacks take either slash 32 or slash 128 on the
1:32:15 loopback address and now we're we use slash 127s for point-to-point links if you have a point
1:32:22 point link you only have two IP addresses a slash 127 will give you two IPv6 addresses to send traffic across
1:32:29 that point-to-point link and then we got a couple examples if we just want to set up for local link
1:32:36 addressing we want IPv6 to run across our network but we're not really going off of our Network we can just say hey
1:32:42 turn on family inet 6 and not give it an address and this way IPv6 can actually
1:32:49 work on our our Network and if we want to use uh eui 64 addressing we just
1:32:55 going to add that to the very end of our address statement so we still will put in an address and put eui 64 on the end
1:33:03 which will give us that addressing
1:33:09 our next section is routing fundamentals
1:33:15 so junos as a routing table like any other device that works on a network
1:33:20 and it compiles information from both the interfaces that are there from
1:33:25 routing protocols and other sources to compile a routing table
1:33:31 now there might be more than one way to get to a destination so it's going to have to select which route is the best
1:33:39 way for the traffic to go and so it selects the active route
1:33:45 once it picks an active route it's going to head ahead and populate all those
1:33:50 active routes into the forwarding table and so it basically maintains the both
1:33:56 the I the ipv4 and the IPv6 routing table in this routing table so if we see
1:34:03 our little document down at the bottom our picture we see that we have ospf we
1:34:09 see directly connected in static routes coming in and the routing table is going
1:34:14 to figure out which one to use and send it to the forwarding table now you might wonder well how's it going
1:34:20 to find the active route it uses what we call route preferences to find the
1:34:25 active route routes from different sources get ranked
1:34:31 differently in this preference and the lower the preference the more preferred it is so you see here we have direct and
1:34:38 local routes and they are zero so they're preferred so if you have a
1:34:43 connection right onto a network you're not going to Route it somewhere else you're going to stick it right out on that interface and push it out to where
1:34:49 it needs to go now static routes at a five so that's the next high so we figure if you're
1:34:55 going to put in a static route you put it in there for a reason now the next one is ospf internals and
1:35:03 they come in at 10. so all your normal uh ospf that's actually learned from the
1:35:09 interfaces they get assigned to 10. rip gets put in at 100 not Rip's not used
1:35:15 very much anymore ospf external is 150 so if you injected
1:35:21 a route into ospf then it comes in at 150 and then bgp comes in at 170 then
1:35:29 that's both external and internal bgp so if everything else is is the same
1:35:37 we're going to look at the preference to determine where that's at now like on
1:35:42 the static route you can actually change the preference so I can put in a static route and change the preference saying
1:35:48 look I I'm going to put this in as a backup route to ospf so if ospf Has a
1:35:54 Glitch I have this backup route and you can change that and say change it down to a 20 or something so ospfs go along
1:35:59 and something glitches in ospf you have a backup for out sitting there as a static behind that one
1:36:07 the routing table on junos is an important object that we work with a lot
1:36:12 the routing table here to see it we do the show route command here in this
1:36:17 example we see the show route command displays the inet.0 table this inet.0 table is the ipv4 table so
1:36:26 every protocol has its own table so IPv6 of course would be inet 6.0
1:36:32 we see that it has six destinations and seven routes and you might go why is
1:36:38 there more routes and destinations because if you see here we have this 10 1 1 0 destination or
1:36:46 prefix and it has two different routes going to it and so we have a static
1:36:52 route and we have a ospf route and if you see the static route has a
1:36:57 preference of five and ospf has a reference of 10. and so we know that the
1:37:05 static five because it's a lower preference value is going to take precedence over the ospf 10.
1:37:12 so if we look at that we see there's an asterisk out in front that asterisk indicates that that's the active route
1:37:19 that active route gets put into the forwarding table if something happened to our interface ge0010 that that static
1:37:26 route is using then that route would get pulled out and the ospf slash 10 route
1:37:33 would go out interface 13 at this point so that is the routing table that when
1:37:42 we look at it so the routing table stores all the
1:37:49 information from all of the routing sources we have ospf bgp rip we have all
1:37:54 the routing protocols Isis and we have other information that comes
1:38:00 in either static or direct routes these can get put into the routing table and
1:38:06 the routing table has to put all those together to make the forwarding table and this forwarding table is where we
1:38:13 actually go to find out where we're going to send the packet when a packet comes in
1:38:19 to look at that forwarding table we can use the command show route forwarding table
1:38:28 so the device as it comes in as as packets come into the device we're going
1:38:35 to go ahead and look at those and we're going to analyze those packets and we're going to look for what we call the
1:38:40 longest match and when we look at the longest match we'll go through and look and try to
1:38:46 find a route that hooks to that as the route that applies to that
1:38:53 and once we find a route that applies to that in the forwarding table we'll go ahead and send that out the interface
1:38:58 that is attached to that
1:39:05 so here's our forwarding table if we do our show route 40 table in here we have a little question we
1:39:13 want to give to you guys is we have um we want to use the we're looking for
1:39:20 where these certain prefixes are going to go so we have a packet that's destined to 172
1:39:26 1952.101 one that's going to 172 1952.21 I want to go into 172.25 100.27.
1:39:36 now these are all in just a little bit different color as you can tell and so
1:39:41 where do you think the first one's going to go to the 172 1952.101
1:39:51 it's going to go right there right it does not fall within the very last one there with the slash 28 it's too high of
1:39:59 a number and so it's going to head there so we see that words are going to go out
1:40:05 of it's going to go out interface ge001 and it's going to a next top of
1:40:11 200.1.2.100. now the next one in our list the 172 19
1:40:18 52.21 well it does fall within the range of this the dot 16-28 and so it will
1:40:25 take interface ge002 and head out to the next hop address there
1:40:32 so the the last one the 172 25 100.27
1:40:37 well we don't have a 100 in the third octet anywhere so it's gonna basically go back to the default route so here we
1:40:45 see we have a default route set up and we have a next hop the next top address
1:40:50 is the on the default is the MAC address that it's going to send that traffic out to and then we see that that's attached
1:40:58 to ge000 in this case and so we have all
1:41:03 of our our next top examples and so as that comes in it's going to find that
1:41:09 longest match in the octet that where the subnet mask is at and send it out
1:41:15 that interface that it is is programmed into the forwarding table
1:41:23 so if you want to make a static route we would put that under the hierarchy of
1:41:29 routing options so again you would type in edit routing options and we'll then
1:41:35 we'll be inside of there then what we do is we do a set static route and then we
1:41:41 give the route the prefix and the next top and so here you see that we we did that
1:41:47 and we down here we set up a default static route to go out
1:41:53 um the interface ge001 now static routes do require a valid
1:42:01 next hop if you do not see your static route in the routing table the the best
1:42:08 reason that it's not there is that the next hop is invalid now that could be for a variety of reasons if it was
1:42:15 working before now it's not working something happened on on your device the the interface that's connected to that
1:42:21 next hop is not working um is probably the the best guess but if
1:42:27 it was never working the best guess is you probably mistyped your next top address in your configuration so you
1:42:33 want to go and check that out and see where that's at
1:42:39 so here we have just a couple examples uh we have a IPv6 route and a couple
1:42:46 ipv4 routes so here we have and we see under routing options we have what we
1:42:54 call a rib a routing information base and that routing information base goes to inet 6.0 we put in after that Now the
1:43:03 default is ipv4 so we don't have to put the ribbon on the ipv4 addresses for
1:43:09 that statement so then we can just say uh under routing options Set static
1:43:14 route give the route prefix next top and give the next top address so here we see a couple other things
1:43:21 down here we see that no re-advertise now a no re-advertise says hey look even
1:43:28 if this should get wrapped up inside of a routing protocol let's say ospf or bgp
1:43:34 and we have a policy created and it should grab that we never want this route to go into a routing protocol so
1:43:42 we can go ahead and and add that at the end there
1:43:50 qualified next hops is a way to have multiple route destinations in case a
1:43:58 route does go down so here you see we have a route our default route and it goes out to the
1:44:05 internet and we have a next top of 172 3025.1 and if you look up at the the
1:44:12 display in the in the middle you'll see the primary has the dot one
1:44:17 well that's fine and we're happy to use that one maybe that's a a 10 gig link
1:44:23 you know well it's not because it's a GE interface um so so it's a gig link and then we
1:44:29 have this se1 it's a Serial interface which is usually slower right we don't have a Serial interface that goes 10 gig
1:44:36 and so it's a slower interface so we're using the primary as long as that one's
1:44:41 alive but if that one dies what happens is we go to this qualified next top and
1:44:47 then we can look at that we say qualified Next Top 172 30 25.5 which is
1:44:53 the next hop of the other link and then we can change the preference of
1:44:58 that to seven and we do that so that the secondary link always stays the secondary as long as the primary is
1:45:05 alive it's going to have a preference of five and the traffic will go across that
1:45:10 preference of five if it's a seven that it's going to come in after the five and
1:45:16 so we have to wait for that other link to go down before we're going to use that so those are our static route options
1:45:25 Dynamic routing is a way that we can tell our routers to look out at the
1:45:31 network around us and get routing information from other routers that
1:45:36 might have information for us now this works really great in larger networks because it has lower administrative
1:45:42 overhead increased Network availability and greater Network scalability so let's take it let's look at this real
1:45:49 quick let's say I have uh a hundred routers and I add a new subnet into one
1:45:56 of my routers and add another Network onto that well I'm gonna have to go to every one
1:46:01 of those routers and add that route to it and maybe put you know both a a
1:46:07 preferred route and a secondary route to make sure we can always get over to hit
1:46:13 to the new subnet that I created well that's going to take a lot of time I could mistype something
1:46:19 um there's just a lot of overhead on that so what we want to do is we want to use a dynamic routing protocol so when I
1:46:26 add this subnet it automatically tells the routing protocol and the routing protocol advertises that out around to
1:46:34 all the other devices so ospf is
1:46:39 is a routing protocol it's an internal routing protocols it's an igp
1:46:45 okay and what it does is it sends floods out link State advertisements to all the
1:46:51 information that it knows about to all the other routers that are out there that it's attached to and so then once
1:46:58 all the routers have all the information from all the other routers it can start doing calculations on this database from
1:47:06 all these link State advertisements to figure out the best path to any of the destinations
1:47:12 and so ospf uses a hierarchical system
1:47:17 uh to split off the advertisements and so if you see down in the pictures it's
1:47:24 called areas and areas are in the so the main area is always area zero and then
1:47:30 we see on the left side we have area one and on the right side we have area two now many networks only use an area zero
1:47:38 it's not until you get into a really large Network that you might want to start splitting it off or if you you
1:47:44 might split it off for stability reasons there's a few other reasons you might split an area off
1:47:51 so let's take a look at our little case study here here we have a network down
1:47:56 here it's a single ospf area area zero and we have three routers in here and we
1:48:04 want to have these prefixes that are on the outside areas the 172 20s we want
1:48:11 those to be advertised around to all the other routers so on router a we have 172
1:48:17 20.1 on router B we have 172 20.2 and on router C we have
1:48:24 um 172 20.3 and we want these to be moved
1:48:29 around so the computers that are out inside of these areas can use the router
1:48:35 a b and c as their default gateway and get to all the other networks that are
1:48:40 in there and so let's see what we're going to do here for our router a for our
1:48:46 configuration at this point so we're going to set up all of the
1:48:54 interfaces here to speak ospf so under the hierarchy protocols ospf we're going
1:49:03 to set an area 0 and add the interfaces so here we say interface
1:49:08 g001 ge002 are going to be um in ospf but interface three interface
1:49:16 3 is the one that points out to the computers the computers that are actually going to try to send the
1:49:22 traffic in this is the default gateway we put this little passive tag on the back of that and that says hey we want
1:49:29 the IP address that's attached to ge003 to come in and and participate in ospf
1:49:36 but we don't want anybody out there to send an ospf packet and try to make a
1:49:41 relationship with our router so this is as a security feature so that is anybody
1:49:47 out that's in the computer area can't hook up a router and and try and mess up our ospf tables
1:49:54 and then we add our loopback of address in of course uh to area zero now you'll
1:50:01 see that when we put area 0 in we type that in it actually gets sent in and put
1:50:07 into a dotted notation this dotted notation is the same as an IP address so
1:50:12 those are four octets and so the if you go over an area of say
1:50:20 255 right because you can get up to 255 in their 0 to 255 is 256 addresses and
1:50:27 eight bits will let us do 256 addresses so let's say I go to 257.
1:50:35 um or 250 uh six as my area number
1:50:41 what's going to happen is it's going to jump over and it'll say area 0 0 1 0 is
1:50:48 my area number so that's just something to watch out for you don't have to type it in that way you don't have to keep
1:50:53 track of it but when it displays it back to you it might be a little different than what you were expecting it to be
1:51:00 so we get this all configured up we got all of our interface and ospf
1:51:06 and we did the same thing on on routers B and C and did the same configurations
1:51:12 put interface one and two in put interface 3 in but added a passive tag and now once we've committed them all
1:51:18 and we go and look and we do a show ospf neighbor on router a we see that we have
1:51:25 uh two neighbors that are in the full state and full is the what you want to
1:51:30 see that means that we've communicated we've all agreed the best routes through the network and everybody's got the same
1:51:37 plan to send traffic through the network because one of the things you do not want to have with automated
1:51:44 um routing protocols is or dynamic routing protocols is that a loop you
1:51:50 don't want a loop to form and we send traffic to router a Ava a sends it back to C C sends it back to a a sends it
1:51:57 back to C and we're in the loop uh Dynamic routing protocols work really hard to make sure that this is not going
1:52:03 to happen and so when it's in this full state it says Hey yep we've all communicated we all know what we're
1:52:09 going to do and we're going to make sure there's no Loops inside of your network so we got the we got all the ospf
1:52:16 neighbors working we're happy there now we can do a show route protocol ospf now
1:52:22 the only thing that's different between this one and the show route command is that we're just going to show you ospf
1:52:28 routes we're not going to see all the static and the dynamic and if we had bgp we won't see the bgp ones either we're
1:52:34 only going to see the ospf routes so here you see we have our 172 20.2 our
1:52:40 172 20.3 right we're on router a and those are the main networks that on B
1:52:46 and C that we were trying to get to and you also see down a little bit lower that we have our 192 168 100s now these
1:52:55 were the loopbacks and so you see that we have the loopback addresses also attached and then you'll see that the
1:53:02 the we have the 172.25 this is the network that hooked routers B and C
1:53:08 together um over on the other side uh the the we weren't really paying attention to but
1:53:14 we have that internal Network that hooks all the routers together and it was the 17225 network over there
1:53:22 all right so that's our case study uh the next thing is IPv6 cannot work with
1:53:30 ospf so they had to come with the new protocol and that is called ospf version
1:53:37 three so ospf3 um it's defined in RFC
1:53:44 5340s made in July 20 uh 2008
1:53:49 so uh all the fundamentals all the stuff you know about ospf if you know anything
1:53:54 about ospf remains basically the same it's just going to allow us to put IPv6
1:54:01 across there now I ospf3 can actually run IP ipv4 and IPv6
1:54:13 so you can run just ospf3 if you want to but ospf3 is not compatible with ospf so
1:54:21 if you don't have a if you have a system over here running uh ipv4 networks and
1:54:29 all of them can't switch over to ospf3 your Best Bets are on ospf and ospf3 so
1:54:36 six would run on ospf34 would run on just normal ospf but if everything can
1:54:42 run ospf3 you can just run ospf3 and not run ospf anymore to help you out there
1:54:51 foreign so now we have a routing demo that we will go ahead and we're gonna actually
1:54:58 set this up and configure it up and show you how it works
1:55:04 let's look at how this routing works now with our routing demo so here we see we have three routers
1:55:11 for router a b and c we have everything set up all the interface is all set up and routers B
1:55:18 and C are already all set up in router a here we need to be able to
1:55:23 add the information to it so that it will run ospf and then
1:55:30 pull in the routes through the link State advertisement so that we can get to the loopback addresses and to the
1:55:37 other uh interfaces out on interface threes the 172 20 networks so let's take
1:55:45 a look real quick here we have a router a and if we do a
1:55:53 show interfaces terse we see that we have them already
1:55:59 configured up here right here in the middle we have interfaces one two and three already configured and ready to go
1:56:09 if we do a show route oh we got to put that e on the end show
1:56:16 route you see we see all the connected networks there's 172 21 now that's our
1:56:22 interface threes uh Network we see we have the 172 uh
1:56:29 25.1 right that goes up g002 and you see
1:56:34 we have the other one that goes off ge001 so we see all of our directly
1:56:39 connected interfaces there and if we did a ping on one of those
1:56:45 ping 172.25.1 Dot let's do a nine right we
1:56:53 should be able to see router C there and router C says yep I see that but if
1:56:59 we change that to that interface 3 17220.3.1
1:57:06 we do not see that we don't have a a route to that so we we can also test that ping 192 168
1:57:18 100.2 no route to that either that's the
1:57:25 loopback on router B so we can't hit the loopbacks or the other actual routes uh or the the routes
1:57:34 out on interface three so what we need to do is we need to add in ospf configuration to listen to the
1:57:42 lsas and add those to our routing table so let's go ahead and do that really
1:57:47 quick so let's jump into configuration mode and once we're in here we need to go
1:57:53 into the protocols hierarchy so we're going to edit protocols ospf
1:58:00 and now we're in there we need to add those interfaces to this in to this configuration so set
1:58:07 interface oh area zero we got to put the area in there
1:58:13 interface and we need to add in interface one
1:58:19 and we need to add in interface two so I'm just going to hit the up arrow and
1:58:25 put a 2 there and interface three but on interface
1:58:30 three we want to put in the passive tag so that we cannot send or receive lsas
1:58:36 on that interface we are just going to take the IP address that's attached to interface 3 and that Network and put it
1:58:44 in to our database and then send out lsas out about it now we also want to put in the loopback
1:58:51 address so we'll uh interface so we'll put that one in
1:58:56 here uh Lo zero now if you see this we put in
1:59:02 all the interfaces but I didn't put in the unit numbers that go on the end but if you look here unit numbers were
1:59:09 automatically attached now the unit number that's attached is zero and since
1:59:15 most of the time the unit number zero junos helps us out and and does this for
1:59:20 us but remember in our example we had a unit 51 if we had a unit 51 at on here
1:59:27 then we and we didn't type it in all the way we just hit that it would put unit 0.
1:59:34 and so ospf would actually be using the wrong sub interface at that time and that's not what we want to have happen
1:59:40 and so you need to be careful that sometimes it's a shortcut and sometimes it it hurts you that you didn't do it
1:59:47 right all right so we got ospf put in there everything's working uh if we if we go
1:59:55 ahead and do a run show route you notice nothing's changed and
2:00:01 nothing's changed because we haven't committed anything remember we always have to do a commit to get our changes
2:00:07 to go into place so let's go ahead and commit there uh and so now it's committed let's jump
2:00:14 back out to the um operational mode here and we're gonna do
2:00:21 some show commands so show uh ospf interfaces
2:00:27 there's our all of our interfaces looks good we see we already have some neighbors that are attached over there
2:00:34 one neighbor to each one of those interfaces and we should we should not ever expect a neighbor on the loopback
2:00:41 and we should not expect a neighbor on ge003 because we put that passive tag on
2:00:48 there and said look we don't want you to look for any neighbors out there all right so everything looks like it's
2:00:54 working good there we can do a show OS PF uh neighbor
2:01:01 and we see that we did find two neighbors one at dot nine and one at dot two and that matches up with our uh
2:01:08 diagram pretty well they're both in the full state that means that all the devices are synced
2:01:16 together and they know the best way to send routes throughout the network so we can also see what has come in show
2:01:24 ospf database and here we can see all the different
2:01:29 networks that are being brought in here so we see we have our 192 uh all of our
2:01:37 information from our loopbacks are coming in and from all the different
2:01:42 networks that are coming in all right so we have the database and
2:01:47 now we can do a show route again
2:01:52 and this time you see we have our 172 21.0
2:01:59 like we had did before but now you see we have a 172 20.2 Network that came in
2:02:05 from router B and one that came in from router C for the dot three
2:02:12 you'll also see that we have um a network here another one here
2:02:20 172.251.4 and this is the network that ties router C and B together
2:02:26 and then down here a little lower you'll see that we have the loopback addresses
2:02:31 all that came in so we can get to all the loopback addresses
2:02:37 so now let's just give it a try here and we can do a show or a ping let's try and
2:02:44 ping and make sure we can get over there I will try the loopback 192 of router B
2:02:50 192 168.100.2
2:02:57 now we don't get a error mesh that says no route to host we have a route to host
2:03:02 there we can also just real quick since it's right here we can do a DOT three and see
2:03:09 if we get to router C and we can so now let's try and ping
2:03:17 172.20.2.1 right that's the the ge003 interface on router B
2:03:24 and we get replies from that Network and we could hurry and quickly go to three
2:03:31 and we got communication everywhere so now as long as the computer's out on
2:03:37 these 17220 networks had the default gateways pointed to these routers they
2:03:43 get to get they could get to the other two networks no matter where they're at in the in in the network scheme
2:03:51 all right this has been our routing demo well we've reached the end of this
2:03:56 course and we're so happy that you've taken time out of your busy schedule to
2:04:02 be with us to learn more about Juniper Networks and the junos operating system
2:04:07 we sure hope that you have found this very useful but you might be thinking well what's
2:04:13 next now that I'm done with this course attend another jumpstart Juniper class you can sign up at the URL on the screen
2:04:21 we have six courses right now they cover junos please watch for more jumpstart
2:04:27 Juniper videos coming soon another fantastic resource is the learning portal at juniper.net
2:04:34 there you'll find a lot of resources that can help you one of those is the Juniper open
2:04:40 learning Juniper open learning is for certification and to help people get
2:04:46 started with their certifications Juniper open learning has live seminars where you can ask experts questions
2:04:53 about the things you might need to know about the certifications they also have some online videos that
2:05:00 you can watch that go over the certification information and help you
2:05:06 learn the things that you need to know they also have practice tests you can
2:05:11 receive vouchers if you pass those practice tests to receive a discount on
2:05:17 your test that you need to take to become Juniper certified so make sure
2:05:22 you check out Juniper open learning another thing is the learning paths that you can find on the learning portal the
2:05:28 learning paths help you decide which track is best for you is it security is
2:05:34 a service provider Enterprise what things do you want to learn from Juniper
2:05:39 Networks On The Learning portal you'll also find all the on-demand courses from
2:05:46 the course development team from Juniper Networks they have many courses for you
2:05:51 to take on the different technologies that Juniper Network provides so that
2:05:56 you can learn and grow in the path that you want there's also a list of class schedules
2:06:03 for scheduled classes that are led by an instructor last of all is the all access
2:06:08 pass this all access pass allows you to take any course the Juniper has this all
2:06:15 access pass is a yearly subscription for you so that you can take as many classes
2:06:21 you'd like throughout the year it's a single price and it also comes with a
2:06:27 few perks and one of those perks is that you can take a actual class from one of
2:06:33 the class schedules so you can take the on-demand course and then you can actually take it from the
2:06:40 instructor so that really helps you be able to find the path that you want to
2:06:45 take Juniper Networks has created a certification path just for you
2:06:51 this certification path will help you distinguish yourself amongst your colleagues that you know how Juniper
2:06:59 Networks operates and how to design and maintain networks built by Juniper
2:07:06 Networks equipment there's four levels within the certification path that you can take
2:07:12 there's an associate level a specialist level a professional level and an expert level
2:07:17 at each one of these levels you get to show how much you know about Juniper
2:07:23 Network's operating system and devices each one of these certifications can run
2:07:30 within a different track Juniper Networks has seven tracks that you can pick from to show your
2:07:38 Proficiency in Juniper network devices and configurations
2:07:43 these tracks are service provider routing and switching Enterprise routing
2:07:48 and switching data center Juno security Cloud Automation and devops data center
2:07:54 Wan security design so there's a track for you to be able to
2:08:01 move forward and show that you are proficient with Juniper Networks devices
2:08:08 thanks again for attending our jumpstart Juniper course today
