Help us improve your experience.

Let us know what you think.

Do you have time for a two-minute survey?


SSL Certificates

SRX Series Firewall acting as SSL proxy manages SSL connections between the client at one end and the server at the other end. SSL proxy server ensures secure transmission of data with encryption technology. SSL relies on certificates and private-public key exchange pairs to provide the secure communication. In this topic, you learn about how to generate and install SSL certificate on your security device for SSL connections.

Configuring and Loading SSL Certificates

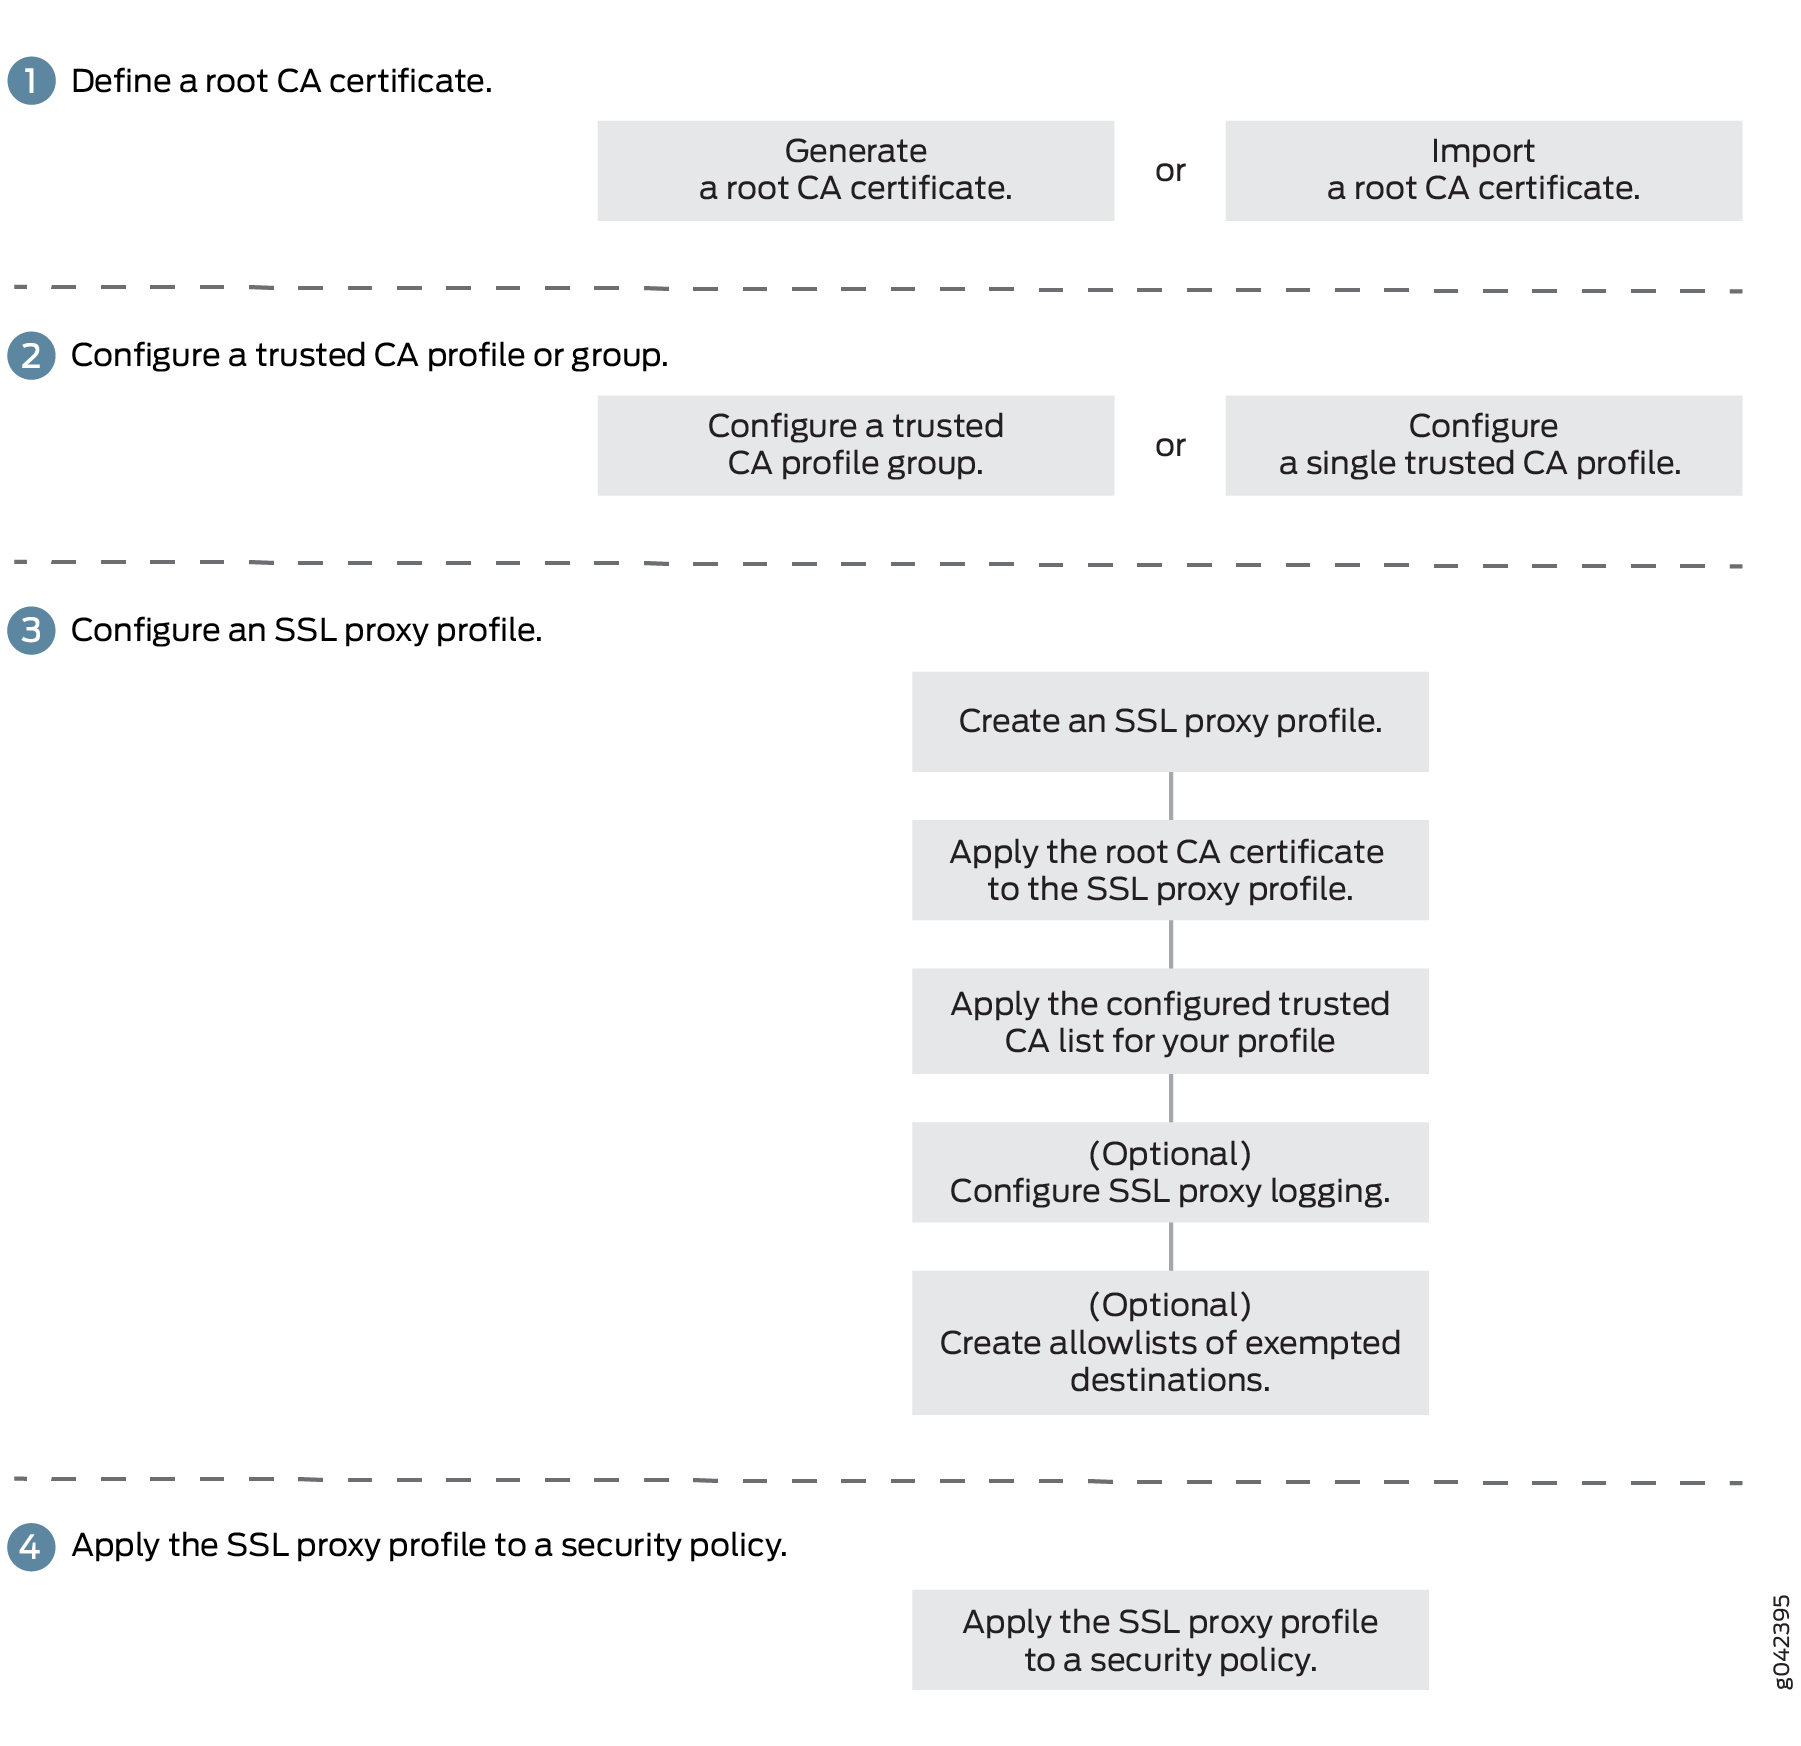
Figure 1 displays an overview of how SSL proxy is configured. Configuring SSL proxy includes:

  • Configuring the root CA certificate

  • Loading a CA profile group

  • Configure SSL proxy profile and associate root CA certificate and CA profile group

  • Applying an SSL proxy profile to a security policy

Figure 1: SSL Proxy Configuration OverviewSSL Proxy Configuration Overview

Lets discuss these procedures in detail in the following sections:

Configuring a Root CA Certificate

A CA can issue multiple certificates in the form of a tree structure. A root certificate is the topmost certificate of the tree, the private key of which is used to sign other certificates. All certificates immediately below the root certificate inherit the signature or trustworthiness of the root certificate. This is somewhat like the notarizing of an identity.

To configure a root CA certificate you must

  1. Obtaining a root CA certificate (by either or importing one)

    • You can generate a root CA certificate using Junos OS CLI on an SRX Series Firewall.

    • Obtain a certificate from an External CA (not covered in this topic)

  2. Applying root CA to an SSL proxy profile.

Generate a Root CA Certificate with CLI

To define a self-signed certificate in CLI, you must provide the following details:

  • Certificate identifier (generated in the previous step)

  • Fully qualified domain name (FQDN) for the certificate

  • e-mail address of the entity owning the certificate

  • Common name and the organization involved

Generate a root CA certificate using the Junos OS CLI:

  1. From operational mode, generate a PKI public/private key pair for a local digital certificate.

    Example:

  2. Define a self-signed certificate.

    Example:

    By configuring the add-ca-constraint option, you make sure that the certificate can be used for signing other certificates.

  3. From configuration mode, apply the loaded certificate as root-ca in the SSL proxy profile.

    Example:

  4. Import the root CA as a trusted CA into client browsers. This is required for the client browsers to trust the certificates signed by the SRX Series Firewall. See Importing a Root CA Certificate into a Browser.

Configuring a Trusted CA Profile Group

The CA profile defines the certificate information for authentication. It includes the public key that SSL proxy uses when generating a new certificate. Junos OS allows you to create a group of CA profiles and load multiple certificates in one action, view information about all certificates in a group, and delete unwanted CA groups. When a connection is initiated, the connecting device (such as a Web browser) checks whether the certificate is issued by a trusted CA. Without these certificates, browsers cannot validate the identity of most websites and mark them as untrusted sites.

Configuring a trusted CA profile group includes following steps:

  • Obtaining a list of trusted CA certificates. You can obtain trusted CA certificates using one of the following methods:

    • Junos OS provides a default list of trusted CA certificates as a PEM file (for example, trusted_CA.pem). After you download the Junos OS package, the default certificates are available on your system.

      From operational mode, load the default trusted CA certificates (the group name identifies the CA profile group):

      Example:

      The SRX Series Firewall support dynamic update of default trusted CA certificates. The latest default trusted CA certificates are stored and periodically updated on Juniper CDN server (http://signatures.juniper.net/cacert). Automatic download of trusted CA bundle is enabled by default in Junos OS device. This eliminates the need for managing these certificates manually in the event of compromise. To use this feature, see Dynamic Updated of Trusted CA Certificates.

      We recommend using this method.

    • Define your own list of trusted CA certificates and import them on your system. You get the list of trusted CAs in a single PEM file (for example IE-all.pem) and save the PEM file in a specific location (for example, /var/tmp). See Knowledge Base Article KB23144.

      From operational mode, load the trusted list to the device (the group name identifies the CA profile group):

      Example:

    • Download the latest CA bundle list from another 3rd party such as Mozilla (https://curl.haxx.se/docs/caextract.html). The list of trusted Certificate Authority can change over time, ensure that you use the latest CA bundle.

    • Import your own trusted CA certificates using the Public Key Infrastructure (PKI). The PKI helps verify and authenticate the validity of the trusted CA certificates. You create CA profile groups that include trusted CA certificates, then import the group on your device for server authentication.

  • Attaching the CA group to the SSL proxy profile.

    • Attach all CA profile groups:

      Example:

    • Attach one CA profile group (the group name identifies the CA profile group).

      Example:

You can easily display information about all certificates in a CA profile group:

You can delete a CA profile group. Remember that deleting a CA profile group deletes all certificates that belong to that group:

What's Next

Now proceed with SSL proxy profile configuration and apply SSL proxy profile to security policy. See Configuring SSL Proxy.

Importing a Root CA Certificate into a Browser

In order to have your browser or system automatically trust all certificates signed by the root CA configured in the SSL proxy profile, you must instruct your platform or browser to trust the CA root certificate.

To import a root CA certificate:

  1. Generate a PEM format file for the configured root CA.
  2. Import a root CA certificate into a browser.

    From Internet Explorer (version 8.0):

    1. From the Tools menu, select Internet Options.
    2. On the Content tab, click Certificates.
    3. Select the Trusted Root Certification Authorities tab and click Import.
    4. In the Certificate Import Wizard, navigate to the required root CA certificate and select it.

    From Firefox (version 39.0):

    1. From the Tools menu, select Options.
    2. From the Advanced menu, select the Certificates tab and click View Certificate.
    3. In the Certificate Manager window, select the Authorities tab and click Import.
    4. Navigate to the required root CA certificate and select it.

    From Google Chrome (45.0):

    1. From the Settings menu, select Show Advanced Settings.
    2. From the Advanced menu, select the Certificates tab and click View Certificate.
    3. Under HTTPS/SSL, click Manage Certificates.
    4. In the Certificate window, select Trusted Root Certification Authorities and click Import.
    5. In the Certificate Import Wizard, navigate to the required root CA certificate and select it.

Certificate Chain Implementation

Starting in Junos OS Release 15.1X49-D30, SSL forward proxy supports the certificate chain implementation. Lets discuss about understanding certificate chain concepts and how to configure it on SRX Series Firewall.

  • Certificate Authority (CA)— CA is a trusted third party responsible for validating the identities of entities (such as websites, email addresses, or companies, or individual persons) and issues a digital certificate by binding cryptographic keys. If your organization owns a CA server, then you become your own CA and use self-signed certificate.

  • Root Certificate—A Root certificate is a certificate issued by a trusted certificate authority (CA). The root certificate is the topmost certificate of the tree, the private key of which is used to sign other certificates. All certificates immediately below the root certificate inherit the signature or trustworthiness of the root certificate. These certificates are used to establish connection between two endpoints.

  • Intermediate CA Certificate—An intermediate CA certificate is a subordinate certificate signed by the trusted root specifically to validate an end-entity certificates.

  • Certificate Chain - An certificate chain is the ordered list of certificates that contains the SSL certificate, intermediate certificate, and root certificate. Some certificate authorities (CAs) do not sign with their root certificate, but instead use an intermediate certificate. An intermediate CA can sign certificates on behalf of the root CA certificate. The root CA signs the intermediate certificate, forming a chain of trust.

    The intermediate certificate must be installed on the same server as the SSL certificate so that the connecting device (browsers, applications, mobile device, etc.) can trust it.

When you initiate a connection, the connecting device (such as a Web browser) checks whether the certificate is authentic and is issued by a trusted certificate authority that is embedded in the browser’s trusted store.

If the SSL certificate is not from a trusted CA, then the connecting device continues to check if the SSL certificate is issued by a intermediate CA and this intermediate CA is signed by a root CA. The check continues till the root CA is found. If it finds a root CA, a secure connection is established. If it doesn’t find a root CA, then the connection is dropped, and your web browser displays an error message about invalid certificate or certificate not trusted.

This example shows how to install the certificate chain to enable browsers to trust your certificate.

Requirements

No special configuration beyond device initialization is required before configuring this feature.

Overview

In this example, you have a domain, example.domain-1, and you want to purchase a certificate from XYZ-Authority for your domain. However, XYZ -Authority is not a Root-CA and the visiting Web browser trusts only Root-CA certificate. In other words, its certificate is not directly embedded in your Web browser and therefore it is not explicitly trusted.

In this case, trust is established in the following manner using the certificate chain (of intermediate certificates).

Topology

Let’s try to visualize this chain through Figure 2. The image depicts a full certificate chain, from the root CA certificate to the end-user certificate. The chain terminates at the end-user certificate.

Figure 2: Certification Path from the Certificate Owner to the Root CACertification Path from the Certificate Owner to the Root CA
Table 1: Certificate Chaining Details

User

Uses Certificate

Signed By

Type

example.domain-1

End User Certificate

XYZ-Authority

End User Certificate. The one the one you purchase from the CA.

XYZ-Authority

Certificate-1

Intermediate CA-1

Intermediate Certificate

Intermediate CA-1

Certificate-2

Intermediate CA-2

Intermediate Certificate

Intermediate CA-2

Certificate-3

Intermediate CA-3

Intermediate Certificate

Intermediate CA-3

Certificate-4

root-example-authority. This is a root CA.

Root Certificate

Its certificate is directly embedded in your Web browser; therefore it can be explicitly trusted.

When you install your end-user certificate for the server example.domain-1, you must bundle all the intermediate certificates and install them along with your end-user certificate. The certificate chain includes all the certificates starting from Certificate-1 to Root-CA certificate. Because the web browser trusts the root CA, it also implicitly trusts all the intermediate certificates. If the SSL certificate chain is invalid or broken, your certificate will not be trusted by some devices.

Note:
  • All certificates must be in Privacy-Enhanced Mail (PEM) format.

  • When you import the concatenated certificate file into the device, the CA provides a bundle of chained certificates that must be added to the signed server certificate. The server certificate must appear before the chained certificates in the combined file.

Configuration

Configuring the SSL certificate chain includes the following tasks:

  • Purchase an SSL certificate from a CA that includes a signing certificate and a respective key.

  • Configure a trusted CA profile group.

  • Load the signing certificate and the key on your device.

  • Load the intermediate and root CA in public key infrastructure (PKI) memory. This certificate file contains all the required CA certificates, one after each other, in PEM format.

  • Create a trusted CA profile for the intermediate or root CA certificate.

  • Set up your device to use the signing certificate received from the CA by configuring and applying the SSL proxy profile to a security policy. SSL forward proxy stores this certificate chain information (CA certificate profile name) in the respective SSL profile. As a part of security policy implementation, SSL profiles having the certificate chain information and CA certificates are used.

The following components are involved in certificate chain processing:

  • Administrator loads the certificate chain and the local certificate (signing certificate) into the PKI daemon certificate cache.

  • The Network Security Daemon (nsd) sends a request to the PKI daemon to provide the certificate chain information for a signing certificate configured in the SSL proxy profile.

This example assumes that you have already purchased an SSL certificate from a CA.

Configuring the Certificate Chain on the Device

Step-by-Step Procedure

To configure certificate chain:

  • Load the local certificate into the PKI memory.

    The following message is displayed:

    Note that the certificate ID will be used under the root-ca section in the SSL proxy profile.

  • Load the intermediate or root CA certificate in the PKI memory.

    The CA profile includes the certificate information used for authentication. It includes the public key that SSL proxy uses when generating a new certificate.

    This certificate will be attached as a certificate chain.

  • Attach the CA profile group to the SSL proxy profile. You can attach trusted CA one at a time or load all in one action.

  • Apply the signing certificate as root-ca in the SSL proxy profile.

  • Create a security policy and specify the match criteria for the policy. As match criteria, specify the traffic for which you want to enable SSL proxy. This example assumes that you have already created security zones based on the requirements.

    SSL forward proxy stores this certificate chain information (CA certificate profile name) into respective the SSL profile. As a part of security policy implementation, SSL profiles having the certificate chain information and CA certificates are used.

    You can view the certificate chain on the connecting Web browser (that is, the client).

Ignore Server Authentication Failure

Server Authentication

Implicit trust between the client and the device (because the client accepts the certificate generated by the device) is an important aspect of SSL proxy. It is extremely important that server authentication is not compromised; however, in reality, self-signed certificates and certificates with anomalies are in abundance. Anomalies can include expired certificates, instances of common name not matching a domain name, and so forth.

Server authentication is governed by setting the ignore-server-auth-failure option in the SSL proxy profile. The results of setting this option is available in Table 2.

Table 2: Ignore Server Authentication Failure Option

SSL Proxy Profile Action

Results

The ignore-server-auth-failure option is not set (Default option)

  • If authentication succeeds, a new certificate is generated by replacing the keys and changing the issuer name to the issuer name that is configured in the root CA certificate in the proxy profile.

  • If authentication fails, the connection is dropped.

The ignore-server-auth-failure option is set

  • If the certificate is self-signed, a new certificate is generated by replacing the keys. The issuer name is not changed. This ensures that the client browser displays a warning that the certificate is not valid.

  • If the certificate has expired or if the common name does not match the domain name, a new certificate is generated by replacing the keys and changing the issuer name to SSL-PROXY: DUMMY_CERT:GENERATED DUE TO SRVR AUTH FAILURE.

    This ensures that the client browser displays a warning that the certificate is not valid.

  • We do not recommend this option for authentication, because configuring it results in websites not being authenticated at all. However, you can use this option to effectively identify the root cause for dropped SSL sessions. See Enabling Debugging and Tracing for SSL Proxy.

Client Authentication

Currently, client authentication is not supported in SSL proxy. If a server requests client authentication, a warning is issued that a certificate is not available. The warning lets the server determine whether to continue or to exit.

Certificate Revocation Lists for SSL Proxy

Working with the Certificate Revocation Lists for SSL Proxy

Certificate authority (CA) periodically publishes a list of revoked certificate using a certificate revocation list (CRL). The security device downloads and caches the most recently issued CRL. The CRL contains the list of digital certificates with serial numbers that have been canceled before their expiration date.

CA revokes the issued certificate if there is any chance that the certificate is compromised. Some other reasons for revoking a certificate are:

  • Unspecified (no particular reason is given).

  • Private key associated with the certificate or CA that issued the certificate was compromised.

  • The owner of the certificate is no longer affiliated with the issuer of the certificate

  • Another certificate replaces the original certificate.

  • The CA that issued the certificate has ceased to operate.

  • The certificate is on hold pending further action. It is treated as revoked but might be accepted in the future.

When a participating device uses a digital certificate, it checks the certificate signature and validity. By default, CRL verification is enabled on SSL proxy profile.

Starting with Junos OS Release 15.1X49-D30 and Junos OS Release 17.3R1, SRX Series Firewalls support certificate revocation list (CRL). CRL validation on SRX Series Firewall involves checking for the revoked certificates from servers.

On SRX Series Firewall, the certificate revocation checking is enabled by default for SSL proxy profile. You can enable or disable the CRL validation to meet your specific security requirements.

  • Disable CRL verification.
  • Re-enable CRL verification.

You can allow or drop the sessions when a CRL information is not available for reasons such as failed CRL download or unavailability of the CRL path in the root or intermediate certificate.

  • Allow the sessions when CRL information is not available.

  • Drop the sessions when CRL information is not available.

  • Configure an SRX Series Firewall to accept a certificate without a reliable confirmation available on the revocation status and allow the sessions when a certificate is revoked and the revocation reason is on hold.

SSL Performance Enhancements

SSL performance enhancement on SRX Series Firewall includes following features:

Optimizing the SSL Performance

The SSL/TLS handshake is a CPU-intensive process. Since SSL/TLS is the most widely used security protocol on the web, it’s performance results in significant impact on the web performance.

Starting from Junos OS Release 15.1X49-D120, you can use the following options for optimizing the performance:

  • Use optimized RSA key exchanges

  • Use Authenticated Encryption with Associated Data (AEAD)—AES128-CBC-SHA, AES256-CBC-SHA

  • Maintaining certificate cache—Certificate cache stores the interdicted server certificate along with the server certificate details. During SSL/TLS handshake, SSL proxy can present the cached interdicted certificate to client instead of generating the new interdicted certificate.

Improving the SSL performance results in improved website performance without compromising security and maximized user experience.

You can optionally configure the following settings for your certificate cache. However, we recommend retaining the default values.

Example:

  • (Optional) Set the certificate cache timeout value (example- 300 seconds) .

    In this example, the certificate cache stores the certificate details for 300 seconds. The default timeout value is 600 seconds.

  • (Optional) Disable the certificate cache.

    When you disable certificate cache, the device allows the SSL full handshake for a new connection. By default certificate cache is enabled.

  • (Optional) Invalidate the existing certificate cache.

    In this example, the device invalidates the existing certificate cache when certificate revocation list (CRL) is updated. By default, invalidate certificate cache on CRL update is disabled.

Session Resumption

SSL session resumption provides a mechanism to resume a previous session using already negotiated session IDs. Session resumption saves the client and server the computational overhead of a complete SSL handshake and generation of new primary keys.

Session resumption shortens the handshake process and accelerates SSL transactions resulting in improved performance while maintaining appropriate level of security.

TLS 1.2 supports session resumption with session identifiers and session tickets mechanisms. An SSL session resumption includes the following steps:

  • A session caching mechanism caches session information, such as the pre-master secret key and agreed-upon ciphers for both the client and server.

  • Session ID identifies the cached information.

  • In subsequent connections both parties agree to use the session ID to retrieve the information rather than create a pre-master secret key.

Starting in Junos OS Release 22.1R1, TLS 1.3 supports session resumption using a pre-shared key (PSK) in SSL proxy. Session resumption using PSK allows resuming a session with a previously established shared secret key to reduce SSL handshake overhead.

PSK is a unique encryption key derived from the initial TLS handshake. After a successful TLS handshake, the server sends a PSK identity to the client. The client uses that PSK identity in the future handshakes to negotiate the use of associated PSK to resume the session.

An SSL session resumption with TLS1.3 includes the following steps:

  1. After an initial TLS handshake, the server sends a new Session Ticket message to the client, which contains the PSK identity (encrypted copy of the PSK).

  2. Next time, when the client attempts to resume the session, it sends the same Session Ticket to the server in the Hello message.
  3. The server decrypts the message, identifies the PSK, and retrieves the session information from its cache to resume the session.

An SSL-I (SSL initiation) uses PSK with ECDHE key exchange mode, and SSL-T (SSL termination) uses PSK and PSK with ECDHE exchange modes.

SSL proxy session supports interoperability between TLS1.3 and TLS1.2 and earlier versions on two ends of a connection for session resumption.

By default, session resumption is enabled for SSL proxy. You can clear the session resumption or re-enable as per your requirements.

  • To clear the session resumption:
  • To re-enable session resumption:

Use the following command to configure the session timeout value.

You can configure the timeout value between 300 seconds to 86400 seconds. The default value is 86400 seconds (24 hours).

Session Renegotiation

The SRX Series Firewall support session renegotiation. After a session is created and SSL tunnel transport is established, a change in SSL parameters requires renegotiation. SSL proxy supports both secure (RFC 5746) and nonsecure (TLS v1.0, TLS v1.1, and TLS v1.2) renegotiation. When session resumption is enabled, session renegotiation is useful in the following situations:

  • Cipher keys need to be refreshed after a prolonged SSL session.

  • Stronger ciphers need to be applied for a more secure connection.

If you modify the SSL proxy profile by changing a certificate, or cipher strength, or trusted CA list, then the system flushes the cache entries when you commit the modified policy. In this case, a full handshake is required to establish the new SSL parameters. (There is no impact to non-SSL sessions.)

If the SSL proxy profile is not altered, cache entries corresponding to that profile are not flushed and the session continues.

Negotiating StartTLS for SMTP Sessions

The StartTLS enables an SMTP session from an initial plain TCP connection to a more secure TLS connection. StartTLS allows SMTP session between the server and client over the TLS layer after successful negotiation between the peers. StartTLS upgrades an existing insecure plain SMTP connection to a secure SSL/TLS connection.

You can set threshold that allow you to decide how long to wait before ignoring the the session if StartTLS is not received from the client.

You can configure the following options:

  • byte-threshold—Minimum bytes of unencrypted session allowed before ignoring the session if StartTLS is not received from the client. Range 100 to 300.
  • packet-threshold—Number of unencrypted packets allowed in client-to-server direction before ignoring the session if StartTLS is not received from the client. Range 1 to 15.

Example:

In this exaple, SSL proxy allows 100 bytes of plain (unencrypted) SMTP traffic. After reaching 100 bytes, it ignores the session if StartTLS is not received from the client.

In this example, SSL proxy allows 2 packets of plain (unencrypted) SMTP traffic. After reaching 2 packets, it ignores the session if StartTLS is not received from the client.

Dynamic Resolution of Domain Names

The IP addresses associated with domain names are dynamic and can change at any time. Whenever a domain IP address changes, it is propagated to the SSL proxy configuration (similar to what is done in the firewall policy configuration).

Release History Table
Release
Description
15.1X49-D30
Starting with Junos OS Release 15.1X49-D30 and Junos OS Release 17.3R1, SRX Series Firewalls support certificate revocation list (CRL).