Digital Certificates
Learn about the digital certificates and find out how to configure digital certificates.
A digital certificate is an electronic means for verifying your identity through a trusted third party, known as a CA. Alternatively, you can use a self-signed certificate to attest to your identity.
Manual certificate processing includes generation of a PKCS10 request, submission to the CA, retrieval of the signed certificate, and manually loading the certificate into the Juniper Networks device. Based on your deployment environment, you can use either SCEP or CMPv2 for online certificate enrollment.
To use a digital certificate to authenticate your identity when establishing a secure VPN connection, do the following:
-
Obtain a CA certificate from which you intend to obtain a local certificate, and then load the CA certificate onto the device. The CA certificate can contain a CRL to identify invalid certificates.
-
Obtain a local certificate from the CA whose CA certificate you have previously loaded, and then load the local certificate in the device. The local certificate establishes the identity of the Juniper Networks device with each tunnel connection.
Generate Digital Certificates Manually: Configuration Overview
To obtain digital certificates manually:
Generate a keypair on the device. See Self-Signed Digital Certificates.
Create a CA profile or profiles containing information specific to a CA. See Example: Configure a CA Profile.
Generate the CSR for the local certificate and send it to the CA server. See Example: Manually Generate a CSR for the Local Certificate and Send it to the CA Server.
Load the certificate onto the device. See Example: Load CA and Local Certificates Manually.
Configure automatic reenrollment. See Example: Using SCEP to Automatically Renew a Local Certificate.
If necessary, load the certificate's CRL on the device. See Example: Manually Load a CRL onto the Device.
If necessary, configure the CA profile with CRL locations. See Example: Configure a Certificate Authority Profile with CRL Locations.
Digital Certificates in Junos OS
For small networks, the use of preshared keys in an IPsec configuration is often sufficient. However, as a network grows, you might find it challenging to add new preshared keys on the local router and all new and existing IPsec peers. The digital certificate implementation helps you scale the IPsec network.
A digital certificate implementation uses the PKI, which requires you to generate a keypair consisting of a public key and a private key. The keys are created with a random number generator and are used to encrypt and decrypt data. In networks that do not use digital certificates, an IPsec-enabled device encrypts data with the private key and IPsec peers decrypt the data with the public key.
With digital certificates you and your IPsec peers request a CA to send you a CA certificate that contains the public key of the CA. Then, you request the CA to enroll a local digital certificate that contains your public key and some additional information. When the CA processes your request, it signs your local certificate with the private key of the CA. You then install the CA certificate and the local certificate in your local router and load the CA certificate in the remote devices before you can establish IPsec tunnels with your peers.
When you request a peering relationship with an IPSec peer, the peer receives a copy of your local certificate. Because the peer already has the CA certificate loaded, it can use the CA’s public key contained in the CA certificate to decrypt your local certificate that has been signed by the CA’s private key. As a result, the peer now has a copy of your public key. The peer encrypts data with your public key before sending it to you. When your local router receives the data, it decrypts the data with your private key.
In the Junos OS, you must implement the following steps to be able to initially use digital certificates:
Configure a CA profile to request CA and local digital certificates—The profile contains the name and URL of the CA or registration authority (RA), as well as some retry timer settings.
Configure certificate revocation list support—A certificate revocation list (CRL) contains a list of certificates canceled before their expiration date. When a participating peer uses a CRL, the CA acquires the most recently issued CRL and checks the signature and validity of a peer’s digital certificate. You can request and load CRLs manually, configure an LDAP server to handle CRL processing automatically, or disable CRL processing that is enabled by default.
Request a digital certificate from the CA—The request can be made either online or manually. Online CA digital certificate requests use the Simple Certificate Enrollment Protocol (SCEP) format. If you request the CA certificate manually, you must also load the certificate manually.
Generate a private/public key pair—The public key is included in the local digital certificate and the private key is used to decrypt data received from peers.
Generate and enroll a local digital certificate—The local certificate can be processed online using SCEP or generated manually in the Public-Key Cryptography Standards #10 (PKCS-10) format. If you create the local certificate request manually, you must also load the certificate manually.
Apply the digital certificate to an IPSec configuration—To activate a local digital certificate, you configure the IKE proposal to use digital certificates instead of preshared keys, reference the local certificate in the IKE policy, and identify the CA in the service set.
Optionally, you can do the following:
Configure the digital certificate to automatically reenroll—Starting in Junos OS Release 8.5, you can configure automatic reenrollment for digital certificates.
Monitor digital certificate events and delete certificates and requests—You can issue operational mode commands to monitor IPSec tunnels established using digital certificates and delete certificates or requests.
Generate a Root CA Certificate
To define a self-signed certificate in CLI, you must provide the following details:
-
Certificate identifier (generated in the previous step)
-
FQDN for the certificate
-
E-mail address of the entity owning the certificate
-
Common name and the organization involved
Generate a root CA certificate using the Junos OS CLI:
Manually Generate Self-Signed SSL Certificates
To manually generate a self-signed SSL certificate on Juniper Networks devices:
Export Certificates to a Specified Location
When a self-signed certificate is generated using a PKI command, the newly generated certificate is stored in a predefined location (var/db/certs/common/local).
Use the following command to export the certificate to a specific location (within the device). You can specify the certificate ID, filename, and type of file format (DER/PEM):
user@host> request security pki local-certificate export certificate-id certificate-id filename filename type der
Configure a Root CA Certificate
A CA can issue multiple certificates in the form of a tree structure. A root certificate is the topmost certificate of the tree, the private key of which is used to sign other certificates. All certificates immediately below the root certificate inherit the signature or trustworthiness of the root certificate. This is somewhat like the notarizing of an identity.
To configure a root CA certificate:
-
Obtain a root CA certificate (by either or importing one)
-
You can generate a root CA certificate using the Junos OS CLI.
-
Obtain a certificate from an external CA (not covered in this topic).
-
-
Apply the root CA to an SSL proxy profile.
Certificate Chain Implementation
The SSL forward proxy supports the certificate chain implementation. Let's discuss certificate chain concepts and how to configure it on an firewall.
-
Certificate authority (CA)—CA is a trusted third party responsible for validating the identities of entities (such as websites, email addresses, or companies, or individual persons) and issues a digital certificate by binding cryptographic keys. If your organization owns a CA server, then you become your own CA and use self-signed certificate.
-
Root certificate—A Root certificate is a certificate issued by a trusted CA. The root certificate is the topmost certificate of the tree, the private key of which is used to sign other certificates. All certificates immediately below the root certificate inherit the signature or trustworthiness of the root certificate. These certificates are used to establish connection between two endpoints.
-
Intermediate CA certificate—An intermediate CA certificate is a subordinate certificate signed by the trusted root specifically to validate an EE certificate.
-
Certificate chain—A certificate chain is the ordered list of certificates that contains the SSL certificate, intermediate certificate, and root certificate. Some CAs do not sign with their root certificate, but instead they use an intermediate certificate. An intermediate CA can sign certificates on behalf of the root CA certificate. The root CA signs the intermediate certificate, forming a chain of trust.
The intermediate certificate must be installed on the same server as the SSL certificate so that the connecting devices, such as browsers, applications, and mobile devices can trust the certificate.
When you initiate a connection, the connecting device checks whether the certificate is authentic and is issued by a trusted CA that is embedded in the browser’s trusted store.
If the SSL certificate is not from a trusted CA, then the connecting device continues to check if the SSL certificate is issued by an intermediate CA and this intermediate CA is signed by a root CA. The check continues until the device finds the root CA. If the device finds a root CA, a secure connection is established. If the device doesn’t find a root CA, then the connection is dropped, and your web browser displays an error message about an invalid certificate or a certificate not trusted.
Certificate Chain Support for SSL Initiation
In the SSL proxy mode, the server sends the complete certificate chain, including the intermediate certificate, to the client for the validation of the certificate chain.
In the non-proxy mode, during the SSL initiation phase, the client sends only the client certificate to the server if requested. Then the server imports the list of trusted CAs to authenticate the client certificate.
During SSL initiation, the devices generate certificate chain and send it along with the client certificate to the server. The certificate chain during the SSL initiation phase enables the server to validate the certificate chain without having to import intermediate CAs of the chain.
The following example shows how to install the certificate chain to enable browsers to trust your certificate.
Requirements
No special configuration beyond device initialization is required before configuring this feature.
Overview
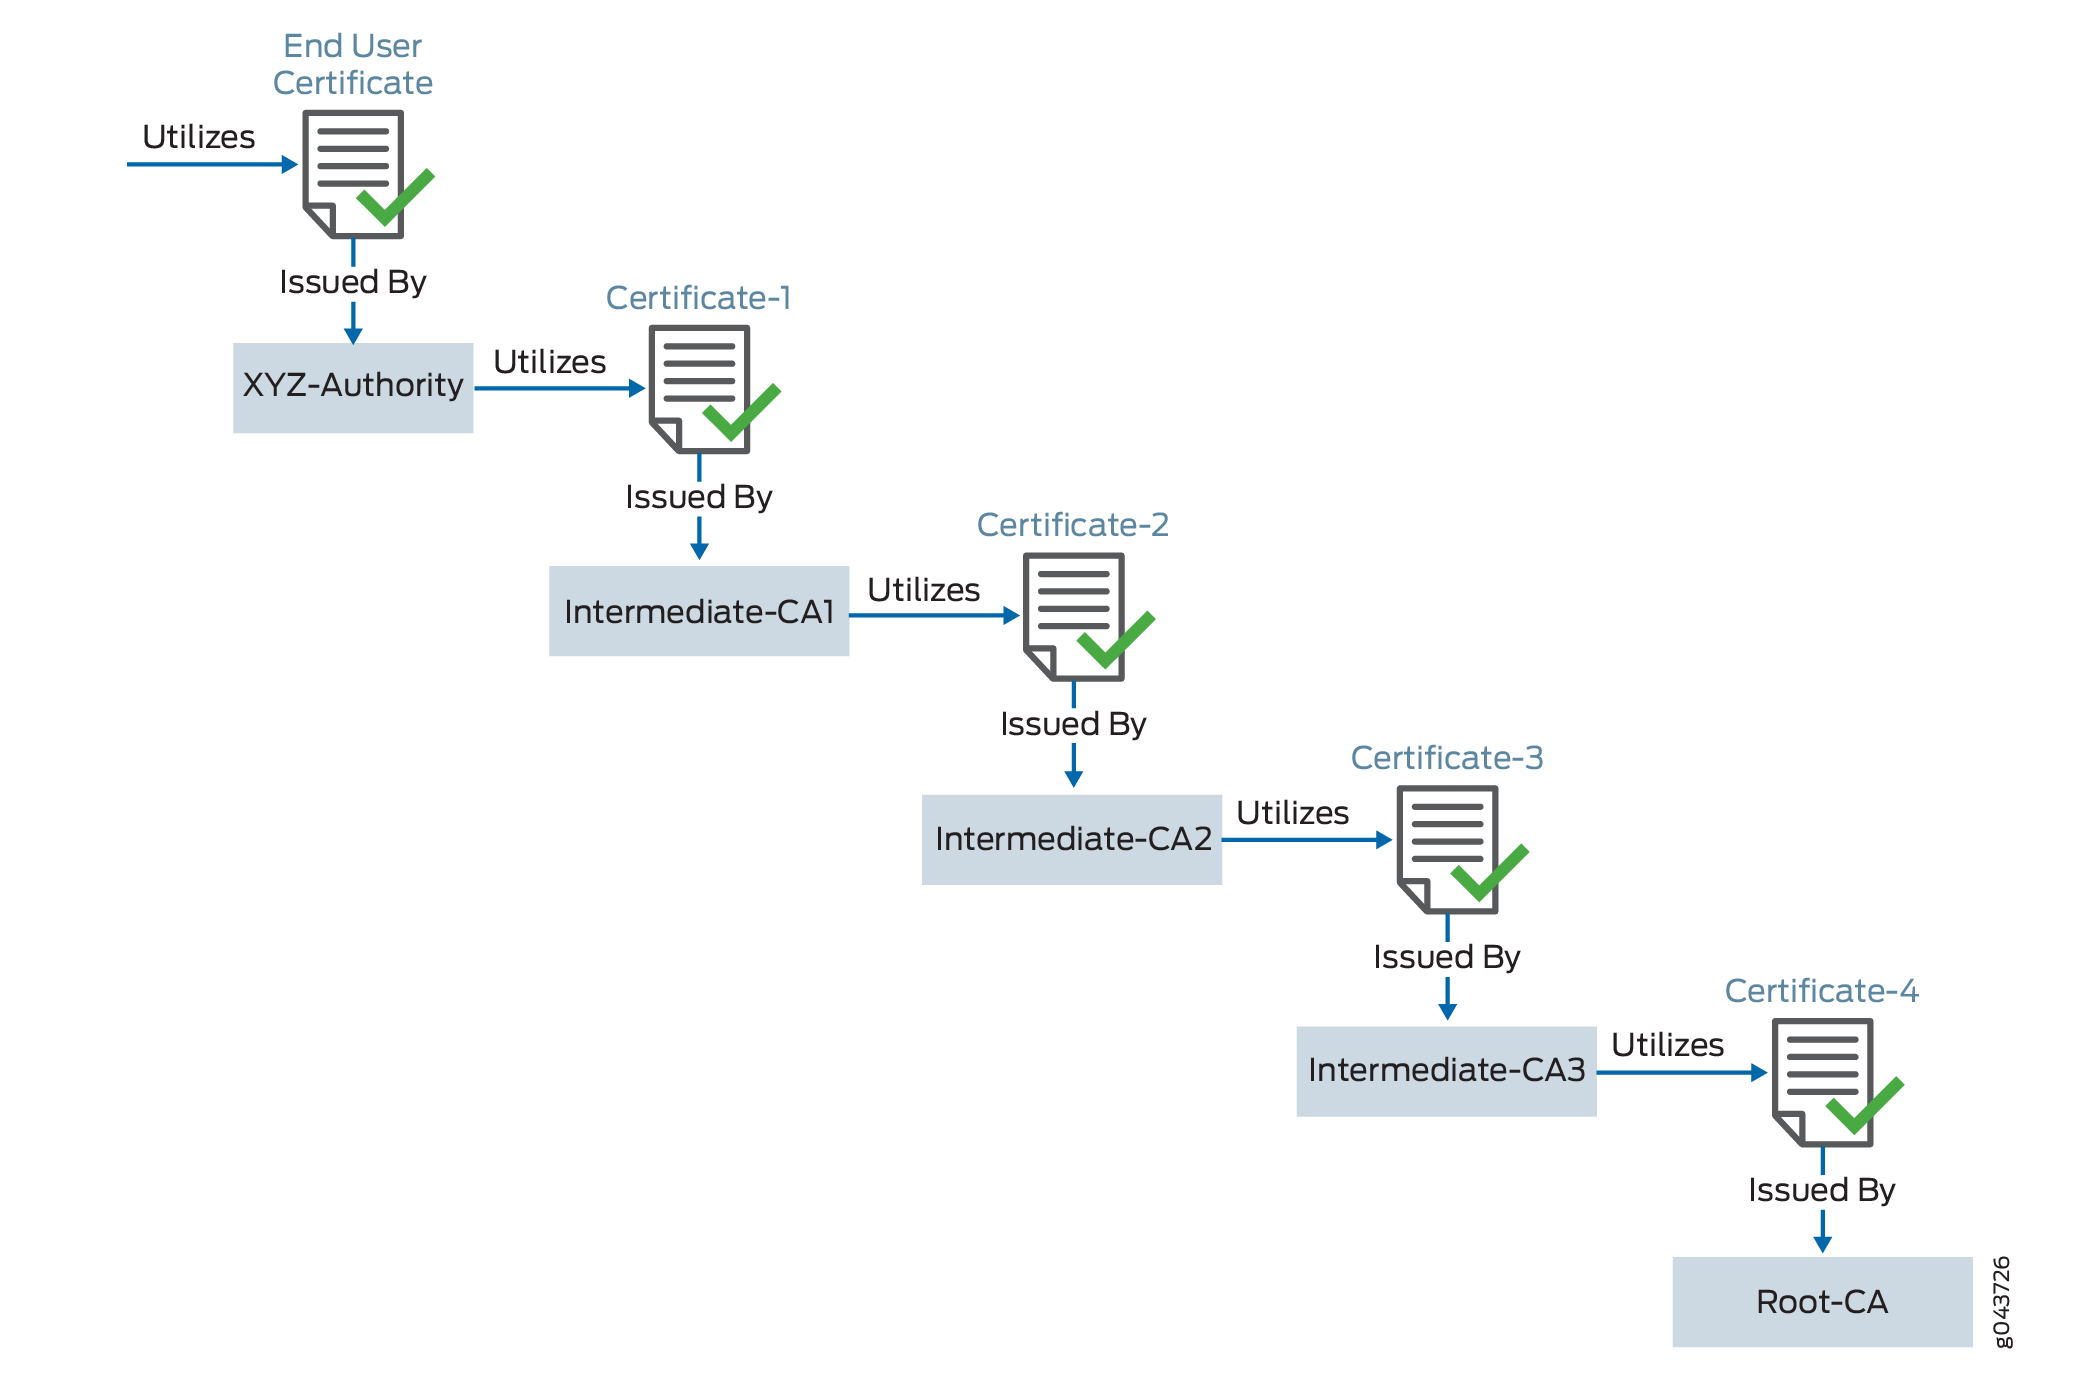
In this example, you have a domain, example.domain-1, and you want to purchase a certificate from XYZ-Authority for your domain. However, XYZ-Authority is not a root CA and the visiting browser trusts only root-CA certificate. In other words, its certificate is not directly embedded in your browser, and therefore it is not explicitly trusted.
In this case, trust is established in the following manner using the certificate chain (of intermediate certificates).
Topology
Let’s try to visualize this chain through Figure 1. This figure depicts a full certificate chain, from the root CA certificate to the end-user certificate. The chain terminates at the end-user certificate.
|
User |
Uses Certificate |
Signed By |
Type |
|---|---|---|---|
|
example.domain-1 |
End-User Certificate |
XYZ-Authority |
End-User Certificate - the one you purchase from the CA |
|
XYZ-Authority |
Certificate-1 |
Intermediate CA-1 |
Intermediate Certificate |
|
Intermediate CA-1 |
Certificate-2 |
Intermediate CA-2 |
Intermediate Certificate |
|
Intermediate CA-2 |
Certificate-3 |
Intermediate CA-3 |
Intermediate Certificate |
|
Intermediate CA-3 |
Certificate-4 |
root-example-authority . This is a root CA. |
Root Certificate - the one whose certificate is directly embedded in your browser, which the device can therefore explicitly trust |
When you install your end-user certificate for the server example.domain-1, you must bundle all the intermediate certificates and install them along with your end-user certificate. The certificate chain includes all the certificates starting from Certificate-1 to Root-CA certificate. Because the web browser trusts the root CA, it also implicitly trusts all the intermediate certificates. If the SSL certificate chain is invalid or broken, your certificate will not be trusted by some devices.
All certificates must be in PEM format.
When you import the concatenated certificate file into the device, the CA provides a bundle of chained certificates that must be added to the signed server certificate. The server certificate must appear before the chained certificates in the combined file.
SSL Certificate: Configuration Overview
To configure the SSL certificate chain:
-
Purchase an SSL certificate from a CA that includes a signing certificate and a respective key.
-
Configure a trusted CA profile group.
-
Load the signing certificate and the key in your device.
-
Load the intermediate and root CAs in PKI memory. This certificate file contains all the required CA certificates, one after each other, in the PEM format.
-
Create a trusted CA profile for the intermediate or root CA certificate.
-
Set up your device to use the signing certificate received from the CA by configuring and applying the SSL proxy profile to a security policy. SSL forward proxy stores this certificate chain information (CA certificate profile name) in the respective SSL profile. As a part of security policy implementation, SSL profiles having the certificate chain information and CA certificates are used.
Certificate chain processing includes the following processes:
-
Administrator loads the certificate chain and the local certificate (signing certificate) into the PKI certificate cache.
-
The Network Security (nsd) sends a request to the PKI to provide the certificate chain information for a signing certificate configured in the SSL proxy profile.
This example assumes that you have already purchased an SSL certificate from a CA.
Configure the Certificate Chain on the Device
Step-by-Step Procedure
To configure certificate chain:
-
Load the local certificate into the PKI memory.
user@host>request security pki local-certificate load filenamessl_proxy_ ca.crt key sslserver.key certificate-id ssl-inspect-caThe following message is displayed:
Local certificate loaded successfully
Note that the certificate ID will be used under the
root-casection in the SSL proxy profile. -
Load the intermediate or root CA certificate in the PKI memory.
user@host>request security pki ca-certificate ca-profile-group load ca-group-name ca-latest filename ca-latest.cert.pemThe CA profile includes the certificate information used for authentication. It includes the public key that SSL proxy uses when generating a new certificate.
Do you want to load this CA certificate? [yes,no] (no) yes
      Loading 1 certificates for group 'ca-latest'.
      ca-latest_1: Loading done.
      ca-profile-group 'ca-latest' successfully loaded
      Success[1] Skipped[0]
You can attach this certificate as a certificate chain.
-
Attach the CA profile group to the SSL proxy profile. You can attach the trusted CA one at a time or load all in one action.
user@host#set services ssl proxy profile ssl-profile trusted-ca all -
Apply the signing certificate as root-ca in the SSL proxy profile.
user@host#set services ssl proxy profile ssl-profile root-ca ssl-inspect-ca -
Create a security policy and specify the match criteria for the policy. As match criteria, specify the traffic for which you want to enable SSL proxy. This example assumes that you have already created security zones based on the requirements.
user@host#set security policies from-zone trust to-zone untrust policy 1 match source-address anyuser@host#set security policies from-zone trust to-zone untrust policy 1 match destination-address anyuser@host#set security policies from-zone trust to-zone untrust policy 1 match application anyuser@host#set security policies from-zone trust to-zone untrust policy 1 then permit application-services ssl-proxy profile-name ssl-profileSSL forward proxy stores this certificate chain information (CA certificate profile name) into respective the SSL profile. As a part of security policy implementation, SSL profiles having the certificate chain information and CA certificates are used.
You can view the certificate chain on the connecting browser, that is, the client.
Configuring Digital Certificates
- Digital Certificates Overview
- Obtaining a Certificate from a CA for an ES PIC
- Request a CA Digital Certificate
- Generate a Private and Public Keypair for Digital Certificates for an ES PIC
Digital Certificates Overview
A digital certificate provides a way of authenticating users through a trusted third-party called a CA. The CA validates the identity of a certificate holder and “signs” the certificate to attest that it has not been forged or altered.
A certificate includes the following information:
The DN of the owner. A DN is a unique identifier and consists of a fully qualified name including the common name (CN) of the owner, the owner’s organization, and other distinguishing information.
The public key of the owner.
The date on which the certificate was issued.
The date on which the certificate expires.
The DN of the issuing CA.
The digital signature of the issuing CA.
The additional information in a certificate allows recipients to decide whether to accept the certificate. The recipient can determine if the certificate is still valid based on the expiration date. The recipient can check whether the CA is trusted by the site based on the issuing CA.
With a certificate, a CA takes the owner’s public key, signs that public key with its own private key, and returns this to the owner as a certificate. The recipient can extract the certificate (containing the CA’s signature) with the owner’s public key. By using the CA’s public key and the CA’s signature on the extracted certificate, the recipient can validate the CA’s signature and owner of the certificate.
When you use digital certificates, your first send in a request to obtain a certificate from your CA. You then configure digital certificates and a digital certificate IKE policy. Finally, you obtain a digitally signed certificate from a CA.
Certificates without an alternate subject name are not appropriate for IPsec services.
Obtaining a Certificate from a CA for an ES PIC
CAs manage certificate requests and issue certificates to the participating IPsec network devices. When you create a certificate request, you need to provide the information about the owner of the certificate. The required information and its format vary across CA.
Certificates use names in the X.500 format, a DAP that provides both read and update access. The entire name is called a DN. It consists of a set of components, which often includes a CN (common name), an organization (O), an organization unit (OU), a country (C), a locality (L), and so on.
For the dynamic registration of digital certificates, the Junos OS supports only the SCEP.
Request a CA Digital Certificate
Specify a URL to the SCEP server and the name of the CA whose certificate you want: mycompany.com. The name of the file that stores the result is filename 1. The output "Received CA certificate:" provides the signature for the certificate, which allows you to verify (offline) that the certificate is genuine.
user@host> request security certificate enroll filename ca_verisign ca-file verisign ca-name xyzcompany url
http://hostname/path/filename
URL: http://hostname/path/filename name: example.com CA file: verisign Encoding: binary
Certificate enrollment has started. To see the certificate enrollment status, check the key management process (kmd) log file at /var/log/kmd. <--------------
Initially, each router is initially manually enrolled with a CA.
Generate a Private and Public Keypair for Digital Certificates for an ES PIC
To generate a private and public key, issue the following command:
user@host> request security key-pair name size key-size type ( rsa | dsa )
name specifies the filename in which the device stores the
public and private keys.
key-size can be 512, 1024, 1596, or 2048
bytes. The default key size is 1024 bytes.
type can be rsa or dsa. The default is
RSA.
When you use SCEP, the Junos OS only supports RSA.
The following example shows how to generate a private and public keypair:
user@host> request security key-pair batt
Generated key pair, key size 1024, file batt Algorithm RSA
Requesting a CA Digital Certificate
- Request a CA Digital Certificate
- Generate a Public–Private Keypair
- Generate and Enroll a Local Digital Certificate
- Apply Local Digital Certificate to an IPsec Configuration
- Configure Automatic Reenrollment of Digital Certificates
Request a CA Digital Certificate
You can request a CA digital certificate either online or manually. To request a digital
certificate online from a CA or a
RA by using SCEP,
issue the request security pki ca-certificate enroll
ca-profile ca-profile-name
command.
If you had obtained the CA digital certificate manually through e-mail or other OOB mechanism,
you must load it manually. To manually install a certificate in your
router, issue the request security pki ca-certificate load
ca-profile profile_name filename
/path/filename.cert
command.
Generate a Public–Private Keypair
A keypair is a critical element of a
digital certificate implementation. The public key is included in
the local digital certificate and the private key is used to decrypt
data received from peers. To generate a private–public keypair,
issue the request security pki generate-key-pair
certificate-id certificate-id-name
command.
Generate and Enroll a Local Digital Certificate
You can generate and enroll a local digital certificate
either online or manually. To generate and enroll a local certificate
online by using SCEP, issue the request security pki local-certificate
enroll command. To generate a local certificate request manually
in the PKCS-10 format, issue the request security pki generate-certificate-request command.
If you create the local certificate request manually,
you must also load the certificate manually. To manually install a
certificate in your router, issue the request security pki local-certificate
load command.
Apply Local Digital Certificate to an IPsec Configuration
To activate a local digital certificate, configure the IKE proposal to use digital certificates
instead of preshared keys, reference the local certificate in the IKE policy, and
identify the CA or RA in the service set. To enable the IKE proposal for digital
certificates, include the rsa-signatures statement at the
[edit services ipsec-vpn ike proposal proposal-name
                    authentication-method]
hierarchy level. To reference the local
certificate in the IKE policy, include the local-certificate
statement at the [edit services ipsec-vpn ike policy
policy-name] hierarchy level. To identify the CA
or RA in the service set, include the trusted-ca statement at the
[edit services service-set service-set-name
                    ipsec-vpn-options]
hierarchy level.
[edit services]
service-set service-set-name {
    .....
    ipsec-vpn-options {
        trusted-ca ca-profile-name;
    }
}
ipsec-vpn {
    ike {
        proposal proposal-name  {
            .....
            authentication-method [pre-shared-keys | rsa-signatures];
        }
        policy policy-name {
            ....
            local-certificate certificate-id-name;
        }
    }
}
Configure Automatic Reenrollment of Digital Certificates
You can configure automatic reenrollment for digital certificates. This feature is not enabled by
default. To configure automatic reenrollment for digital certificates, include the
auto-re-enrollment statement at the [edit security
pki] hierarchy level:
[edit]
security {
    pki {
        auto-re-enrollment {
            certificate-id certificate-name {
                ca-profile ca-profile-name;
                challenge-password password;
                re-enroll-trigger-time-percentage percentage; # Percentage of validity-period
# (specified in certificate) when automatic
# reenrollment should be initiated.
                re-generate-keypair;
                validity-period number-of-days;
            }
        }
    }
}
Configure Digital Certificates for an ES PIC
Digital Certificates provide a way of authenticating users through a trusted third party called a CA. The CA validates the identity of a certificate holder and “signs” the certificate to attest that it has not been forged or altered.
To define the digital certificate configuration for an encryption service interface,
include the following statements at the [edit security certificates]
and [edit security ike] hierarchy levels:
[edit security]
certificates {
    cache-size bytes;
    cache-timeout-negative seconds;
    certification-authority ca-profile-name {
        ca-name ca-identity;
        crl filename;
        encoding (binary | pem);
        enrollment-url url-name;
        file certificate-filename;
        ldap-url url-name;
    }
    enrollment-retry attempts;
    local certificate-filename {
        certificate-key-string;
        load-key-file URL key-file-name;
    }
    maximum-certificates number;
    path-length certificate-path-length;
}
ike {
    policy ike-peer-address {
        description policy;
        encoding (binary | pem);
        identity identity-name;
        local-certificate certificate-filename;
        local-key-pair private-public-key-file;
        mode (aggressive | main);
        pre-shared-key (ascii-text key | hexadecimal key);
        proposals [ proposal-names ];
    }
}
Tasks to configure digital certificates for ES PICs are:
- Configure the CA Properties for an ES PIC
- Configure the Cache Size
- Configure the Negative Cache
- Configure the Number of Enrollment Retries
- Configure the Maximum Number of Peer Certificates
- Configure the Path Length for the Certificate Hierarchy
Configure the CA Properties for an ES PIC
To configure a CA and its properties for an ES PIC, include the following statements
at the [edit security certificates] hierarchy level:
[edit security certificates]
certification-authority ca-profile-name {
    ca-name ca-identity;
    crl filename;
    encoding (binary | pem);
    enrollment-url url-name;
    file certificate-filename;
    ldap-url url-name;
}
ca-profile-name is the CA profile name.
Perform the following tasks to configure the CA properties:
- Specify the CA Name
- Configure the CRL
- Configure the Type of Encoding Your CA Supports
- Specify an Enrollment URL
- Specify a File to Read the Digital Certificate
- Specify an LDAP URL
Specify the CA Name
If you are enrolling with a CA using SCEP, you need to specify the CA name (CA identity) that is used in the certificate request, in addition to the URL for the SCEP server.
To specify the name of the CA identity, include the ca-name
statement at the [edit security certificates certification-authority
ca-profile-name] hierarchy level:
[edit security certificates certification-authority
                                ca-profile-name]
ca-name ca-identity;
ca-identity specifies the CA identity to
use in the certificate request. It is typically the CA domain name.
Configure the CRL
A CRL contains a list of digital certificates that have been canceled before their expiration date. When a participating peer uses a digital certificate, it checks the certificate signature and validity. It also acquires the most recently issued CRL and checks that the certificate serial number is not on that CRL.
To configure the CRL, include the crl statement and specify
the file from which to read the CRL at the [edit security
certificates certification-authority
ca-profile-name] hierarchy level:
[edit security
                            certificates certification-authority
                            ca-profile-name]
crl filename;
Configure the Type of Encoding Your CA Supports
By default, encoding is set to binary. Encoding specifies the file format
used for the local-certificate and
local-key-pair statements. By default, the binary DER
format is enabled. PEM is an ASCII base 64 encoded format. Check with your
CA to determine which file formats it supports.
To configure the file format that your CA supports, include the
encoding statement and specify a binary or PEM format
at the [edit security certificates certification-authority
ca-profile-name] hierarchy level:
[edit security certificates certification-authority
                                ca-profile-name]
encoding (binary | pem);
Specify an Enrollment URL
You specify the CA location where your router or switch sends SCEP-based
certificate enrollment requests. To specify the CA location by naming the CA
URL, include the enrollment-url statement at the
[edit security certificates certification-authority
                                ca-profile-name]
hierarchy level:
[edit security certificates certification-authority ca-profile-name]
enrollment-url url-name;
url-name is the CA location. The format
is http://ca-name, where
ca-name is the CA host DNS name
or IP address.
Specify a File to Read the Digital Certificate
To specify the file from which the device reads the digital certificate,
include the file statement and specify the certificate
filename at the [edit security certificates certification-authority
ca-profile-name] hierarchy level:
[edit security certificates certification-authority
                                ca-profile-name]
file certificate-filename;
Specify an LDAP URL
If your CA stores its current CRL at its LDAP server, you can optionally
check your CA CRL list before using a digital certificate. If the digital
certificate appears on the CA CRL, your router or switch cannot use it. To
access your CA CRL, include the ldap-url statement at the
[edit security certificates certification-authority
                                ca-profile-name]
hierarchy level:
[edit security certificates certification-authority ca-profile-name]
ldap-url url-name;
url-name is the CA LDAP server name. The
format is ldap://server-name, where
server-name is the CA host DNS
name or IP address.
Configure the Cache Size
By default, the cache size is 2 MB. To configure total cache size for digital
certificates, include the cache-size statement at the
[edit security certificates] hierarchy level:
[edit security certificates]
cache-size bytes;
bytes is the cache size for digital
certificates. The range can be from 64 through 4,294,967,295 bytes.
We recommend that you limit your cache size to 4 MB.
Configure the Negative Cache
Negative caching stores negative results and reduces the response time for negative answers. It also reduces the number of messages that are sent to the remote server. Maintaining a negative cache state allows the system to quickly return a failure condition when a lookup attempt is retried. Without a negative cache state, a retry would require waiting for the remote server to fail to respond, even though the system already knows that remote server is not responding.
By default, the negative cache is
20 seconds. To configure the negative cache, include the
cache-timeout-negative statement at the [edit
security certificates] hierarchy level:
[edit
                        security certificates]
cache-timeout-negative seconds;
seconds is the amount of time for which a
failed CA or router certificate is present in the negative cache. While
searching for certificates with a matching CA identity (domain name for
certificates or CA domain name and serial for CRLs), the negative cache is
searched first. If an entry is found in the negative cache, the search fails
immediately.
Configuring a large negative cache value can make you susceptible to a DoS attack.
Configure the Number of Enrollment Retries
By default, the number of enrollment retries is set to 0, an infinite number of
retries. To specify how many times a router or switch will be re-sent a
certificate request, include the enrollment-retry statement at
the [edit security certificates] hierarchy level:
[edit security certificates]
enrollment-retry attempts;
attempts is the number of enrollment retries
(0 through 100).
Configure the Maximum Number of Peer Certificates
By default, the maximum number of peer certificates to be cached is 1024. To
configure the maximum number of peer certificates to be cached, include the
maximum-certificates statement at the [edit
security certificates] hierarchy statement level:
[edit
                        security certificates]
maximum-certificates number;
number is the maximum number of peer
certificates to be cached. The range is from 64 through 4,294,967,295 peer
certificates.
Configure the Path Length for the Certificate Hierarchy
CAs can issue certificates to other CAs. This creates a tree-like certification hierarchy. The highest trusted CA in the hierarchy is called the trust anchor. Sometimes the trust anchor is the root CA, which is usually signed by itself. In the hierarchy, every certificate is signed by the CA immediately above it. An exception is the root CA certificate, which is usually signed by the root CA itself. In general, a chain of multiple certificates might be needed, comprising a certificate of the public key owner (the end entity) signed by one CA, and zero or more additional certificates of CAs signed by other CAs. Such chains, called certification paths, are required because a public key user is only initialized with a limited number of assured CA public keys.
Path length refers to a path of certificates from one certificate to another
certificate, based on the relationship of a CA and its “children.” When you
configure the path-length statement, you specify the maximum
depth of the hierarchy to validate a certificate from the trusted root CA
certificate to the certificate in question. For more information about the
certificate hierarchy, see RFC 3280, Internet X.509 Public Key
Infrastructure Certificate and Certificate Revocation List (CRL)
Profile.
By default, the maximum certificate path length is set to 15. The root anchor is 1.
To configure path length, include the path-length statement at
the [edit security certificates] hierarchy level:
[edit security certificates]
path-length certificate-path-length;
certificate-path-length is the maximum number
certificates for the certificate path length. The range is from 2 through 15
certificates.