Enroll a Certificate
Learn about how to enroll and manage various PKI certificates.
A CA issues digital certificates, which helps to establish a secure connection between two endpoints through certificate validation. The following topics describe how to configure CA certificates online or local using SCEP.
Enroll Digital Certificates Online: Configuration Overview
You can use either CMPv2 or SCEP to enroll digital certificates. To enroll a certificate online:
Generate a keypair on the device. See Self-Signed Digital Certificates.
Create a CA profile or profiles containing information specific to a CA. See Example: Configure a CA Profile.
For SCEP only, enroll the CA certificate. See Enroll a CA Certificate Online Using SCEP.
Enroll the local certificate from the CA whose CA certificate you have previously loaded. See Example: Enroll a Local Certificate Online Using SCEP.
Configure automatic reenrollment. See Example: Using SCEP to Automatically Renew a Local Certificate.
Certificate Enrollment
- Online CA Certificate Enrollment
- Local Certificate Requests
- CMPv2 and SCEP Certificate Enrollment
- Example: Manually Generate a CSR for the Local Certificate
- Example: Manually Load CA and Local Certificates
- Configure PKI and SSL Forward Proxy to Authenticate Users
- Configure Digital Certificates for Adaptive Services Interfaces
Online CA Certificate Enrollment
With SCEP, you can configure your Juniper Networks device to obtain a CA certificate online and start the online enrollment for the specified certificate ID. The CA public key verifies certificates from remote peers.
Local Certificate Requests
When you create a local certificate request, the device generates an EE certificate in PKCS #10 format from a keypair you previously generated using the same certificate ID.
A subject name is associated with the local certificate request in the form of a common name (CN), organizational unit (OU), organization name (O), locality (L), state (ST), country (C), and domain component (DC). Additionally, a SAN is associated in the following form:
-
IP address
-
E-mail address
-
FQDN
Specify the subject name in the DN format in quotation marks, including the domain component (DC), common name (CN), serial number (SN), organizational unit name (OU), organization name (O), locality (L), state (ST), and country (C).
Some CAs do not support an e-mail address as the domain name in a certificate. If you do not include an e-mail address in the local certificate request, you cannot use an e-mail address as the local IKE ID when you configure the device as a dynamic peer. Instead, you can use an FQDN (if it is in the local certificate), or you can leave the local ID field empty. If you do not specify a local ID for a dynamic peer, enter the hostname.domain-name of that peer on the device at the other end of the IPsec tunnel in the peer ID field.
CMPv2 and SCEP Certificate Enrollment
Based on your deployment environment, you can use either CMPv2 or SCEP for online certificate enrollment. This topic describes some of the basic differences between the two protocols.
Table 1 describes the differences between the CMPv2 and SCEP certificate enrollment protocols.
Attribute |
CMPv2 |
SCEP |
|---|---|---|
Supported certificate types: |
DSA, ECDSA, and RSA |
RSA only |
Supported standards |
RFCs 4210 and 4211 |
Ietf draft |
Certificate enrollment, reenrollment requests, and responses differ between CMPv2 and SCEP. With
CMPv2, no separate command to enroll CA certificates. With SCEP, you enroll CA
certificates with the request security pki ca-certificate enroll
command and specify the CA profile. A CA profile must be configured with either CMPv2 or
SCEP.
Example: Manually Generate a CSR for the Local Certificate
This example shows how to generate a CSR manually.
Requirements
Generate a public and private key. See Self-Signed Digital Certificates.
Overview
In this example, you generate a certificate request using the certificate ID of a public-private keypair you previously generated (ca-ipsec). Then you specify the domain name (example.net) and the associated common name (abc). The certificate request is displayed in PEM format.
You copy the generated certificate request and paste it into the appropriate field at the CA website to obtain a local certificate (refer to the CA server documentation to determine where to paste the certificate request.) When the PKCS #10 content is displayed, the MD5 hash and SHA-1 hash of the PKCS #10 file are also displayed.
Configuration
Procedure
Step-by-Step Procedure
To generate a local certificate manually:
-
Specify the certificate ID, domain name, and common name.
user@host> request security pki generate-certificate-request certificate-id ca-ipsec domain-name example.net subject CN=abc
Verification
To view the CSR, enter the show security pki certificate-request detail
command.
Certificate identifier: ca-ipsec
Certificate version: 1
Issued to: CN = abc
Public key algorithm: rsaEncryption(1024 bits)
30:81:89:02:81:81:00:da:ea:cd:3a:49:1f:b7:33:3c:c5:50:fb:57
de:17:34:1c:51:9b:7b:1c:e9:1c:74:86:69:a4:36:77:13:a7:10:0e
52:f4:2b:52:39:07:15:3f:39:f5:49:d6:86:70:4b:a6:2d:73:b6:68
39:d3:6b:f3:11:67:ee:b4:40:5b:f4:de:a9:a4:0e:11:14:3f:96:84
03:3c:73:c7:75:f5:c4:c2:3f:5b:94:e6:24:aa:e8:2c:54:e6:b5:42
c7:72:1b:25:ca:f3:b9:fa:7f:41:82:6e:76:8b:e6:d7:d2:93:9b:38
fe:fd:71:01:2c:9b:5e:98:3f:0c:ed:a9:2b:a7:fb:02:03:01:00:01
Fingerprint:
0f:e6:2e:fc:6d:52:5d:47:6e:10:1c:ad:a0:8a:4c:b7:cc:97:c6:01 (sha1)
f8:e6:88:53:52:c2:09:43:b7:43:9c:7a:a2:70:98:56 (md5)
Example: Manually Load CA and Local Certificates
This example shows how to load CA and local certificates manually.
Requirements
Before you begin:
-
Generate a public-private keypair. See Self-Signed Digital Certificates.
-
Create a CA profile. See Certificate Authority
CA Profile is only required for the CA certificate and not for the local certificate.
-
Generate a certificate request. See Example: Manually Generate a CSR for the Local Certificate and Send it to the CA Server.
Overview
In this example, you download the local.cert and ca.cert certificates and save the certificates to the /var/tmp/directory on the device.
After you download certificates from a CA, you transfer certificates to the device (for example, using FTP).
Then, you can load the following certificate files onto a device running Junos OS:
A local or EE certificate that identifies your local device. This certificate is your public key.
A CA certificate that contains the CA's public key.
A CRL that lists any certificates revoked by the CA.
You can load multiple EE certificate onto the device.
Configuration
Procedure
Step-by-Step Procedure
To load the certificate files onto a device:
Load the local certificate.
[edit]
user@host> request security pki local-certificate load certificate-id local.cert filename /var/tmp/local.cert
Load the CA certificate.
[edit]
user@host> request security pki ca-certificate load ca-profile ca-profile-ipsec filename /var/tmp/ca.cert
Examine the fingerprint of the CA certificate; if it is correct for this CA certificate, select yes to accept.
Verification
To verify the certificates loaded properly, enter the show security pki
local-certificate and show security pki ca-certificate
commands in operational mode.
Fingerprint:
e8:bf:81:6a:cd:26:ad:41:b3:84:55:d9:10:c4:a3:cc:c5:70:f0:7f (sha1)
19:b0:f8:36:e1:80:2c:30:a7:31:79:69:99:b7:56:9c (md5)
Do you want to load this CA certificate ? [yes,no] (no) yes
Configure PKI and SSL Forward Proxy to Authenticate Users
Non-domain users can configure PKI to validate integrity, confidentiality, and authenticity of traffic. PKI includes digital certificates issued by the CA, certificate validity and expiration dates, details about the certificate owner and issuer, and security policies.
For any non-domain user or domain user on a non-domain machine, the administrator specifies a captive portal to force the user to perform firewall authentication (if the firewall supports captive portal for the traffic type). After the user enters a name and password and passes firewall authentication, the device gets firewall authentication user or group information and can enforce the user firewall policy to control the user accordingly. In addition to captive portal, if the IP address or user information is not available from the event log, the user can again log in to the Windows PC to generate an event log entry. Then the system generates the user’s authentication entry accordingly.
To enable the device to authenticate the users through HTTPs, the users must configure and enable the SSL forward proxy. You need to generate a local certificate, add an SSL termination profile, add an SSL proxy profile, and reference the SSL proxy profile in the security policy. If the SSL forward proxy is not enabled, the firewall cannot authenticate users who are using HTTPS, but for users who are using HTTP, FPT, and Telnet, the authentication can be performed as expected.
To generate PKI and enable SSL forward proxy:
Generate a PKI public-private keypair for a local digital certificate.
user@host# request security pki generate-key-pair certificate-id ssl-inspect-ca size 2048 type rsa
Manually generate a self-signed certificate for the given DN.
user@host# request security pki local-certificate generate-self-signed certificate-id ssl-inspect-ca domain-name www.mycompany.net subject "CN=www.mycompany.com,OU=IT,O=MY COMPANY,L=Sunnyvale,ST=CA,C=US" email security-admin@mycompany.net
Define the access profile to be used for SSL termination services.
user@host# set services ssl termination profile for_userfw server-certificate ssl-inspect-ca
Configure the loaded certificate as root-ca in the SSL proxy profile.
user@host# set services ssl proxy profile ssl-inspect-profile root-ca ssl-inspect-ca
Specify the
ignore-server-auth-failureoption if you do not want to import the entire CA list and you do not want dropped sessions.user@host# set services ssl proxy profile ssl-inspect-profile actions ignore-server-auth-failure
Add an SSL termination profile into security policies.
user@host# set security policies from-zone untrust to-zone trust policy p1 then permit firewall-authentication user-firewall ssl-termination-profile for_userfw
Commit the configuration.
user@host# commit
Use Feature Explorer to confirm platform and release support for specific features.
Review the Platform-Specific SSL Termination Services Behavior section for notes related to your platform.
Configure Digital Certificates for Adaptive Services Interfaces
A digital certificate implementation uses the PKI, which requires that you generate a keypair consisting of a public key and a private key. The keys are created with a random number generator and are used to encrypt and decrypt data. In networks that do not use digital certificates, an IPsec-enabled device encrypts data with the private key and IPsec peers decrypt the data with the public key.
With digital certificates, the key sharing process requires an additional level of complexity. First, you and your IPsec peers request that a CA send you a CA certificate that contains the public key of the CA. Next you request the CA to assign you a local digital certificate that contains the public key and some additional information. When the CA processes your request, it signs your local certificate with the private key of the CA. Then you install the CA certificate and the local certificate in your router and load the CA in remote devices before you can establish IPsec tunnels with your peers.
For digital certificates, the Junos OS supports VeriSign, Entrust, Cisco Systems, and Microsoft Windows CAs for the Adaptive Services (AS) and Multiservices PICs.
The following tasks enable you to implement digital certificates.
- Configure the Certificate Authority Properties
- Configure the Certificate Revocation List
- Manage Digital Certificates
- Configure Auto-Reenrollment of a Router Certificate
Configure the Certificate Authority Properties
A CA is a trusted third-party organization that creates, enrolls, validates, and revokes digital certificates.
To configure a CA and its properties for the AS and Multiservices PICs,
include the following statements at the [edit security pki]
hierarchy level:
[edit security pki]
ca-profile ca-profile-name {
    ca-identity ca-identity;
    enrollment {
        url url-name;
        retry number-of-attempts;
        retry-interval seconds;
    }
}
Tasks for configuring the CA properties are:
Specify the CA Profile Name
The CA profile contains the name and URL of the CA or RA, as well as some retry-timer settings. CA certificates issued by Entrust, VeriSign, Cisco Systems, and Microsoft are compatible.
To specify the CA profile name, include the ca-profile
statement at the [edit security pki]
security level:
[edit security pki]
ca-profile ca-profile-name;
You also need to specify the name of the CA identity used in the
certificate request. This name is typically the domain name. To
specify the name of the CA identity, include the
ca-identity statement at the [edit
security pki ca-profile
ca-profile-name] level:
[edit
                                    security pki ca-profile
                                    ca-profile-name]
ca-identity ca-identity;
Specify an Enrollment URL
You specify the CA location where your router should send the
SCEP-based certificate enrollment requests. To specify the CA
location by naming the CA URL, include the url
statement at the [edit security pki enrollment]
hierarchy level:
[edit security pki ca-profile ca-profile-name enrollment]
url url-name;
url-name is the CA location. The
format is http://CA_name, where
CA_name is the CA host
DNS name or IP address.
Specify the Enrollment Properties
You can specify the number of times a router will be re-sent a certificate request and the amount of time, in seconds, the router should wait between enrollment attempts.
By default, the number of enrollment retries is set to 0, an infinite
number of retries. To specify how many times a router will be
re-sent a certificate request, include the retry
number-of-attempts statement at
the [edit security pki ca-profile
ca-profile-name enrollment]
hierarchy level:
[edit security pki ca-profile ca-profile-name enrollment]
retry number-of-attempts;
The range for number-of-attempts
is from 0 through 100.
To specify the amount of time, in seconds, that a router should wait
between enrollment attempts, include the retry-interval
seconds statement at the
[edit security pki ca-profile
                                        ca-profile-name enrollment]
hierarchy level:
[edit security pki ca-profile ca-profile-name enrollment]
retry-interval seconds;
The range for seconds is from 0
through 3600.
Configure the Certificate Revocation List
Tasks to configure the CRL is:
- Specify an LDAP URL
- Configure the Interval Between CRL Updates
- Override Certificate Verification if CRL Download Fails
Specify an LDAP URL
You can specify the URL for the LDAP server where your CA stores its current CRL. If the CA includes the Certificate Distribution Point (CDP) in the digital certificate, you do not need to specify a URL for the LDAP server. The CDP is a field within the certificate that contains information about how to retrieve the CRL for the certificate. The router uses this information to download the CRL automatically.
Configure an LDAP URL if you want to use a different CDP from the one specified in the certificate. Any LDAP URL you configure takes precedence over the CDP included in the certificate.
You can configure up to three URLs for each CA profile.
If the LDAP server requires a password to access the CRL, you need to
include the password statement.
To configure the router to retrieve the CRL from the LDAP server,
include the url statement and specify the URL name
at the [edit security pki ca-profile
ca-profile-name revocation-check
crl] hierarchy level:
[edit security pki ca-profile
                                        ca-profile-name revocation-check
                                    crl]
url {
url-name;
}
url-name is the CA LDAP server
name. The format is
ldap://server-name,
where server-name is the CA host
DNS name or IP address.
To specify to use a password to access the CRL, include the
password statement at the [edit
security pki ca-profile ca-profile-name
revocation-check crl url] hierarchy level:
[edit security pki ca-profile ca-profile-name revocation-check crl url] password password;
password is the secret password
that the LDAP server requires for access.
Configure the Interval Between CRL Updates
By default, the time interval between CRL updates is 24 hours. To
configure the amount of time between CRL updates, include the
refresh-interval statement at the [edit
security pki ca-profile ca-profile-name
revocation-check crl] hierarchy level:
[edit
                                    security pki ca-profile ca-profile-name
                                    revocation-check crl]
refresh-interval number-of-hours;
The range for number of hours is from 0 through 8784.
Override Certificate Verification if CRL Download Fails
By default, if the router either cannot access the LDAP URL or
retrieve a valid CRL, certificate verification fails and the IPsec
tunnel is not established. To override this behavior and permit the
authentication of the IPsec peer when the CRL is not downloaded,
include the disable on-download-failure statement
at the [edit security pki ca-profile
ca-profile-name revocation-check
crl] hierarchy level:
[edit security pki ca-profile ca-profile-name revocation-check crl] disable on-download-failure;
Manage Digital Certificates
After you configure the CA profile, you can request a CA certificate from the trusted CA. Next, you must generate a public/private keypair. When the keypair is available, you can generate a local certificate either online or manually.
Tasks to manage digital certificates are:
- Request a CA Digital Certificate for AS and Multiservices PICs
- Generate a Public/Private Keypair
- Generate and Enroll a Local Digital Certificate
Request a CA Digital Certificate for AS and Multiservices PICs
For information about how to configure a CA profile, see Configure the Certificate Authority Properties.
In this example, the certificate is enrolled online and installed into the router automatically.
user@host> request security pki ca-certificate enroll ca-profile entrust
Received following certificates:
Certificate: C=us, O=juniper
 Fingerprint:00:8e:6f:58:dd:68:bf:25:0a:e3:f9:17:70:d6:61:f3:53:a7:79:10
Certificate: C=us, O=juniper, CN=First Officer
 Fingerprint:bc:78:87:9b:a7:91:13:20:71:db:ac:b5:56:71:42:ad:1a:b6:46:17
Certificate: C=us, O=juniper, CN=First Officer
 Fingerprint:46:71:15:34:f0:a6:41:76:65:81:33:4f:68:47:c4:df:78:b8:e3:3f
Do you want to load the above CA certificate ? [yes,no] (no) yes
If you obtain the CA certificate directly from the CA (for example,
as an e-mail attachment or Web site download), you can install it
with the request security pki ca-certificate load
command. For more information, see the CLI Explorer.
Generate a Public/Private Keypair
After obtaining a certificate for an AS PIC or MS-PIC, you must
generate a public-private key before you can generate a local
certificate. The public key is included in the local digital
certificate and the private key is used to decrypt data received
from peers. To generate a public-private keypair, issue the
request security pki generate-key-pair certificate-id
                                        certificate-id-name
command.
The following example shows how to generate a public-private key for an AS PIC or MS-PIC:
user@host>request security pki generate-key-pair certificate-id local-entrust2
Generated key pair local-entrust2, key size 1024 bits
Generate and Enroll a Local Digital Certificate
You can generate and enroll local digital certificates either online
or manually. To generate and enroll a local certificate online by
using the SCEP for an AS PIC or MS-PIC, issue the request
security pki local-certificate enroll command. To
generate a local certificate request manually in the PKCS-10 format,
issue the request security pki
generate-certificate-request command.
If you create the local certificate request manually, you must also
load the certificate manually. To manually install a certificate in
your router, issue the request security pki
local-certificate load command.
The following example shows how to generate a local certificate request manually and send it to the CA for processing:
user@host> request security pki generate-certificate-request certificate-id local-entrust2 domain-name router2.example.com filename entrust-req2
subject cn=router2.example.com
Generated certificate request
-----BEGIN CERTIFICATE REQUEST-----
MIIBoTCCAQoCAQAwGjEYMBYGA1UEAxMPdHAxLmp1bmlwZXIubmV0MIGfMA0GCSqG
SIb3DQEBAQUAA4GNADCBiQKBgQCiUFklQws1Ud+AqN5DDxRs2kVyKEhh9qoVFnz+
Hz4c9vsy3B8ElwTJlkmIt2cB3yifB6zePd+6WYpf57Crwre7YqPkiXM31F6z3YjX
H+1BPNbCxNWYvyrnSyVYDbFj8o0Xyqog8ACDfVL2JBWrPNBYy7imq/K9soDBbAs6
5hZqqwIDAQABoEcwRQYJKoZIhvcNAQkOMTgwNjAOBgNVHQ8BAf8EBAMCB4AwJAYD
VR0RAQH/BBowGIIWdHAxLmVuZ2xhYi5qdW5pcGVyLm5ldDANBgkqhkiG9w0BAQQF
AAOBgQBc2rq1v5SOQXH7LCb/FdqAL8ZM6GoaN5d6cGwq4bB6a7UQFgtoH406gQ3G
3iH0Zfz4xMIBpJYuGd1dkqgvcDoH3AgTsLkfn7Wi3x5H2qeQVs9bvL4P5nvEZLND
EIMUHwteolZCiZ70fO9Fer9cXWHSQs1UtXtgPqQJy2xIeImLgw==
-----END CERTIFICATE REQUEST-----
Fingerprint:
0d:90:b8:d2:56:74:fc:84:59:62:b9:78:71:9c:e4:9c:54:ba:16:97 (sha1)
1b:08:d4:f7:90:f1:c4:39:08:c9:de:76:00:86:62:b8 (md5)
The trusted CA digitally signs the local certificate and returns it to you. Copy the certificate file into the router and load the certificate:
user@host> request security pki local-certificate load filename /tmp/router2-cert certificate-id local-entrust2
Local certificate local-entrust2 loaded successfully
The name of the file sent to you by the CA might not match the name
of the certificate identifier. However, the
certificate-id name must always match the name
of the keypair you generated for the router.
After the local and CA certificates have been loaded, you can reference certificates in your IPsec configuration. Using default values in the AS and Multiservices PICs, you do not need to configure an IPsec proposal or an IPsec policy. However, you must configure an IKE proposal that specifies the use of digital certificates, reference the IKE proposal and locate the certificate in an IKE policy, and apply the CA profile to the service set.
Configure Auto-Reenrollment of a Router Certificate
Use the auto-re-enrollment statement to configure automatic reenrollment of a
specified existing router certificate before its existing expiration date. This function
automatically reenrolls the router certificate. The reenrollment process requests the CA
to issue a new router certificate with a new expiration date. The date of
auto-reenrollment is determined by the following parameters:
re-enroll-trigger-time—The percentage of the difference between the router certificate start date/time (when the certificate was generated) and the validity period. There-enroll-trigger-timeused to specify how long auto-reenrollment should be initiated before expiration.validity-period—The number of days after issuance when the router certificate will expire, as set when a certificate is generated.
By default, this feature is not enabled unless configured explicitly. This means that a certificate that does not have auto-reenrollment configured will expire on its normal expiration date.
The ca-profile statement specifies which CA will
be contacted to reenroll the expiring certificate. This is the CA
that issued the original router certificate.
The challenge-password statement provides the issuing
CA with the router certificate’s password, as set by the administrator
and normally obtained from the SCEP enrollment Web page of the CA.
The password is 16 characters in length.
Optionally, the router certificate keypair can be regenerated by using the
re-generate-keypair statement.
To configure automatic reenrollment properties, include the
following statements at the [edit security pki] hierarchy
level:
[edit security pki]
auto-re-enrollment {
    certificate-id {
        ca-profile ca-profile-name;
        challenge-password password;
        re-enroll-trigger-time-percentage percentage;
        re-generate-keypair;
        validity-period days;
    }
}
percentage is the percentage
for the reenroll trigger time. The range can be from 1 through 99
percent.
days is the number of days for
the validity period. The range can be from 1 through 4095.
Tasks to configure automatic reenrollment of certificates are:
- Specify the Certificate ID
- Specify the CA Profile
- Specify the Challenge Password
- Specify the Reenroll Trigger Time
- Specify the Regenerate Keypair
- Specify the Validity Period
Specify the Certificate ID
Use the certificate-id statement to specify the name
of the router certificate to configure for auto-reenrollment. To specify
the certificate ID, include the statement at the [edit security
pki auto-re-enrollment] hierarchy level:
[edit security pki auto-re-enrollment] certificate-id certificate-name;
Specify the CA Profile
Use the ca-profile statement to specify the name
of the CA profile from the router certificate previously specified
by certificate ID. To specify the CA profile, include the statement
at the [edit security pki auto-re-enrollment certificate-id certificate-name] hierarchy level:
[edit security pki auto-re-enrollment certificate-id certificate-name]
ca-profile ca-profile-name;
The referenced ca-profile must have an enrollment URL configured
at the [edit security pki ca-profile ca-profile-name
enrollment url] hierarchy level.
Specify the Challenge Password
The challenge password is used by the CA specified by the PKI certificate ID for reenrollment and revocation.
To specify the challenge password, include the following statement
at the [edit security pki auto-re-enrollment certificate-id certificate-name] hierarchy level:
[edit security pki auto-re-enrollment certificate-id certificate-name]
challenge-password password;
Specify the Reenroll Trigger Time
Use the re-enroll-trigger-time statement to set the
percentage of the validity period before expiration at which reenrollment
occurs. To specify the reenroll trigger time, include the following
statement at the [edit security pki auto-re-enrollment certificate-id certificate-name] hierarchy level:
[edit security pki auto-re-enrollment certificate-id certificate-name]
re-enroll-trigger-time percentage;
percentage is the percentage
for the reenroll trigger time. The range can be from 1 through 99
percent.
Specify the Regenerate Keypair
When a regenerate keypair is configured, a new keypair is generated during reenrollment. On
successful reenrollment, a new keypair and new certificate replace the old
certificate and keypair. To generate a new keypair, include the following
statement at the [edit security pki auto-re-enrollment certificate-id
certificate-name] hierarchy level:
[edit security pki auto-re-enrollment certificate-id certificate-name] re-generate-keypair;
Specify the Validity Period
The validity-period statement specifies the router
certificate validity period, in number of days, that the specified
router certificate remains valid. To specify the validity period,
include the statement at the [edit security pki auto-re-enrollment
certificate-id certificate-name] hierarchy
level:
[edit security pki auto-re-enrollment certificate-id certificate-name] validity-period days;
days is the number of days for
the validity period. The range can be from 1 through 4095.
Enroll a CA Certificate Using SCEP
- Enroll a CA Certificate Online Using SCEP
- Example: Enroll a Local Certificate Online Using SCEP
- Example: Using SCEP to Automatically Renew a Local Certificate
Enroll a CA Certificate Online Using SCEP
Before you begin:
Generate a public and private keypair.
Create a CA profile.
To enroll a CA certificate online:
Retrieve the CA certificate online using SCEP.
user@host> request security pki ca-certificate enroll ca-profile ca-profile-ipsec
The command is processed synchronously to provide the fingerprint of the received CA certificate.
Fingerprint:
e6:fa:d6:da:e8:8d:d3:00:e8:59:12:e1:2c:b9:3c:c0:9d:6c:8f:8d (sha1)
82:e2:dc:ea:48:4c:08:9a:fd:b5:24:b0:db:c3:ba:59 (md5)
Do you want to load the above CA certificate ? [yes,no]
Confirm that the correct certificate is loaded. The CA certificate is loaded only when you type yes at the CLI prompt.
For more information about the certificate, such as the bit length of the keypair, use the command
show security pki ca-certificate.
Example: Enroll a Local Certificate Online Using SCEP
This example shows how to enroll a local certificate online using SCEP.
Requirements
Before you begin:
Generate a public and private keypair. See Self-Signed Digital Certificates.
Configure a CA profile. See Example: Configure a CA Profile.
For SCEP, enroll the CA certificate. See Enroll a CA Certificate Online Using SCEP.
Overview
In this example, you configure your Juniper Networks device
to obtain a local certificate online and start the online enrollment
for the specified certificate ID with SCEP. You specify the URL path
to the CA server in the CA profile name ca-profile-ipsec.
You use the request security pki local-certificate enroll scep command to start
the online enrollment for the specified certificate ID. Starting in Junos OS Release
15.1X49-D40 and Junos OS Release 17.3R1, the scep keyword is
supported and required. You must specify the CA profile name (for example,
ca-profile-ipsec), the certificate ID corresponding to a
previously generated keypair (for example, qqq), and the following
information:
-
The challenge password provided by the CA administrator for certificate enrollment and reenrollment.
The RFC8894 states that the challenge password is optional when an existing certificate signs a renewal request. The challenge password is not mandatory. You can commit the configuration even without challenge password.
At least one of the following values:
The domain name to identify the certificate owner in IKE negotiations—for example,
qqq.example.net.The identity of the certificate owner for IKE negotiation with the e-mail statement—for example,
qqq@example.net.The IP address if the device is configured for a static IP address—for example,
10.10.10.10.
Specify the subject name in the DN format in quotation marks, including the domain component (DC), common name (CN), serial number (SN), organizational unit name (OU), organization name (O), locality (L), state (ST), and country (C).
After you obtain the device certificates and the online enrollment begins for the certificate ID, the command is processed asynchronously.
Configuration
Procedure
Step-by-Step Procedure
To enroll a local certificate online:
Specify the CA profile.
[edit]
user@host# set security pki ca-profile ca-profile-ipsec  enrollment url path-to-ca-server
If you are done configuring the device, commit the configuration.
[edit]
user@host# commit
Initiate the enrollment process by running the operational mode command.
user@host> request security pki local-certificate enroll scep ca-profile ca-profile-ipsec certificate-id qqq challenge-password ca-provided-password domain-name qqq.example.net email qqq@example.net ip-address 10.10.10.10 subject DC=example, CN=router3, SN, OU=marketing, O=example, L=sunnyvale, ST=california, C=us
If you define SN in the subject field without the serial number, then the serial number is read directly from the device and added to the CSR.
Starting in Junos OS Release 19.4R2, a warning message ECDSA Keypair not supported with
SCEP for cert_id <certificate id> is
displayed when you try to enroll local certificate using ECDSA key with SCEP as
ECDSA key is not supported with SCEP.
Verification
To verify the configuration is working properly, enter the show security
pki command.
Example: Using SCEP to Automatically Renew a Local Certificate
You can use either CMPv2 or SCEP to enroll digital certificates. This example shows how to renew the local certificates automatically using SCEP.
Requirements
Before you begin:
Obtain a certificate either on line or manually. See Digital Certificates.
Obtain a local certificate. See Example: Enroll a Local Certificate Online Using SCEP.
Overview
You can enable the device to automatically renew certificates that you acquired by online enrollment or loaded manually. Automatic certificate renewal saves you from having to remember to renew certificates on the device before certificate expire and helps maintain valid certificates at all times.
Automatic certificate renewal is disabled by default. You can enable automatic certificate renewal and configure the device to automatically send out a request to reenroll a certificate before it expires. You can specify when the certificate reenrollment request is to be sent; the trigger for reenrollment is the percentage of the certificate’s lifetime that remains before expiration. For example, if the renewal request is to be sent when the certificate's remaining lifetime is 10%, then configure 10 for the reenrollment trigger.
For automatic certificate renewal to work, make sure the device is able to reach the CA server and the certificate remain on the device during the renewal process. Furthermore, you must also ensure that the CA that issues the certificate can return the same DN. The CA must not modify the subject name or alternate subject name extension in the new certificate.
You can enable and disable automatic SCEP certificate renewal either for all SCEP certificates or
on a per-certificate basis. You use the set security pki auto-re-enrollment
scep command to enable and configure certificate reenrollment. In this
example, you specify the certificate ID of the CA certificate as
ca-ipsec and set the CA profile name associated with the
certificate to ca-profile-ipsec. You set the challenge password for
the CA certificate to the challenge password provided by the CA administrator; this
password must be the same one configured previously for the CA. You also set the
percentage for the reenrollment trigger to 10. During automatic
reenrollment, the Juniper Networks device by default uses the existing keypair. A
good security practice is to regenerate a new keypair for reenrollment. To generate
a new keypair, use the re-generate-keypair command.
Configuration
Procedure
Step-by-Step Procedure
To enable and configure local certificate reenrollment:
Use the following command to enable and configure certificate reenrollment.
[edit]
user@host# set security pki auto-re-enrollment scep certificate-id ca-ipsec  ca-profile-name ca-profile-ipsec  challenge-password ca-provided-password re-enroll-trigger-time-percentage 10 re-generate-keypair
Starting in Junos OS Release 15.1X49-D40 and Junos OS Release 17.3R1, the
scepkeyword is supported and required.If you are done configuring the device, commit the configuration.
[edit]
user@host# commit
Verification
To verify the configuration is working properly, enter the show security pki
local-certificate detail operational mode
command.
Enroll a CA Certificate Online Using CMPv2
The request security pki local-certificate enroll cmpv2 command uses
CMPv2 to enroll a local digital certificate online. This command loads both end-entity and
CA certificates based on the CA server configuration. You must create the CA profile before
CA certificates enrollment because the enrollment URL is extracted from the CA profile.
This topic describes certificate enrollment with the CMPv2 protocol.
- Certificate Enrollment and Reenrollment Messages
- EE Certificate with Issuer CA Certificate
- EE Certificate with CA Certificate Chain
Certificate Enrollment and Reenrollment Messages
The CMPv2 protocol mainly involves certificate enrollment and reenrollment operations. The certificate enrollment process includes Initialization Request and Initialization Response messages, while certificate reenrollment includes Key Update Request and Key Update Response messages.
The CMPv2 server responds with Initialization Response (IP). The response contains the EE certificate along with optional CA certificates. You can verify the message integrity and message authenticity Initialization Response using shared-secret-information according to RFC 4210. You can also verify the Initialization Response using the issuer CA public key. Before you reenroll an EE certificate, you must have a valid CA certificate enrolled on the device.
The Initialization Response or Key Update Response message can contain an issuer CA certificate or a chain of CA certificates. The CA certificates received in the responses are treated as trusted CA certificates and stored in the receiving device if the trusted CA store. These CA certificates are later used for EE certificate validation.
We do not support CA certificate reenrollment. If a CA certificate expires, you must unenroll the current CA certificate and enroll it back again.
EE Certificate with Issuer CA Certificate
In a simple scenario, the Initialization Response message might contain only an EE certificate, in which case the CA information is provided separately. The certificate is stored in the EE certificate store.
The Initialization Response message can contain an EE certificate as well as a self-signed issuer CA certificate. The EE certificate is first stored in the certificate store, and then the CA certificate is checked. If the CA certificate is found and the subject DN of the CA certificate in the Initialization Response message matches the issuer DN of the EE certificate, the CA certificate is stored in the CA certificate store for the CA profile name specified in the CMPv2 certificate enrollment command. If the CA certificate already exists in the CA certificate store, no action is taken.
EE Certificate with CA Certificate Chain
In many deployments, the EE certificate is issued by an intermediate CA in a certificate chain. In this case, the Initialization Response message can contain the EE certificate along with a list of CA certificates in the chain. The intermediate CA certificates and the self-signed root CA certificates are all required to validate the EE certificate. The CA chain might also be needed to validate certificates received from peer devices with similar hierarchies. The following section describes how certificates in the CA chain are stored.
In Figure 1, the Initialization Response message includes the EE certificate and three CA certificates in a certificate chain.
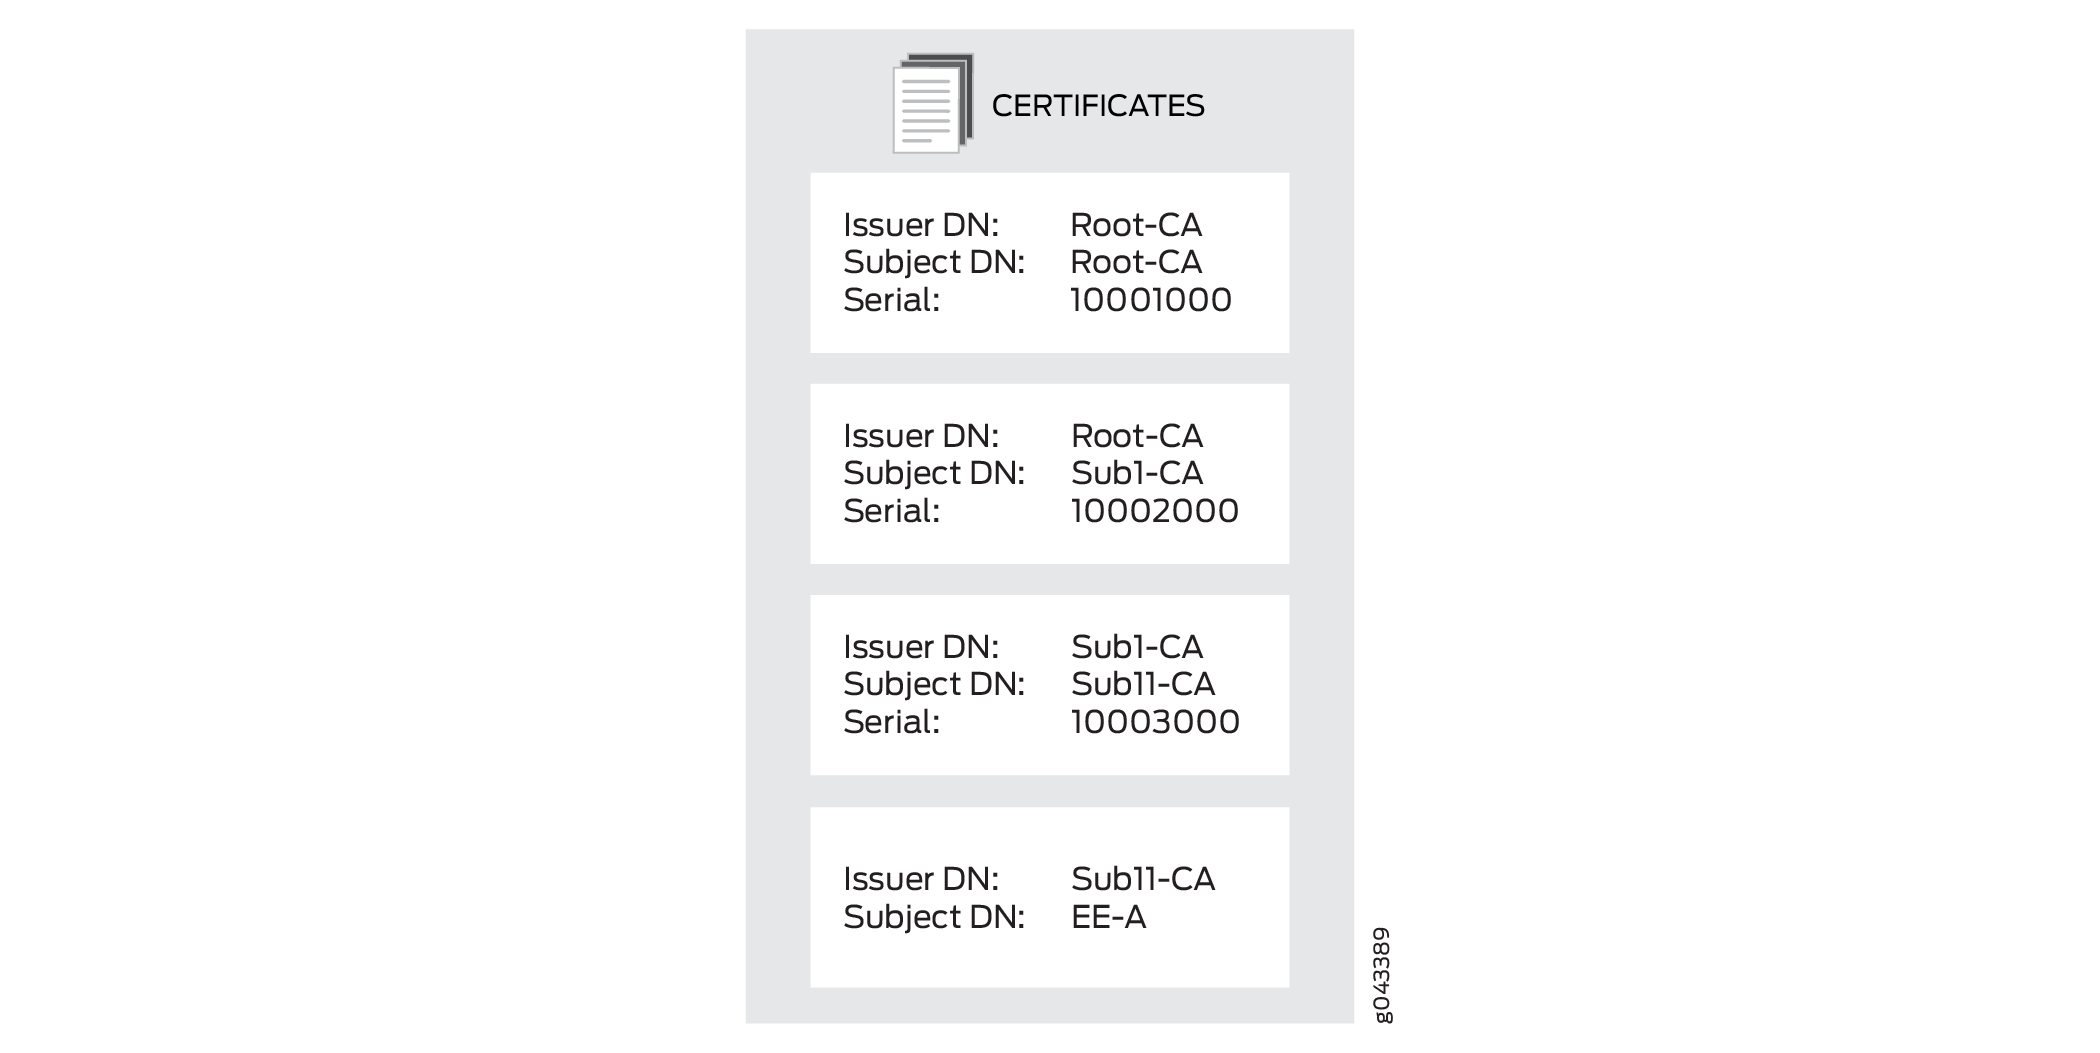
In the above image, the EE certificate is stored in the EE certificate store. Each CA certificate needs a CA profile. The CA certificate with the subject DN Sub11-CA is the first CA in the chain and is the issuer of the EE certificate. It is stored in the CA profile that is specified with the CMPv2 certificate enrollment command.
The device checks the presence of each of the remaining CA certificates in the chain in
the CA store. If a CA certificate is not present in the CA store, it is saved and a CA
profile is created for it. The new CA profile name is created using the least
significant 16 digits of the CA certificate serial number. If the serial number is
longer than 16 digits, the most significant digits beyond 16 digits are truncated. If
the serial number is shorter than 16 digits, the remaining most significant digits are
filled with 0s. For example, if the serial number is
11111000100010001000, then the CA profile name is 1000100010001000. If
the serial number is 10001000, then the CA profile name is
0000000010001000.
It is possible that multiple certificate serial numbers can
have the same least significant 16 digits. In that case, -00 is appended to the profile name to create a unique CA profile name;
additional CA profile names are created by incrementing the appended
number, from -01 up to -99. For example, CA
profile names can be 1000100010001000, 1000100010001000-00, and 1000100010001000-01.
Install a Digital Certificate on Your Router
A digital certificate is an electronic means for verifying your identity through a trusted third party, known as a CA. Alternatively, you can use a self-signed certificate to attest to your identity. The CA server you use can be owned and operated by an independent CA or by your own organization, in which case you become your own CA. If you use an independent CA, you must contact them for the addresses of their CA and CRL servers (for obtaining certificates and CRLs) and for the information they require when submitting personal certificate requests. When you are your own CA, you determine this information yourself. The PKI provides an infrastructure for digital certificate management.
Manually Request a Digital Certificate
To obtain digital certificates manually, you must configure a CA profile, generate a private–public keypair, create a local certificate, and load the certificates on the router. After loading the certificates, they can be referenced in your IPsec–VPN configuration.
The following procedure shows how you can configure a CA profile:
Understand ACME Protocol
Learn about ACME protocol and how to enroll the certificate.
- What is ACME Protocol
- Enroll Local Certificate Using Let’s Encrypt Server
- Manually Reenroll Local Certificate
- Delete ACME Account
What is ACME Protocol
Automated Certificate Management Environment (ACME) protocol is a new PKI enrollment standard used by several PKI servers such as Let’s Encrypt. The Let’s encrypt certificate allows for free usage of webserver certificates in firewalls, and this can be used in Juniper Secure Connect and J-Web. The Junos OS automatically reenrolls Let’s Encrypt certificates on occurrence of every 25 days.
The ACME protocol allows the enrollment of certificates from Let’s Encrypt server or ACME-enabled servers. The firewalls enroll the certificates from Let’s Encrypt server, and Juniper Secure Connect validates the certificates without copying and downloading any CA certificates.
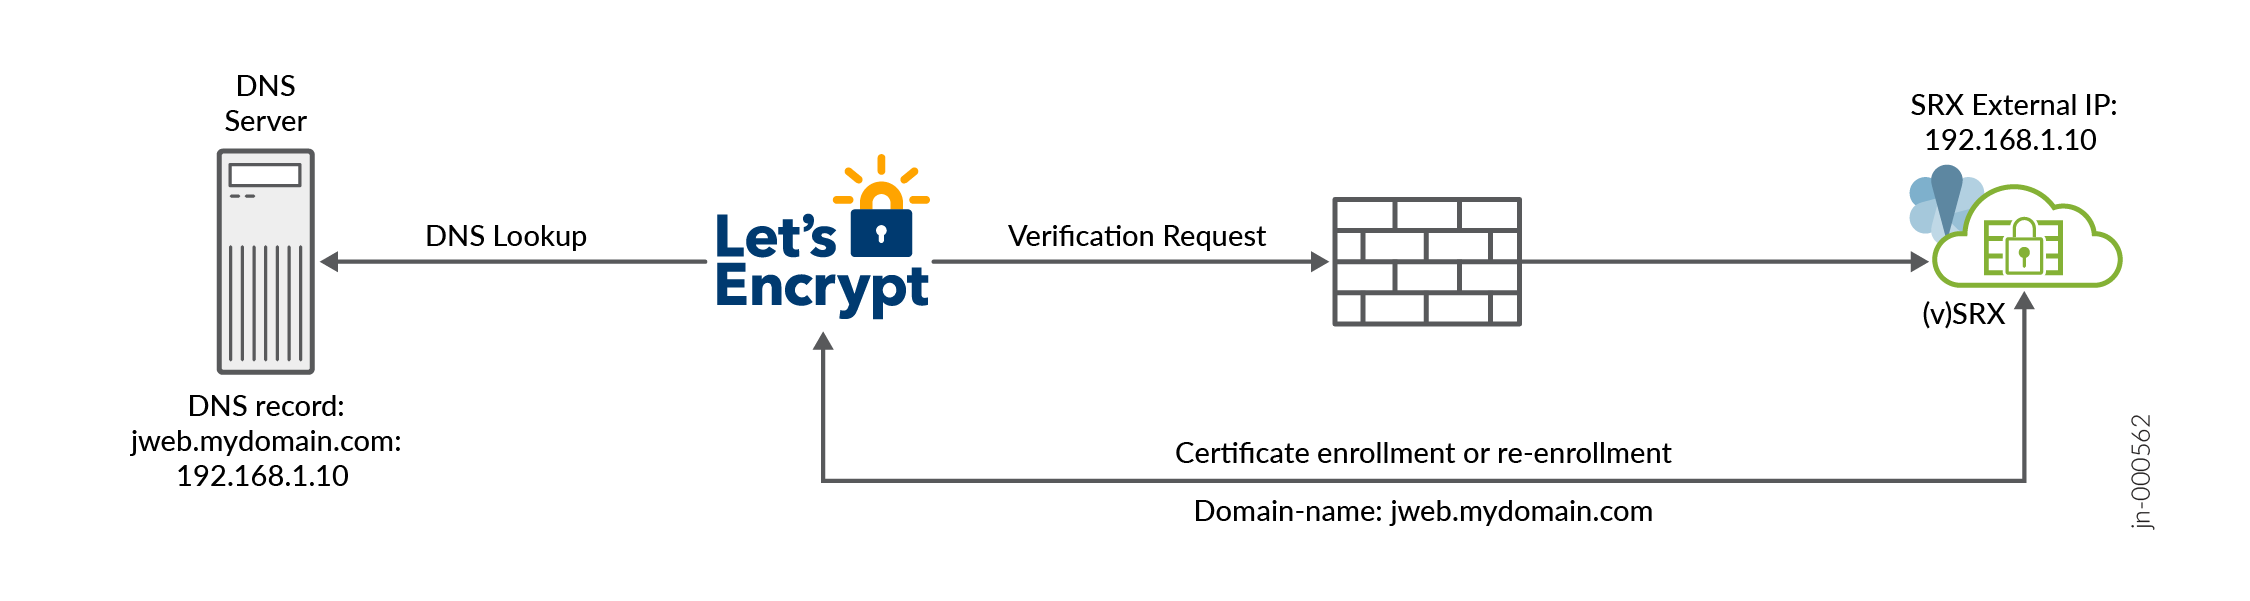
When using Let’s Encrypt, ensure that the Let’s Encrypt server is able to resolve the domain name to the IP address of the firewall interface as shown in Figure 2. Let’s Encrypt server must be able to reach the firewall interface on TCP port 80. During the certificate enrollment, the firewall temporarily enable this incoming request automatically. If your firewall or an intermediate device or a router is blocking the TCP port 80, certificate enrollment will fail.
The firewall uses port 443 for outbound communication with the Let's Encrypt Server . Ensure that your network security policies allow this outbound traffic. Communication over port 80 to the Let's Encrypt server is not supported for outbound connections from firewall.
Limitations
-
The dns-01 and external account binding are not supported.
-
ACME cannot be used when J-Web listens to port 80
-
Wildcard certificate is not supported, such as
*.mydomain.com; instead, you can enroll multiple DNS names.
Enroll Local Certificate Using Let’s Encrypt Server
This example shows how to enroll the local certificate using Let's Encrypt.
-
Specify the CA profile. The ACME enrollment process does not include CRL validation.
[edit]
user@host#
set security pki ca-profile ISRG_Root_X1 ca-identity ISRG_Root_X1
user@host# set security pki ca-profile ISRG_Root_X1 revocation-check disable
user@host# set security pki ca-profile Lets_Encrypt ca-identity Lets_Encrypt

user@host# set security pki ca-profile Lets_Encrypt enrollment url https://acme-v02.api.letsencrypt.org/directory
-
Commit the configuration.
[edit]
user@host# commit
-
Load the CA certificate.
[edit]
user@host> request security pki ca-certificate load ca-profile ISRG_Root_X1 filename ISRG_Root_X1.pem
To download the ISRG_Root_X1.pem certificate, see KB84991.
-
Create ACME key ID.
[edit]
user@host> request security pki generate-key-pair size 2048 type rsa acme-key-id mydomain
-
Prepare enrollment of local certificate.
[edit]
user@host> request security pki generate-key-pair size 2048 type rsa certificate-id service-mydomain
-
Enroll a certificate with one domain name.
When using Let’s Encrypt, ensure that the Let’s Encrypt server is able to resolve the domain name to the IP address of the firewall interface as shown in Figure 2. Let’s Encrypt server must be able to reach the firewall interface on TCP port 80. During the certificate enrollment, the firewall temporarily enable this incoming request automatically. If your firewall or an intermediate device or a router is blocking the TCP port 80, certificate enrollment will fail.
The firewall uses port 443 for outbound communication with the Let's Encrypt Server . Ensure that your network security policies allow this outbound traffic. Communication over port 80 to the Let's Encrypt server is not supported for outbound connections from firewall.
[edit]
user@host> request security pki local-certificate enroll acme acme-key-id mydoamin certificate-id service-mydomain ca-profile Lets_Encrypt domain-name jweb.mydomain.com email jweb@acmejnpr.net letsencrypt-enrollment yes terms-of-service agree
Enroll a certificate with multiple domain names.
[edit]
user@host> request security pki local-certificate enroll acme acme-key-id mydomain certificate-id service-mydomain ca-profile Lets_Encrypt domain-name jweb.mydomain.com,remote-acess.mydomain.com  email jweb@acmejnpr.net letsencrypt-enrollment yes terms-of-service agree
-
Once the enrollment is finished, the issued certificate will be loaded in certificate-id service-mydomian.
Manually Reenroll Local Certificate
To reenroll a local certificate online:
-
Initiate the reenrollment request.
[edit]
user@host> request security pki local-certificate re-enroll acme acme-key-id mydomain certificate-id service-mydomain ca-profile Lets_Encrypt re-generate-keypair
-
Once the reenrollment is finished, the issued certificate will be loaded in certificate-id service-mydomian.
Delete ACME Account
To delete the ACME account, perform the following step:
-
Issue the following command.
[edit]
user@host> clear security pki acme account acme-key-id mydomain ca-profile Lets_Encrypt
You can delete the ACME account key only if the ACME is activated or created by the enrollment.
Platform-Specific SSL Termination Services Behavior
Use Feature Explorer to confirm platform and release support for specific features.
Use the following table to review platform-specific behaviors for your platform:
| Platform | Difference |
|---|---|
| SRX Series |
|