使用模板配置交换机
请按照以下步骤使用模板为您的交换机配置确切的功能和设置,从而满足站点上的用户的需求。
我们建议仅通过瞻博网络 Mist 云管理组织中的所有交换机,而非通过设备的 CLI 进行管理。
使用 Juniper Mist™ Wired Assurance 配置多台交换机的推荐方法包括两个主要步骤:
创建交换机配置模板。
将模板应用到一个或多个站点。
链接到特定站点的配置设置将应用于该站点内的交换机(包括新添加的交换机和现有交换机)。通过该功能,您可以在整个网络基础架构中管理和应用一致的标准化配置,使配置过程更加高效和简化。
您也可以从 交换机详细信息 页面单独配置交换机(而不使用模板)。
有关交换机模板的快速概述,请观看以下视频:
Juniper Mist Wired Assurance makes day-one configurations simple yet powerful. The templates can be configured at an org level, site level, or a specific switch. Navigate to Organization and Switch Templates.
We'll use prod-template in this example. The first template configures the RADIUS and NTP servers at the org level, or for all the switches in the network. The Shared Elements configuration is shared among the switches.
This is where you can create specific IoT, corporate, or camera networks mapped to VLAN IDs. You can create port profiles for camera devices, customizing PoE settings, assigning networks, and speed negotiation. Once the configuration is set, it's time to apply the template.
Let's save this as test-rule and apply it to switches assigned with an access rule. Or you can apply the rules to particular switch models. The templates also allow you to apply port profiles to port ranges in all the switches assigned to a site.
For example, port 4 is for access points, and port 5 is for IoT devices. Now the template can be applied to a site. At primary site, you can see all the inherited configuration that we just set at a global level.
These templates are simple yet flexible, meaning that you can override the global configurations at an organization, site, or switch level. If we click into the EX2300, you see that it has inherited the config defined by the global templates. You can also choose to override template settings, changing it from 4.4.2.2 to time.google.com. This switch has also inherited all the networks, port profiles, and switch configurations.
The templates make the initial setup easy and can also adapt to specific site or switch settings as needed. You can also click into the port icons to change the configurations as needed for a single or multiple ports. Whether you configure templates and profiles for one site or thousands of sites, you can scale with consistency and commonality with ease.
要配置交换机,您需要为自己分配一个超级用户角色。此角色授予您进行更改和自定义交换机设置所需的权限。
建议您在配置交换机时遵循 交换机配置最佳实践 。
要了解瞻博网络 Mist Wired Assurance 支持哪些交换机,请参阅瞻 博网络 Mist 支持的硬件。
创建交换机配置模板
交换机配置模板可以轻松地将相同的设置应用于各个站点的交换机。无论是一个站点还是多个站点,您都可以使用该模板来快速配置新的交换机。将交换机分配到站点时,交换机会自动采用关联模板中的配置。
通过 Mist 仪表板在交换机上完成的配置将覆盖通过设备 CLI 完成的任何配置。交换机详细信息页面不会显示您通过交换机 CLI 直接在交换机上所做的任何配置更改。
要创建交换机配置模板,请执行以下操作:
将模板分配给站点
创建交换机配置模板后,您需要将其分配到相关站点。这可以确保将配置设置应用于这些站点内的交换机。您可以根据具体要求灵活地将模板应用到单个站点或多个站点。
要将模板分配给一个或多个站点:
或者,您可以使用以下步骤从 “站点配置 ”页面将模板应用到站点:
-
单击 站点 > 交换机配置。
-
单击列表中的站点将其打开。
-
从 “配置模板” 字段中选择一个模板,然后单击“ 保存”。
配置站点特定设置
连接到特定站点的交换机继承应用于该站点的组织级模板设置。如果需要,您可以在站点级别自定义设置。这些特定于站点的更改不会影响组织级模板,并将应用于所选站点中的所有交换机。
除非需要,否则不要覆盖站点级别的设置。请改用 站点变量。
要在站点级别更新交换机设置:
配置特定于交换机的设置
您需要在单个交换机上配置某些参数。这可能特定于每台交换机,无法通过模板进行配置。特定于交换机的设置可能包括交换机名称、角色、管理接口(带外)和 IRB 接口。您可以在各个交换机上手动配置设置,也可以导入设置。
手动配置特定于交换机的设置
要手动配置其他交换机级配置设置:
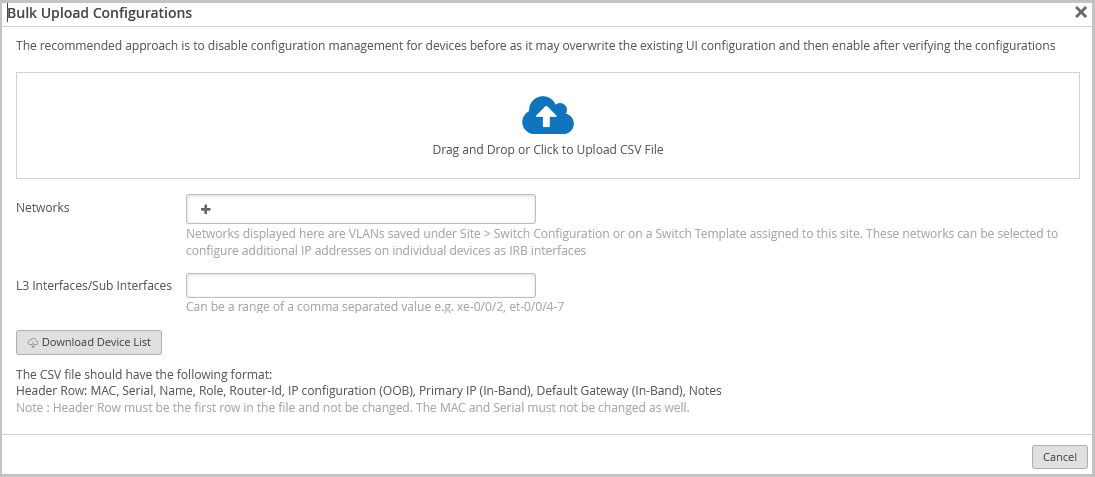
使用批量上传选项配置特定于交换机的设置
如果您不想在每台交换机上手动配置特定于交换机的设置,可以通过 CSV 文件上传设置来配置设置。您可以一次上传一个或多个交换机的设置。您可以上传以下设置:MAC 地址、序列号、交换机名称、交换机角色、路由器 ID、IP 配置 (OOB)、主 IP(带内)和默认网关(带内)。
要上传交换机级别设置,请执行以下操作:
- 点击批量上传配置。将会显示批量上传配置 (Bulk Upload Configurations) 窗口。
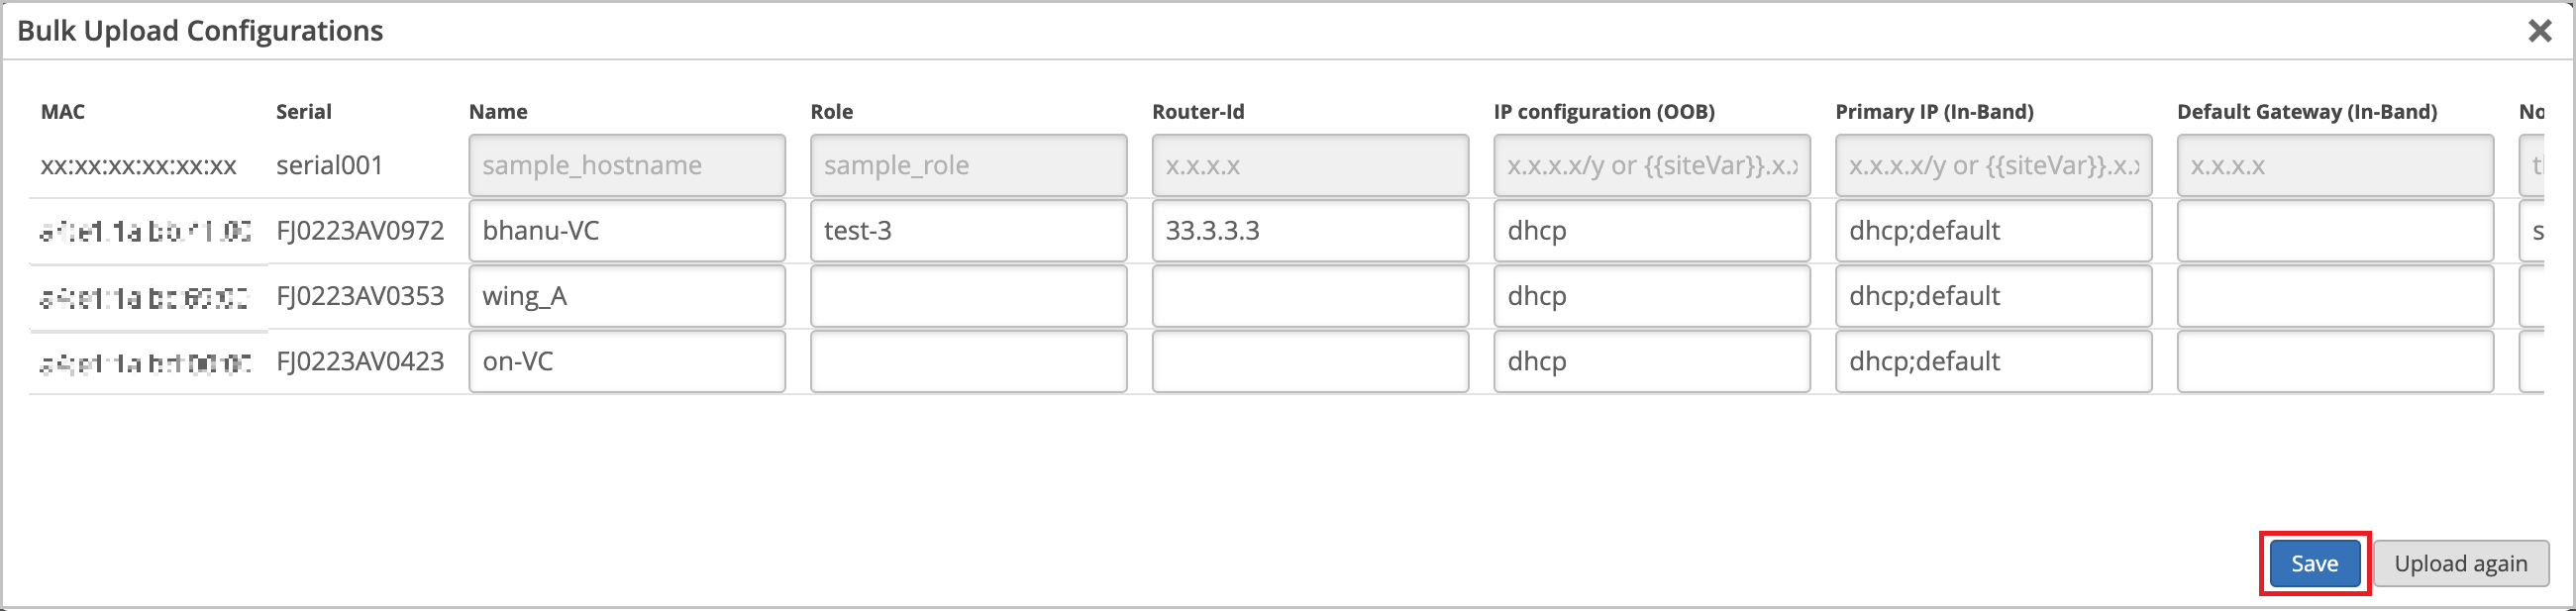
- 从文件上传窗口打开要上传的文件时,UI 页面会以可编辑的格式加载配置,如下所示:
 注意:
注意:-
如果 CSV 文件中未包含所选某些交换机的信息,则不会将配置推送到这些交换机(文件中缺少的交换机)。
-
如果 CSV 文件包含尚未选择的交换机的信息,则配置也不会推送到这些交换机。
-
验证交换机配置
您可以通过 Mist 门户上的 交换机详情 页面轻松查看应用于交换机的配置,并进行任何更新。
要访问交换机详细信息页面,请执行以下操作:
-
在 Mist 门户上,单击左侧菜单上的 交换机 选项卡以打开交换机页面。
-
在 列表 选项卡上,单击交换机以打开交换机详细信息页面。
当交换机详细信息页面打开时,您会发现自己位于“前面板”选项卡上。此选项卡可全面概览交换机的端口面板。
要检查特定端口的配置和状态,请将光标悬停在前面板图中的该端口上。例如,在以下示例中,如果将鼠标悬停在端口 ge-0/0/45 上,您将看到指示 Mist 接入点已连接到该端口的信息。显示的信息还包括有关速度、功率、IP 地址等的详细信息。
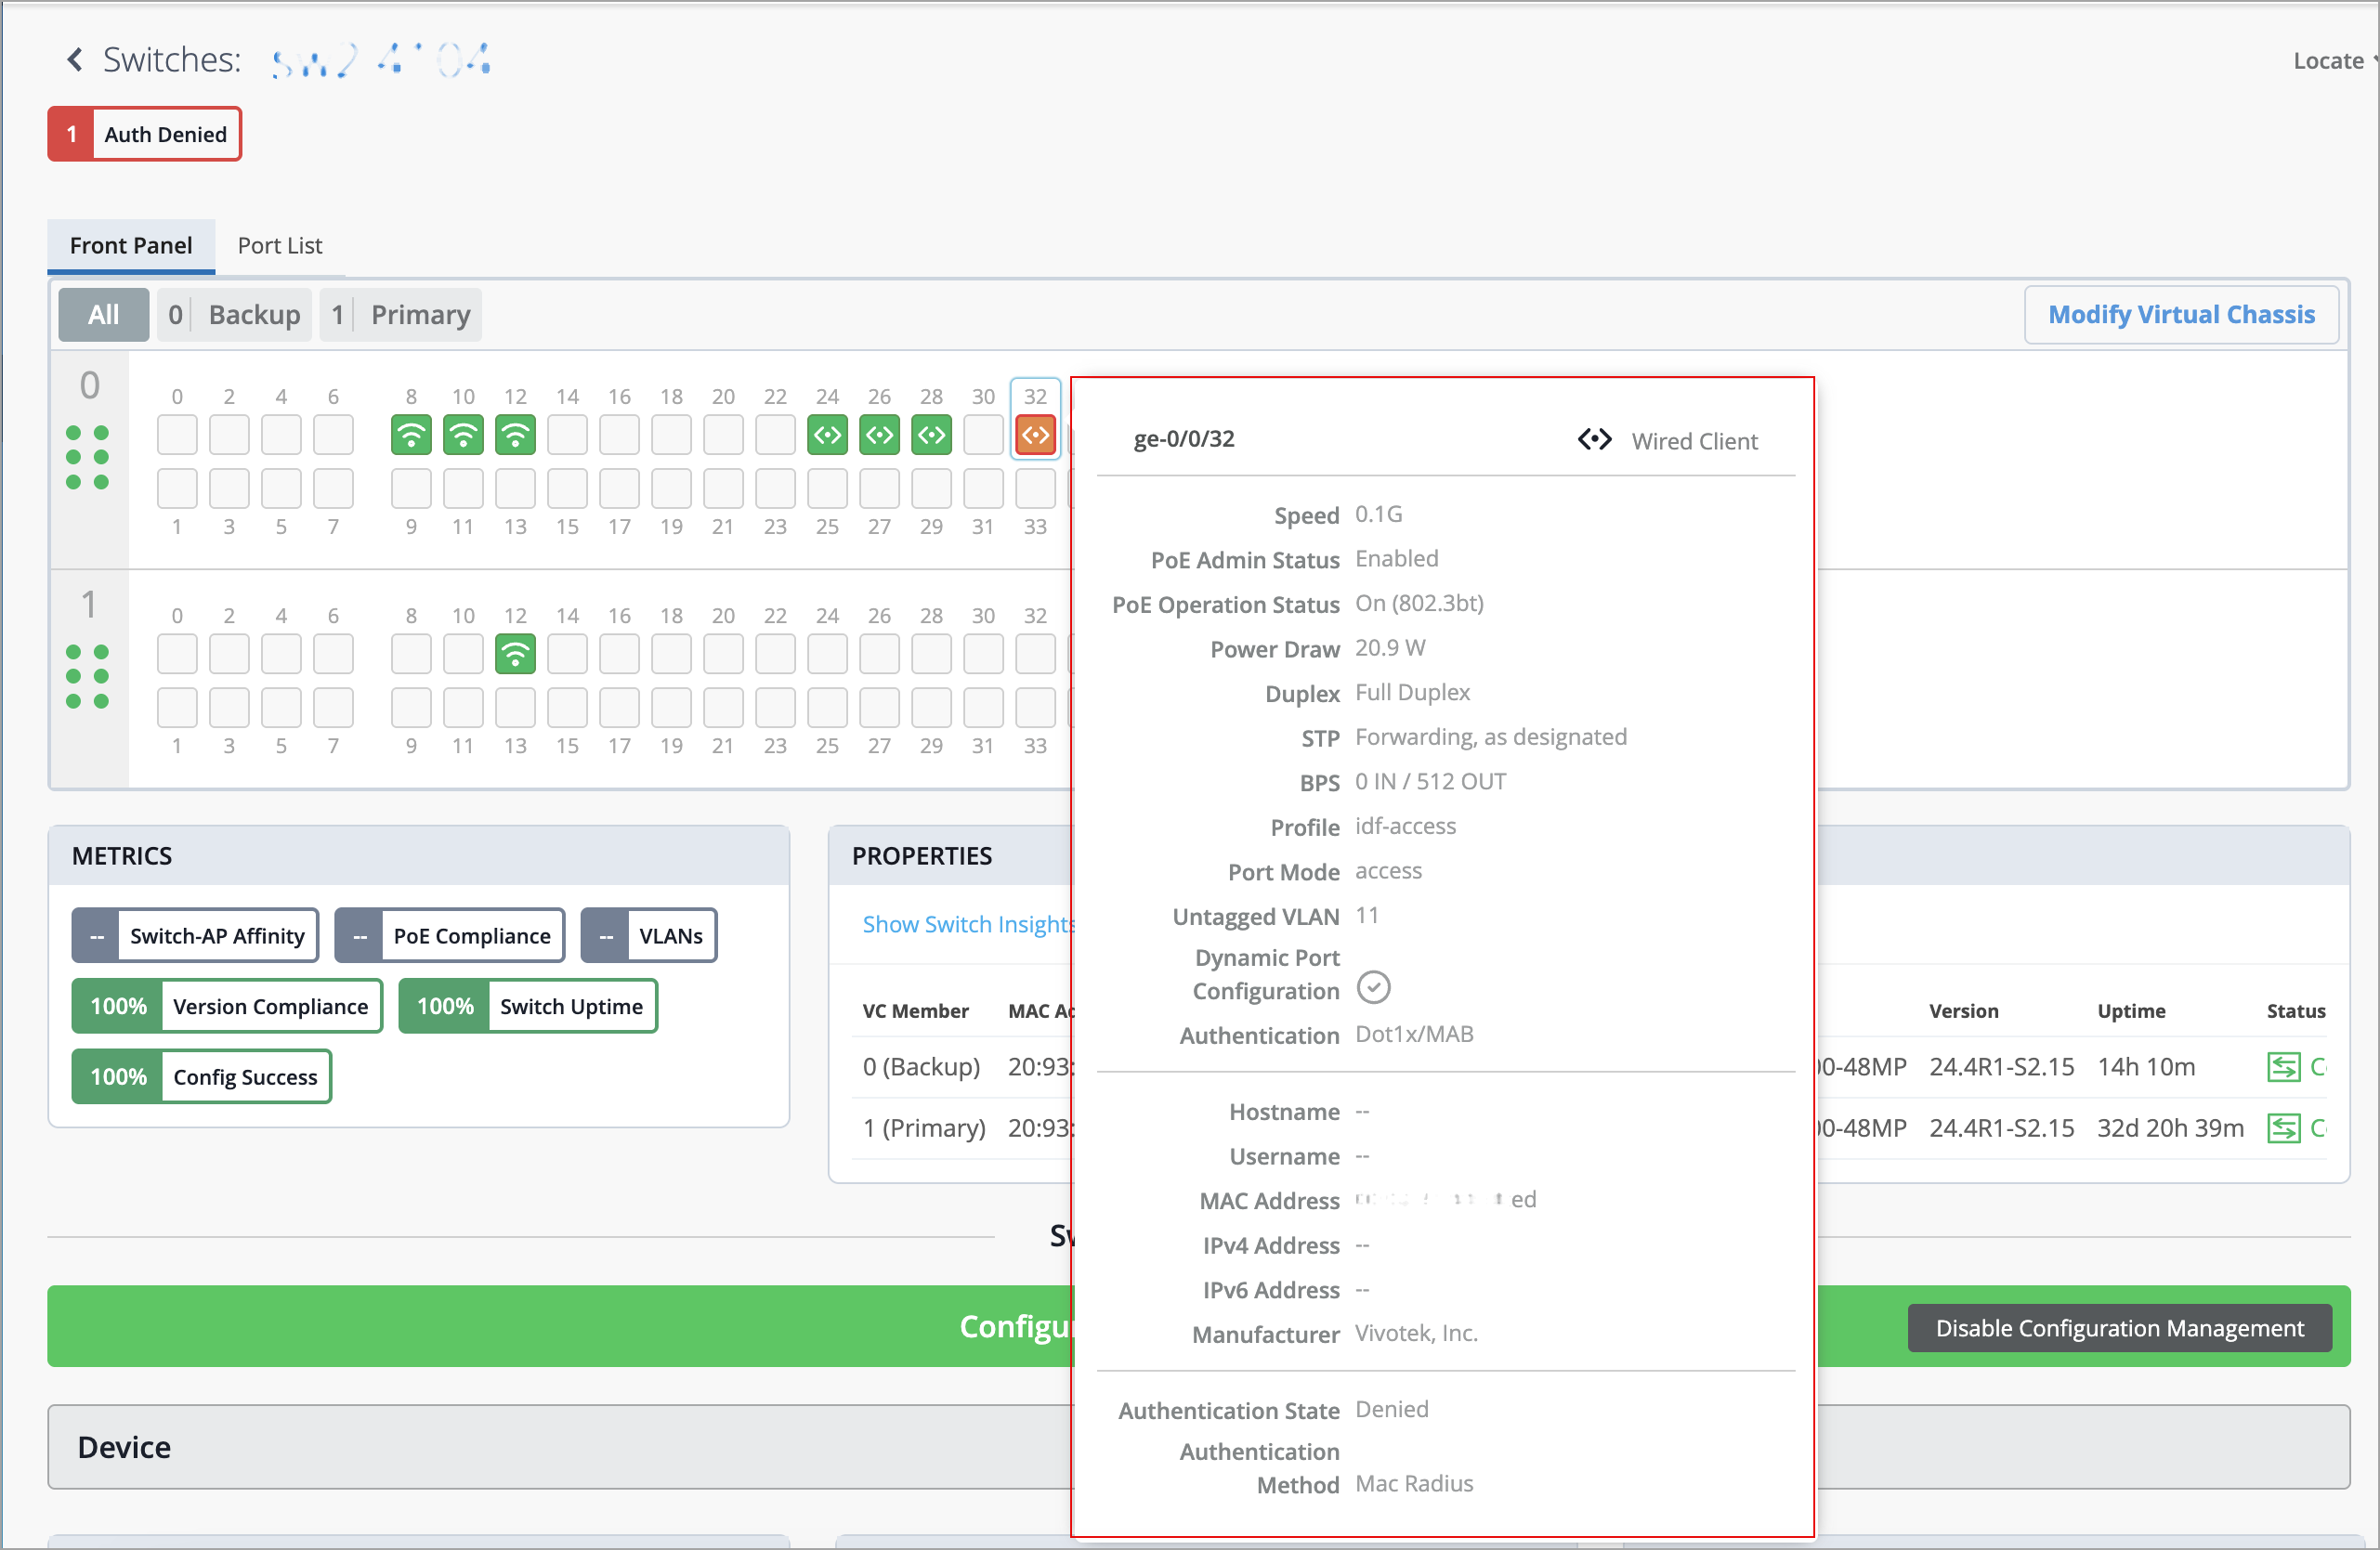
单击前面板插图上的端口可查看更详细的视图。通过此视图,您可以执行访问已连接的设备(例如接入点)、查看交换机洞察和编辑端口配置等任务。
在交换机详细信息页面的 Switch Insights 部分,您还可以找到有关交换机事件的信息,例如配置更改。
如果要以文本文件形式下载配置,请在交换机详细信息页面的公用事业下拉列表中选择下载 Junos 配置选项。
要查看应用于交换机的完整配置,只需向下滚动到 交换机配置 部分。从那里,您可以查看配置元素,并在需要时编辑配置元素。
如果需要,您可以在交换机级别、站点级别或模板级别更新设置。您还可以使用 CLI 命令配置 Mist 门户上的预定义下拉列表和文本字段不支持的功能。有关如何更新设置的更多信息,请参阅 管理或更新配置设置。