Application Policies
Use this information to add application policies to your organization, a WAN Edge template, a hub profile, or a device configuration.
Application Policies Overview
You can think of application policies in Juniper Mist as pulling together networks, applications, and traffic steering to determine where sessions are delivered. You're creating intention-driven policies by setting rules that govern access.
Use application policies to define which networks and users can access which applications, and which traffic-steering policies are used.
Understanding Policy Scope
You can define application policies at various levels to ensure that your policies meet the various needs of your organization and the many network users within it.
When you define an application policy at the organization-level, you can import and use the policy in multiple WAN Edge templates or in hub profiles. That is, you can follow the “define once, use multiple times” model.
For more particular use cases involving specific sites and devices, you can define an application policy in a WAN Edge template, hub profile, or device configuration. In this case, the scope of the policy is limited to the sites and devices that you specify. You cannot re-use this type of policy in other templates or profiles.
Design Policies to Support Traffic Flows
Before you create your application policies, consider your traffic-flow requirements. This example shows traffic flows for a corporate VPN.
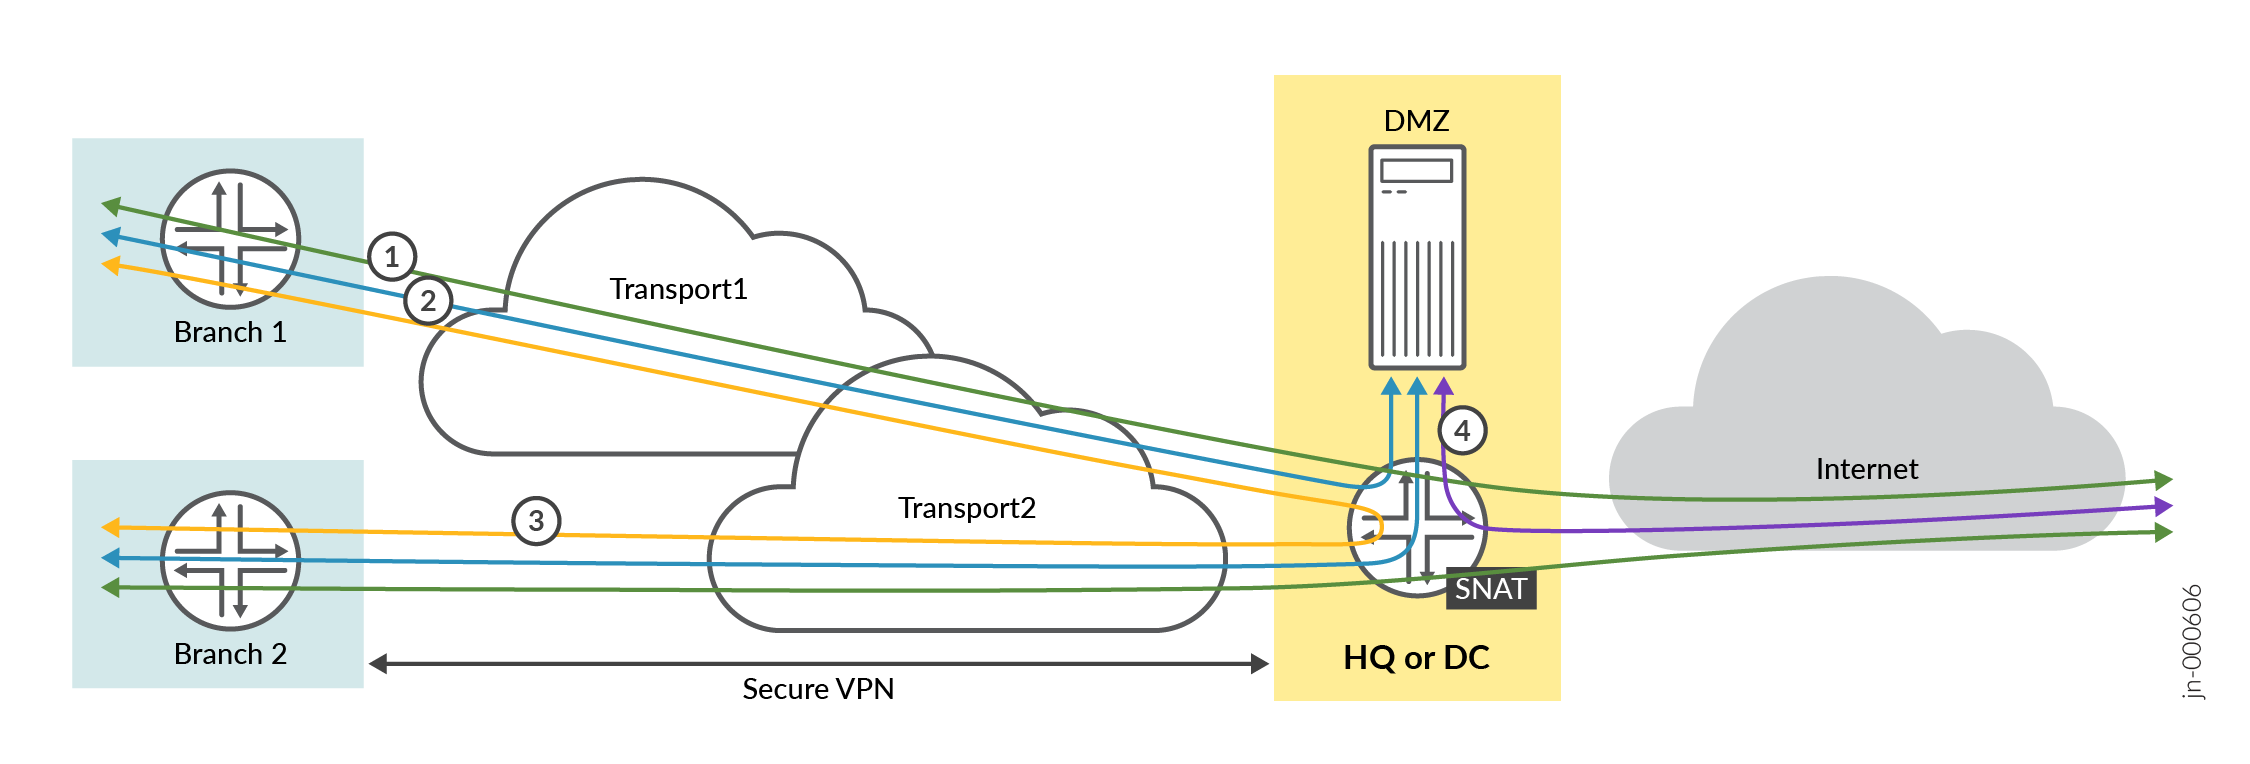
For this scenario, you need the following application rules:
-
Policy 1—Allows traffic to flow between the spoke sites and the hub, as depicted by the blue lines.
-
Policy 2—Allows traffic to flow between the spoke devices and the Internet via the hub device. In this case, the hub applies source NAT to the traffic and routes traffic to a WAN interface, as defined in the hub profile. This rule is general, so you should place it after the specific rules. Juniper Mist cloud evaluates and applies application policies in the order in which the policies are listed.
-
Policy 3—Allows spoke-to-spoke traffic, as depicted by the yellow lines. This traffic goes through the corporate LAN via the overlay.
Note:This may not be feasible in the real world except on expensive MPLS networks with managed IPs. Managed IPs send traffic directly from spoke-to-spoke. This type of traffic usually flows through a hub device.
-
Policy 4—Allows traffic to flow between the demilitarized zone (DMZ) and the Internet, as depicted by the purple line.
The following example shows how policies appear in the Application Policies area of a configuration screen.
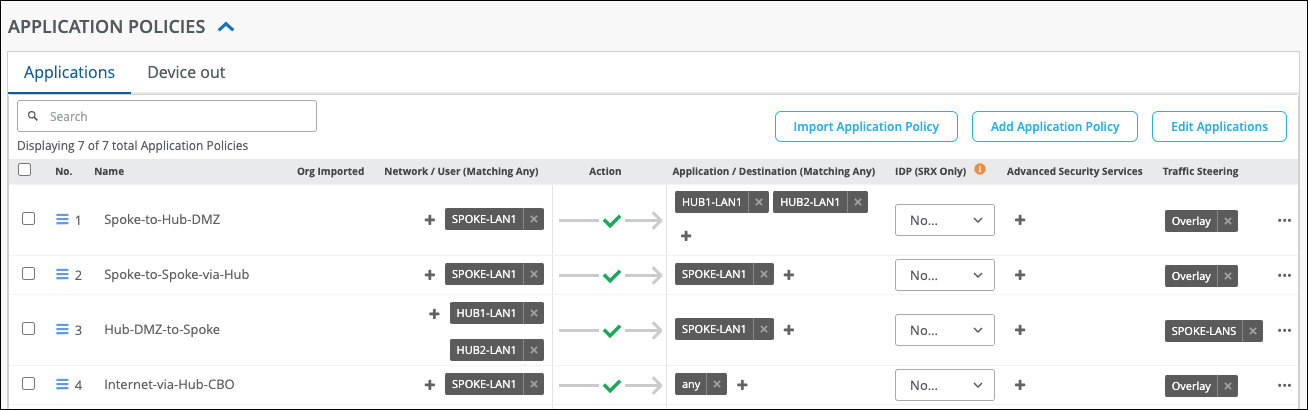
| S.No | Rule Name | Network | Action | Destination | Steering |
|---|---|---|---|---|---|
| 1 | Spoke-to-Hub-DMZ | SPOKE-LAN1 | Pass | HUB1-LAN1 + HUB2-LAN1 | Overlay |
| 2 | Spoke-to-Spoke-via-Hub | SPOKE-LAN1 | Pass | SPOKE-LAN1 | Overlay |
| 3 | Hub-DMZ-to-Spoke | HUB1-LAN1 + HUB2-LAN1 | Pass | SPOKE-LAN1 | SPOKE-LANS |
| 4 | Internet-via-Hub-CBO | SPOKE-LAN1 | Pass | ANY | Overlay |
General Notes
-
We recommend placing the most specific rules at the top.
-
We recommend placing global rules towards the end of the policy rules list.
-
Use the same name for the network on both sides for Session Smart Router for traffic to traverse between a hub and a spoke. The network name for the Session Smart Router must be identical to the security tenant used for traffic isolation. Because of this, the network name must match on both sides.
-
Application policies that allow traffic from WAN to LAN must be configured with a network that has Destination NAT configured. This configuration enables the application policy to be pushed to the SRX Series firewall.
SSR Notes
-
For SSR, you can list the policies in any order.
-
For SSR, traffic steering is optional. When you use Session Smart Router, the system announces all routes on each LAN interface using the iBGP-based route distribution.
-
Use the same name for the network on both sides for Session Smart Router for traffic to traverse between a hub and a spoke. The network name for the Session Smart Router must be identical to the security tenant used for traffic isolation. Because of this, the network name must match on both sides.
-
Application policies that allow traffic from WAN to LAN must be configured with a network that has Destination NAT configured. This configuration enables the application policy to be pushed to the SRX Series firewall.
SRX Notes
-
For SRX, you must associate a traffic steering policy to the application policy.
-
Application policies that allow traffic from WAN to LAN must be configured with a network that has Destination NAT configured. This configuration enables the application policy to be pushed to the SRX Series firewall.
Navigating to Application Policies
From the left menu of the Juniper Mist portal, navigate as follows:
-
Organization-level policy—Select Organization > WAN > Application Policy to create a policy at the organization level.
-
Template-specific policy—Select Organization > WAN > WAN Edge Templates. Click a template, or create a new one. Scroll down to the Application Policies section.
-
Profile-specific policy—Select Organization > WAN > Hub Profiles. Click a profile, or create a new one. Scroll down to the Application Policies section.
-
Device-specific policy—Select WAN Edges > WAN Edges. Click a device. Scroll down to the Application Policies section.
Using Same IP Addresses/Prefixes in Networks and Applications
In the application policies configuration, Network/Users belong to the source zone, and Applications/Destination belong to the destination zone.
You can use the same IP addresses and prefixes for both networks and applications when you define them for different purposes. That is, they act as a source in one policy and as a destination in another policy.
Consider the policies in Figure 3.

Here, you have a Network/Users SPOKE-LAN1 that has an IP address 192.168.200.0/24 for a spoke LAN interface. The screenshot shows that the following policies are using the same network in different ways:
-
Spoke-to-Spoke-via-Hub—This policy allows inbound and outbound spoke-to-spoke traffic through a hub. Here, we defined SPOKE-LAN1 as both a network and as an application.
-
Spoke-to-Hub-DMZ—This policy allows spoke-to-hub traffic. Here, we defined SPOKE-LAN1 as a network.
-
Hub-DMZ-to-Spoke—This policy allows hub-to-spoke traffic. Here, we defined SPOKE-LAN1 as an application.
Configure an Application Policy
Before You Begin: Before you define application policies, you must first create networks and applications. If you want to include traffic-steering or IDP profiles, add them as well. For help with these items, see:
You can configure a policy for an application or a device.
To configure an application policy:
-
In the Application policy section of the configuration page, click the tab
for the type of policy that you want
-
Applications—Configure a policy for any traffic, to or from the WAN Edge device.
-
Device In—(Available if you're on the device configuration page) For applications that require inbound ICMP traffic, configure a policy to allow ICMP traffic from a remote network to the WAN Edge device.
Select the Device In tab, as shown below, and then click Add Application Policy.
Under Network / User choose the remote network that is the source of the ICMP traffic, and then ICMP for the Destination.
Figure 4: Policy to Allow Remote ICMP Traffic
-
Device Out—Configure a policy for how traffic leaves the device. For example, you can set a traffic steering policy that states the device can only access the Mist cloud using a cellular network instead of your default link.
Figure 5: Policy to Traffic Out using a Cellular Network
-
Settings for Application Policies
| Field | Description |
|---|---|
| No. |
Not available in organization-level policies. The position of the application policy. You can drag a policy up or down to change the number. |
| Name | Name of the policy. You can enter up to 32 letters, numbers, underscores, and dashes. |
| Network/User |
Networks are the sources of the requests in your network. You can select one or more networks and users from the list. |
| Action |
The action taken by this policy (allow or block traffic from source to destination). To change the action, click the icon, and then select from the list. |
| Application/Destination | The applications that this policy allows or blocks access to. You can select one or more applications from the list. |
| IDP |
(Optional) Intrusion Detection and Prevention (IDP) profiles. If you have purchased the necessary IDP/URL filtering licenses and subscriptions, you can select one of the IDP profiles:
The IDP profile applied in your application policy performs traffic inspection to detect and prevent intrusions on the allowed traffic. |
| Advanced Security Services |
Enable secure AI-native Edge features in your application policy. Ensure that the required device-side licenses are in place.
|
| Traffic Steering |
Not available in organization-level policies. A traffic-steering profile defines the traffic path or paths for the policy. These profiles are required for deploying the policy to a WAN Edge spoke device or a hub device. The Traffic Steering field is not available for organization-level application policies. When you define an application policy directly inside a WAN Edge template or hub profile, you need to specify the order number and traffic-steering options. For more information, see Traffic Steering Rules. |
| Hit Count | Available for SRX devices. For SSR devices, the hit count is available only for devices running software version 7.x.x and later. The application policy hit count tracks the number of times the application policy rule has been matched by traffic. This information is useful for troubleshooting. For example, if a rule consistently shows zero hits, it may indicate an issue such as an incorrect destination.You can filter the hit count information for the last 60 minutes, last 24 hours, last 7 days, yesterday, today, this week, or for a custom date or range. |
Reordering and Deleting Application Policies
Reordering application policies allows you to move the policies around after they have been created.
Note the following about policy order for Session Smart Routers:
- New policies appear at the end of the policy list.
- Policy order is not important for Session Smart Routers. Session Smart Routers evaluate all policies simultaneously and apply the most specific matching policy to each session. The order of application policies in the policy list does not affect their evaluation or application.
- On SRX Series Firewalls, which function as Zone-Based Firewalls, the device evaluates polices in a top down manner. Ordering a more specific policy above a less specific policy will change which policy matches. You need to position block policies at the top of the sequence to ensure that the matching traffic is blocked, rather than being evaluated by other rules.
You can organize your policies in any order according to your management needs without affecting their application.
Select a policy and use Up Arrow or Down Arrow to change the order. You can change the policy order anytime.

To delete an application policy, select the application policy you want to delete, and then click the Delete option that appears in red on the top right side of the pane.
Monitoring Breakout Paths (Beta)
You can monitor breakout paths with the Application Path Insights graph on the WAN Edge Insights dashboard.
This feature is available to Beta participants only.
To improve your network monitoring experience with Session Smart Routers, Juniper Mist switches local breakout traffic from one path to another when the path doesn’t meet the associated SLA requirements for the link latency, jitter, and loss parameters.
The SSR devices compare the SLA parameters (latency, jitter, and loss) for all the local breakout paths against the thresholds configured for these parameters for each application. Whenever a set threshold is breached (that is, a local breakout path fails to meet the associated SLA requirements), the traffic shifts to another path based on the traffic steering configuration. Any such shifts in traffic are displayed on the Application Path Insights graph on the WAN Edge Insights dashboard.
In the following example, you see a traffic shift from the ge-0/0/0 interface to the ge-0/0/5 interface due to a SLA threshold breach.
