Configure Advanced Threat Prevention Features (SRX Only)
Create Security Intel (SecIntel) profiles and advanced anti-malware profiles and apply them in application policies on WAN Edge devices.
Juniper Networks' Advanced Threat Prevention (ATP) for SRX Series Firewalls offers a comprehensive suite of features designed to detect, analyze, and prevent advanced cyber threats. Juniper Mist supports the following features:
- SecIntel Threat Intelligence Feeds—Juniper's curated security intelligence feeds, SecIntel, provide dynamic and automatic updates to identify and block malicious domains, URLs, and IP addresses. In Juniper Mist, SecIntel profiles enable you to block malicious and unwanted traffic such as Command and Control (C&C) communications, compromised IP addresses or IP subnets, and domains connected to malicious activities.
- Advanced Anti-Malware (AAMW)—Juniper Networks Anti-Malware is a security solution that uses cloud-sourced data to protect against advanced cybersecurity threats. This feature detects and blocks malware and unwanted files on the network before they reach an endpoint. In Juniper Mist, you can create anti-malware profiles for WAN Edge devices, detailing which files need cloud analysis and the steps to take when malware is detected.
-
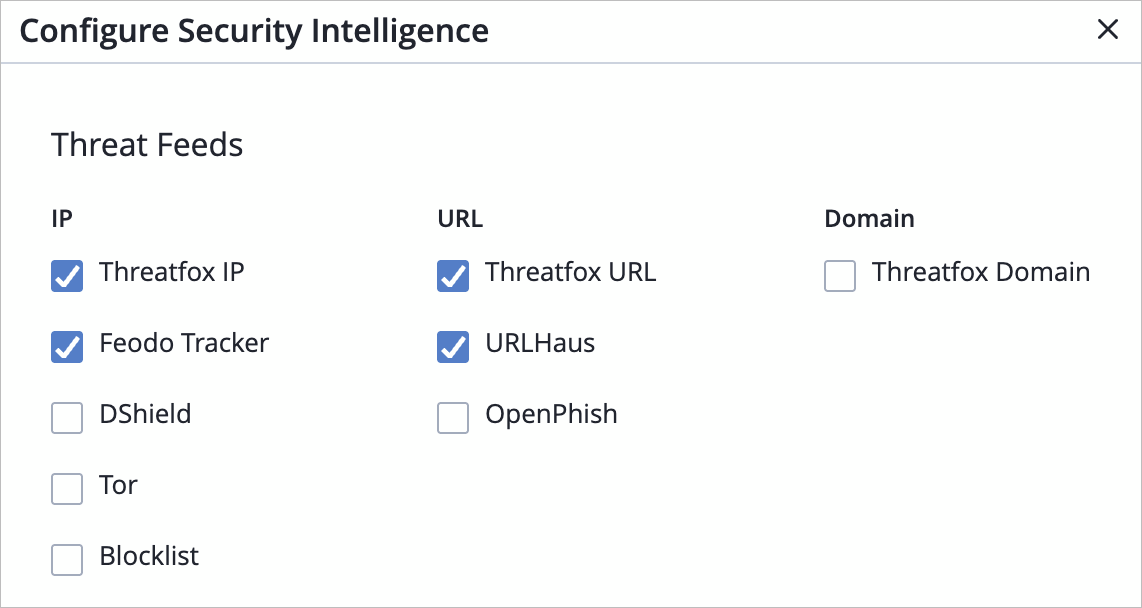
Third-party threat feeds—Sky ATP allows you to enable additional threat intelligence feeds (known malicious IPs, domains and URLs) from external vendors. Once enabled, these feeds will be a part of the Security Intel CC Category on the device. Supported feed types include:
-
IP-based—Threatfox IP, Feodo Tracker, DShield, Tor, Blocklist
-
URL-based—Threatfox URL, URLHaus, OpenPhish
-
Domain-based—Threatfox Domain
-
-
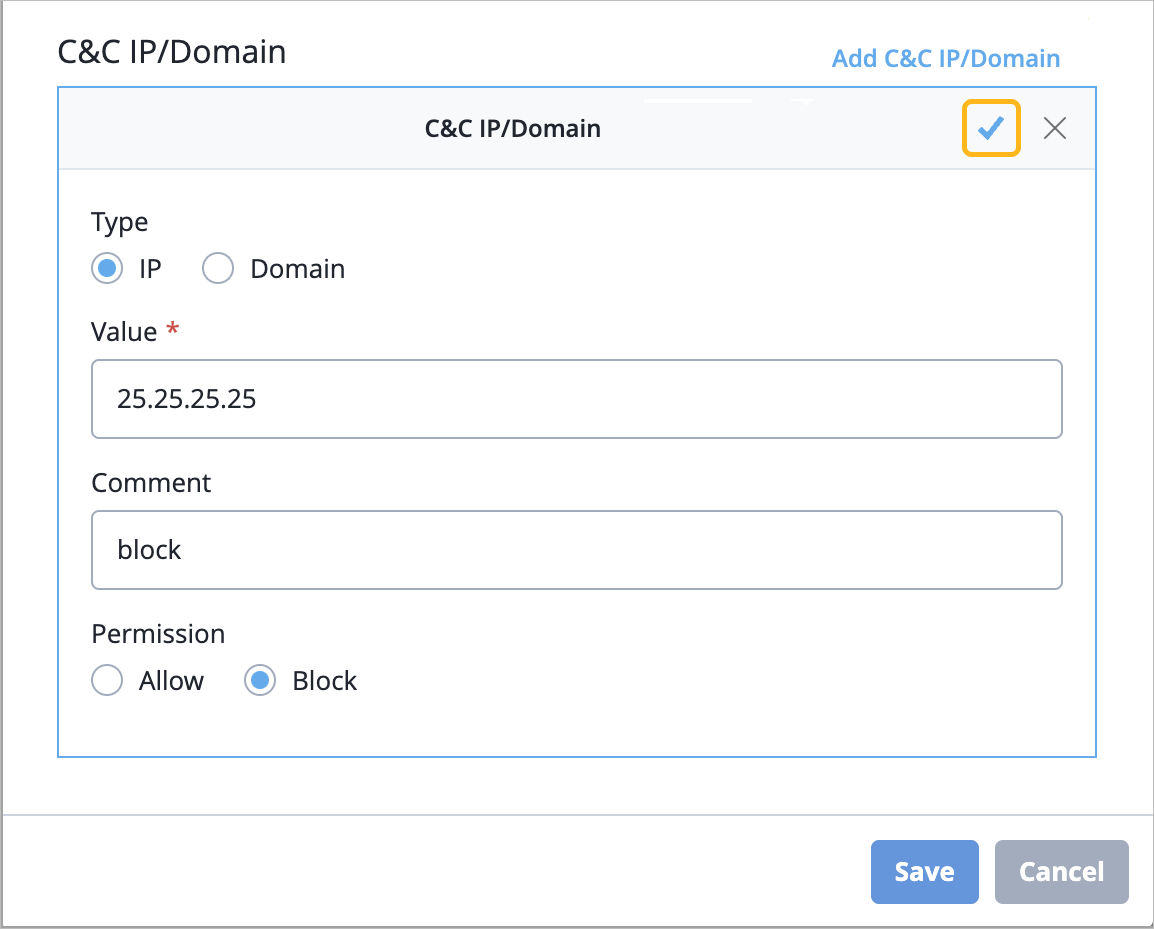
SecIntel custom allowlist and blocklist—You can define customs IP addresses and domains under two categories - Allowlist and Blocklist. These user-defined IP addresses or domains are included under the Security Intel CC Category on the device.
The Advanced Threat Prevention feature is supported on SRX Series Firewalls.
Before You Begin
Ensure you have following available:
- Juniper Advanced Threat Prevention Cloud account and an ATP Cloud Realm created from your account. See Enroll an SRX Series Firewall Using Juniper ATP Cloud Web Portal.
- Your ATP Cloud account associated with a license. For more information, see Software Licenses for ATP Cloud.
Enrollment of a WAN Edge device in ATP Cloud occurs once a realm is created and either a SecIntel or an AAMW profile is associated with a security policy for that device.
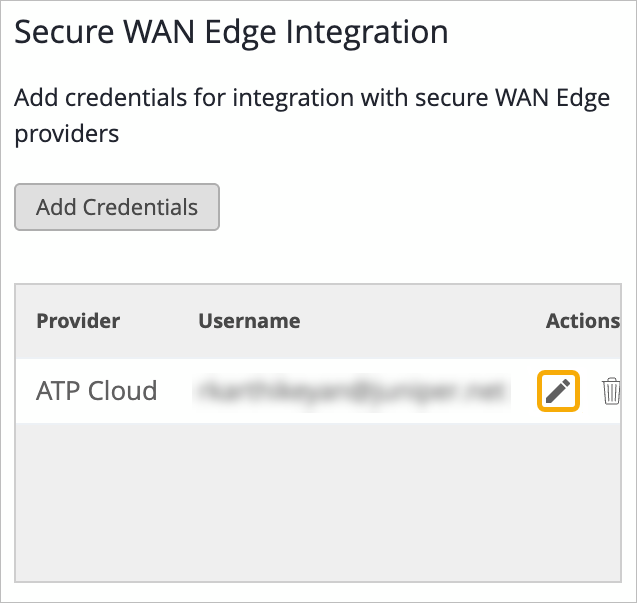
Add Your ATP Credential Details to Your Organization and Specify the Features
Juniper Mist automatically enrolls devices in Cloud ATP Services as required. To integrate Juniper Mist Cloud with ATP Cloud, you need to provide ATP credential details in the Juniper Mist portal.
-
Add the credentials for your ATP Cloud account:
-
In the Add Credentials pop-up window, enter
the details.
- Provider—Select ATP Cloud.
- Email Address—Enter the username for your ATP account.
- Password—Enter the password for your ATP account.
-
Cloud Name—Select the cloud instance for your ATP account.
- Realm—Enter the realm name for your ATP account.

Your new provider now appears in the providers list. -
In the Add Credentials pop-up window, enter
the details.
-
Set up the threat feeds and domains for the newly added provider:
-
In the providers list, click the pencil button for the provider
that you just added.
-
In the Configure Security Intelligence pop-up window, select the
check box for each feature to enable.
-
In the C&C IP/Domain section of the window, click
Add C&C IP/Domain, enter the details
to identify the domain, and then click the check mark in the C&C
IP/Domain title bar.
-
In the providers list, click the pencil button for the provider
that you just added.
You'll need to reboot individual or clustered devices enrolled in Cloud ATP Services in order to activate Enhanced Services Mode. This increases the maximum number of services for L7 service processing.
Create Security Intelligence (SecIntel) Profiles
SecIntel offers meticulously curated and verified threat intelligence sourced from Juniper Networks’ Advanced Threat Prevention (ATP) Cloud. This intelligence is delivered to WAN Edge device for effectively blocking Command and Control (C&C) communications at line rate. By enabling automatic and responsive traffic filtering, SecIntel provides real-time threat intelligence.
Many of the feeds include an associated threat score, allowing customers to define security rules and controls that are applied to traffic passing through their devices. The SecIntel security service integrates Juniper threat feeds, including those for C&C communications, malicious domains, and infected hosts. See also: SecIntel Feeds Overview and Benefits.
SecIntel profiles, which can be incorporated into application policies, enable the blocking of malicious and unwanted traffic such as C&C communications, compromised IP addresses or subnets, and domains linked to malicious activities.
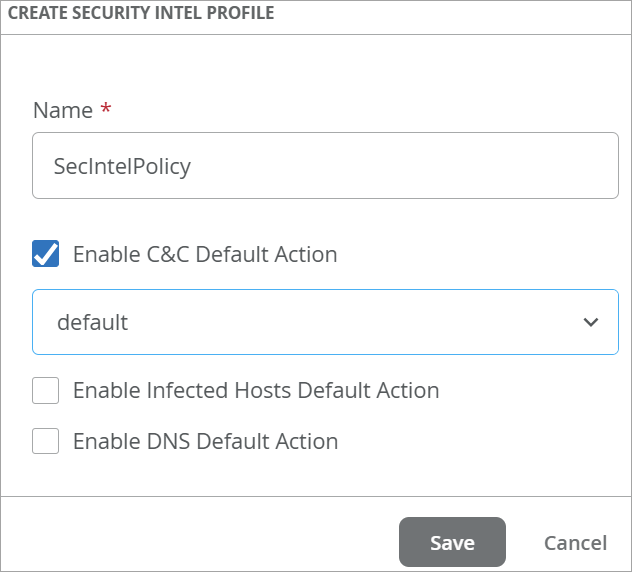
To create a SecIntel profile:
-
In the Create Security Intel Profile pop-up window, enter the details for
this profile.
-
Name—Enter a name to identify this profile.
- Check boxes—Select the actions for this profile.
-
Enable C&C Default Action—Actions against C&C servers that have attempted to contact and compromise hosts on your network.
-
Enable Infected Host Default Action—Actions against infected hosts, which are local devices that are potentially compromised because they appear to be part of a C&C network or exhibit other symptoms.
-
Enable DNS Default Action—Actions against the domains that are known to be associated with malicious activities.
After selecting a check box, also use the drop-down menu to select the response level.
-
Default—The least aggressive response. Monitors and logs events with a threat score of 1-8; blocks events scoring 9-10.
-
Standard—The mid-level response. Monitors and logs events with a threat score of 1-5; blocks events scoring 6-10.
-
Strict—The most aggressive response. Monitors and logs events with a threat score of 1-2; blocks events scoring 3-10.
-
-
Create Advanced Anti-Malware Profiles
This feature detects and blocks malware and unwanted files on the network before they reach an endpoint. Like SecIntel, anti-malware profiles can be created from the application policy screen and included in an application policy.
To create an Anti-Malware profile:
-
Click Add Anti-Malware Profile, and then enter the
details.
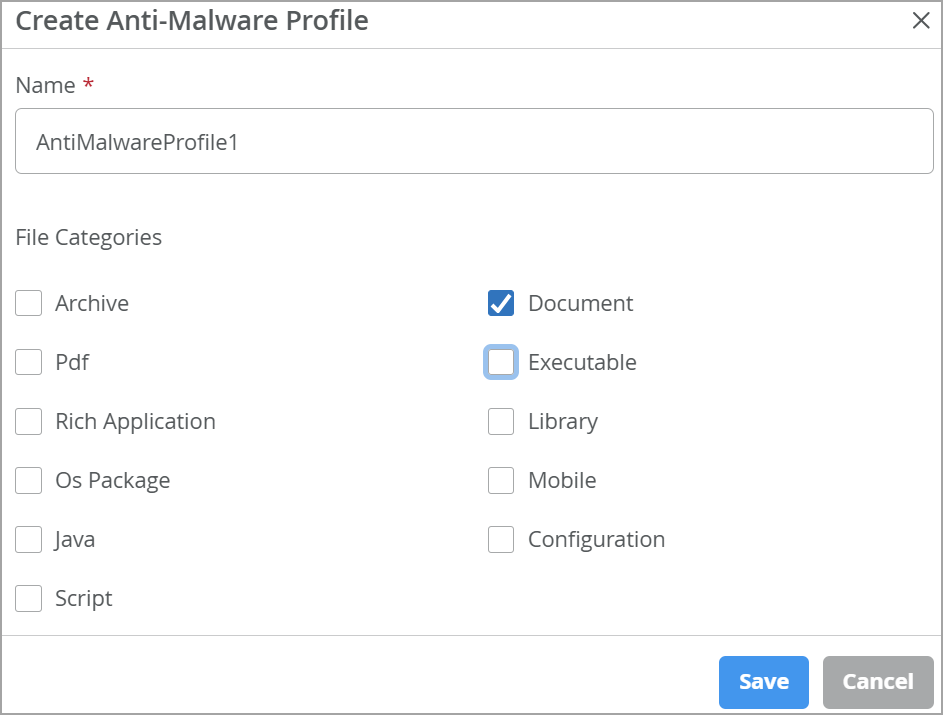
- Enter a name for the profile.
- Select one or more file categories as provided in the table below:
Table 1: File Category Contents Category Description File Types Archive Archive files .zip, .rar, .tar, .gzip PDF PDF, e-mail, and MBOX files .email, .mbox, .pdf, .pdfa Rich Application Installable Internet Applications such as Adobe Flash, JavaFX, Microsoft Silverlight .swf, .xap, .xbap OS package OS-specific update applications .deb, .dmg Java Java applications, archives, and libraries .class, .ear, .jar, .war Script Scripting files .bat, .js, .pl, .ps1, .py, .sct, .sh, .tcl, .vbs, plsm, pyc, pyo Document All document types except PDFs .chm, .doc, .docx, .dotx, .hta, .html, .pot, .ppa, .pps, .ppt, .pptsm, .pptx, .ps, .rtf, .txt, .xlsx, .xml, .xsl, .xslt Executable Executable binaries .bin, .com, .dat, .exe, .msi, .msm, .mst Library Dynamic and static libraries and kernel modules .a, .dll, .kext, .ko, .o, .so, .ocx Mobile Mobile formats .apk, .ipa Configuration Configuration files .inf, .ini, .lnk, .reg, .plist
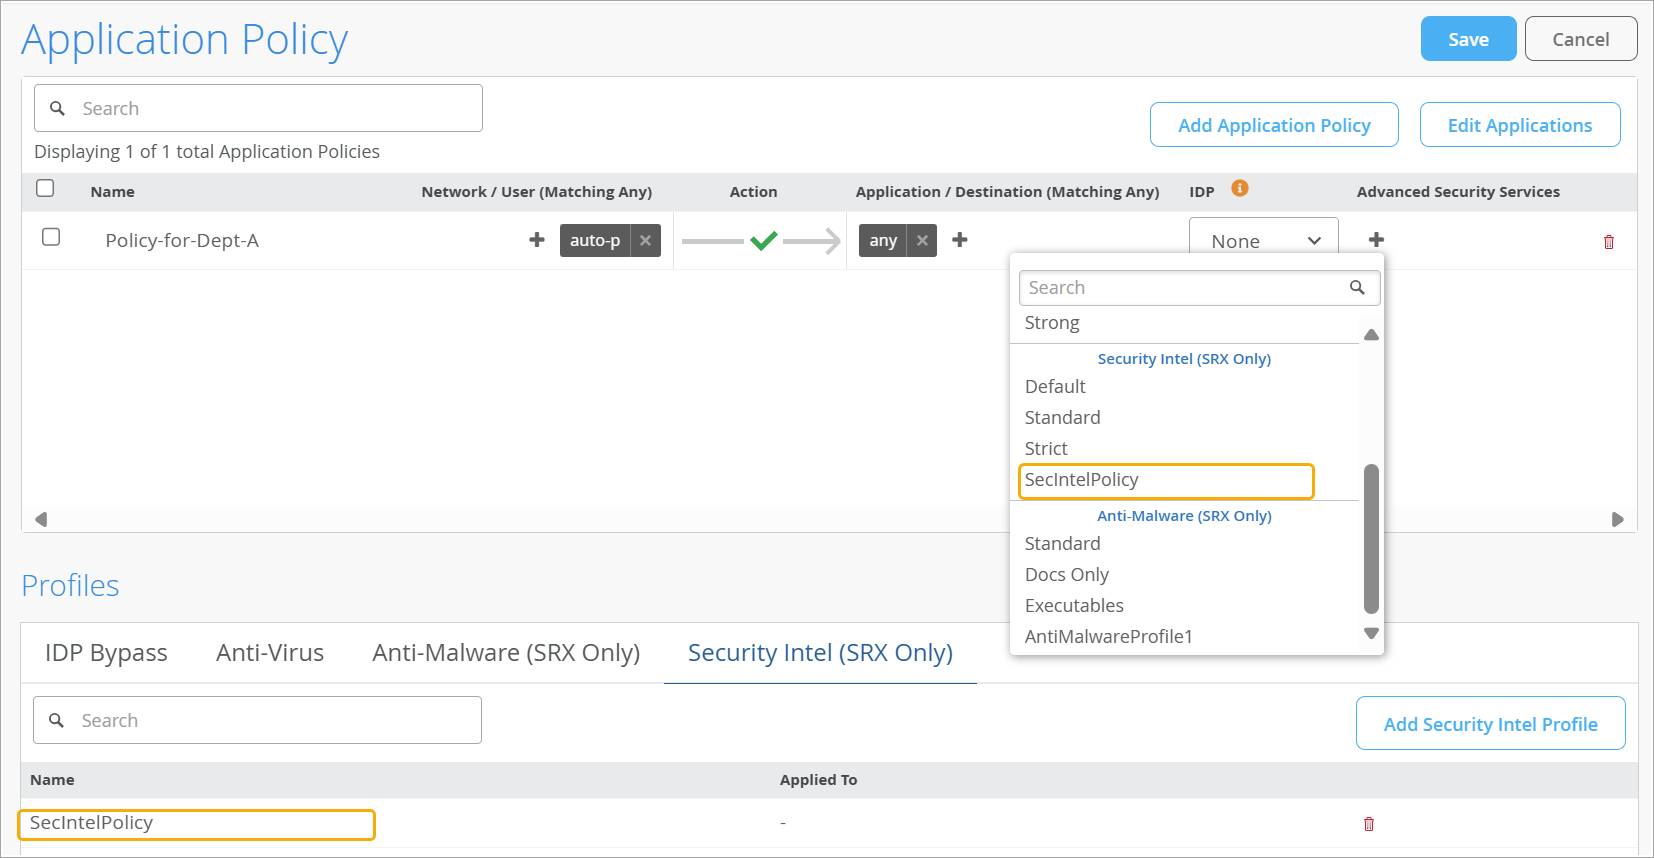
Apply a Profile to an Application Policy
Before You Begin
In this procedure, you'll apply security profiles to application policies. First, you must complete the following tasks:
-
Create your application policies. For help, see Application Policies.
-
Create your security profiles. For help, see the earlier sections of this topic.
-
In the Advanced Security Services column, click
+, and then click the profile to apply.
In the drop-down menu, search by the name of the profile, or scroll through the list. Refer to the section headings to find profiles by type, such as Security Intel or Anti-Malware.
For example, this image shows a profile in the Security Intel section of the drop-down menu.
Status Information
You can view basic device monitoring information on the WAN Edges page. From the left menu, navigate to WAN Edges > WAN Edges.
After you click a device on the WAN Edges page, the device details appear. On the details page, you'll see:
-
Advanced Security—The status of security services. A green check mark indicates that the service is active on this device.
Figure 1: Advanced Security Status Details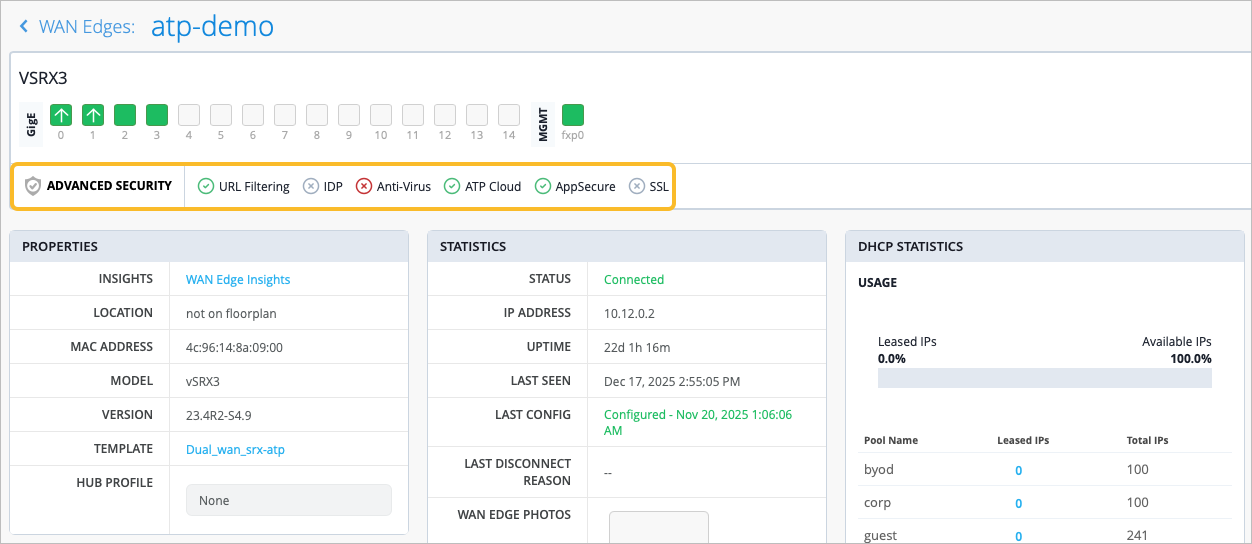
-
Properties—Click WAN Edge Insights to view recent events and other information on the Insights page.
Figure 2: WAN Edge Events Details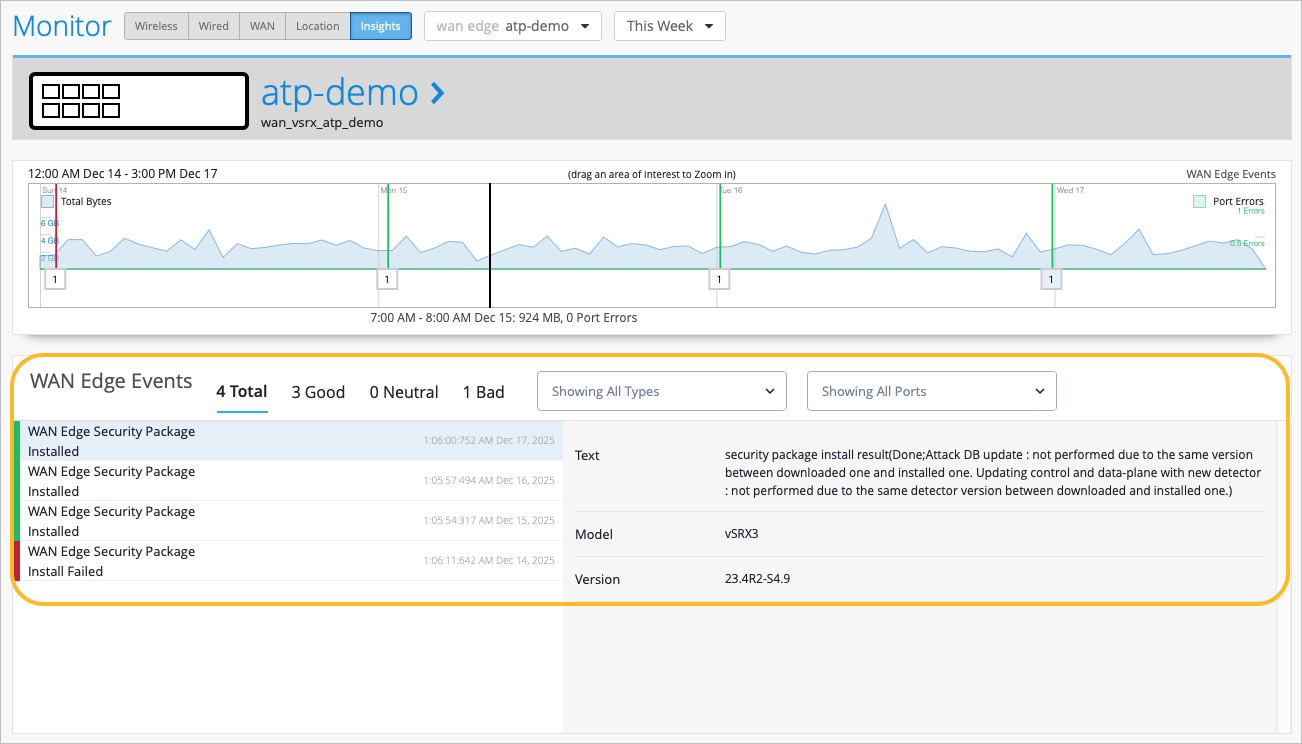 Tip:
Tip:-
By default, the Insights page shows only today's events, but you can select a time period from the drop-down menu near the top-right corner of the page.
-
In the WAN Edge Events list, you can click an event to see a summary on the right side of the page.
-
View Security Events
The Juniper Mist Security Events page, accessible through Site > WAN Edge > Security Events, provides a centralized view of security-related events. It displays a log of security events detected by Juniper Mist to monitor the security posture of the network. Users can filter and view details allowing for proactive security response and analysis.
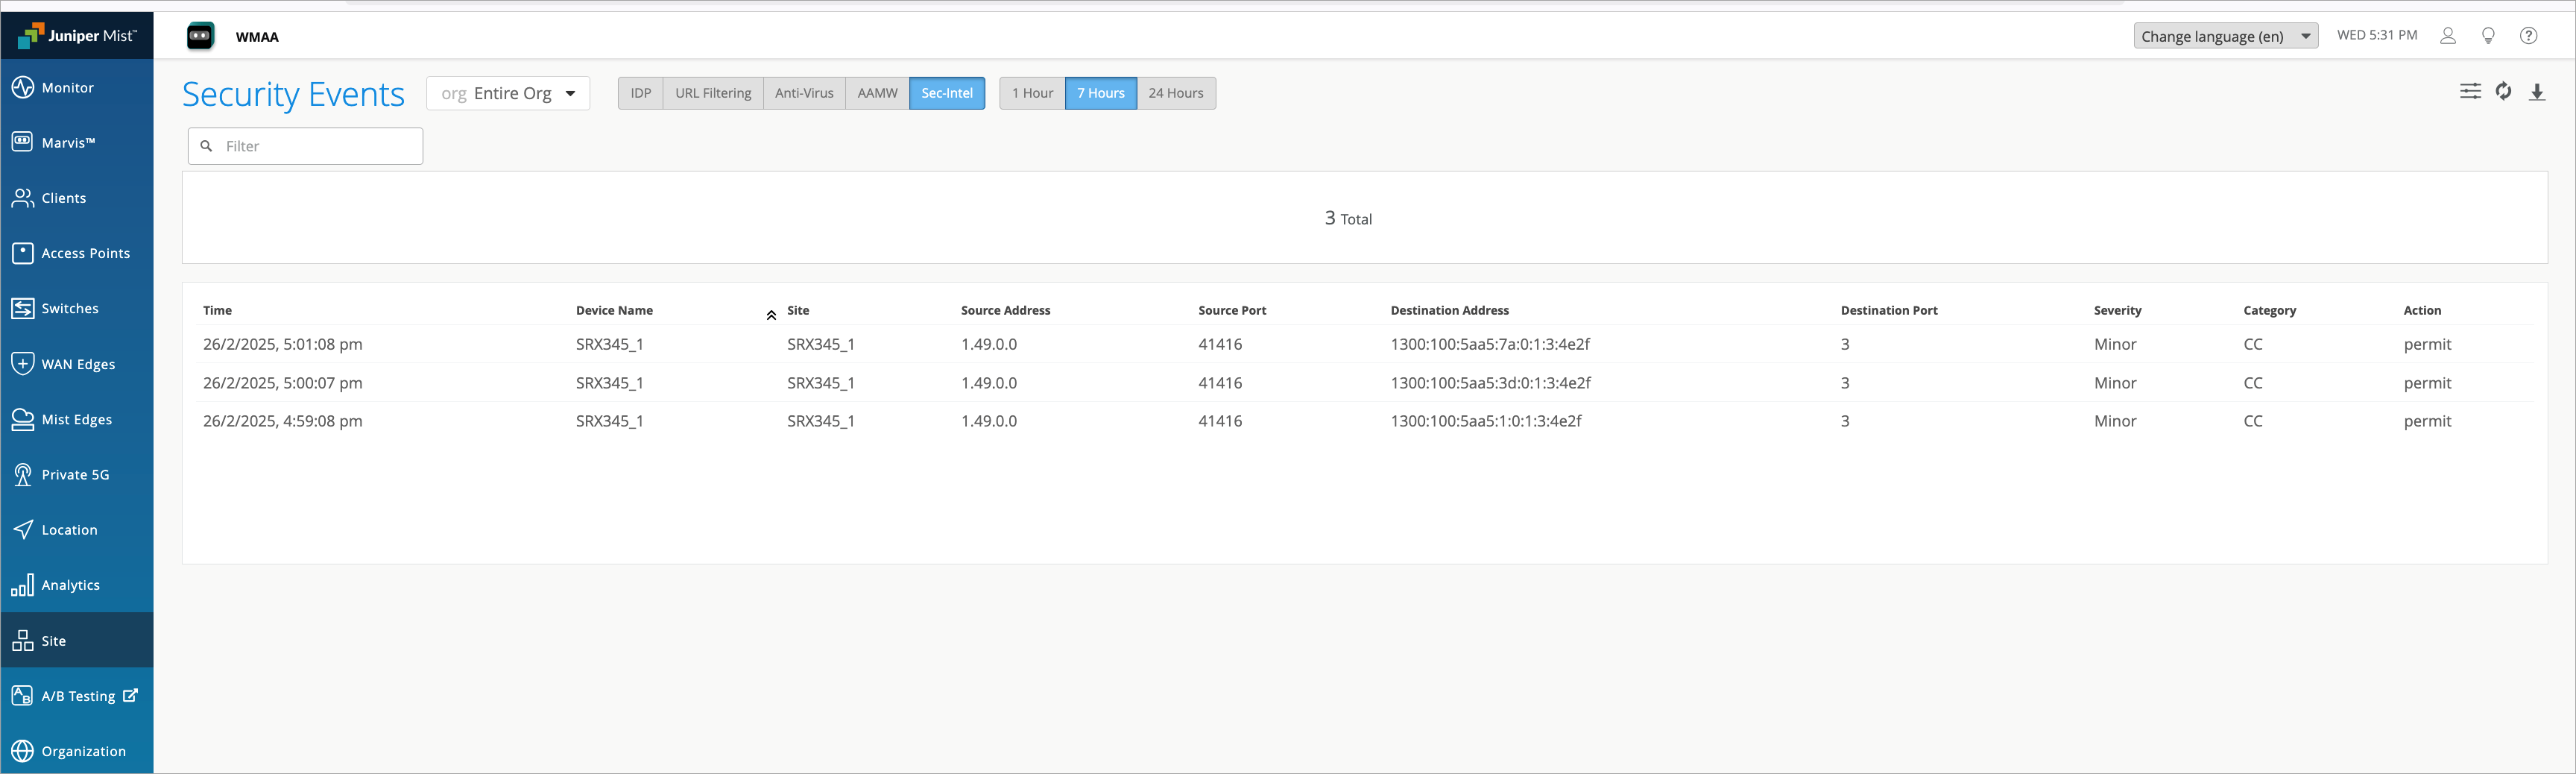
Click one of the tabs AAMW (Advanced Anti-Malware) or SecIntel to see the related security event details. In the example above, the page shows incident details for Command and Control (C&C) with a severity level of Minor. It also indicates the action taken, which is Permit in this case. Additionally, you can view other information such as the device name, site, source and destination addresses, and source and destination ports information.