Reimage an SSR Device using OTP
The steps in this section describe the process of re-imaging an SSR100 or SSR1000 series device for onboarding to a Conductor using the OTP process. This process is for SSR devices that cannot use Mist for onboarding, telemetry, or WAN Assurance.
For customers or partners who can access Mist and are not in an "air-gap" network, the easiest way to onboard an SSR device is to configure an account on Mist (this is free), and onboard to a conductor using ZTP. This provides a simple conductor onboarding process, and does not require access to Mist after the onboarding. See ZTP Onboarding to a Conductor. This process provides the ability to perform conductor-managed onboarding for customers who will not be using Mist Telemetry or WAN Assurance.
Re-Imaging Process
The image shipped on the SSR devices is designed to connect with Mist and Mist WAN Assurance. To use these devices in a conductor-managed environment that does not have access to Mist, re-image the SSR device with a generally available, package-based, OTP-compatible SSR software release. The minimum requirement for this re-imaging process is SSR Version 5.4.9. OTP software images are located at the following link:
You will be prompted for your username and token to access the web page listing the software versions, and will be able to download directly from the page.
See Downloading an ISO for important information about the download process.
- Use of a non-GA software release will void the Juniper device warranty. Refer to SSR Releases - General Availability for the list of GA releases.
Prerequisites
-
To successfully onboard an SSR using OTP, you must already have a Conductor up and running in the network where the SSR router can connect and receive configuration information.
-
The conductor must have a software version equal to or greater than the version that will be installed on the routers using OTP.
-
To retain a valid warranty, the software used to re-image the SSR device must be an official Juniper GA Release of the SSR Software, and at a minimum, version 5.4.9.
OTP Re-Imaging Process
The process varies based on the SSR device, and whether Mac or Windows is used as the re-imaging host. Use the following procedures for the serial connection and set up and device specific re-imaging.
Mac Serial Connection and Set-up
- Use the procedure Creating a Bootable USB from an ISO to download the package-based ISO and create a bootable USB. Once you have completed that step, continue below.
- Connect the RJ45/USB cable to the console port on the SSR device.
- Connect the USB end of the cable to your Mac.
- Connect the power input to the back of the SSR device, but do not power it up.
- Open a terminal window.
- Run the following command to identify the USB port:
ls -al /dev/*usb*
- Copy the serial port info displayed after running the command above.
- In the terminal window, type
screen, paste the serial port info, and add the baud rate as shown in the example below.
screen /dev/tty.usbserial-A50285BI 115200
- Press Enter.
- Insert your USB with the new ISO image into the USB port of the SSR device.
- Power up the SSR device.
- Use the instructions below appropriate for your device (SSR100 or SSR1000 series) to complete the re-imaging process.
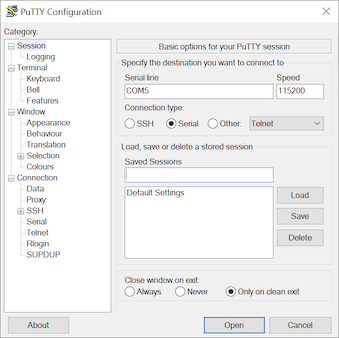
Windows Serial Connection and Set-up
- Use the procedure Creating a Bootable USB from an ISO to download the package-based ISO and create a bootable USB. Once you have completed that step, continue below.
- Connect the RJ45/USB cable to the console port on the SSR device.
- Connect the USB end of the cable to your Windows PC.
- Connect the power input to the back of the SSR device, but do not power it up.
- From the Windows Device Manager, open a PuTTY session, and select the serial port and baud rate.
- Insert your USB with the new ISO image into the USB port of the SSR device.
- Power up the SSR device.
- Use the instructions below appropriate for your device (SSR100 or SSR1000 series) to complete the re-imaging process.
Device Re-imaging
Use the process specific to your device to complete the re-imaging process.
SSR100 Series Devices
- At the instruction in the terminal window:
Press ESC for boot menu, do so.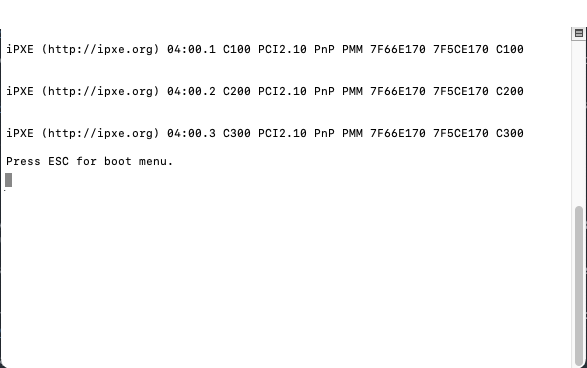
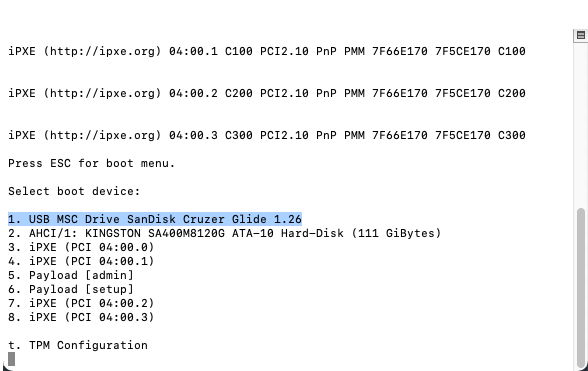
- From the boot menu, enter the boot device number corresponding to the USB, and press Enter.
 3. When the USB installer boot menu is displayed, follow the Installing SSR Using OTP instructions to complete the installation process.
SSR1000 Series Devices
- At the instruction in the terminal window:
Press <Tab> or <DEL> to enter Setup, do so.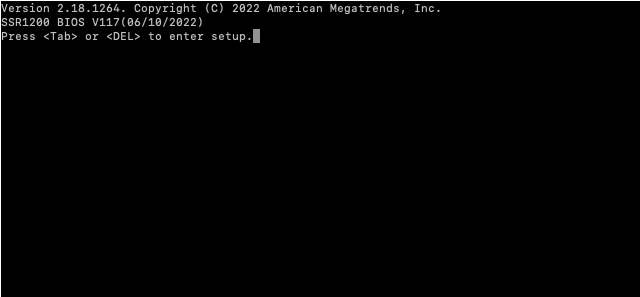
- When the Setup Utility window appears, use the left and right arrow keys to navigate to the
Save & Exittab.
 3. Use the up and down arrow keys to highlight the boot device in the Boot Override list.
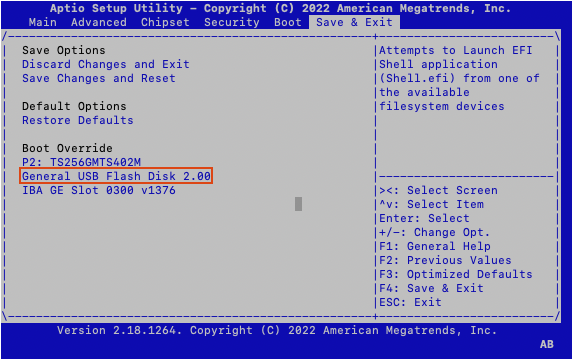 4. Press Enter to confirm boot from the USB device.
5. When the USB installer boot menu is displayed, follow the Installing SSR Using OTP instructions to complete the installation process.
4. Press Enter to confirm boot from the USB device.
5. When the USB installer boot menu is displayed, follow the Installing SSR Using OTP instructions to complete the installation process.