Help us improve your experience.
Let us know what you think.
Do you have time for a two-minute survey?
Help us improve your experience.
Let us know what you think.
Do you have time for a two-minute survey?
With a view to improving user experience and streamlining operations, we have introduced a few enhancements to the Network Admin roles in Mist. These enhancements optionally grant additional privileges that expand administrative capabilities without imposing any limitations on existing functionality.
What is changing?
We have introduced a new user role called Org Admin, which provides write access to all components within the Mist dashboard (both GUI and API), except for administrative functions such as:
Creating or managing other admin users
Modifying login and authentication settings
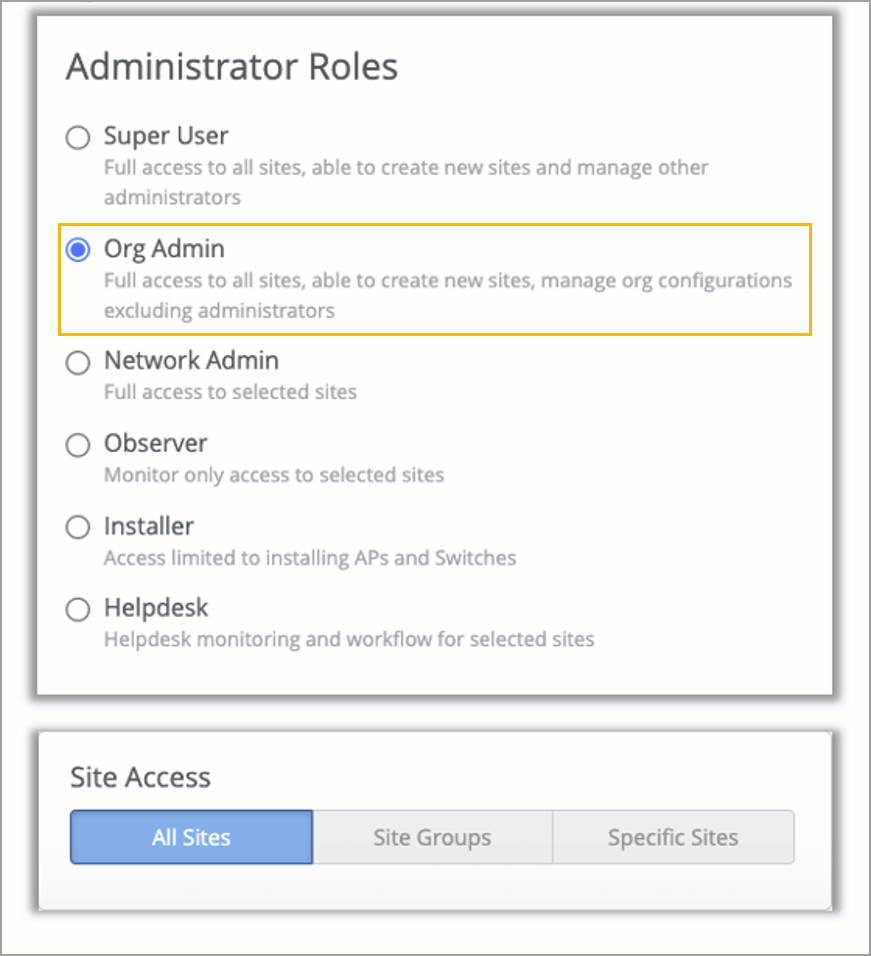
The Org Admin role provides read and write access to the following pages on the Organization menu:
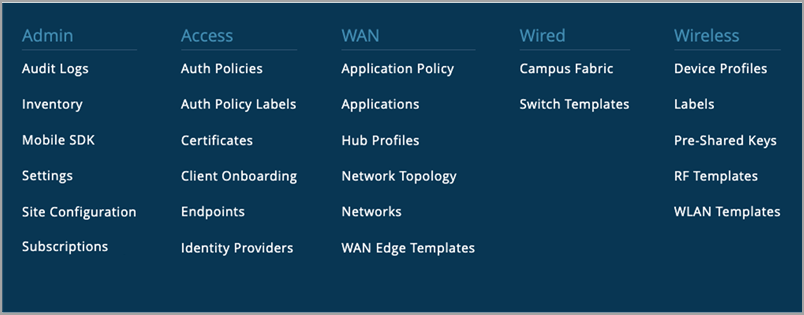
Network Admins (Site, Site Group, or All Sites) will now have an option to enable additional privileges as listed below:
Write access to site configuration pages within their respective scope via the Mist dashboard.
Read-only access to organization-level templates.
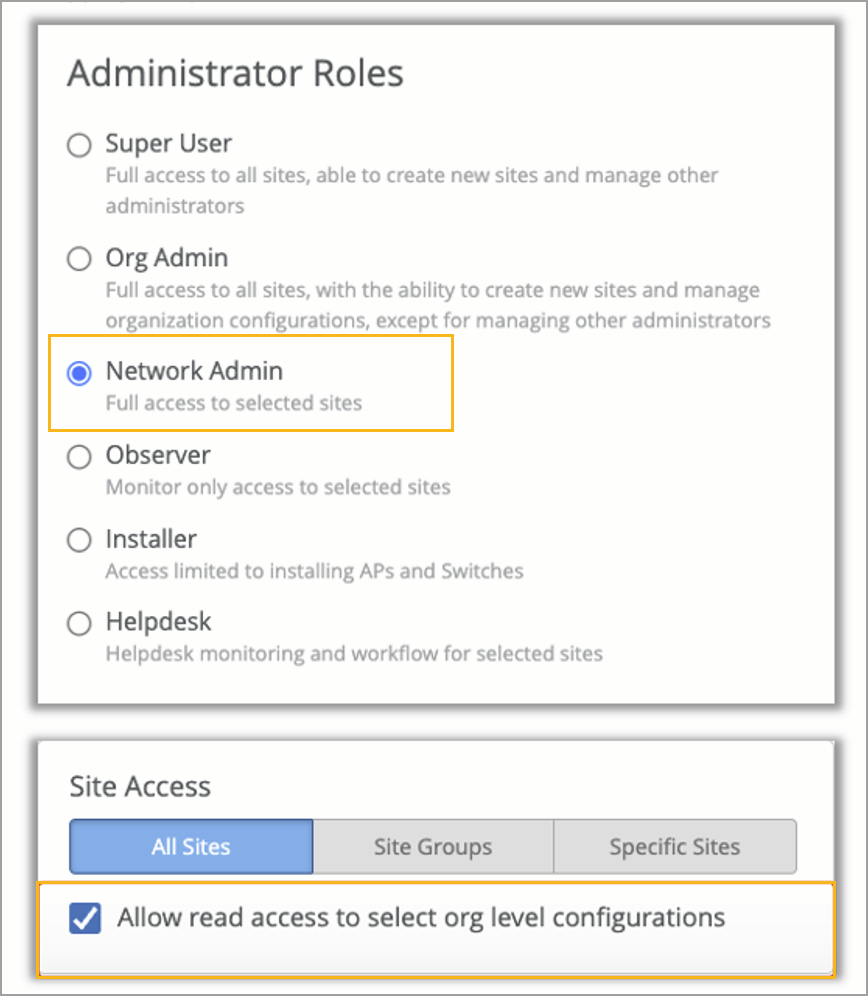
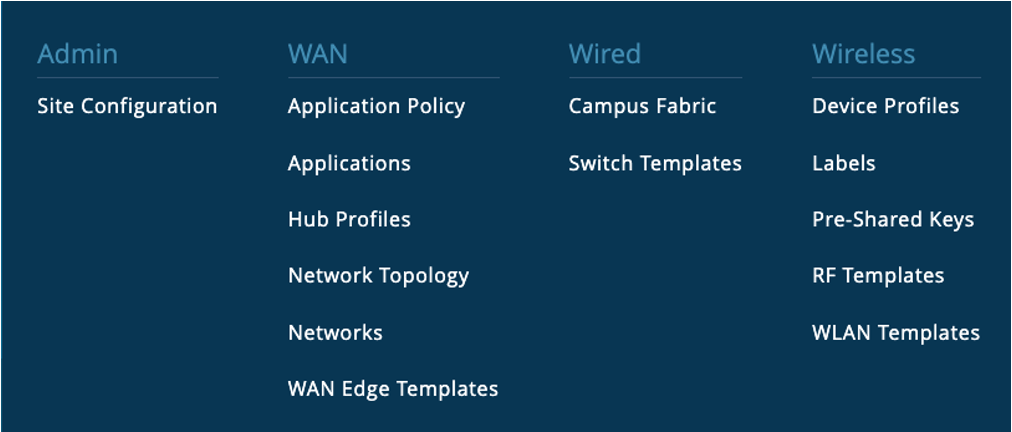
Network Admins provide read and write permissions to site configuration, and read permissions to other pages on the Organization menu.
Changes to existing Network-Admin users
Network Admins (Site/Site Group): No changes to current functionality. However, super users will now have the option to grant additional privileges to these users if needed.
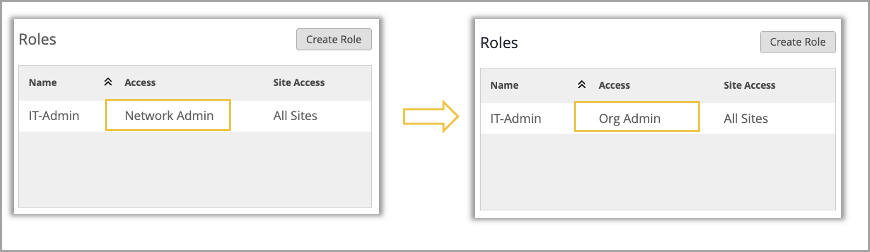
Network Admins (All Sites): These users will now be elevated to the “Org Admin” role within the Mist portal. This role grants the right to view and modify organization-level templates, as well as both organization and site level settings. If you do not prefer to grant elevated privileges to these users, you may revert their role back to “Network Admin (All Sites)”.
The above changes also applies to 'roles' mapped to Single Sign on users.
If the SSO user is mapped to the role Network Admin(all sites), their role will get elevated to Org Admin. If you do not prefer to grant elevated privileges to these SSO users, you may revert the role mapping of those users back to “Network Admin (All Sites)" from the Organization > Settings page.
Changes to newly created Network-Admin users
Network Admins (Site/Site Group/All Sites): Optional additional privileges will be enabled by default for newly created network admin users. Super Users may choose to disable these privileges as needed while creating users.
Network Admins (All Sites): These users will have their privileges restricted to the site level in both the Mist portal UI and API. The intent of this role is to limit users to site-level operations; therefore, organization-level privileges such as Inventory, Org Campus Fabric, and Pre-shared Keys will no longer be available. If these or other organization-level privileges are required, it is recommended to assign the user the Org Admin role instead.
Changes to Network Admin role under MSP
Under the Managed Services (MSP) portal, the Network Admin role will now be reflected as Org Admin. There will not be any changes to the MSP dashboard operations for this role. At the organization level, this role gets mapped to Org Admin for the respective organizations.

API mappings for Network Admin and Org Admin users
Role | Mapping for newly created users (Default: read access to select org level configurations is allowed) | Mapping for existing users (or if read access to select org level configurations is unchecked) |
Network Admin (Site) | { "scope":"site", "role": "write" , "view": "org_network_admin"} { "scope":"org", "role": "read" , "view": "org_network_admin"} | { "scope":"site", "role": "write" } |
Network Admin (Site Group) | { "scope":"sitegroup", "role": "write" , "view": "org_network_admin"} { "scope":"org", "role": "read" , "view": "org_network_admin"} | { "scope":"sitegroup", "role": "write" } |
Network Admin (All Sites) | { "scope":"orgsites", "role": "write" , "view": "org_network_admin"} { "scope":"org", "role": "read" , "view": "org_network_admin"} | { "scope":"orgsites", "role": "write" } |
Org Admin | { "scope":"org", "role": "write" , "view": "org_admin"} | - |
MSP Org Admin | { "scope":"msp", "role": "write" , "view": "org_admin"} | - |
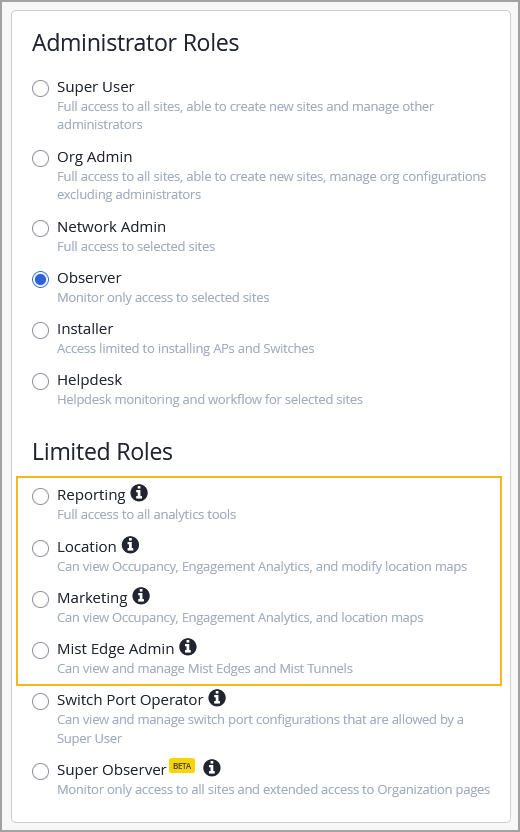
We have now made the following limited roles generally available to Mist users:
Reporting—This role has the same API access as an Observer Administrator Role. However, its access is limited to the following analytics tools on the Mist portal:
Engagement Analytics
Occupancy Analytics
Network Analytics
Premium Analytics (if an active subscription is available)
Location—This role has the same API access as an Observer Administrator Role. However, its access is limited to the following location-related tools on the Mist portal:
Live View: Users can edit the maps - for example, they can add or modify zones, or position access points (APs) and virtual beacons.
The location related analytics pages, such as Engagement Analytics and Occupancy Analytics.
Marketing—This role has the same API access as an Observer Administrator Role. However, it is limited to the marketing related tools on the Mist portal. This role grants the read-only access to Live View and the location related analytics pages, such as Engagement Analytics and Occupancy Analytics.
Mist Edge Admin—This role provides the ability to configure Mist Edges that are allowed by the Super Admin role. This role allows users to manage Mist Edges and Mist Tunnels on the Mist portal.
Limited roles are used to limit an administrator’s access in the Mist portal to the pages pertaining to the tasks they perform. See also: Portal User Roles. You can assign limited roles to users from the Organization > Administrators page.
The Site Configuration page of the Mist portal now groups configuration widgets by Mist product line. Each group contains the configuration widgets that are specific to that particular product line. This makes the Site Configuration page more organized and clarifies exactly what configuration will be applied to a device or group of devices.
When you select Organization > Site Configuration from the Mist portal, you will see a group for each Mist domain as you scroll down the page.
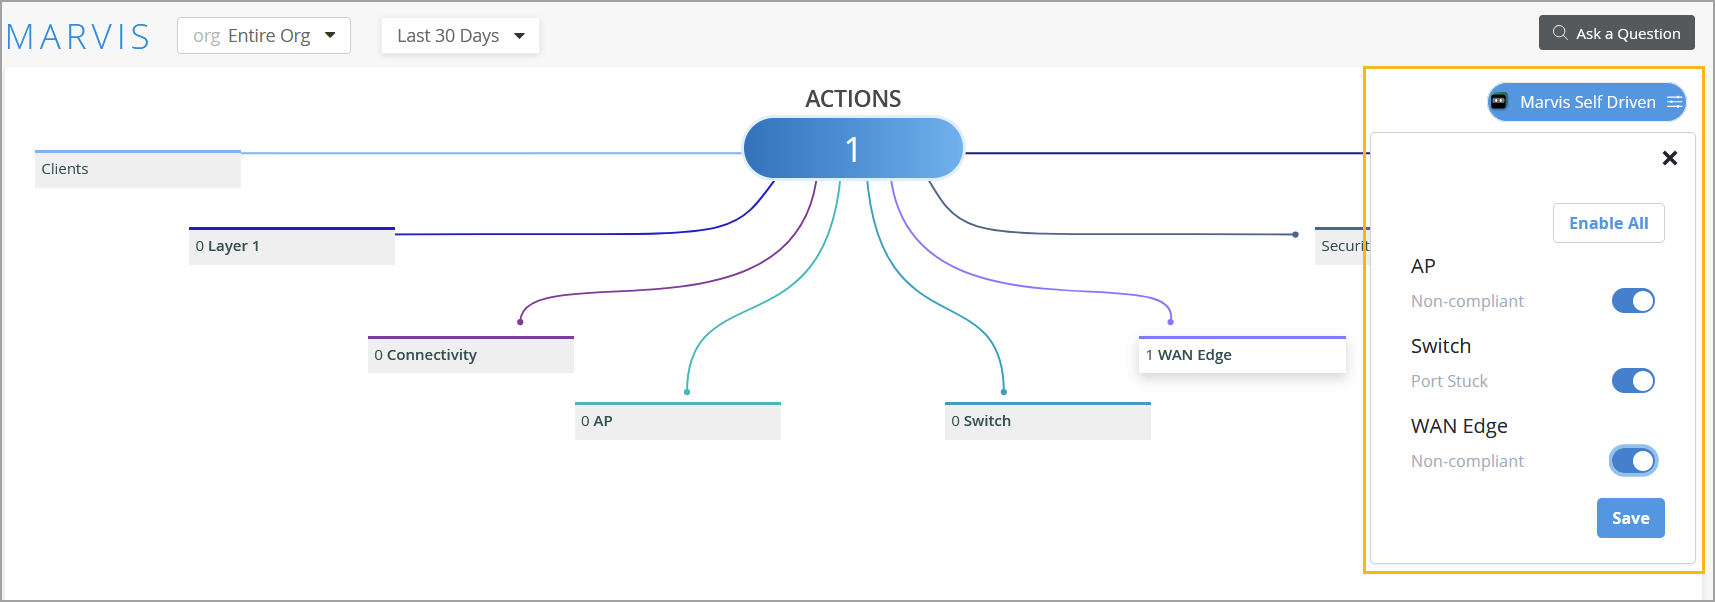
You can now enable a select set of Marvis Actions to operate in self-driving mode. When self driving is enabled for a Marvis Action, Marvis automatically remediates the issues identified under that action—no manual intervention is required. For more information, refer to Self-Driving Marvis Actions.
The following Marvis Actions currently support self driving:
AP actions:
Non-Compliant—Marvis automatically upgrades any AP running a firmware version that is older than the version running on majority of other APs of the same model at the site. The upgrade action is initiated during a low-usage period to mitigate any impacts on operations.
WAN Edge actions (SRX only):
Non-Compliant—Marvis auto initiates a snapshot creation to update the Junos OS version on the backup partition to the same version that is running on primary partition. This update snapshot is initiated during a low-usage period and does not impact operations as it does not involve a device reboot.
Switch actions:
Port Stuck—When Marvis detects a port stuck issue, it initiates an automatic port bounce to fix the issue. Marvis attempts auto port recovery up to three times. If the issue persists even after three attempts, the action is moved to open state, so that users can verify if it is a hardware issue on the device connected to the switch port.
You can enable the self-drive permission for an action from the Marvis Actions page. By default, the self-drive permission is enabled for Port Stuck, but disabled for AP and WAN Edge Non-Compliant actions. If the self-drive permission is disabled for a Marvis action, Marvis will not attempt to automatically resolve the issue; instead, it provides an option for you to manually initiate the corrective action.
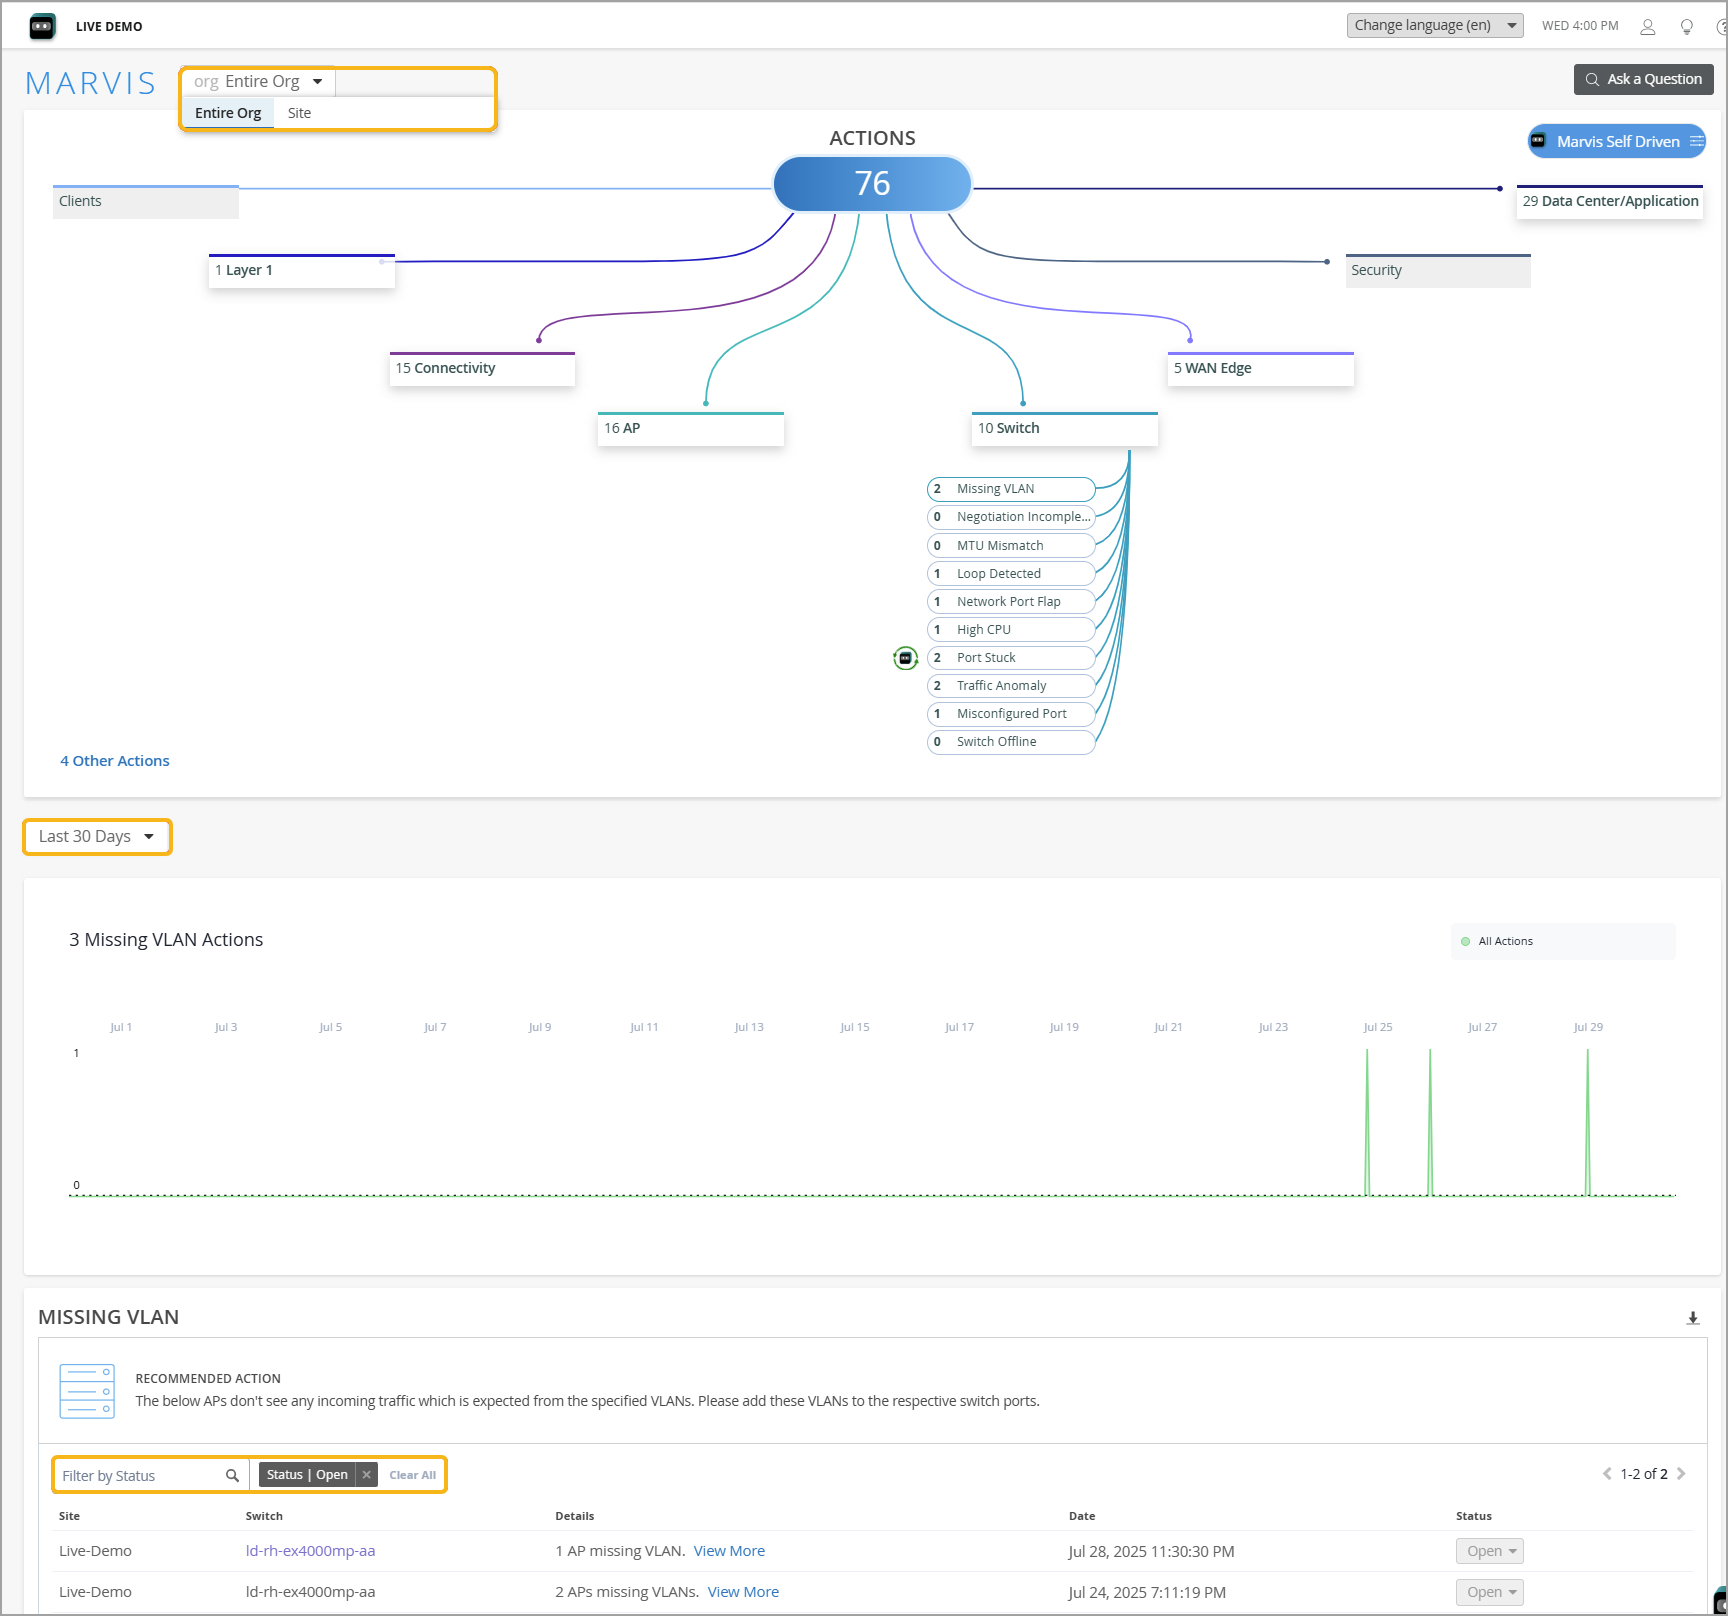
Note that the Marvis Actions page lists issues that are currently open at the organization or site level irrespective of the time that you select. However, the Time Series graph and the Recommended Actions sections display issues for all possible statuses based on the timeline selected.
The Marvis Client app is now available for iOS devices. To install and use the app, your device must be running iOS 12.0 or later.
Marvis Client for iOS is a secure, lightweight mobile app designed to simplify and secure how users connect their iOS devices to enterprise networks. Powered by Juniper Mist Access Assurance, the app provides a zero-touch onboarding experience using certificate-based authentication—no passwords required. The app supports BYOD, guest, and corporate device use cases.
To use the Marvis Client for iOS application, you require an active Juniper Mist Access Assurance subscription (provided by your IT team).
We have introduced several enhancements to the Marvis Actions page to improve usability and provide more insights:
Users can now view the number of open issues and recommended actions specifically for a selected site, allowing for quick site-level troubleshooting.
A time series graph has been added to display the number of Marvis Actions generated over a selected period, offering a visual representation of organizational or site-level patterns.
A filter has been added to the Recommended Actions section, enabling users to view actions at the organization or site level based on status for a specified time duration. This replaces the previous Latest Updates section that listed issues resolved over the past seven days.
Users now have the option to view actions for the last 60 days. The default is 30 days.
Users can now click any Marvis action with no open issues to view the previous list of AI Validated issues associated with the action.
For organizations with Marvis subscription, Marvis Minis will now probe the availability of authentication servers once per switch per hour.
Marvis will automatically detect if the switches are configured to use authentication servers in the Services section for authenticating wired users. Minis will be triggered every hour on the switch using the following credentials:
User: "minis-radius-user"
Pass: "minis-radius-pass"
When probing the authentication server, the server is expected to return an ACCESS-REJECT response. This response indicates that the server is reachable and actively processing requests. Users also have an option to configure this user as a valid user. In that case, the server sends an ACCESS-ACCEPT response which also indicates the availability of the server.
Marvis will generate actions when authentication requests time out, helping monitor the health and responsiveness of RADIUS functions. Note that this data is currently not available in the Mist portal. It will be made accessible through the Minis dashboard and Marvis account in a future release.
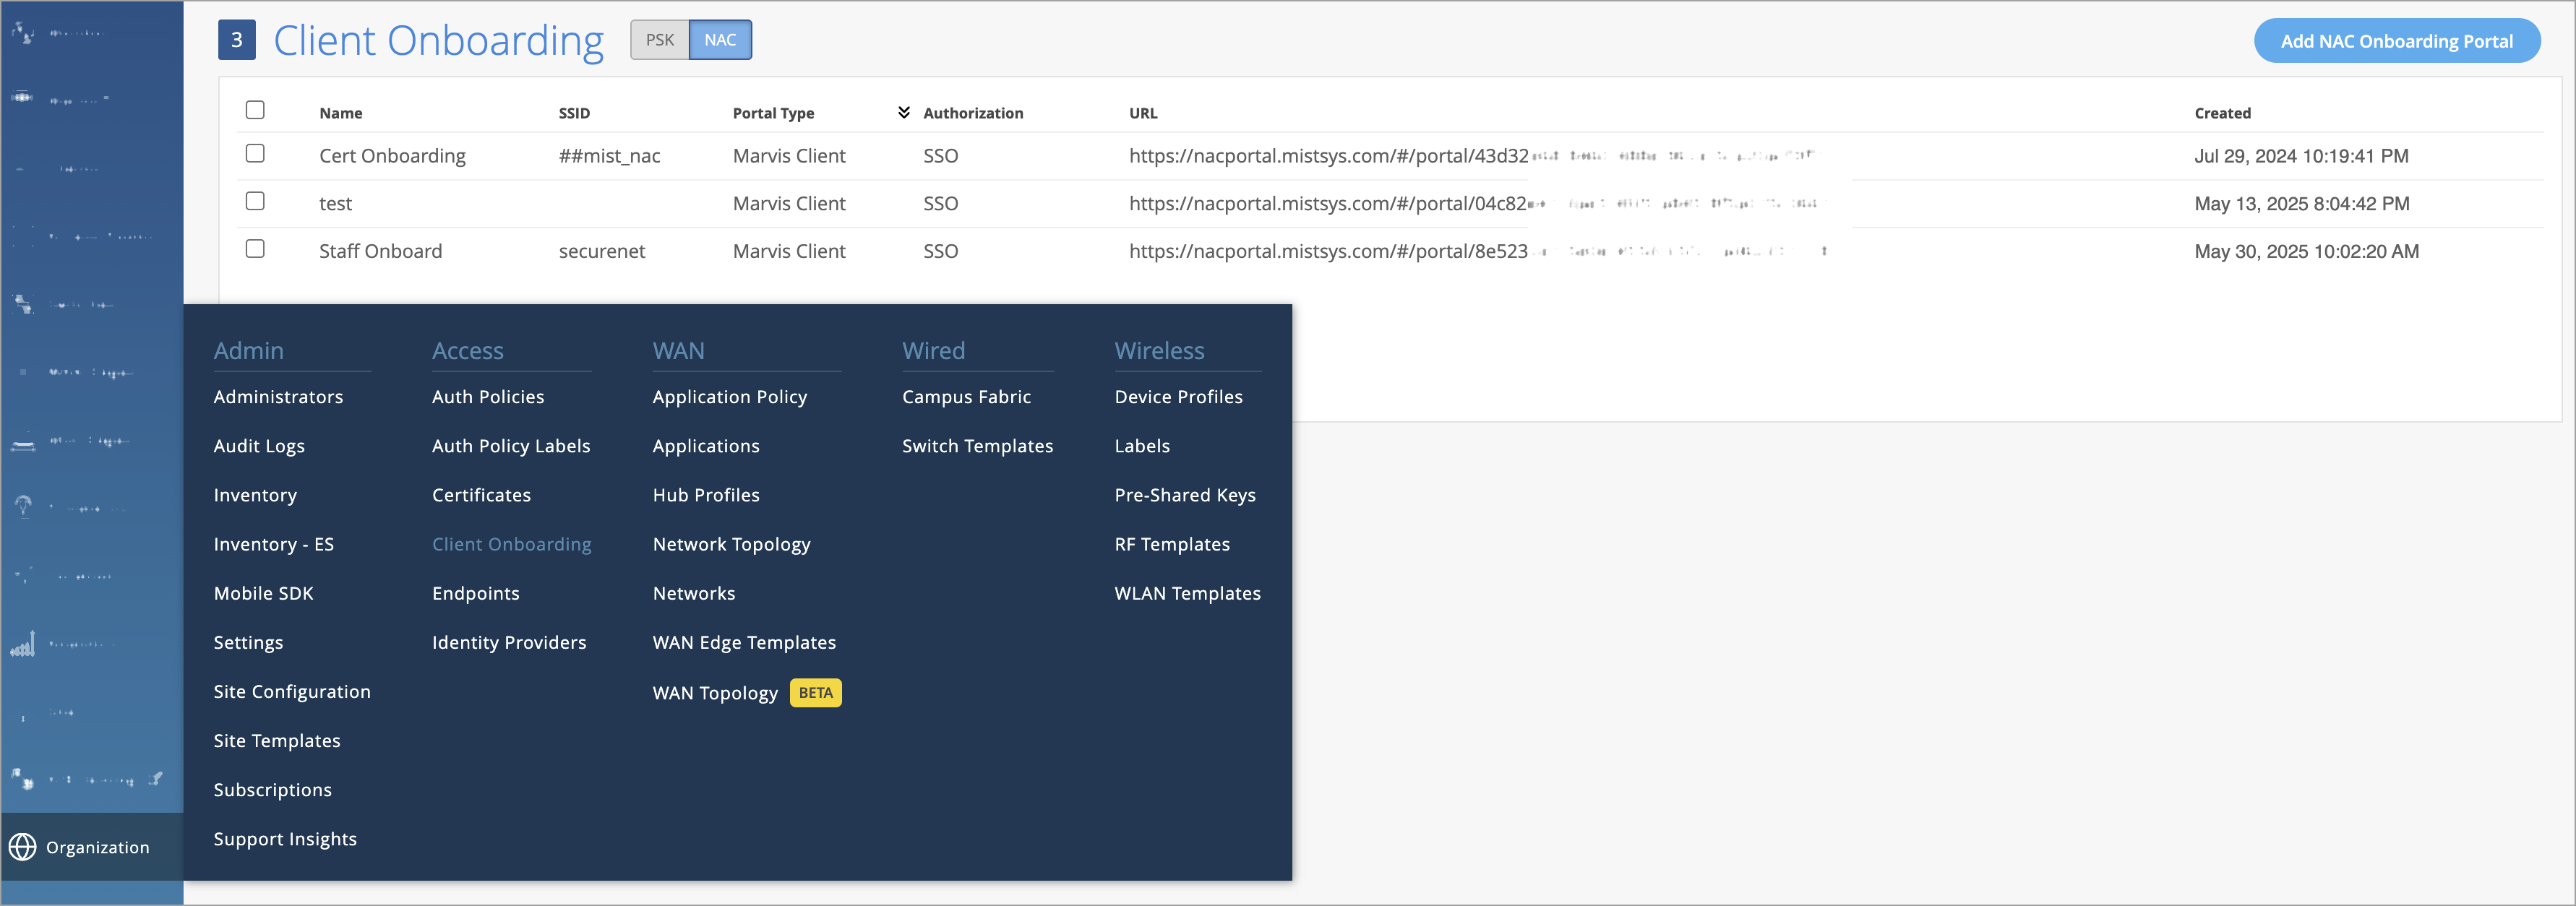
You can now onboard devices to the Mist cloud through a custom Network Access Control (NAC) portal, using the Marvis Client app. This feature enables users to automatically provision their devices with the appropriate Wi-Fi profile and personal certificate following a successful SSO authentication. Device onboarding through the NAC portal using Marvis Client ensures a secure, seamless, and password-less access to your organization’s Wi-Fi network.
You can configure the NAC portal from the Organization > Access > Client Onboarding page.
Note: We have moved the Client Onboarding option from Organization > Admin to Organization > Access. Both PSK and the NAC portals are now managed from the same location.
Once the NAC portal is configured and associated with your SAML SSO, users can access it through a designated URL to initiate the onboarding process. If the Marvis Client app is not already installed on the client device, it will be automatically downloaded and installed. The app then completes the provisioning by installing the appropriate network profile and personal certificate on the device.
Onboarding a device through the Marvis Client app ensures the following:
You receive a unique digital certificate tied to your identity and device.
A secure 802.1X-enabled Wi-Fi profile is installed on the device automatically.
If you leave the organization or remove the app, your access is revoked automatically.
This feature is supported on the following platforms: Windows, Mac OS, iOS and Android.
You need an active Access Assurance Advanced Subscription to use this feature. This feature is currently available only upon request. Reach out to the Juniper Accounts team if you would like to try it out.
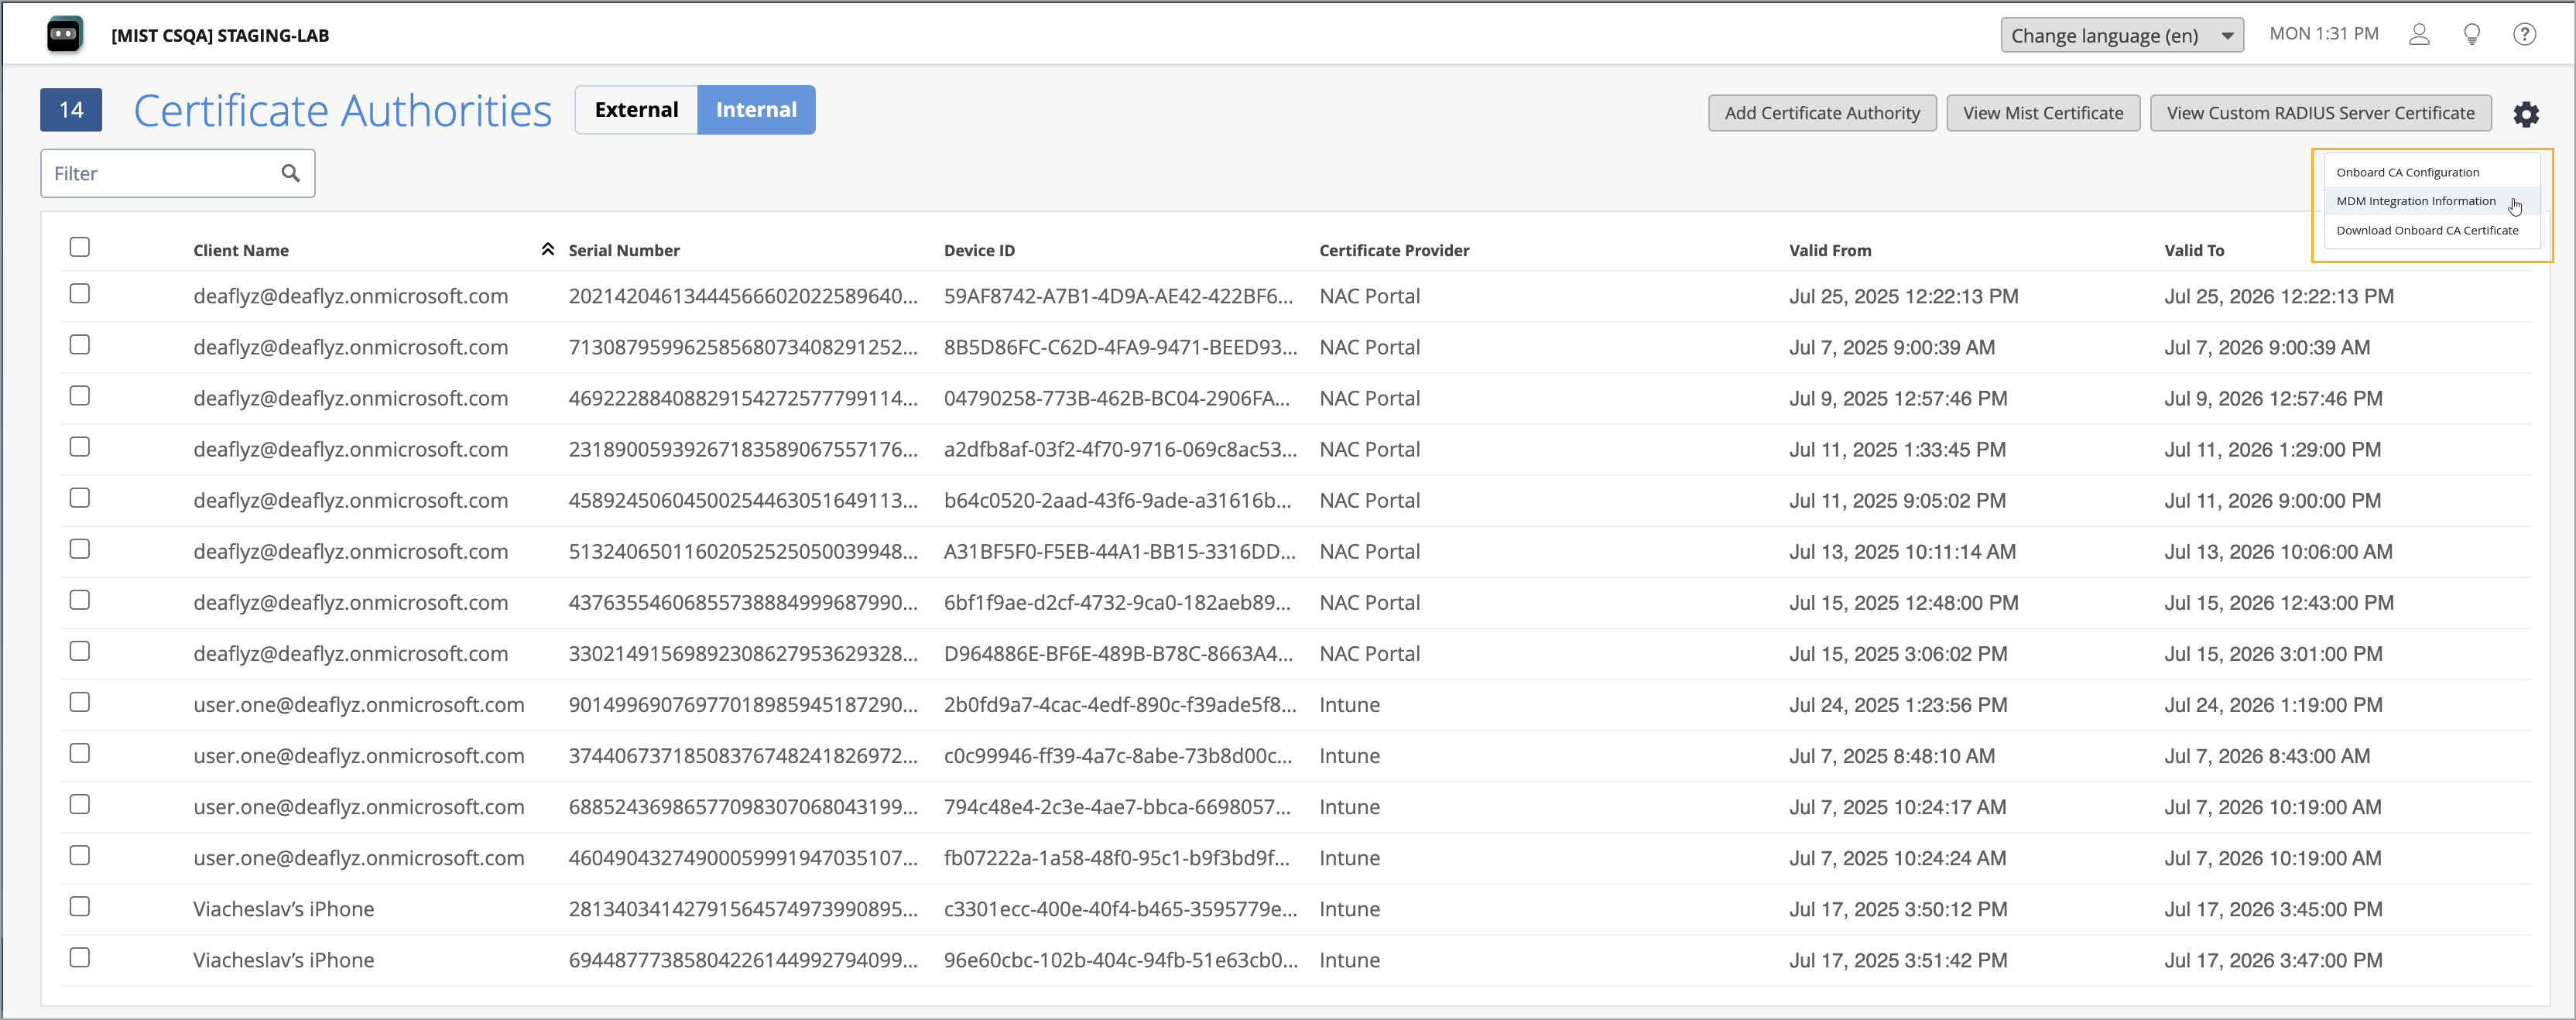
Access Assurance now includes a built-in Certificate Authority (CA) for issuing x509 certificates to client devices. This CA leverages the NAC onboarding portal to provide secure access to the devices. The certificates are issued to clients via the Marvis Client app, NAC portal, or through supported MDM platforms like Intune and JAMF.
To enable built-in Certificate Authority, go to the Organization > Access > Certificates page, select the Onboard CA Configuration option from the settings menu and then choose Active under Onboard Certificate Authority.

As a result, a new Internal certificates page tab appears. From this tab, you can find information to integrate the built-in CA with external MDM Providers such as Intune and JAMF by using the MDM Integration Information option from the settings menu.
You need an active Access Assurance Advanced Subscription to use this feature. This feature is currently available only upon request. Reach out to the Juniper Accounts team if you would like to try it out.
We have enhanced the Access Point (AP) list and details pages to include LLDP and PoE statistics when both Ethernet ports (eth0 and eth1) on the AP47 are connected. With this update, the AP details page displays the Connected Switch Properties for LLDP neighbor information for each Ethernet port on the AP47. Previously, this data was shown only for the active port.
The Connected Switch Properties section on the AP details page shows information for both the active and standby ports. To make identification easier, the active port is visually marked with a green circle next to it.
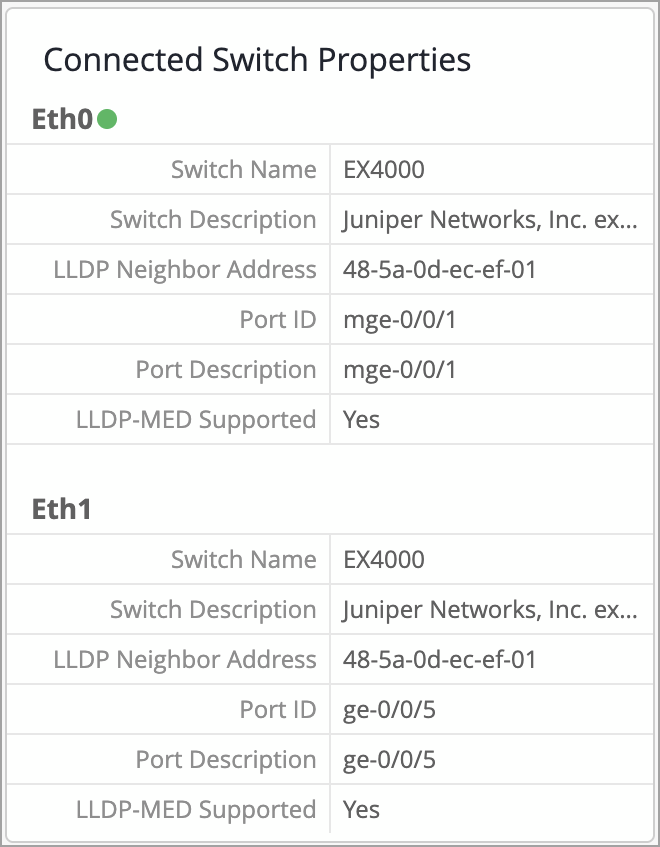
The AP47 supports redundant PoE and Ethernet inputs, ensuring uninterrupted Wi-Fi coverage during switch or infrastructure outages and upgrades. It not only negotiates power from two independent PSE sources, but also supports multiple Ethernet links for cloud connectivity and user traffic. For more information, refer to AP47 Documentation.
We have enhanced the column selector across list pages for Wireless Assurance in the Mist portal to make it easier for you to manage the list views. The updated column selector now includes:
A filter that helps you quickly find and enable or disable a column.
Select All and Deselect All buttons for bulk actions.
In the following image, the keyword LLDP is used to filter the results on the column selector on the Access Point list page. When a keyword is entered in the search field, only the relevant fields are visible to select or deselect as desired; the non-filtered fields remain unaffected by the selection changes performed.
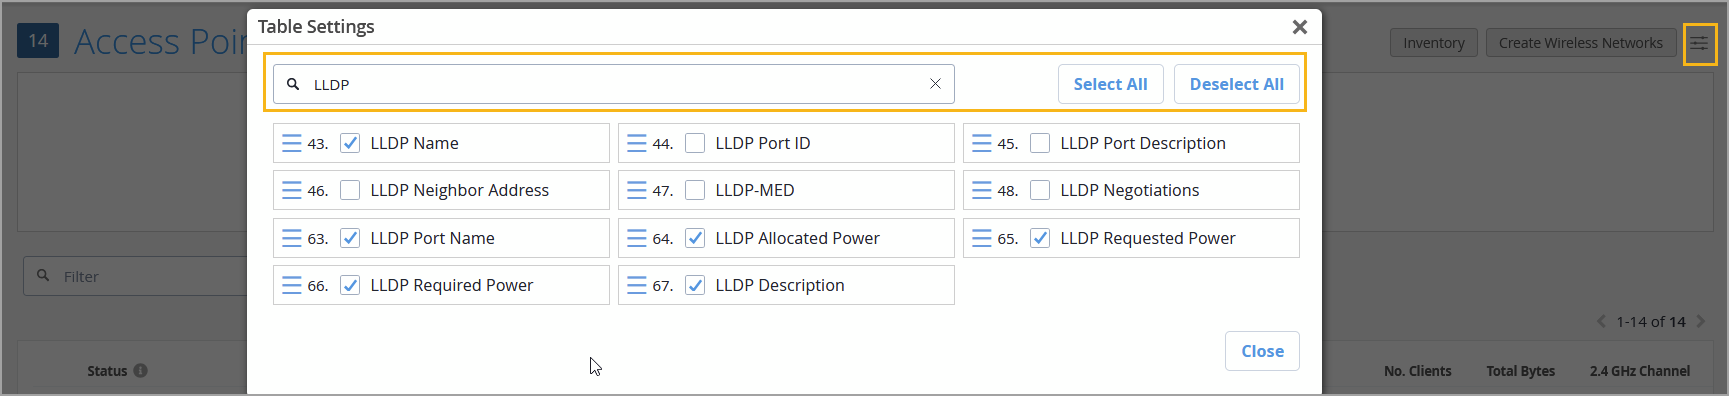
You can access the column selector by clicking the selector button on the right of the page.
These improvements are especially helpful when working with list pages that contain a large number of columns, making it faster and easier to customize your view.
When a Virtual Chassis device is represented in Mist by the MAC address of one of its member switches, managing it can become challenging. Especially, replacing or removing a member switch may cause inconsistencies in how the Virtual Chassis is represented, potentially disrupting connectivity.
To address this issue, we have introduced a new API capability that allows you to convert a cloud-connected Virtual Chassis from being identified by the member 0 MAC address to being represented by a Virtual Device ID. This enhancement simplifies how Virtual Chassis devices are managed and modified, particularly when performing updates or making configuration changes.
To convert a Virtual Chassis, issue a POST request to the API endpoint below using your Site ID (associated with the site where Virtual Chassis is deployed) and device ID.
Endpoint:
https://api.<cloud_env>.mist.com/api/v1/sites/<site_id>/devices/<device_id>/vc/convert_to_virtualmac
Example:
In the Mist UI, this feature will be available in an upcoming release.
For more information, refer to Convert a Virtual Chassis to Use a Virtual Device ID (via API).
To ensure that all Virtual Chassis devices in Mist are properly preprovisioned, we have introduced enhancements that alert users when a device is not preprovisioned.
The switch list page now includes a new column titled Preprovisioned VC, which displays the preprovisioning status of each Virtual Chassis device. Additionally, the switch details page shows a warning message and provides a Preprovision button for devices that haven't been preprovisioned. Before modifying any Virtual Chassis, we recommend preprovisioning it. These enhancements make it easier for users to quickly identify and take action on non-preprovisioned Virtual Chassis devices.
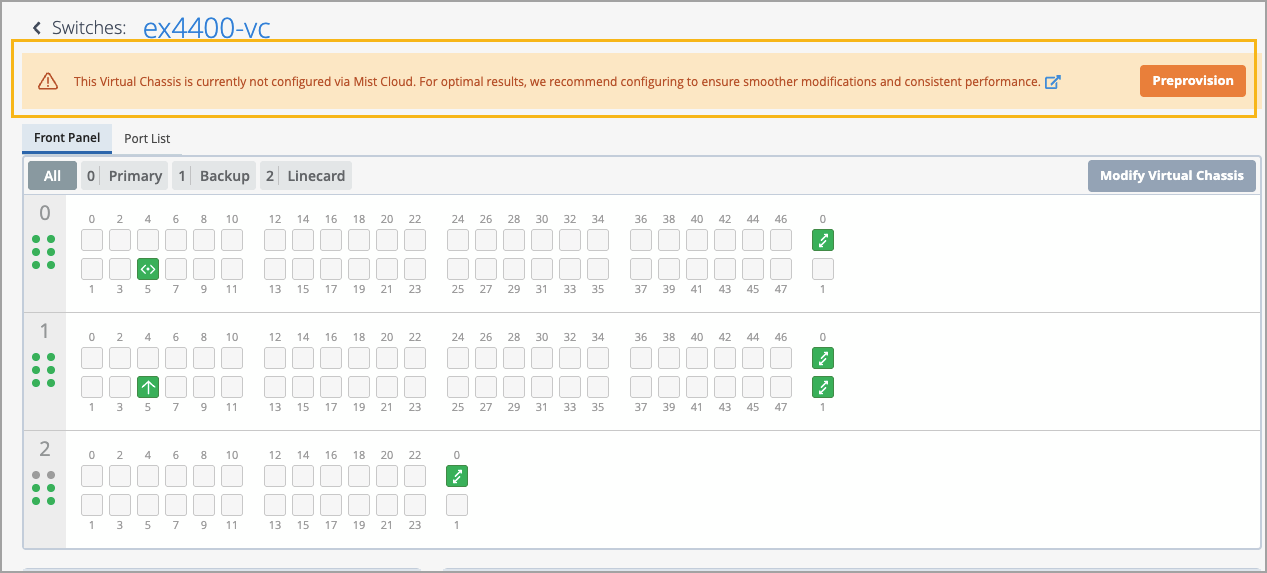
Clicking the Preprovision takes you to the Modify Virtual Chassis window. From there, you need to click Preprovision Virtual Chassis. This action pushes the preprovisioned Virtual Chassis configuration to the device and overwrites the old autoprovision Virtual Chassis configuration pushed to the device during the ZTP process. This option assumes the current positioning of the members and preprovisions them as is.
For more information, refer to the Preprovision a Virtual Chassis section in Manage a Virtual Chassis Using Mist (Add, Delete, Replace, and Modify Members).
You can now include routing policies (import and export policies) in OSPF configurations at the switch level (Switches > Switch Name). The routing policy is composed of terms. Each term can include a set of conditions and a then statement, which defines the actions to take if an OSPF route matches the conditions specified in the term. You can see the option to create an import and export policy when you enable the OSPF configuration from the OSPF tile on the switch configuration page. You must first add an OSPF area and network to the switch to be able to enable OSPF configuration.
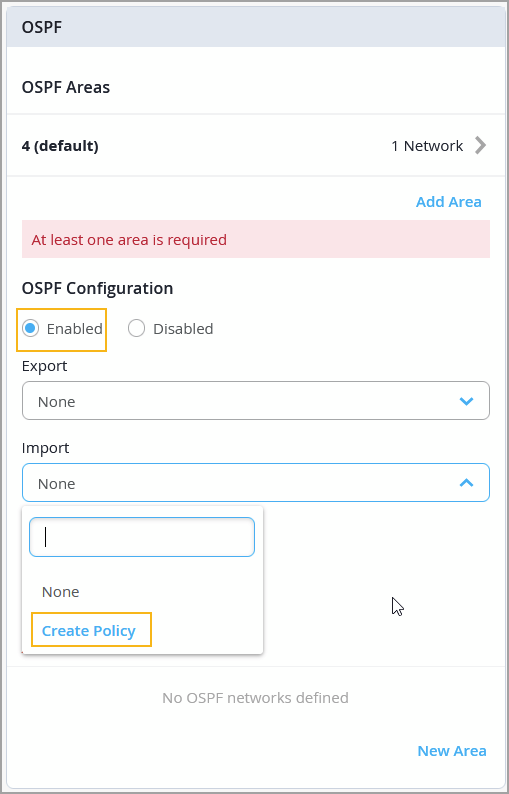
For more information on the routing policy configuration, refer to OSPF Configuration for Switches.
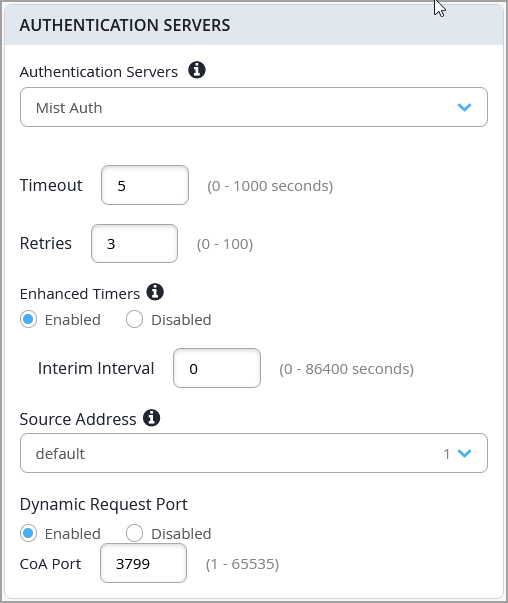
You can now configure various options under Mist Auth for authentication of wired clients. Mist Auth is Mist's cloud-based authentication service.
The configurable options include:
Timeout—Duration in seconds after which the authentication request times out.
Retries—Number of retries allowed.
Enhanced Timers—By default, EX Series switches have a range of 30-60 seconds for various communication timers between the switch and the client device. Enabling this option enhances these timers between 2 and 10 seconds. You can further modify them by changing the authentication server Timeout and Retries.
Interim Interval—Specify the frequency (in seconds) at which the Mist Auth server is updated with information about an active user session.
Source Address—Select a source network. This network should be part of a Layer 3 or IRB interface created with a static IP address.
Dynamic Request Port—Specify a change of Authorization (CoA) port.
You can configure these options from the Authentication Servers tile on the switch template (Organization > Wired > Switch Templates) or switch details page (Switches > Switch Name).
When Mist Auth is enabled for authentication, existing RADIUS configuration, if there is any, is disabled.
In the Simple Network Management Protocol version 3 (SNMPv3) configuration for switches, you can now choose to use the device MAC address as the SNMPv3 engine IDs. This option is available on the General tab of the SNMP tile in the switch configuration template, as well as on the switch details page.
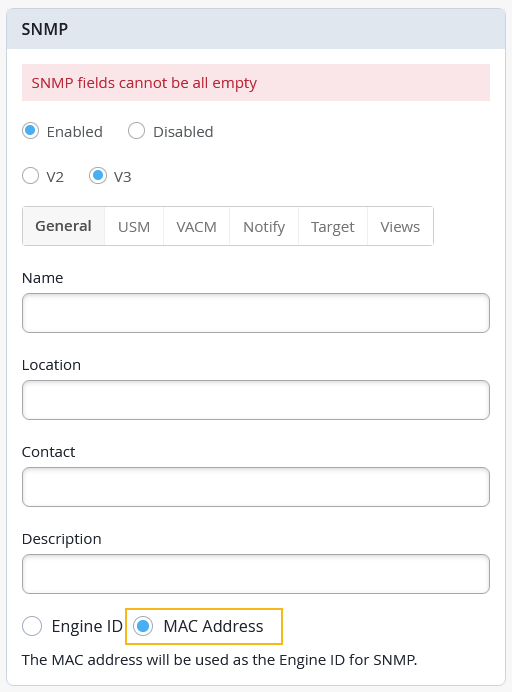
Using MAC address ensures the engine ID’s uniqueness and stability without much manual intervention. Engine ID is a unique identifier used in the SNMPv3 configuration to distinguish between different SNMP entities (like agents and managers) in a network. It plays a key role in SNMPv3's security features.
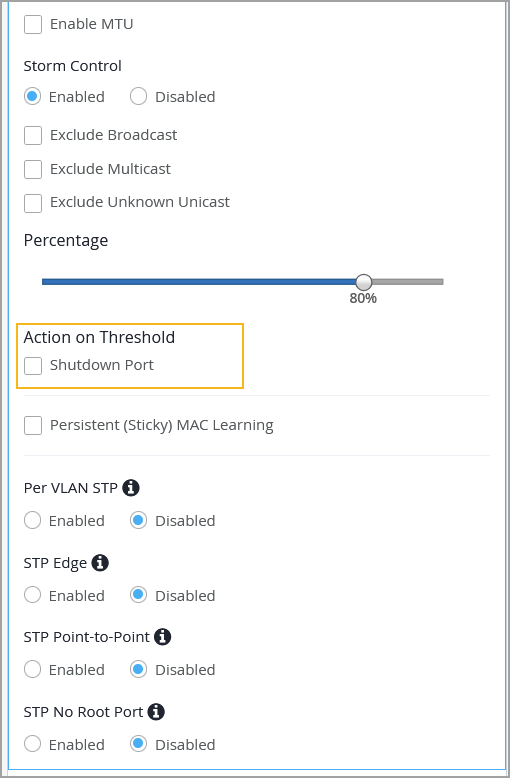
To mitigate disruptions caused by a traffic storm, you can now configure a switch to automatically shut down a port when traffic exceeds the user-defined storm control threshold. Previously, you could set a switch port to discard excess packets when traffic exceeded the storm control threshold. With this update, you get an additional option to shut down a port when the specified threshold is breached. You can enable this feature on a switch port through Port Profiles or Port Configurations. This feature is available at both the switch template level and the individual switch level.
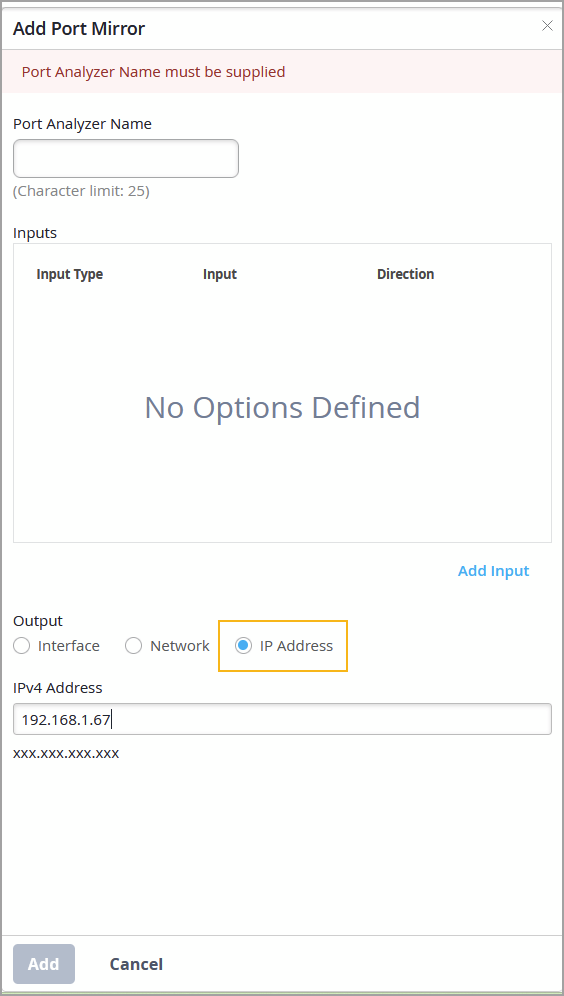
You can now configure an IP address as the destination in your port mirroring setup.
This feature allows mirrored traffic to be sent directly to a specified IP address—typically that of a remote monitoring system that captures and inspects the duplicated packets for analysis.
You can configure this feature from the Port Mirroring tile in the All Switches Configuration section of switch configuration—either on the switch template or the switch details page.
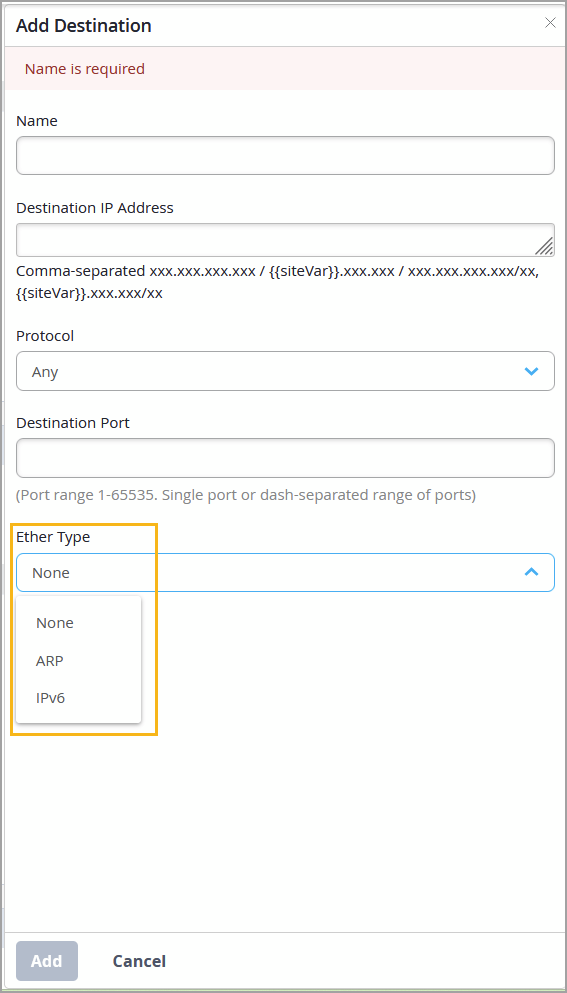
Juniper Mist now supports the use of the EtherType values ARP and IPv6 as destination tags within a switch policy. EtherTypes indicate the protocol encapsulated in the payload of an Ethernet frame, and can be used as match conditions in RADIUS-based firewall filters on switches. Administrators can use them to define switch policies to permit or deny traffic based on the encapsulated protocol.
By default, no EtherType is selected.
We have introduced some SD-WAN security enhancements to the Juniper Advanced Threat Prevention (ATP) or Sky ATP feature for SRX Series firewalls. These updates, listed below, provide greater flexibility and control over threat intelligence and policy enforcement.
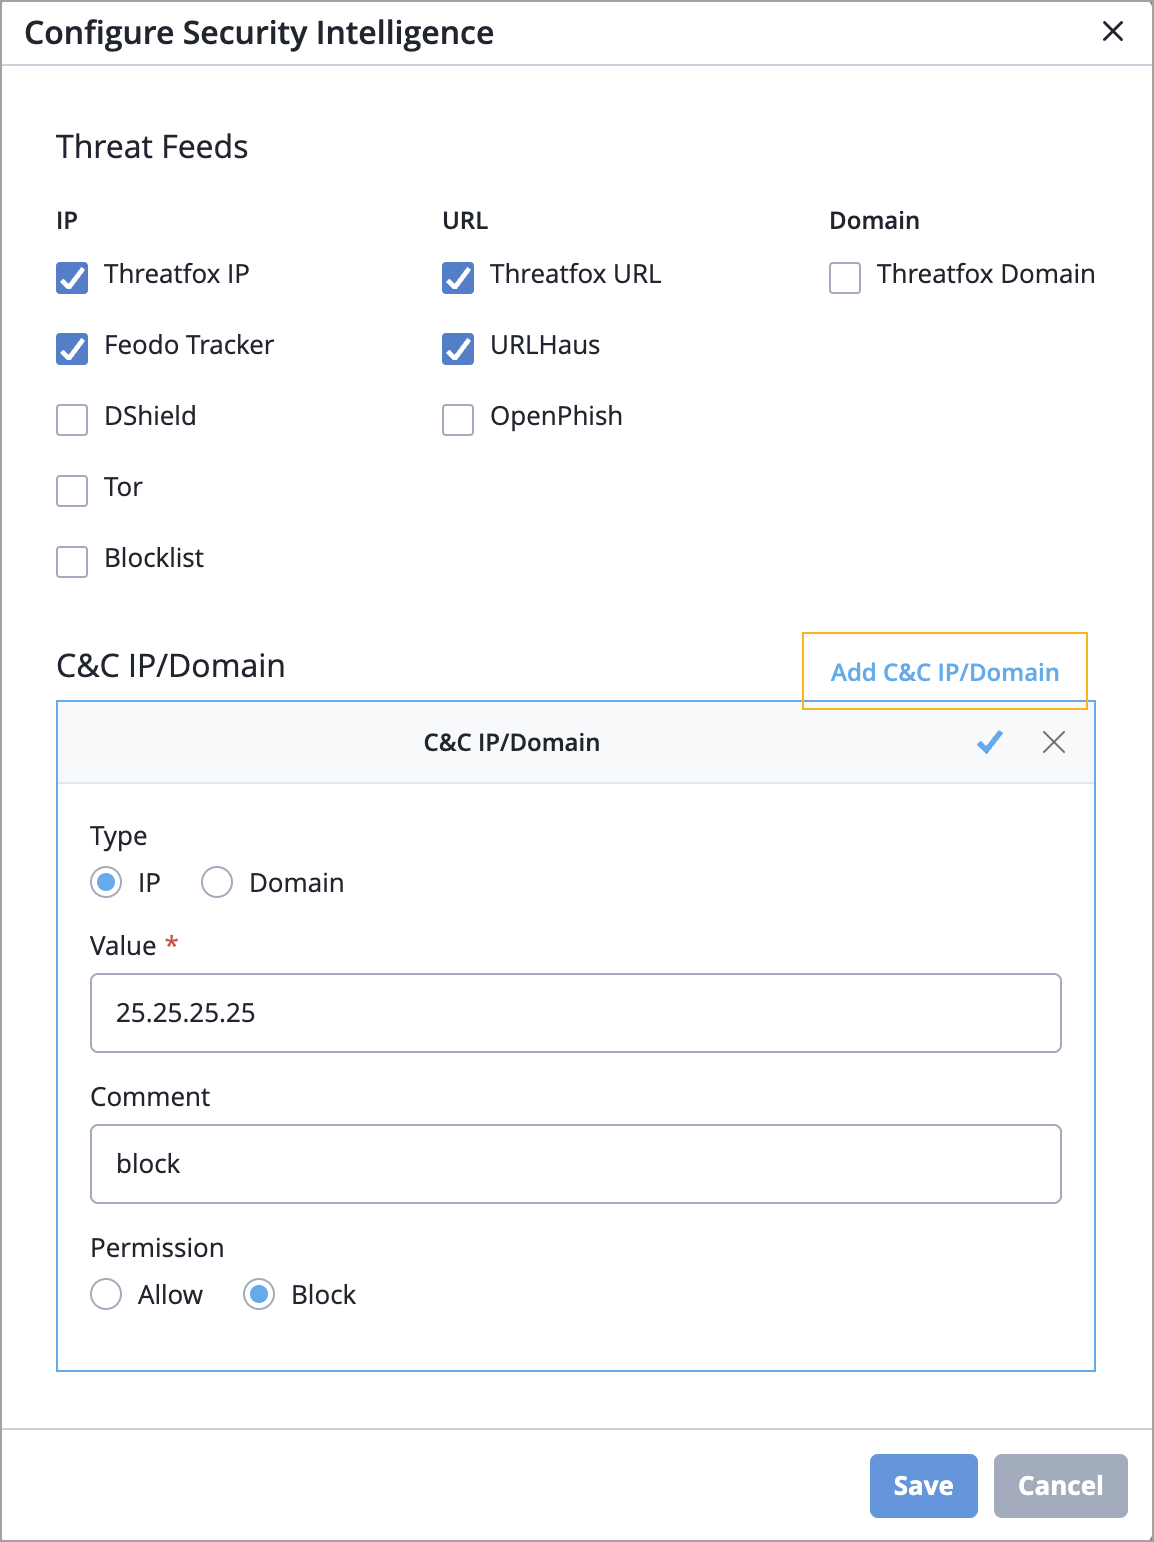
Third-party threat feeds—Sky ATP allows you to enable additional threat intelligence feeds (known malicious IPs, domains and URLs) from external vendors. Once enabled, these feeds will be a part of the Security Intel CC Category on the device. Supported feed types include:
IP-based—Threatfox IP, Feodo Tracker, DShield, Tor, Blocklist
URL-based—Threatfox URL, URLHaus, OpenPhish
Domain-based—Threatfox Domain
Security-Intel custom allowlist and blocklist - You can define customs IP addresses and domains under two categories - Allowlist and Blocklist. These user-defined IP addresses or domains are included under the Security Intel CC Category on the device.
You must be logged into an ATP cloud realm to be able to configure these features.
You can configure these features from the Secure WAN Edge Integration tile on the Organization > Settings page by updating the ATP Cloud provider entry. Click the edit button in the Action column of the provider list to open the Configure Security Intelligence window and specify the threat feeds, allowlists, and blocklists.
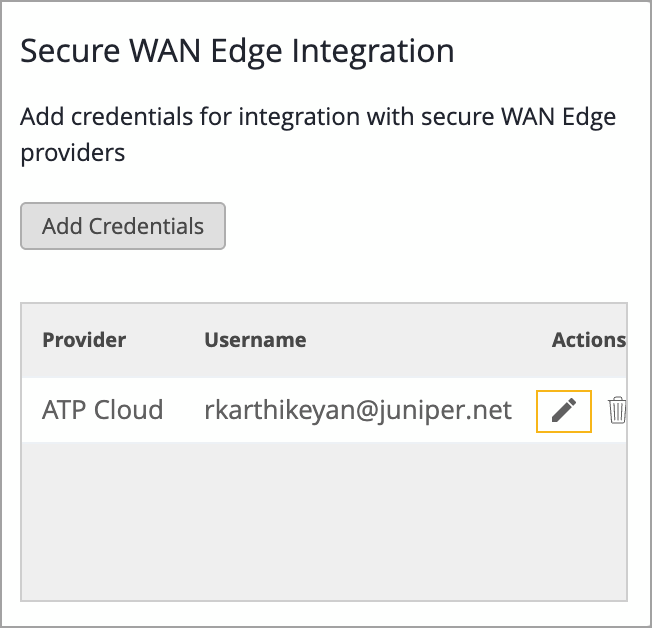
On the Configure Security Intelligence window, select a threat feed check box to enable that feed.

To add an allowlist or blocklist entry, click Add C&C IP/Domain, configure the details, and save them.
We have introduced a new alert to help you monitor the thermal health of your SRX devices. The alert, named Gateway High Temperature, is triggered when a device’s temperature exceeds the upper threshold of 75°C.
You can configure this alert from the Monitor > Alerts > Alerts Configuration page.
On the Monitor > Alerts page, the Gateway High Temperature alert appears as shown below:
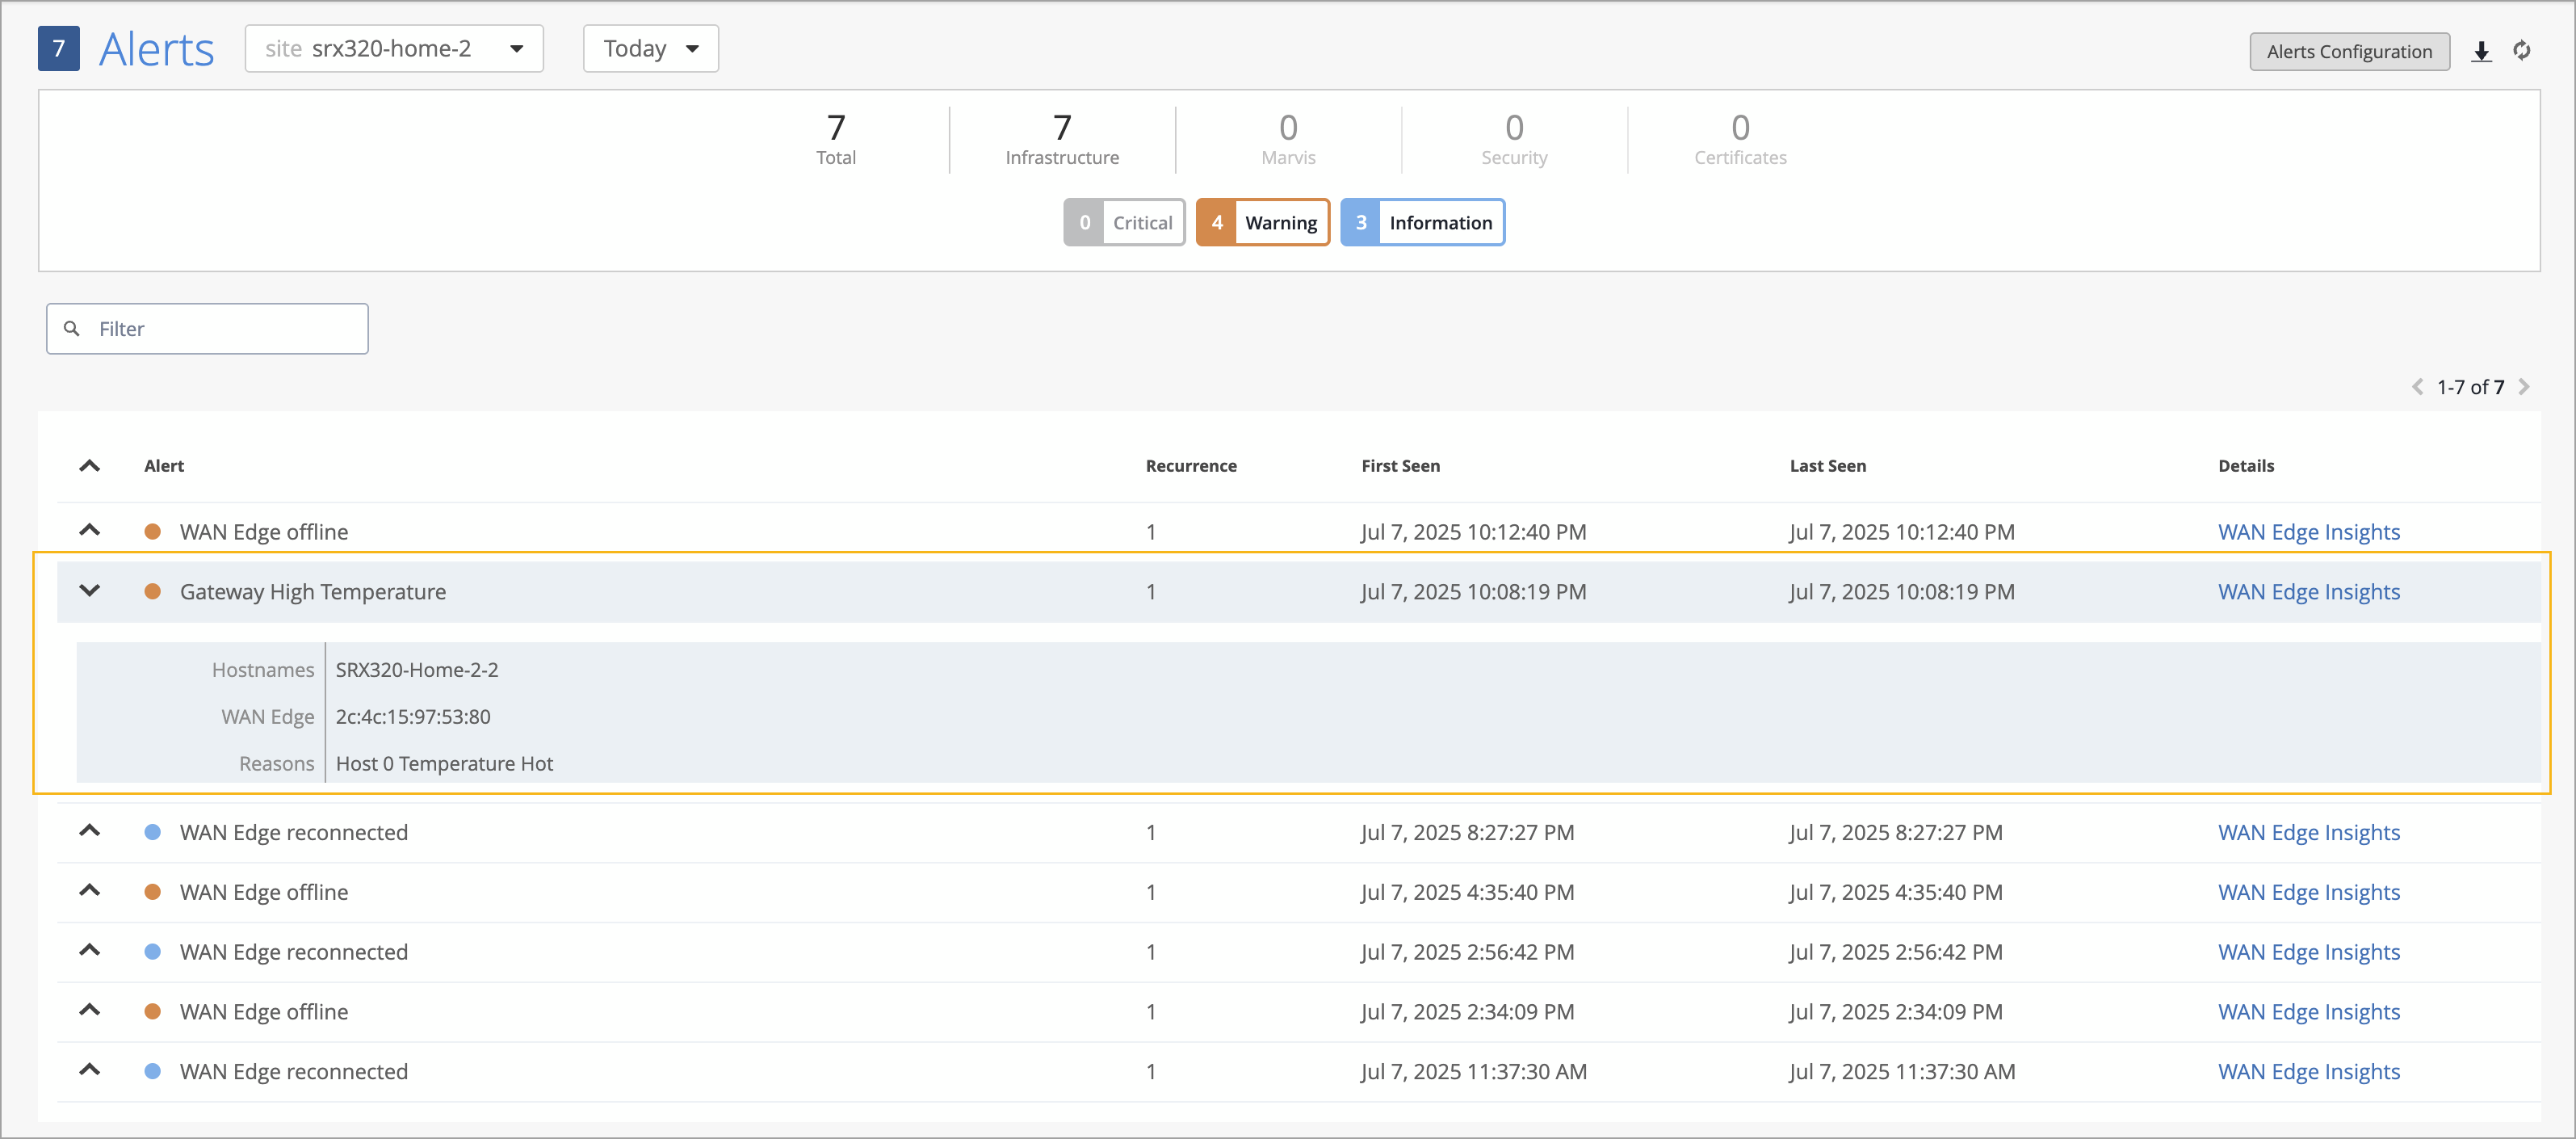
In addition, the WAN Edge Events section on the WAN Edge Insights page will display the following sequence of events:
WAN Edge Chassis Hot — Indicates the device has overheated.
WAN Edge Disconnected — Triggered as a result of the high temperature condition.
The WAN Edge topology builder now provides support for creating full-mesh overlay topologies. In this release, these topologies are supported on SSR devices. In a full mesh topology, sites provide a seamless interconnectivity across the overlay, as every device is directly connected to every other device. To configure it, navigate to Organization > WAN > WAN Topology. The topology configuration includes a name and one or more overlay endpoints.
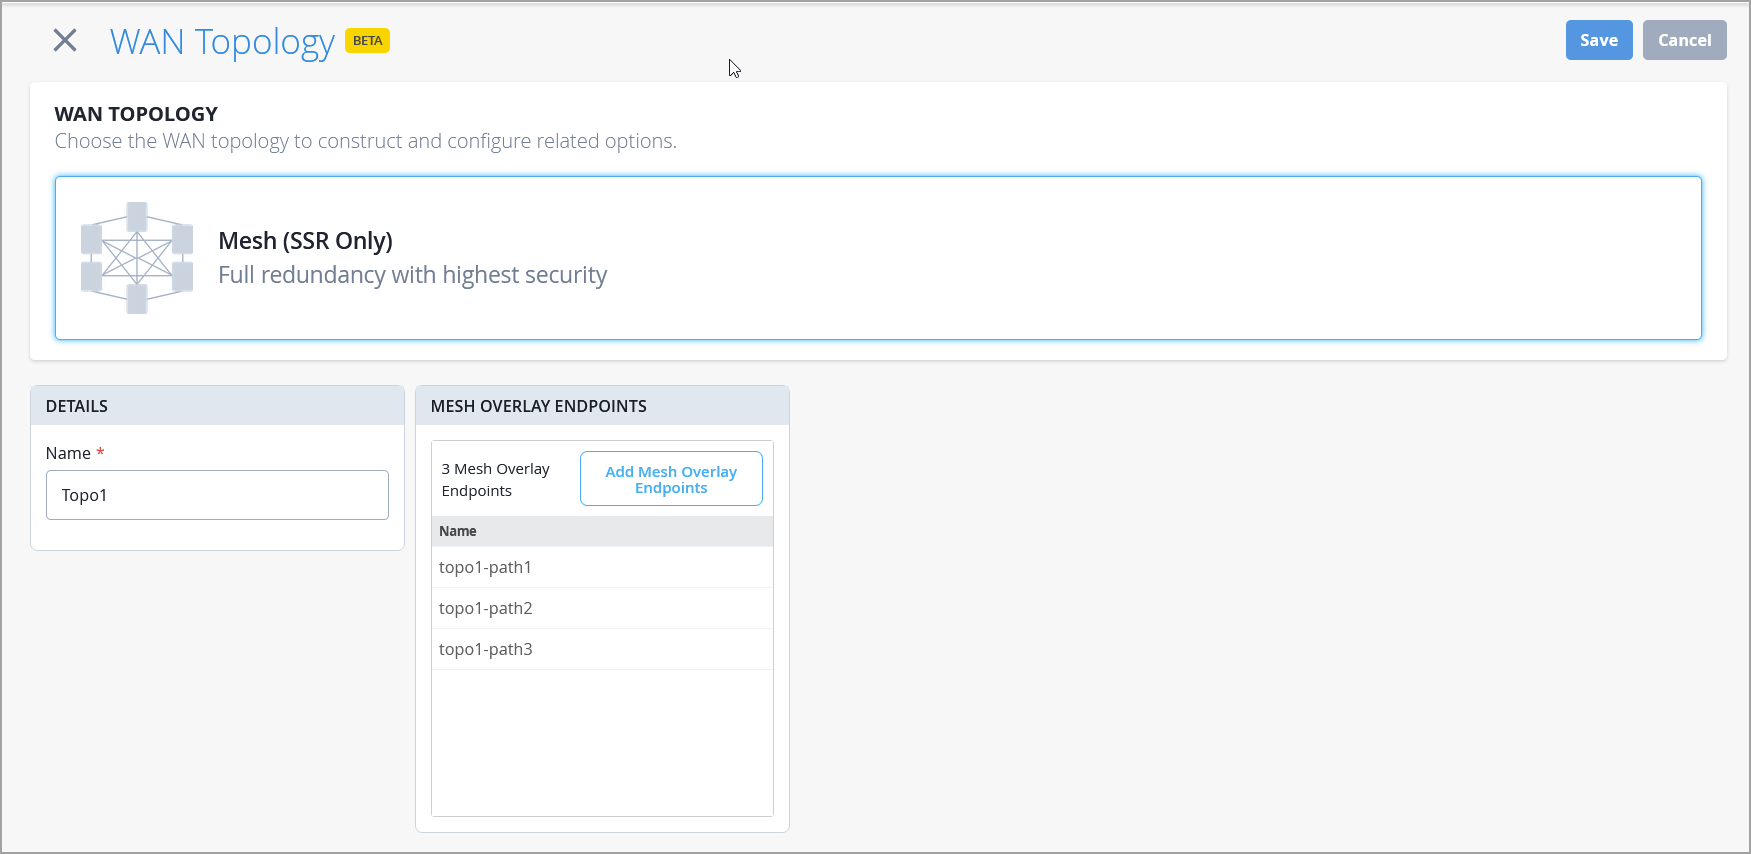
Once the topology is created, include it, along with the relevant endpoints, in the WAN Interface section of the WAN Edge configuration, either at the template or device level. Additionally, reference the topology endpoints in the Traffic Steering section of the WAN Edge configuration to complete the setup.
Devices that are part of a hub and spoke overlay cannot be included in a mesh topology, and vice versa. A full-mesh topology can support up to 20 devices.
Mist provides an option to test the speed of WAN links on Conductor-managed Session Smart Routers (SSRs). This speed test feature supports specific use cases. For example, you can test the speed of circuits installed to a branch office with an SSR at the edge of the customer premises. You can carry out tasks such as the following:
New link qualification
On-demand speed tests when a low link speed is suspected to be causing link issues
You can run the speed test from the SSR WAN Edge details page (WAN Edges > WAN Edges > WAN Edge Name) and then select the WAN port from the port panel. Results for past on-demand or scheduled speed test runs will be available on the WAN Edge details page.
Before running the test, ensure that the WAN link has connectivity to the Internet, where the speed test infrastructure can be reached.
For this feature to work, the Conductor needs to have the WAN Assurance plugin version 3.13.
Routing policies on WAN Edge devices, including both import and export policies, now support conditional advertisement of BGP routes based on the presence or absence of specific route conditions. For example, you can configure a WAN Edge device to advertise a BGP route only when some other specific routes are present in the routing table.
In the configuration, you can specify a conditional prefix and a custom VR.
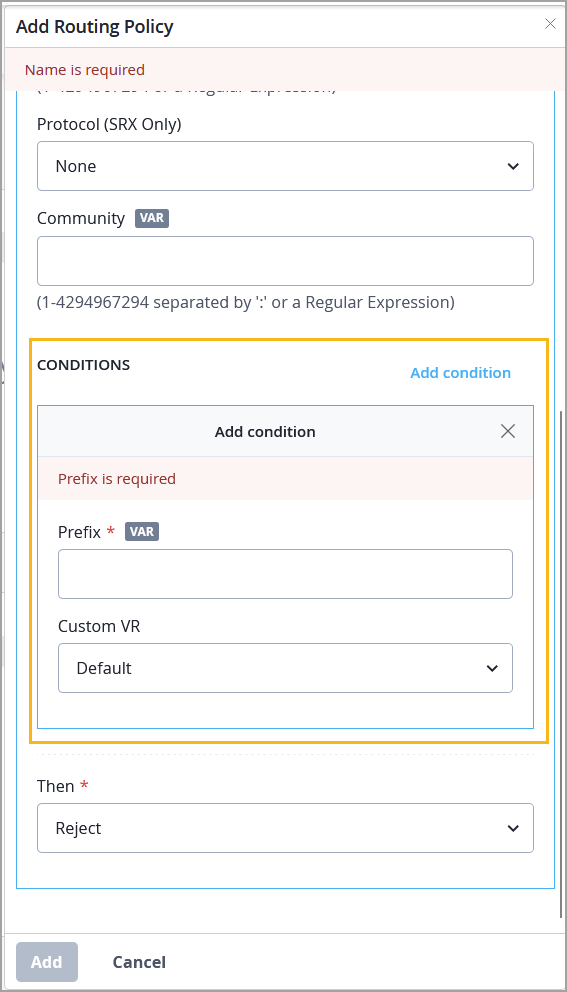
For more information on conditional route advertisement refer to Conditional Advertisement Enabling Conditional Installation of Prefixes Use Cases.
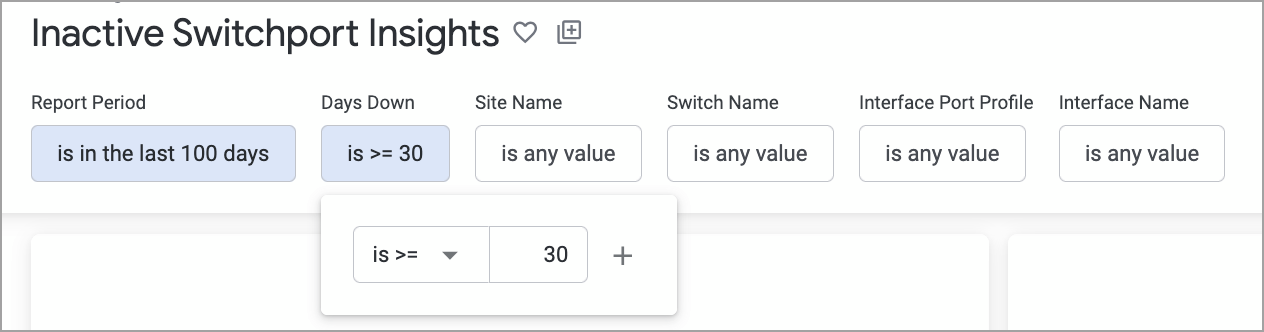
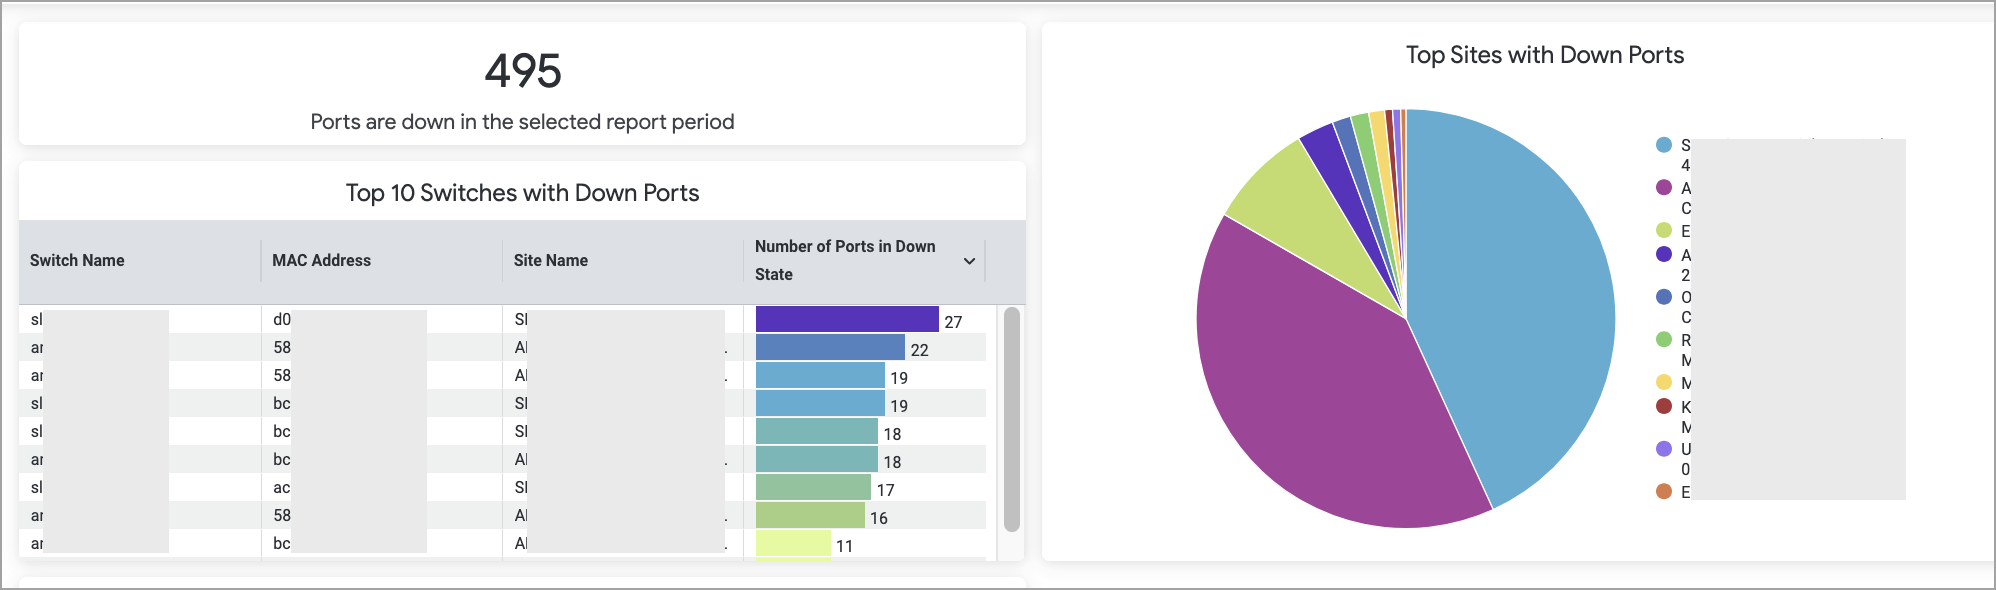
We have introduced a new dashboard—Inactive Switchport Insights—that offers clear visibility into unused switch ports.
This dashboard will be available to users by mid of August, 2025.
Monitoring switch ports that were previously active but have remained unused for a long time is important for keeping the network secure and efficient. This dashboard helps network administrators identify such ports and take actions, such as disconnecting patch cords or disabling the ports, to reduce security risks.
The dashboard includes filters that help refine the information displayed. Key filters include:
Days Down—Use this filter to specify the number of days a port has remained in the Down state.
Site, Switch Name, and Interface Port Profile—Use these filters to narrow the list of inactive ports based on specific criteria.
Sample dashboard visuals are shown below.

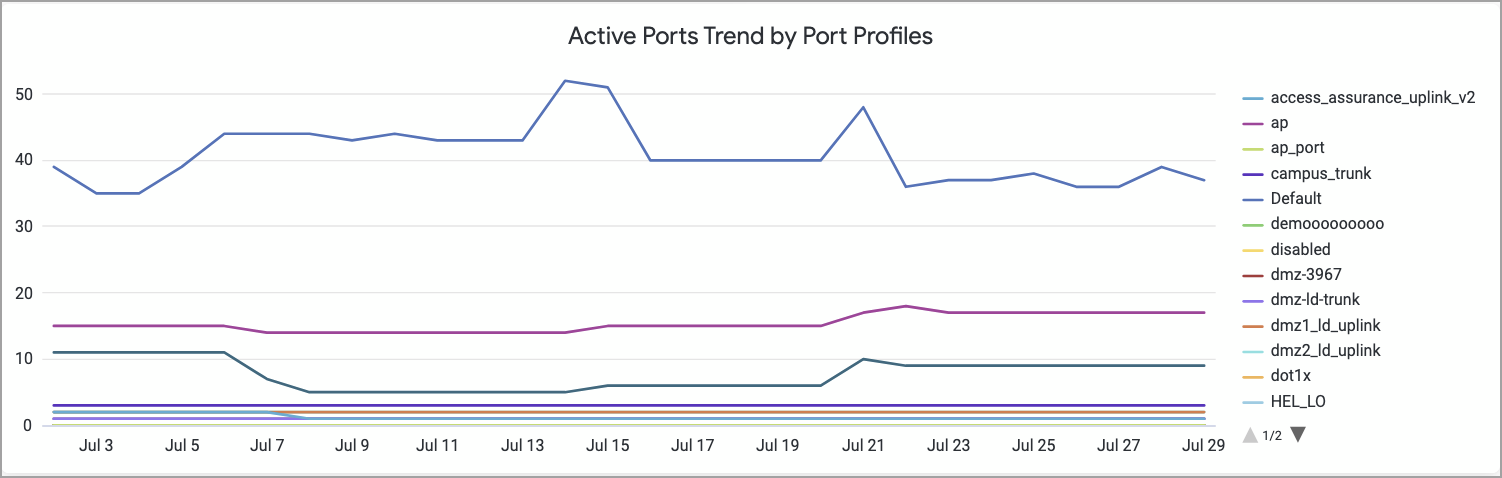
The Wired Network Insights dashboard now provides enhanced visibility into Port Profile usage across the organization. The new visualization displays the number of configured port profiles compared to the number of ports that are actively in use.

The dashboard also shows trends that indicate port profile adoption over time.
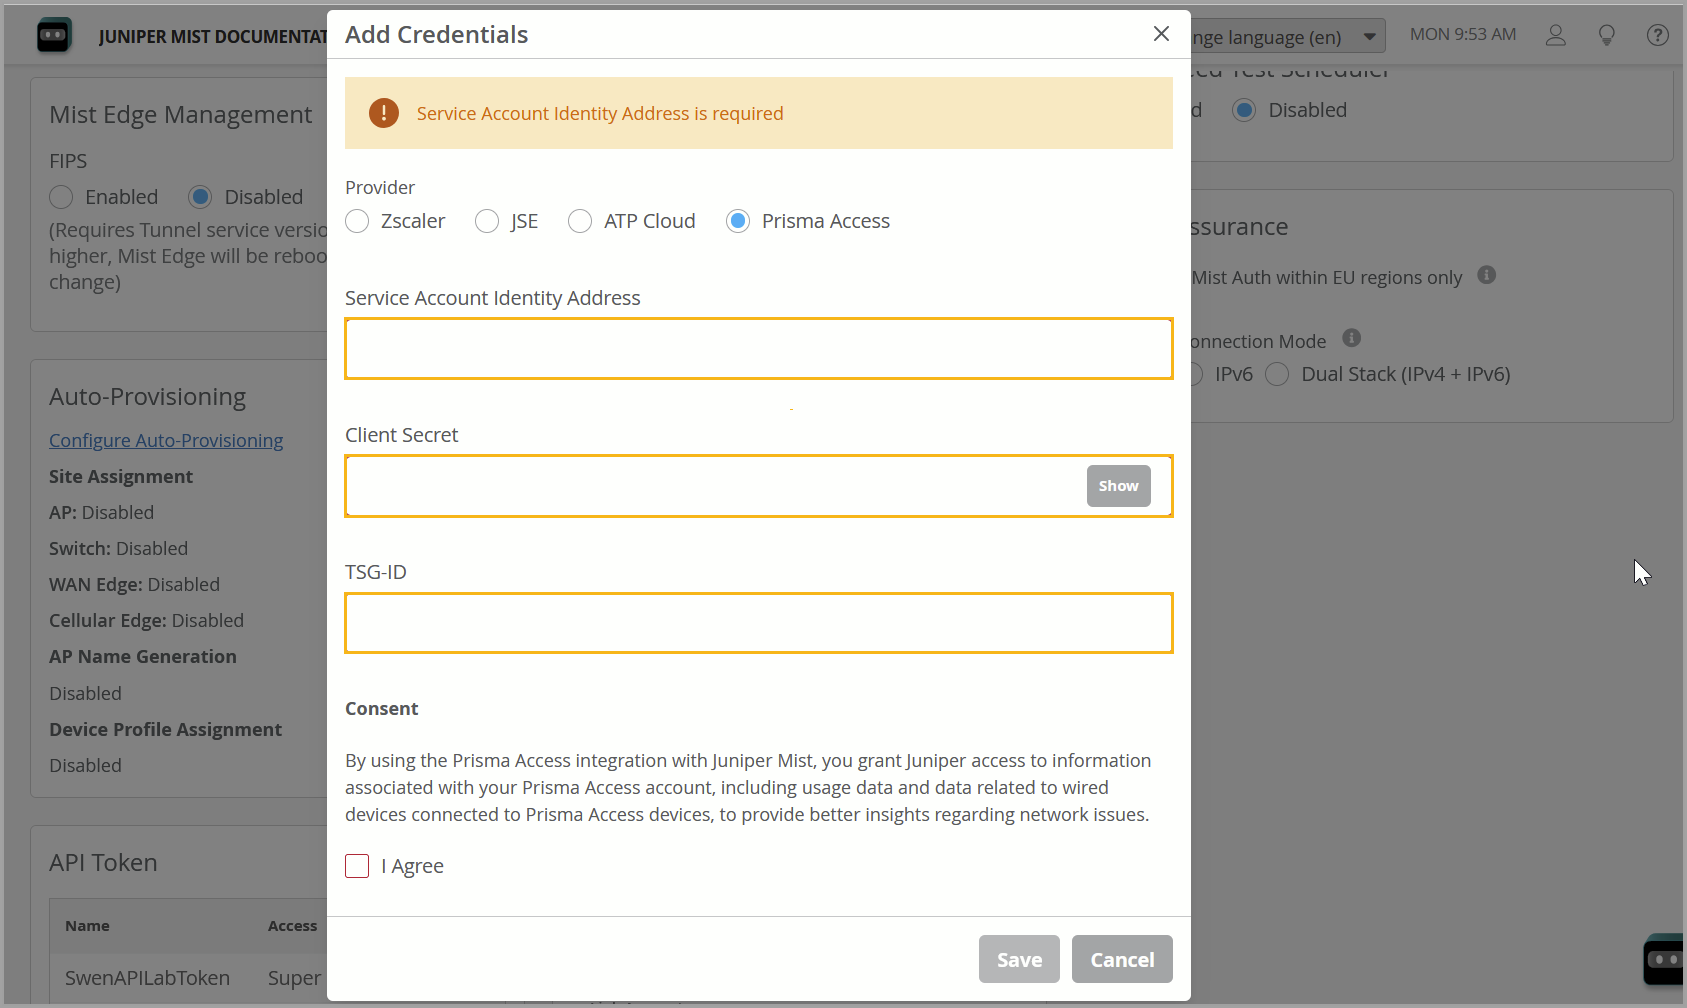
You can now integrate a Palo Alto Prisma Access account with a Juniper Mist organization.
Prisma Access is a cloud-based security platform that ensures secure and fast access to applications and data for users regardless of their location. This integration enables the Mist users to view the Prisma Access events directly from Mist for troubleshooting purposes.
The Prisma Access account integration with Juniper Mist involves the following steps:
Add the Prisma Access user credentials (service account identity address, client secret, and the tenant service group ID or TSG-ID) that you obtained from Prisma (Strata Cloud Manager) to your Mist organization. You can do this from the Secure WAN Edge Integration tile on the Organization > Settings page. You can add multiple Prisma Access accounts to Mist. These accounts will appear for selection in WAN Edge templates and WAN Edge details page.
Manually provision an IPsec tunnel from the WAN Edge device in your Mist organization to the Prisma Access cloud. To do this, configure a Prisma Access-based provider along with the Prisma account from Secure Edge Connectors tile in the WAN Edge template (Organization > WAN Edge Templates) or the WAN Edge details page (WAN Edges > WAN Edges > WAN Edge Name).
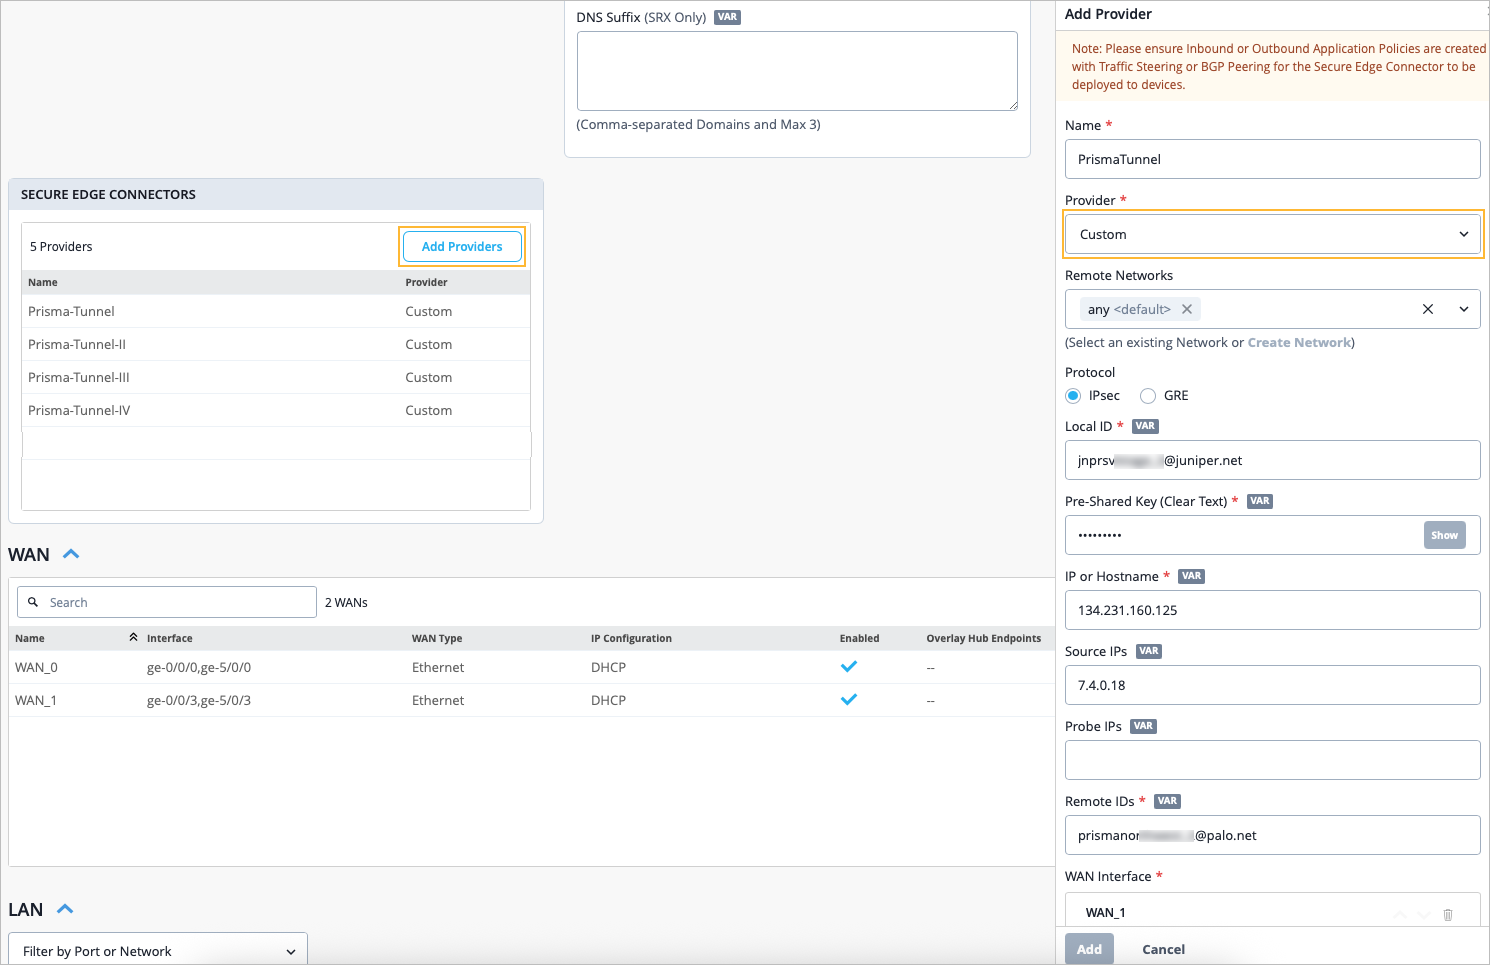
After adding the provider information, you must then create a traffic steering policy where you indicate the Prisma Provider you created. Once the traffic steering policy has been created, you must then create an application policy with that traffic steering policy assigned to it in order to specify the path that traffic is allowed to take.
When you assign a template integrated with a Prisma Access account to a site, a tunnel from the device to the closest network point of presence (POP) is brought up. Once integrated with Mist, you can view the Prisma Access events under WAN Edge Events on the WAN Edge Insights page for the WAN Edge device which has an IPsec tunnel configured to the Prisma Access cloud. A symbol will appear next to any Prisma Access events which you can hover over.
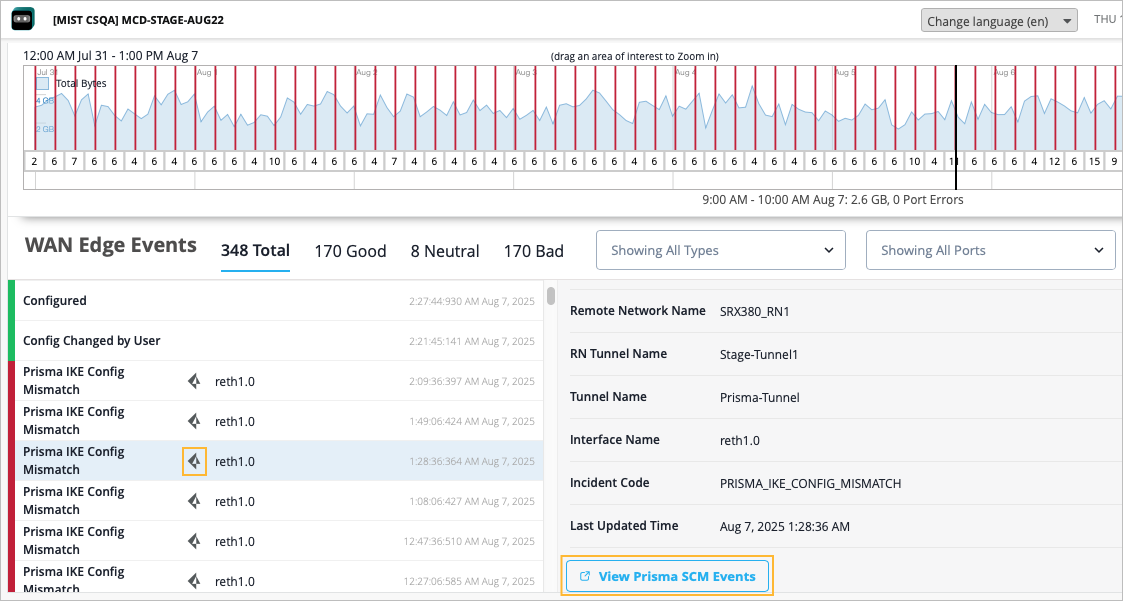
In addition, the Peer Path Stats charts on the WAN Edge Insights page display Prisma Access tunnel statistics.
We have updated the Mist API behavior for removing Mist Edge devices from an organization. Here are the updates:
The following API endpoint no longer deletes Mist Edge devices from an organization: PUT /api/v1/orgs/:org_id/inventory
Currently, this endpoint only removes other device types. If a device is assigned to a site, it will be unassigned from that site.
To delete a Mist Edge from an organization, use the following endpoint instead:
DELETE /api/v1/orgs/:org_id/mxedges/:mxedge_id
Currently, the following API requests return an unpaginated, full list of inventory devices.
GET /api/v1/orgs/:org_id/inventory
GET /api/v1/sites/:site_id/stats/devices
Starting in early 2026, these API requests will fetch paginated responses to limit the size of the response. By default, the API response will fetch the first 100 entries in the list. You can modify the number of entries in the response (range: 1 to 1000) by using the query parameter 'limit'.
Currently, if you query this API directly when you have more than 100 devices in your organization inventory, we recommend that you update the scripts to handle the paginated responses.
For more information, see Pagination.