Manage a Virtual Chassis Using Mist
Follow these steps to manage the members of a Virtual Chassis.
You can use the Modify Virtual Chassis option on the switch details page to manage your Virtual Chassis. The operations you can perform include renumbering and replacing the Virtual Chassis members and adding new members to a Virtual Chassis.
The Modify Virtual Chassis workflow leverages the Junos preprovisioning method which configures the role and serial number of all members in a Virtual Chassis.
The preprovisioned configuration specifies the chassis serial number, member ID, and role for both member switches in the Virtual Chassis. When a new member router joins the Virtual Chassis, Junos compares its serial number against the values specified in the preprovisioned configuration. Preprovisioning prevents any accidental role assignment to a Routing Engine, or any accidental addition of a new member to the Virtual Chassis. Role assignments, member ID assignments, and additions or deletions of members in Virtual Chassis are under the control of a preprovisioned configuration.
-
The Modify Virtual Chassis option is available:
-
To Super Users or Network Admins.
-
For switches that have their configuration managed by Mist.
-
-
This workflow applies to all the EX Series and QFX Series platforms that support Virtual Chassis.
- To delete a member whose MAC address is used as the Virtual Chassis device ID, trash and replace it with an existing member in the Virtual Chassis. To verify if any Virtual Chassis member is used as the device identifier, look for the device ID on the switch details page (Virtual Chassis page) or on the switch list.
- The Add Switch dropdown only shows the switches that:
- Are part of the same site. Models with dedicated Virtual Chassis ports can be in connected or disconnected state. However, to modify the EX2300, EX4650, or QFX5120 Virtual Chassis, the members should be in the connected state as these switches don’t have dedicated Virtual Chassis ports.
- Have configuration management enabled in Mist.
- Are not currently part of the same or another Virtual Chassis.
- Are of the same model family. For example, an EX4100-F switch can be part of a Virtual Chassis with an EX4100-48MP switch.
- The Modify Virtual Chassis button is disabled when the Configuration Management option is disabled for the switch.
- When a Virtual Chassis configuration is in progress, you cannot make any changes inside the Modify Virtual Chassis page.
Prerequisites
Before your perform any modification to a Virtual Chassis, you must remove all the
additional CLI commands specific to Virtual Chassis (the
virtual-chassis commands) from the associated device or site
template. The additional CLI commands take precedence over other types of
configurations. If a Virtual Chassis configuration is detected under the Additional
CLI Commands section, you cannot make any changes using the Modify
Virtual Chassis option. When you attempt to modify a Virtual
Chassis, the Mist dashboard displays a message to indicate that the Additional CLI
commands (if present) need to be removed and saved.
Before you modify an existing Virtual Chassis that uses a member MAC address as its device ID, we recommend converting it to use a virtual device ID. This makes managing the Virtual Chassis easier. For more information, refer to Convert a Virtual Chassis to Use a Virtual Device ID.
Convert a Virtual Chassis to Use a Virtual Device ID
When a Virtual Chassis device is represented in Mist by the MAC address of one of its member switches, managing it can become challenging. Especially, replacing or removing a member switch may cause inconsistencies in how the Virtual Chassis is represented, potentially disrupting connectivity.
Therefore, we recommend converting any existing Virtual Chassis device that uses the member 0 MAC address as its device ID to use a virtual device ID instead. Moving to a virtual device ID provides a consistent and centralized way to represent and manage a Virtual Chassis as a single logical entity, making future operations cleaner and more reliable.
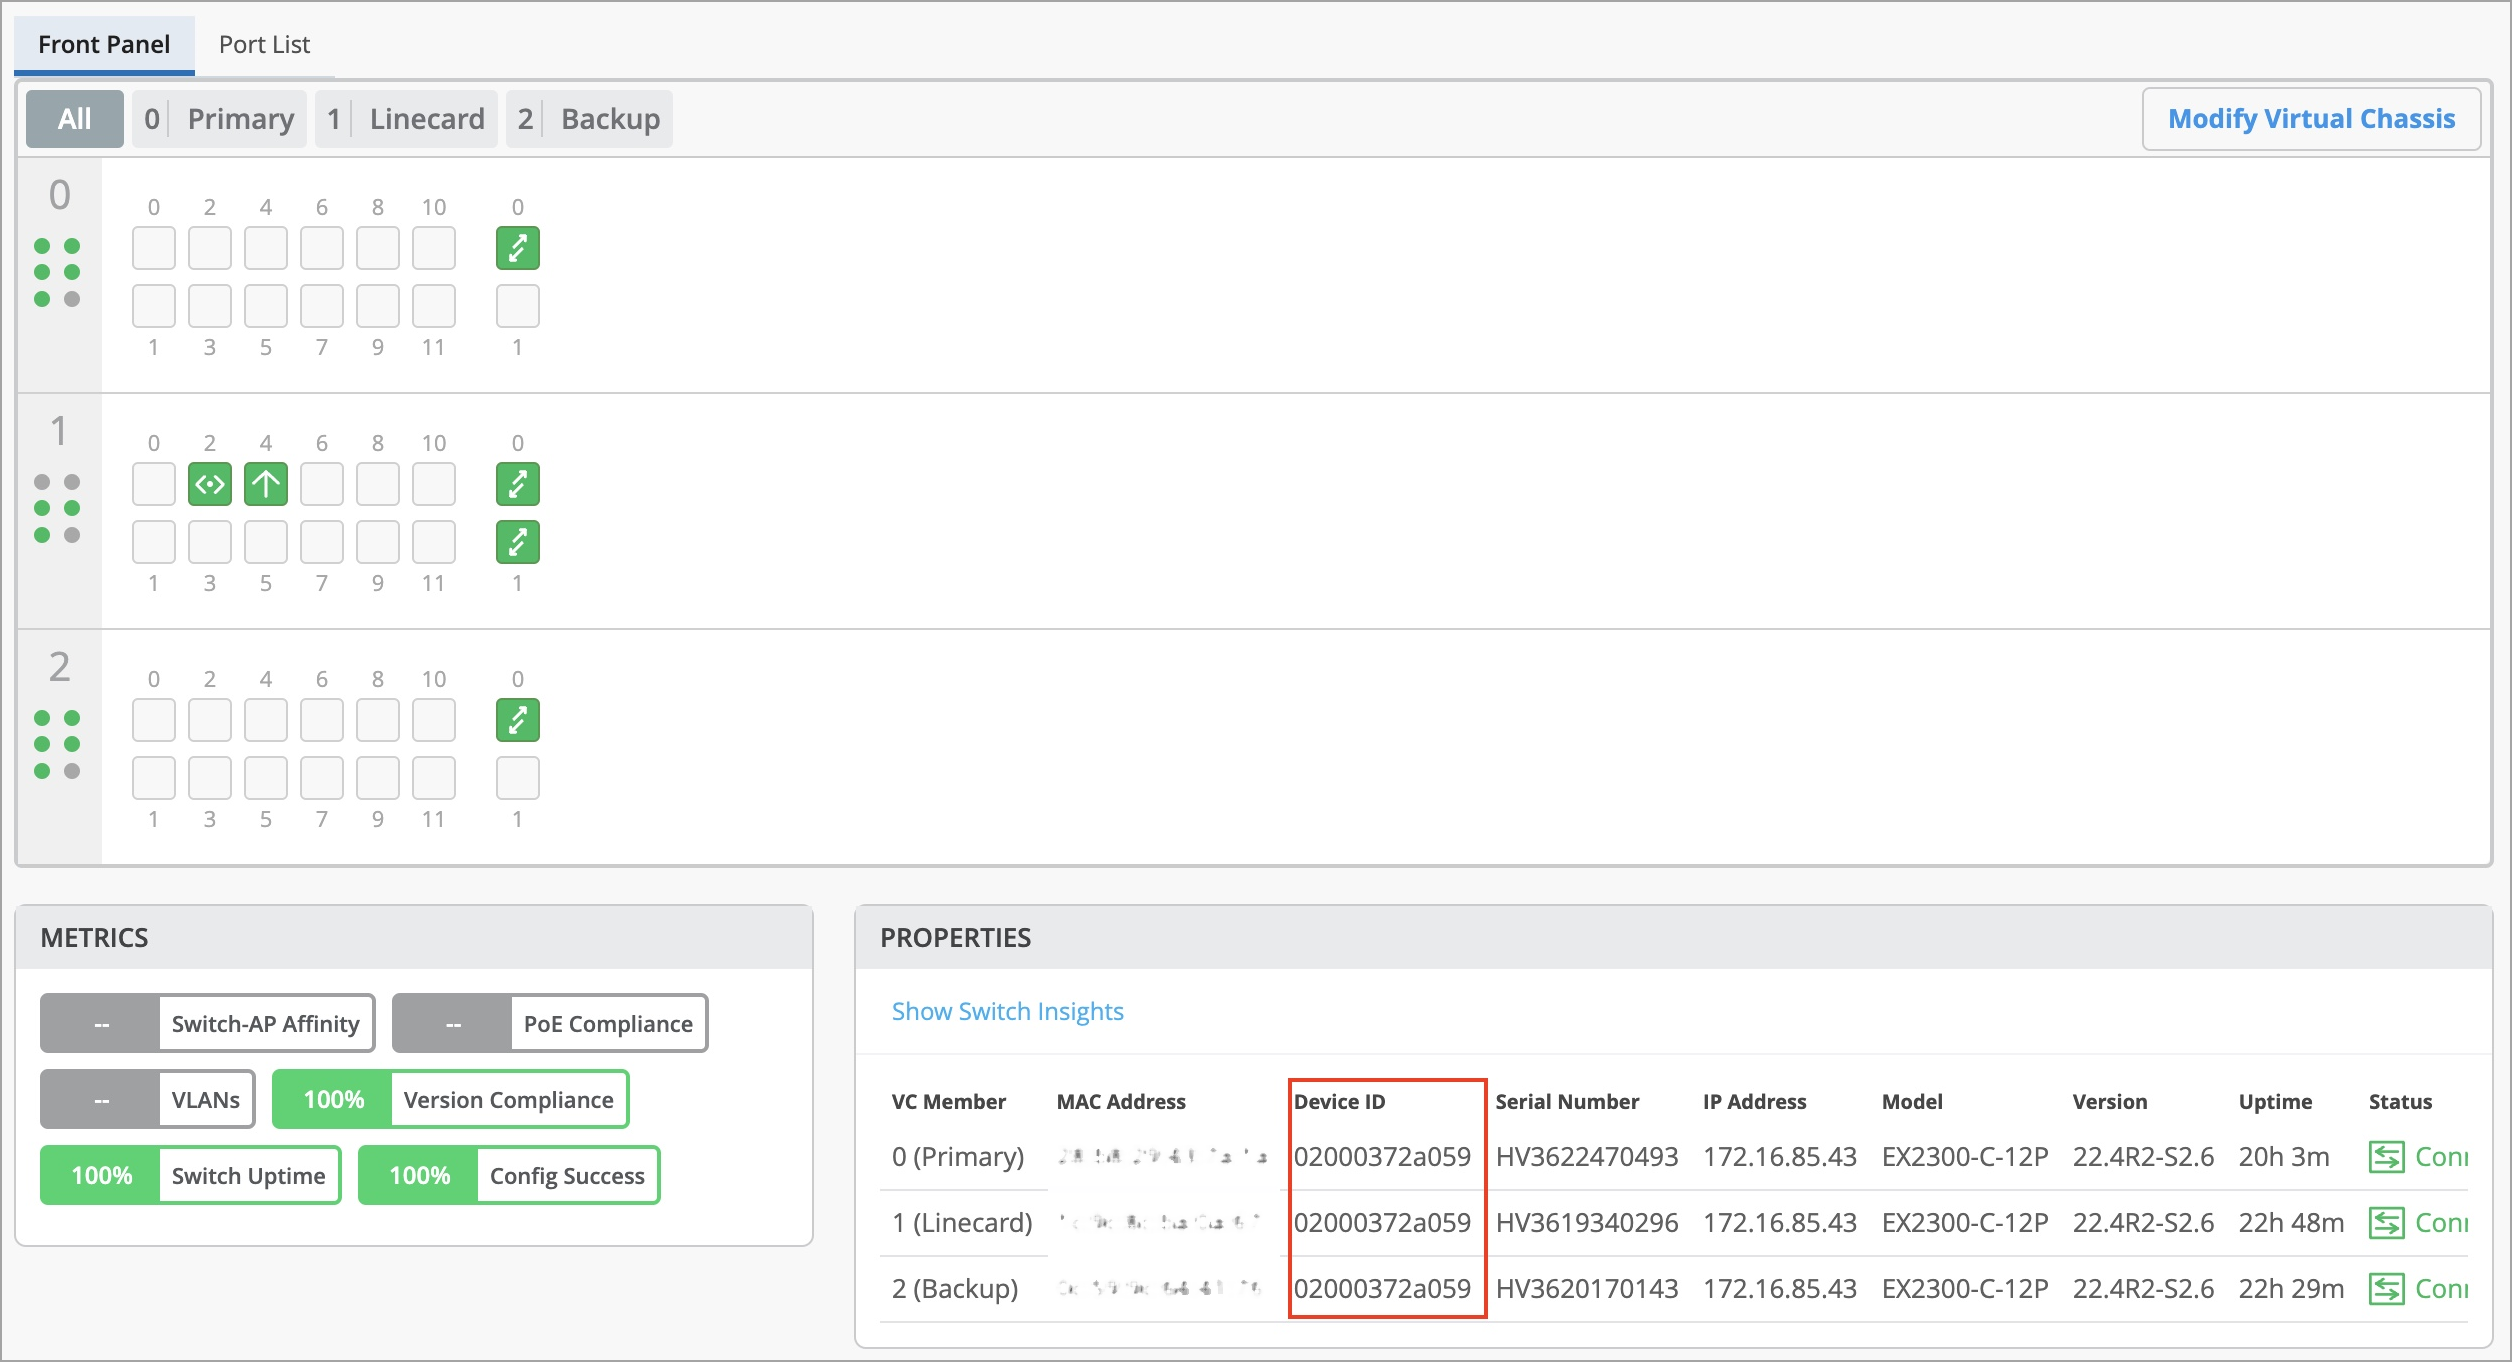
A virtual device ID starts with the value 0200. A device ID that starts with any other value is assumed to be based on a member MAC address.
You can convert a Virtual Chassis using the Mist portal or via API.
To convert a virtual chassis using the Mist portal:
Click Switches to go to the list of switches.
From the list of switches, identify the Virtual Chassis device which you want to convert.
Click the Virtual Chassis device to open it.
The Virtual Chassis details page (switch details page) appears.
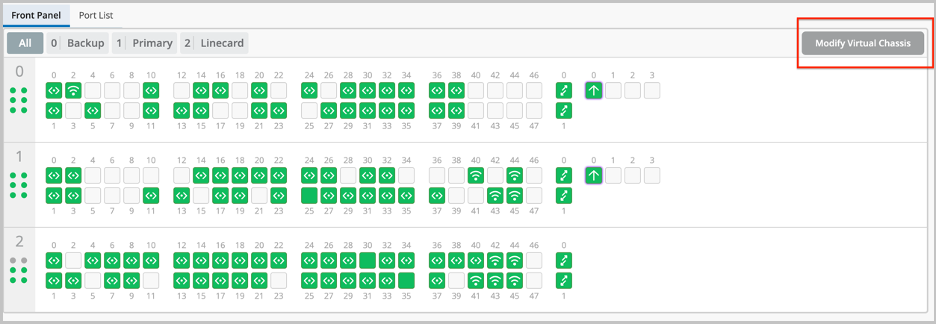
Click the Modify Virtual Chassis button on the upper right of the page.
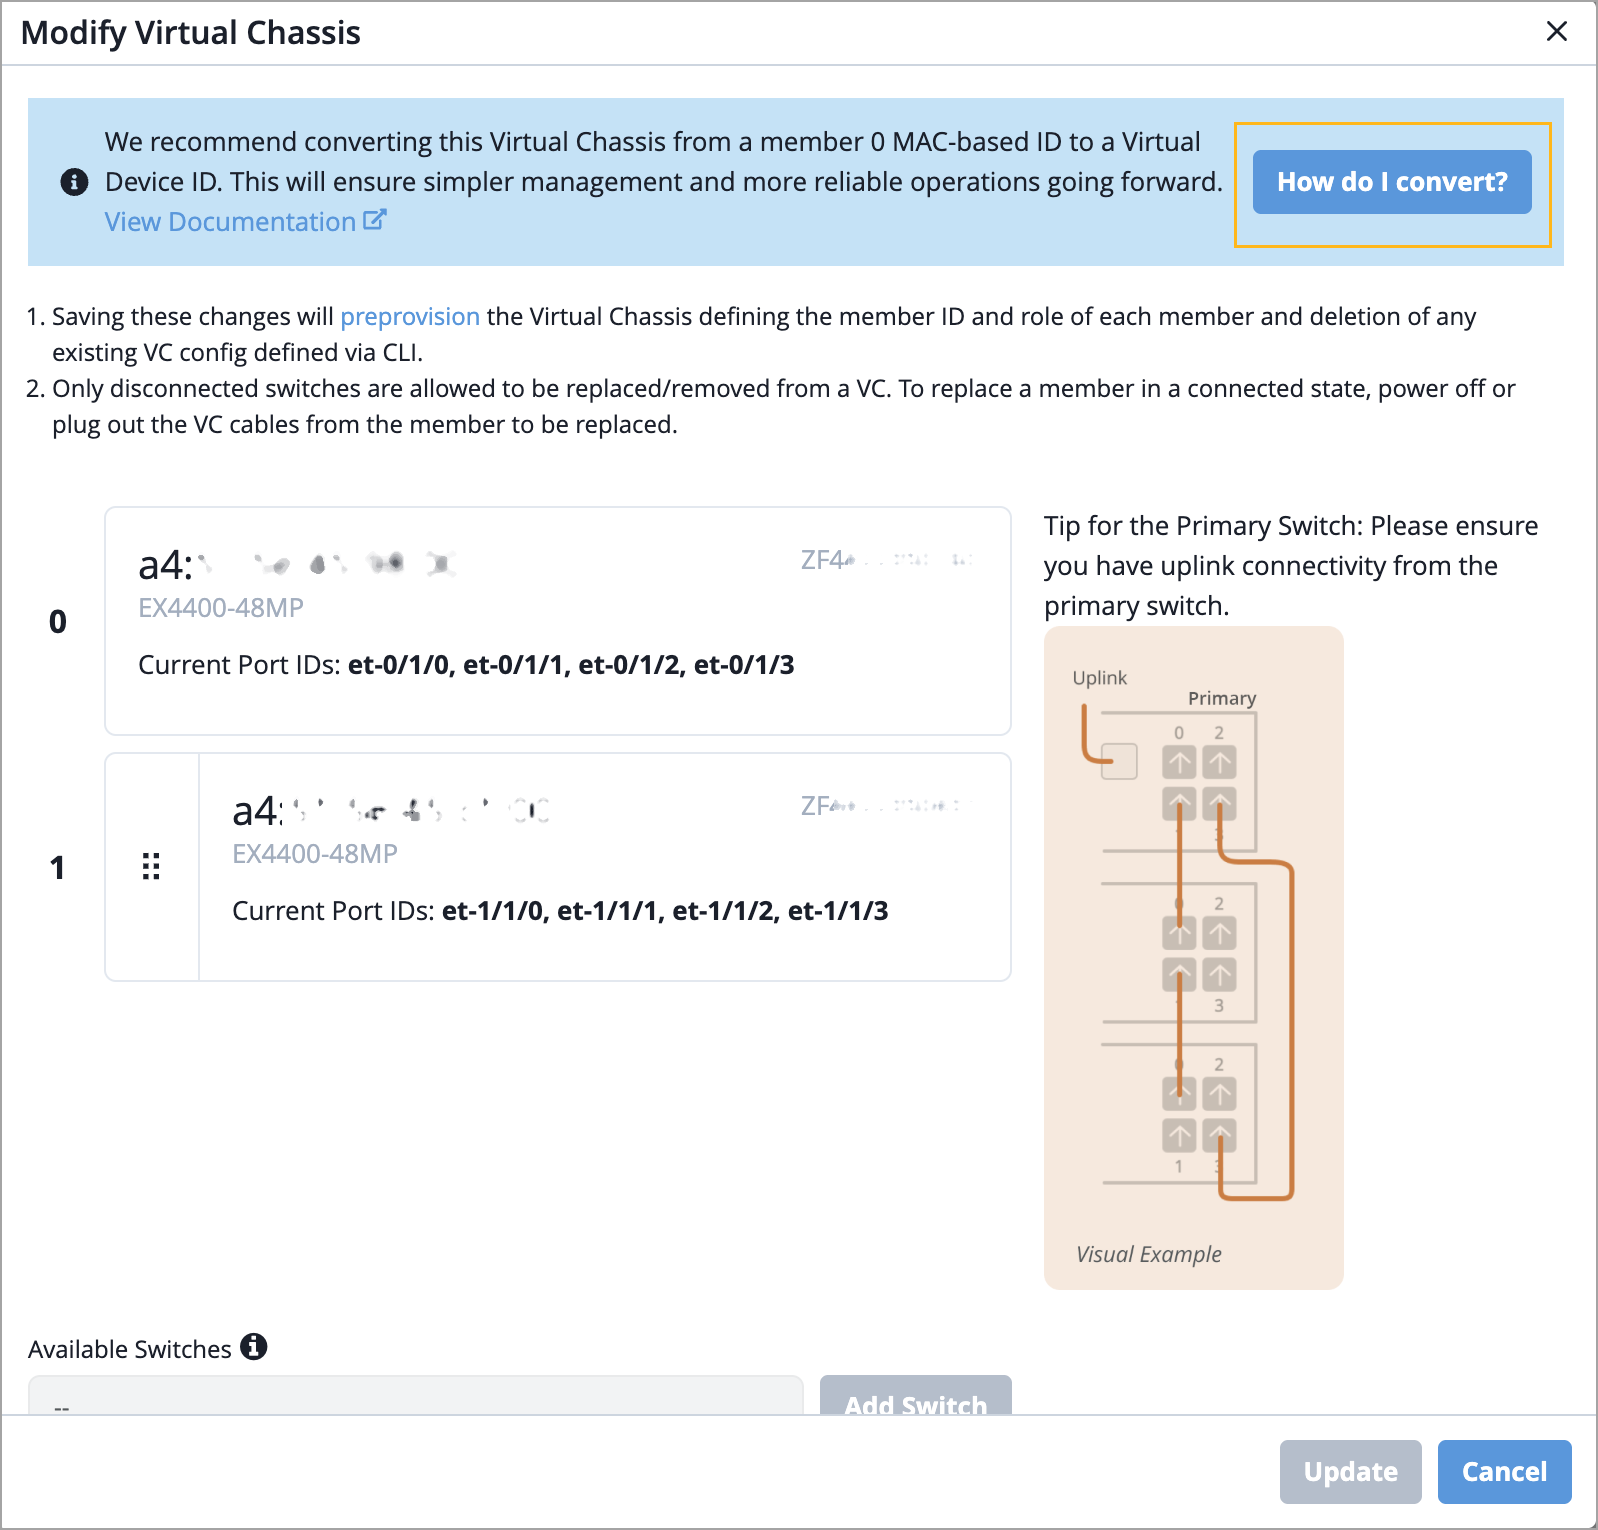
For a Virtual Chassis device that is using a MAC address-based device ID, the Modify Virtual Chassis page displays a banner message recommending that you convert the Virtual Chassis to use a virtual device ID instead.
Click the How do I convert? button on the right of the banner message.
Click Convert to initiate the conversion.
After conversion, you will be redirected to the switch list page. Following conversion, the existing Virtual Chassis device (represented by a member MAC) is disconnected from the Mist cloud, and a new device along with a virtual device ID is created and displayed. A virtual device ID typically starts with '0200'.
To convert a virtual chassis via API:
Following conversion, the existing Virtual Chassis device (represented by a member MAC) is disconnected from the Mist cloud, and a new device along with a virtual device ID is created and displayed. A virtual device ID typically starts with '0200'.
-
Converting a Virtual Chassis device to use a virtual device ID will permanently erase all the events and stats previously stored for this device in the Mist cloud.
-
The newly created Virtual Chassis may initially show as disconnected on the switch list page. However, within a few minutes, it will automatically reconnect and appear on the switch list as connected.
-
The conversion does not impact the data plane—switching functionality continues uninterrupted.
Replace a Virtual Chassis Member
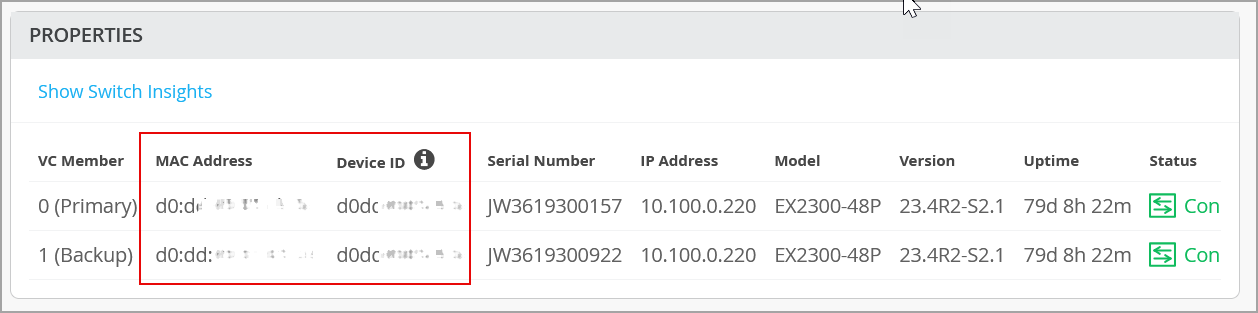
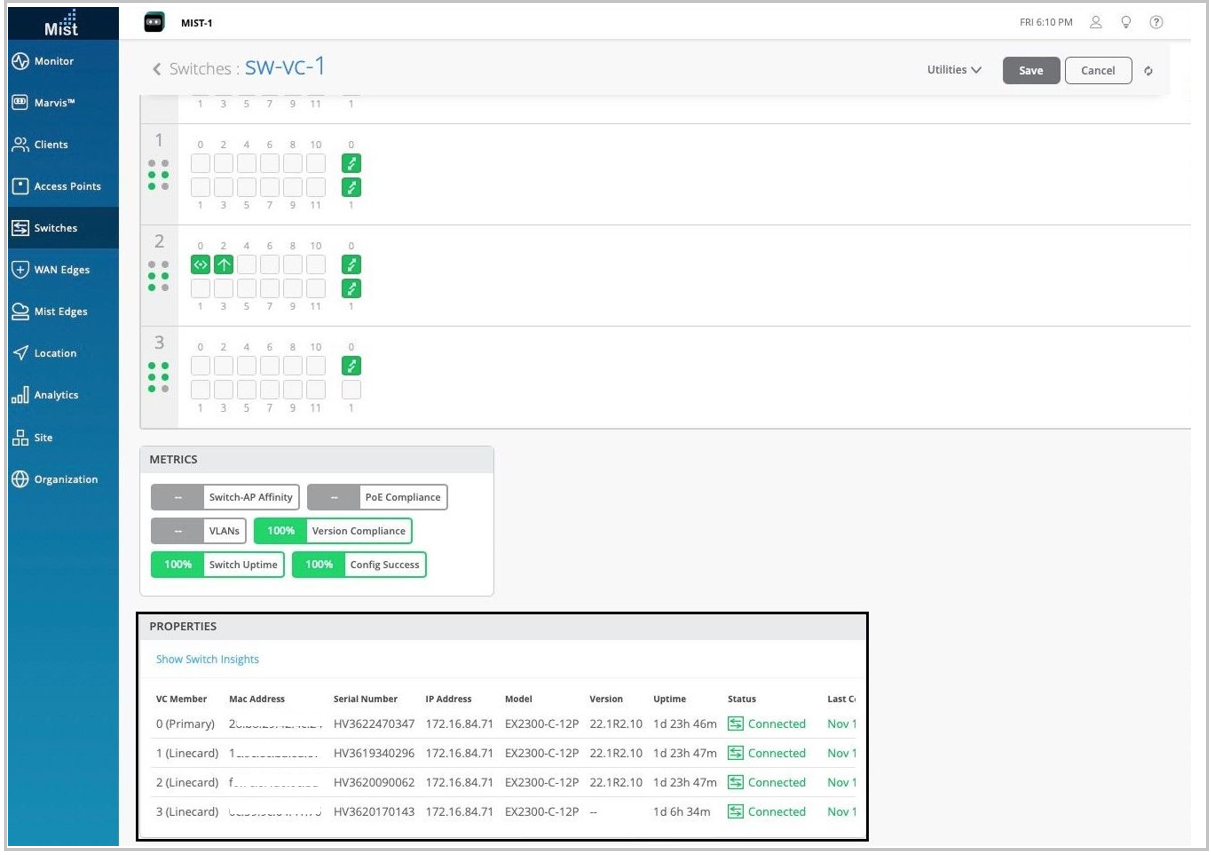
Instructions in this topic apply to any Virtual Chassis device that uses a virtual device ID, represented by a device ID starting with '0200', as shown in the image below. If the Virtual Chassis uses a member MAC address as its device identifier, you must follow the instructions in Replace a Member Whose MAC Address is Used as Virtual Chassis Device ID to avoid any connectivity disruptions during the process. You can find the device ID on the switch details page (Virtual Chassis page).
Replacing a Virtual Chassis member switch involves deleting the old member and adding a new member. Before replacing a member switch, you must ensure that:
- The new switch is of the same model family as the other members in the Virtual Chassis.
- The new switch is connected to the Virtual Chassis.
- The new switch is assigned to the same site as the other members in the Virtual Chassis.
To replace a Virtual Chassis member that has a device ID starting with '0200':
-
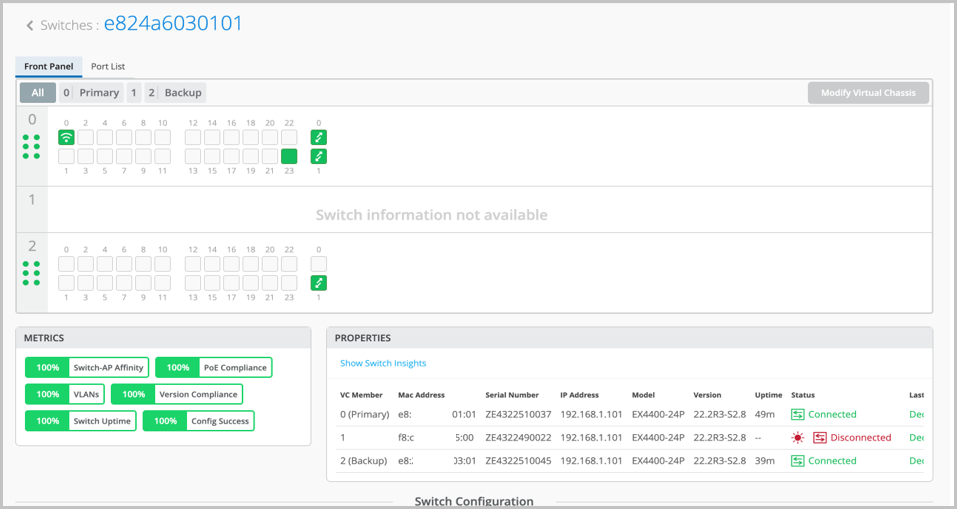
Wait for the switch details page to display the member switch to be
replaced as offline, as shown below:
-
Wait for Virtual Chassis formation to be complete.
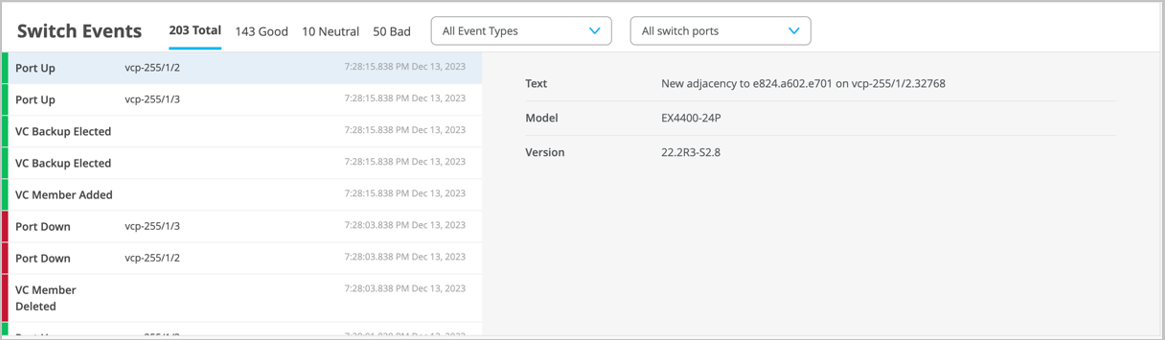
The Switch Events page displays all the Virtual Chassis update events.
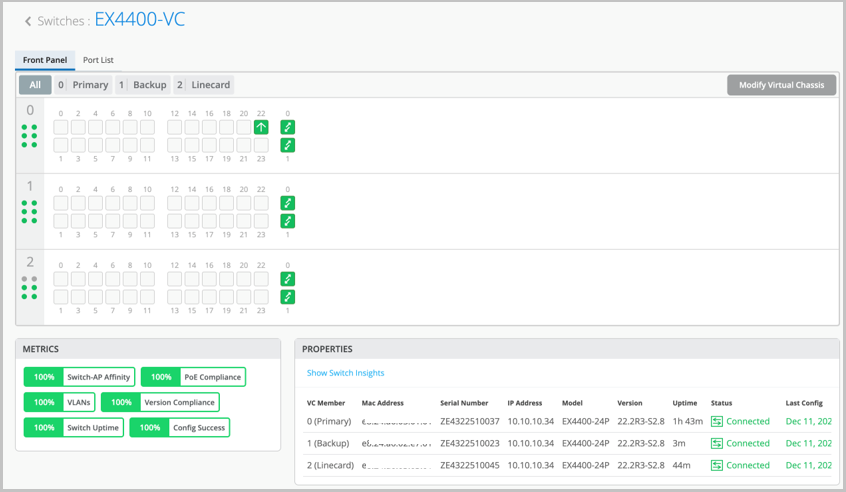
The switch details page displays the updated Virtual Chassis information.
Replace a Member Whose MAC Address is Used as Virtual Chassis Device ID
Before you attempt the steps in this section, we recommend converting any existing Virtual Chassis device that uses a member MAC address as its device ID to use a virtual device ID (for more information, refer to Convert a Virtual Chassis to Use a Virtual Device ID). This makes managing the Virtual Chassis device easier. To replace a member in a Virtual Chassis that is converted to use a virtual device ID, you must follow the steps in Replace a Virtual Chassis Member.
Instructions in this topic apply to any Virtual Chassis device that uses a member MAC address as its device identifier, as shown in the image below. If the Virtual Chassis that has a device ID starting with 0200, you must follow the instructions in Replace a Virtual Chassis Member to replace its members. You can find the device ID on the switch details page (Virtual Chassis page).
If a Virtual Chassis uses the MAC address of a member (typically the FPC0) as the device identifier, you cannot replace that member in a single operation as it is used to communicate to the Mist cloud. You need to carry out the replacement in a 2-step process that includes adding the new replacement switch and then removing the switch to be replaced. In such cases, you should carry out the member replacement operation in a maintenance window as this operation can impact the traffic to the clients connected.
Before replacing a member switch, you must ensure that:
- The new switch is of the same model family as the other members in the Virtual Chassis.
- The new switch is connected to the Virtual Chassis.
- The new switch is assigned to the same site as the other members in the Virtual Chassis.
-
The Virtual Chassis is pre-provisioned. For a 2-member VC, the split and merge feature is disabled by default (no-split-detection) if the Virtual Chassis is provisioned by the cloud.
To replace a member (FPC0, for example) whose MAC address is used as the Virtual Chassis device ID:
-
Move the FPC2 member to slot 0 (the FPC0 slot) by dragging and
dropping.
 Note:
Note:Ensure that no role change is performed.
Renumber the Virtual Chassis Members
If you prefer to see the Virtual Chassis members on the Mist portal in the same order as they are physically stacked, you need to reorder the switches (after they are powered on and connected to Virtual Chassis) using the Modify Virtual Chassis option.
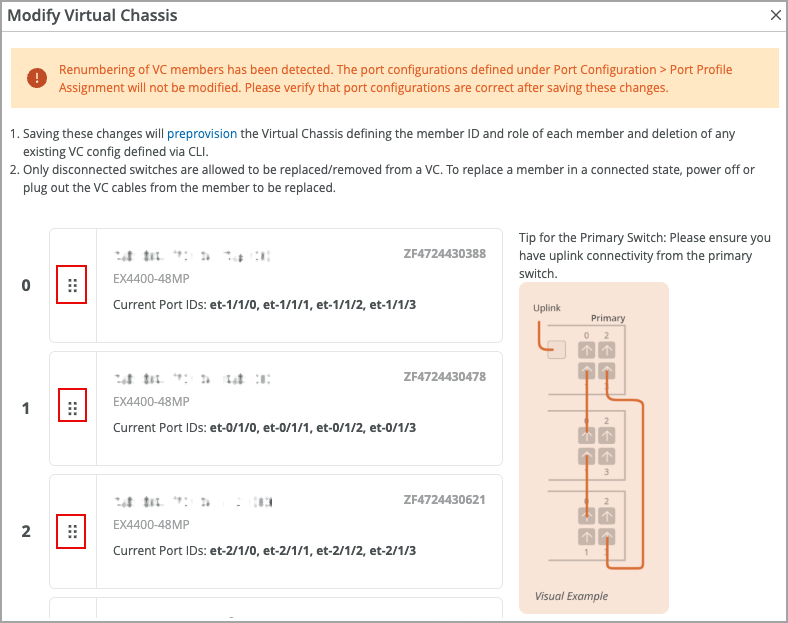
You can modify the member switches’ order on the Mist portal by renumbering the members. On the Modify Virtual Chassis window, accessible from the switch details page, you can move around the port panel of a switch to change the order of the member. The order is incremental. The first entry is member 0, the second is member 1, and so on. You are required to specify the FPC0.
To renumber the switches in a preprovisioned Virtual Chassis:
-
On the Modify Virtual Chassis screen, drag and drop the port panel of a
switch to different slots to change the switch number. The order is
incremental. The first entry is member 0, the second is member 1, and so on.
In the example below, the FPC1 has been renumbered as FPC2 and the FPC2 has
been renumbered as FPC1.
 Note:
Note:-
Within a Virtual Chassis that uses the MAC address of a member (typically FPC0) as the device identifier, you cannot renumber or move around that member unless it is disconnected.
-
Renumbering the members within a Virtual Chassis does not renumber the port configurations and port profile assignment. When you renumber a VC, Mist displays the following warning (as shown in the picture above): "Renumbering of VC members has been detected. The port configurations defined under Port Configuration > Port Profile Assignment will not be modified. Please verify that port configurations are correct after saving these changes."
So, ensure that these changes are taken care of before or after renumbering the members in the Virtual Chassis.
-
Reassign Virtual Chassis Member Roles
A Virtual Chassis configuration in a Juniper Mist™ network has two switches in the Routing Engine role - one in the primary Routing Engine role, and the other in the backup Routing Engine role. The remaining member switches operate in the linecard role.
To change the role of Virtual Chassis members:
-
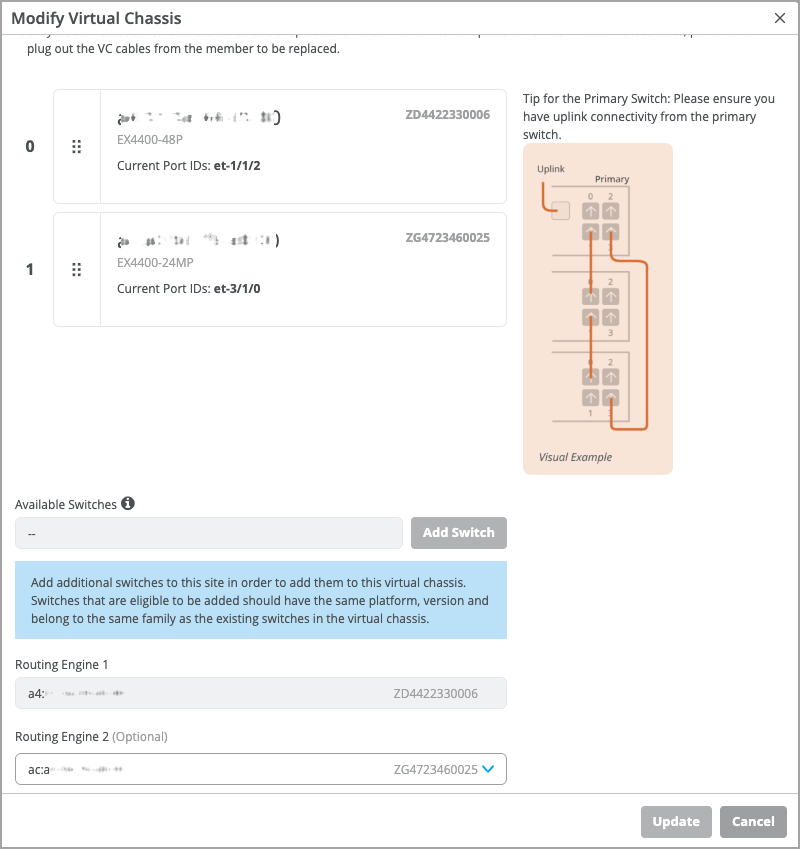
On the Modify Virtual Chassis screen, specify Routing Engine 1 or Routing
Engine 2. All the other switches assume a linecard role.
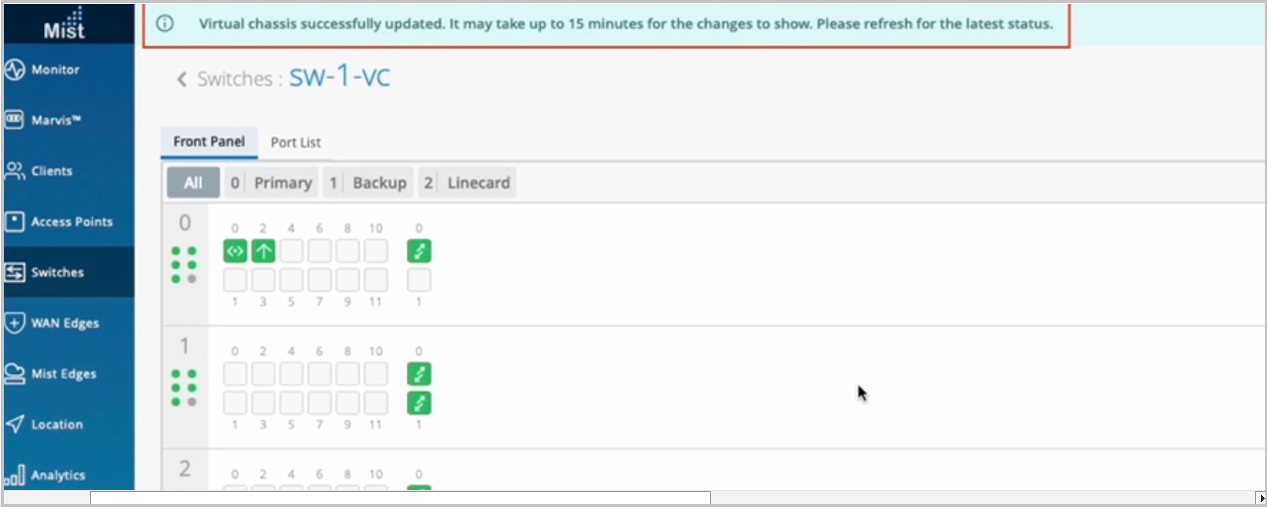
You will see the updated status about the role change on the switches page on the Mist portal. The role change will take some time (approximately 15 minutes) to appear on the Mist portal. You can see a banner message at the top after every change that you make, as shown below:
Delete Virtual Chassis Members
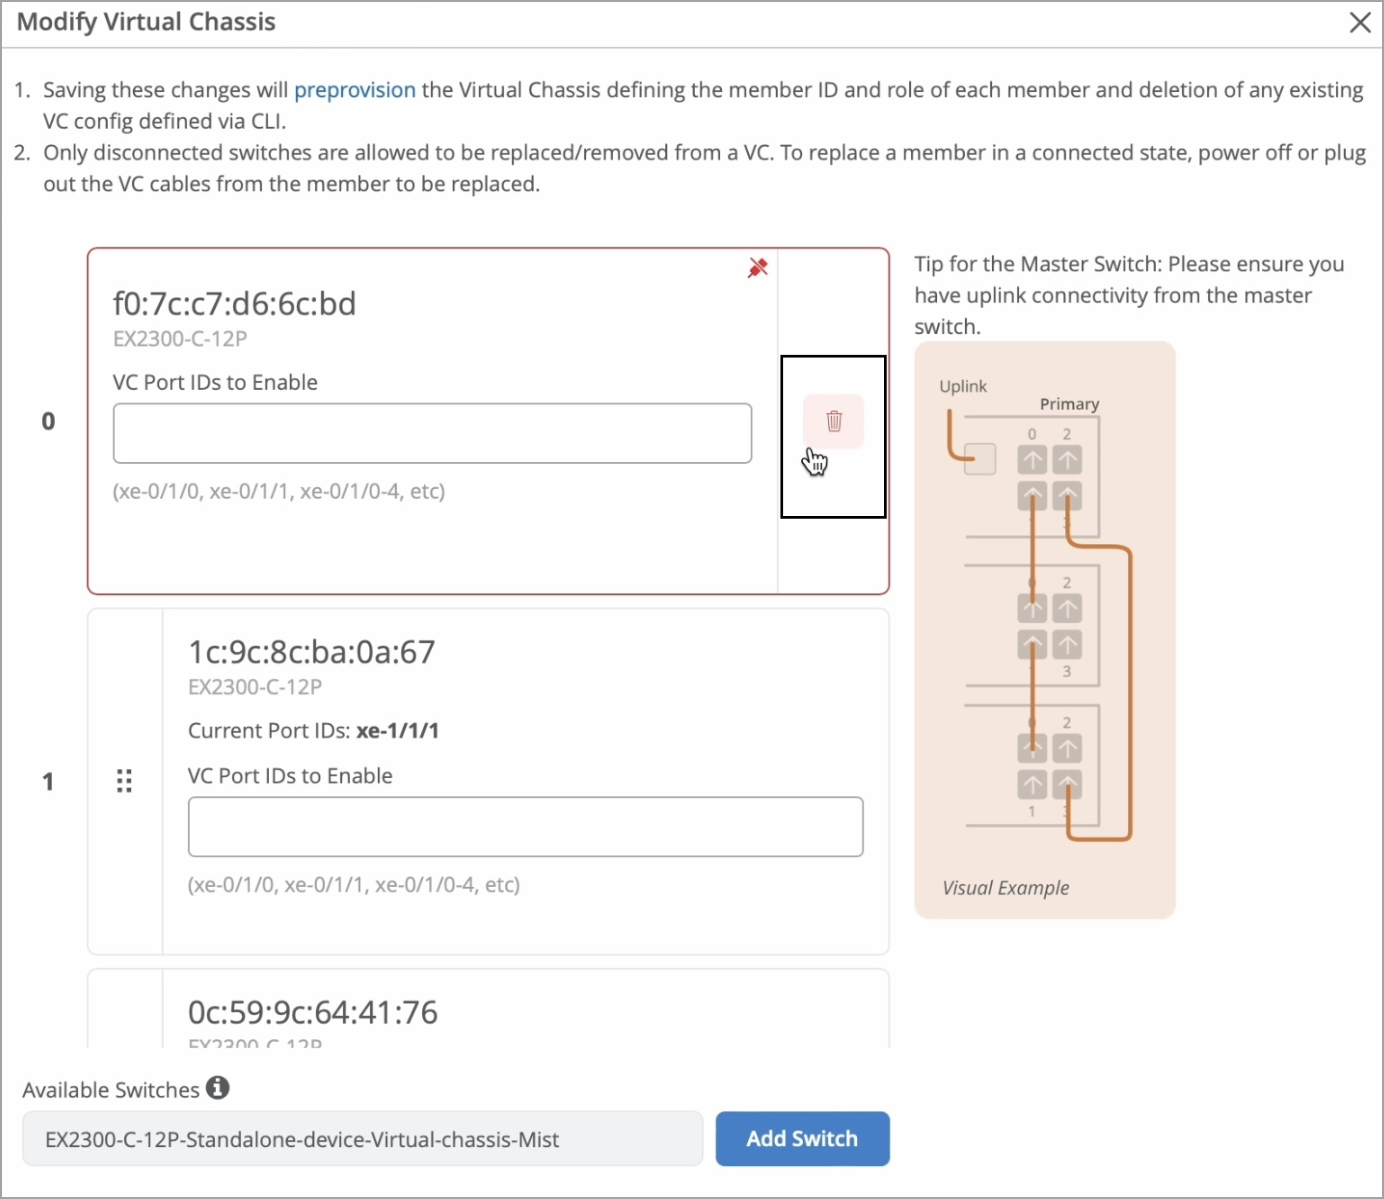
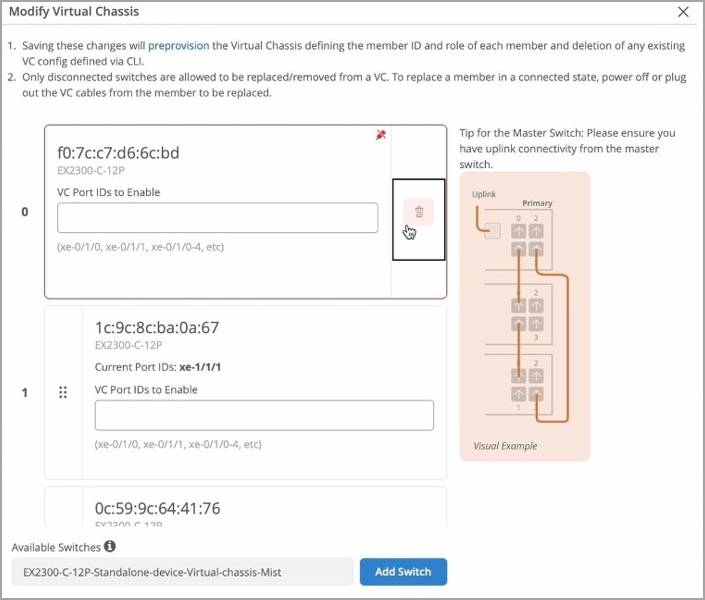
You can delete the member switches from the Virtual Chassis, by clicking the delete (trash) icon on the Modify Virtual Chassis window. Before deleting any member switch, you must ensure that the switch to be removed is disconnected from the Virtual Chassis. If the switch is connected, power it off or remove the VCP connection from it.
To delete a member switch from Virtual Chassis:
-
Click the delete icon.
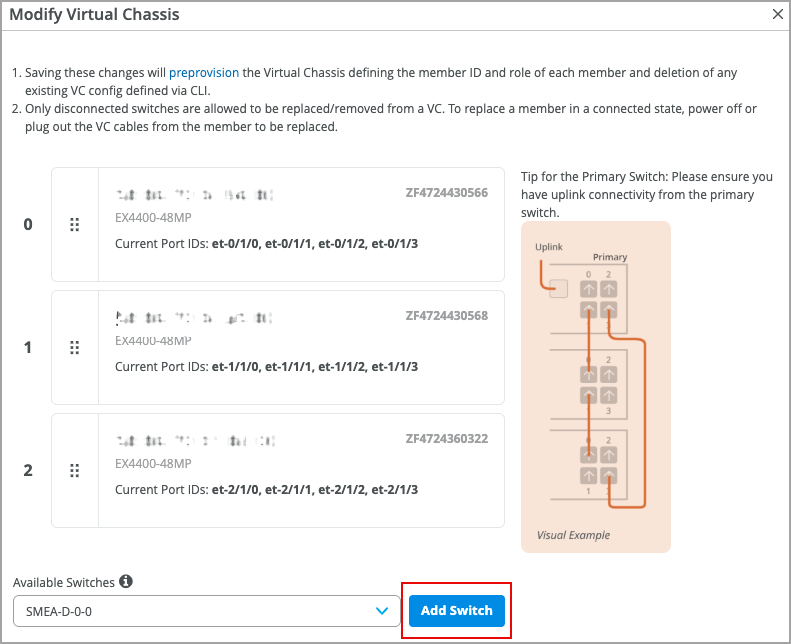
Add a Member Switch to a Virtual Chassis
You can add one or more member switches to a Virtual Chassis from the Modify Virtual Chassis window. Before adding a new member switch to a Virtual Chassis, ensure the following:
- The new switch is of the same model family as the other members in the Virtual Chassis.
- The new switch is connected to the network (applicable to EX2300, EX4650, and QFX5120).
- The new switch is assigned to the same site as the other members in the Virtual Chassis.
Juniper Mist automatically upgrades a Virtual Chassis linecard member if it is running a Junos version different from that of the primary member. The linecard member will be upgraded to the same version as the primary member if the following conditions are met:
-
The switch must form a Virtual Chassis with three or more members—that is, a primary, a backup, and a linecard member.
-
The Junos version on the linecard member is different from that on the primary member.
-
The linecard member must be in Inactive state.
Note that a linecard member will be upgraded only if it is inactive and running a clearly different Junos version. Minor differences, such as different spin numbers, will not trigger an upgrade.
-
Only the Junos versions listed on the Mist portal are available for upgrade.
To add a new member switch to the Virtual Chassis:
-
On the Modify Virtual Chassis window, click Add
Switch.
-
Connect the VCPs as specified on the Modify Virtual Chassis window and wait
for 3 to 5 minutes for virtual chassis to be updated.
While the Virtual Chassis is forming, the switches page displays the status as 'VC Forming'.

After Mist updates the Virtual Chassis, the switch details page displays the front panel of all the three Virtual Chassis members.
Preprovision a Virtual Chassis
Before modifying any Virtual Chassis, we recommend that you ensure it is preprovisioned.
The preprovisioned configuration specifies the chassis serial number, member ID, and role for the member switches in a Virtual Chassis. When a new member router joins the Virtual Chassis, Junos compares its serial number against the values specified in the preprovisioned configuration. Preprovisioning prevents any accidental role assignments, or the accidental addition of a new member to the Virtual Chassis. Each role, member ID, addition or removal of members, is under the control of the configuration.
To preprovision a Virtual Chassis:
Initiate Routing Engine Switchover
You can manually initiate Routing Engine switchover in a Virtual Chassis.
In a Virtual Chassis, one member switch is assigned the primary role and hosts the primary Routing Engine. Another member switch is assigned the backup role and hosts the backup Routing Engine. Routing Engine switchover enables the system to transition control from the primary Routing Engine to the backup Routing Engine.
To perform Routing Engine switchover:
You will see the updated status about the Routing Engine switchover on the switch details page. This operation takes some time (approximately 15 minutes) to complete.