Upgrade Switch Firmware
You can either manually upgrade switches and Virtual Chassis in a site, or schedule or automate upgrades across multiple sites in your organization.
Wired Assurance is not compatible with Junos Flex images. To ensure that only a standard Junos image is deployed, we recommend that you upgrade switches through the Mist portal.
Supported Devices and Available Versions
The Mist portal allows you to upgrade the following switch firmware:
-
Junos OS on EX2300, EX3400, EX4000, EX4100, EX4100-F, EX4300-P, EX4300-MP, EX4400, EX4600, EX4650, EX9200, QFX5110, QFX5120, and EX Series Virtual Chassis platforms.
-
AOS-CX on CX 5420, CX 6300F, CX 6300M, CX 6405, CX 6410, and Virtual Switching Framework (VSF) platforms.
Juniper Mist does not support nonstop software upgrade (NSSU).
For both standard EOL and EEOL releases, you can upgrade to the next three subsequent releases or downgrade to the previous three releases.
For example, you can upgrade from Junos OS release 21.2 to the next three releases—21.3, 21.4 and 22.1—or downgrade to the previous three releases—21.1, 20.4 and 20.3.
For EEOL releases, you have an additional option—you can upgrade directly from one EEOL release to the next two subsequent EEOL releases, even if the target release is beyond the next three releases. Likewise, you can downgrade directly from one EEOL release to the previous two EEOL releases, even if the target release is beyond the previous three releases. For example, 21.2 is an EEOL release. Hence, you can upgrade from 21.2 to the next two EEOL releases —21.4 and 22.2—or downgrade to the previous two EEOL releases—20.4 and 20.2. Check Junos OS Dates and Milestones to see whether a release has reached EEOL.
For more information about Junos releases, consult these topics:
-
Knowledge Base (Log in, and then search by service release number.)
Free Up Storage Space on Your Switch (EX and QFX Series Switches)
When you initiate a switch upgrade process, Juniper Mist™ runs the request system
storage cleanup command on the switch before copying the software image. This
process mostly ensures the availability of storage space to accommodate the software image
in the /var/tmp folder on the switch. However, in the case of some switches, such as
EX2300 and EX3400, the request system storage cleanup command doesn't
clear the required space. In this case, you will need to free up more space.
-
To perform the steps listed in this topic, you must have the root password configured in the site settings on the Organization > Site Configuration page of the Juniper Mist portal.
-
Perform the steps listed in this topic only if your switch doesn't have the required space for the upgrade.
To free up storage space on your switch:
In the case of a Virtual Chassis upgrade, the preceding steps free up the space only on the primary member (member 0). You also need to initiate a session with each of the other FPC members (such as member 1 and member 2) and repeat the storage cleanup steps. See the following example:
user@Mist_Sw> request session member 1
Last login: Tue Feb 16 00:42:30 from 13.56.90.212...

mist@Mist_Sw> start shell user root
Password:

user@mist_sw:RE:0% df -h
Filesystem          Size    Used      Avail     Capacity     Mounted on
/dev/md0.uzip        22M     22M         0B         100%        /
devfs               1.0K    1.0K         0B         100%        /dev
/dev/gpt/junos      1.3G    916M       340M          73%        /.mount
...output truncated...
Upgrade Switches in a Site Manually
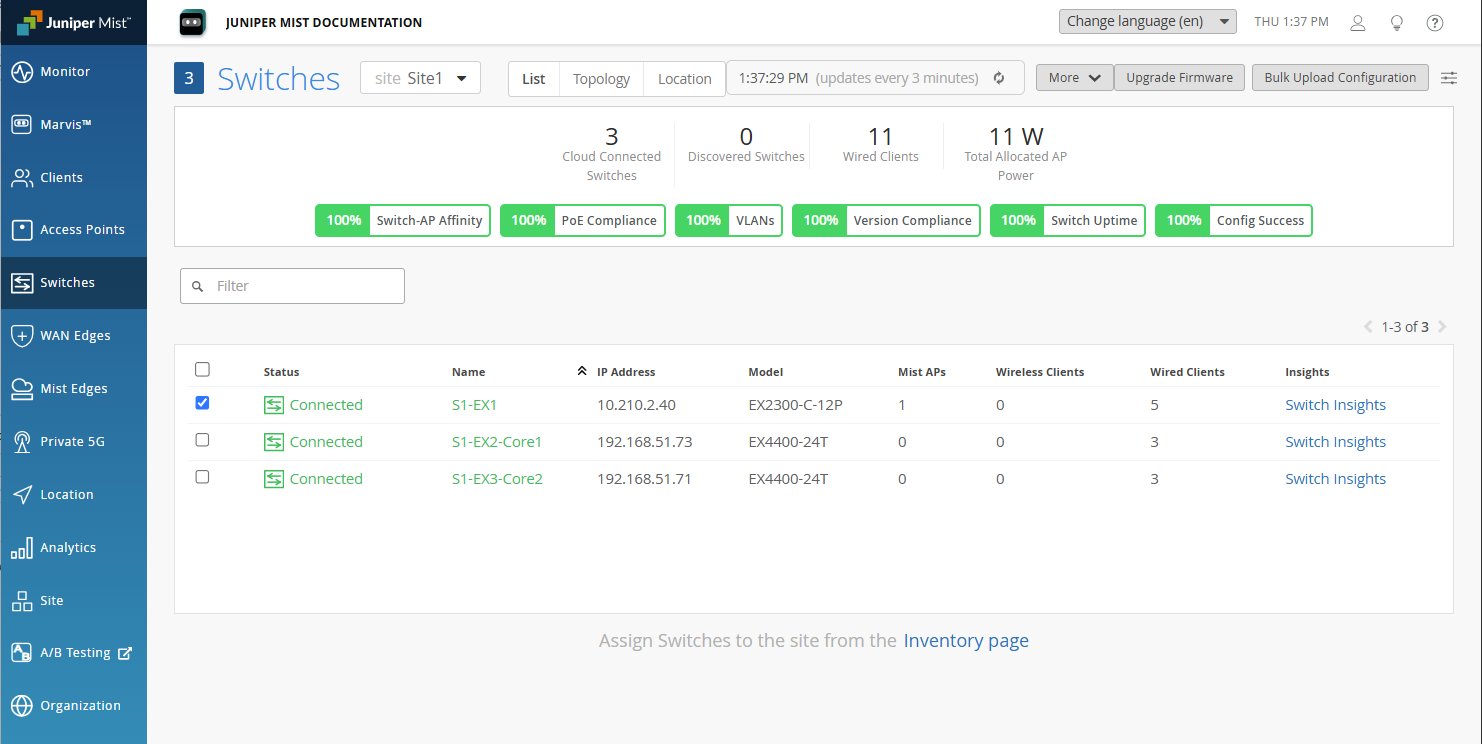
Users with Super User or Network Admin privileges for the site can manually upgrade firmware on switches or Virtual Chassis by selecting them from the switch list and clicking the Upgrade Firmware button.
The switch should be under warranty, have an active maintenance contract, and an active software subscription. In addition, please be sure the switch has the following:
-
The storage space required to accommodate the new image.
-
A stable SSH connection to the Mist cloud.
To upgrade the firmware on your switch:
-
From the List tab, select the switch that requires a software
upgrade, and then click Upgrade Firmware. You can select one or
more switches for upgrade.
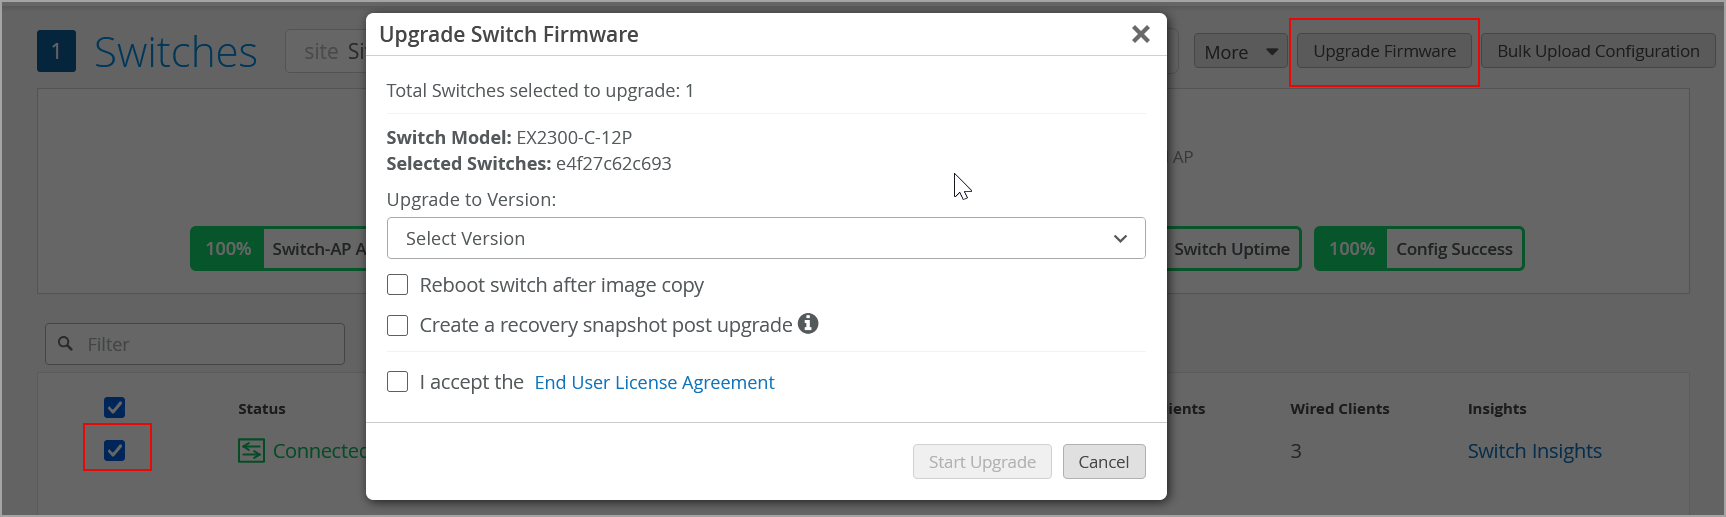
The following image
shows an example of an EX Series switch upgrade.
Alternatively, you can also upgrade the switch by using the Upgrade Firmware option on the Utilities drop-down list on the switch details page (see Switch Details).
-
Select the Reboot switch after image copy check box if you want the switch to
reboot automatically after the image copy procedure is complete. If you select this
option, the switch boots up with the new image. If you do not select this option, the
switch remains in a state of pending reboot. In this case, do the following to complete
the upgrade:
-
Click Switches > Switch Name to navigate to the switch details page.
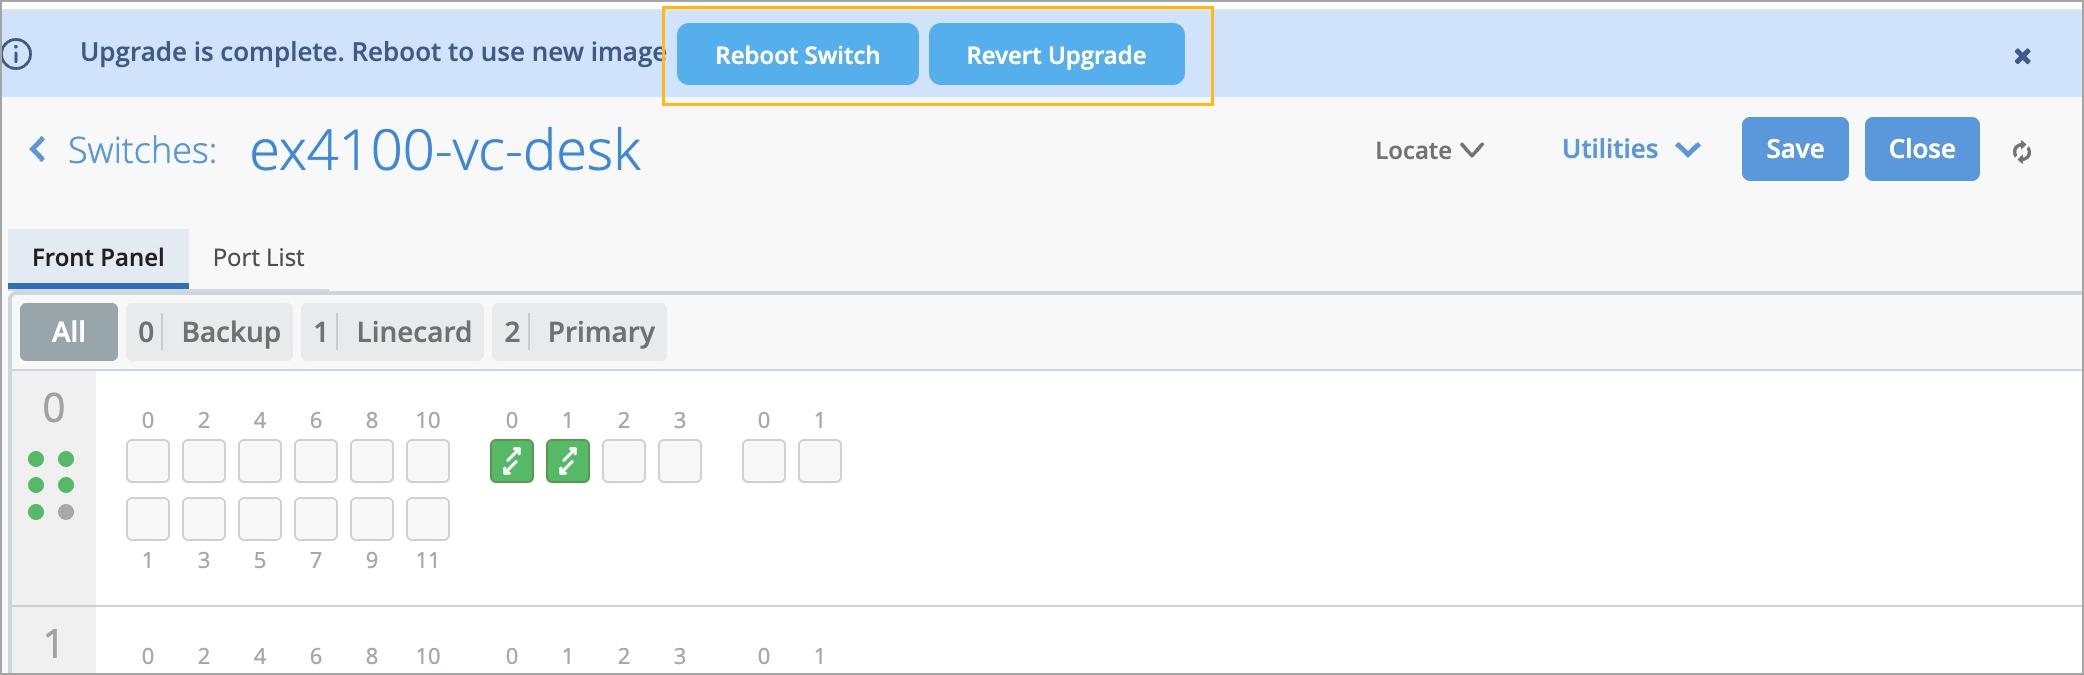
Reboot the switch by clicking the Reboot option displayed at the top of the page. Or, click Utilities > Reboot Switch to initiate a reboot.
Depending on the switch model, the switch details page may provide options to either reboot the switch or revert the upgrade. If you choose not to proceed with the upgrade, you can revert it. Note that the revert option is only available until the switch is rebooted.
-
Once the upgrade starts, the Status column in the switch list view shows the switch status as Upgrading. The column also shows the progress of the upgrade.
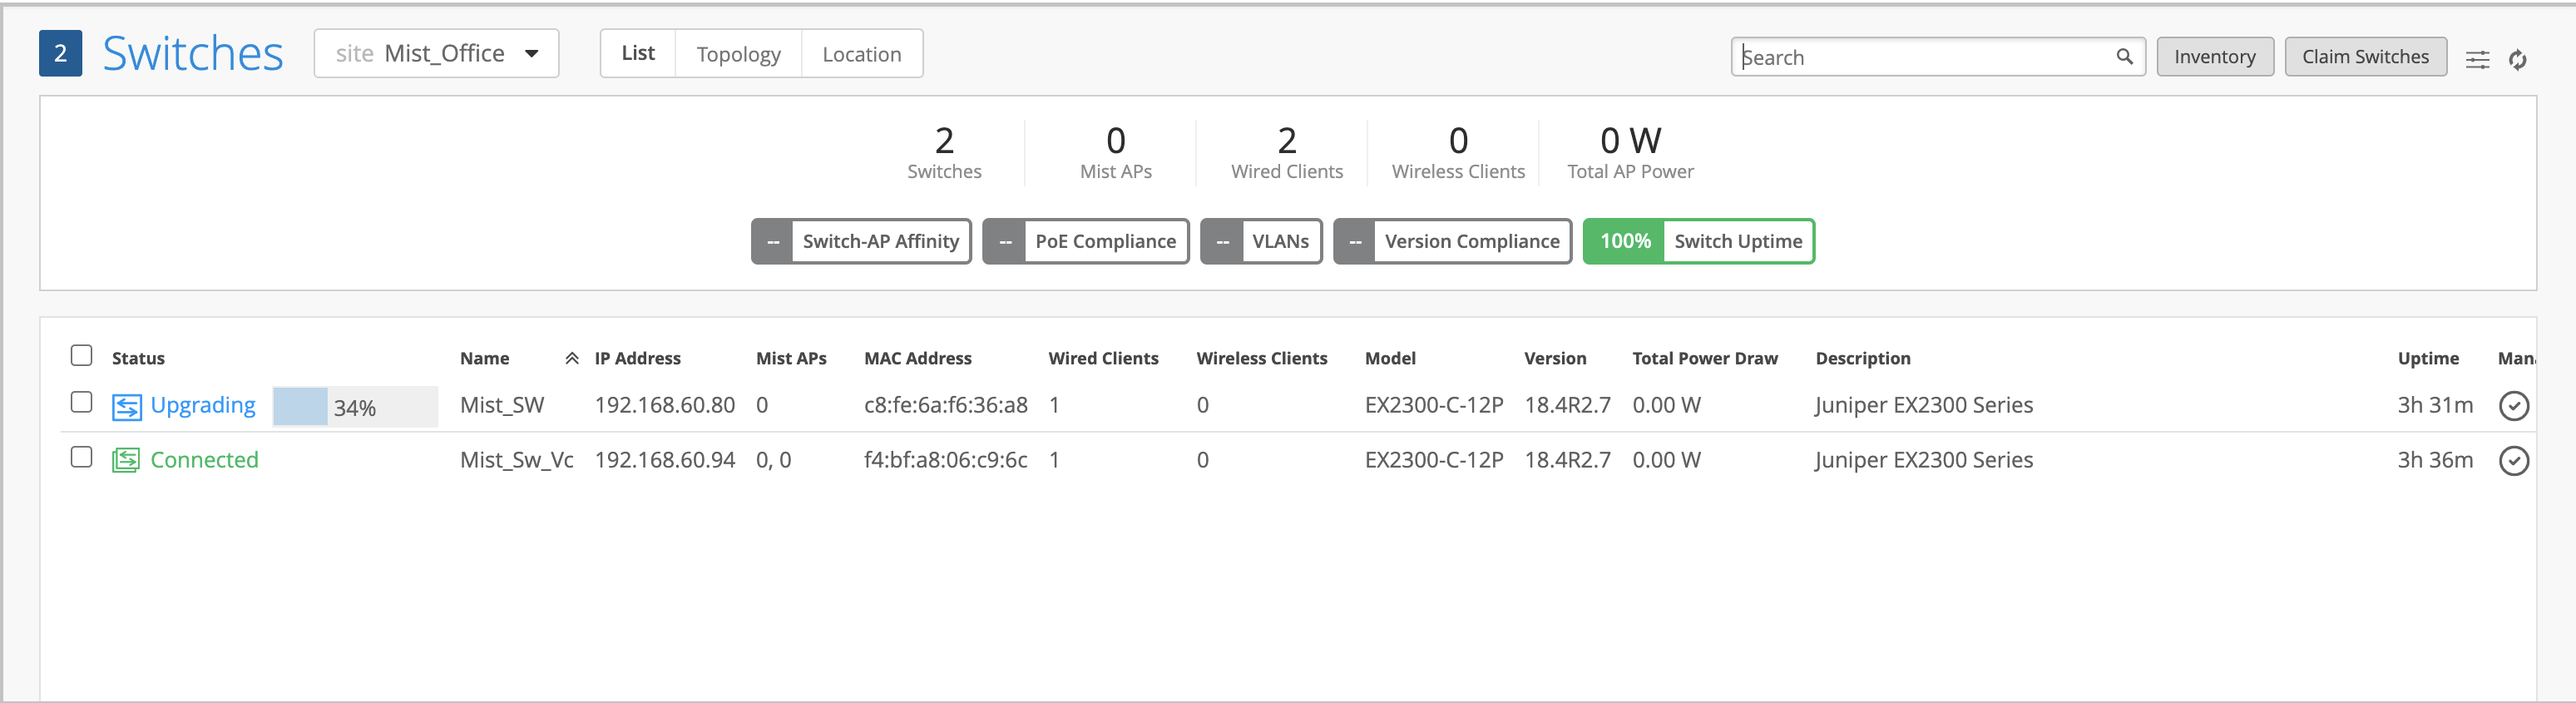
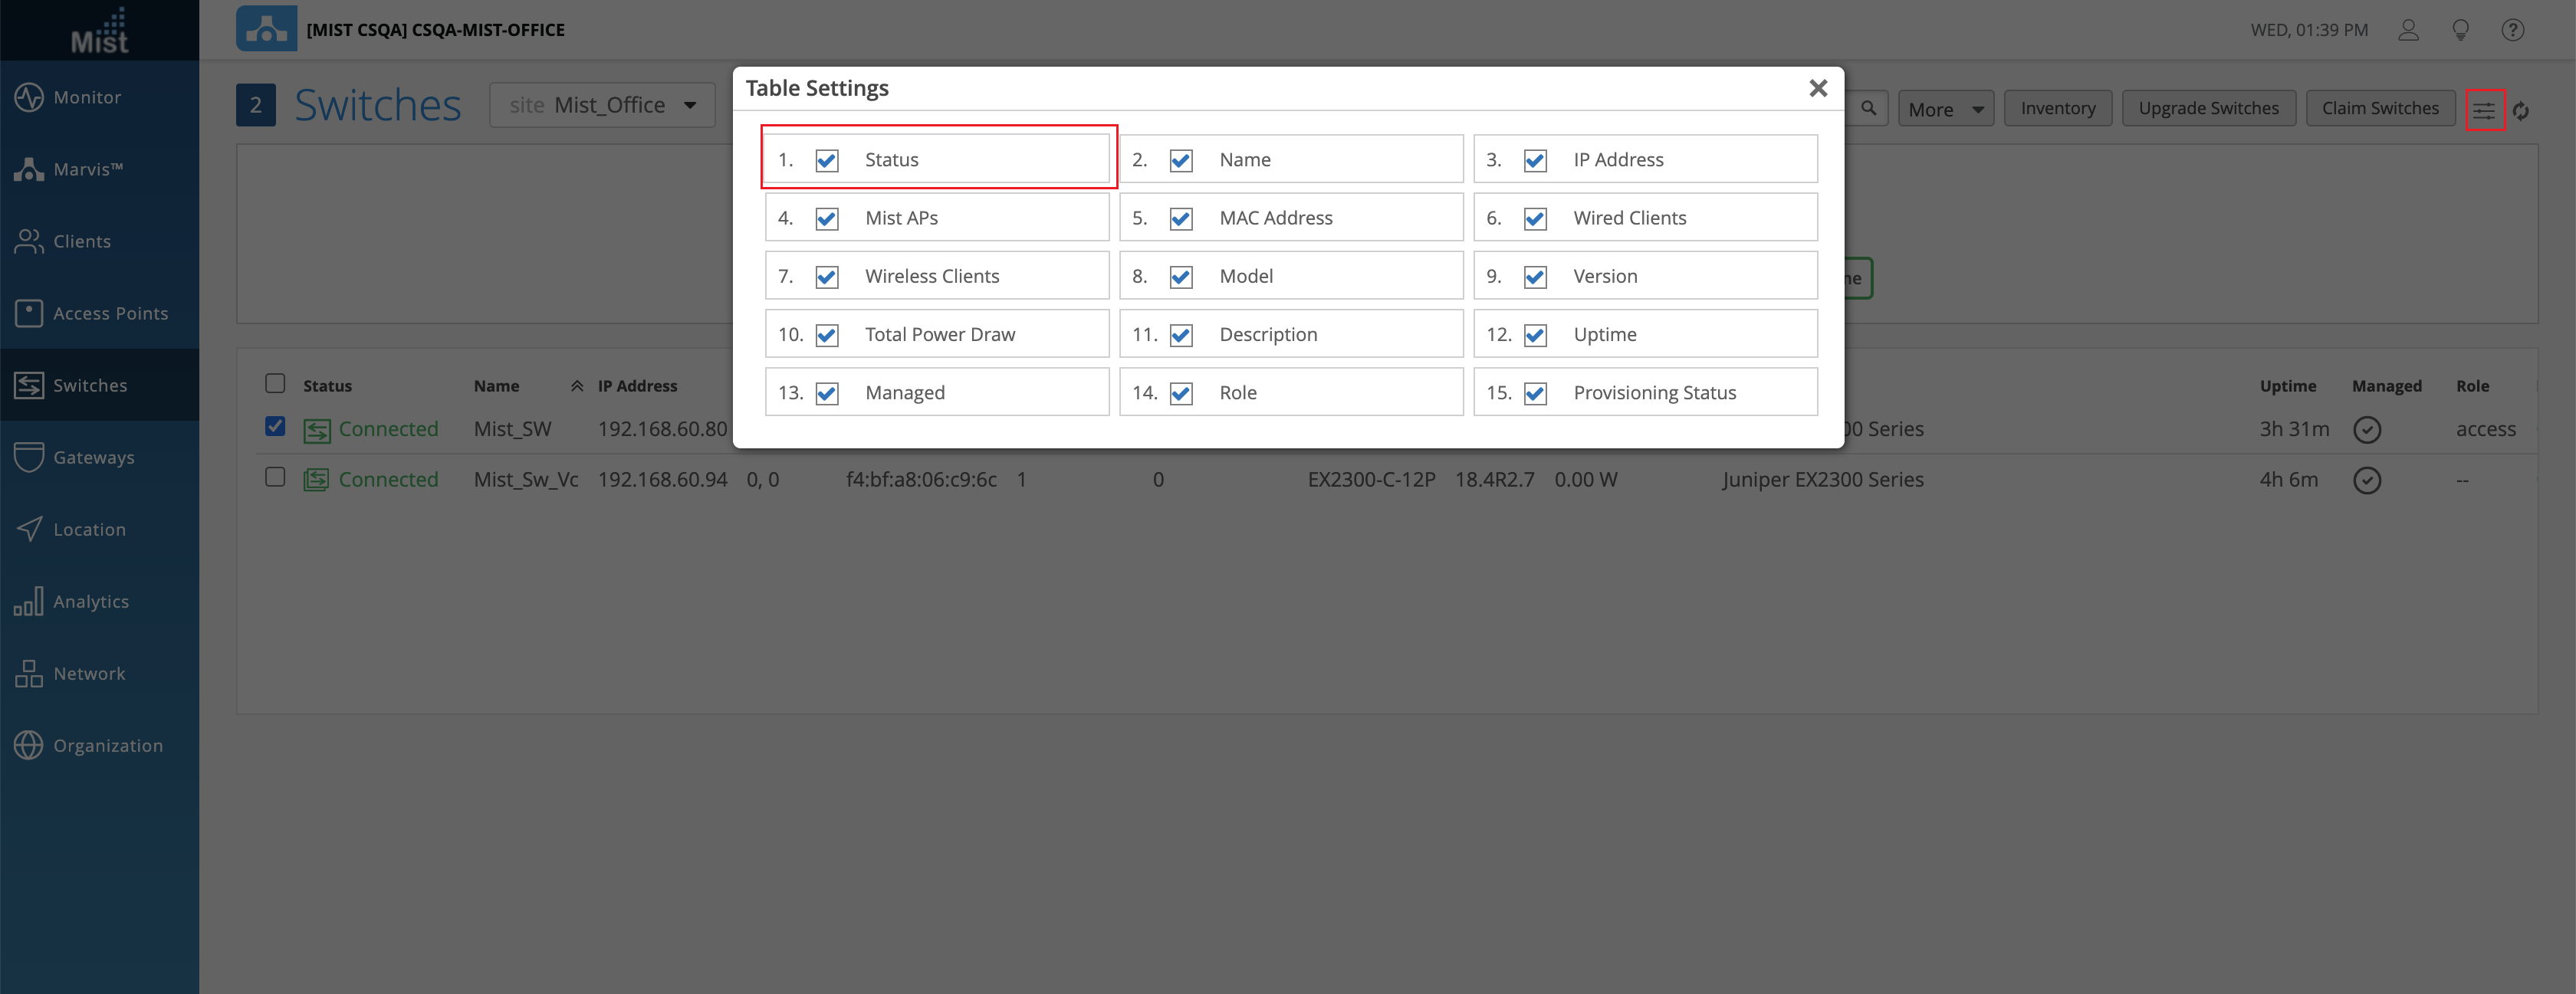
If you don't see the Status column in the switch list view, click the hamburger menu in the upper right of the page. Select the Status check box to display the column.
You can also view the switch status (as Upgrading) on the switch details page and the Switch Insights page.
You can view the upgrade events in the Switch Events section of a Switch Insights page. To access the Switch Insights page, open a switch details page and click the Switch Insights link on the Properties tile.
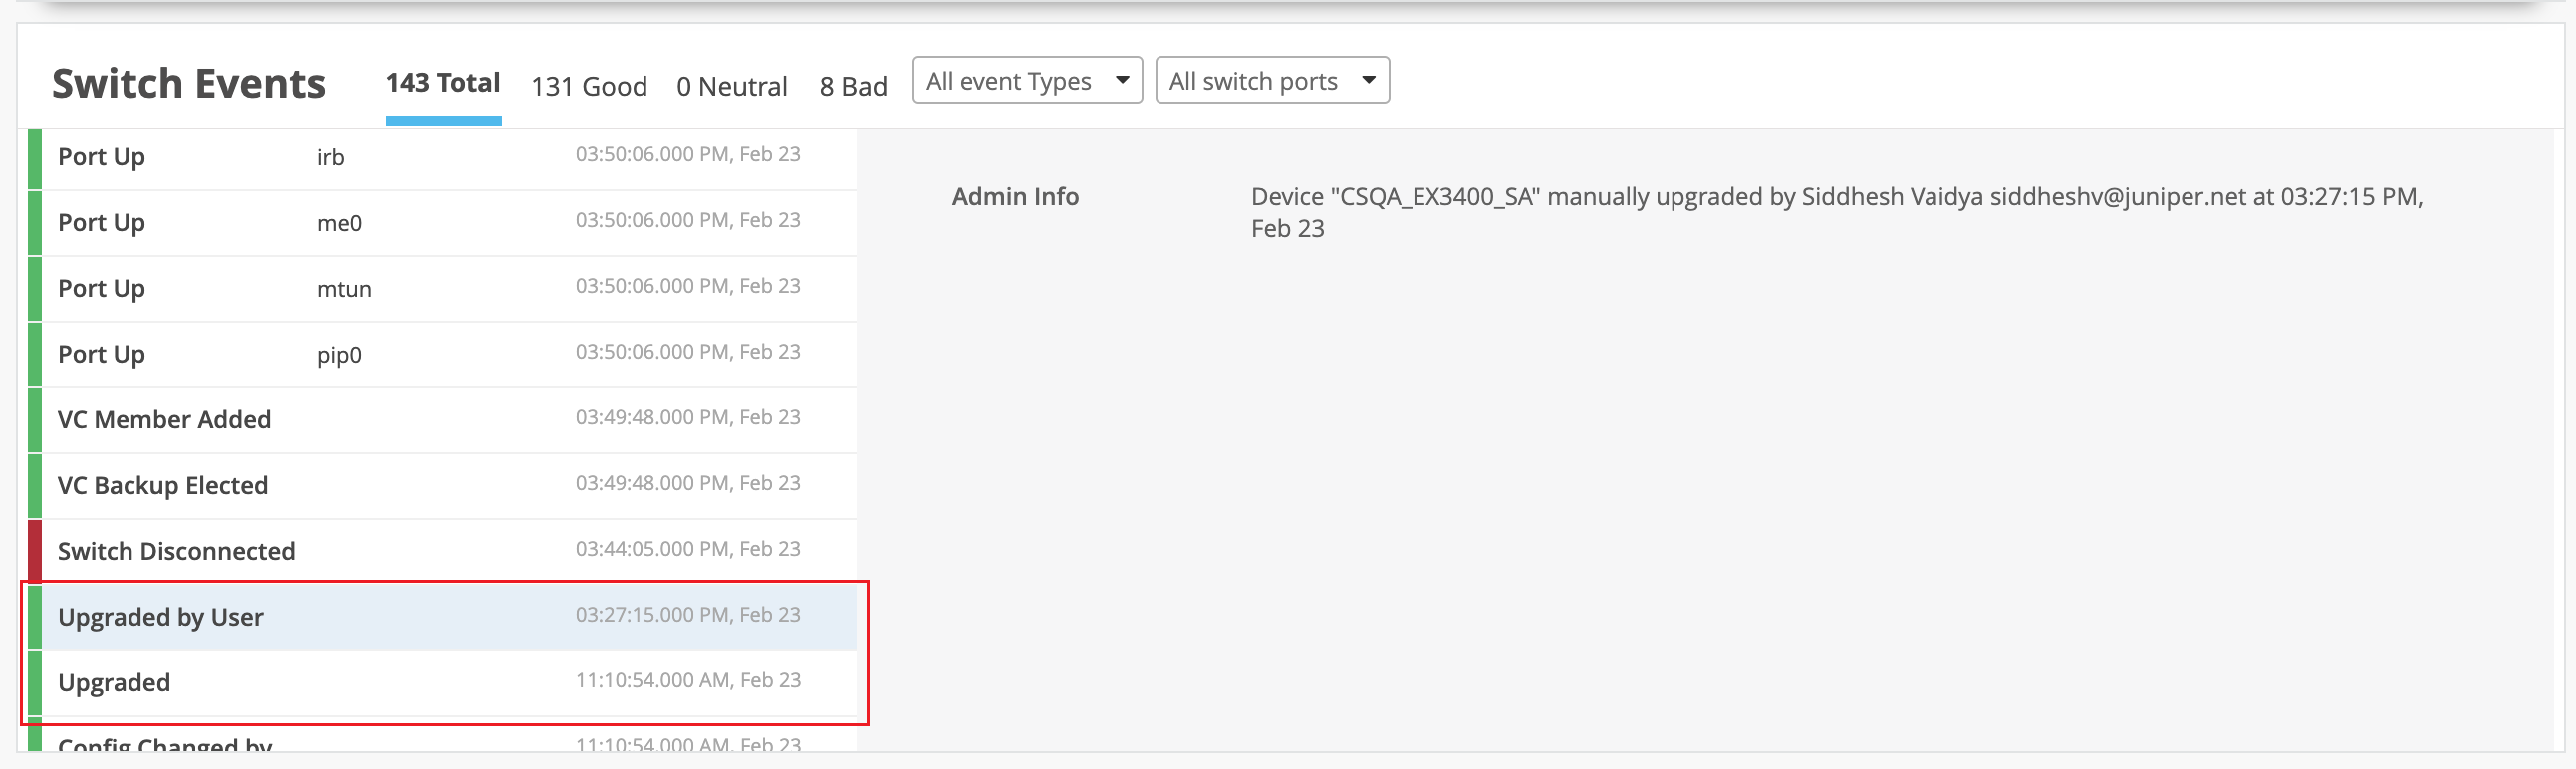
The above image shows a Switch Insights page, which lists switch upgrade events. The Upgraded by User event indicates that a user has initiated the upgrade. The Upgraded event indicates that the upgrade operation is complete. This means that the new software image was copied and the switch was rebooted.
An upgrade will fail if:
-
The switch doesn't have an SSH connection to the Juniper Mist cloud or if an uplink port is flapping.
The switch doesn't have enough storage. If the upgrade fails because of insufficient space, the upgrade failure event is displayed on the Switch Insights page as shown below:

See also: Free Up Storage Space on Your Switch (EX and QFX Series Switches)
-
You initiate an upgrade to the same software version that is already running on the switch. In this case, the Switch Events section of the Switch Insights page shows this failure reason:
Upgrade not needed. Please check current or pending version.
-
The time on the switch is incorrect. In this case, the Switch Events section of the Switch Insights page shows this failure reason:
OC FWUPDATE WRITEFAILED. See also: [EX/QFX] Certificate errors - Cannot validate Junos Image : Format error in certificate.
Schedule and Automate Switch Upgrades
Juniper Mist allows you to:
-
Create and manage upgrade schedules for the switches that are connected to the Mist cloud. This option is available at the organization and site level.
-
Configure settings to automatically upgrade new switches when they are onboarded. This setting is available only at the organization level.
- Schedule Switch Upgrades
- Manage Switch Upgrade and Reboot Schedules
- Enable Automatic Upgrade for Switches
Schedule Switch Upgrades
You can schedule firmware upgrades on your switches for a future date and time. You can also execute the upgrades immediately. You can create upgrade schedules at the organization and site level for switch models that are already connected to cloud.
To schedule a switch upgrade:
-
Click Schedule Upgrade.
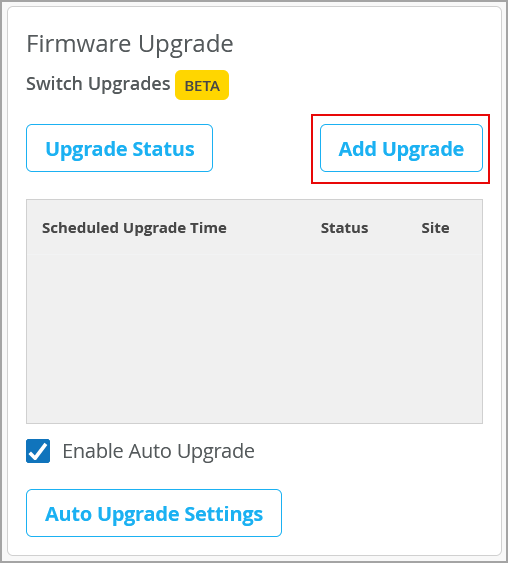
-
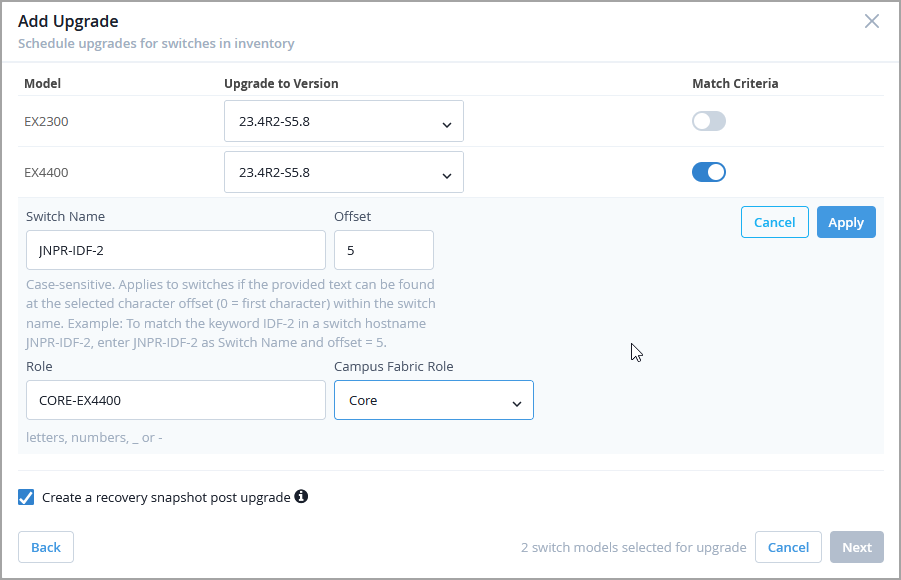
If you want to apply upgrades only to specific switches belonging to the
selected model, do the following:
-
Define the parameters to be matched. They include:
-
Switch Name—Specify a switch name to be matched. Optionally, specify an offset value, which indicates the starting character within the switch name (0 being the first character). For example, to match the keyword IDF-2 in the switch hostname JNPR-IDF-2, enter JNPR-IDF-2 as the switch name and set the offset value to 5.
-
Role—You can either select a switch role that is already defined by a user, or define a new role.
-
Campus Fabric Role—Select a campus fabric role from the drop-down list.
Note: If multiple parameters (for example, a Switch Name and a Role) are specified, an upgrade is triggered only if all the specified parameters are matched. The keywords are case-sensitive.
-
Note:For Virtual Chassis switches, firmware upgrades always trigger a full stack reboot, and all Virtual Chassis members are upgraded together, regardless of the order in which member upgrades are scheduled. Per‑member reboots are not supported for Virtual Chassis environments.
-
Define the parameters to be matched. They include:
If you configure multiple upgrade schedules for the same device, the most recently configured schedule will be applied.
Manage Switch Upgrade and Reboot Schedules
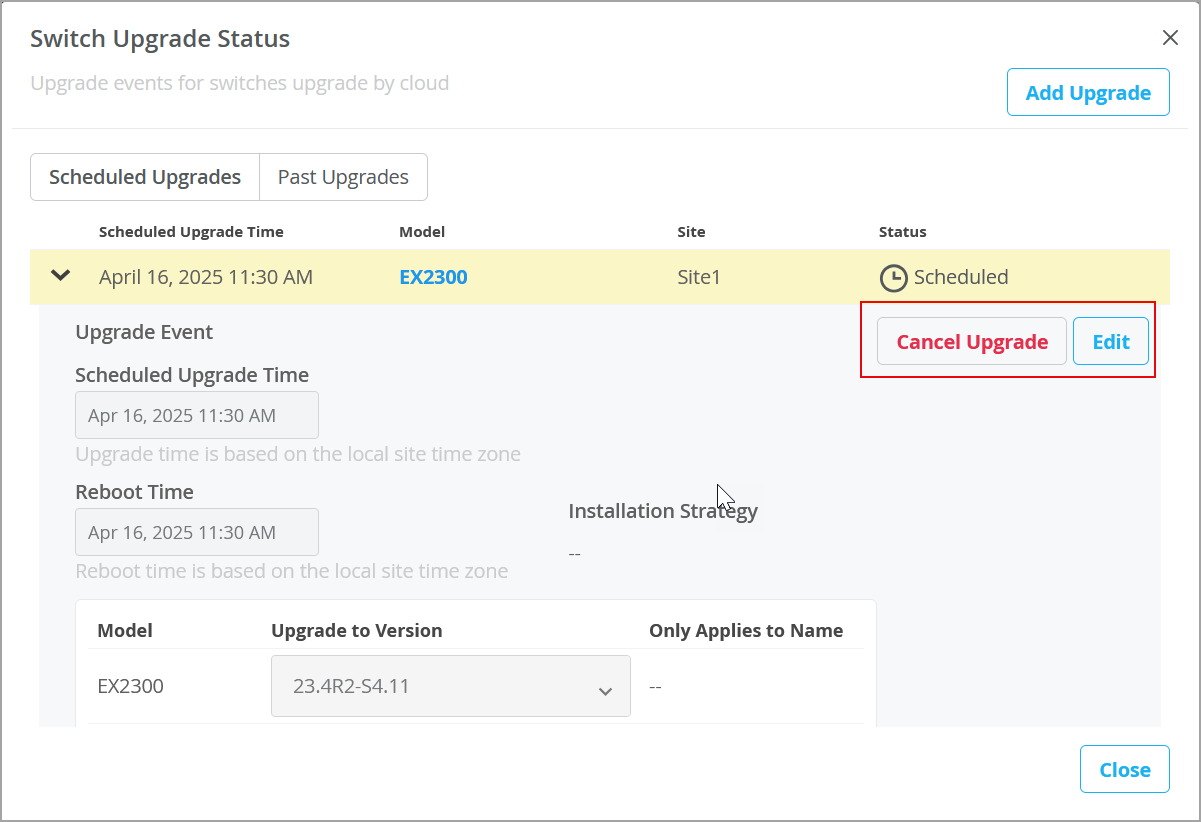
You can cancel, edit, or view switch upgrade schedules or reboot-only schedules from the Firmware Upgrade page.
Note that the upgrade schedules will be available only if your inventory has switches that meet the upgrade schedule parameters defined. For example, if you specify a switch name in the upgrade schedule but your inventory does not have a switch with that name, you will not see a record for that upgrade schedule.
To view the schedule details and upgrade status, go to Organization > Firmware Upgrade page and expand the schedule by clicking the up arrow on the left of the line item.
To edit or cancel an upgrade or reboot-only schedule:
-
Expand the upgrade schedule that you want to update or cancel, and use the
following options as required:
If you want to edit or cancel a reboot-only schedule, expand the Reboot only section at the bottom of the Firmware Upgrade page and then expand the reboot schedule record.
-
To edit the schedule, click Edit, make the changes, and then click Save Changes. You can edit only those upgrades or reboots that have not yet started. You cannot edit in-progress upgrades or reboots. Only the following information can be edited: scheduled upgrade time, reboot time, and the upgrade to version.
-
To cancel a schedule, click Cancel Upgrade (Cancel Reboot for a reboot-only operation) and follow instructions. You can cancel the upgrades or reboots that are either in-progress or yet to start.
-
To view all the upgrades that were completed within the last 30 days, click the Past Upgrades tab (the Past Reboot tab for a reboot-only operation). You cannot edit these records.
Enable Automatic Upgrade for Switches
If you want newly onboarded switches in an organization or specific sites to automatically upgrade to a specific firmware version when they connect to the Mist cloud for the first time, you can map switch models to relevant firmware versions. This feature is not applicable to the switches that are already online.
We recommend enabling Auto Upgrade as a best practice to ensure that all the onboarded switches are on the suggested version right from the beginning.
To configure automatic upgrade settings:
- Click Organization > Firmware Upgrade.
- Select Auto Upgrade Settings.
- Select Switches.
- Select Upgrade To Version for each switch model listed.
- If you are upgrading an EX or QFX Series switch, a recovery snapshot is automatically created on the switch post upgrade. If you don’t want that, clear the Create a recovery snapshot post upgrade check box.
- Select the I accept the End User License Agreement check box for the applicable switch families.
- Click Save.
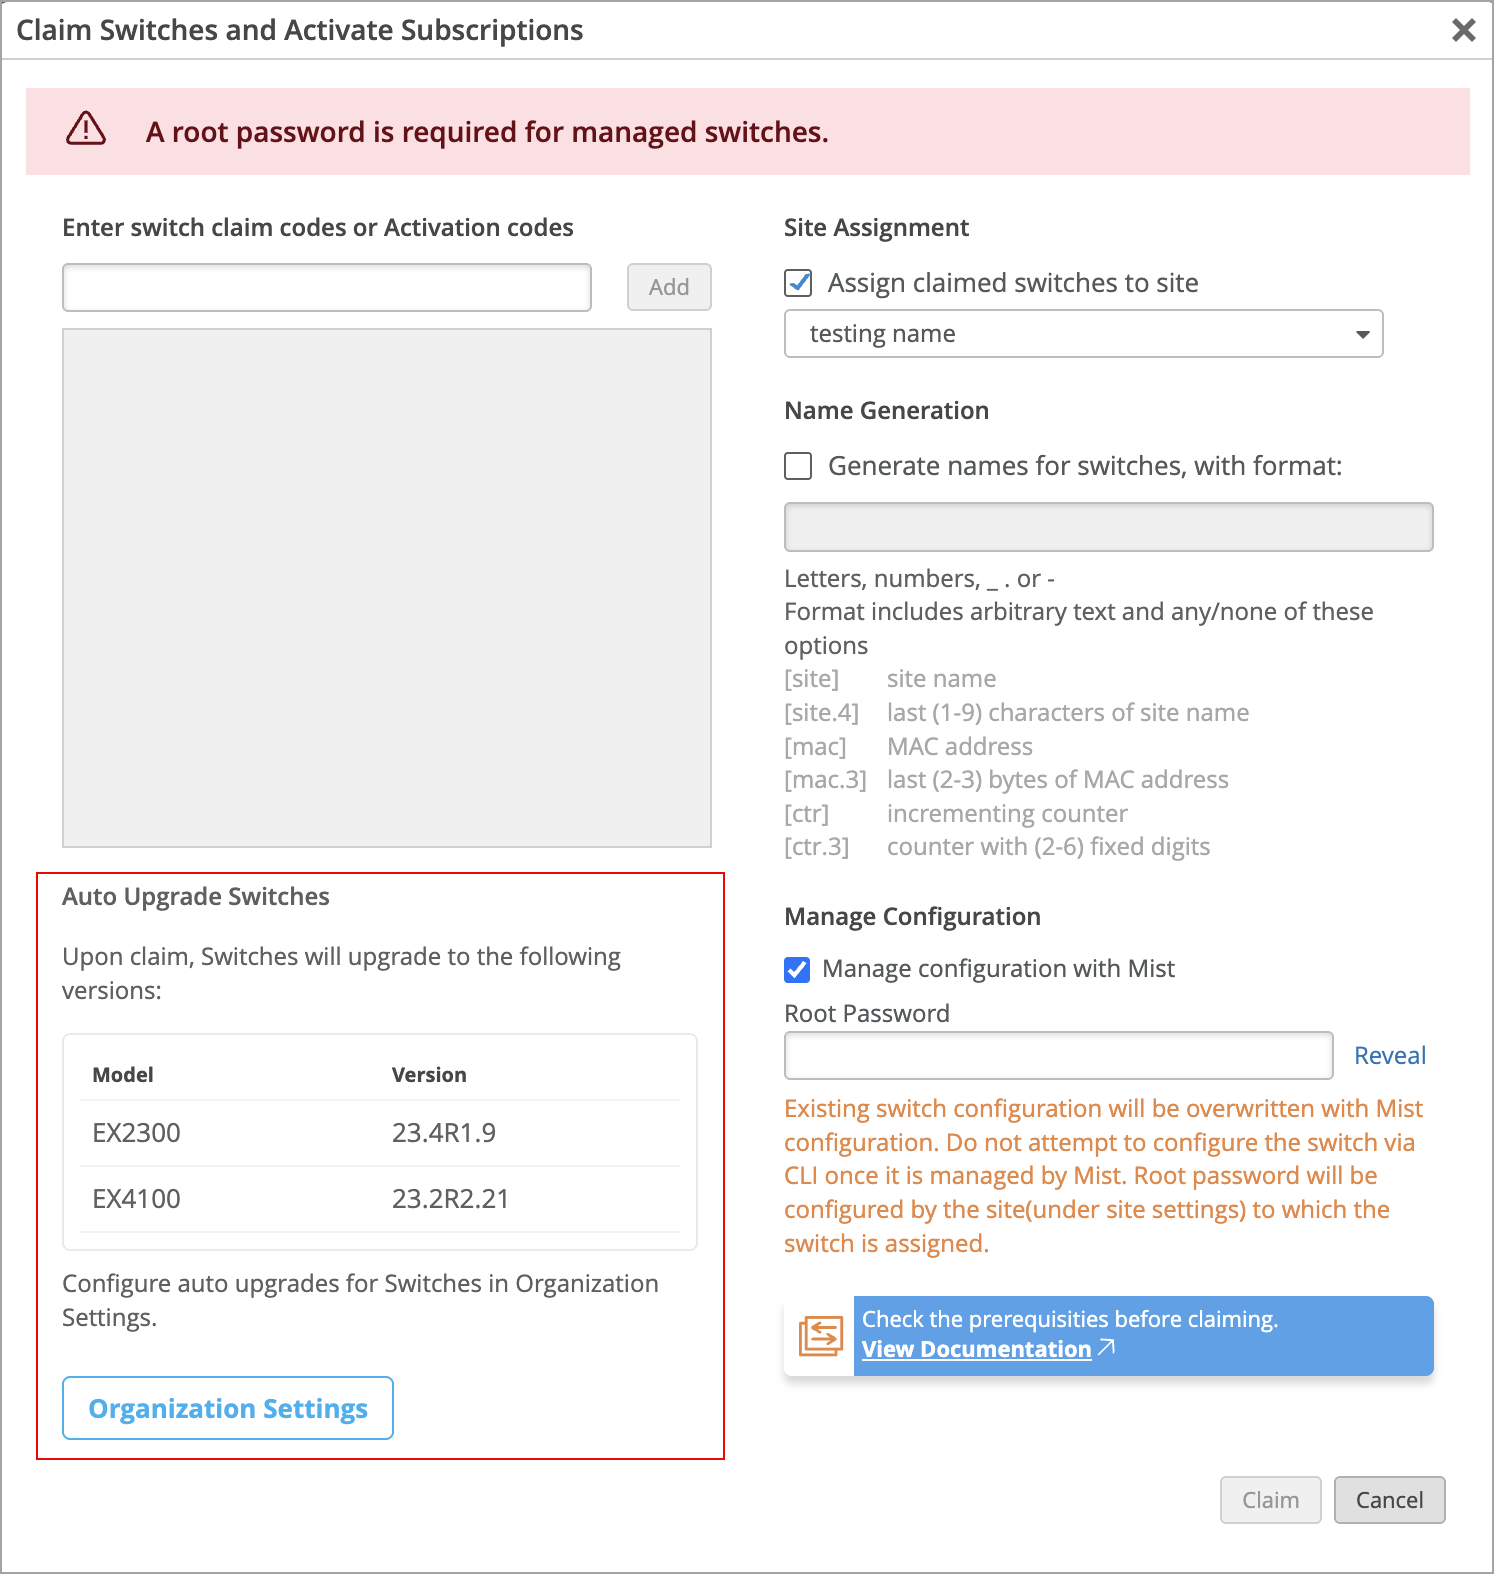
When you claim a new switch, the claim window displays the automatic upgrade
version
that is configured for each switch model. If you want to update this
configuration, click Firmware Upgrades to make the
required changes.