Onboard Switches to Mist Cloud
Follow these steps to claim new switches or adopt previously deployed switches into your organization. Ignore these steps if your switches are already onboarded to the Mist cloud.
Wired Assurance does not support Junos Flex images. To ensure compatibility, please verify that your switch is running a standard (non-Flex) Junos image. When upgrading a switch, we recommend doing so via the Mist cloud, which ensures that only a standard Junos image is deployed.
To configure and manage a switch through Juniper Mist cloud, you must onboard the switch into your organization.
You can onboard greenfield or brownfield switches to Mist:
-
Greenfield—New cloud-ready switches. Cloud-ready devices have a QR code or claim code on the chassis that you can scan to onboard the device quickly in the Juniper Mist portal.
-
Brownfield—Existing, in-service (brownfield) switches which are not cloud-ready but are still supported by Mist. These switches do not have a QR code attached. For devices that are not cloud-ready but still supported in Mist, you must enter some Junos CLI commands locally in the switch to onboard (adopt) the device.
Juniper switches use an HTTPS connection (TCP port 443) to send telemetry updates to the Juniper Mist cloud. In brownfield deployments, switches may initially use an SSH connection (TCP port 2200) during the adoption process before automatically transitioning to HTTPS over TCP port 443. SSH is also used when opening a remote shell to switches from the Utilities menu on the switch details page (Switches > Switch Name).
To forestall the chance of denial-of-service attacks or other possible SSH exploits, you can configure an upper limit of connections and/or sessions per connection on the switch. For Juniper EX and QFX series switches, the default value for ssh max-sessions-per-connection is 10, You can change that by issuing an Junos command such as the following:
[edit system services ssh] set connection-limit <number>
Switch Onboarding Prerequisites
Before you onboard a switch:
-
Ensure that you have a Wired Assurance Subscription, and login credentials for the Juniper Mist portal. To get started with Mist, follow the instructions in Quick Start: Mist.
-
Ensure that the required switch administrator roles are assigned to you. For more information, refer to Switch Administrator Role Requirements.
-
Ensure that the switch is supported by Mist Wired Assurance. To see the supported switch models and software versions, refer to Hardware and Software Requirements for Your Wired Network.
-
Ensure that the switch is connected to a DNS server (an NTP server is also recommended), and is able to connect to the Juniper Mist cloud architecture over the Internet.
-
If there is a firewall between the cloud and the switch, allow outbound access on TCP port 2200 to the management port of the switch.
Onboard a Greenfield Switch
You can onboard one or more greenfield, cloud-ready switches using your computer, or a single switch using your mobile phone. The easiest way to onboard a single switch to the Mist cloud is by using the Mist AI Mobile App. To onboard multiple cloud‑ready switches together, use the Juniper Mist portal and enter the activation code linked to the purchase order.
To onboard a greenfield switch, follow the instructions in Quick Start: Cloud-Ready EX and QFX Switches with Mist.
For a quick demo, watch the following video:
Onboarding a Greenfield CloudReady EX switch is simple. In your inventory page, find the Switches tab. Click on Claim Switches.
Type in your switch's unique claim code, which can be found near the QR code at the front of the switch. Alternatively, you can also enter an activation code, which pulls all your newly purchased Juniper hardware from one order, rather than adding individual switch codes. Add and check for your desired settings, such as site assignment and configuration management.
Click Claim, and the switch has been added to the site. The EX3400 has been added. In the site view, you should see the switch appropriately assigned.
Notice that red indicates the switch is offline, but will turn green once it comes online. The switch is cloud-managed and accounted for as part of the health metrics above.
Onboard a Brownfield Switch
Use the Adopt Switch option to onboard a brownfield switch that is not cloud-ready or does not have a QR code. When you adopt a brownfield switch, you can have Mist manage it (recommended), which means any existing configuration will be replaced with settings made in the Mist console. Or, you can choose to not have Mist manage the switch, in which case the existing configuration will remain as is, plus some new settings for connecting to the cloud and telemetry. An unmanaged switch will be unique – configurations made in the Mist console will not be applied, nor will it benefit from the use of templates or site variables or any of the other conveniences available to managed devices. In addition, subsequent configurations made on the switch will not be "known" to Mist, so you may want to set up a warning message in the CLI to indicate it is part of the Mist environment, or limit who can make configuration changes so they don't conflict.
If Mist will manage the switch, that is, you select the Manage
configuration with Mist option when onboarding it, be sure to
back up the existing Junos OS configuration before adopting the switch. Do this
by connecting to the switch, logging on to the CLI, and in Junos, running the
request system configuration rescue save command to save
the currently active configuration and any installation-specific parameters.
For virtual devices such as a vJunos-switch or legacy devices that predate the use of Mist claim codes on the hardware, you need to adopt, rather than claim them. Note that if the VM was previously claimed in one environment, such as Global02, it may not be available from the inventory or installed base of another environment or organization (this is because the MAC address may still be attached to the original environment.) You need to release the device from the original environment, or recreate the virtual device, which will generate a new virtual MAC for it.
In the procedure below, you will make configuration changes to the Juniper Mist portal, and also to the switch using the Junos OS CLI. Be sure you can log in to both environments.
An unmanaged switch still receives configurations from Mist to maintain connectivity with the Mist cloud. These include system scripts and extensions for efficient stats collection, system syslog settings for efficient logging on the device, and a user account named 'mist' for cloud communication.
To onboard a brownfield switch to the Mist cloud:
-
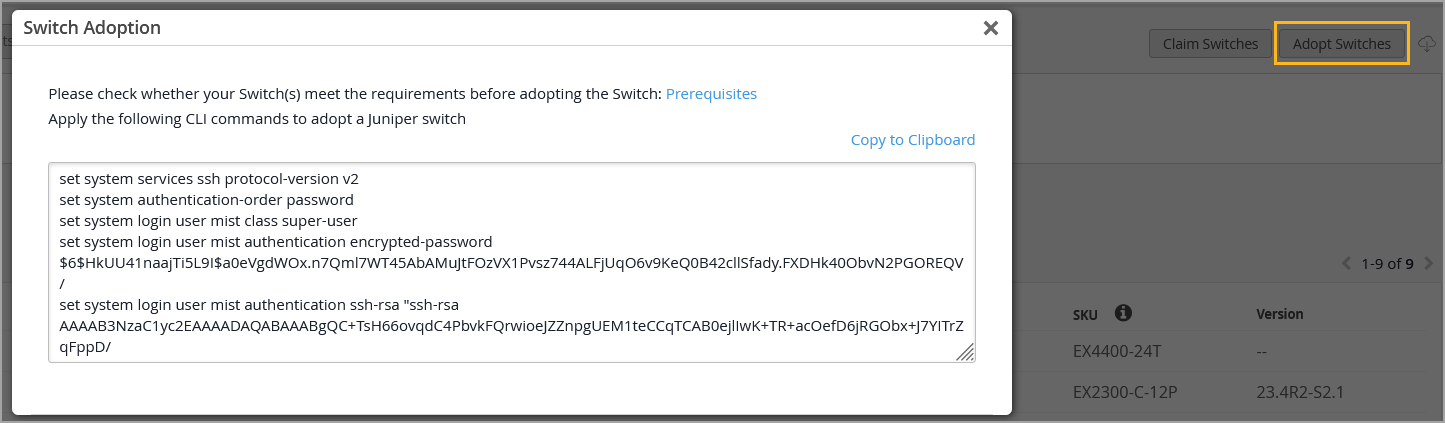
Select Switches at the top of the page that appears,
and then click the Adopt Switch button in the
upper-right corner to generate the Junos OS CLI commands needed for the
interoperability. The commands create a Juniper Mist user account, and an
SSH connection to the Juniper Mist cloud over TCP port 2200 (the switch
connection is initiated from a management interface and is used for setting
up configuration and sending telemetry data).
For a quick demo, watch the following video:
Adopting switches for brownfield environments only takes a few steps. In Organization, look for the Inventory tab and toggle to Switches. Click on Adopt Switches.
This brings up a clipboard of CLI commands to copy and paste into the console of a switch. Put in the config and commit it in the switch. Ensure that TCP port 2200 is open to the internet.
This allows for the switch to communicate with the Juniper Mist cloud. Check that it is connected properly by entering Show System Connection to see an established TCP session. Going back to the dashboard, you can see the EX switch online and fully cloud-managed.
Templates will also be inherited when you enable Configuration Management. Don't forget to save. Now you're good to go.
Adopting an EX switch to the Juniper Mist cloud from a brownfield environment is a straightforward process. Now you have the power and simplicity of a cloud-managed solution for your EX switches.