Configure a Virtual Chassis Using EX3400, EX4100, EX4100-F, EX4100-H, EX4300, EX4000, or EX4400
Follow these steps to configure a Virtual Chassis on Juniper switches with a dedicated Virtual Chassis port.
-
Instructions for configuring a Virtual Chassis using the EX4400-24X switches are slightly different. For details, refer to Configure a Virtual Chassis Using EX4400-24X.
-
Ensure that you use the Mist portal interfaces to manage all Virtual Chassis configurations. Avoid using CLIs or Additional CLIs for managing Virtual Chassis settings.
-
Juniper Mist automatically upgrades a Virtual Chassis linecard member if it is running a Junos version different from that of the primary member. The linecard member will be upgraded to the same version as the primary member if the following conditions are met:
-
The switch must form a Virtual Chassis with three or more members—that is, a primary, a backup, and a linecard member.
-
The Junos version on the linecard member is different from that on the primary member.
-
The linecard member must be in Inactive state.
Note that a linecard member will be upgraded only if it is inactive and running a clearly different Junos version. Minor differences, such as different spin numbers, will not trigger an upgrade.
-
Only the Junos versions listed on the Mist portal are available for upgrade.
-
The EX3400, EX4100, EX4100-F, EX4100-H, EX4300, EX4000, and EX4400 switches come with dedicated Virtual Chassis ports (VCPs). To create Virtual Chassis using these switches, you only need to connect them to each other via VCPs. The Form Virtual Chassis option on the Switches page on the Mist portal is not applicable to these switches. However, once a Virtual Chassis is created with these switches, you can use the Modify Virtual Chassis option on the switch details page to modify and manage the Virtual Chassis. The Virtual Chassis workflow for these switches involves the following two steps:
-
Virtual Chassis formation by connecting the switches via the dedicated VCPs and powering on them.
-
Preprovisioning the Virtual Chassis using the Modify Virtual Chassis option on the Juniper Mist Portal. Mist supports only the preprovisioned Virtual Chassis configuration. The preprovisioned configuration specifies the chassis serial number, member ID, and role for both member switches in the Virtual Chassis. When a new member router joins the Virtual Chassis, Junos compares its serial number against the values specified in the preprovisioned configuration. Preprovisioning prevents any accidental role assignments, or the accidental addition of a new member to the Virtual Chassis. Each role, member ID, addition or removal of members, is under the control of the configuration.
In addition to Virtual Chassis creation, you can renumber, replace, or add a member to an existing Virtual Chassis, by using the Modify Virtual Chassis option on the Switch Details Page.
You can configure the Virtual Chassis in mixed mode or non-mixed mode. A Virtual Chassis that includes switches of the same model operates as a non-mixed Virtual Chassis. However, a Virtual Chassis that includes different models of the same switch operates in mixed mode because of architecture differences between the different switch models. For more information, see Mixed and Non-Mixed Virtual Chassis.
| Allowed Routing Engine Members | Allowed Linecard Members |
|---|---|
| EX4300 | EX4300 |
| EX4300-48MP | EX4300-48MP and EX4300 |
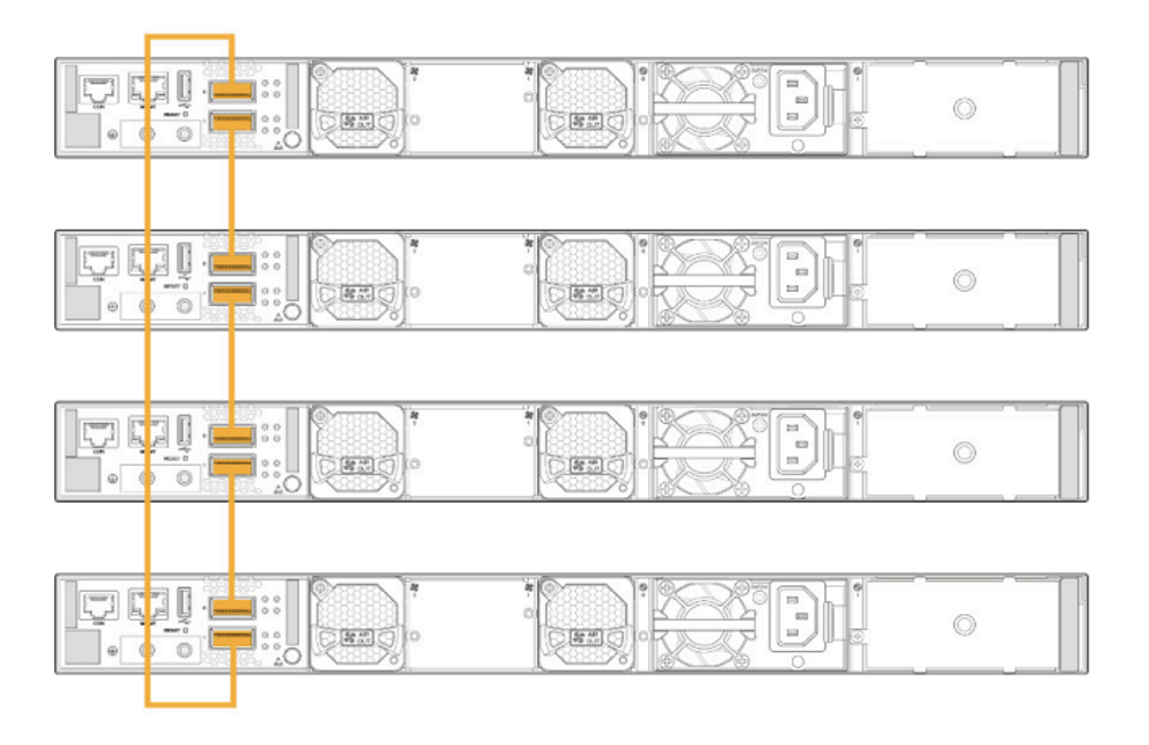
To configure a Virtual Chassis using EX3400, EX4100, EX4100-F, EX4300, or EX4400 switches:
-
Connect the switches to each other using the dedicated Virtual Chassis ports (VCPs),
preferably in a full ring topology, as shown below. The following is a sample image. The
location of the VCPs will vary depending on the switch models.
 Note:
Note:On EX4100-F-12P and EX4100-F-12T switches, the 10-Gigabit Ethernet ports in PIC 2, which are used as uplink ports, cannot be configured as Virtual Chassis ports. These ports do not support the HGoE mode. For more information about the HGoE mode, see HiGig and HGoE Modes.
-
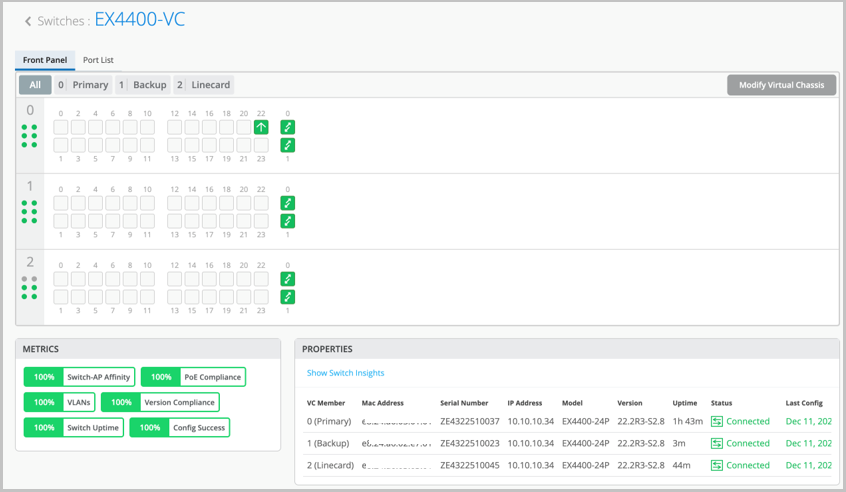
Click Switches > Switch Name to go to the
Virtual Chassis page (the switch details page) to verify the details.
The switches appear as a single Virtual Chassis as shown below:
For a detailed procedure on how to modify a Virtual Chassis, see Manage a Virtual Chassis Using Mist.