Configure a Virtual Chassis Using EX4400-24X
-
Virtual Chassis formation on the EX4400-24X switches cannot be executed without pre-provisioning. You may need to enable this in a lab or staging environment where you have proper access to the Mist cloud managing the devices so that they appear on the Inventory page. For EX4400-24X switches, plan to have serial console access when pre-provisioning the Virtual Chassis.
-
Juniper Mist automatically upgrades a Virtual Chassis linecard member if it is running a Junos version different from that on the primary member. The linecard member will be upgraded to the same version as that on the primary member if the following conditions are met:
-
The switch must form a Virtual Chassis with three or more members—that is, a primary, a backup, and a linecard member.
-
The Junos version on the linecard member is different from that on the primary member.
-
The linecard member must be in Inactive state.
Note that a linecard member will be upgraded only if it is inactive and running a clearly different Junos version. Minor differences, such as different spin numbers, will not trigger an upgrade.
-
Only the Junos versions listed on the Mist portal are available for upgrade.
-
-
Ensure that you use the Mist portal interfaces to manage all Virtual Chassis configurations. Avoid using CLIs or Additional CLIs for managing Virtual Chassis settings.
To configure a Virtual Chassis using EX4400-24X follow the steps below (in these steps, we use two EX4400-24X switches as an example):
-
Connect the Virtual Chassis ports (VCPs) on EX4400-24X using DAC Cables – 40G/100G. The
Virtual Chassis ports are located on the front-panel on the EX4400-24X (as indicated in
the below figure) and only support the HGoE protocol for Virtual Chassis formation.

-
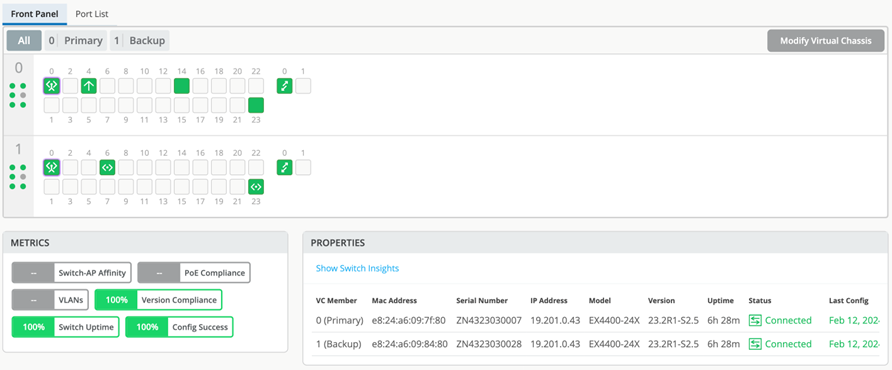
Once the devices come up on the Mist portal after the reboot, they should be in Virtual
Chassis mode and seen as a single device on the Mist dashboard. You can verify this from
the switch details page by clicking Switches >
Switch Name.
-
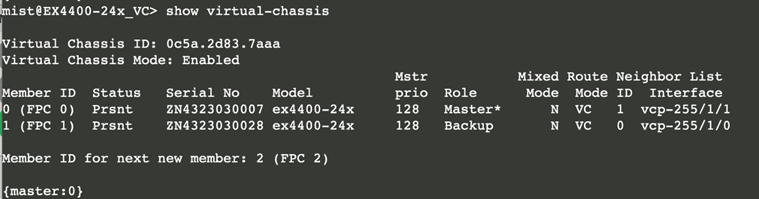
Optional: Check the Virtual Chassis state via Remote Shell as shown in the figure
below: