Configure a Virtual Chassis Using EX3400, EX4100, EX4100-F, EX4300, EX4400, or EX4600 Switches
The EX3400, EX4100, EX4100-F, EX4300, EX4400, and EX4600 switches come with dedicated Virtual Chassis ports (VCPs). You can create Virtual Chassis using these switches by connecting them to each other via VCPs. These switches don't support the Form Virtual Chassis option on the Switches page on the Mist portal. However, once a Virtual Chassis is created with these switches, you can use the Modify Virtual Chassis option on the switch details page to modify and manage the Virtual Chassis. The Virtual Chassis workflow for these switches involves the following two steps:
-
Virtual Chassis formation by connecting the switches via the dedicated VCPs and powering on them.
-
Preprovisioning the Virtual Chassis using the Modify Virtual Chassis option on the Juniper Mist Portal. Mist supports only the preprovisioned Virtual Chassis configuration. The preprovisioned configuration specifies the chassis serial number, member ID, and role for both member switches in the Virtual Chassis. When a new member router joins the Virtual Chassis, Junos compares its serial number against the values specified in the preprovisioned configuration. Preprovisioning prevents any accidental role assignments, or the accidental addition of a new member to the Virtual Chassis. Each role, member ID, addition or removal of members, is under the control of the configuration.
Before configuring a Virtual Chassis using the EX3400, EX4100, EX4100-F, EX4300, EX4400, or EX4600 Switches, ensure the following:
-
All the switches that you want to include in the Virtual Chassis are onboarded to the Juniper Mist™ cloud and assigned to the same site. To onboard a new switch (greenfield deployment), see Onboard Switches to Mist Cloud. To onboard an existing switch (brownfield deployment), see Onboard a Brownfield Switch.
-
All the switches are running the same Junos software version. If they are not, you can upgrade the switch software using a USB drive locally or using the Juniper Mist portal. See Upgrade Junos OS Software on Your Switch.
In addition to Virtual Chassis creation, you can renumber, replace, or add a member to an existing Virtual Chassis, by using the Modify Virtual Chassis option on the Switch Details Page. The Modify Virtual Chassis option is available for switches that have the configuration management enabled in Mist.
You can configure the Virtual Chassis in mixed mode or non-mixed mode. A Virtual Chassis that includes switches of the same model operates as a non-mixed Virtual Chassis. However, a Virtual Chassis that includes different models of the same switch operates in mixed mode because of architecture differences between the different switch models. For more information, see Mixed and Non-Mixed Virtual Chassis.
| Allowed Routing Engine Members | Allowed Linecard Members |
|---|---|
| EX4300 | EX4300 and EX4600 |
| EX4300-48MP | EX4300-48MP and EX4300 (excludes EX4600) |
|
EX4600 |
EX4600 and EX4300 (excludes EX4300-48MP) |
To configure a Virtual Chassis using EX3400, EX4100, EX4100-F, EX4300, EX4400, or EX4600 switches:
-
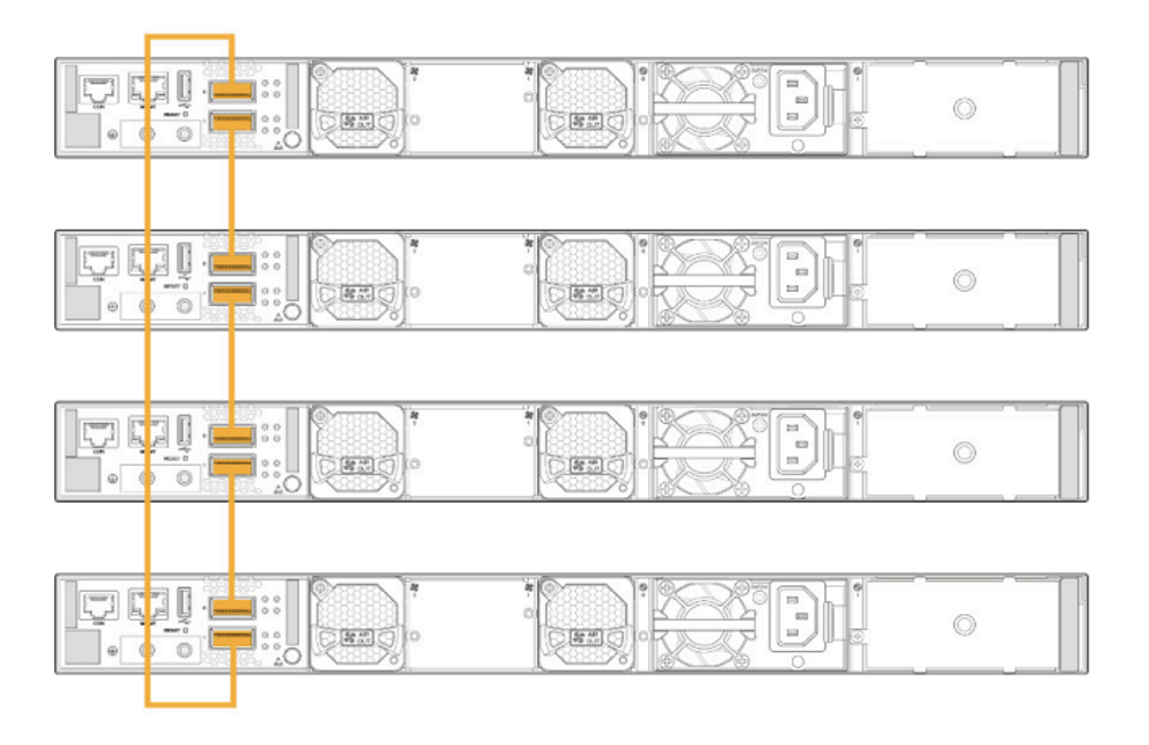
Connect the switches to each other using the dedicated Virtual Chassis ports (VCPs),
preferably in a full ring topology, as shown
below.
The following is a sample image. The location of the VCPs will vary depending on the
switch models.
-
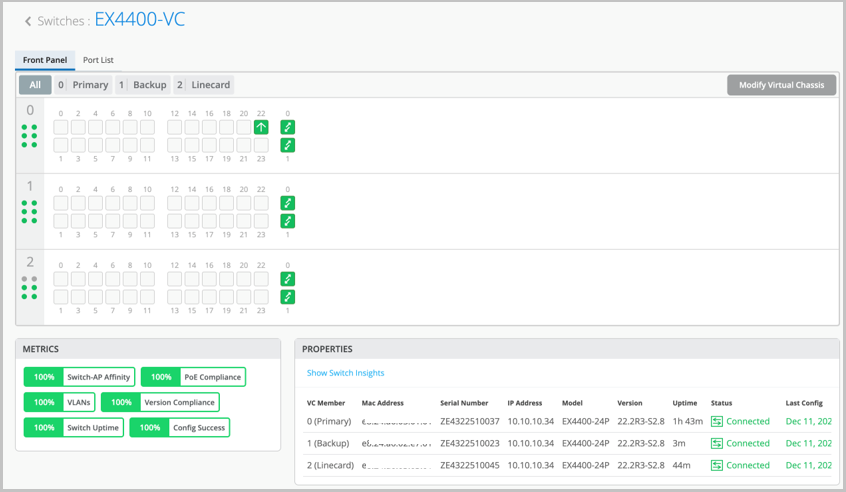
Click Switches > Switch Name to go to the
Virtual Chassis page (the switch details page) to verify the details.
The switches appear as a single Virtual Chassis as shown below:
-
After Virtual Chassis is
connected
to the Mist cloud, preprovision it. Preprovisioning allows users to
define the roles and renumber appropriately. To preprovision the Virtual Chassis, follow
the steps below:
-
On the Modify Virtual Chassis page, click Preprovision Virtual
Chassis. See a sample Modify Virtual Chassis page below:
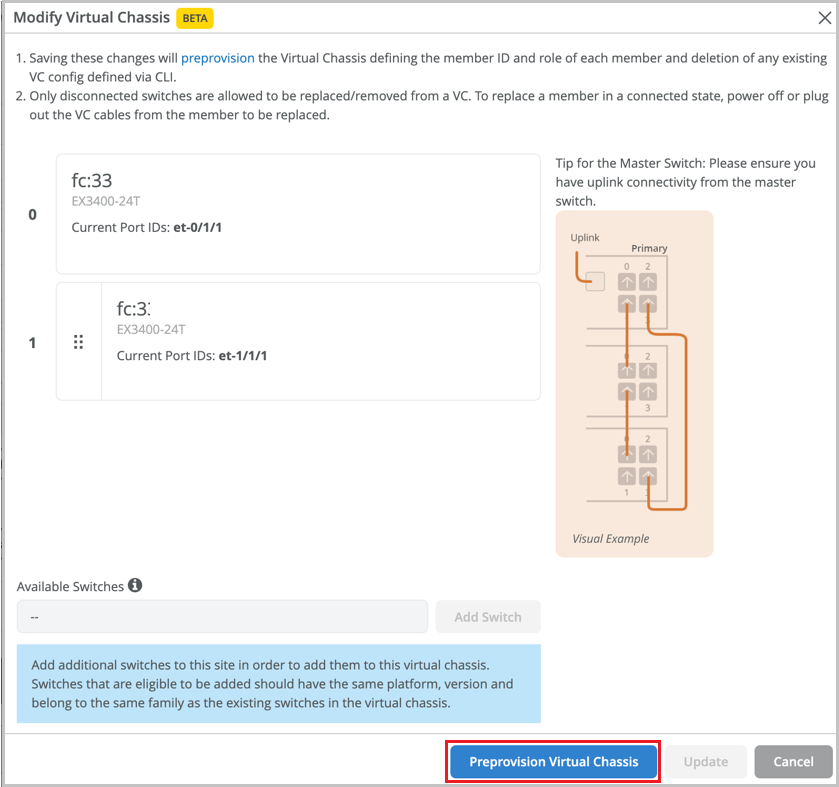
This step pushes the preprovisioned Virtual Chassis configuration to the device and overwrites the old autoprovision Virtual Chassis configuration in the device. This option assumes the current positioning of the members and preprovisions them as is.
Note:If you make any changes on the Modify Virtual Chassis page, such as moving the members around or adding or removing members, the Preprovision Virtual Chassis button is disabled and the Update button is enabled. In this case, click the Update button to effect the changes made and Preprovision the Virtual Chassis.
All configurations are pushed instantly after you preprovision the Virtual Chassis. The stats could take up to 15 minutes to appear on the Mist dashboard.
-
On the Modify Virtual Chassis page, click Preprovision Virtual
Chassis. See a sample Modify Virtual Chassis page below:
For a detailed procedure on how to modify a Virtual Chassis, see Manage a Virtual Chassis Using Mist (Add, Delete, Replace, and Modify Members).