
ON THIS PAGE
Contact Customer Support and Return the Chassis or Components
If you need to return a hardware component to Juniper Networks, Inc., you need a Return Material Authorization (RMA) number and the equipment serial number. Contact the Juniper Networks Technical Assistance Center (JTAC) to generate an RMA number. You may also need to locate the chassis or component details using the CLI or by referring to equipment labels. You then pack and ship the component.
Contact Customer Support
You can contact JTAC 24 hours a day, seven days a week.
| Chat |
Use the Ask me icon at the bottom right of the Support page. Don't see the Chat icon? Read this. |
| Web | |
| Telephone |
U.S. and Canada (Toll-free): 1-888-314-JTAC (5822) Outside the US or Canada, use the relevant country number listed on the regional tabs listed on the Contact Support page. Federal Government Support: 1-833-900-1454 |
We do not support opening new cases through e-mail. Please use one of the above options to contact JTAC.
Return a Hardware Component to Juniper Networks
If a hardware component fails, contact Juniper Networks to obtain an RMA number. We use this number to track the returned material at the factory and to return the repaired or new components to you, as needed.
Do not return any component to Juniper Networks unless you have first obtained an RMA number. Juniper Networks reserves the right to refuse shipments that do not have an RMA number. Refused shipments are returned to you by collect freight.
To return a defective hardware component:
- Determine the part number and the serial number of the defective component. See Locate the Serial Number of the PTX12008 or its Components.
- Obtain an RMA number from JTAC as described in Request a Return Material Authorization.
- Pack the component for shipment. See Packing the PTX12008 for Shipment.
For more information about return and repair policies, see the Support page at https://support.juniper.net/support/.
Locate the Serial Number of the PTX12008 or its Components
If the router is operational and you can access the CLI, you can list serial numbers for the router and for some components with a CLI command. If you don’t have access to the CLI, or if the serial number for the component doesn’t appear in the command output, you can locate the serial number ID label on the router or component.
If you want to find the serial number ID label on a component, you need to remove the component from the router chassis.
- List the PTX12008 Chassis and Component Details Using the CLI
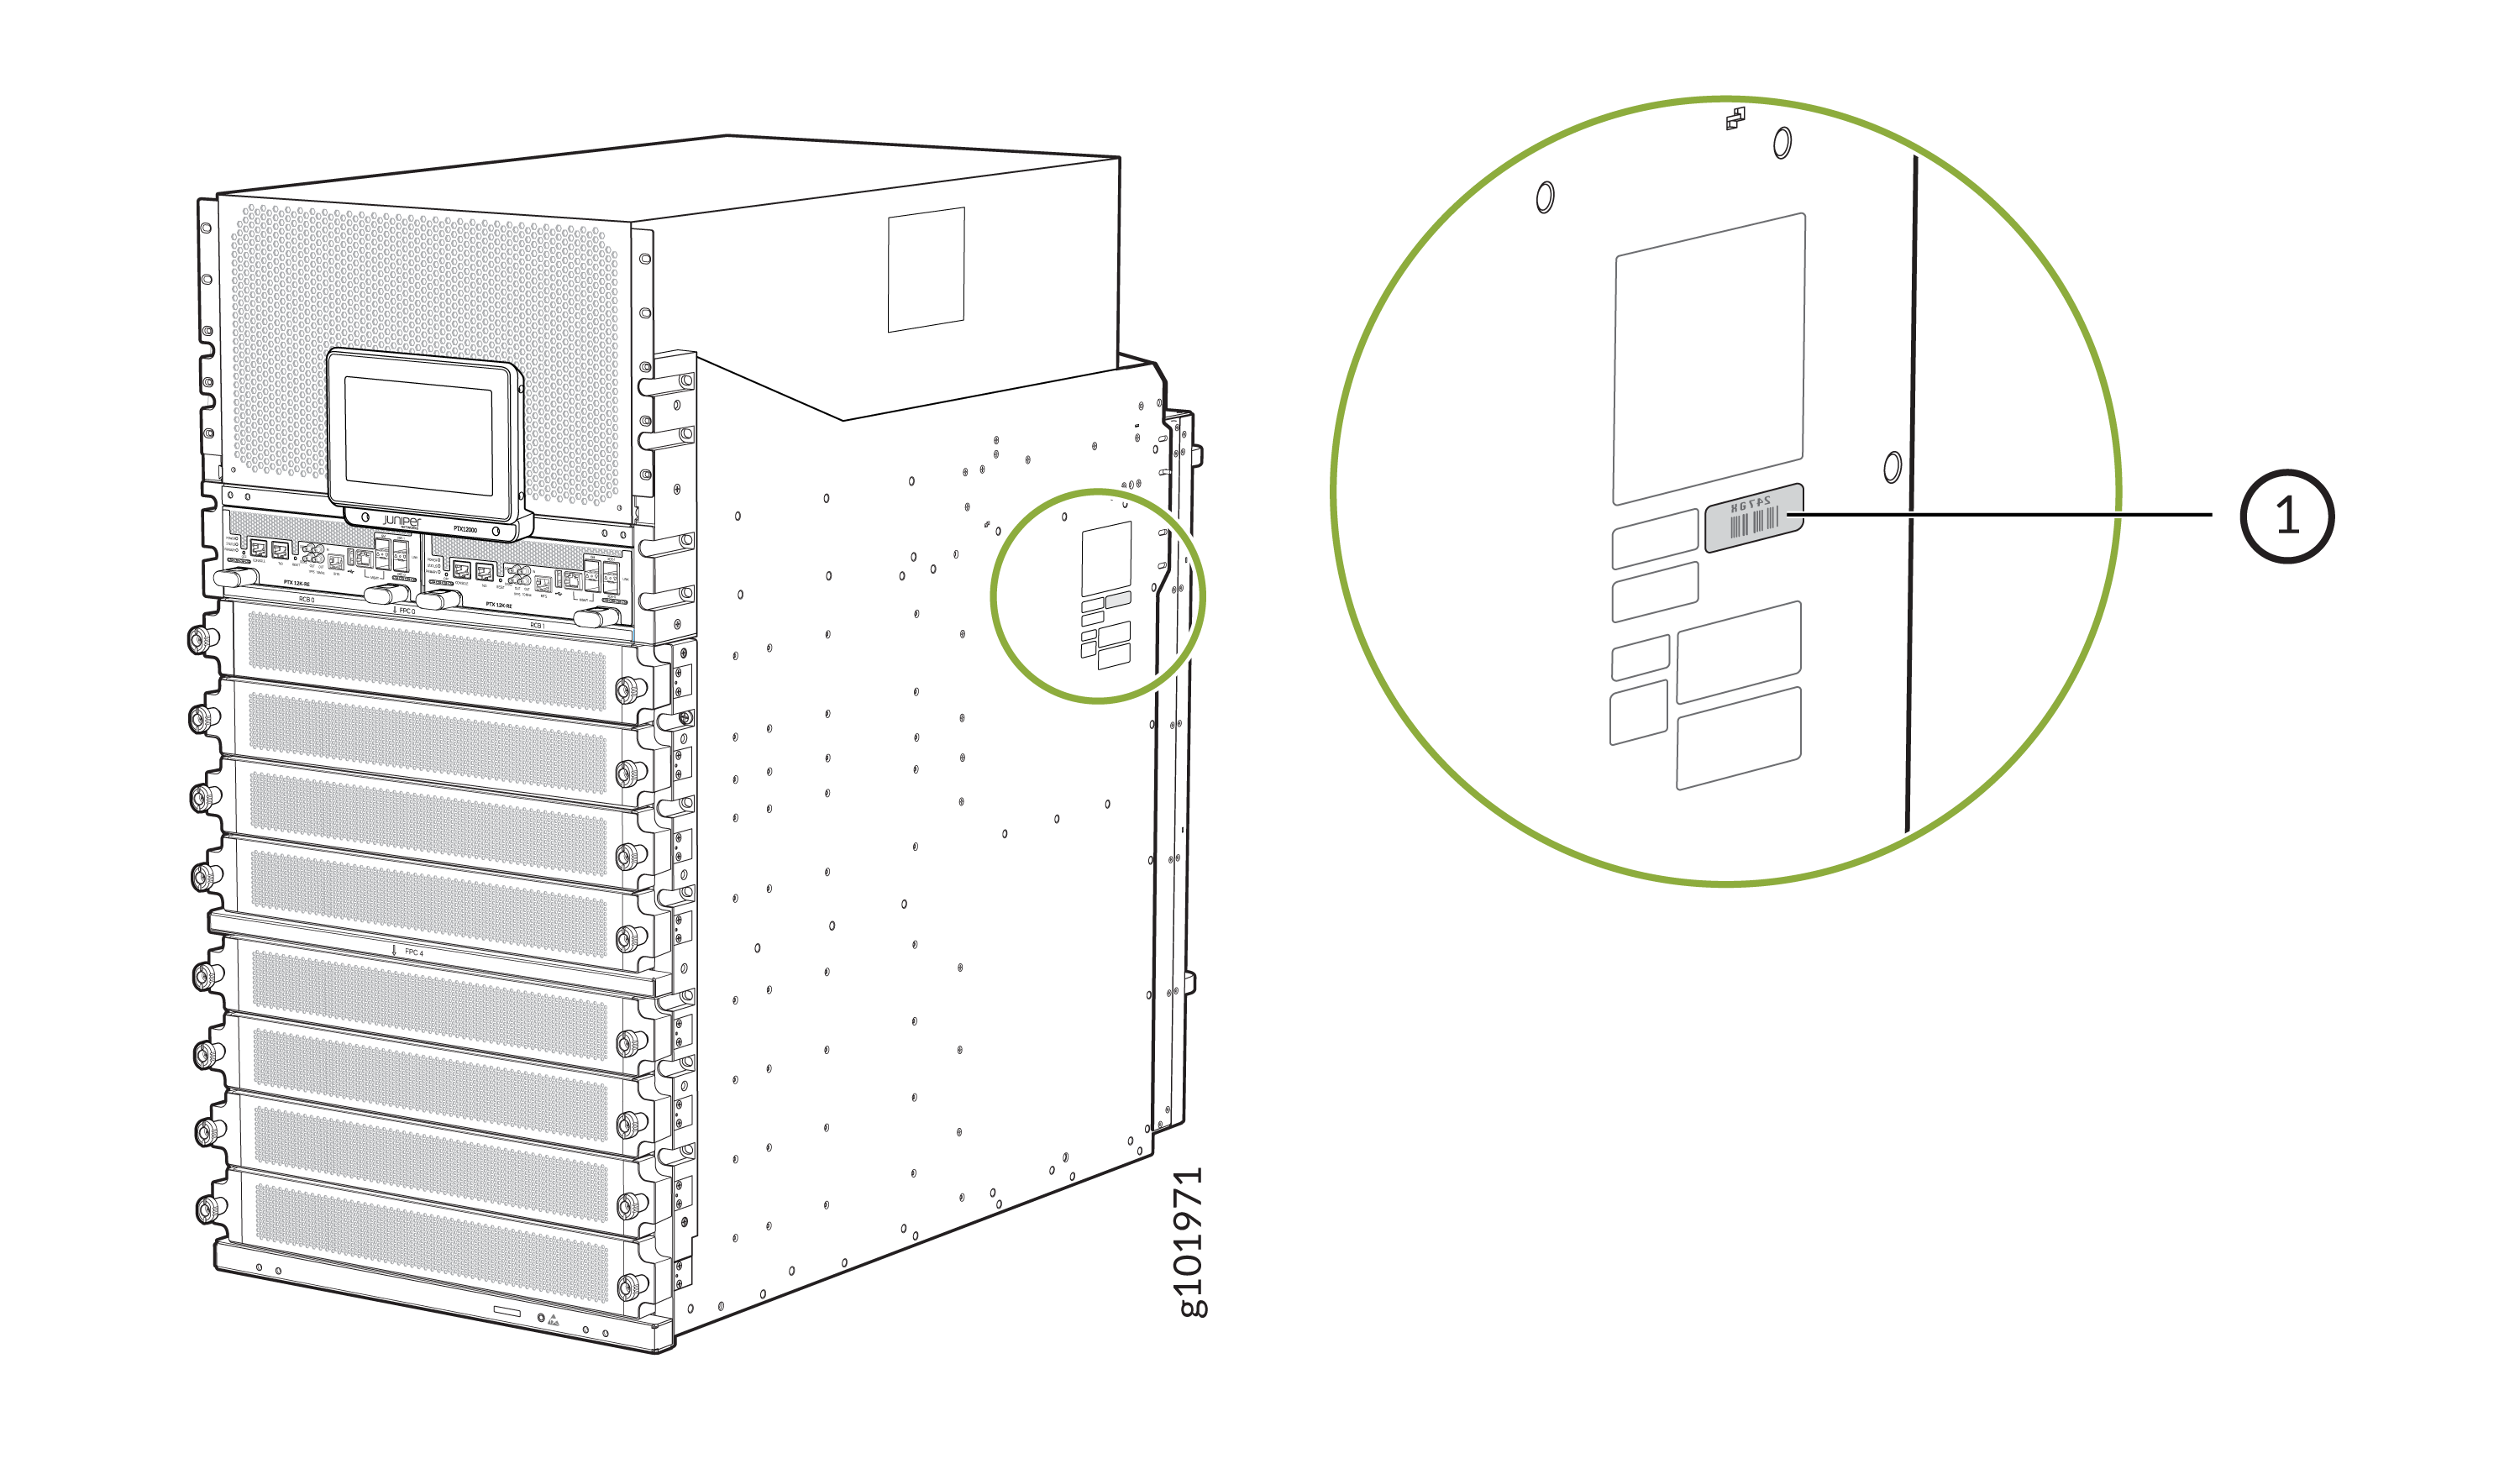
- Locate the Chassis Serial Number ID Label
- Locate the Serial Number ID Label on the AC/HVAC/HVDC Power Supply Module
- Locate the Serial Number ID Label on the DC Power Supply Module
- Locate the Serial Number ID Label on the Fan Tray
- Locate the Serial Number ID Label on the Routing and Control Board
- Locate the Serial Number ID Label on the Switch Interface Board
- Locate the Serial Number ID Label on the PTX12K-LC54OSFP and PTX12K-LC54QDD Flexible PIC Concentrators
List the PTX12008 Chassis and Component Details Using the CLI
To list the router and router components and their serial numbers, enter the show
chassis hardware command on the CLI.
user@host> show chassis hardware
Hardware inventory:
Item             Version  Part number  Serial number     Description
Chassis                                FX032             PTX12008
Midplane 0       REV 01   750-180225   BCFZ3803          Midplane 8
FPM 0            REV 01   750-181246   BCGB4121          Front Panel Display
PSM 0            REV 05   740-143236   1GH1D130494       JNP 3000W HVAC/HVDC Power Supply
PSM 1            REV 05   740-143236   1GH1D130478       JNP 3000W HVAC/HVDC Power Supply
PSM 2            REV 05   740-143236   1GH1D130499       JNP 3000W HVAC/HVDC Power Supply
PSM 3            REV 05   740-143236   1GH1D130486       JNP 3000W HVAC/HVDC Power Supply
PSM 4            REV 05   740-143236   1GH1D130487       JNP 3000W HVAC/HVDC Power Supply
PSM 5            REV 05   740-143236   1GH1D130483       JNP 3000W HVAC/HVDC Power Supply
PSM 6            REV 05   740-143236   1GH1D130463       JNP 3000W HVAC/HVDC Power Supply
PSM 7            REV 05   740-143236   1GH1D130474       JNP 3000W HVAC/HVDC Power Supply
PSM 8            REV 05   740-143236   1GH1D130469       JNP 3000W HVAC/HVDC Power Supply
PSM 9            REV 05   740-143236   1GH1D130485       JNP 3000W HVAC/HVDC Power Supply
PSM 10           REV 06   740-143236   1GH1E430638       JNP 3000W HVAC/HVDC Power Supply
PSM 11           REV 06   740-143236   1F36E500027       JNP 3000W HVAC/HVDC Power Supply
PSM 12           REV 06   740-143236   1F36E500126       JNP 3000W HVAC/HVDC Power Supply
PSM 13           REV 06   740-143236   1F36E500007       JNP 3000W HVAC/HVDC Power Supply
PSM 14           REV 06   740-143236   1F36E500012       JNP 3000W HVAC/HVDC Power Supply
PSM 15           REV 05   740-143236   1GH1D130429       JNP 3000W HVAC/HVDC Power Supply
PSM 16           REV 05   740-143236   1GH1D130489       JNP 3000W HVAC/HVDC Power Supply
PSM 17           REV 05   740-143236   1GH1D130491       JNP 3000W HVAC/HVDC Power Supply
PSM 18           REV 05   740-143236   1GH1D130476       JNP 3000W HVAC/HVDC Power Supply
PSM 19           REV 05   740-143236   1GH1D130498       JNP 3000W HVAC/HVDC Power Supply
Routing Engine 0          BUILTIN      BUILTIN           PTX12K-RE
Routing Engine 1          BUILTIN      BUILTIN           PTX12K-RE
CB 0             REV 06   750-173945   BCFS1429          Control Board
CB 1             REV 12   750-173945   BCGR4043          Control Board
FPC 0            REV 29   750-173325   BCGJ3200          PTX12K-LC54QDD
  CPU            REV 05   750-173947   BCGF9527          PTX12K-LC54 PMB Board
  PIC 0                   BUILTIN      BUILTIN           PTX12K-54QDD800-LC-PIC
  MEZZ 0         REV 09   750-175158   BCGF9428          PTX12K-LC54QDD MEZZ A Board
  MEZZ 1         REV 08   750-175159   BCGG0265          PTX12K-LC54QDD MEZZ B Board
  MEZZ 2         REV 06   750-175033   BCGF5395          PTX12K-LC54 Power Board Right
  MEZZ 3         REV 07   750-175031   BCGF4361          PTX12K-LC54 Power Board Left
FPC 1            REV 17   750-173322   BCFZ3747          PTX12K-LC54OSFP
  CPU            REV 04   750-173947   BCFZ6313          PTX12K-LC54 PMB Board
  PIC 0                   BUILTIN      BUILTIN           PTX12K-54OSFP800-LC-PIC
  MEZZ 0         REV 04   750-175154   BCFZ6245          PTX12K-LC54OSFP MEZZ A Board
  MEZZ 1         REV 04   750-175157   BCFZ7496          PTX12K-LC54OSFP MEZZ B Board
  MEZZ 2         REV 04   750-175033   BCFX9225          PTX12K-LC54 Power Board Right
  MEZZ 3         REV 05   750-175031   BCFZ2121          PTX12K-LC54 Power Board Left
FPC 2            REV 29   750-173325   BCGJ3197          PTX12K-LC54QDD
  CPU            REV 05   750-173947   BCGF9519          PTX12K-LC54 PMB Board
  PIC 0                   BUILTIN      BUILTIN           PTX12K-54QDD800-LC-PIC
  MEZZ 0         REV 09   750-175158   BCGF9424          PTX12K-LC54QDD MEZZ A Board
  MEZZ 1         REV 08   750-175159   BCGG0257          PTX12K-LC54QDD MEZZ B Board
  MEZZ 2         REV 06   750-175033   BCGF5402          PTX12K-LC54 Power Board Right
  MEZZ 3         REV 07   750-175031   BCGF4365          PTX12K-LC54 Power Board Left
FPC 3            REV 29   750-173322   BCGJ3189          PTX12K-LC54OSFP
  CPU            REV 05   750-173947   BCGF9523          PTX12K-LC54 PMB Board
  PIC 0                   BUILTIN      BUILTIN           PTX12K-54OSFP800-LC-PIC
  MEZZ 0         REV 09   750-175154   BCGF9247          PTX12K-LC54OSFP MEZZ A Board
  MEZZ 1         REV 08   750-175157   BCGF9432          PTX12K-LC54OSFP MEZZ B Board
  MEZZ 2         REV 06   750-175033   BCGF5418          PTX12K-LC54 Power Board Right
  MEZZ 3         REV 07   750-175031   BCGF4376          PTX12K-LC54 Power Board Left
FPC 4            REV 17   750-173322   BCFY2429          PTX12K-LC54OSFP
  CPU            REV 04   750-173947   BCFZ6306          PTX12K-LC54 PMB Board
  PIC 0                   BUILTIN      BUILTIN           PTX12K-54OSFP800-LC-PIC
  MEZZ 0         REV 04   750-175154   BCFZ6255          PTX12K-LC54OSFP MEZZ A Board
  MEZZ 1         REV 04   750-175157   BCFZ7448          PTX12K-LC54OSFP MEZZ B Board
  MEZZ 2         REV 04   750-175033   BCFX9240          PTX12K-LC54 Power Board Right
  MEZZ 3         REV 05   750-175031   BCFZ2111          PTX12K-LC54 Power Board Left
FPC 5            REV 46   750-173322   BCGT8620          PTX12K-LC54OSFP
  CPU            REV 08   750-173947   BCGT9286          PTX12K-LC54 PMB Board
  PIC 0                   BUILTIN      BUILTIN           PTX12K-54OSFP800-LC-PIC
  MEZZ 0         REV 12   750-175154   BCGV2215          PTX12K-LC54OSFP MEZZ A Board
  MEZZ 1         REV 10   750-175157   BCGT9230          PTX12K-LC54OSFP MEZZ B Board
  MEZZ 2         REV 08   750-175033   BCGV2153          PTX12K-LC54 Power Board Right
  MEZZ 3         REV 09   750-175031   BCGV3115          PTX12K-LC54 Power Board Left
FPC 6            REV 17   750-173322   BCFY2414          PTX12K-LC54OSFP
  CPU            REV 04   750-173947   BCFZ6346          PTX12K-LC54 PMB Board
  PIC 0                   BUILTIN      BUILTIN           PTX12K-54OSFP800-LC-PIC
  MEZZ 0         REV 04   750-175154   BCFZ6263          PTX12K-LC54OSFP MEZZ A Board
  MEZZ 1         REV 04   750-175157   BCFZ7453          PTX12K-LC54OSFP MEZZ B Board
  MEZZ 2         REV 04   750-175033   BCFX9243          PTX12K-LC54 Power Board Right
  MEZZ 3         REV 05   750-175031   BCFZ1900          PTX12K-LC54 Power Board Left
FPC 7            REV 17   750-173322   BCFY2416          PTX12K-LC54OSFP
  CPU            REV 04   750-173947   BCFZ6318          PTX12K-LC54 PMB Board
  PIC 0                   BUILTIN      BUILTIN           PTX12K-54OSFP800-LC-PIC
  MEZZ 0         REV 04   750-175154   BCFZ6281          PTX12K-LC54OSFP MEZZ A Board
  MEZZ 1         REV 04   750-175157   BCFZ7499          PTX12K-LC54OSFP MEZZ B Board
  MEZZ 2         REV 04   750-175033   BCFX9221          PTX12K-LC54 Power Board Right
  MEZZ 3         REV 05   750-175031   BCFZ2102          PTX12K-LC54 Power Board Left
SIB 0            REV 20   750-173308   BCGR7353          SIB-PTX12008-SF
  MEZZ 0         REV 04   750-176911   BCGS0396          SIB-PTX12008-SF Power Board
SIB 1            REV 20   750-173308   BCGR7344          SIB-PTX12008-SF
  MEZZ 0         REV 04   750-176911   BCGS0406          SIB-PTX12008-SF Power Board
SIB 2            REV 20   750-173308   BCGR7339          SIB-PTX12008-SF
  MEZZ 0         REV 04   750-176911   BCGS0379          SIB-PTX12008-SF Power Board
SIB 3            REV 22   750-173308   BCGV5056          SIB-PTX12008-SF
  MEZZ 0         REV 04   750-176911   BCGV2204          SIB-PTX12008-SF Power Board
SIB 4            REV 20   750-173308   BCGR7335          SIB-PTX12008-SF
  MEZZ 0         REV 04   750-176911   BCGS0407          SIB-PTX12008-SF Power Board
SIB 5            REV 22   750-173308   BCGV5055          SIB-PTX12008-SF
  MEZZ 0         REV 04   750-176911   BCGV2209          SIB-PTX12008-SF Power Board
SIB 6            REV 22   750-173308   BCGV5061          SIB-PTX12008-SF
  MEZZ 0         REV 04   750-176911   BCGV2196          SIB-PTX12008-SF Power Board
SIB 7            REV 22   750-173308   BCGV5059          SIB-PTX12008-SF
  MEZZ 0         REV 04   750-176911   BCGV2164          SIB-PTX12008-SF Power Board
SIB 8            REV 22   750-173308   BCGV5058          SIB-PTX12008-SF
  MEZZ 0         REV 04   750-176911   BCGT2281          SIB-PTX12008-SF Power Board
Fan Tray 0       REV 01   750-175846   BCFW3852          PTX12008 Fan tray
Fan Tray 1       REV 01   750-175846   BCFW3820          PTX12008 Fan tray
Fan Tray 2       REV 01   750-175846   BCFW3816          PTX12008 Fan tray
POWERSHELF 0              BUILTIN      BUILTIN           5 Row PSM POWERSHELF
Locate the Chassis Serial Number ID Label
You can find the serial number ID label on the right hand side of the chassis.
Locate the Serial Number ID Label on the AC/HVAC/HVDC Power Supply Module
You can find the serial number ID label on the top side of the AC/HVAC/HVDC power supply module (PSM).
The PSMs are supplied by two suppliers. The name of the supplier is displayed on the serial number ID label.
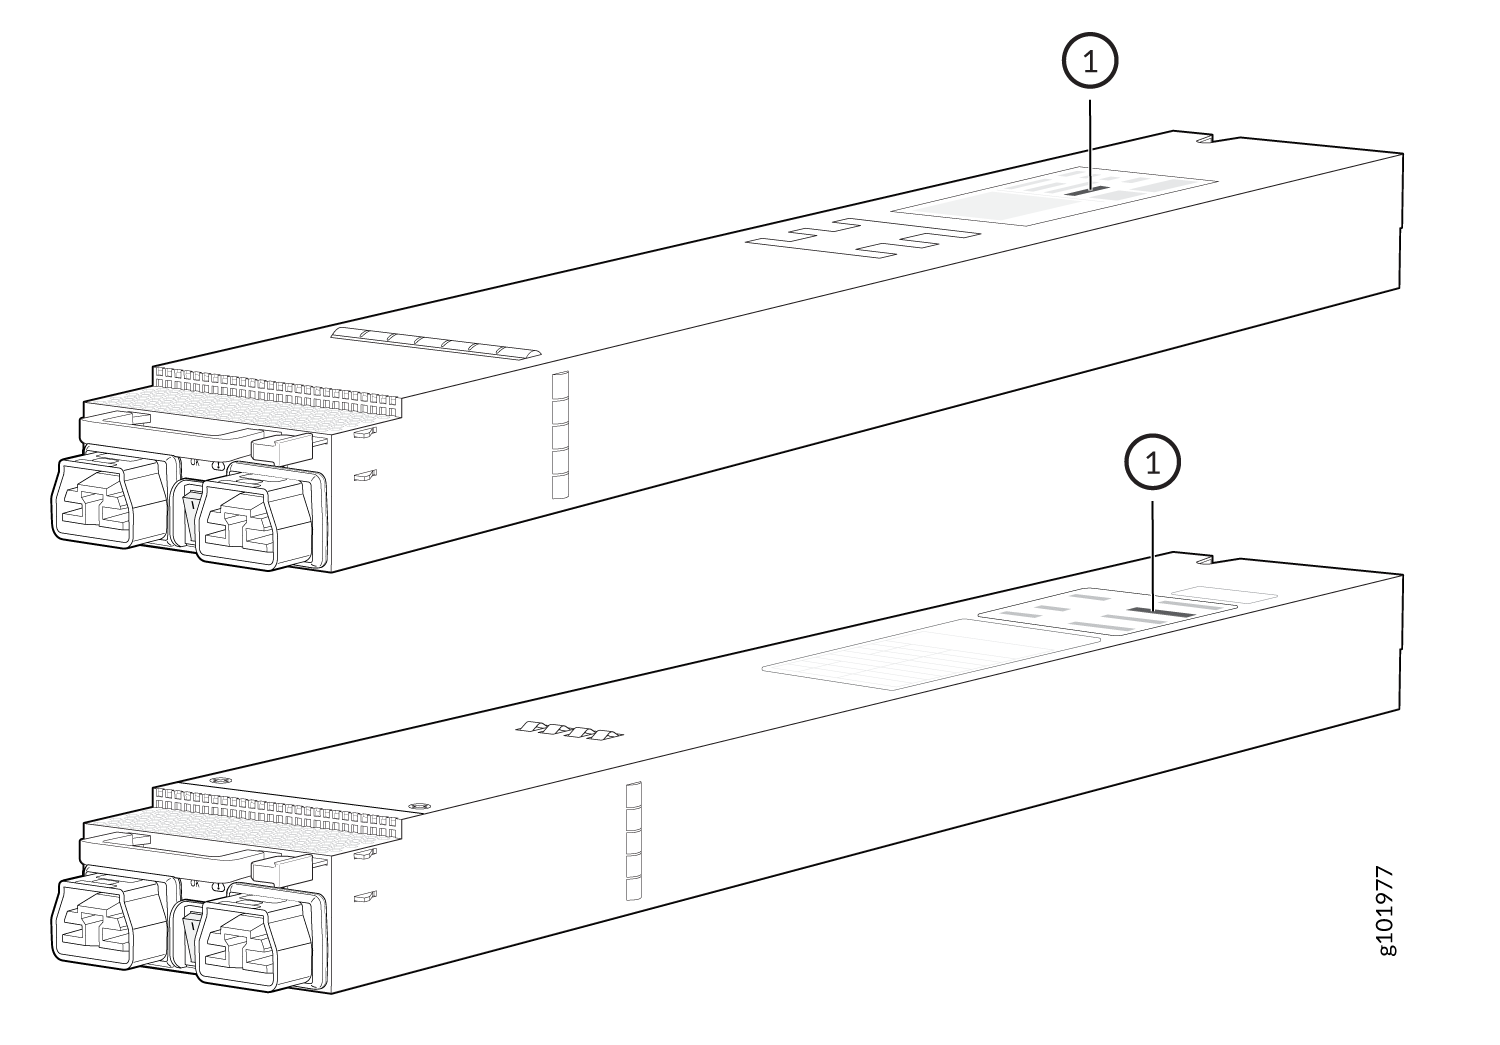
1 — Serial number ID label |
Locate the Serial Number ID Label on the DC Power Supply Module
You can find the serial number ID label on the top side of the DC PSM.
The PSMs are supplied by two suppliers. The name of the supplier is displayed on the serial number ID label.
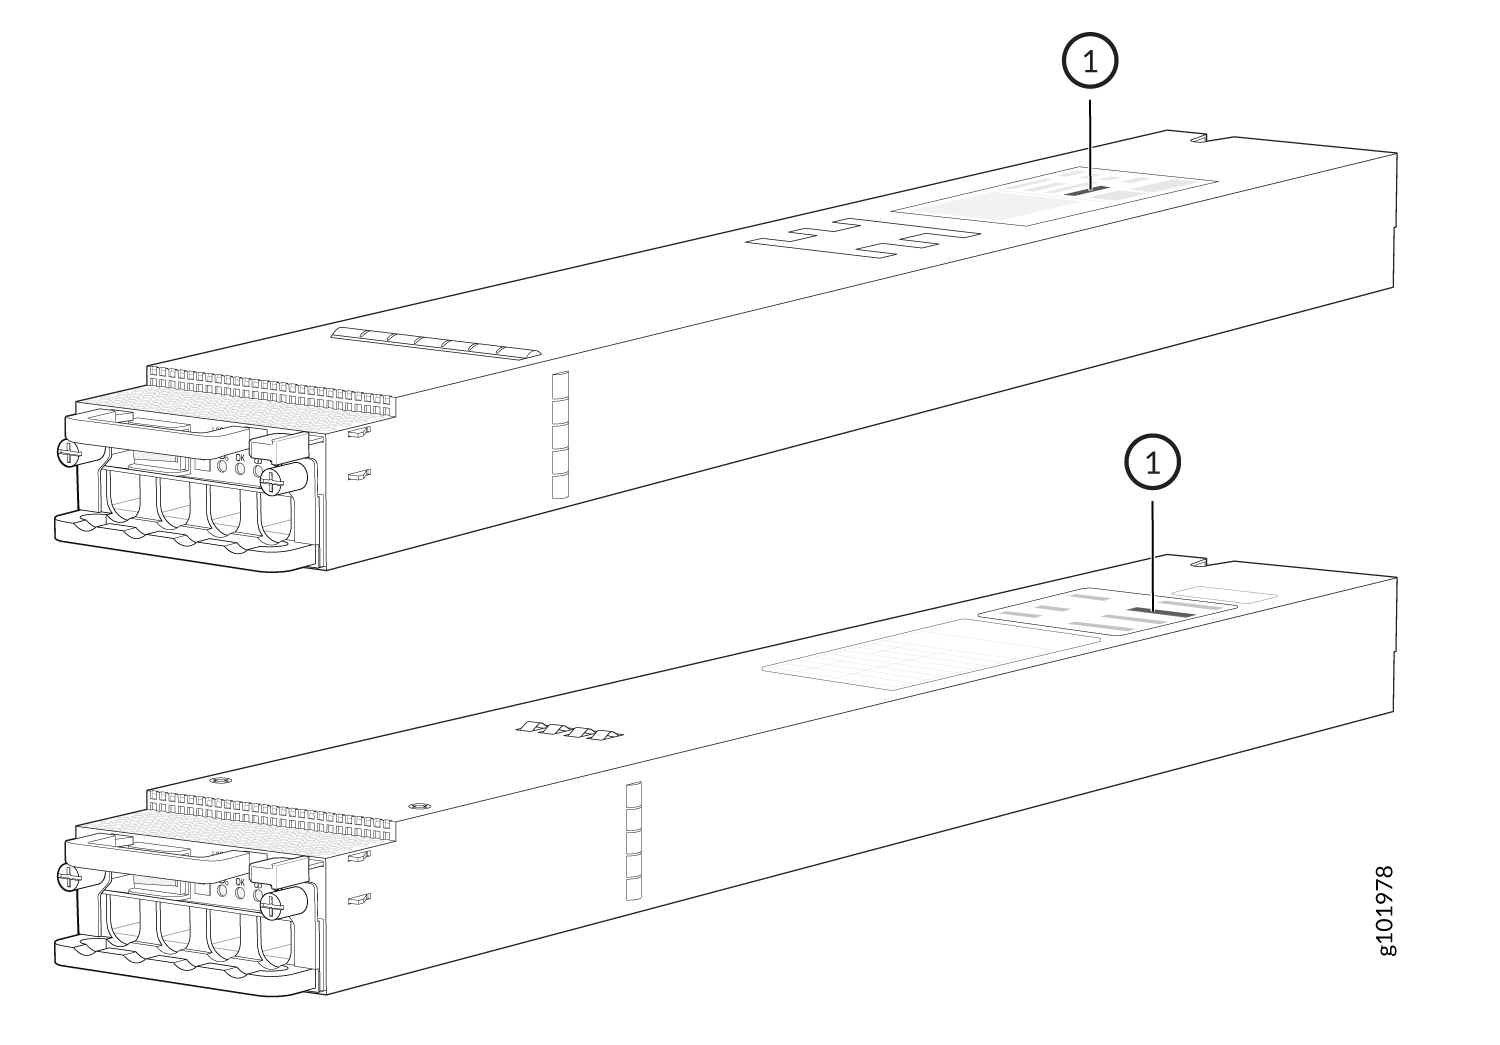
1 — Serial number ID label |
Locate the Serial Number ID Label on the Fan Tray
You can find the serial number ID label on the top side of the fan tray.
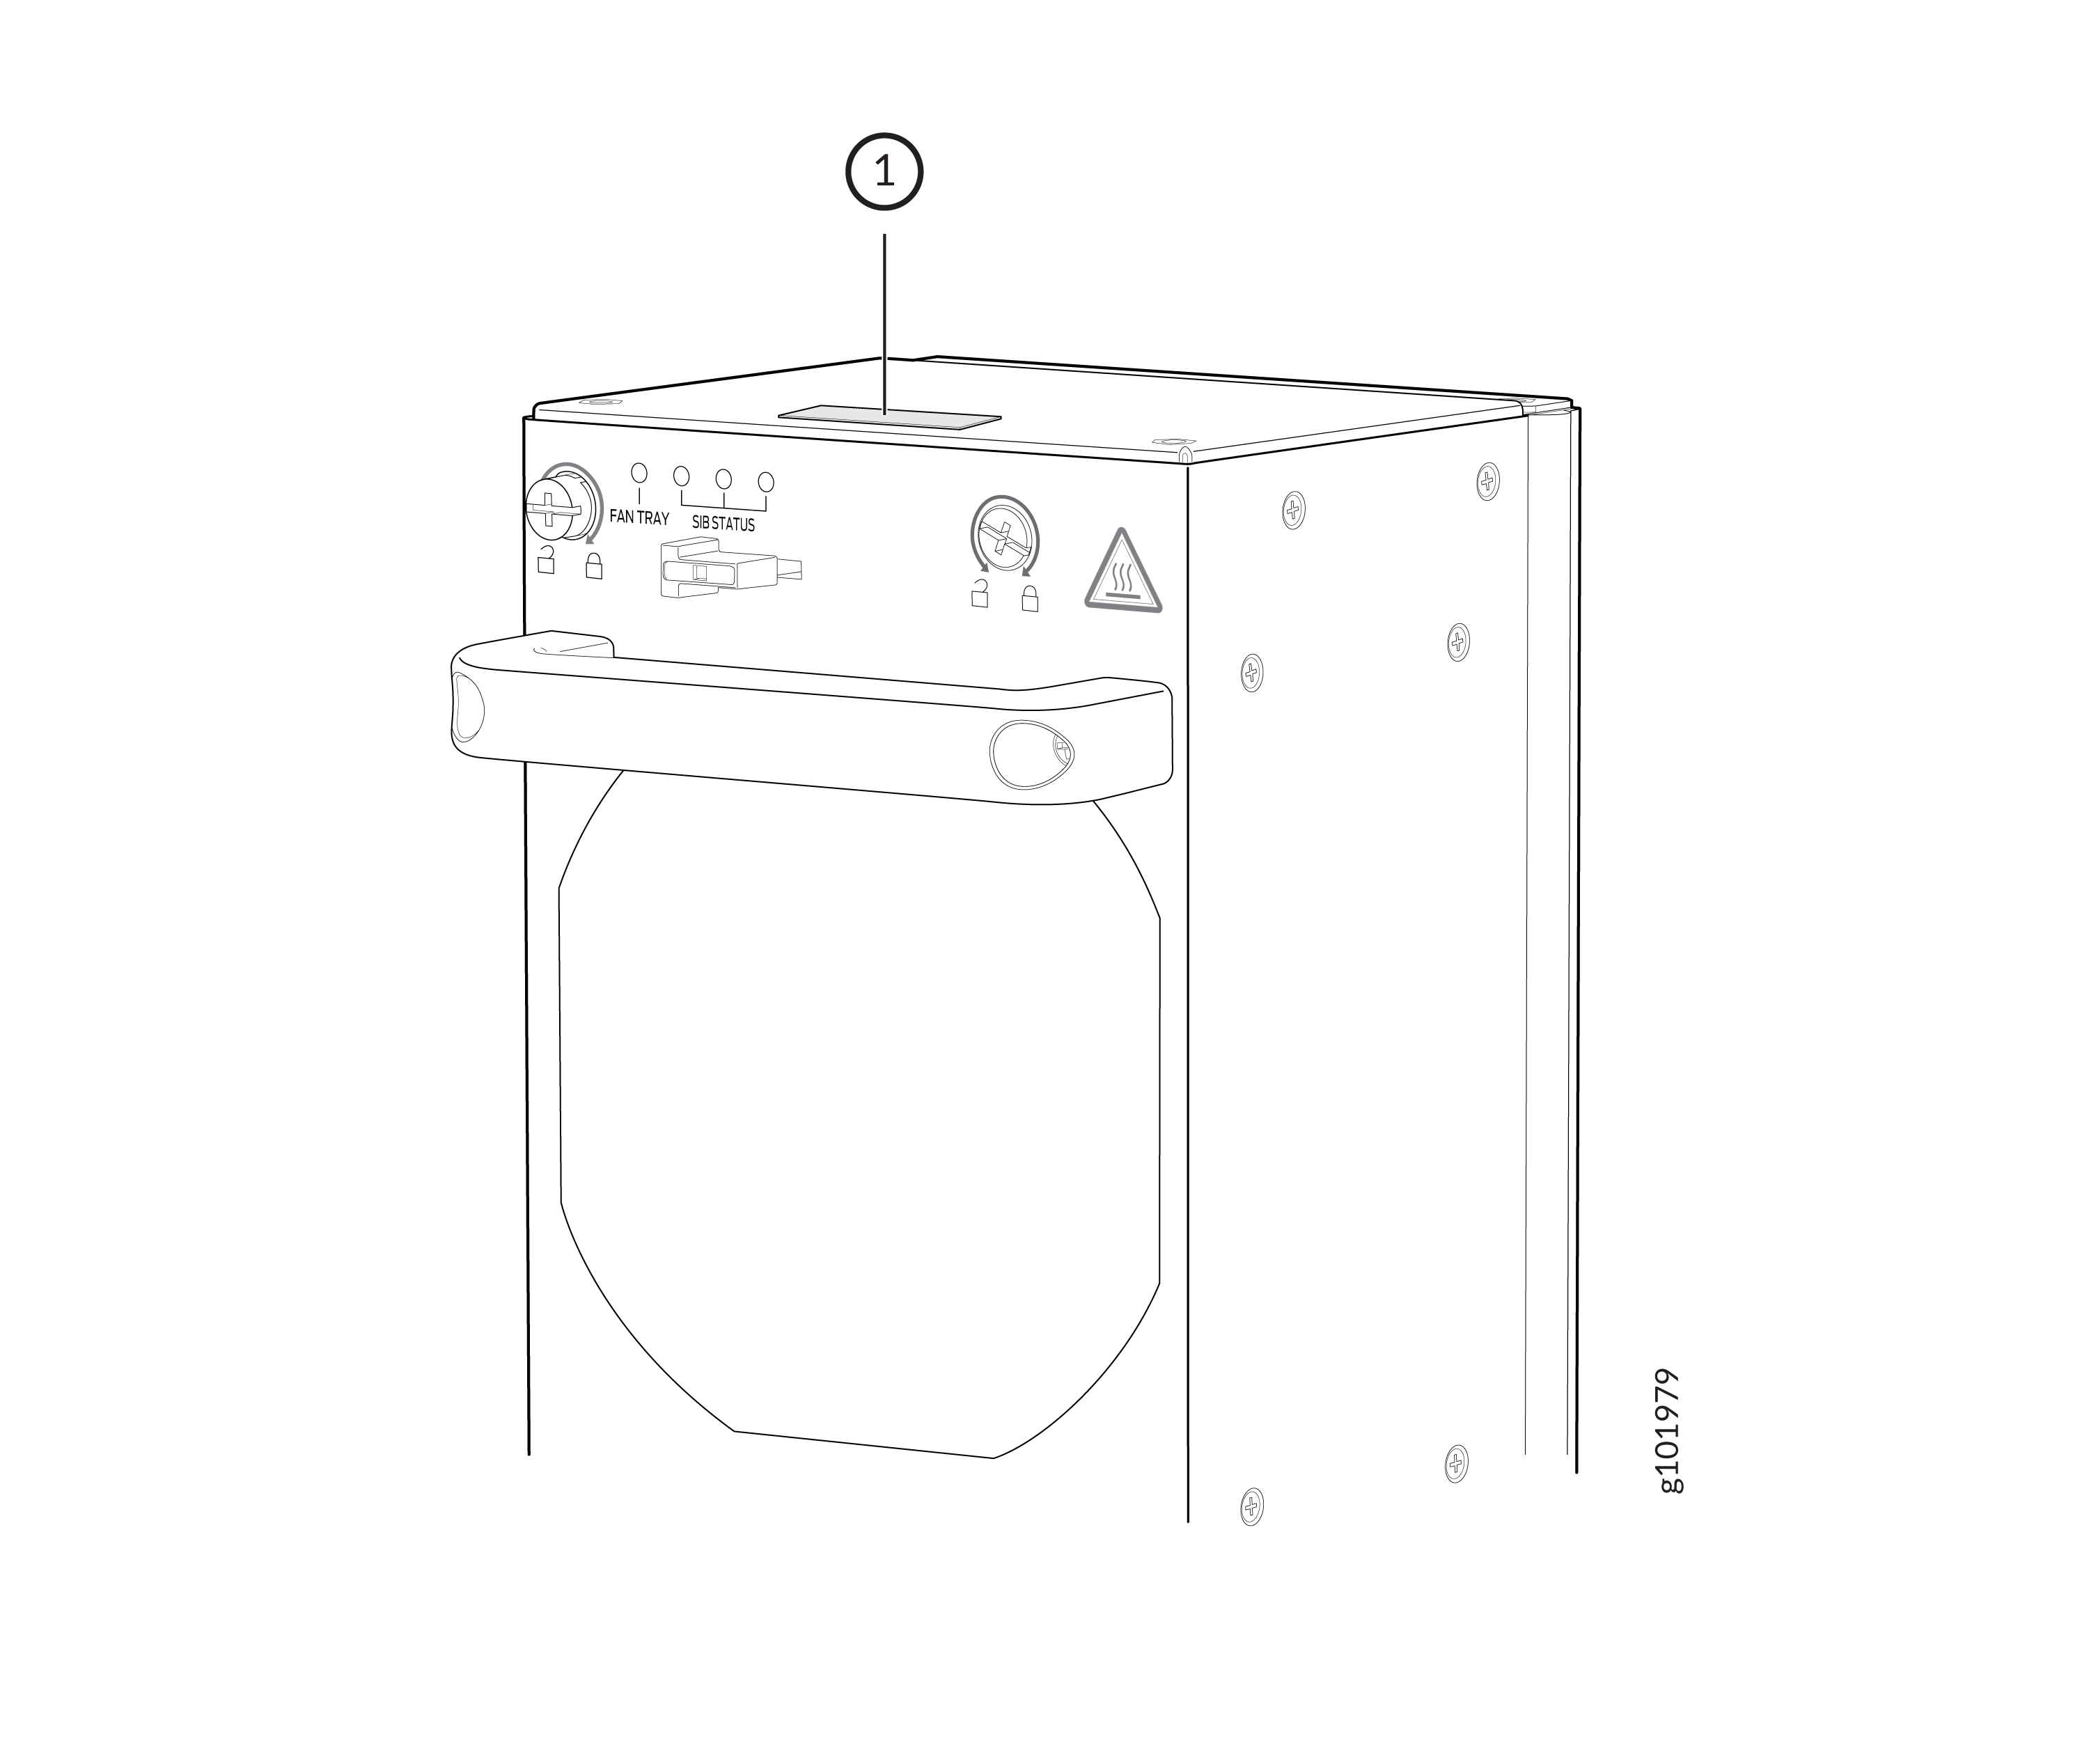
1 — Serial number ID label |
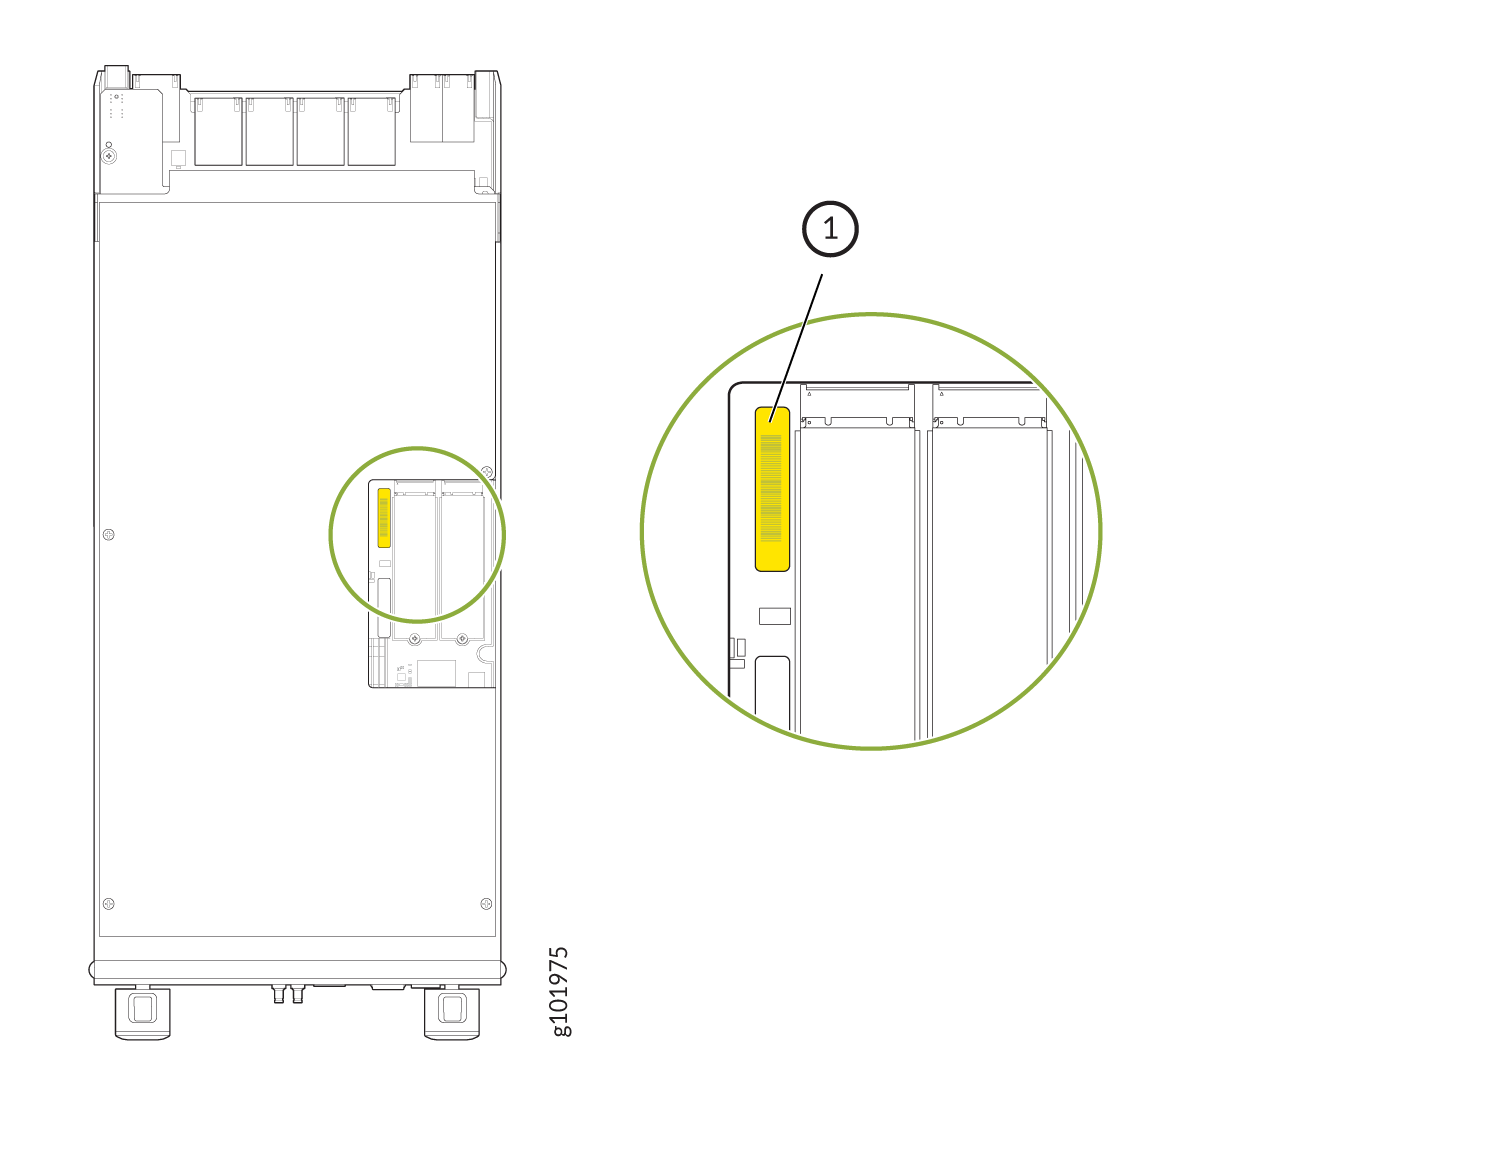
Locate the Serial Number ID Label on the Routing and Control Board
You can find the serial number ID label on the top side of the Routing and Control Board (RCB).
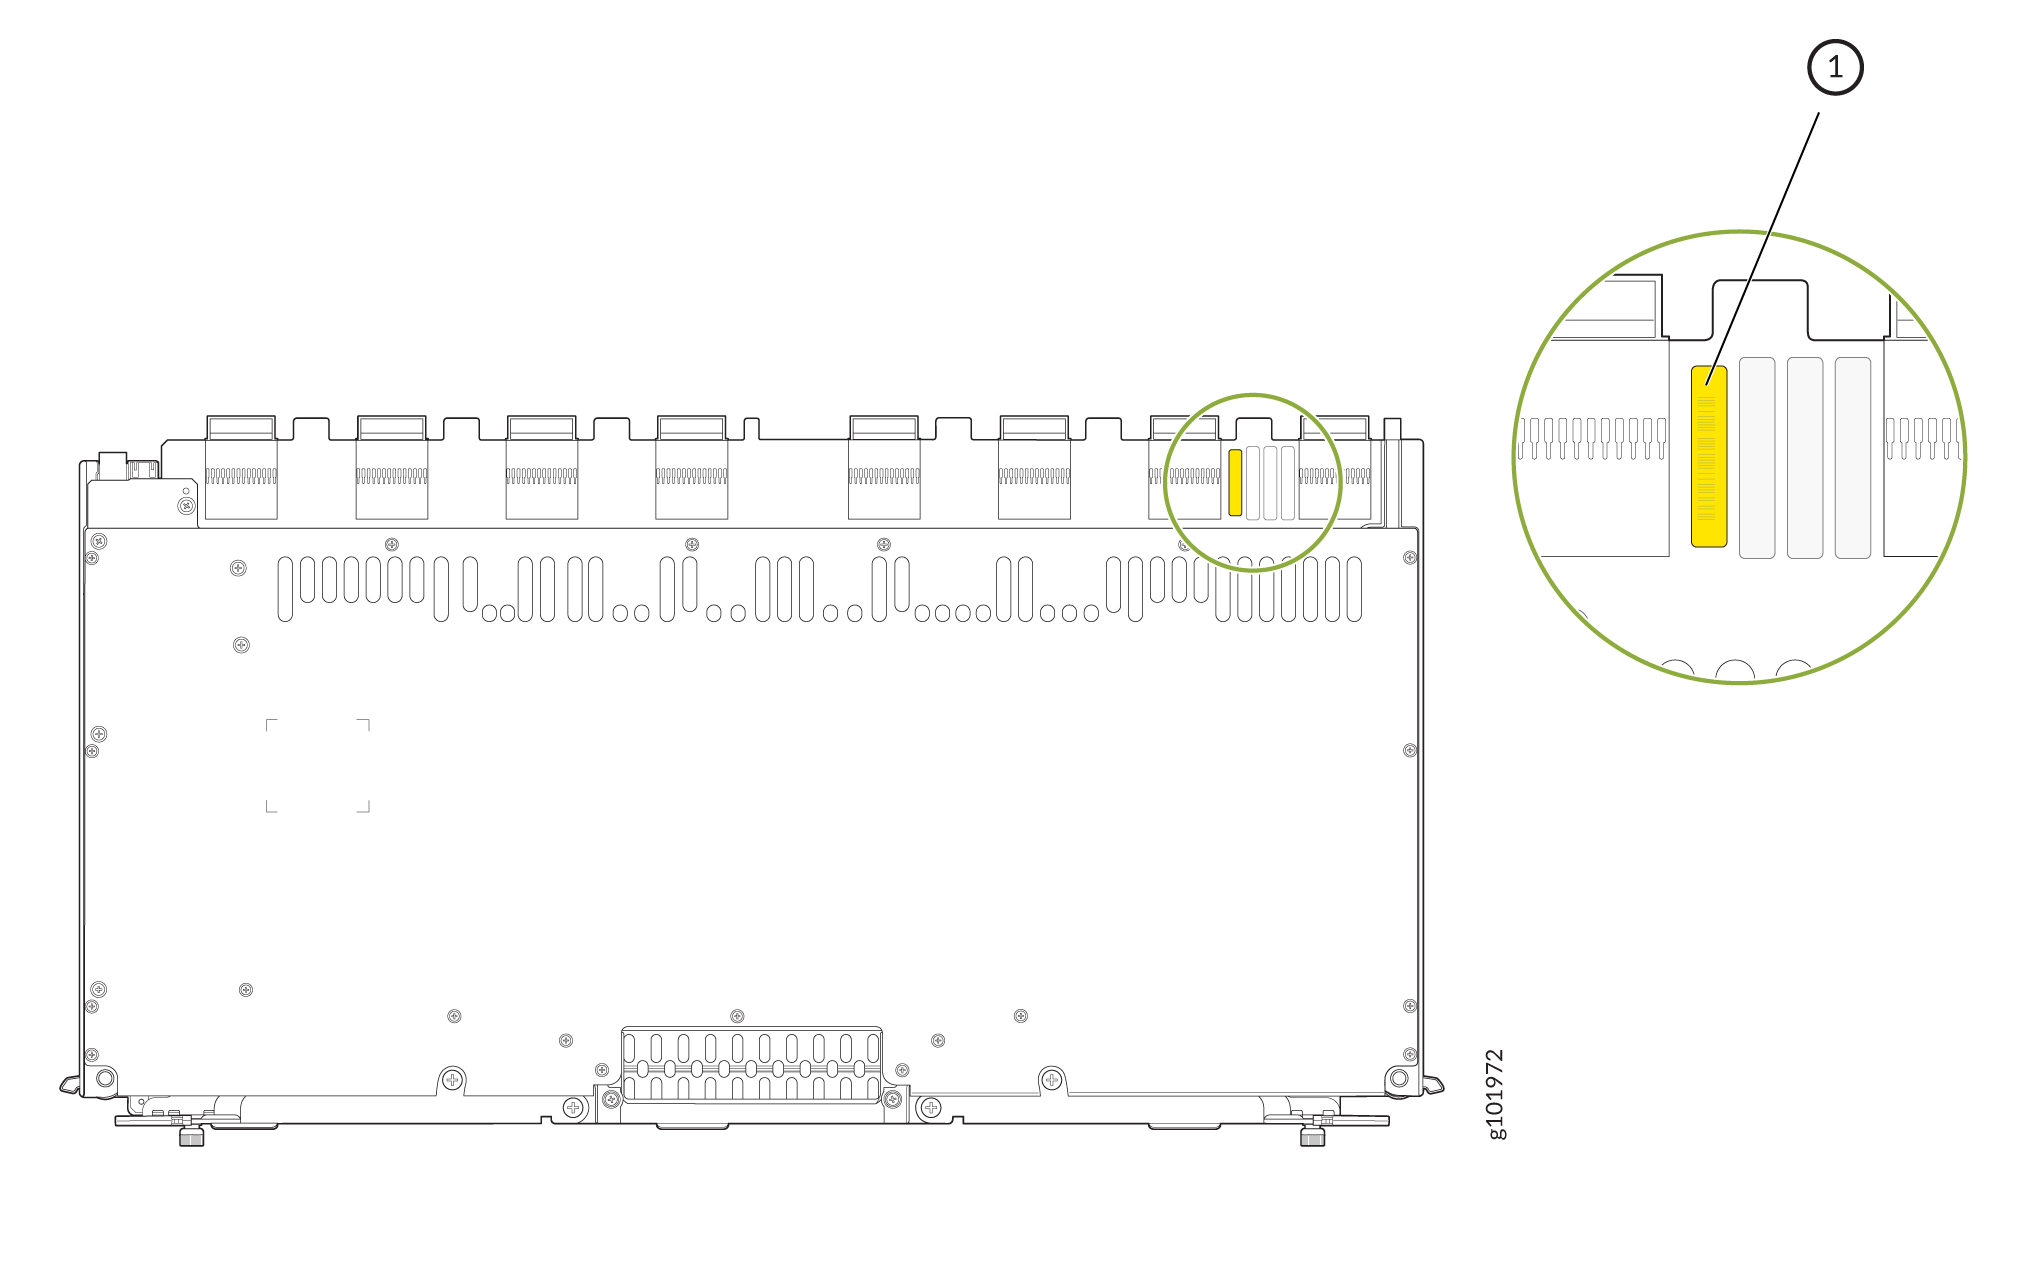
Locate the Serial Number ID Label on the Switch Interface Board
You can find the serial number ID label on the top side of the Switch Interface Board (SIB).
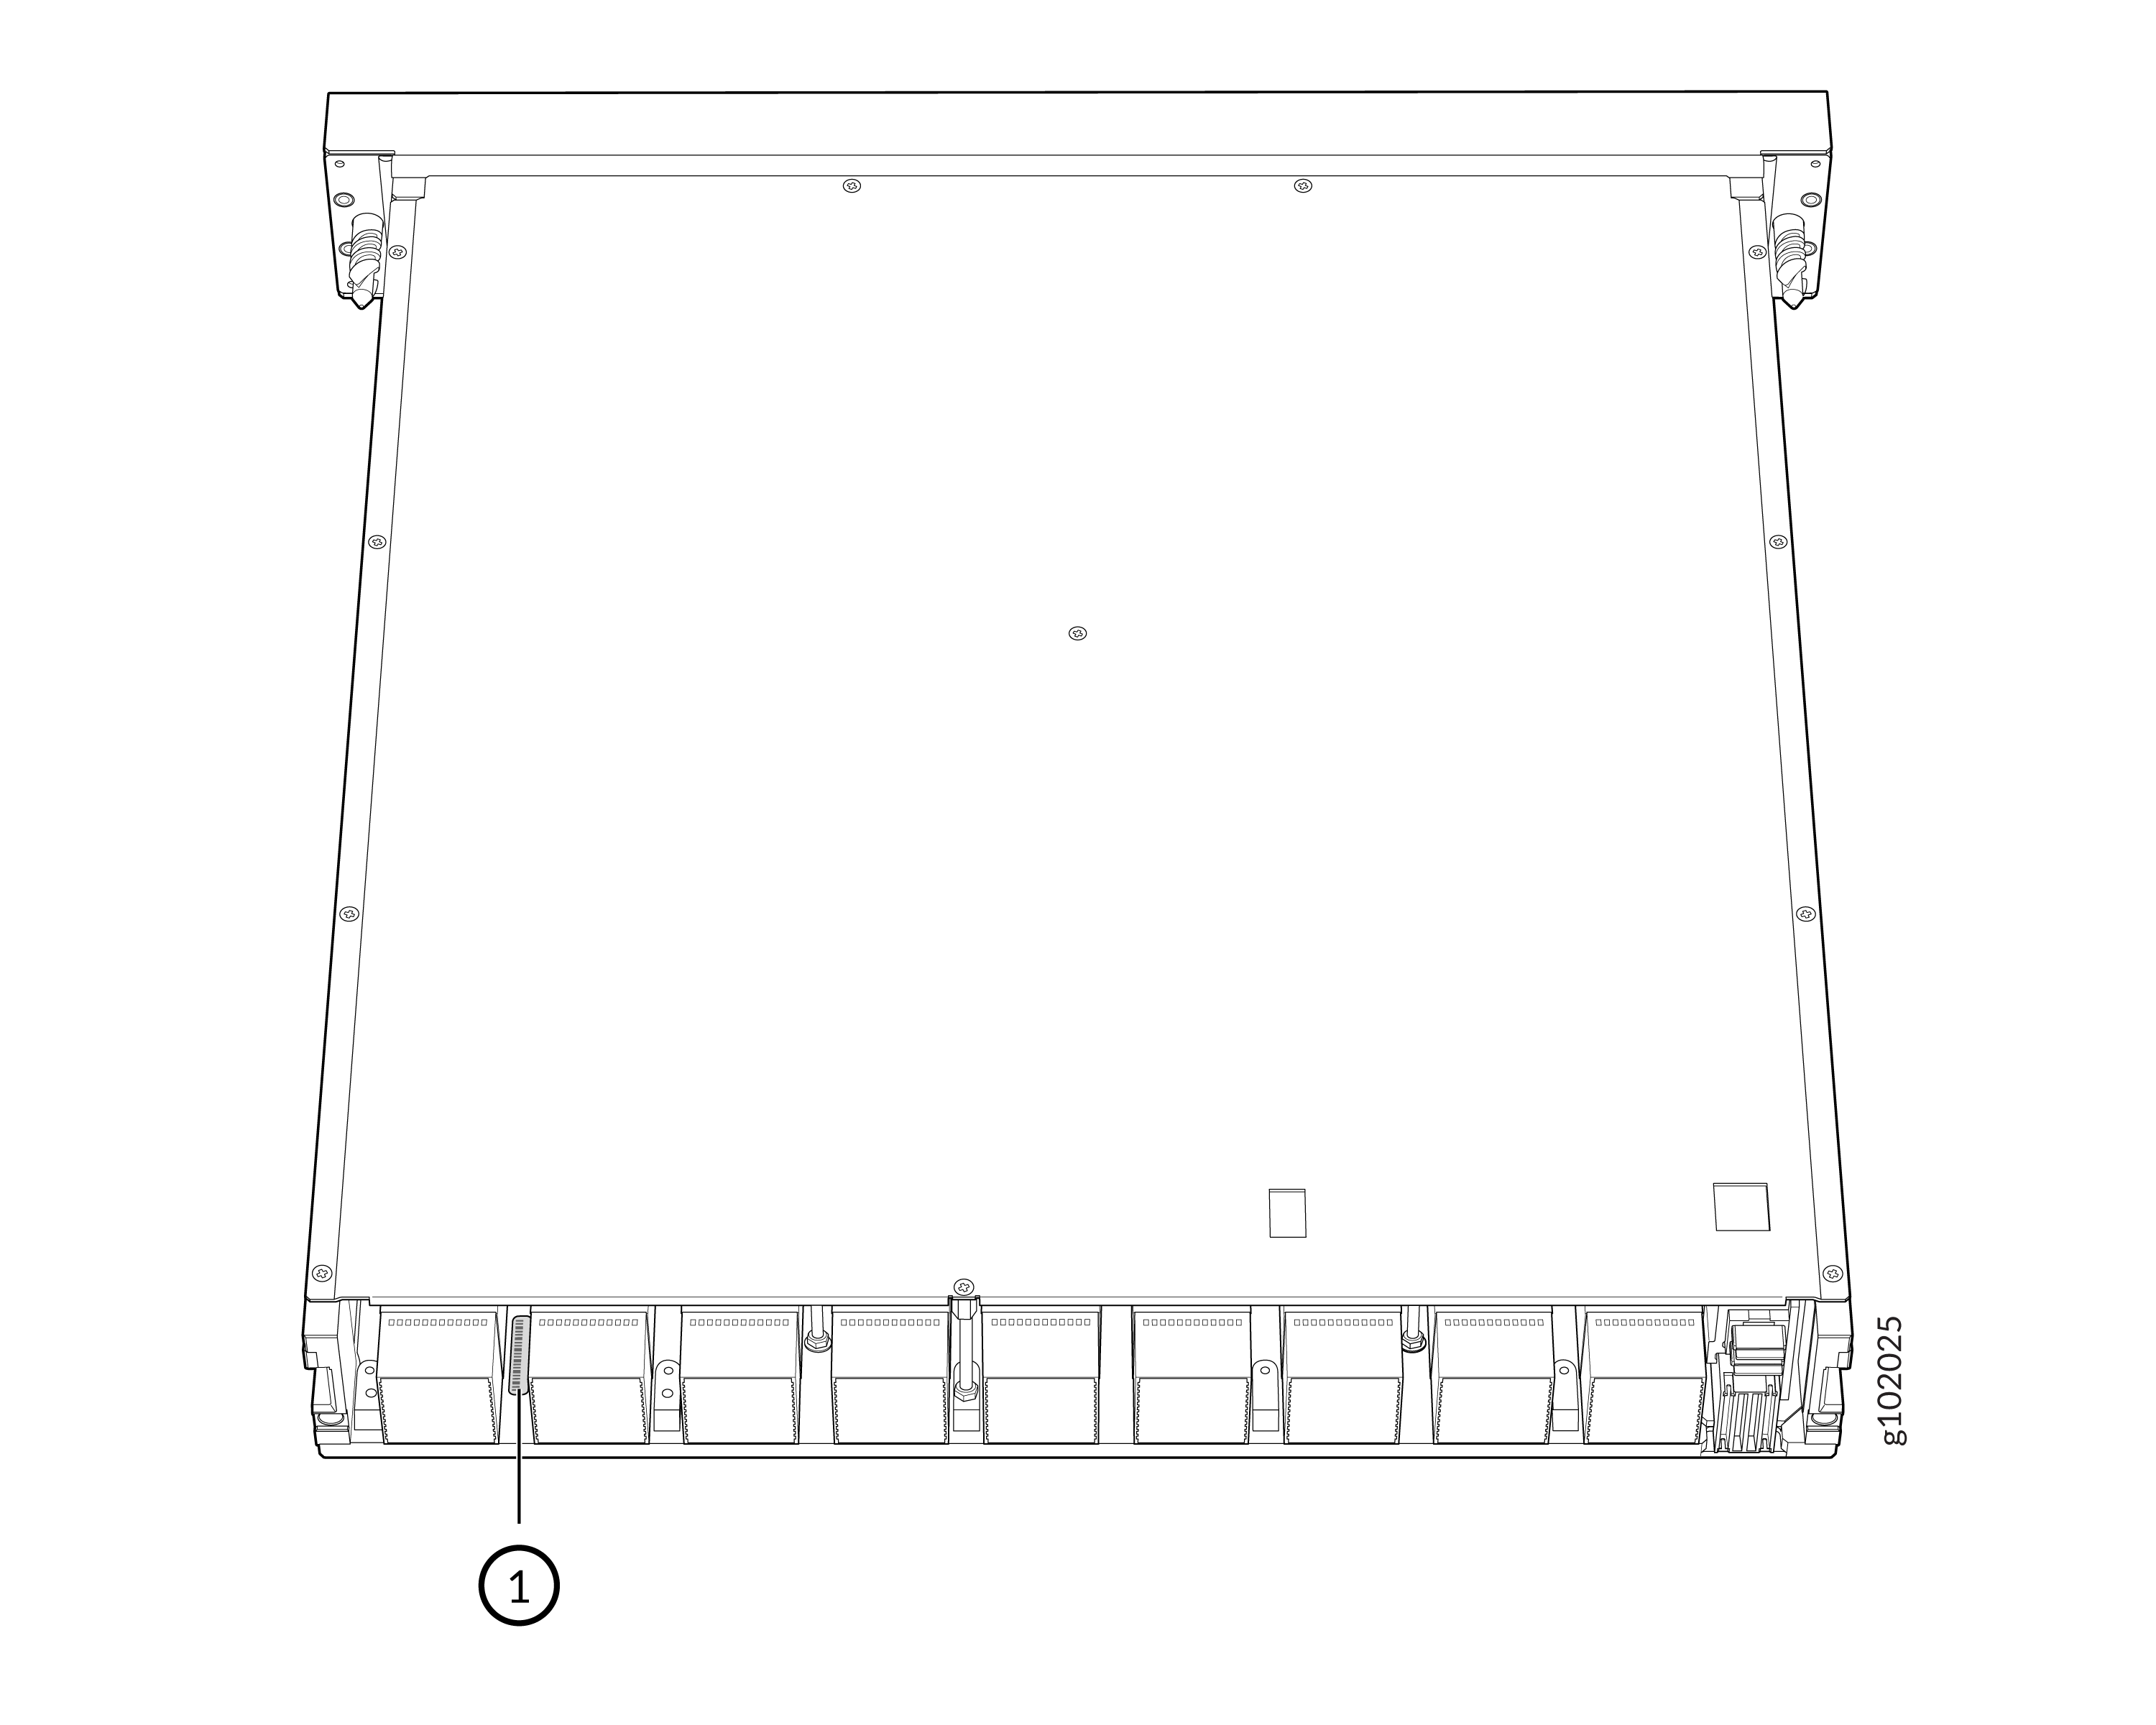
Locate the Serial Number ID Label on the PTX12K-LC54OSFP and PTX12K-LC54QDD Flexible PIC Concentrators
You can find the serial number ID label on the back side of the Flexible PIC Concentrator (FPC).
Remove the Front Door
Before you remove the front door from a PTX12008:
-
Ensure that you understand how to prevent electrostatic discharge (ESD) damage. See Prevention of Electrostatic Discharge Damage.
-
Ensure that you have the following parts and tools available:
-
An ESD grounding strap—not provided
-
A Phillips (+) screwdriver, number 2—not provided
-
Two antistatic bags—not provided
-
To remove the front door from a PTX12008:
-
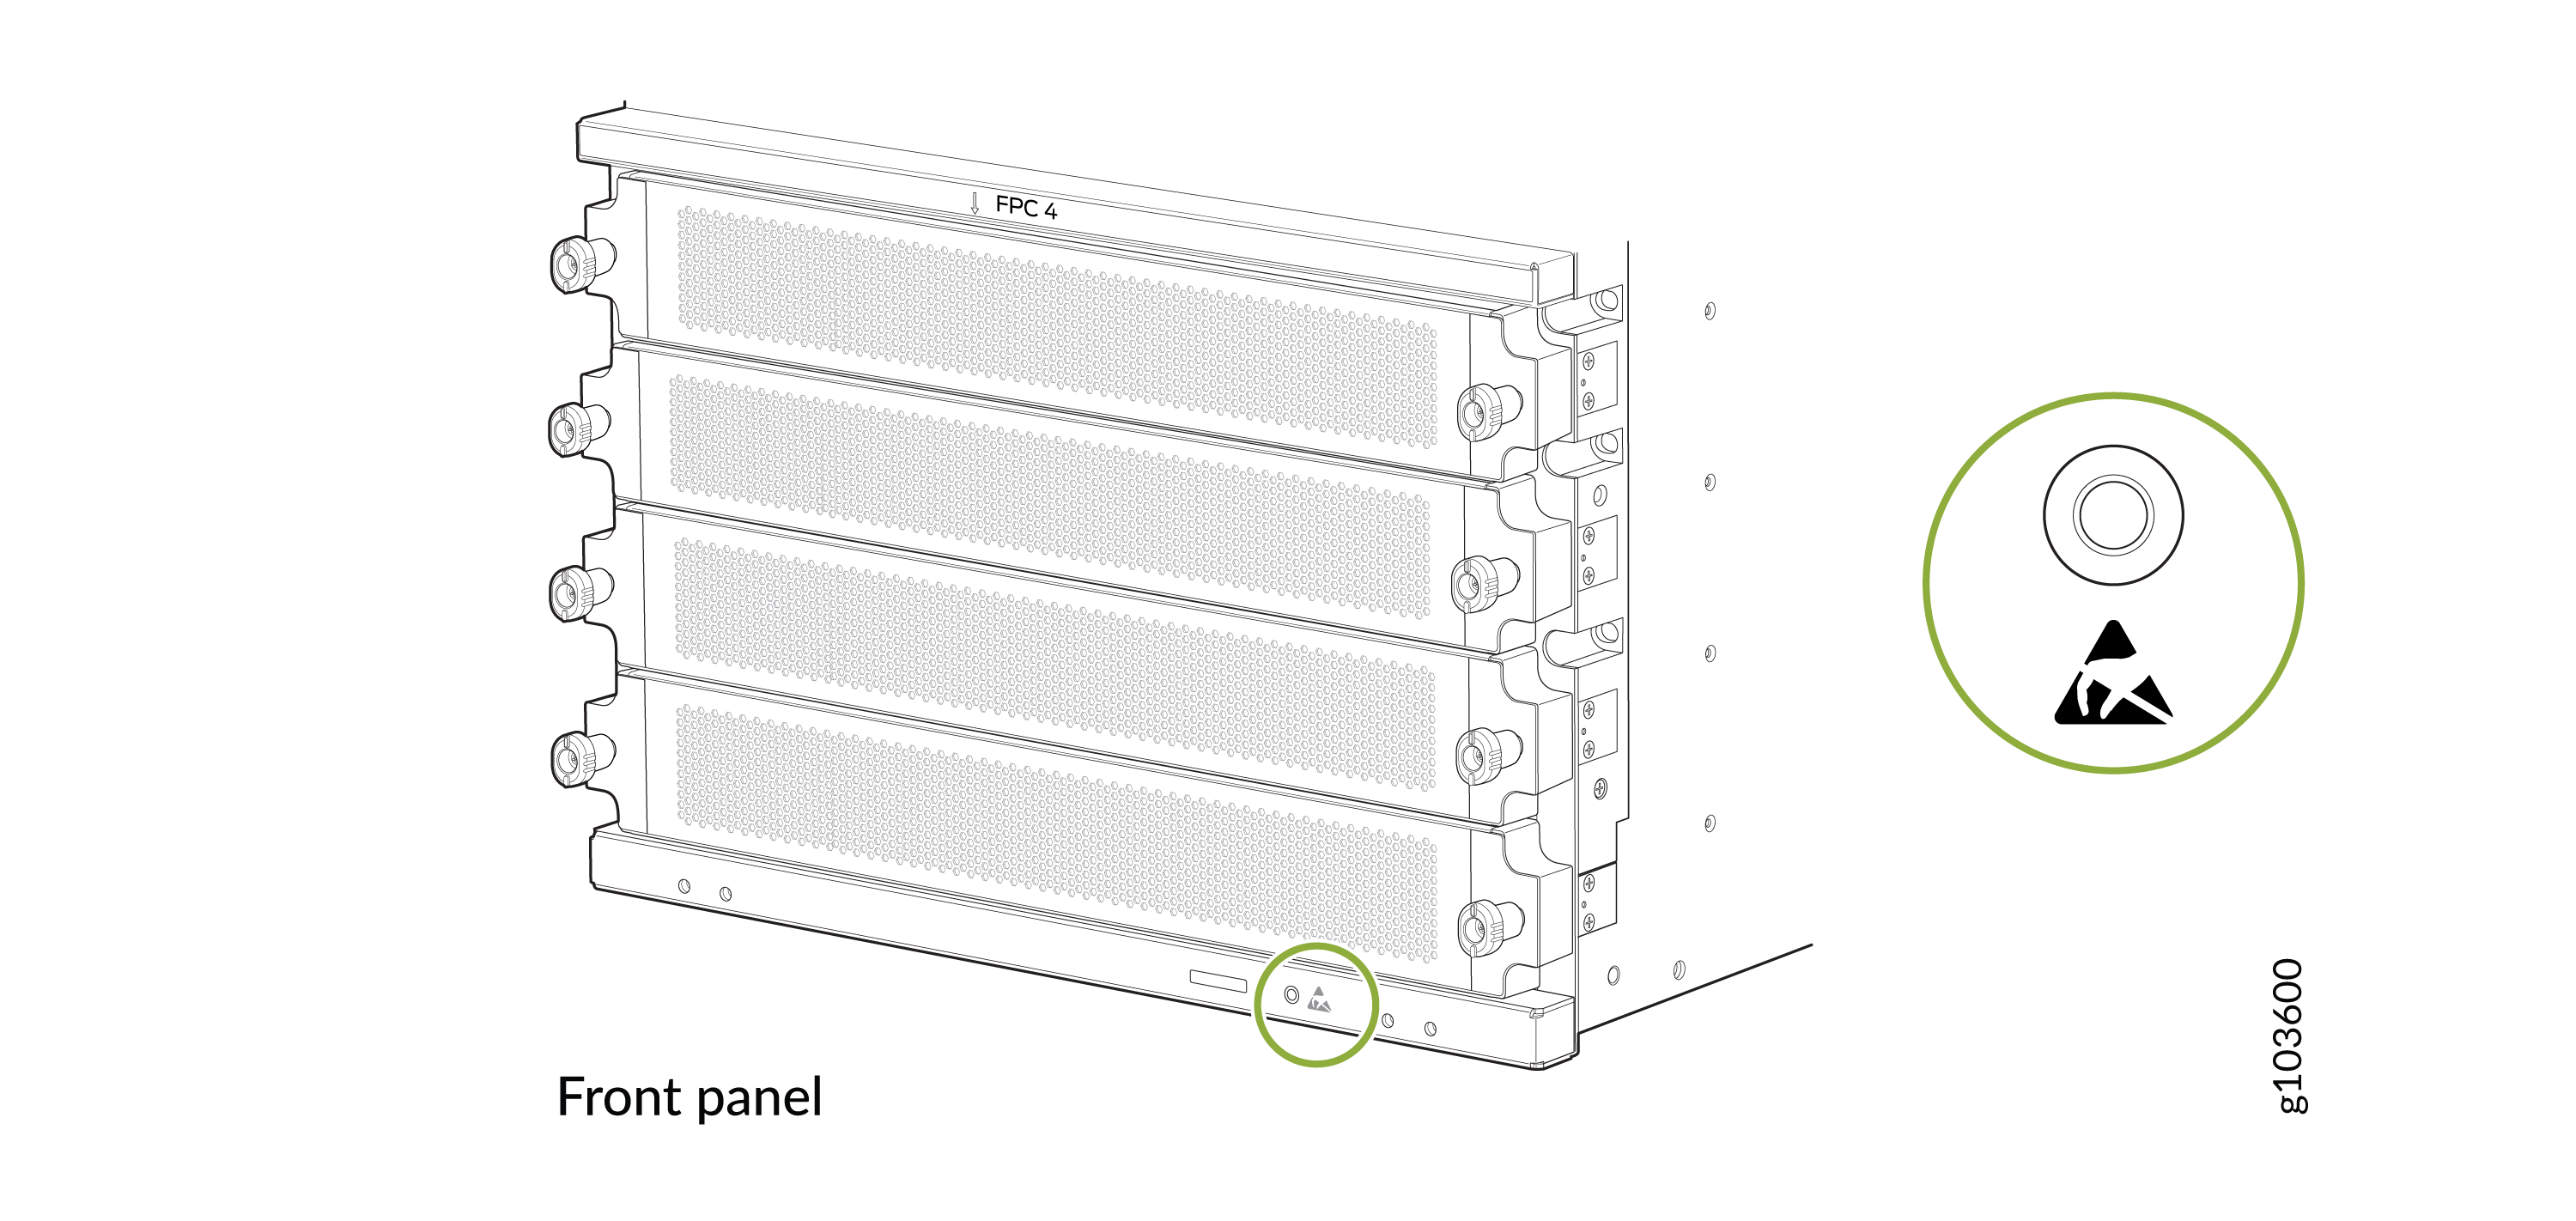
Wrap and fasten one end of the ESD grounding strap around your bare wrist
and connect the other end of the strap to the ESD point on the front panel
of the chassis.
Figure 1: ESD Point on the Front Panel of the Chassis
Remove the PTX12008 from a Rack
Before you remove the PTX12008 from a rack:
-
Ensure that you understand how to prevent electrostatic discharge (ESD) damage. See Prevention of Electrostatic Discharge Damage.
-
Shut down the router by using the
request system power-off
                                all
command. -
Remove the transceivers (see Remove an OSFP or QSFP-DD Transceiver), FPCs (see Remove an FPC from the PTX12008), RCBs (see Remove an RCB from the PTX12008), PSMs (see Remove an AC/HVAC/HVDC PSM from the PTX12008 or Remove a DC PSM from the PTX12008), fan trays (see Remove a Fan Tray from the PTX12008), and SIBs (see Remove a SIB from the PTX12008).
-
Have at least two persons available.
-
Ensure that you have the following parts and tools available:
-
An ESD grounding strap—not provided
-
A screwdriver to remove the screws that secure the chassis to the rack—not provided
-
A mechanical lift to move the router—not provided
-
To remove the PTX12008 from a rack:
Request a Return Material Authorization
If you are returning a device or hardware component to Juniper Networks for repair or replacement, obtain an RMA number from JTAC.
Before you request an RMA from JTAC, be prepared to provide the following information:
-
Your existing service request number, if you have one
-
Serial number of the device or component
-
Your name, organization name, telephone number, fax number, and shipping address
-
Details of the failure or problem
-
Type of activity you were performing on the device when the problem occurred
-
Configuration data displayed by one or more
showcommands
If you're contacting JTAC by telephone:
-
To report a new incident, press the star (*) key to be routed to the next available support engineer.
-
To enquire about an existing case, enter your 12-digit service request number followed by the pound (#) key.
The support representative validates your request and issues an RMA number for return of the device or component.
Packing the PTX12008 for Shipment
To pack your device for shipment:
Guidelines for Packing and Shipping Hardware Components
When you return the chassis or components:
- Make sure to adequately protect them with packing materials. Pack them properly to prevent the pieces from moving around the carton.
- Use the original shipping materials, if they are available.
- Place the individual components in antistatic bags.
- Write the RMA number on the exterior of the box to ensure proper tracking.