在 SRX 系列设备上配置机箱群集
SRX 系列服务网关可配置为在群集模式下运行,其中,一对设备可以连接在一起并配置为像单个设备一样运行,以提供高可用性。配置为机箱群集后,两个节点彼此备份,一个节点充当主设备,另一个作为辅助设备,确保在发生系统或硬件故障时进行有状态的进程和服务故障切换。如果主设备发生故障,辅助设备将接管流量处理。
对于 SRX300、SRX320、SRX340、SRX345 和 SRX380 设备,将节点 0 上的 ge-0/0/1 连接到节点 1 上的 ge-0/0/1。出厂默认配置不包括 HA 配置。要启用高可用性,如果高可用性使用的物理接口具有某些配置,则需要移除这些配置。 表 1 列出了 SRX300、SRX320、SRX340、SRX345 和 SRX380 上 HA 使用的物理接口。
装置 |
fxp0 接口 (HA MGT) |
fxp1 接口(HA 控制) |
晶圆厂接口 |
|---|---|---|---|
SRX300 |
ge-0/0/0 |
ge-0/0/1 |
用户定义 |
SRX320 |
ge-0/0/0 |
ge-0/0/1 |
用户定义 |
SRX340 |
耿耿 |
ge-0/0/1 |
用户定义 |
SRX345 |
耿耿 |
ge-0/0/1 |
用户定义 |
SRX380 |
耿耿 |
ge-0/0/1 |
用户定义 |
有关更多信息,请参阅以下主题:
示例:在 SRX 系列防火墙上配置机箱群集
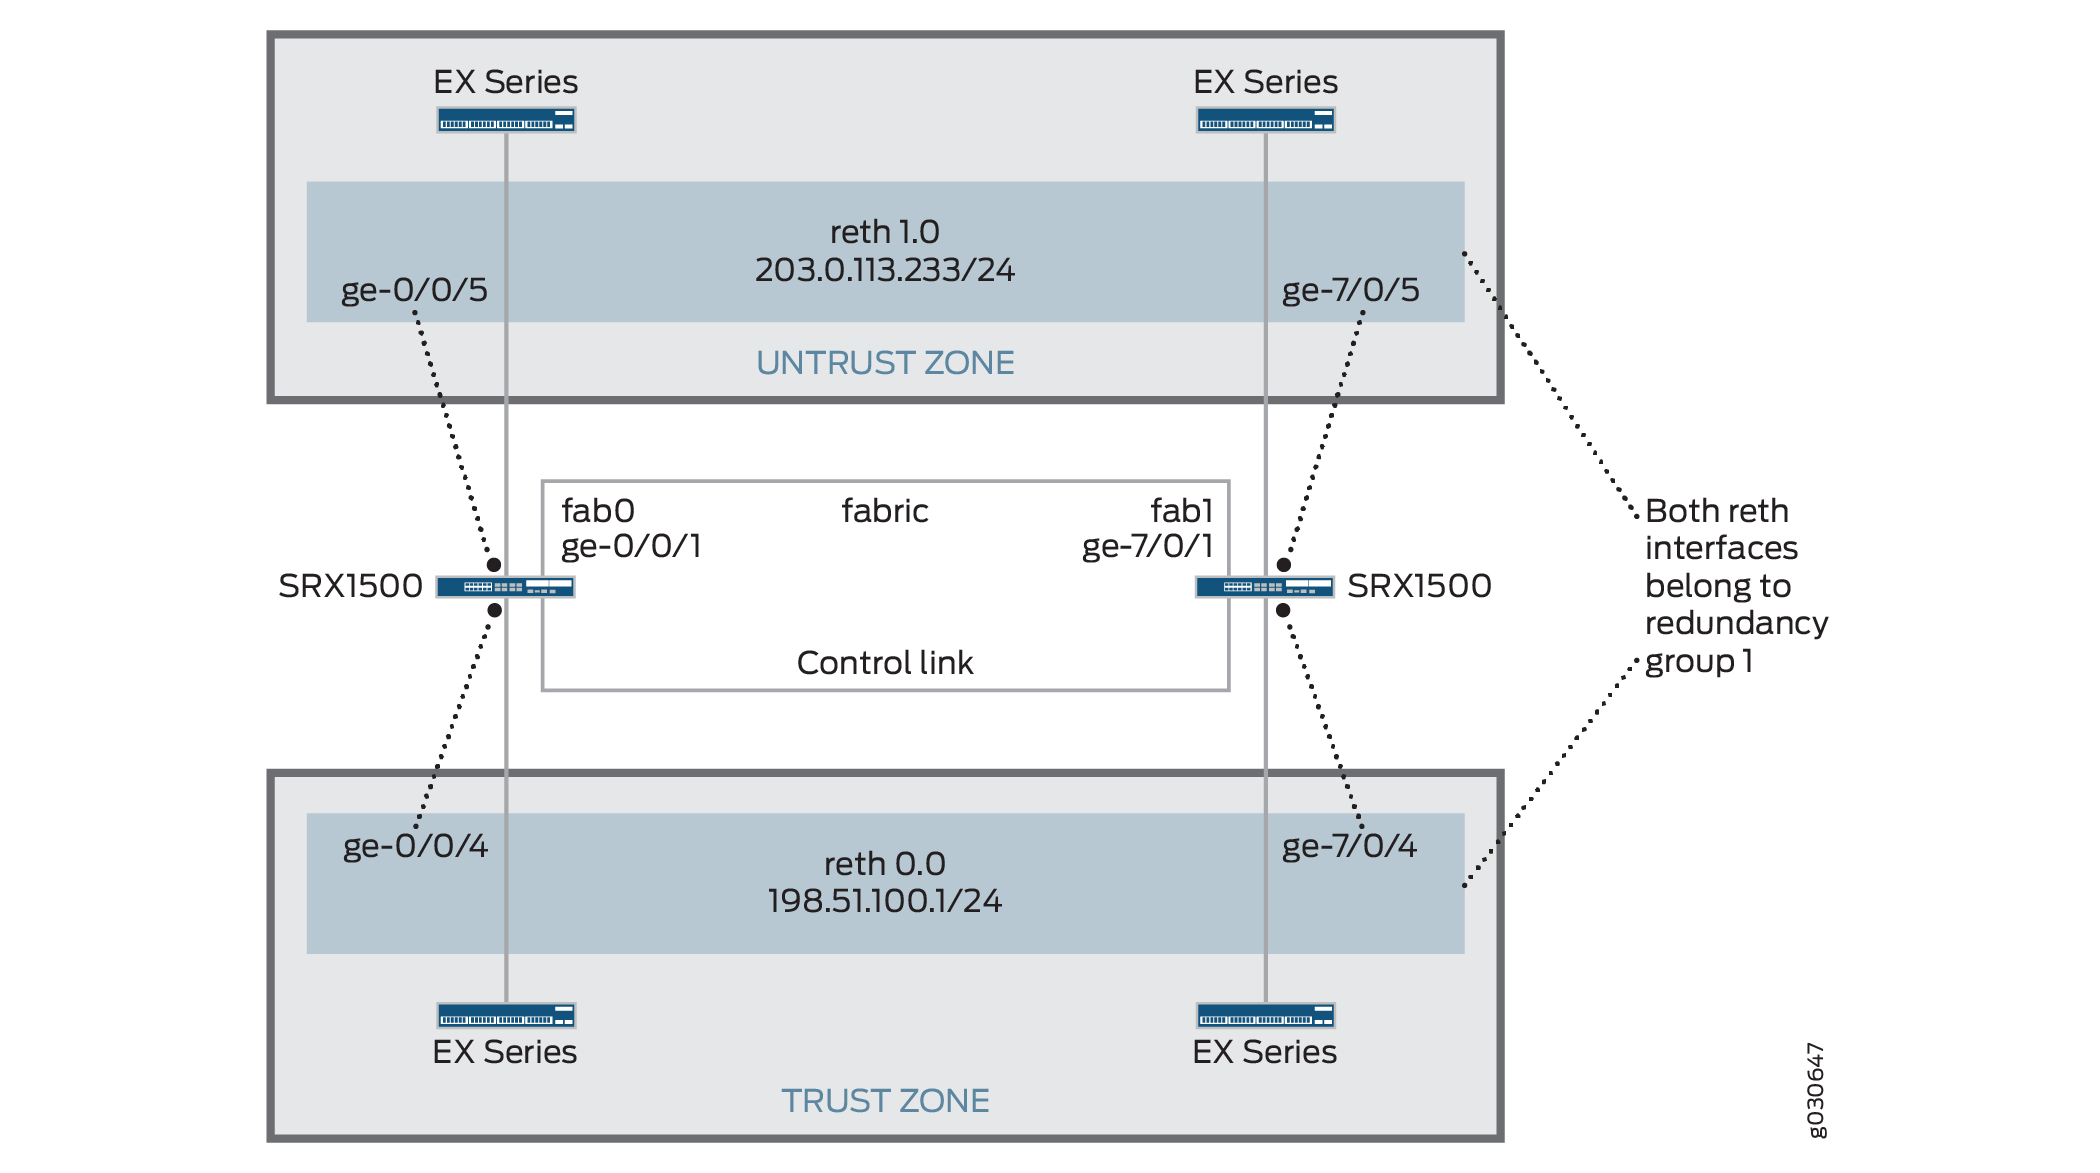
此示例说明如何在SRX 系列防火墙上设置机箱群集(以 SRX1500 或 SRX1600 为例)。
要求
开始之前:
物理连接两台设备,并确保其型号相同。例如,在 SRX1500 或 SRX1600 防火墙上,连接节点 0 和节点 1 上的专用控制端口。
将两台设备设置为群集模式并重新启动设备。您必须在两台设备上输入以下作模式命令,例如:
在节点 0 上:
user@host> set chassis cluster cluster-id 1 node 0 reboot
在节点 1 上:
user@host> set chassis cluster cluster-id 1 node 1 reboot
两台设备上的群集 ID 相同,但节点 ID 必须不同,因为一台设备为节点 0,另一台设备为节点 1。群集 ID 的范围为 0 到 255,将其设置为 0 相当于禁用群集模式。
为设备设置群集后,继续SRX1500或SRX1600防火墙示例,节点 1 上的 ge-0/0/0 接口将改为 ge-7/0/0。
设置群集后,
对于 SRX300 设备,节点 1 上的 ge-0/0/1 接口将改为 ge-1/0/1。
对于 SRX320 设备,节点 1 上的 ge-0/0/1 接口将改为 ge-3/0/1。
对于 SRX340 和 SRX345 设备,节点 1 上的 ge-0/0/1 接口将改为 ge-5/0/1。
重新启动后,将分配以下接口并改变其用途以形成群集:
对于 SRX300 和 SRX320 设备,ge-0/0/0 将变为 fxp0,用于机箱群集的单独管理。
SRX340 和 SRX345 设备包含一个专用端口 fxp0。
对于所有 SRX300、SRX320、SRX340、SRX345 和 SRX380 设备,ge-0/0/1 将变为 fxp1,用作机箱群集中的控制链路。
其他接口也会在辅助设备上重命名。
有关 SRX 系列防火墙的完整映射,请参阅 了解 SRX 系列机箱群集插槽编号以及物理端口和逻辑接口命名 。
从此时开始,群集的配置将在节点成员之间同步,两台独立的设备作为一台设备运行。
概述
此示例说明如何在SRX 系列防火墙上设置机箱群集,以SRX1500或SRX1600设备为例。
节点 1 将系统 FPC 的总数添加到接口的原始 FPC 数量中,从而对其接口重新进行编号。请参阅表 2 ,了解 SRX 系列防火墙上的接口重新编号。
SRX 系列服务网关 |
重新编号常量 |
节点 0 接口名称 |
节点 1 接口名称 |
|---|---|---|---|
| SRX300 |
1 |
ge-0/0/0 |
GE-1/0/0 |
| SRX320 |
3 |
ge-0/0/0 |
GE-3/0/0 |
| SRX340 SRX345 SRX380 |
5 |
ge-0/0/0 |
GE-5/0/0 |
| SRX1500 |
7 |
ge-0/0/0 |
GE-7/0/0 |
| SRX1600 |
7 |
ge-0/0/0 |
GE-7/0/0 |
启用群集后,系统将创建 fxp0、fxp1 和 em0 接口。根据设备的不同,映射到物理接口的 fxp0、fxp1 和 em0 接口并非是用户定义。但是,fab 接口是由用户定义。
图 1 显示了此示例中使用的拓扑。
配置
程序
CLI 快速配置
要在 SRX1500 防火墙上快速配置机箱群集,请将以下命令复制粘贴到 CLI 中:
在 {primary:node0} 上
[edit]
set groups node0 system host-name srx1500-1
set groups node0 interfaces fxp0 unit 0 family inet address 192.16.35.46/24
set groups node1 system host-name srx1500-2
set groups node1 interfaces fxp0 unit 0 family inet address 192.16.35.47/24
set groups node0 system backup-router <backup next-hop from fxp0> destination <management network/mask>
set groups node1 system backup-router <backup next-hop from fxp0> destination <management network/mask>
set apply-groups "${node}"
set interfaces fab0 fabric-options member-interfaces ge-0/0/1
set interfaces fab1 fabric-options member-interfaces ge-7/0/1
set chassis cluster redundancy-group 0 node 0 priority 100
set chassis cluster redundancy-group 0 node 1 priority 1
set chassis cluster redundancy-group 1 node 0 priority 100
set chassis cluster redundancy-group 1 node 1 priority 1
set chassis cluster redundancy-group 1 interface-monitor ge-0/0/5 weight 255
set chassis cluster redundancy-group 1 interface-monitor ge-0/0/4 weight 255
set chassis cluster redundancy-group 1 interface-monitor ge-7/0/5 weight 255
set chassis cluster redundancy-group 1 interface-monitor ge-7/0/4 weight 255
set chassis cluster reth-count 2
set interfaces ge-0/0/5 gigether-options redundant-parent reth1
set interfaces ge-7/0/5 gigether-options redundant-parent reth1
set interfaces reth1 redundant-ether-options redundancy-group 1
set interfaces reth1 unit 0 family inet address 203.0.113.233/24
set interfaces ge-0/0/4 gigether-options redundant-parent reth0
set interfaces ge-7/0/4 gigether-options redundant-parent reth0
set interfaces reth0 redundant-ether-options redundancy-group 1
set interfaces reth0 unit 0 family inet address 198.51.100.1/24
set security zones security-zone Untrust interfaces reth1.0
set security zones security-zone Trust interfaces reth0.0
如果配置 SRX300、SRX320、SRX340、SRX345 和 SRX380 设备,请参阅 表 3 ,了解设备的命令和接口设置,并将这些命令替换到 CLI 中。
| 命令 |
SRX300 |
SRX320 |
SRX340 SRX345 SRX380 |
|---|---|---|---|
|
|
|
|
|
|
|
|
|
|
|
|
|
|
|
|
|
|
|
|
|
|
|
|
|
|
|
|
|
|
|
|
|
|
|
|
|
|
|
|
|
|
|
|
|
|
|
|
|
|
分步过程
下面的示例要求您在各个配置层级中进行导航。有关作说明,请参阅 CLI 用户指南中的在配置模式下使用 CLI 编辑器。
要在 SRX 系列防火墙上配置机箱群集:
在主设备(节点 0)上执行步骤 1 到 5。当您执行 commit 命令时,它们会自动复制到辅助设备(节点 1)。这些配置将会同步,因为控制链路和 fab 链路接口已激活。要验证配置,请使用 show interface terse 命令并查看输出。
使用配置组为每台设备设置主机名和管理 IP 地址。这些配置特定于每台设备,并且对于其特定节点是唯一的。
user@host# set groups node0 system host-name srx1500-1
user@host# set groups node0 interfaces fxp0 unit 0 family inet address 192.16.35.46/24
user@host# set groups node1 system host-name srx1500-2
user@host# set groups node1 interfaces fxp0 unit 0 family inet address 192.16.35.47/24
为每个节点设置默认路由和备份路由器。
user@host# set groups node0 system backup-router <backup next-hop from fxp0> destination <management network/mask>
user@host# set groups node1 system backup-router <backup next-hop from fxp0> destination <management network/mask>
apply-group设置命令,使先前命令设置的每个节点的单独配置仅应用于该节点。user@host# set apply-groups "${node}"使用每个节点的物理端口 ge-0/0/1,定义用于 fab 连接(用于 RTO 同步的数据平面链路)的接口。这些接口必须背对背或者通过第 2 层基础架构进行连接。
user@host# set interfaces fab0 fabric-options member-interfaces ge-0/0/1
user@host# set interfaces fab1 fabric-options member-interfaces ge-7/0/1
为路由引擎故障切换属性设置冗余组 0,并设置冗余组 1(此例中所有接口都在一个冗余组中),以便为冗余以太网接口定义故障切换属性。
user@host# set chassis cluster redundancy-group 0 node 0 priority 100
user@host# set chassis cluster redundancy-group 0 node 1 priority 1
user@host# set chassis cluster redundancy-group 1 node 0 priority 100
user@host# set chassis cluster redundancy-group 1 node 1 priority 1
设置接口监控以监控接口的运行状况并触发冗余组故障切换。
不建议对冗余组 0 进行接口监控,因为它会导致控制平面在发生接口翻动时从一个节点切换到另一个节点。
user@host# set chassis cluster redundancy-group 1 interface-monitor ge-0/0/5 weight 255
user@host# set chassis cluster redundancy-group 1 interface-monitor ge-0/0/4 weight 255
user@host# set chassis cluster redundancy-group 1 interface-monitor ge-7/0/5 weight 255
user@host# set chassis cluster redundancy-group 1 interface-monitor ge-7/0/4 weight 255
接口故障切换只会在权重达到 0 后发生。
设置冗余以太网 (reth) 接口,并将冗余接口分配给一个区段。
user@host# set chassis cluster reth-count 2
user@host# set interfaces ge-0/0/5 gigether-options redundant-parent reth1
user@host# set interfaces ge-7/0/5 gigether-options redundant-parent reth1
user@host# set interfaces reth1 redundant-ether-options redundancy-group 1
user@host# set interfaces reth1 unit 0 family inet address 203.0.113.233/24
user@host# set interfaces ge-0/0/4 gigether-options redundant-parent reth0
user@host# set interfaces ge-7/0/4 gigether-options redundant-parent reth0
user@host# set interfaces reth0 redundant-ether-options redundancy-group 1
user@host# set interfaces reth0 unit 0 family inet address 198.51.100.1/24
user@host# set security zones security-zone Untrust interfaces reth1.0
user@host# set security zones security-zone Trust interfaces reth0.0
结果
在作模式下,输入 show configuration 命令以确认您的配置。如果输出未显示预期的配置,请重复此示例中的配置说明,以便进行更正。
为简洁起见,此 show 命令输出仅包含与此示例相关的配置。系统上的任何其他配置都已替换为省略号 (...)。
> show configuration
version x.xx.x;
groups {
    node0 {
        system {
            host-name SRX1500-1;
            backup-router 10.100.22.1 destination 66.129.243.0/24;
        }
        interfaces {
            fxp0 {
                unit 0 {
                    family inet {
                        address 192.16.35.46/24;
                    }
                }
            }
        }
    }
    node1 {
        system {
            host-name SRX1500-2;
            backup-router 10.100.21.1 destination 66.129.243.0/24;        }
        interfaces {
            fxp0 {
                unit 0 {
                    family inet {
                        address 192.16.35.47/24;
                    }
                }
            }
        }
    }
}
apply-groups "${node}";
chassis {
    cluster {
        reth-count 2;
        redundancy-group 0 {
            node 0 priority 100;
            node 1 priority 1;
        }
        redundancy-group 1 {
            node 0 priority 100;
            node 1 priority 1;
            interface-monitor {
                ge–0/0/5 weight 255;
                ge–0/0/4 weight 255;
                ge–7/0/5 weight 255;
                ge–7/0/4 weight 255;
            }
        }
    }
}
interfaces {
    ge–0/0/5 {
        gigether–options {
            redundant–parent reth1;
        }
    }
    ge–0/0/4 {
        gigether–options {
            redundant–parent reth0;
        }
    }
    ge–7/0/5 {
        gigether–options {
            redundant–parent reth1;
        }
    }
    ge–7/0/4 {
        gigether–options {
            redundant–parent reth0;
        }
    }
    fab0 {
        fabric–options {
            member–interfaces {
                ge–0/0/1;
            }
        }
    }
    fab1 {
        fabric–options {
            member–interfaces {
                ge–7/0/1;
            }
        }
    }
    reth0 {
        redundant–ether–options {
            redundancy–group 1;
        }
        unit 0 {
            family inet {
                address 198.51.100.1/24;
            }
        }
    }
    reth1 {
        redundant–ether–options {
            redundancy–group 1;
        }
        unit 0 {
            family inet {
                address 203.0.113.233/24;
            }
        }
    }
}
...
security {
    zones {
        security–zone Untrust {
            interfaces {
                reth1.0;
            }
        }
        security–zone Trust {
            interfaces {
                reth0.0;
            }
        }
    }
    policies {
        from–zone Trust to–zone Untrust {
            policy 1 {
                match {
                    source–address any;
                    destination–address any;
                    application any;
                }
                then {
                    permit;
                }
            }
        }
    }
}
如果完成设备配置,请从配置模式输入 commit 。
验证
确认配置工作正常。
验证机箱群集状态
目的
验证机箱群集状态、故障切换状态和冗余组信息。
行动
在作模式下,输入 show chassis cluster status 命令。
{primary:node0}
user@host# show chassis cluster status
Cluster ID: 1
Node                       Priority     Status    Preempt  Manual failover

Redundancy group: 0 , Failover count: 1
    node0                   100         primary   no       no
    node1                   1           secondary no       no

Redundancy group: 1 , Failover count: 1
    node0                   0           primary   no       no
    node1                   0           secondary no       no
验证机箱群集接口
目的
验证有关机箱群集接口的信息。
行动
在作模式下,输入 show chassis cluster interfaces 命令。
{primary:node0}
user@host> show chassis cluster interfaces
Control link name: em0

Redundant-ethernet Information:
    Name         Status      Redundancy-group
    reth0        Up          1
    reth1        Up          1

Interface Monitoring:
    Interface         Weight    Status    Redundancy-group
    ge-7/0/5          255       Up        1
    ge-7/0/4          255       Up        1
    ge-0/0/5          255       Up        1
    ge-0/0/4          255       Up        1
验证机箱群集统计信息
目的
验证有关要同步的不同对象的统计信息、交换结构和控制接口查询以及群集中受监控接口的状态等信息。
行动
在作模式下,输入 show chassis cluster statistics 命令。
{primary:node0}
user@host> show chassis cluster statistics

Control link statistics:
    Control link 0:
        Heartbeat packets sent: 2276
        Heartbeat packets received: 2280
        Heartbeat packets errors: 0
Fabric link statistics:
    Child link 0
        Probes sent: 2272
        Probes received: 597
Services Synchronized:
    Service name                              RTOs sent    RTOs received
    Translation context                       0            0
    Incoming NAT                              0            0
    Resource manager                          6            0
    Session create                            161          0
    Session close                             148          0
    Session change                            0            0
    Gate create                               0            0
    Session ageout refresh requests           0            0
    Session ageout refresh replies            0            0
    IPSec VPN                                 0            0
    Firewall user authentication              0            0
    MGCP ALG                                  0            0
    H323 ALG                                  0            0
    SIP ALG                                   0            0
    SCCP ALG                                  0            0
    PPTP ALG                                  0            0
    RPC ALG                                   0            0
    RTSP ALG                                  0            0
    RAS ALG                                   0            0
    MAC address learning                      0            0
    GPRS GTP                                  0            0
验证机箱群集控制平面统计信息
目的
验证有关机箱群集控制平面统计信息(发送和接收的心跳)和交换结构链路统计信息(发送和接收的探查)的信息。
行动
在作模式下,输入 show chassis cluster control-plane statistics 命令。
{primary:node0}
user@host> show chassis cluster control-plane statistics

Control link statistics:
    Control link 0:
        Heartbeat packets sent: 2294
        Heartbeat packets received: 2298
        Heartbeat packets errors: 0
Fabric link statistics:
    Child link 0
        Probes sent: 2290
        Probes received: 615
验证机箱群集数据平面统计信息
目的
验证有关为服务发送和接收的 RTO 数量的信息。
行动
在作模式下,输入 show chassis cluster data-plane statistics 命令。
{primary:node0}
user@host> show chassis cluster data-plane statistics

Services Synchronized:
    Service name                              RTOs sent    RTOs received
    Translation context                       0            0
    Incoming NAT                              0            0
    Resource manager                          6            0
    Session create                            161          0
    Session close                             148          0
    Session change                            0            0
    Gate create                               0            0
    Session ageout refresh requests           0            0
    Session ageout refresh replies            0            0
    IPSec VPN                                 0            0
    Firewall user authentication              0            0
    MGCP ALG                                  0            0
    H323 ALG                                  0            0
    SIP ALG                                   0            0
    SCCP ALG                                  0            0
    PPTP ALG                                  0            0
    RPC ALG                                   0            0
    RTSP ALG                                  0            0
    RAS ALG                                   0            0
    MAC address learning                      0            0
    GPRS GTP                                  0            0
验证机箱群集冗余组状态
目的
验证群集中两个节点的状态和优先级,以及有关主节点是否已被抢占或是否存在手动故障切换的信息。
行动
在作模式下,输入 chassis cluster status redundancy-group 命令。
{primary:node0}
user@host> show chassis cluster status redundancy-group 1
Cluster ID: 1
    Node               Priority    Status    Preempt  Manual failover

	Redundancy group: 1, Failover count: 1
    node0              100          primary   no       no
    node1              50           secondary no       no
查看机箱群集配置
查看机箱群集统计信息
目的
显示有关机箱群集服务和接口的信息。
行动
从 CLI 中输入 show chassis cluster statistics 命令:
{primary:node1}
user@host> show chassis cluster statistics

Control link statistics:
    Control link 0:
        Heartbeat packets sent: 798
        Heartbeat packets received: 784
Fabric link statistics:
    Child link 0
        Probes sent: 793
        Probes received: 0
Services Synchronized:
    Service name                              RTOs sent    RTOs received
    Translation context                       0            0
    Incoming NAT                              0            0
    Resource manager                          0            0
    Session create                            0            0
    Session close                             0            0
    Session change                            0            0
    Gate create                               0            0
    Session ageout refresh requests           0            0
    Session ageout refresh replies            0            0
    IPSec VPN                                 0            0
    Firewall user authentication              0            0
    MGCP ALG                                  0            0
    H323 ALG                                  0            0
    SIP ALG                                   0            0
    SCCP ALG                                  0            0
    PPTP ALG                                  0            0
    RTSP ALG                                  0            0
{primary:node1}
user@host> show chassis cluster statistics

Control link statistics:
    Control link 0:
        Heartbeat packets sent: 258689
        Heartbeat packets received: 258684
    Control link 1:
        Heartbeat packets sent: 258689
        Heartbeat packets received: 258684
Fabric link statistics:
    Child link 0
        Probes sent: 258681
        Probes received: 258681
    Child link 1
        Probes sent: 258501
        Probes received: 258501
Services Synchronized:
    Service name                              RTOs sent    RTOs received
    Translation context                       0            0
    Incoming NAT                              0            0
    Resource manager                          0            0
    Session create                            1            0
    Session close                             1            0
    Session change                            0            0
    Gate create                               0            0
    Session ageout refresh requests           0            0
    Session ageout refresh replies            0            0
    IPSec VPN                                 0            0
    Firewall user authentication              0            0
    MGCP ALG                                  0            0
    H323 ALG                                  0            0
    SIP ALG                                   0            0
    SCCP ALG                                  0            0
    PPTP ALG                                  0            0
    RPC ALG                                   0            0
    RTSP ALG                                  0            0
    RAS ALG                                   0            0
    MAC address learning                      0            0
    GPRS GTP                                  0            0
{primary:node1}
user@host> show chassis cluster statistics

Control link statistics:
    Control link 0:
        Heartbeat packets sent: 82371
        Heartbeat packets received: 82321
    Control link 1:
        Heartbeat packets sent: 0
        Heartbeat packets received: 0
清除机箱群集统计信息
要清除显示的有关机箱群集服务和接口的信息,请从 CLI 中输入 clear chassis cluster statistics 命令:
{primary:node1}
user@host> clear chassis cluster statistics

Cleared control-plane statistics
Cleared data-plane statistics
了解主节点和辅助节点之间的机箱群集自动同步
设置 SRX 系列机箱群集时,SRX 系列防火墙必须相同,包括其配置。当辅助节点加入主节点成为群集时,机箱群集同步功能会自动将主节点的配置同步到辅助节点。使用此功能,无需手动即可确保群集中每个节点上的配置都相同,从而降低支出。
如果想要禁用主节点与辅助节点之间的机箱群集自动同步功能,可通过在配置模式中输入 set chassis cluster configuration-synchronize no-secondary-bootup-auto 命令来实现。
任何时候,想要重新启用机箱群集自动同步,请在配置模式中使用 delete chassis cluster configuration-synchronize no-secondary-bootup-auto 命令。
要查看机箱群集自动同步是否已启用以及同步状态,请输入 show chassis cluster information configuration-synchronization 作命令。
要么主节点的整个配置已成功应用到辅助节点,要么辅助节点保留其原始配置。不存在部分同步。
如果创建群集 ID 大于 16 的群集,然后决定回滚到不支持扩展群集 ID 的早期版本映像,系统将启动为独立设备。
如果已设置群集并且运行的是早期版本的 Junos OS,则可以升级到 Junos OS 12.1X45-D10 版,然后重新创建群集 ID 大于 16 的群集。但是,如果出于任何原因决定恢复到不支持扩展群集 ID 的 Junos OS 早期版本,则系统将重启为独立设备。但是,如果群集 ID 集小于 16,并且您回滚到之前的版本,则系统将以之前的设置启动。
另见
验证机箱群集配置同步状态
目的
显示机箱群集的配置同步状态了解 主节点和辅助节点之间的自动机箱群集同步。
行动
从 CLI 中输入 show chassis cluster information configuration-synchronization 命令:
{primary:node0}
user@host> show chassis cluster information configuration-synchronization

node0:
--------------------------------------------------------------------------

Configuration Synchronization:
    Status:
        Activation status: Enabled
        Last sync operation: Auto-Sync
        Last sync result: Not needed
        Last sync mgd messages:

    Events:
        Mar  5 01:48:53.662 : Auto-Sync: Not needed.

node1:
--------------------------------------------------------------------------

Configuration Synchronization:
    Status:
        Activation status: Enabled
        Last sync operation: Auto-Sync
        Last sync result: Succeeded
        Last sync mgd messages:
            mgd: rcp: /config/juniper.conf: No such file or directory
            mgd: commit complete

    Events:
        Mar  5 01:48:55.339 : Auto-Sync: In progress. Attempt: 1
        Mar  5 01:49:40.664 : Auto-Sync: Succeeded. Attempt: 1