Configuring OSPF Support for Traffic Engineering
OSPF Support for Traffic Engineering
Traffic engineering allows you to control the path that data packets follow, bypassing the standard routing model, which uses routing tables. Traffic engineering moves flows from congested links to alternate links that would not be selected by the automatically computed destination-based shortest path.
To help provide traffic engineering and MPLS with information about network topology and loading, extensions have been added to the Junos OS implementation of OSPF. When traffic engineering is enabled on the routing device, you can enable OSPF traffic engineering support. When you enable traffic engineering for OSPF, the shortest-path-first (SPF) algorithm takes into account the various label-switched paths (LSPs) configured under MPLS and configures OSPF to generate opaque link-state advertisements (LSAs) that carry traffic engineering parameters. The parameters are used to populate the traffic engineering database. The traffic engineering database is used exclusively for calculating explicit paths for the placement of LSPs across the physical topology. The Constrained Shortest Path First (CSPF) algorithm uses the traffic engineering database to compute the paths that MPLS LSPs take. RSVP uses this path information to set up LSPs and to reserve bandwidth for them.
By default, traffic engineering support is disabled. To enable traffic engineering, include the traffic-engineering statement. You can also configure the following OSPF traffic engineering extensions:
advertise-unnumbered-interfaces—(OSPFv2 only) Advertises the link-local identifier in the link-local traffic engineering LSA packet. You do not need to include this statement if RSVP is able to signal unnumbered interfaces as defined in RFC 3477, Signalling Unnumbered Links in Resource Reservation Protocol - Traffic Engineering (RSVP-TE).
credibility-protocol-preference—(OSPFv2 only) Assigns a credibility value to OSPF routes in the traffic engineering database. By default, Junos OS prefers OSPF routes in the traffic engineering database over other interior gateway protocol (IGP) routes even if the routes of another IGP are configured with a lower, that is, more preferred, preference value. The traffic engineering database assigns a credibility value to each IGP and prefers the routes of the IGP with the highest credibility value. In Junos OS Release 9.4 and later, you can configure OSPF to take protocol preference into account to determine the traffic engineering database credibility value. When protocol preference is used to determine the credibility value, OSPF routes are not automatically preferred by the traffic engineering database, depending on your configuration.
ignore-lsp-metrics—Ignores RSVP LSP metrics in OSPF traffic engineering shortcut calculations or when you configure LDP over RSVP LSPs. This option avoids mutual dependency between OSPF and RSVP, eliminating the time period when the RSVP metric used for tunneling traffic is not up to date. In addition, If you are using RSVP for traffic engineering, you can run LDP simultaneously to eliminate the distribution of external routes in the core. The LSPs established by LDP are tunneled through the LSPs established by RSVP. LDP effectively treats the traffic-engineered LSPs as single hops.
multicast-rpf-routes—(OSPFv2 only) Installs unicast IPv4 routes (not LSPs) in the multicast routing table (inet.2) for multicast reverse-path forwarding (RPF) checks. The inet.2 routing table consists of unicast routes used for multicast RPF lookup. RPF is an antispoofing mechanism used to check if the packet is coming in on an interface that is also sending data back to the packet source.
no-topology—(OSPFv2 only) To disable the dissemination of link-state topology information. If disabled, traffic engineering topology information is no longer distributed within the OSPF area.
shortcuts—Configures IGP shortcuts, which allows OSPF to use an LSP as the next hop as if it were a logical interface from the ingress routing device to the egress routing device. The address specified in the to statement at the [edit protocols mpls label-switched-path lsp-path-name] hierarchy level on the ingress routing device must match the router ID of the egress routing device for the LSP to function as a direct link to the egress routing device and to be used as input to the OSPF SPF calculations. When used in this way, LSPs are no different from Asynchronous Transfer Mode (ATM) and Frame Relay virtual circuits (VCs), except that LSPS carry only IPv4 traffic.
OSPFv2 installs the prefix for IPv4 routes in the inet.0 routing table, and the LSPs are installed by default in the inet.3 routing table.
OSPFv3 LSPs used for shortcuts continue to be signaled using IPv4. However, by default, shortcut IPv6 routes calculated through OSPFv3 are added to the inet6.3 routing table. The default behavior is for BGP only to use LSPs in its calculations. If you configure MPLS so that both BGP and IGPs use LSPs for forwarding traffic, IPv6 shortcut routes calculated through OSPFv3 are added to the inet6.0 routing table.
Note:Whenever possible, use OSPF IGP shortcuts instead of traffic engineering shortcuts.
lsp-metric-info-summary—Advertises the LSP metric in summary LSAs to treat the LSP as a link. This configuration allows other routing devices in the network to use this LSP. To accomplish this, you need to configure MPLS and OSPF traffic engineering to advertise the LSP metric in summary LSAs.
When you enable traffic engineering on the routing device, you can also configure an OSPF metric that is used exclusively for traffic engineering. The traffic engineering metric is used for information injected into the traffic engineering database. Its value does not affect normal OSPF forwarding.
Example: Enabling OSPF Traffic Engineering Support
This example shows how to enable OSPF traffic engineering support to advertise the label-switched path (LSP) metric in summary link-state advertisements (LSAs).
Requirements
Before you begin:
Configure the device interfaces. See the Interfaces User Guide for Security Devices.
Configure BGP per your network requirements. See the BGP User Guide
Configure MPLS per your network requirements. See the MPLS Applications User Guide.
Overview
You can configure OSPF to treat an LSP as a link and have other routing devices in the network use this LSP. To accomplish this, you configure MPLS and OSPF traffic engineering to advertise the LSP metric in summary LSAs.
In this example, there are four routing devices in area 0.0.0.0, and you want OSPF to treat the LSP named R1-to-R4 that goes from the ingress Device R1 to the egress Device R4 as a link.
For OSPF, you enable traffic engineering on all four routing
devices in the area by including the traffic-engineering statement. This configuration ensures that the shortest-path-first
(SPF) algorithm takes into account the LSPs configured under MPLS
and configures OSPF to generate LSAs that carry traffic engineering
parameters. You further ensure that OSPF uses the MPLS LSP as the
next hop and advertises the LSP metric in summary LSAs, by including
the optional shortcuts lsp-metric-into-summary statement
on the ingress Device R1.
For MPLS, you enable traffic engineering so that MPLS performs
traffic engineering on both BGP and IGP destinations by including
the traffic-engineering bgp-igp statement, and you include
the LSP named R1-to-R4 by including the label-switched-path lsp-path-name to address statement
on the ingress Device R1. The address specified in the to statement on the ingress Device R1 must match the router ID of the
egress Device R4 for the LSP to function as a direct link to the egress
routing device and to be used as input to the OSPF SPF calculations.
In this example, the router ID of the egress Device R4 is 10.0.0.4.
Configuration
The following example requires you to navigate various levels in the configuration hierarchy. For information about navigating the CLI, see Modifying the Junos OS Configuration in theCLI User Guide.
Procedure
CLI Quick Configuration
To quickly enable OSPF traffic engineering support to advertise the LSP metric in summary LSAs, copy the following commands and paste them into the CLI.
Configuration on R1:
[edit]
set routing-options router-id 10.0.0.1
set protocols ospf area 0.0.0.0 interface all
set protocols ospf area 0.0.0.0 interface fxp0.0 disable
set protocols ospf traffic-engineering shortcuts lsp-metric-into-summary
set protocols mpls traffic-engineering bgp-igp
set protocols mpls label-switched-path R1-to-R4 to 10.0.0.4
Configuration on R2:
[edit]
set routing-options router-id 10.0.0.2
set protocols ospf area 0.0.0.0 interface all
set protocols ospf area 0.0.0.0 interface fxp0.0 disable
set protocols ospf traffic-engineering
Configuration on R3:
[edit]
set routing-options router-id 10.0.0.3
set protocols ospf area 0.0.0.0 interface all
set protocols ospf area 0.0.0.0 interface fxp0.0 disable
set protocols ospf traffic-engineering
Configuration on R4:
[edit]
set routing-options router-id 10.0.0.4
set protocols ospf area 0.0.0.0 interface all
set protocols ospf area 0.0.0.0 interface fxp0.0 disable
set protocols ospf traffic-engineering
Step-by-Step Procedure
To enable OSPF traffic engineering support to advertise LSP metrics in summary LSAs:
Configure the router ID.
[edit]
user@R1# set routing-options router-id 10.0.0.1
[edit]
user@R2# set routing-options router-id 10.0.0.2
[edit]
user@R3# set routing-options router-id 10.0.0.3
[edit]
user@R4# set routing-options router-id 10.0.0.4
Configure the OSPF area and add the interfaces.
Note:To specify OSPFv3, include the
ospf3statement at the[edit protocols]hierarchy level.[edit] user@R1# set protocols ospf area 0.0.0.0 interface all user@R1# set protocols ospf area 0.0.0.0 interface fxp0.0 disable
[edit]
user@R2# set protocols ospf area 0.0.0.0 interface all
user@R2# set protocols ospf area 0.0.0.0 interface fxp0.0 disable
[edit]
user@R3# set protocols ospf area 0.0.0.0 interface all
user@R3# set protocols ospf area 0.0.0.0 interface fxp0.0 disable
[edit]
user@R4# set protocols ospf area 0.0.0.0 interface all
user@R4# set protocols ospf area 0.0.0.0 interface fxp0.0 disable
Enable OSPF traffic engineering.
[edit]
user@R1# set protocols ospf traffic-engineering shortcuts lsp-metric-into-summary
[edit]
user@R2# set protocols ospf traffic-engineering
[edit]
user@R3# set protocols ospf traffic-engineering
[edit]
user@R4# set protocols ospf traffic-engineering
On Device R1, configure MPLS traffic engineering.
[edit ] user@R1#
set protocols mpls traffic-engineering bgp-igpuser@R1#set protocols mpls label-switched-path R1-to-R4 to 10.0.0.4If you are done configuring the devices, commit the configuration.
[edit]
user@host# commit
Results
Confirm your configuration by entering the show
routing-options, show protocols ospf, and show
protocols mpls commands. If the output does not display the
intended configuration, repeat the instructions in this example to
correct the configuration.
Output for R1:
user@host# show routing-options
router-id 10.0.0.1;
user@host# show protocols ospf
    traffic-engineering {
        shortcuts lsp-metric-into-summary;
    }
    area 0.0.0.0 {
        interface all;
        interface fxp0.0 {
            disable;
        }
    }
user@host# show protocols mpls
    traffic-engineering bgp-igp;
    label-switched-path R1-to-R4 {
        to 10.0.0.4;
}
Output for R2:
user@host# show routing-options
router-id 10.0.0.2;
user@host# show protocols ospf
    traffic-engineering;
    area 0.0.0.0 {
        interface all;
        interface fxp0.0 {
            disable;
        }
    }
Output for R3:
user@host# show routing-options
router-id 10.0.0.3;
user@host# show protocols ospf
    traffic-engineering;
    area 0.0.0.0 {
        interface all;
        interface fxp0.0 {
            disable;
        }
    }
Output for R4:
user@host# show routing-options
router-id 10.0.0.4;
user@host# show protocols ospf
    traffic-engineering;
    area 0.0.0.0 {
        interface all;
        interface fxp0.0 {
            disable;
        }
    }
To confirm your OSPFv3 configuration, enter the show routing-options, show protocols ospf3, and show protocols mpls commands.
Verification
Confirm that the configuration is working properly.
- Verifying the Traffic Engineering Capability for OSPF
- Verifying OSPF Entries in the Traffic Engineering Database
- Verifying That the Traffic Engineering Database Is Learning Node Information from OSPF
Verifying the Traffic Engineering Capability for OSPF
Purpose
Verify that traffic engineering has been enabled for OSPF. By default, traffic engineering is disabled.
Action
From operational mode, enter the show ospf overview command for OSPFv2, and enter the show ospf3 overview for OSPFv3.
Verifying OSPF Entries in the Traffic Engineering Database
Purpose
Verify the OSPF information in the traffic engineering database. The Protocol field displays OSPF and the area from which the information was learned.
Action
From operational mode, enter the show ted database command.
Verifying That the Traffic Engineering Database Is Learning Node Information from OSPF
Purpose
Verify that OSPF is reporting node information. The Protocol name field displays OSPF and the area from which the information was learned.
Action
From operational mode, enter the show ted protocol command.
Example: Configuring the Traffic Engineering Metric for a Specific OSPF Interface
This example shows how to configure the OSPF metric value used for traffic engineering.
Requirements
Before you begin:
Configure the device interfaces. See the Interfaces User Guide for Security Devices.
Configure OSPF for traffic engineering. See Example: Enabling OSPF Traffic Engineering Support
Overview
You can configure an OSPF metric that is used exclusively for
traffic engineering. To modify the default value of the traffic engineering
metric, include the te-metric statement. The OSPF traffic
engineering metric does not affect normal OSPF forwarding. By default,
the traffic engineering metric is the same value as the OSPF metric.
The range is 1 through 65,535.
In this example, you configure the OSPF traffic engineering metric on OSPF interface fe-0/1/1 in area 0.0.0.0.
Configuration
CLI Quick Configuration
To quickly configure the OSPF traffic engineering
metric for a specific interface, copy the following commands, paste
them into a text file, remove any line breaks, change any details
necessary to match your network configuration, copy and paste the
commands into the CLI at the [edit] hierarchy level, and then enter commit from configuration mode.
[edit]
set protocols ospf area 0.0.0.0 interface fe-0/1/1 te-metric 10
Procedure
Step-by-Step Procedure
To configure an OSPF traffic engineering metric for a specific interface used only for traffic engineering:
Create an OSPF area.
Note:To specify OSPFv3, include the
ospf3statement at the[edit protocols]hierarchy level.[edit] user@host# edit protocols ospf area 0.0.0.0
Configure the traffic engineering metric of the OSPF network segments.
[edit protocols ospf area 0.0.0.0]
user@host set interface fe-0/1/1 te-metric 10
If you are done configuring the device, commit the configuration.
[edit protocols ospf area 0.0.0.0]
user@host# commit
Results
Confirm your configuration by entering the show
protocols ospf command. If the output does not display the intended
configuration, repeat the instructions in this example to correct
the configuration.
user@host# show protocols ospf
area 0.0.0.0 {
    interface fe-0/1/1.0 {
        te-metric 10;
    }
}
To confirm your OSPFv3 configuration, enter the show protocols
ospf3 command.
Verification
Confirm that the configuration is working properly.
OSPF Passive Traffic Engineering Mode
Ordinarily, interior routing protocols such as OSPF are not run on links between autonomous systems. However, for inter-AS traffic engineering to function properly, information about the inter-AS link—in particular, the address on the remote interface—must be made available inside the autonomous system (AS). This information is not normally included either in the external BGP (EBGP) reachability messages or in the OSPF routing advertisements.
To flood this link address information within the AS and make it available for traffic engineering calculations, you must configure OSPF passive mode for traffic engineering on each inter-AS interface. You must also supply the remote address for OSPF to distribute and include it in the traffic engineering database. OSPF traffic engineering mode allows MPLS label-switched paths (LSPs) to dynamically discover OSPF AS boundary routers and to allow routers to establish a traffic engineering LSP across multiple autonomous systems.
Example: Configuring OSPF Passive Traffic Engineering Mode
This example shows how to configure OSPF passive mode for traffic engineering on an inter-AS interface. The AS boundary router link between the EBGP peers must be a directly connected link and must be configured as a passive traffic engineering link.
Requirements
Before you begin:
Configure the device interfaces. See the Interfaces User Guide for Security Devices.
Configure BGP per your network requirements. See the BGP User Guide.
Configure the LSP per your network requirements. See the MPLS Applications User Guide.
Configure the router identifiers for the devices in your OSPF network. See Example: Configuring an OSPF Router Identifier.
Control OSPF designated router election. See Example: Controlling OSPF Designated Router Election
Configure a single-area OSPF network. See Example: Configuring a Single-Area OSPF Network.
Configure a multiarea OSPF network. See Example: Configuring a Multiarea OSPF Network.
Overview
You can configure OSPF passive mode for traffic engineering on an inter-AS interface. The address used for the remote node of the OSPF passive traffic engineering link must be the same as the address used for the EBGP link. In this example, you configure interface so-1/1/0 in area 0.0.0.1 as the inter-AS link to distribute traffic engineering information with OSPF within the AS and include the following settings:
passive—Advertises the direct interface addresses on an interface without actually running OSPF on that interface. A passive interface is one for which the address information is advertised as an internal route in OSPF, but on which the protocol does not run.
traffic-engineering—Configures an interface in OSPF passive traffic-engineering mode to enable dynamic discovery of OSPF AS boundary routers. By default, OSPF passive traffic-engineering mode is disabled.
remote-node-id—Specifies the IP address at the far end of the inter-AS link. In this example, the remote IP address is 192.168.207.2.
Configuration
To quickly configure OSPF passive mode for traffic engineering, copy the following command, remove any line breaks, and paste it into the CLI.
[edit]
set protocols ospf area 0.0.0.1 interface so-1/1/0 passive traffic-engineering remote-node-id 192.168.207.2
Procedure
Step-by-Step Procedure
To configure OSPF passive traffic engineering mode:
Create an OSPF area.
Note:To specify OSPFv3, include the
ospf3statement at the[edit protocols]hierarchy level.[edit] user@host# set protocols ospf area 0.0.0.1
Configure interface so-1/1/0 as a passive interface configured for traffic engineering, and specify the IP address at the far end of the inter-AS link.
[edit protocols ospf area 0.0.0.1]
user@host# set interface so-1/1/0 passive traffic-engineering remote-node-id 192.168.207.2
If you are done configuring the device, commit the configuration.
[edit protocols ospf]
user@host# commit
Results
Confirm your configuration by entering the show
protocols ospf command. If the output does not display the intended
configuration, repeat the instructions in this example to correct
the configuration.
user@host# show protocols ospf
area 0.0.0.1 {
    interface so-1/1/0.0 {
        passive {
            traffic-engineering {
                remote-node-id 192.168.207.2;
            }
        }
    }
}
To confirm your OSPFv3 configuration, enter the show protocols
ospf3 command.
Verification
Confirm that the configuration is working properly.
Verifying the Status of OSPF Interfaces
Purpose
Verify the status of OSPF interfaces. If the interface is passive, the Adj count field is 0 because no adjacencies have been formed. Next to this field, you might also see the word Passive.
Action
From operational mode, enter the show ospf interface
detail command for OSPFv2, and enter the show ospf3 interface
detail command for OSPFv3.
Advertising Label-Switched Paths into OSPFv2
One main reason to configure label-switched paths (LSPs) in your network is to control the shortest path between two points on the network. You can advertise LSPs into OSPFv2 as point-to-point links so that all participating routing devices can take the LSP into account when performing SPF calculations. The advertisement contains a local address (the from address of the LSP), a remote address (the to address of the LSP), and a metric with the following precedence:
Use the LSP metric defined under OSPFv2.
Use the LSP metric configured for the label-switched path under MPLS.
If you do not configure any of the above, use the default OSPFv2 metric of 1.
If you want an LSP that is announced into OSPFv2 to be used in SPF calculations, there must be a reverse link (that is, a link from the tail end of the LSP to the head end). You can accomplish this by configuring an LSP in the reverse direction and also announcing it in OSPFv2.
Example: Advertising Label-Switched Paths into OSPFv2
This example shows how to advertise LSPs into OSPFv2.
Requirements
Before you begin, configure the device interfaces. See the Junos OS Network Interfaces Library for Routing Devices.
Overview
To advertise an LSP into OSPFv2, you define the LSP and configure OSPFv2 to route traffic using the LSP. By doing this, you can use the LSP to control the shortest path between two points on the network. You might choose to do this if you want to have OSPF traffic routed along the LSP instead of having OSPF use the default best-effort routing.
In this example, you configure the following to advertise an LSP into OSPFv2:
BGP
For all routing devices, configure the local AS number 65000 and define the IBGP group that recognizes the specified BGP systems as peers. All members are internal to the local AS, so you configure an internal group with a full list of peers. You also include the peer AS group, which is the same as the local AS number that you configure.
MPLS
For all routing devices, configure the protocol family on each transit logical interface and enable MPLS on all interfaces, except for the management interface (fxp0.0). Specify the mpls protocol family type.
RSVP
For all routing devices, enable RSVP on all interfaces, except for the management interface (fxp0.0). You enable RSVP on the devices in this network to ensure that the interfaces can signal the LSP.
OSPFv2
For all routing devices, use the loopback address to assign the router ID, administratively group all of the devices into OSPF area 0.0.0.0, add all of the interfaces participating in OSPF to area 0.0.0.0, and disable OSPF on the management interface (fxp0.0).
Label-switched path
On the ingress routing device R1, which is the beginning (or head end) of the LSP, configure an LSP with an explicit path. The explicit path indicates that the LSP must go to the next specified IP address in the path without traversing other nodes. In this example, you create an LSP named R1-to-R6, and you specify the IP address of the egress routing device R6.
Advertise the LSP in OSPFv2
On the ingress routing device R1, you advertise the LSP as a point-to-point link into OSPFv2. You can optionally assign a metric to have the LSP be the more or less preferred path to the destination.
Topology
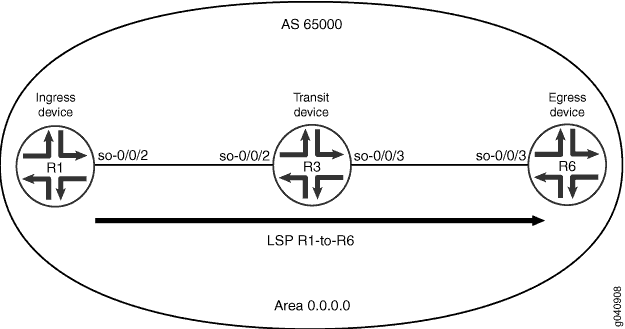
Figure 1 shows a sample network topology that consists of the following:
BGP is configured on all routing devices, with one local autonomous system (AS) 65000 that contains three routing devices:
R1—Device R1 is the ingress device with a router ID of 10.0.0.1. Interface so-0/0/2 connects to Device R3.
R3—Device R3 is the transit device with a router ID of 10.0.0.3. Interface so-0/0/2 connects to Device R1, and interface so-0/0/3 connects to Device R6.
R6—Device R6 is the egress device with a router ID of 10.0.0.6. Interface so-0/0/3 connects to Device R3.
OSPFv2 is configured on all routing devices.
MPLS and RSVP are enabled on all routing devices.
One RSVP-signaled LSP is configured on Device R1.
Configuration
The following examples require you to navigate various levels in the configuration hierarchy. For information about navigating the CLI, see Modifying the Junos OS Configuration in CLI User Guide.
To configure the devices to advertise an LSP into OSPFv2, perform the following tasks:
- Configuring BGP
- Configuring MPLS
- Configuring RSVP
- Configuring OSPF
- Configuring the LSP
- Advertising the LSP into OSPFv2
Configuring BGP
CLI Quick Configuration
To quickly configure BGP on each routing device, copy the following commands and paste them into the CLI.
Configuration on Device R1:
[edit]
set routing-options autonomous-system 65000
set protocols bgp group internal-peers type internal
set protocols bgp group internal-peers local-address 10.0.0.1
set protocols bgp group internal-peers neighbor 10.0.0.3
set protocols bgp group internal-peers neighbor 10.0.0.6
set protocols bgp group internal-peers peer-as 65000
Configuration on Device R3:
[edit]
set routing-options autonomous-system 65000
set protocols bgp group internal-peers type internal
set protocols bgp group internal-peers local-address 10.0.0.3
set protocols bgp group internal-peers neighbor 10.0.0.1
set protocols bgp group internal-peers neighbor 10.0.0.6
set protocols bgp group internal-peers peer-as 65000
Configuration on Device R6:
[edit]
set routing-options autonomous-system 65000
set protocols bgp group internal-peers type internal
set protocols bgp group internal-peers local-address 10.0.0.6
set protocols bgp group internal-peers neighbor 10.0.0.1
set protocols bgp group internal-peers neighbor 10.0.0.3
set protocols bgp group internal-peers peer-as 65000
Step-by-Step Procedure
To configure BGP:
On each routing device, configure the local AS number.
[edit]
user@R1# set routing-options autonomous-system 65000
[edit]
user@R3# set routing-options autonomous-system 65000
[edit]
user@R6# set routing-options autonomous-system 65000
On each routing device, configure the internal BGP neighbor connections.
[edit]
user@R1# set protocols bgp group internal-peers type internal
user@R1#  set protocols bgp group internal-peers local-address 10.0.0.1
user@R1#  set protocols bgp group internal-peers neighbor 10.0.0.3
user@R1#  set protocols bgp group internal-peers neighbor 10.0.0.6
user@R1# set protocols bgp group internal-peers peer-as 65000
[edit]
user@R3# set protocols bgp group internal-peers type internal
user@R3#   set protocols bgp group internal-peers local-address 10.0.0.3
user@R3# set protocols bgp group internal-peers neighbor 10.0.0.1
user@R3# set protocols bgp group internal-peers neighbor 10.0.0.6
user@R3# set protocols bgp group internal-peers peer-as 65000
[edit]
user@R6# set protocols bgp group internal-peers type internal
user@R6#  set protocols bgp group internal-peers local-address 10.0.0.6
user@R6#   set protocols bgp group internal-peers neighbor 10.0.0.1
user@R6#   set protocols bgp group internal-peers neighbor 10.0.0.3
user@R6# set protocols bgp group internal-peers peer-as 65000
If you are done configuring the devices, commit the configuration.
[edit]
user@host# commit
Results
Confirm your configuration by entering the show
routing-options and show protocols bgp commands.
If the output does not display the intended configuration, repeat
the instructions in this example to correct the configuration.
Configuration on R1:
user@R1# show routing-options
autonomous-system 65000;
user@R1# show protocols bgp
group internal-peers {
    type internal;
    local-address 10.0.0.1;
    peer-as 65000;
    neighbor 10.0.0.3;
    neighbor 10.0.0.6;
}
Configuration on R3:
user@R3# show routing-options
autonomous-system 65000;
user@R3# show protocols bgp
group internal-peers {
    type internal;
    local-address 10.0.0.3;
    peer-as 65000;
    neighbor 10.0.0.1;
    neighbor 10.0.0.6;
}
Configuration on R6:
user@R6# show routing-options
autonomous-system 65000;
user@R6# show protocols bgp
group internal-peers {
    type internal;
    local-address 10.0.0.6;
    peer-as 65000;
    neighbor 10.0.0.1;
    neighbor 10.0.0.3;
}
Configuring MPLS
CLI Quick Configuration
To quickly configure MPLS on all of the routing devices in AS 65000, copy the following commands and paste them into the CLI.
Configuration on Device R1:
[edit]
set interfaces so-0/0/2 unit 0 family mpls
set protocols mpls interface all
set protocols mpls interface fxp0.0 disable
Configuration on Device R3:
[edit]
set interfaces so-0/0/2 unit 0 family mpls
set interfaces so-0/0/3 unit 0 family mpls
set protocols mpls interface all
set protocols mpls interface fxp0.0 disable
Configuration on Device R6:
[edit]
set interfaces so-0/0/3 unit 0 family mpls
set protocols mpls interface all
set protocols mpls interface fxp0.0 disable
Step-by-Step Procedure
To configure MPLS:
Configure the transit interfaces for MPLS.
[edit ]
user@R1# set interfaces so-0/0/2 unit 0 family mpls
[edit ]
user@R3# set interfaces so-0/0/2 unit 0 family mpls
user@R3# set interfaces so-0/0/3 unit 0 family mpls
[edit ]
user@R6# set interfaces so-0/0/3 unit 0 family mpls
Enable MPLS.
[edit ]
user@R1# set protocols mpls interface all
[edit ]
user@R3# set protocols mpls interface all
[edit ]
user@R6# set protocols mpls interface all
Disable MPLS on the management interface (fxp0.0).
[edit ]
user@R1# set protocols mpls interface fxp0.0 disable
[edit ]
user@R3# set protocols mpls interface fxp0.0 disable
[edit ]
user@R6# set protocols mpls interface fxp0.0 disable
If you are done configuring the devices, commit the configuration.
[edit]
user@host# commit
Results
Confirm your configuration by entering the show
interfaces and show protocols mpls commands. If the
output does not display the intended configuration, repeat the instructions
in this example to correct the configuration.
Configuration on Device R1:
user@R1# show interfaces
so-0/0/2 {
    unit 0 {
        family mpls;
    }
}
user@R1# show protocols mpls
interface all;
interface fxp0.0 {
    disable;
}
Configuration on Device R3:
user@R3# show interfaces
so-0/0/2 {
    unit 0 {
        family mpls;
    }
}
so-0/0/3 {
    unit 0 {
        family mpls;
    }
}
user@R3# show protocols mpls
interface all;
interface fxp0.0 {
    disable;
}
Configuration on Device R6:
user@R6# show interfaces
so-0/0/3 {
    unit 0 {
        family mpls;
    }
}
user@R6# show protocols mpls
interface all;
interface fxp0.0 {
    disable;
}
Configuring RSVP
CLI Quick Configuration
To quickly configure RSVP on all of the routing devices in AS 65000, copy the following commands and paste them into the CLI.
Configuration on Device R1:
[edit]
set protocols rsvp interface so-0/0/2
set protocols rsvp interface fxp0.0 disable
Configuration on Device R3:
[edit]
set protocols rsvp interface so-0/0/2
set protocols rsvp interface so-0/0/3
set protocols rsvp interface fxp0.0 disable
Configuration on Device R6:
[edit]
set protocols rsvp interface so-0/0/3
set protocols rsvp interface fxp0.0 disable
Step-by-Step Procedure
To configure RSVP:
Enable RSVP.
[edit ]
user@R1# set protocols rsvp interface so-0/0/2
[edit ]
user@R3# set protocols rsvp interface so-0/0/2
user@R3# set protocols rsvp interface so-0/0/3
[edit ]
user@R6# set protocols rsvp interface so-0/0/3
Disable RSVP on the management interface (fxp0.0).
[edit ]
user@R1# set protocols rsvp interface fxp0.0 disable
[edit ]
user@R3# set protocols rsvp interface fxp0.0 disable
[edit ]
user@R6# set protocols rsvp interface fxp0.0 disable
If you are done configuring the devices, commit the configuration.
[edit]
user@host# commit
Results
Confirm your configuration by entering the show
protocols rsvp command. If the output does not display the intended
configuration, repeat the instructions in this example to correct
the configuration.
Configuration on Device R1:
user@R1# show protocols rsvp
interface so-0/0/2.0;
interface fxp0.0 {
    disable;
}
Configuration on Device R3:
user@R3# show protocols rsvp
interface so-0/0/2.0;
interface so-0/0/3.0;
interface fxp0.0 {
    disable;
}
Configuration on Device R6:
user@R3# show protocols rsvp
interface so-0/0/3.0;
interface fxp0.0 {
    disable;
}
Configuring OSPF
CLI Quick Configuration
To quickly configure OSPF, copy the following commands and paste them into the CLI.
Configuration on Device R1:
[edit]
set routing-options router-id 10.0.0.1
set protocols ospf area 0.0.0.0 interface all
set protocols ospf area 0.0.0.0 interface fxp0.0 disable
Configuration on Device R3:
[edit]
set routing-options router-id 10.0.0.3
set protocols ospf area 0.0.0.0 interface all
set protocols ospf area 0.0.0.0 interface fxp0.0 disable
Configuration on Device R6:
[edit]
set routing-options router-id 10.0.0.6
set protocols ospf area 0.0.0.0 interface all
set protocols ospf area 0.0.0.0 interface fxp0.0 disable
Step-by-Step Procedure
To configure OSPF:
Configure the router ID.
[edit]
user@R1# set routing-options router-id 10.0.0.1
[edit]
user@R3# set routing-options router-id 10.0.0.3
[edit]
user@R6# set routing-options router-id 10.0.0.6
Configure the OSPF area and the interfaces.
[edit]
user@R1# set protocols ospf area 0.0.0.0 interface all
[edit]
user@R3# set protocols ospf area 0.0.0.0 interface all
[edit]
user@R6# set protocols ospf area 0.0.0.0 interface all
Disable OSPF on the management interface (fxp0.0).
[edit]
user@R1# set protocols ospf area 0.0.0.0 interface fxp0.0 disable
[edit]
user@R3# set protocols ospf area 0.0.0.0 interface fxp0.0 disable
[edit]
user@R6# set protocols ospf area 0.0.0.0 interface fxp0.0 disable
If you are done configuring the devices, commit the configuration.
[edit ]
user@host# commit
Results
Confirm your configuration by entering the show
routing-options and the show protocols ospf commands.
If the output does not display the intended configuration, repeat
the instructions in this example to correct the configuration.
Configuration on Device R1:
user@R1# show routing-options
router-id 10.0.0.1;
user@R1# show protocols ospf
area 0.0.0.0 {
    interface all;
    interface fxp0.0 {
        disable;
    }
}
Configuration on Device R3:
user@R3# show routing-options
router-id 10.0.0.3;
user@R3# show protocols ospf
area 0.0.0.0 {
    interface all;
    interface fxp0.0 {
        disable;
    }
}
Configuration on Device R6:
user@R6# show routing-options
router-id 10.0.0.6;
user@R6# show protocols ospf
area 0.0.0.0 {
    interface all;
    interface fxp0.0 {
        disable;
    }
}
Configuring the LSP
CLI Quick Configuration
To quickly configure the LSP on the ingress routing device Router R1, copy the following command and paste it into the CLI.
[edit]
set protocols mpls label-switched-path R1-to-R6 to 10.0.0.6
Step-by-Step Procedure
To configure the LSP on Device R1:
Enter MPLS configuration mode.
[edit]
user@R1# edit protocols mpls
Create the LSP.
[edit protocols mpls]
user@R1# set label-switched-path R1-to-R6 to 10.0.0.6
If you are done configuring the device, commit the configuration.
[edit ]
user@R1# commit
Results
Confirm your configuration by entering the show
protocols mpls command. If the output does not display the intended
configuration, repeat the instructions in this example to correct
the configuration.
user@R1# show protocols mpls
label-switched-path R1-to-R6 {
    to 10.0.0.6;
}
Advertising the LSP into OSPFv2
CLI Quick Configuration
To quickly advertise the LSP into OSPFv2 and optionally include a metric for the LSP on Device R1, copy the following commands and paste them into the CLI.
[edit]
set protocols ospf area 0.0.0.0 label-switched-path R1-to-R6
set protocols ospf area 0.0.0.0 label-switched-path R1-to-R6 metric 2
Step-by-Step Procedure
To advertise the LSP into OSPFv2 on Router R1:
Enter OSPF configuration mode.
[edit]
user@R1# edit protocols ospf
Include the
label-switched-pathstatement, and specify the LSP R1-to-R6 that you created.[edit protocols ospf] user@R1# set area 0.0.0.0 label-switched-path R1-to-R6
(Optional) Specify a metric for the LSP.
[edit protocols ospf]
user@R1# set protocols ospf area 0.0.0.0 label-switched-path R1-to-R6 metric 2
If you are done configuring the device, commit the configuration.
[edit]
user@R1# commit
Results
Confirm your configuration by entering the show
protocols ospf command. If the output does not display the intended
configuration, repeat the instructions in this example to correct
the configuration.
user@R1# show protocols ospf
area 0.0.0.0 {
    label-switched-path R1-to-R6 {
        metric 2;
    }
}
Verification
Static Adjacency Segment Identifier for OSPF
Adjacency segment is a strict forwarded single-hop tunnel that carries packets over a specific link between two nodes, irrespective of the link cost. You can configure static adjacency segment identifier (SID) labels for an interface.
Configuring a static adjacency SID on an interface causes the existing dynamically allocated adjacency SID to be removed along with the transit route for the same.
For static adjacency SIDs, the labels are picked from either a static reserved label pool or from an OSPF segment routing global block (SRGB).
You can reserve a label range to be used for static allocation of labels using the following configuration:
user@host# set protocols mpls label-range static-label-range start-value end-value
The static pool can be used by any protocol to allocate a label
in this range. You need to ensure that no two protocols use the same
static label. OSPF adjacency SIDs can be allocated from this label
block through the configuration using keyword label. The label value for the specific adjacency SIDs need to be explicitly
configured. The following is a sample configuration:
user@host# set protocols mpls label-range static-label-range 700000 799999;user@host# set protocols ospf source-packet-routing srgb start-label 800000 index-range 4000;user@host# set protocols ospf area 0.0.0.0 interface ge-0/0/0.1 ipv4-adjacency-segment unprotected label 700001;
When you use ipv4-adjacency-segment command,
the underlying interface must be point-to-point.
SRGB is a global label space that is allocated for the protocol based on configuration. The labels in the entire SRGB is available for OSPF to use and are not allocated to other applications/protocols. Prefix SIDs (and Node SIDs) are indexed from this SRGB.
OSPF Adj-SIDs can be allocated from OSPF SRGB using keyword ‘index’ in the configuration. In such cases, it should be ensured that the Adj-SID index does not conflict with any other prefix SID in the domain. Like Prefix-SIDs, Adj-SIDs will also be configured by mentioning the index with respect to the SRGB. However, the Adj-SID subtlv will still have the SID as a value and the L and V flags are set. The following is a sample configuration:
user@host# set protocols ospf source-packet-routing srgb start-label 800000 index-range 4000;user@host# set protocols ospf area 0.0.0.0 interface ge-0/0/0.1 ipv4-adjacency-segment unprotected index 1;
Static adjacency SIDs can be configured per area and also based
on whether the protection is required or not. Adjacency SIDs should
be configured per interface at the [edit protocols ospf area area interface interface-name] hierarchy level.
Protected—Ensures adjacency SID is eligible to have a backup path and a B-flag is set in an adjacency SID advertisement.
Unprotected—Ensures no backup path is calculated for a specific adjacency SID and a B-flag is not set in an adjacency SID advertisement.
The following is a sample configuration:
user@host# set protocols ospf area 0.0.0.0 interface ge-0/0/0.1 ipv4-adjacency-segment unprotected index 1;user@host# set protocols ospf area 0.0.0.0 interface ge-0/0/1.1 ipv4-adjacency-segment protected index 2;
When segment routing is used in LAN subnetworks, each router in the LAN may advertise the
adjacency SID of each of its neighbors. To configure adjacency SID for a LAN interface
to a specific neighbor, you should configure the adjacency SIDs under the lan-neighbor
configuration at the [edit protocols ospf area
0.0.0.0
interface interface_name lan-neighbor
neighbor-routerid] hierarchy level. The following is
a sample configuration:
user@host# set protocols mpls label-range static-label-range 700000 799999;user@host# set protocols ospf source-packet-routing srgb start-label 800000 index-range 4000;user@host# set protocols ospf area 0.0.0.0 interface ge-1/0/0.1 lan-neighbor 11.12.1.2 ipv4-adjacency-segment unprotected label 700001;
Use the following CLI hierarchy for configuring adjacency SID:
[edit ]
protocols {
    ospf {
        area 0.0.0.0 {
        interface <interface_name> {
            ipv4-adjacency-segment {
                protected {
                    dynamic;
                    label <value>
                    index <index>
                }
                unprotected {
                    dynamic;
                    label <value>
                    index <index>
                }
            }
        }
        interface <interface_name> {
                lan-neighbor <neighbor-routerid>{
                    ipv4-adjacency-segment {
                        protected {
                            dynamic;
                            label <value>
                            index <index>
                        }
                        unprotected {
                            dynamic;
                            label <value>
                            index <index>
                        }
                    }
                }
            }
        }
    }
}
Use the following operational CLI commands to verify the configuration:
show ospf neighbor detail
The following sample output displays the details of configured and dynamic adjacency SID.
user@host> show ospf neighbor detail
Address          Interface              State     ID               Pri  Dead
11.12.1.2        ge-1/0/0.0             Full      12.1.1.1         128    34
  Area 0.0.0.0, opt 0x52, DR 0.0.0.0, BDR 0.0.0.0
  Up 00:06:27, adjacent 00:06:27
  SPRING Adjacency Labels:

     Label       Flags       Adj-Sid-Type

     90010       BVLP        Protected

     1212        VLP         UnProtected
regress@10.49.129.231# run show route label 90010

mpls.0: 19 destinations, 19 routes (19 active, 0 holddown, 0 hidden)
+ = Active Route, - = Last Active, * = Both

90010              *[L-OSPF/10/5] 00:00:21, metric 0
                    >  to 11.12.1.2 via ge-1/0/0.0, Pop
                       to 11.12.2.2 via ge-1/0/2.0, Swap 16021
                       to 11.12.3.2 via ge-1/0/3.0, Swap 16021
Overview of Segment Routing Statistics
Traffic
statistics in a segment routing network can be recorded in an OpenConfig compliant
format for the Layer 3 interfaces. The statistics is recorded for the Source Packet
Routing in Networking (SPRING) traffic only, excluding RSVP and LDP-signaled traffic,
and the family MPLS statistics per interface is accounted for separately. The SR
statistics also includes SPRING traffic statistics per link aggregation group (LAG)
member, and per segment identifier (SID). To enable recording of segment routing
statistics, include sensor-based-stats statement at the [edit
protocol isis source-packet-routing] hierarchy level.
Earlier, sensors were available for collecting segment routing statistics for MPLS transit traffic only, which is MPLS-to-MPLS in nature. On MX Series routers with MPC and MIC interfaces and PTX Series routers, additional sensors are introduced to collect segment routing statistics for MPLS ingress traffic, which is IP-to-MPLS in nature. With this feature, you can enable sensors for label IS-IS segment routing traffic only, and stream the statistics to a gRPC client.
You can enable the segment routing statistics for MPLS ingress traffic using the
egress option under the per-sid configuration
statement. The resource name for the per-sid egress functionality is:
/junos/services/segment-routing/sid/egress/usage/
You can view the label IS-IS route association with the sensors using the show
isis spring sensor info command output. This command does not display
counter values of the actual sensors.
The segment routing statistics records are exported to a server. You can view segment routing statistics data from the following the OpenConfig paths:
-
/mpls/signalling-protocols/segment-routing/aggregate-sid-counters/aggregate-sid-counter[ip-addr='L-ISIS-10.1.1.1']/state/counters[name='oc-xxx']/out-pkts -
/mpls/signalling-protocols/segment-routing/aggregate-sid-counters/aggregate-sid-counter[ip-addr='L-ISIS-10.1.1.1']/state/counters[name='oc-xxx']/out-pkts
-
Graceful Routing Engine switchover (GRES) is not supported for segment routing statistics.
Nonstop active routing (NSR) is not supported for label IS-IS. During a Routing Engine switchover, a new sensor is created in the new primary Routing Engine, replacing the sensor created by the previous primary Routing Engine. As a result, at the time of a Routing Engine switchover, the segment routing statistics counter start from zero.
-
Graceful restart is not supported for label IS-IS.
In case of graceful restart, the existing sensor is deleted and a new sensor is created during IS-IS initialization. The segment routing statistics counter restarts from zero.
-
In-service software upgrade (ISSU) and nonstop software upgrade (NSSU) are not supported. In such cases, the segment routing statistics counter is restarted.
-
Zero-statistics segment routing data is suppressed and does not get streamed to the gRPC clients.