ON THIS PAGE
Deactivate and Reactivate Statements and Identifiers in a Device Configuration
Example: Deactivate and Reactivate Statements and Identifiers in a Device Configuration
Example: How to Use Global Replace in a Device Configuration—the \n Back Reference
Example: Global Replace in a Device Configuration—Replacing an Interface Name
Example: Global Replace in a Device Configuration—the upto Option
Example: Include Comments in a Device Configuration by Using the CLI
Modify the Configuration of a Device
The CLI enables you to modify an existing Junos OS configuration. This section explains the specifics of adding a statement, deleting a statement, copying a statement, and inserting a new identifier, including examples.
Display Users Currently Editing the Configuration
To display the users currently editing the configuration,
use the status configuration mode command:
user@host# status
Users currently editing the configuration:
  rchen terminal p0 (pid 55691) on since 2018-03-01 13:17:25 PST
      [edit interfaces]
The system displays who is editing the configuration
(rchen), where the user is logged in (terminal p0), the date and time the user logged in (2018-03-01 13:17:25 PST), and what level of the hierarchy the user is editing
([edit interfaces]).
If you issue the status configuration
mode command and a user has scheduled a candidate configuration to
become active for a future time, the system displays who scheduled
the commit (root), where the user is logged in (terminal
d0), the date and time the user logged in (2018-10-31 14:55:15
PST), and that a commit is pending (commit at).
[edit]
user@host# status
Users currently editing the configuration:
root terminal d0 (pid 767) on since 2018-10-31 14:55:15 PST, idle 00:03:09
commit at
If you issue the status configuration
mode command and a user is editing the configuration in configure
exclusive mode, the system displays who is editing the configuration
(root), where the user is logged in (terminal d0), the date and time the user logged in (2018-11-01 13:05:11
PST), and that a user is editing the configuration in configure
exclusive mode (exclusive [edit]).
[edit]
user@host# status
Users currently editing the configuration:
root terminal d0 (pid 2088) on since 2018-11-01 13:05:11 PST
exclusive [edit]
See Also
How to Modify the Juniper Networks Device Configuration
To configure a Juniper Networks device or to modify an existing configuration, you add statements
to the configuration using the edit and set commands. For
each statement hierarchy, you create the hierarchy starting with a statement at the top level.
You then continue creating the hierarchy with statements that move progressively lower in the
hierarchy.
To modify the hierarchy, you use two configuration mode commands. Select the relevant command based on what you want to accomplish:
edit—Moves to a specified hierarchy level. If that hierarchy level does not exist, theeditcommand creates it. Theeditcommand has the following syntax:edit <statement-path>
set—Creates a configuration statement and sets identifier values. After you issue asetcommand, you remain at the same level in the hierarchy. Thesetcommand has the following syntax:set <statement-path> statement <identifier>
The hierarchy to the configuration statement and the statement itself is
statement-path. If you have already moved to the statement’s hierarchy level, you can omit the statement path. The configuration statement itself isstatement. Theidentifierstring identifies an instance of a statement.
Statements can be either container statements or leaf statements. A container statement can
include additional container statements within it, as well as leaf statements. A leaf
statement, however, stands alone. The command edit? displays the container
statements, while set? displays both the container and leaf statements, using
> to differentiate between them.
You cannot use the edit command to change the
value of identifiers. You must use the set command.
See Also
How to Add Configuration Statements and Identifiers
You configure all properties of a Juniper Networks device by including statements in the configuration. A statement consists of a keyword, which is fixed text. You can also include an identifier in a statement. An identifier is an identifying name that you define, such as the name of an interface or a username, and that enables you and the CLI to discriminate among a collection of statements.
For example, the following list shows the statements available at the top level in configuration mode:
user@host# set ?
Possible completions:
> accounting-options   Accounting data configuration
+ apply-groups         Groups from which to inherit configuration data
> chassis              Chassis configuration
> class-of-service     Class-of-service configuration
> firewall             Define a firewall configuration
> forwarding-options   Configure options to control packet sampling
> groups               Configuration groups
> interfaces           Interface configuration
> policy-options       Routing policy option configuration
> protocols            Routing protocol configuration
> routing-instances    Routing instance configuration
> routing-options      Protocol-independent routing option configuration
> snmp                 Simple Network Management Protocol
> system               System parameters
An angle bracket ( > ) before
the statement name indicates that it is a container statement and
that you can define other statements at levels below it. If there
is no angle bracket ( > ) before the statement
name, the statement is a leaf statement; you cannot define other statements
at hierarchy levels below it.
A plus sign (+) before the statement name indicates that it can contain a set of values. To specify a set, include the values in brackets. For example:
[edit]
user@host# set policy-options community my-as1-transit members [65535:10 65535:11]
In some statements, you can include an identifier. For some identifiers, such as interface names, you must specify the identifier in a precise format. For example, the interface name so-0/0/0 refers to a SONET/SDH interface that is on the Flexible PIC Concentrator (FPC) in slot 0, in the first PIC location, and in the first port on the Physical Interface Card (PIC).
For other identifiers, such as interface descriptive text and policy and firewall term names, you can specify any name, including special characters, spaces, and tabs.
You must enclose identifiers in quotation marks (double quotes). You must also use quotation marks to enclose identifiers and any strings that include a space, a tab character, or any of the following characters:
( ) [ ] { } ! @ # $ % ^ & | ' = ?
If you do not type an option for a statement that requires one, a message indicates the type of information required. In this example, you must type an area number to complete the command:
[edit]
user@host# set protocols ospf area
                                ^
syntax error, expecting <identifier>
See Also
How to Delete a Statement from a Device Configuration
You delete a statement or identifier from a device configuration using the
delete configuration mode command. Deleting a statement or an identifier
effectively "unconfigures" the functionality associated with that statement or identifier,
returning that functionality to its default condition.
user@host# delete <statement-path> <identifier>
When you delete a statement, the statement and all its subordinate statements and identifiers are removed from the configuration.
For statements that can have more than one identifier, when you delete one identifier, only that identifier is deleted. The other identifiers in the statement remain.
To delete the entire hierarchy starting at the current hierarchy level, use the
delete command without specifying a statement or an identifier. When you
omit the statement or identifier, you are prompted to confirm the deletion:
[edit]
user@host# delete
Delete everything under this level? [yes, no] (no)
Possible completions:
no    Don't delete everything under this level
yes   Delete everything under this level
Delete everything under this level? [yes, no] (no) You cannot delete multiple statements or identifiers within a hierarchy using a single
delete command. You must delete each statement or identifier
individually, using multiple delete commands. For example, consider the
following configuration at the [edit system] hierarchy level:
system {
    host-name host-211;
    domain-name domain-122;
    backup-router 192.168.71.254;
    arp;
    authentication-order [ radius password tacplus ];
}
To delete the domain-name, host-name, and
backup-router from the configuration, you must delete each statement
individually.
user@hostdelete system host-name host-211user@hostdelete system domain-name domain-122user@hostdelete system backup-router 192.168.71.254
You cannot issue a single delete command. For example, the following
command would not work:
user@host> delete system hostname host-211 domain-name domain-122 backup-router 192.168.71.254You can delete related configuration items simultaneously, such as channelized interfaces or static routes, by using a single command and regular expressions. Deleting a statement or an identifier effectively “unconfigures” the functionality associated with that statement or identifier, returning that functionality to its default condition.
You can delete only certain parts of the configuration where you normally put multiple items, such as interfaces. However, you cannot delete "groups" of different items, as shown in this example:
user@host#show system servicesftp; rlogin; rsh; ssh { root-login allow; } telnet; [edit] user@host#wildcard delete system services *syntax error.
When you delete a statement, the statement and all its subordinate statements and identifiers are removed from the configuration.
To delete related configuration items, issue the wildcard configuration
mode command with the delete option and specify the statement path, the
items to be summarized with a regular expression, and the regular expression, as follow:
user@host# wildcard delete <statement-path> <identifier> <regular-expression>
When you use the wildcard command to delete related configuration items,
the regular expression must be the final statement.
If the Junos OS matches more than eight related items, the CLI displays only the first eight items.
How to Delete Interfaces from the Configuration
You can delete multiple T1 interfaces in the range from t1-0/0/0:0 through
t1-0/0/0:23 by using this syntax:
  user@host# wildcard delete interfaces t1-0/0/0:.*
    matched: t1-0/0/0:0
    matched: t1-0/0/0:1
    matched: t1-0/0/0:2
  Delete 3 objects? [yes,no] (no) no
How to Delete Routes from the Configuration
You can delete static routes in the range from 172.0.0.0 to
172.255.0.0 by using this syntax:
user@host# wildcard delete routing-options static route 172.*
    matched: 172.16.0.0/12
    matched: 172.16.14.0/24
    matched: 172.16.100.0/24
    matched: 172.16.128.0/19
    matched: 172.16.160.0/24
    matched: 172.17.12.0/23
    matched: 172.17.24.0/23
    matched: 172.17.28.0/23
    ...
  Delete 13 objects? [yes,no] (no)
Example: Delete a Statement from the Device Configuration
The following example shows how to delete the ospf statement,
effectively unconfiguring OSPF on the router:
[edit] user@host#set protocols ospf area 0.0.0.0 interface so-0/0/0 hello-interval 5[edit] user@host#showprotocols { ospf { area 0.0.0.0 { interface so-0/0/0 { hello-interval 5; } } } } [edit] user@host#delete protocols ospf[edit] user@host#show[edit] user@host#
Delete all statements from the current level down:
[edit] user@host#edit protocols ospf area 0.0.0.0[edit protocols ospf area 0.0.0.0] user@host#set interface so-0/0/0 hello-interval 5[edit protocols ospf area 0.0.0.0] user@host#deleteDelete everything under this level? [yes, no]yes[edit protocols ospf area 0.0.0.0] user@host#show[edit] user@host#
Unconfigure a specific property. In this example, remove the interface speed setting:
[edit] user@host#set interfaces so-3/0/0 speed 100mb[edit] user@host#showinterfaces { so-3/0/0 { speed 100mb; } } [edit] user@host#delete interfaces so-3/0/0 speed[edit] user@host#showinterfaces { so-3/0/0; }
Copy a Statement in the Configuration
When you have many similar statements in a device configuration, you can add one statement and then make copies of that statement. Copying a statement duplicates that statement and the entire hierarchy of statements configured under that statement. Copying statements is useful when you are configuring many physical or logical interfaces of the same type.
To make a copy of an existing statement in the configuration:
- Use the configuration mode
copycommand:user@host#
copy existing-statement to new-statement - Immediately after you have copied a portion of the configuration, check the validity of the new configuration.
- If the configuration is invalid, modify either the copied portion or the original portion to produce a valid configuration.
Example: Copy a Statement in the Configuration
This example shows how you can create one virtual connection (VC) on an interface by copying an existing VC.
Requirements
No special configuration beyond device initialization is required before configuring this example.
Before you begin this example, configure the following initial configuration:
[edit interfaces]
user@host# show
at-1/0/0 {
    description "PAIX to MAE West"
    encapsulation atm-pvc;
    unit 61 {
        point-to-point;
        vci 0.61;
        family inet {
            address 10.0.1.1/24;
        }
    }
}
To quickly configure the initial configuration for this example, copy the following commands,
paste them into a text file, remove any line breaks and change any details necessary
to match your network configuration, copy and paste this command into the CLI at the
[edit] hierarchy level, and then enter commit
in configuration mode.
set interfaces at-1/0/0  description "PAIX to MAE West"
set interfaces at-1/0/0 encapsulation atm-pvc
set interfaces at-1/0/0 unit 61 point-to-point
set interfaces at-1/0/0 unit 61 vci 0.61
set interfaces at-1/0/0 unit 61 family inet address 10.0.1.1/24
Overview
In this example illustrating how to copy statements, you add a virtual connection that is very similar to a virtual connection already configured.
Configuration
CLI Quick Configuration
Start at the [edit interfaces at-1/0/0] hierarchy level.
copy unit 61 to unit 62set unit 62 vci 0.62edit unit 62replace pattern 10.0.1.1 with 10.0.2.1
Configure by Copying
Step-by-Step Procedure
To configure by copying a configuration:
Go to the
[edit interfaces at-1/0/0]hierarchy level and copy unit 61.[edit interfaces at-1/0/0] user@host#
copy unit 61 to unit 62-
Take a look at the new configuration and see what you need to change to make the configuration valid.
user@host#
show interfaces at-1/0/0description "PAIX to MAE West" encapsulation atm-pvc; unit 61 { point-to-point; vci 0.61; family inet { address 10.0.1.1/24; } } unit 62 { point-to-point; vci 0.61; family inet { address 10.0.1.1/24; } } Change the configuration to make it valid.
In this example you want to reconfigure the virtual circuit identifier (VCI) and virtual path identifier (VPI).
[edit interfaces at-1/0/0]
user@host# set unit 62 vci 0.62
You also want to replace the IP address of the new interface with its own IP address.
[edit interfaces at-1/0/0] user@host#
edit unit 62user@host#replace pattern 10.0.1.1 with 10.0.2.1
Results
[edit]
show interfaces
at-1/0/0 {
    description "PAIX to MAE West"
    encapsulation atm-pvc;
    unit 61 {
        point-to-point;
        vci 0.61;
        family inet {
            address 10.0.1.1/24;
        }
    }
    unit 62 {
        point-to-point;
        vci 0.62;
        family inet {
            address 10.0.2.1/24;
        }
    }
}
Example: Replace a Configuration
If you need to make changes to the configuration of a device, you can always remove the original
configuration settings using the delete command and add your new
configuration settings using the set command. However, there are other
ways of modifying a configuration that are more efficient and easier to use.
This example shows how to use the following configuration mode commands to update an existing configuration:
rename—Rename an existing configuration setting, such as an interface name. This command can be useful when you are adding new interfaces to a device.copy—Copy a configuration setting and the entire hierarchy of statements configured under that setting. Copying configuration statements is useful when you are configuring many physical or logical interfaces of the same type.replace—Make global changes to text patterns in the configuration. For example, if you consistently misspell a word common to the description statement for all of the interfaces on your device, you can fix this mistake with a single command.
Requirements
No special configuration beyond device initialization is required before configuring this example.
Overview
During the first example in this topic, you make the following configuration changes:
Create a new interface with a description that contains a typing error.
Copy the configuration from the interface that you created to create a new interface.
Rename one of the interfaces that you created.
Fix the typing error in the description for the interfaces that you created.
In the second, shorter example, you try some of the same commands under slightly different circumstances.
Configuration
- Use the Copy, Rename, and Replace Commands to Modify a Loopback Interface Configuration
- Compare the Copy Command at the Top-Level Configuration Hierarchy Level
Use the Copy, Rename, and Replace Commands to Modify a Loopback Interface Configuration
Step-by-Step Procedure
If your existing configuration uses any of the loopback interface unit numbers used in this example, you must substitute different unused loopback interface unit numbers. Otherwise, following these steps could damage the existing operational status of your device.
To create and modify a configuration of a loopback interface using the
copy, rename, and
replace commands:
-
Create a new loopback interface unit number and include a description.
The mistakes in the spelling of loopback in the description are intentional.
[edit] user@host#
set interfaces lo0 unit 100 description "this is a lopbck interface" -
Display the configuration for the loopback interface you have just added.
[edit] user@host#
show interfaces lo0 unit 100description "this is a lopbck interface"; -
Duplicate the loopback interface you have just created, errors included, from unit 100 to unit 101.
[edit] user@host#
copy interfaces lo0 unit 100 to unit 101 -
Display the configurations for loopback interfaces lo0 unit 100 and lo0 unit 101.
[edit] user@host#
show interfaces lo0 unit 100description "this is a lopbck interface";[edit] user@host#show interfaces lo0 unit 101description "this is a lopbck interface";The
copycommand duplicates an interface including any child statements, such asdescription. -
Rename the loopback interface lo0 unit 100 to loopback interface lo0 unit 102.
[edit] user@host#
rename interfaces lo0 unit 100 to unit 102 -
Display the configuration for loopback interface lo0 unit 100.
[edit] user@host#
show interfaces lo0 unit 100[edit] user@host#You should not see any results from this command. The loopback interface lo0 unit 100 is now gone. The
renamecommand replaces the configuration statement indicated with the new configuration. -
Fix the misspelling of the word loopback in the descriptions for loopback interfaces lo0 unit 101 and lo0 unit 102.
[edit] user@host#
replace pattern lopbck with loopback -
Display the configuration for loopback interfaces lo0 unit 101 and lo0 102 to verify that the word loopback is now spelled correctly.
[edit] user@host#
show interfaces lo0 unit 101description "this is a loopback interface";[edit] user@host#show interfaces lo0 unit 102description "this is a loopback interface";The
replacecommand replaces all instances of the pattern specified in the command, unless limited in some way. The next example in this topic shows one way to limit the effect of thereplacecommand. -
In configuration mode, use the
rollbackcommand to returnthe device configuration to the state it was in before you executed the previous steps.[edit] user@host#
rollback
Results
In configuration mode, use the show interfaces lo0 unit 101
and show interfaces lo0 unit 102 commands to ensure that
the device configuration is in the state it was in before you executed the
steps in this example.
[edit]
user@host: show interfaces lo0 unit 101
[edit]
user@host#
You should not see any results from this command.
[edit]
user@host# show interfaces lo0 unit 102
[edit]
user@host#
You should not see any results from this command.
Compare the Copy Command at the Top-Level Configuration Hierarchy Level
Step-by-Step Procedure
The previous example shows the copy,
rename, and replace commands at the
[edit interfaces interface-name unit
                                logical-interface-number]
hierarchy
level. This example shows how some of these commands work at the top level
of the CLI configuration mode hierarchy.
The following example requires you to navigate to various levels in the configuration hierarchy. For information about navigating the CLI, see Using the CLI Editor in Configuration Mode .
-
Create an Ethernet interface.
[edit] user@host#
set interfaces et-2/0/0 unit 0 family inet address 192.0.2.2 -
Copy the interface you just created to another interface.
[edit]
user@host# copy interfaces et-2/0/0 to et-2/1/0
Compare this
copycommand to the one in the previous example, where thecopycommand takes the keywordunitbefore the value to be copied:[edit] user@host#
copy interfaces lo0 unit 100 to unit 101Notice that the keyword
interfacesis not repeated after the prepositiontoand before the value to be copied. This happens in some top-level statements with thecopycommand.Tip:Similarly, in the
renamecommand, you do not repeat the keyword part of the statement before the new identifier in some top-level statements. -
Show your configuration so far.
[edit] user@host#
show interfaceset-2/0/0 { unit 0 { family inet { address 192.0.2.2/32; } } } et-2/1/0 { unit 0 { family inet { address 192.0.2.2/32; } } } -
Replace the address for et-2/1/0 with another IP address.
[edit interfaces et-2/1/0 unit 0 family inet]
user@host# replace pattern 192.0.2.2 with 192.0.2.40
Notice that if you want to change only a specific occurrence of a pattern instead of all occurrences, youmust navigate to that specific hierarchy level before using the
replacecommand. -
Show the interfaces again.
[edit] user@host#
show interfaceset-2/0/0 { unit 0 { family inet { address 192.0.2.2/32; } } } et-2/1/0 { unit 0 { family inet { address 192.0.2.40/32; } } } -
In configuration mode, use the
rollbackcommand to return the device configuration to the state it was in before you executed the previous steps.[edit] user@host#
rollback
Results
In configuration mode, use the show interfaces et-2/0/0 and
show interfaces et-2/1/0 commands to ensure that the
device configuration is in the state it was in before you executed the steps
in this example.
[edit]
user@hostshow interfaces et-2/0/0
[edit]
user@host#
You should not see any results from this command.
[edit]
user@R1# show interfaces et-2/1/0
[edit]
user@host#
You should not see any results from this command.
Insert a New Identifier in a Device Configuration
When configuring a Juniper Networks device, you can enter most statements and identifiers in any order. Regardless of the order in which you enter the configuration statements, the CLI always displays the configuration in a strict order. However, in a few cases the order of the statements matters because the configuration statements create a sequence that is analyzed in order.
For example, in a routing policy or firewall filter, you define terms that are analyzed sequentially. Also, when you create a named path in dynamic MPLS, you define an ordered list of the transit routers in the path, starting with the first transit router and ending with the last one.
To modify a portion of the configuration in which the statement order matters, use the
insert configuration mode
command:
user@host#insert <statement-path> identifier1 (before | after) identifier2
If you do not use the insert command but instead configure the identifier, the
identifier is placed at the end of the list of
similar identifiers.
Example: Insert a New Identifier in a Device Configuration
This example shows the use of the insert command.
Whereas a term added using the set command is placed at the end of the existing
list of terms, you use the insert command to add a term in the order
you specify. Specifying the order of statements is important in the cases in which the
order matters because the configuration statements create a sequence that is analyzed in
order.
As this example shows, you must create the term (or it must already exist) before you can use it
with the insert command. The reference point for placing the term must
also exist; for example, to place the term T1 before the term T2, both T1 and T2 must
already exist and be populated. Junos OS removes empty terms
automatically.
Requirements
Before you can insert a term, you must configure
an initial policy. To quickly configure the initial policy for this
example, copy the following commands, paste them into a text file,
remove any line breaks and change any details necessary to match your
network configuration, copy and paste the commands into the CLI at
the [edit policy-options] hierarchy level, and then enter commit from configuration mode.
set policy-statement statics term term1 from route-filter 192.168.0.0/16 orlonger
set policy-statement statics term term1 from route-filter 224.0.0.0/3 orlonger
set policy-statement statics term term1 then reject
set policy-statement statics term term2 from protocol direct
set policy-statement statics term term2 then reject
set policy-statement statics term term3 from protocol static
set policy-statement statics term term3 then reject
set policy-statement statics term term4 then accept
Now check to verify that you have the hierarchy configured correctly:
[edit policy-options]
user@host# show
policy-statement statics {
    term term1 {
        from {
            route-filter 192.168.0.0/16 orlonger;
            route-filter 224.0.0.0/3 orlonger;
        }
        then reject;
    }
    term term2 {
        from protocol direct;
        then reject;
    }
    term term3 {
        from protocol static;
        then reject;
    }
    term term4 {
        then accept;
    }
}
Overview
To modify a portion of the configuration in which the statement
order matters, you must use the insert configuration mode
command. If you use the set command instead, the added
statement or identifier will be in the wrong place sequentially. The
only other way to get the terms of the command in the correct order
is to dismantle the configuration and start over.
Configuration
CLI Quick Configuration
To quickly configure this example, copy the following commands, paste them into a text file,
remove any line breaks and change any details necessary to match your network
configuration, copy and paste the commands into the CLI at the [edit
policy-options] hierarchy level, and then enter commitin
configuration mode.
[edit] user@host#rename policy-options policy-statement statics term term4 to term term6[edit] user@host#set policy-options policy-statement statics term term4 from protocol local[edit] user@host#set policy-options policy-statement statics term term4 then reject[edit] user@host#set policy-options policy-statement statics term term5 from protocol aggregate[edit] user@host#set policy-options policy-statement statics term term5 then reject[edit] user@host#insert policy-options policy-statement statics term term4 after term term3[edit] user@host#insert policy-options policy-statement statics term term5 after term term4
Configure to Insert Terms
Step-by-Step Procedure
-
Determine the order in which your configuration terms need to go. Consider both the original terms and the new terms you plan to add.
In the original configuration, the policy is named
statics, and there are four terms. Each of the first three terms matches on a different match criteria, and the resulting matches are rejected. The last term accepts all the rest of the traffic.In this example, you need to add two terms that eliminate additional types of traffic. Both these terms need to go before the last term in the original configuration.
Rename original term4 to term6.
[edit]
user@host# rename policy-options policy-statement statics term term4 to term term6
This step preserves the original last term, now renamed term6, as the last term.
Create a new term4.
[edit] user@host#
set policy-options policy-statement statics term term4 from protocol localuser@host#set policy-options policy-statement statics term term4 then rejectA new term is added that matches traffic from local system addresses and rejects it.
Create new term5.
[edit] user@host#
set policy-options policy-statement statics term term5 from protocol aggregateuser@host#set policy-options policy-statement statics term term5 then rejectA new term is added that matches traffic from aggregate routes and rejects it.
Insert term4 after term3.
[edit]
user@host# insert policy-options policy-statement statics term term4 after term term3
Insert term5 after term4.
[edit]
user@host# insert policy-options policy-statement statics term term5 after term term4
Results
[edit]
user@host# show policy-options policy-statement statics
term term1 {
        from {
                route-filter 192.168.0.0/16 orlonger;
                route-filter 224.0.0.0/3 orlonger;
    }
        then reject;
}
term term2 {
        from protocol direct;
        then reject;
}
term term3 {
        from protocol static;
        then accept;
}
term term4 {
        from protocol local;
        then reject;
}
term term5 {
        from protocol aggregate;
        then reject;
}
term term6 {
        then accept;
}
Deactivate and Reactivate Statements and Identifiers in a Device Configuration
In a Junos OS configuration, you can deactivate statements and
identifiers so they do not take effect when you issue the commit
command. Any deactivated statements and identifiers are marked with the
inactive tag. They remain in the configuration but are not
activated when you issue a commit command.
To deactivate a statement or identifier, use the deactivate configuration mode command:
user@host# deactivate( statement | identifier )
To reactivate a statement or identifier, use the activate configuration mode command:
user@host# activate ( statement | identifier )
In both commands, the statement and the
identifier you specify must be at the
current hierarchy level. When you deactivate a statement, that specific statement is
ignored and is not applied at all when you issue a commit
command.
To disable a statement, use the disable configuration mode command.
In some portions of the configuration hierarchy, you can include a disable
statement to disable functionality. One example is disabling an interface by
including the disable statement at the [edit interface
interface-name] hierarchy
level. When you disable a function, it is reactivated when you issue a
commit command but is treated as though it is down or
administratively disabled.
Example: Deactivate and Reactivate Statements and Identifiers in a Device Configuration
This example shows a common use case in which you use the deactivate and
activate configuration mode commands. It involves dual Routing
Engines, primary and backup, that have graceful Routing Engine switchover (GRES)
configured. The software on both Routing Engines needs to be upgraded. This can easily
be accomplished by deactivating GRES, updating the Routing Engines, and then
reactivating GRES.
You can also perform a similar upgrade using the same setup, except that nonstop active routing (NSR) is configured instead of GRES. You would need to deactivate NSR and then upgrade the Routing Engines before reactivating NSR.
Requirements
This example requires the use of a device with dual Routing Engines that can be upgraded.
Before you begin this example, make sure that you have GRES configured.
Overview
In this example, there are two Routing Engines. GRES is configured, and the Routing Engines need to be upgraded. To accomplish the upgrade, you need to deactivate the GRES feature, upgrade each of the Routing Engines, and then activate GRES again.
Configuration
Configure the Deactivation and Reactivation of GRES
Step-by-Step Procedure
To deactivate and reactivate GRES for Routing Engine upgrade:
Show that GRES is enabled for the router.
[edit] user@host#
show chassisredundancy { graceful-switchover; } fpc 2 { pic 0 { tunnel-services { bandwidth 1g; } } }Deactivate GRES.
[edit] user@host#
deactivate chassis redundancy graceful-switchoveruser@host#commitShow that GRES is deactivated.
[edit] user@host#
show chassisredundancy { inactive: graceful-switchover; } fpc 2 { pic 0 { tunnel-services { bandwidth 1g; } } }-
Upgrade the Routing Engines one by one.
For instructions on upgrading Junos OS on dual Routing Engines, see Installing the Software Package on a Device with Redundant Routing Engines.
Reactivate GRES.
[edit] user@host#
activate chassis redundancy graceful-switchoveruser@host#commit
Results
Verify that GRES feature is activated again.
[edit]
user@host# show chassis
redundancy {
    graceful-switchover;
}
fpc 2 {
    pic 0 {
        tunnel-services {
            bandwidth 1g;
        }
    }
}
How to Make Global Changes in the Device Configuration
You can make global changes to variables and identifiers in the device configuration by using the
replace configuration mode command. This command
replaces a pattern in a configuration with another pattern. For example, you
can use this command to find and replace all occurrences of an interface
name when a PIC is moved to another slot in the router.
user@host# replace pattern pattern1 with pattern2 <upto n>
The pattern
pattern1 option is a text string or
regular expression that defines the identifiers and values you want to
replace in the configuration.
The pattern2 option is a text string or regular expression
that replaces the identifiers and values located within
pattern1.
The CLI uses standard UNIX-style regular expression syntax (as defined in POSIX 1003.2). If the regular expression contains spaces, operators, or wildcard characters, enclose the expression in quotation marks. Greedy qualifiers (match as much as possible) are supported. Lazy qualifiers (match as little as possible) are not supported.
The upto
n option specifies the number of objects
replaced. The value of n controls the
total number of objects that are replaced in the configuration (not the
total number of times the pattern occurs). Objects at the same hierarchy
level (siblings) are replaced first. Multiple occurrences of a pattern
within a given object are considered a single replacement. For example, if a
configuration contains a 010101 text string, the command
replace pattern 01 with pattern 02 upto 2 replaces
010101 with 020202 (instead of
020201). Replacement of 010101
with 020202 is considered a single replacement
(n =
1), not three separate replacements
(n
=3).
If you do not specify an upto option, all identifiers and values in the
configuration that match pattern1 are
replaced.
The replace command is available in
configuration mode at any hierarchy level. All matches are case-sensitive.
Common Regular Expressions to Use with the replace Command
Operator |
Function |
|---|---|
|
Indicates that a match can be one of the two terms on either side of the pipe. |
|
Used at the beginning of an expression, denotes where a match should begin. |
|
Used at the end of an expression, denotes that a term
must be matched exactly up to the point of the |
|
Specifies a range of letters or digits to match. To separate the start and end of a range, use a hyphen ( - ). |
|
Specifies a group of terms to match. Stored as numbered
variables. Use for back references as |
|
Denotes 0 or more terms. |
|
Denotes one or more terms. |
|
Denotes any character except for a space (" "). |
|
A backslash escapes special characters to suppress their special meaning. For example, \. matches
|
|
Back reference that matches the nth group. |
|
Back reference that matches the entire match. |
The following table lists some replacement examples.
Command |
Result |
|---|---|
|
Match: Result: |
|
Match: Result: |
|
Match: Result: |
|
Match: Result: |
Example: How to Use Global Replace in a Device Configuration—the \n Back Reference
This example shows how you can use a back reference to replace a pattern.
Requirements
No special configuration beyond device initiation is required before configuring this example.
Before you begin, configure the following:
[edit]
user@host# show interfaces
xe-0/0/0 {
    unit 0;
}
fe-3/0/1 {
    vlan-tagging;
    unit 0 {
        description "inet6 configuration. IP: 2000::c0a8::1bf5";
        vlan-id 100;
        family inet {
            address 17.10.1.1/24;
        }
        family inet6 {
            address 2000::c0a8:1bf5/3;
        }
    }
}
To quickly configure this initial configuration, copy the following
commands and paste them in a text file, remove any line breaks, change
any details necessary to match your network configuration, and then
copy and paste the commands into the CLI at the [edit] hierarchy
level:
set interfaces xe-0/0/0 unit 0set interfaces fe-3/0/1 vlan-taggingset interfaces fe-3/0/1 unit 0 description "inet6 configuration IP: 2000::c0a8::1bf5"set interfaces fe-3/0/1 unit 0 vlan-id 100set interfaces fe-3/0/1 unit 0 family inet address 17.10.1.1/24set interfaces fe-3/0/1 unit 0 family inet6 address 2000::c0a8:1bf5/3
Overview
One of the most useful features of regular expressions is the back reference. Backreferences
provide a convenient way to identify a repeated character or substring within a
string. Once you find the pattern, you can repeat it without writing it again. You
refer to the previously captured pattern with just \# (where
# is a numeral that indicates the number of times you want the
pattern matched).
You can use backreferences to recall, or find, data and replace it with something else. In this way you can reformat large sets of data with a single replace command, thus saving you the time it would take to look for and replace the pattern manually.
Configuration
Configuring a Replacement Using a Back Reference in the Command
Step-by-Step Procedure
To replace a pattern in a Junos OS configuration using a back reference:
Use the
replacecommand.[edit] user@host#
replace pattern pattern1 with pattern2In this case, we want to replace
:1bf5with1bf5.[edit] user@host#
replace pattern "(.*):1bf5" with "\11bf5"Notice the back reference (\1), which indicates the pattern should be searched for and replaced only once.
Results
Here is the resulting configuration:
[edit]
user@host# show interfaces
xe-0/0/0 {
    unit 0;
}
fe-3/0/1 {
    vlan-tagging;
    unit 0 {
        description "inet6 configuration. IP: 2000::c0a8:1bf5";
        vlan-id 100;
        family inet {
            address 17.10.1.1/24;
        }
        family inet6 {
            address 2000::c0a8:1bf5/3;
        }
    }
}
In this example, the pattern 2000::c0a8::1bf5 is replaced with 2000::c0a8:1bf5 once.
Example: Global Replace in a Device Configuration—Replacing an Interface Name
This example shows how to replace an interface
name globally in a configuration by using the replace command.
Using the replace command can be a faster and better
way to change a configuration. For example, a PIC might be moved
to another slot in a router, which changes the interface name. With
one command you can update the whole configuration. Or you might want
to quickly extend the configuration with other similar configurations,
for example, similar interfaces.
By using a combination of the copy and replace commands, you can add to a configuration and then replace certain
aspects of the newly copied configurations. The replace command works with regular expressions. Regular expressions are
quick, flexible, and ubiquitous. You can fashion just about any pattern
you might need to search for, and most programming languages support
regular expressions.
Requirements
No special configuration beyond device initialization is required before configuring this example.
Before you begin, configure the following hierarchy on the router. To quickly configure this hierarchy, see CLI Quick Configuration .
user@host#show interfacesso-0/0/0 { dce; } user@host#show protocolsospf { area 0.0.0.0 { interface so-0/0/0.0 { hello-interval 5; } } }
Overview
This example shows how to replace an interface name globally
in a configuration by using the replace command. It is
a simple example.
The previous configuration is the starting point for this configuration update. In the course of this example, you change the name of the initial interface throughout the configuration with one command.
Configuration
CLI Quick Configuration
To quickly configure
the initial configuration for this example, copy the following commands,
paste them into a text file, remove any line breaks and change any
details necessary to match your network configuration, copy and paste
these commands into the CLI at the [edit] hierarchy level,
and then enter commit from configuration mode.:
set interfaces so-0/0/0 dce
set protocols ospf area 0.0.0.0 interface so-0/0/0.0 hello-interval 5
Configuring an Interface Name Change
Step-by-Step Procedure
To change an interface name:
Make sure that you are at the top of the configuration mode hierarchy.
user@host#
top-
Replace
so-0/0/0withso-1/1/0using thereplacecommand, which uses thepatternkeyword.user@host#
replace pattern so-0/0/0 with so-1/1/0
Results
After making the required changes, verify the configuration
by using the show interfaces and show protocols configuration mode commands.
[edit] user@host#show interfacesso-1/1/0 { dce; } user@host#show protocolsospf { area 0.0.0.0 { interface so-1/1/0.0 { hello-interval 5; } } }
After you have confirmed that the configuration is correct,
enter the commit command.
Example: Global Replace in a Device Configuration—the upto Option
Consider the hierarchy shown in Figure 1. The text string 010101 appears in three places: the description
sections of ge-0/0/0, ge-0/0/0.0, and
fe-0/0/1. These three instances are three objects. The following
example shows how you can use the upto option to perform replacements
in a device configuration:
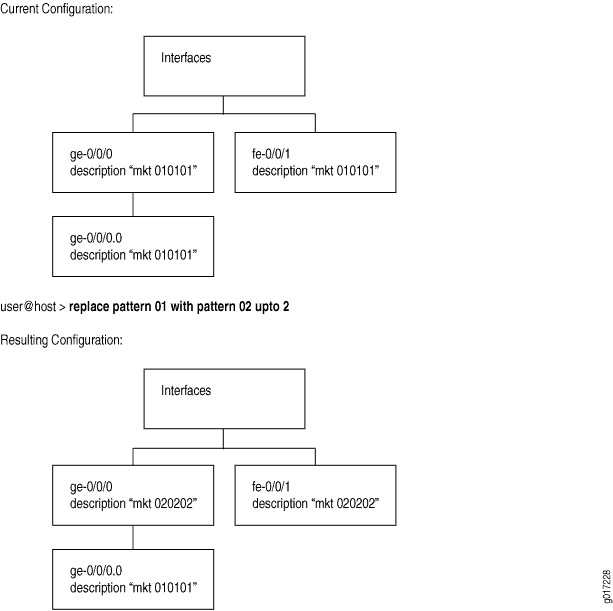
An upto 2 option in the replace command
converts 01 to 02 for two object instances.
The objects under the main interfaces ge-0/0/0 and fe-0/0/1 will be replaced first (since these are siblings in
the hierarchy level). Because of the upto 2 restriction,
the replace command replaces patterns in the first and
second instance in the hierarchy (siblings), but not the third instance
(child of the first instance).
user@host#show interfacesge-0/0/0 { description "mkt 010101"; #First instance in the hierarchy unit 0 { description "mkt 010101"; #Third instance in the hierarchy (child of the first instance) } } fe-0/0/1 { description "mkt 010101"; #second instance in the hierarchy (sibling of the first instance) unit 0 { family inet { address 200.200.20.2/24; } } } [edit] user@host#replace pattern 01 with 02 upto 2[edit] user@host#commitcommit complete
[edit]
user@host# show interfaces
ge-0/0/0 {
    description "mkt 020202"; #First instance in the hierarchy
    unit 0 {
        description "mkt 010101"; #Third instance in the hierarchy (child of the first
        instance)
    }
}
fe-0/0/1 {
    description "mkt 020202"; #second instance in the hierarchy (sibling of the first
    instance)
    unit 0 {
        family inet {
            address 200.200.20.2/24;
        }
    }
}
Add Comments in a Device Configuration
You can include comments in a device configuration to describe any statement in the configuration. You can add comments interactively in the CLI and by editing the ASCII configuration file.
When configuring interfaces, you can add comments about the interface by including the
description statement at the [edit interfaces
interface-name]
hierarchy level. Any comments you include appear in the output of the show
interfaces
commands..
Add Comments in the CLI
When you add comments in configuration mode, they are associated with a statement at the current level. Each statement can have one single-line comment associated with it. Before you can associate a comment with a statement, the statement must exist. The comment is placed on the line preceding the statement.
To add comments to a configuration, use the annotate configuration mode command:
user@host# annotate statement "comment-string"
statement is the
configuration statement to which you are attaching the comment; it
must be at the current hierarchy level. If a comment for the specified statement already exists, it is deleted
and replaced with the new comment.
comment-string is the text of the comment. The comment text
can be any length, and you must type it on a single line. If the comment
contains spaces, you must enclose it in quotation marks. In the comment string,
you can include the comment delimiters /* */ or
#. If you do not specify any, the comment string is
enclosed with the /* */ comment delimiters.
To delete an existing comment, specify an empty comment string:
user@host# annotate statement ""
If you add comments with the annotate command, you can view the comments within the configuration by entering
the show configuration mode command or the show configuration operational mode command.
Junos OS supports annotation up to the last level in the configuration
hierarchy, including oneliners. However, annotation of parts (the child
statements or identifiers within the oneliner) of the oneliner is not
supported. For example, in the following sample configuration hierarchy,
annotation is supported up to the level 1 parent hierarchy,
but not supported for the metric child statement:
[edit protocols]
    isis {
        interface ge-0/0/0.0 {
            level 1 metric 10;
        }
    }
}
Add Comments in a File
When you edit the ASCII configuration file and
add comments, they can be one or more lines and must precede the statement
they are associated with. If you place the comments in other places
in the file, such as on the same line following a statement or on
a separate line following a statement, they are removed when you use
the load command to open the configuration into the CLI.
The following excerpt from a configuration example illustrates how to place and how not to place comments in a configuration file:
/* This comment goes with routing-options */
routing-options {
    /* This comment goes with routing-options traceoptions */
    traceoptions {
        /* This comment goes with routing-options traceoptions tracefile */
        tracefile rpd size 1m files 10;
        /* This comment goes with routing-options traceoptions traceflag task */
        traceflag task;
        /* This comment goes with routing-options traceoptions traceflag general */
        traceflag general;
    }
    autonomous-system 10458;    /* This comment is dropped */
}
routing-options {
    rib-groups {
        ifrg {
            import-rib [ inet.0 inet.2 ];
            /* A comment here is dropped */
        }
        dvmrp-rib {
            import-rib inet.2;
            export-rib inet.2;
            /* A comment here is dropped */
        }
        /* A comment here is dropped */
    }
    /* A comment here is dropped */
}
When you include comments in the configuration file directly, you can format comments in the following ways:
Start the comment with a
/*and end it with a*/. The comment text can be on a single line or can span multiple lines.Start the comment with a
#and end it with a new line (carriage return).
Example: Include Comments in a Device Configuration by Using the CLI
Adding comments to a device configuration makes the configuration file readable and more readily
understood by users. You can include comments as you configure by using the
annotate statement. In this example, comments are added by using
the CLI for an already existing configuration:
Requirements
No special configuration beyond device initialization is required before configuring this example.
Before you add a comment, you must configure the following hierarchy on the router.
To quickly configure the initial configuration for this example,
copy the following command, paste it into a text file, remove any
line breaks and change any details necessary to match your network
configuration, copy and paste this command into the CLI at the [edit] hierarchy level, and then enter commit from
configuration mode.
set protocols ospf area 0.0.0.0 interface so-0/0/0.0 hello-interval 5
Now verify that you have this hierarchy configured.
user@host# show protocols
ospf {
    area 0.0.0.0 {
        interface so-0/0/0 {
            hello-interval 5;
        }
    }
}
Overview
When you add comments by using the CLI, you do so in configuration
mode using the annotate statement. Each comment you add
is associated with a statement at the current level. Each statement
can have one single-line comment associated with it.
To configure the annotate statement, move to the
level of the statement with which you want to associate a comment.
To view the comments, go to the top of the configuration hierarchy
and use the show command.
Configuration
CLI Quick Configuration
To quickly configure
the comments for this example, copy the following commands, paste
them into a text file, remove any line breaks and change any details
necessary to match your network configuration, copy and paste the
commands into the CLI, starting at the [edit] hierarchy
level, and then enter commit from configuration mode.
edit protocols ospfannotate area 0.0.0.0 "Backbone area configuration added June 15, 2018"edit area 0.0.0.0annotate interface so-0/0/0.0 "Interface from router sj1 to router sj2"
Notice that the commands are moving you down the hierarchy as you annotate different sections of the hierarchy.
Including Comments in the CLI Configuration Mode
Step-by-Step Procedure
This procedure assumes that you have already configured the initial configuration.
To add comments to a configuration:
Move to the first hierarchy level to which you need to add a comment.
[edit]
user@host# edit protocols ospf
Add a comment to the
areaconfiguration statement by using theannotatestatement.[edit protocols ospf] user@host#
annotate area 0.0.0.0 "Backbone area configuration added June 15, 1998"Move down a level to the
interfaceconfiguration statement.[edit protocols ospf] user@host#
edit area 0.0.0.0-
Add a comment to interface
so-0/0/0.0by using theannotatestatement.[edit protocols ospf area 0.0.0.0] user@host#
annotate interface so-0/0/0.0 "Interface from router sj1 to router sj2"
Results
Move to the top of the hierarchy and use the show command to see the comments you added. The comments precede the
statement they are associated with.
[edit]
user@host# show protocols
ospf {
    /* Backbone area configuration added June 15, 2018 */
    area 0.0.0.0 {
        /* Interface from router sj1 to router sj2 */
        interface so-0/0/0.0 {
            hello-interval 5;
        }
    }
}
After you have confirmed that the configuration is correct,
enter the commit command.
Example: Use the Wildcard Command with the Range Option
If you need to make changes to the configuration of a device, you can always remove the
original configuration settings using the delete command and add your
new configuration settings using the set command. However, there are
other ways of modifying a configuration that are more efficient and easier to use.
This example shows how to use the wildcard command along with ranges in activate, deactivate, delete, protect, set, show, and unprotect configuration commands.
The wildcard command cannot create a configuration hierarchy. You use it to modify
existing statements. Expect CLI errors of the form warning: statement not
found when you try to set parameters, such as deactivate, on an empty
hierarchy.
Requirements
Junos OS Release 12.1 or later running on the device.
Overview
The range option with the wildcard command enables you to specify ranges in activate, deactivate, delete, protect, set, show, and unprotect commands. You can use ranges to specify a range of interfaces, logical units, VLANs, and other numbered elements. The wildcard range option expands the command you entered into multiple commands, each of which corresponds to one item in the range.
The wildcard range option enables you to configure multiple configuration statements using a single set command, instead of configuring each of them individually. For example, to configure 24 Gigabit Ethernet interfaces with different port numbers, you can use a single wildcard range set command instead of 24 individual set interfaces commands.
Similarly, to deactivate a group of 30 logical interfaces, you can use the wildcard range deactivate command instead of deactivating each logical interface individually.
Configuration
- Use the wildcard command with range statements for a variety of configuration tasks.
- Using the Range Option for Configuring a Series of Named Identifiers for a Configuration Statement
- Specifying Multiple Ranges in the Syntax
- Specifying a Range and Unique Numbers In the Syntax
- Excluding Some Values from a Range
- Specifying a Range with a Step Number
- Use Wildcard to Delete Policies p1-p10
Use the wildcard command with range statements for a variety of configuration tasks.
Step-by-Step Procedure
- You can use wildcard range with the active, deactivate, delete,
protect, set, show, and unprotect configuration commands.
[edit] user@host#
wildcard range ? Possible completions: activate Remove the inactive tag from a statement annotate Annotate the statement with a comment deactivate Add the inactive tag to a statement delete Delete a data element protect Protect the statement set Set a parameter show Show a parameter unprotect Unprotect the statement -
The
wildcardstatement can be qualified with a full configuration hierarchy. When parked at a configuration hierarchy, the wildcard command is relative to the options supported at that hierarchy.[edit] user@host#
wildcard range set interfaces ? Possible completions: <interface-name> Interface name + apply-groups Groups from which to inherit configuration data + apply-groups-except Don't inherit configuration data from these groups > interface-range Interface ranges configuration > interface-set Logical interface set configuration lo0 Interface name > stacked-interface-set Stacked interface set configuration > traceoptions Interface trace options xe-0/0/0:0 Interface name xe-0/0/0:1 Interface nameuser@host# edit interfaces [edit interfaces]wildcard range set ? Possible completions: <interface-name> Interface name + apply-groups Groups from which to inherit configuration data + apply-groups-except Don't inherit configuration data from these groups > interface-range Interface ranges configuration > interface-set Logical interface set configuration lo0 Interface name > stacked-interface-set Stacked interface set configuration > traceoptions Interface trace options xe-0/0/0:0 Interface name xe-0/0/0:1 Interface nameIn the first case the full path to the interfaces hierarchy is specified with the wildcard statement. In the second, the user is parked at the interfaces hierarchy. The options supported are the same with either method.
Using the Range Option for Configuring a Series of Named Identifiers for a Configuration Statement
Step-by-Step Procedure
To configure a series of the same type of interface with different port numbers (0 through 23), specify the range for the port numbers with the following format.
-
[edit]
user@host# wildcard range set interfaces ge-0/0/[0-23] unit 0 family vpls
-
Display the result. The range wildcard range is expanded to 24 different set commands to configure interfaces with port numbers ranging from 0 through 23. In this case the interfaces are created in order to add the
vplsprotocol family. If the interfaces are already defined then just the family is added.root@R1# show | compare [edit interfaces] + ge-0/0/0 { + unit 0 { + family vpls; + } + } + ge-0/0/1 { + unit 0 { + family vpls; + } + } + ge-0/0/2 { + unit 0 { + family vpls; + } + } . . . + ge-0/0/23 { + unit 0 { + family vpls; + }
Specifying Multiple Ranges in the Syntax
Step-by-Step Procedure
You can have multiple ranges specified in a wildcard range command. Each range must be separated by a comma. You can also have overlapping ranges.
For the remaining examples you create a temporary copy of your configuration with ten policy statements. Having these statements avoids CLI errors that are reported when you try to manipulate attributes in a null portion of the hierarchy.
[edit]
user@device# set policy-options policy-statement p1 then reject
set policy-options policy-statement p10 then reject
set policy-options policy-statement p2 then reject
set policy-options policy-statement p3 then reject
set policy-options policy-statement p4 then reject
set policy-options policy-statement p5 then reject
set policy-options policy-statement p6 then reject
set policy-options policy-statement p7 then reject
set policy-options policy-statement p8 then reject
set policy-options policy-statement p9 then reject

[edit]
user@device# save temp
Wrote 254 lines of configuration to 'temp'
- To specify more than one range in the syntax, include the minimum and
maximum values for each range, separated by a comma.
[edit]
user@host# wildcard range deactivate policy-options policy-statement p[1-3,5-7,6-9]
-
Display the result. The wildcard range expands to add the
deactivatestatement to policies that have names matching the specified ranges. Of note is the absence of p4 and p10 in the list of changes to the candidate configuration.Note:An error is returned if the policy name specified does not already exist in the configuration. This is because you cannot add the deactivate statement to an empty portion of the configuration hierarchy.
[edit]
show | compare
[edit policy-options]
!    inactive: policy-statement p1 { ... }
!    inactive: policy-statement p2 { ... }
!    inactive: policy-statement p3 { ... }
!    inactive: policy-statement p5 { ... }
!    inactive: policy-statement p6 { ... }
!    inactive: policy-statement p7 { ... }
!    inactive: policy-statement p8 { ... }
!    inactive: policy-statement p9 { ... }
Specifying a Range and Unique Numbers In the Syntax
Step-by-Step Procedure
You can specify a combination of a range and unique numbers in the syntax of the wildcard range command.
-
Reload the temporary configuration.
[edit]
user@host# load override temp
load complete
- To specify a range and a unique number, separate them with a comma. In
this example 10 is added as a unique number to a series of ranges.
[edit]
user@host# wildcard range deactivate policy-options policy-statement p[1-3,5,7,10]
-
Display the result. The wildcard range expands to add the
deactivatestatement to policies that have names matching the specified ranges and also to the unique number. As a result the p10 policy is also deactivated in this example.Note:An error is returned if the policy name specified does not already exist in the configuration. This is because you cannot add the deactivate statement to a empty configuration hierarchy.
[edit]
user@host#  show | compare
[edit policy-options]
!    inactive: policy-statement p1 { ... }
!    inactive: policy-statement p10 { ... }
!    inactive: policy-statement p2 { ... }
!    inactive: policy-statement p3 { ... }
!    inactive: policy-statement p5 { ... }
!    inactive: policy-statement p7 { ... }
Excluding Some Values from a Range
Step-by-Step Procedure
You can exclude certain values from a range by marking the numbers or the range of numbers to be excluded by using an exclamation mark.
-
Reload the temporary configuration.
[edit]
user@host# load override temp
load complete
- To exclude certain values from a range, include the portion to be
excluded with ! in the syntax.
[edit]
user@host# wildcard range deactivate policy-options policy-statement p[1-5,!3-4]
-
Display the result. The wildcard range expands to add the
deactivatestatement to policies that have names matching the specified ranges. Note that policies p3 and p4 are absent in the list of modifications made to the candidate configuration. They have been excluded from the wildcard range.Note:An error is returned if the policy name specified does not already exist in the configuration. This is because you cannot add the deactivate statement to a empty configuration hierarchy.
[edit]
user@host# show | compare
[edit policy-options]
!    inactive: policy-statement p1 { ... }
!    inactive: policy-statement p2 { ... }
!    inactive: policy-statement p5 { ... }
Specifying a Range with a Step Number
Step-by-Step Procedure
You can provide a step number to have a constant interval in the range. The step value counts the first match, and then skips subsequent matches up to the specified step value.
-
Reload the temporary configuration.
[edit]
user@host# load override temp
load complete
- To provide a step, include the step value in the syntax preceded by a
forward slash (/). Here we specify a range of 1-10, skipping 1 number
between each match using a step value of 2. The effect is to skip all
even numbered matches as we begin by matching an odd number
(1).
[edit]
user@host# wildcard range deactivate policy-options policy-statement p[1-10/2]
-
Display the result. The wildcard range expands to add the
deactivatestatement to every other matching statement, starting with the first match.Note:An error is returned if the policy name specified does not already exist in the configuration. This is because you cannot add the deactivate statement to a empty configuration hierarchy.
[edit]
user@host# show | compare
[edit policy-options]
!    inactive: policy-statement p1 { ... }
!    inactive: policy-statement p3 { ... }
!    inactive: policy-statement p5 { ... }
!    inactive: policy-statement p7 { ... }
!    inactive: policy-statement p9 { ... }
To better illustrate the step function, the temporary configuration is restore and the wildcard command is repeated, this time with a step value of 4. Now 3 entries are skipped after each initial match.
[edit]
user@host# load override temp
load complete
user@host## wildcard range deactivate policy-options policy-statement p[1-10/4]
\
-
Display the result. The wildcard range expands to add the
deactivatestatement to every fourth matching statement, starting with the first match.[edit] user@host# show | compare [edit policy-options] ! inactive: policy-statement p1 { ... } ! inactive: policy-statement p5 { ... } ! inactive: policy-statement p9 { ... }
Use Wildcard to Delete Policies p1-p10
Step-by-Step Procedure
Delete the temporary policies added to test the wildcard function.
- Use the
deletestatement with a wildcard range statement to delete policies p1 through p10.[edit] user@host# wildcard range delete policy-options policy-statement p[1-10]
-
Display the result. Our
policy-optionsstanza contained only policies p1 through p10. This results in an emptypolicy-optionsconfiguration hierarchy.[edit] user@host# show policy-options