Zero Touch Provisioning
Zero Touch Provisioning installs or upgrades the software automatically on your new Juniper Networks devices with minimal manual intervention.
Zero Touch Provisioning Overview
Zero Touch Provisioning (ZTP) allows you to provision new Juniper Networks devices in your network automatically, with minimal manual intervention. You can use either management ports or network ports, depending on your device, to connect to the network. When you physically connect a device to the network and boot it with a default factory configuration, the device upgrades (or downgrades) the software release and autoinstalls a configuration file from the network. The configuration file can be a configuration or a script. Using scripts, you can create device-specific configuration files and perform HTTP request operations to web servers to download specific configuration files or software releases.
To locate the necessary software image and configuration files on the network, the device uses information that you have configured on a Dynamic Host Configuration Protocol (DHCP) server. If you do not configure the DHCP server to provide this information, the device boots with the preinstalled software and default factory configuration.
For certain switches, you can use the phone-home client (PHC) to provision software for the switch. When the switch boots up, if there are DHCP options that have been received from the DHCP server for ZTP, ZTP resumes. If DHCP options are not present, PHC is attempted. For more information about PHC, see Provision a Virtual Chassis Using the Phone-Home Client.
To see which platforms support ZTP, in a browser, go to Feature Explorer. In the Explore Features section of the Feature Explorer page, select All Features. In the Features Grouped by Feature Family box, select Zero Touch Provisioning. You can also type the name of the feature in the Search for Features edit box. See the Release History Table at the end of this topic for more details of how ZTP support has expanded.
- ZTP Workflow
- Provisioning a Device Using a Script
- Zero Touch Provisioning Restart Process Triggers
- Caveats Relating to ZTP
- Zero Touch Provisioning Using WAN Interfaces on PTX1000 Routers
ZTP Workflow
When a device boots up with the default configuration, the following events take place:
-
DHCP client is run on supported interfaces.
-
DHCP server provisions an IP address and includes several DHCP options in the reply related to the ZTP process.
-
The device processes the DHCP options and locates configuration files, executes scripts, and upgrades and/or downgrades software.
-
If both the image and configuration files are present, the image is installed and the configuration is applied.
-
If only the image file is present, the image is installed on the device.
-
If the image is the same as the image already installed on the device, ZTP continues and skips the installation step.
-
If the image was unable to be fetched by the device, ZTP will try to fetch the image again.
-
If the image is corrupted, installation fails.
If installation fails for any reason, ZTP will restart.
-
If only the configuration file is present, the configuration is downloaded.
If the first line of the file consists of the #! characters followed by an interpreter path, then the file is considered a script, and the script is executed by the interpreter. If the script returns an error, ZTP state machine will re-fetch the script and attempt to execute the script again.
If the configuration file is unable to be downloaded, the ZTP process will try to download it again.
If the configuration file is corrupted, has syntax errors, or includes commands that are unsupported by the device, the device will be unable to commit, and the retry mechanism will restart.
-
If there is no image or configuration file, the ZTP process starts again.
-
If there is no file server information, the ZTP process starts again.
-
Once the configuration is committed, the ZTP process is deemed successful and terminates.
Provisioning a Device Using a Script
During the ZTP process, when you connect and boot a new networking device, the device requests an IP address from the DHCP server. The server provides the IP address, and if configured, the filenames and locations for the software image and configuration file for the device. The configuration file can be a configuration or a script.
If a configuration file is provided, the operating system determines if the file is a
script based on the first line of the file. If the first line contains the characters
#! followed by an interpreter path, the operating system treats the file
as a script and executes it with the specified interpreter.
If the script returns an error (that is, a nonzero value), the ZTP state machine re-fetches the script and attempts to execute it again. This continues until the script executes successfully.
Table 1 outlines the supported script types, the corresponding interpreter path, and the platforms that support that script type during the ZTP process.
|
Script Type |
Interpreter Path |
Platform Support |
|---|---|---|
|
Shell script |
|
All devices |
|
SLAX script |
|
All devices |
|
Python script |
|
Devices running Junos OS with Enhanced Automation Devices running Junos OS Evolved |
For security reasons, Junos OS has strict requirements for running unsigned Python scripts on devices running Junos OS. Only devices running Junos OS with Enhanced Automation and devices running Junos OS Evolved support using unsigned Python scripts in DHCP option 43 suboption 01.
If the operating system does not find the characters #! followed by an
interpreter path, it treats the file as a configuration in text format and loads the
configuration on the device.
Zero Touch Provisioning Restart Process Triggers
ZTP restarts when any of the following events occur:
-
Request for configuration file, script file, or image file fails.
-
Configuration file is incorrect, and commit fails.
-
No configuration file and no image file is available.
-
Image file is corrupted, and installation fails.
-
No file server information is available.
-
DHCP server does not have valid ZTP parameters configured.
-
When none of the DHCP client interfaces goes to a bound state.
-
ZTP transaction fails after six attempts to fetch configuration file or image file.
When any of these events occur, ZTP resets the DHCP client state machine on all of the DHCP client-configured interfaces (management and network) and then restarts the state machine. Restarting the state machine enables the DHCP client to get the latest DHCP server-configured parameters.
Before ZTP restarts, approximately 15 to 30 seconds must elapse to allow enough time to build a list of bound and unbound DHCP client interfaces.
The list of bound and unbound DHCP client interfaces can contain:
-
No entries.
-
Multiple DHCP client interfaces.
Priority is given to the DHCP client interfaces that have received all ZTP parameters (software image file, configuration file, and file server information) from the DHCP server.
After the lists of bound and unbound client interfaces are created, and a DHCP client gets selected for ZTP activity, any existing default route is deleted and the DHCP client interface that was selected adds a new default route. In order to add a new default route, only one ZTP instance can be active.
After ZTP restarts, the DHCP client attempts fetching files from the DHCP server for up to six times, with ten to fifteen seconds elapsing between attempts. Every attempt, whether successful or not, is logged and can be seen on the console.
If there is a failure, or the number of attempts exceeds the limit, ZTP stops. ZTP then clears the DHCP client bindings and restarts the state machine on the DHCP-configured interfaces.
The ZTP restart process continues until there is either a successful software upgrade, or an operator manually commits a user configuration and deletes the ZTP configuration.
Caveats Relating to ZTP
There are two downgrade limitations for EX Series switches:
-
If you downgrade to a software version earlier than Junos OS Release 12.2, in which ZTP is not supported, the configuration file autoinstall phase of the zero touch provisioning process does not happen.
-
To downgrade to a software version that does not support resilient dual-root partitions (Junos OS Release 10.4R2 or earlier), you must perform some manual work on the device. For more information, see Configuring Dual-Root Partitions.
The following are caveats for QFX Series switches:
-
On QFX3500 and QFX3600 switches running the original CLI, you cannot use ZTP to upgrade from Junos OS Release 12.2 or later to Junos OS Release 13.2X51-D15 or later.
-
QFX5200 switches only work with HTTP in 15.1X53-D30. FTP and TFTP protocols are not supported.
-
If you are performing Zero Touch Provisioning (ZTP) with a Junos OS image that contains enhanced automation for the QFX5100 switch, configure root authentication, and the provider name, license type, and deployment scope for Chef and Puppet at the
[edit system]hierarchy in the configuration file that is fetched from the server:{ master:0} root# set root-authentication (encrypted-password password | plain-text-password password | ssh-dsa public-key | ssh-rsa public-key) root# set extensions providers juniper license-type customer deployment-scope commercial root# set extensions providers chef license-type customer deployment-scope commercial -
In Junos OS Release 18.1R1, if you are upgrading the software, you must perform a full software upgrade. A full upgrade includes upgrading both the Junos OS software and the host software packages.
Zero Touch Provisioning Using WAN Interfaces on PTX1000 Routers
Zero Touch Provisioning (ZTP) allows you to provision your router in your network automatically, with minimal manual intervention. Starting in Junos OS Release 19.3R1, you can use either WAN interfaces or management interfaces, to automatically download and install the appropriate software and the configuration file on your router during the ZTP bootstrap process.
When you connect the router to the network at the first time, you can choose any available WAN port on the router to connect the optics. The ZTP automatically configures WAN interfaces based on the optics type, and then connects your device to the Dynamic Host Configuration Protocol (DHCP) server to perform the bootstrap process.
The WAN interfaces created based on the optics type you connected to the device and the WAN interface speed auto-transitions through all possible supported port speeds until the ZTP gets completed successfully. The speed auto-transition ensures to establish physical link of the WAN port with the optics you connected and the peer end device connectivity to the DHCP server.
The PTX1000 Packet Transport Router Hardware Guide shows the available combinations for the ports on the PTX1000 routers.
Zero Touch Provisioning Using DHCP Options
Zero Touch Provisioning (ZTP) allows for automatic provisioning of Juniper Network devices that you add to your network. You can provision any supported device by using either a script to be executed or a configuration file to be loaded. You will also need to configure a DHCP server with required information, which is provided in this procedure, to use ZTP.
Optionally, you can configure an HTTP proxy server for either the phone-home server or redirect server. When the phone-home client receives information regarding the HTTP proxy server via DHCP option 43 suboption 8, it will create an HTTPS transparent tunnel with the proxy server. Once the tunnel is established, the phone-home client uses the tunnel as a proxy for the phone-home server or redirect server. The phone-home client downloads the software image and configuration file through the tunnel onto the device. Once bootstrapping is complete, the device reboots and the tunnel quits.
ZTP requires that your device is in a factory default state. The device from the
factory boots with preinstalled software and factory default configuration. On a
device that does not currently have the factory default configuration, you can issue
the request system zeroize command.
The request system zeroize command is not supported on PTX1000,
PTX10001-20C, QFX10002-60C, PTX10002-60C devices. You must issue the
request vmhost zeroize command (instead of request
system zeroize) for factory default configuration on PTX1000
routers.
On PTX10001-20C devices, after you issue the the request vmhost
zeroize command, you will see the following message twice:
VMHost Zeroization : Erase all data, including configuration and log
                        files ? [yes,no] (no) yes warning: Vmhost will reboot and may not boot
                        without configuration Erase all data, including configuration and log files?
                        [yes,no] (no) yes
Before you begin:
-
Ensure that the device has access to the following network resources:
-
The DHCP server that provides the location of the software image and configuration files on the network
Refer to your DHCP server documentation for configuration instructions.
-
The File Transfer Protocol (anonymous FTP), Hypertext Transfer Protocol (HTTP), or Hypertext Transfer Protocol Secure (HTTPS), or Trivial File Transfer Protocol (TFTP) server on which the software image and configuration files are stored
Note:Although TFTP is supported, we recommend that you use FTP or HTTP instead, because these transport protocols are more reliable.
CAUTION:HTTP URLs are limited to 256 characters in length.
-
A Domain Name System (DNS) server to perform reverse DNS lookup (not supported).
-
(Optional) An NTP server to perform time synchronization on the network
-
(Optional) A system log (syslog) server to manage system log messages and alerts.
Syslog messages will be forwarded to this syslog server during ZTP.
-
-
(Optional) An HTTP proxy server for either the phone-home server or redirect server.
-
Locate and record the MAC address for your device.
On PTX10008 devices, the management MAC addresses are located on routing engines.
You cannot commit a configuration while the device is performing the software update process. If you commit a configuration while the device is performing the configuration file autoinstallation process, the process stops, and the configuration file is not downloaded from the network.
To enable zero touch provisioning for a device using DHCP options:
Zero Touch Provisioning Using DHCPv6 Options
Zero Touch Provisioning (ZTP) using DHCPv6 options isn't supported on Junos OS Flex images. A Flex image has the word "flex" in the filename. Here is an example filename of a Flex image: jinstall-host-qfx-5e-flex-x86-64-20.4R3.8-secure-signed.tgz.
The DHCPv6 protocol doesn't have a subnet option for the IA_NA (identity association for non-temporary addresses) to learn and install subnet routes. Instead, the subnet route is installed through Neighbor Discovery Protocol.
In IPv6, devices periodically advertise IPv6 prefixes along with other link parameters using Router Advertisement (RA) messages. On the client (Juniper device running ZTP), once the DHCPv6 client is bound, the Neighbor Discovery Protocol (NDP) will learn these prefixes and installs the prefix routes via the client interface, with the next hop as the link to the local address of the gateway device.
On the client device, router advertisement configuration is enabled by default along with the DHCPv6 configuration.
-
Ensure that the device has access to the following network resources:
-
The DHCP server that provides the location of the software image and configuration files on the network
Refer to your DHCP server documentation for configuration instructions.
-
On the MX Series, the File Transfer Protocol (anonymous FTP), Trivial File Transfer Protocol (TFTP), Hypertext Transfer Protocol (HTTP), or Hypertext Transfer Protocol Secure (HTTPS) server on which the software image and configuration files are stored.
CAUTION:HTTP URLs are limited to 256 characters in length.
-
On the EX3400, EX4300, QFX5100, and QFX5200 devices, the Hypertext Transfer Protocol (HTTP) or Hypertext Transfer Protocol Secure (HTTPS) server on which the software image and configuration files are stored.
CAUTION:HTTP URLs are limited to 256 characters in length.
-
(Optional) An HTTP proxy server for either the phone-home server or redirect server.
-
-
Locate and record the MAC address printed on the device.
Zero Touch Provisioning (ZTP) allows for automatic provisioning of Juniper Network devices that you add to your network. You can provision any supported device by using either a script to be executed or a configuration file to be loaded.
To use ZTP, you configure a DHCP server to provide the required information. If you
do not configure the DHCP server to provide this information, the device boots with
the preinstalled software and default factory configuration. If your device is not
in a factory default state, you can issue the request system
zeroize command.
Optionally, you can configure an HTTP proxy server for either the phone-home server or redirect server. When the phone-home client receives information regarding the HTTP proxy server via DHCP option 17 suboption 8, it will create an HTTPS transparent tunnel with the proxy server. Once the tunnel is established, the phone-home client uses the tunnel as a proxy for the phone-home server or redirect server. The phone-home client downloads the software image and configuration file through the tunnel onto the device. Once bootstrapping is complete, the device reboots and the tunnel quits.
Starting in Junos OS Release 20.2R1-S1, the DHCPv6 client is supported the MX-Series, EX3400, EX4300, QFX5100, and QFX5200 switches. Both DHCPv4 and DHCPv6 clients are included as part of the default configuration. During the bootstrap process, the device first uses the DHCPv4 client to request for information regarding image and configuration file from the DHCP server. The device checks the DHCPv4 bindings sequentially. If there is a failure with one of the DHCPv4 bindings, the device will continue to check for bindings until provisioning is successful. If there are no DHCPv4 bindings, however, the device will check for DHCPv6 bindings and follow the same process as for DHCPv4 until the device can be provisioned successfully. The DHCP server uses DHCPv6 options 59 and 17 and applicable sub-options to exchange ZTP-related information between itself and the DHCP client.
You cannot commit a configuration while the device is performing the software update process. If you commit a configuration while the device is performing the configuration file autoinstallation process, the process stops, and the configuration file is not downloaded from the network.
To use zero touch provisioning for a device using DHCPv6 options:
Zero Touch Provisioning on SRX Series Firewalls
- Understanding Zero Touch Provisioning on SRX Series Firewalls
- Configuring Zero-Touch Provisioning on an SRX Series Firewall
- Understanding Factory-Default Configuration on SRX Series Firewall for Zero Touch Provisioning
Understanding Zero Touch Provisioning on SRX Series Firewalls
This topic includes following sections:
Understanding ZTP on SRX Series Firewalls
Zero Touch Provisioning (ZTP) enables you to provision and configure devices automatically, minimizing most of the manual intervention required for adding devices to a network. ZTP is supported on SRX300, SRX320, SRX340, SRX345, SRX550M, and SRX1500 devices.
Starting in Junos OS Release 20.2R1 on SRX300, SRX320, SRX340, SRX345, SRX550 HM, and SRX1500 devices, you can use Zero Touch Provisioning with DHCP options to provision your device. See Zero Touch Provisioning Using DHCP Options for more information.
ZTP is currently supported on xe-0/0/16 and xe-0/0/17 ports on SRX1500. To avoid using these ports, the following the default configurations have been added to xe-0/0/18 and xe-0/0/19 ports.
set interfaces xe-0/0/18 unit 0 family inet dhcp vendor-id Juniper-srx1500
set interfaces xe-0/0/19 unit 0 family inet dhcp vendor-id Juniper-srx1500
set security zones security-zone untrust interfaces xe-0/0/18.0 host-inbound-traffic system-services dhcp
set security zones security-zone untrust interfaces xe-0/0/18.0 host-inbound-traffic system-services tftp
set security zones security-zone untrust interfaces xe-0/0/18.0 host-inbound-traffic system-services https
set security zones security-zone untrust interfaces xe-0/0/19.0 host-inbound-traffic system-services dhcp
set security zones security-zone untrust interfaces xe-0/0/19.0 host-inbound-traffic system-services tftp
set security zones security-zone untrust interfaces xe-0/0/19.0 host-inbound-traffic system-services https
ZTP on SRX Series Firewalls is responsible for the initial bootup and configuration of the device when the device is powered on. This functionality includes:
-
Providing the bare-minimum bootstrapping of the device. The SRX Series Firewall is shipped with a factory-default configuration. The factory-default configuration includes the URL of the redirect server, that is used to connect to the central server by using a secure encrypted connection.
-
Automatically connecting to the server over the Internet, and downloading the configuration and Junos OS image as specified by the customer or user from the server when the SRX Series Firewall boots up with the factory-default configuration. The new image is installed first and then the initial configuration is applied and committed on the SRX Series Firewall.
ZTP offers the following advantages:
-
Simplified and faster deployment
-
Increased configuration accuracy
-
Support for scaling of network without additional resources
The ZTP process uses Network Activator to initially provision SRX Series Firewalls.
Network Activator Overview
Network Service Activator enables fast device discovery and provisioning for automated configuration to eliminate complex device setup.
Network Activator initially provisions SRX Series Firewalls (henceforth referred to as remote devices in this documentation), which reside at end users’ sites. The remote devices download a boot image and initial configuration files from servers hosting Network Activator, using a process that provides full authorization and authentication for all interactions. When initial provisioning is complete, the remote device communicates with a management server, which then starts to manage and monitor the remote device.
Network Activator uses a distributed architecture to support remote devices. Network Activator is installed on one central administration server (central server) and multiple regional administration servers (regional servers). A device communicates directly with its assigned regional server. The distributed architecture optimizes the efficiency of the initial provisioning process, contributing to high performance and scaling of the network.
Figure 1 Illustrates the distributed architecture and the components involved in the initial provisioning process.
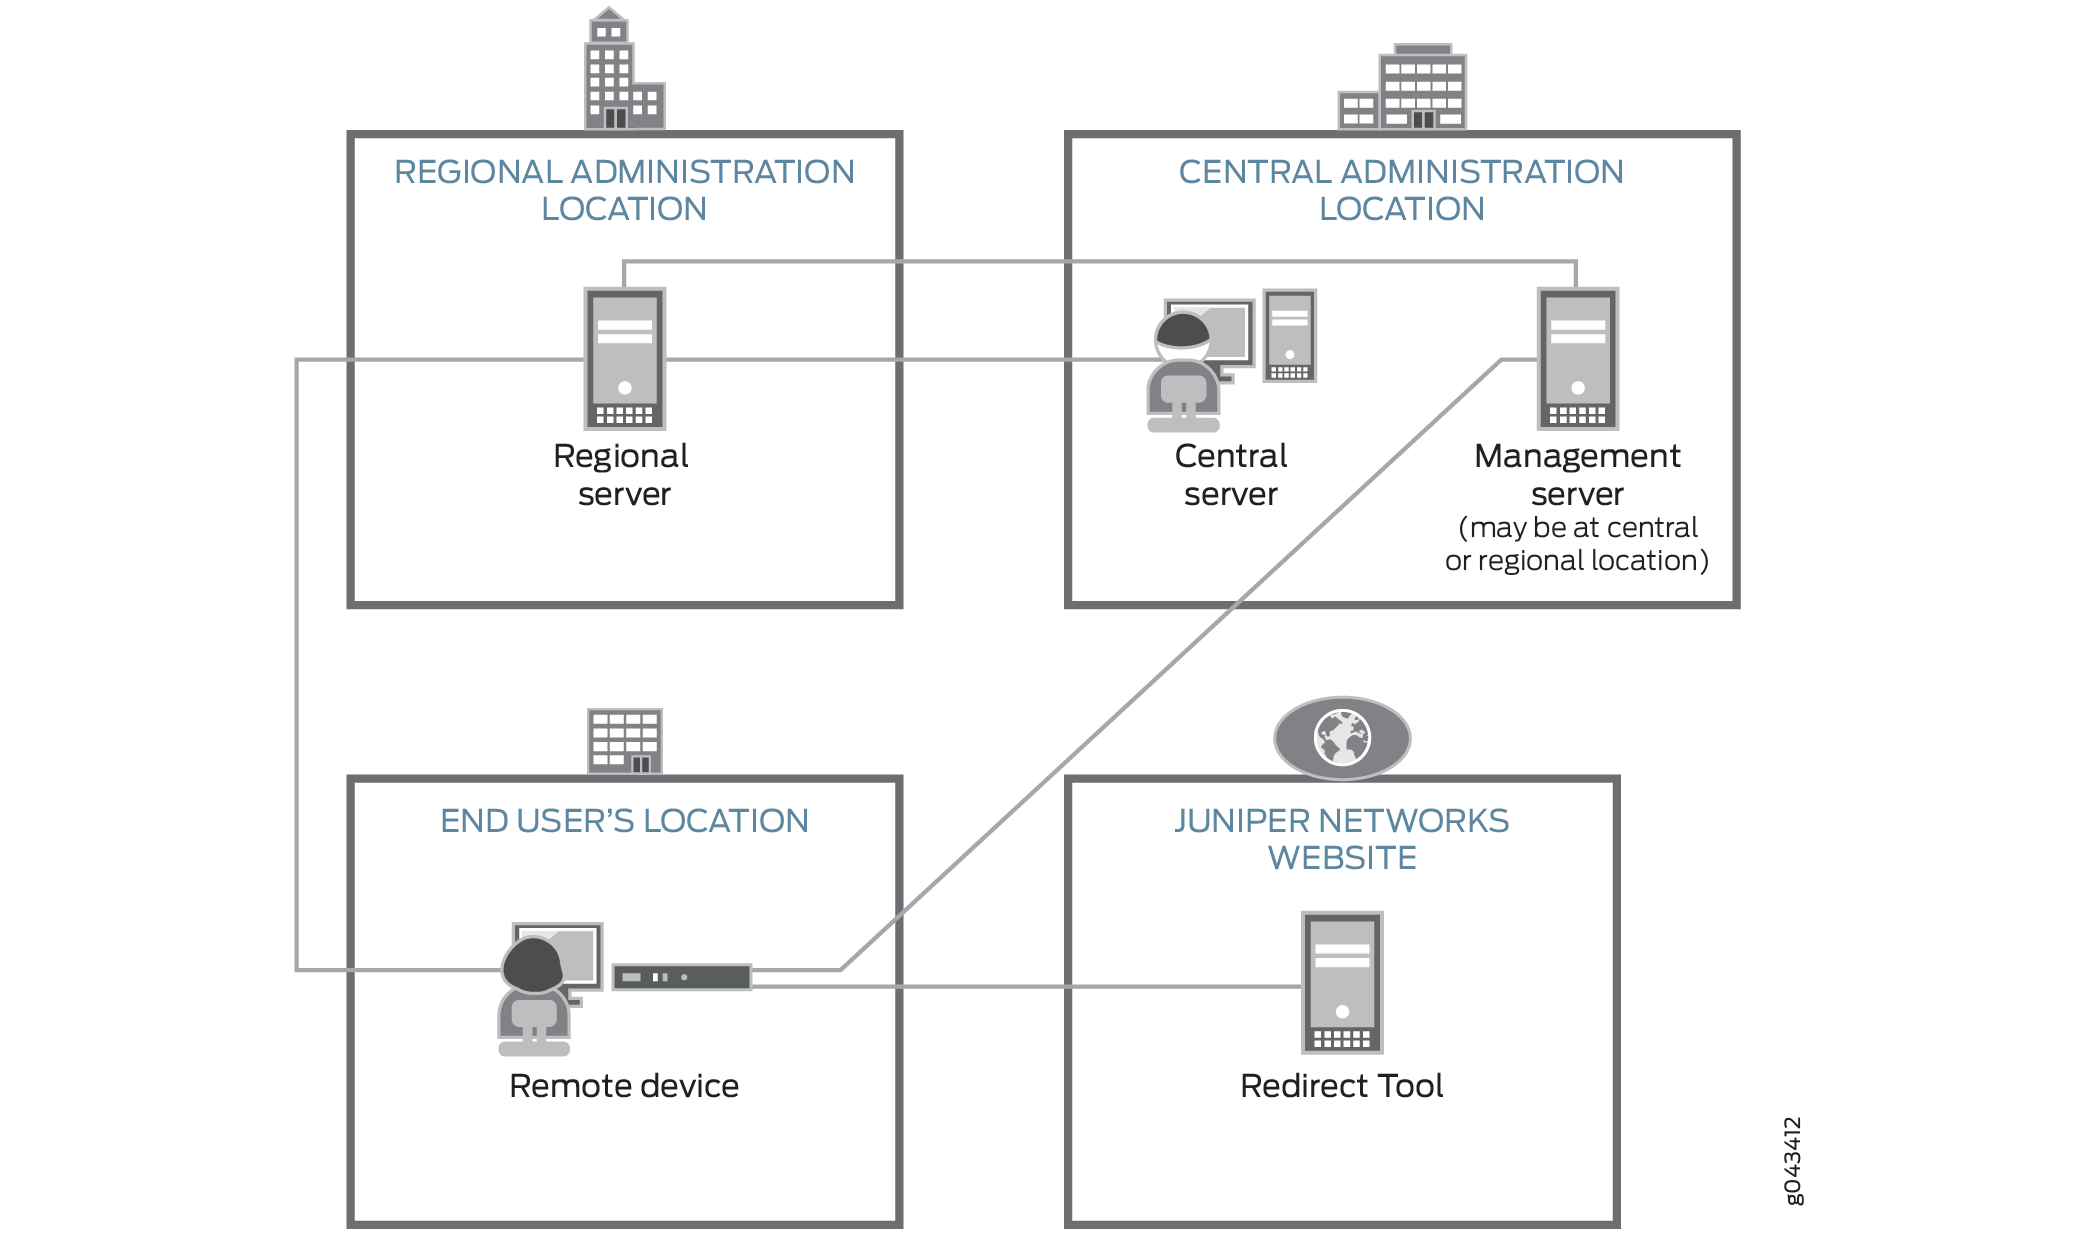
The roles of the components in the initial provisioning process are as follows:
-
The remote device sends requests for initial provisioning. The remote device resides at the end user’s location.
-
The Redirect Tool provides authentication and authorization for remote devices to access their assigned regional servers through use of ITU-T X.509 private key infrastructure (PKI) digital certificates. Redirect service is hosted on Amazon Web Services (AWS), operated and maintained by Juniper Networks.
-
The central server hosts Network Activator and communicates with the regional activator servers. Administrators at a service provider or central enterprise location interact with this server to install and set up Network Activator. The central server is located at a central geographic location for the service provider.
-
The regional server also hosts Network Activator. This server stores information about its assigned remote devices and communicates directly with those devices. This server typically resides at a regional administrative location the provider designates for the end user.
Figure 2 illustrates the initial provisioning workflow.
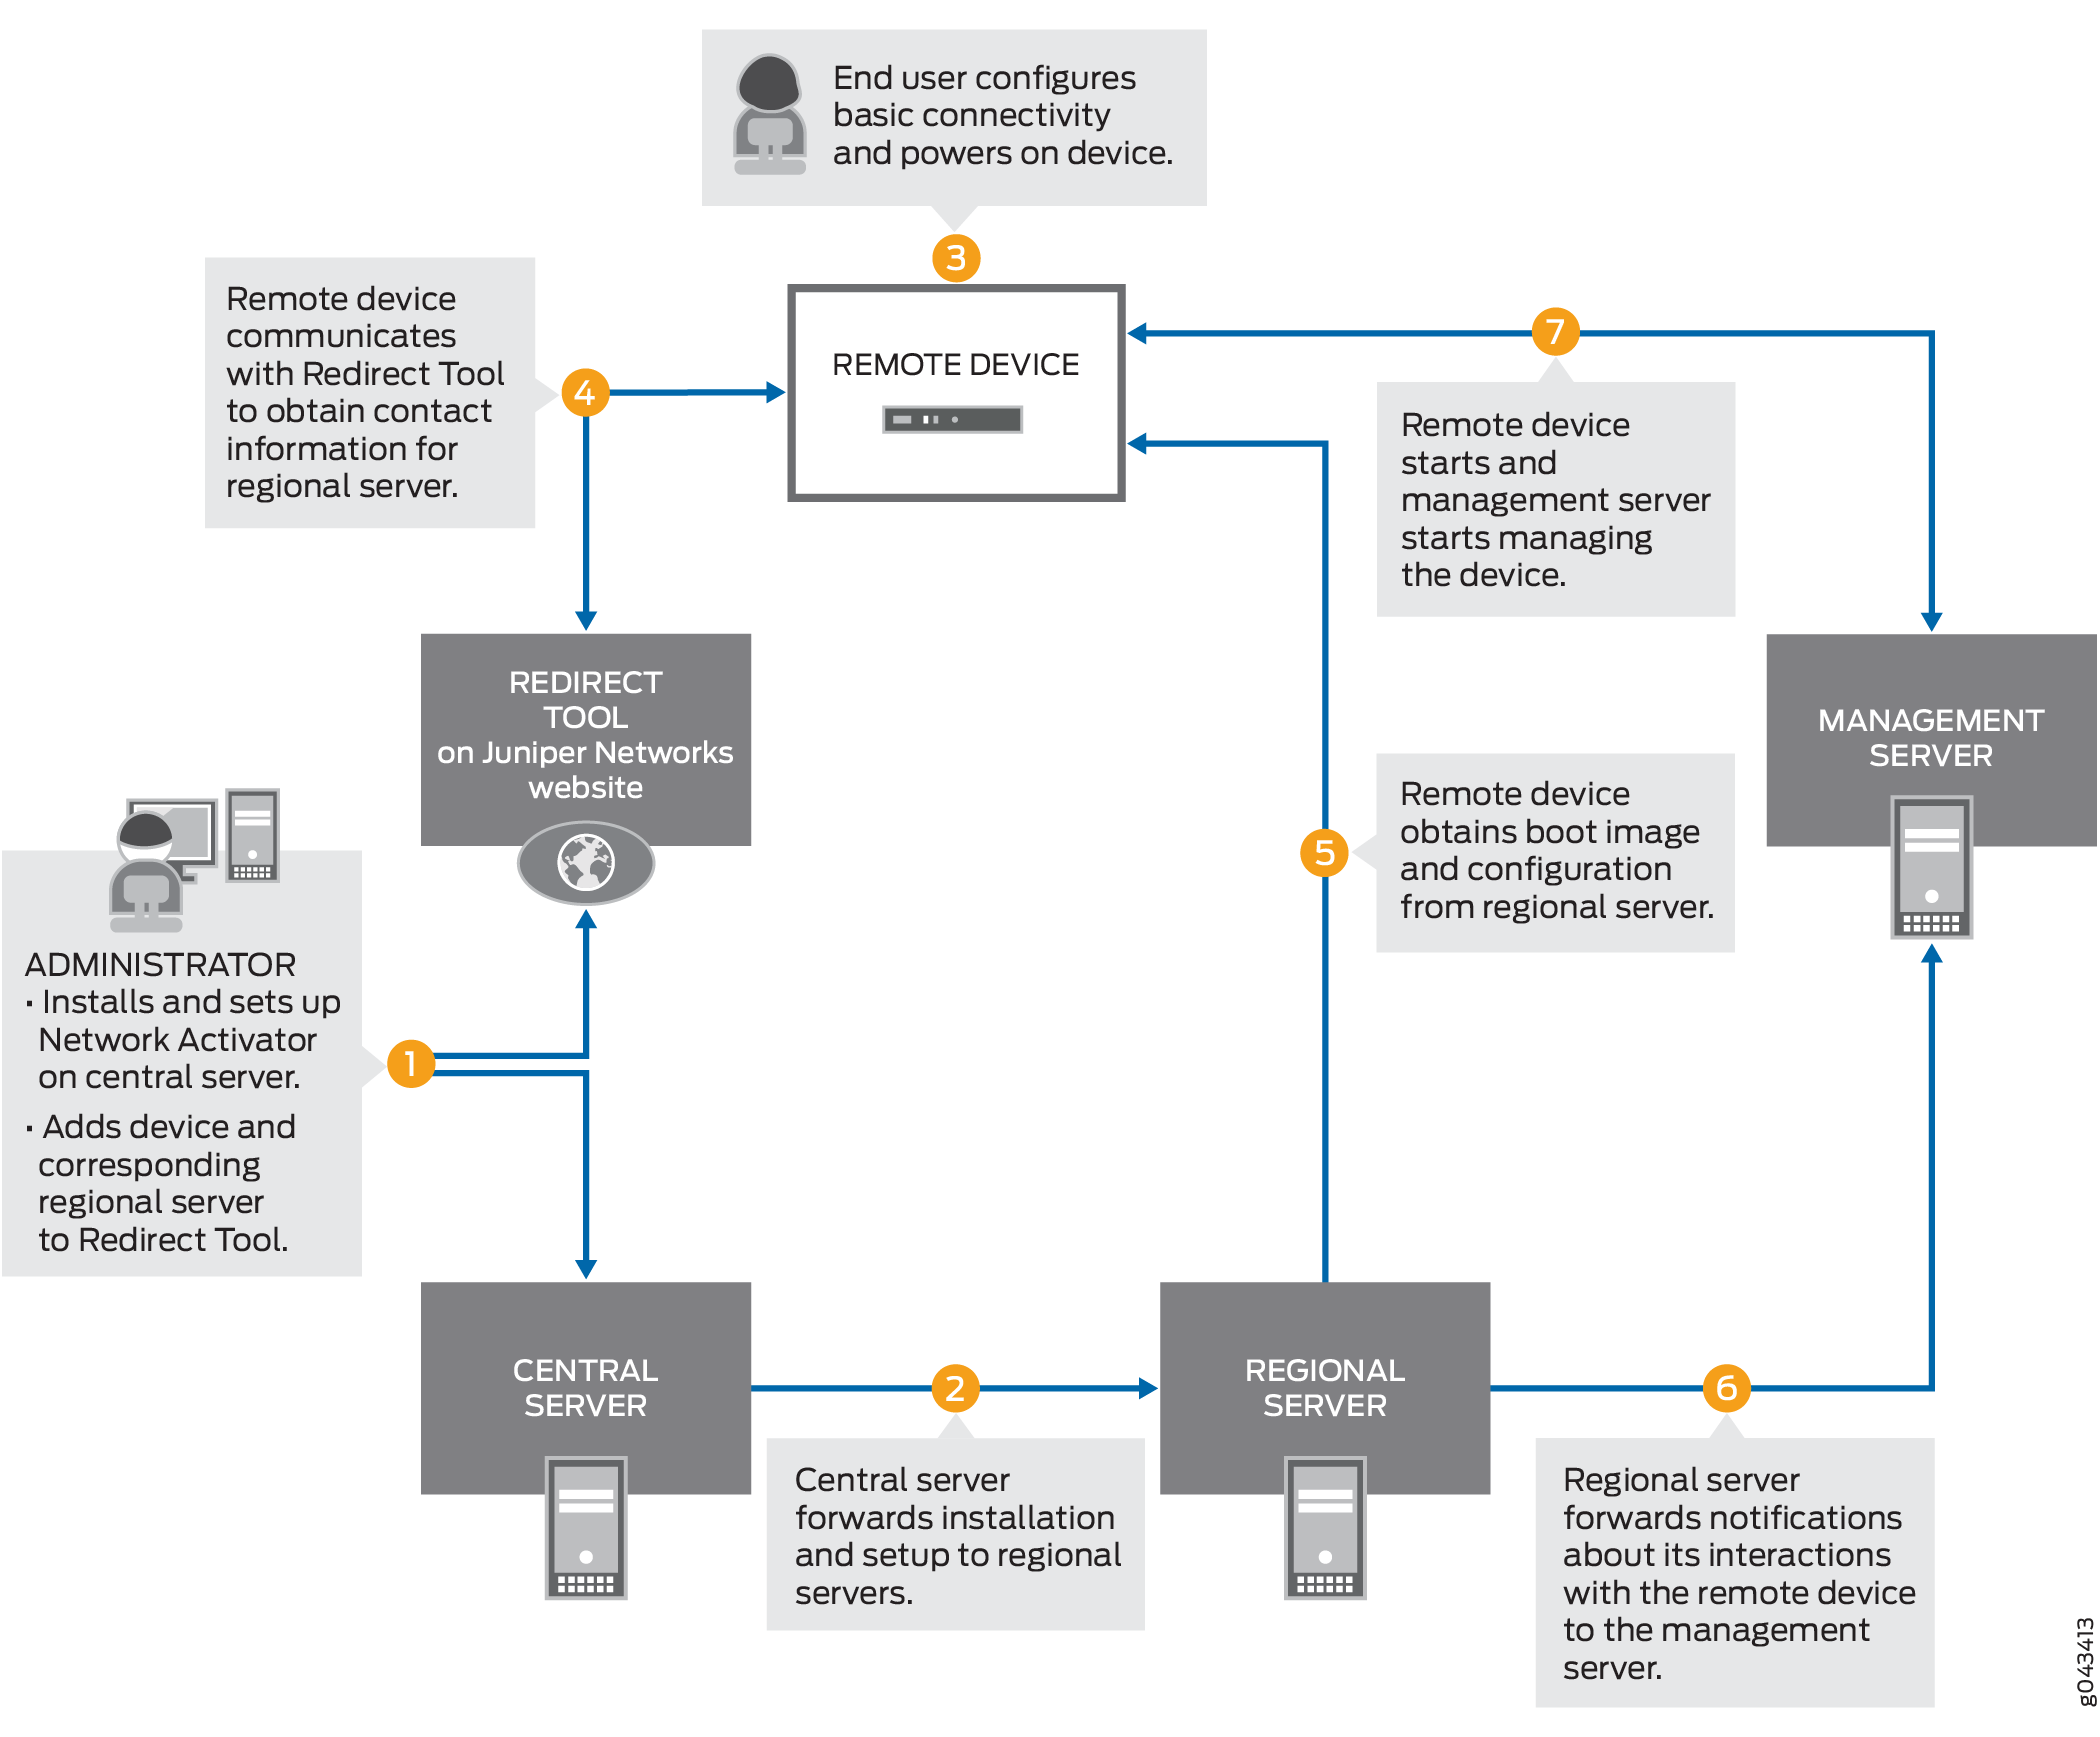
In detail, the provisioning workflow proceeds as follows:
-
The administrator at the service provider:
-
Installs and sets up Network Activator on the central server.
-
Adds remote devices and regional servers in the Redirect Tool.
-
-
The central server forwards the installation to the regional servers.
-
The end user powers on the remote device, connects it to a computer, and enters the authentication code in the webpage to send a request for initial provisioning.
-
The device transmits its X.509 certificate and fully qualified domain name (FQDN) as a provisioning request to the Redirect Tool.
-
The Redirect Tool searches its data store for the regional server that the administrator specified for this device, and confirms that the device’s request corresponds to the X.509 certificate specified for the server.
-
The Redirect Tool sends contact information for the regional server to the device.
-
The device sends a request to the regional server for the URL of the boot image and the location of the initial configuration.
-
The regional server sends the information to the device.
-
The device obtains the boot image and configuration from the regional server.
-
The device uses the boot image and configuration to start and become operational.
Limitations
-
There are no restrictions on the number of attempts for entering the correct activation code.
-
If the remote device is not able to reach the server (because the configured address in the factory-default configuration is not correct or the server is down, and so on), the remote device attempts to connect to an alternative server (if configured in the factory-default configuration). If there is only one server configured, then you can reattempt to connect. In such scenarios, we recommend that you configure the device manually through the console.
-
Captive portal redirection, required for automatically redirecting users to the authentication webpage for entering the activation code, is not supported. You must manually navigate to the activation page after connecting to the device.
Configuring Zero-Touch Provisioning on an SRX Series Firewall
Before you begin:
-
Unpack the device, install it, complete the necessary cabling, connect a laptop or any other terminal device, and power on the device. See the Hardware installation Guide for your device for more information.
-
For SRX300, SRX320, SRX340, SRX345, and SRX550M devices, connect the management device and access the J-Web interface.
For more information, see Quick Start guides of respective devices at SRX300, SRX320, SRX340, SRX345, and SRX550M.
You are provided with an option to use ZTP; you can use this option or skip it and continue with J-Web wizards.
-
For SRX1500 devices, before you can use J-Web to configure your device, you must access the CLI to configure the root authentication and the management interface. For more information, see How to Set Up Your SRX1500 Services Gateway.
This section provides step-by-step instructions on how to use ZTP on an SRX Series Firewall for initial provisioning of the device.
To provision an SRX Series Firewall by using ZTP:
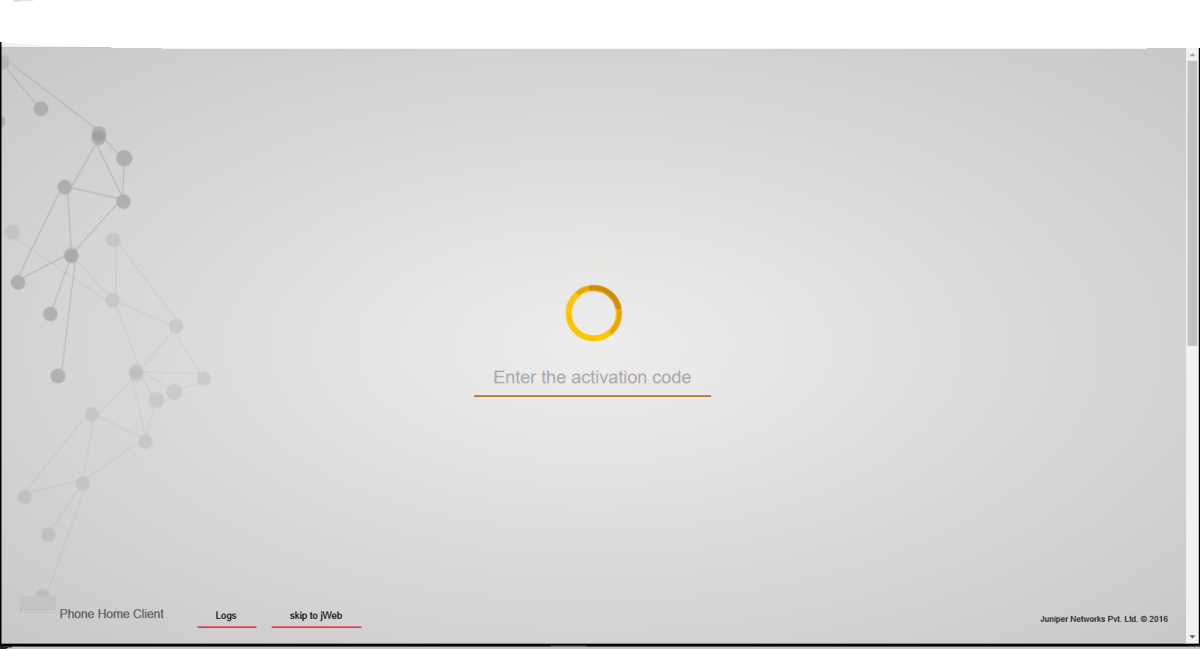
-
Launch a Web browser from the management device and enter the
authentication code in the webpage as shown in Figure 3.
Figure 3: Entering Activation Code for ZTP
After the device is successfully authenticated, it starts downloading the software image and initial configuration from the server as shown in Figure 4.
Figure 4: Initiating ZTP Process (Software Image Downloading)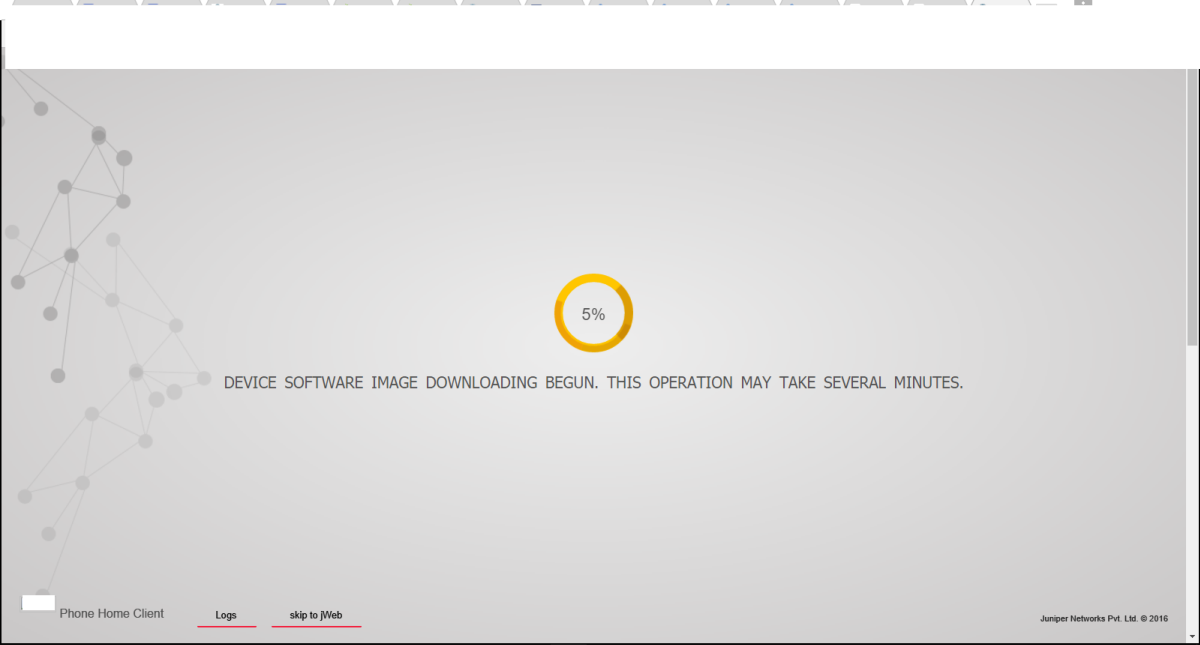
At this step:
-
The activation code is sent to the server, and if the authentication is successful, the server pushes the initial configuration to the device. If the authentication is unsuccessful, you are asked to provide the correct code.
-
The server can optionally pushes a new software image on the SRX Series Firewall. In that case, the new image is installed first and then the initial configuration is applied and committed on the device.
The new image is installed and then the initial configuration is applied and committed on the device. When the process is complete, a confirmation message is displayed, as shown in Figure 5.
Figure 5: Completing ZTP Process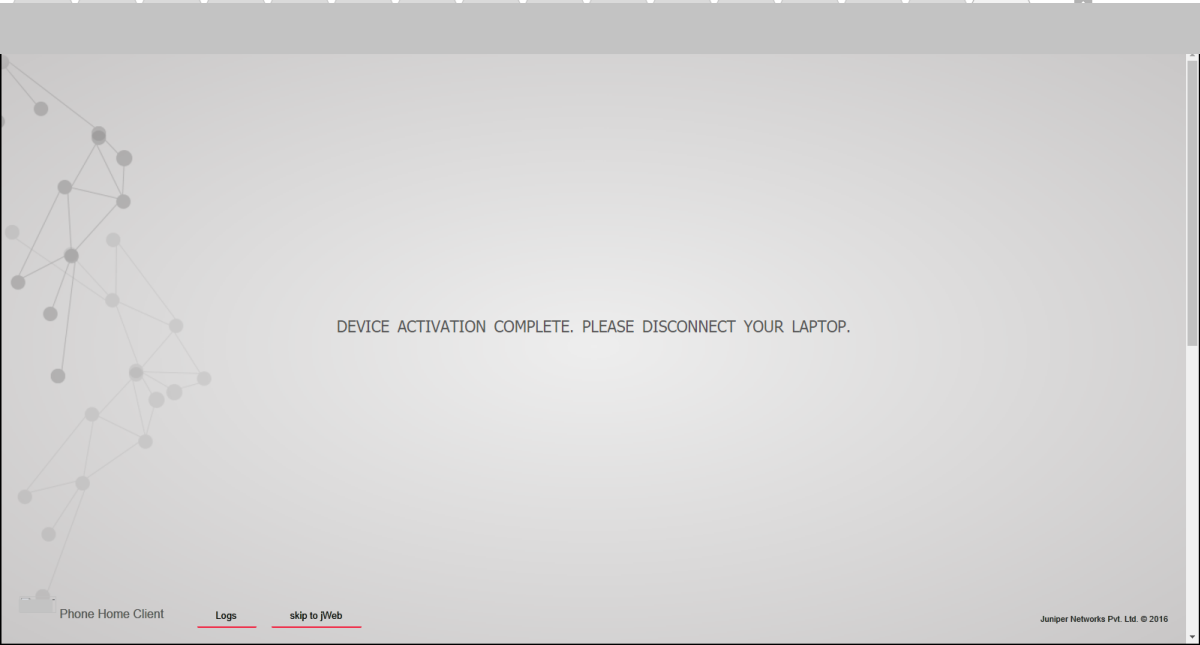
-
After successfully installing the new software image and configuration on the
system, the client sends the bootstrap-complete
notification to the server that provided the image and the configuration.
After the notification is sent, the configuration that includes the names of
servers is deleted from the system. When you use ZTP the next time, you must
explicitly configure the URL of the redirect server.
In case of failure at any stage, the procedure is started all over again.
The ZTP process either upgrades or downgrades the Junos OS version. During a downgrade on an SRX Series Firewall, if you downgrade to a software version earlier than Junos OS Release 15.1X49-D100, in which ZTP is not supported, the autoinstallation phase of the ZTP process does not happen.
For SRX300, SRX320, SRX340, SRX345, and SRX550M devices, ZTP is the default method for provisioning the devices. However, if you want to use J-Web-based provisioning (J-Web setup wizards supported for the SRX300 line of devices and SRX550M devices), then instead of ZTP, you can use the option provided in the client portal to skip to J-Web setup wizards for performing the initial software configuration of your device.
If you select the Skip to JWeb option, you must configure the system root authentication password as shown in Figure 6.
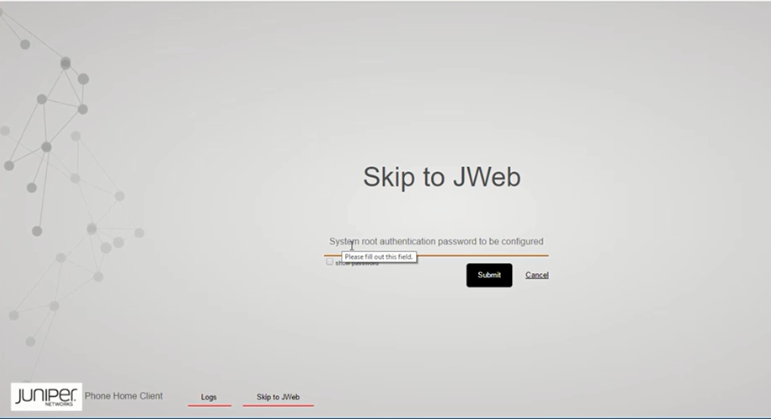
For SRX1500 devices, the Skip to JWeb option is not supported. To access J-Web, the ZTP client configuration must be deleted during the initial setup of SRX1500 through CLI.
Understanding Factory-Default Configuration on SRX Series Firewall for Zero Touch Provisioning
Your services gateway is shipped with a factory-default configuration. Following is a sample of the default configuration that includes configuration for ZTP:
system {
    phone-home {
        rfc-compliant;
        server https://redirect.juniper.net;
    }
}
Note that, in this configuration:
-
serverindicates the name or IP address of the server. The factory-default configuration on an SRX Series Firewall might include IP addresses of more than one servers. -
rfc-compliantindicates that after an upgrade, the server enforces certain behaviors that are compliant with RFC standards.
By default, the system autoinstallation configuration is part of the
factory-default configuration of the device. So, the administrator must
ensure that the configuration file sent from the regional server to the
remote device (SRX Series Firewall) must include the delete system
autoinstallation option in the factory-default
configuration.
Monitoring Zero Touch Provisioning
You can use the console and operational mode commands to monitor Zero Touch Provisioning.
- Using the Console to Monitor Zero Touch Provisioning in Junos OS
- Using System Log Alerts to Monitor Zero Touch Provisioning
- Using Error Messages to Monitor Zero Touch Provisioning
- Using System Log Files to Monitor Zero Touch Provisioning in Junos OS Using DHCP Options
- Using System Log Files to Monitor Zero Touch Provisioning in Junos OS Using DHCPv6 Options
- Using the show dhcp client binding Command
- Using the show dhcpv6 client binding Command
- Using the show dhcp client statistics Command
- Using the show dhcpv6 client statistics Command
Using the Console to Monitor Zero Touch Provisioning in Junos OS
The following Zero Touch Provisioning (ZTP) activities are displayed on the console during the ZTP process:
-
Starting and ending times of ZTP process.
-
Lists of bound and unbound DHCP client interfaces.
-
DHCP options that DHCP servers send to DHCP clients.
-
Logs indicating which interfaces are used for ZTP.
-
ZTP parameters that DHCP clients obtain from DHCP servers.
-
Filenames of configuration and image files, names of file servers, protocols used to fetch files, and times when DHCP servers fetch configuration and image files.
-
Failure states caused by files not being on servers, or unreachable servers, and time outs.
-
Number of attempts made, and number of attempts remaining, for retry in current ZTP cycle.
-
Completion of file transfers.
-
Installation, reboot, and state of ZTP process.
-
Internal state errors and termination of ZTP process.
-
Logs for when default routes were added or deleted.
Using System Log Alerts to Monitor Zero Touch Provisioning
Purpose
In this example, the system log alert alerts you that the auto-image upgrade will start.
Action
Use the following system log alert to monitor the auto-image upgrade process.
“ALERT:Auto-image upgrade will start. This can terminate config CLI session(s). Modified configuration will be lost. To stop Auto-image, in CLI do the
following: 'edit; delete chassis auto-image-upgrade; commit'.”

“Checking whether image upgrade is already invoked”
Meaning
This system log alert indicates that the auto-image upgrade will start, and provides information on how to stop the auto-image upgrade process.
Using Error Messages to Monitor Zero Touch Provisioning
Purpose
Error messages provide information on which DHCP options are not configured.
Action
Use the information in the following error message to find out which DHCP options are not configured.
“DHCP Log Server Option”
“DHCP Host Name Option”
“DHCP NTP Server Option”
Meaning
The error message indicates that the DHCP log server, hostname, and NTP server options are not configured.
Using System Log Files to Monitor Zero Touch Provisioning in Junos OS Using DHCP Options
Purpose
System log files provide information on the state of the auto-upgrade process, lists of bound and unbound DHCP client interfaces, IP addresses of file servers, names and locations of image and configuration files, and successful and failed attempts at fetching configuration and image files.
Action
Use the information in the following system log files to monitor the auto-upgrade process.
Auto Image Upgrade: Start fetching config-file file from server 10.1.1.1 through irb using ftp


Auto Image Upgrade: Tried [2] attempts to fetch config-file file from server 10.1.1.1 through irb. Summary: "Retrieving /config-file
:: Failed to open file.". To retry [4] times.


Auto Image Upgrade: Tried [4] attempts to fetch config-file file from server 10.1.1.1 through irb. Summary: "Retrieving /config-fileconfig-file
:: Failed to open file.". To retry [2] times.

Auto Image Upgrade: Tried [6] attempts to fetch config-file file from server 10.1.1.1 through irb. Summary: "Retrieving /config-file
:: Failed to open file.". To retry [0] times.


Auto Image Upgrade: All [6] attempts to fetch config-file file from server 10.1.1.1 through irb FAILED. Start retry again in few minutes.
Meaning
These system log files indicate that there were six failed attempts to fetch the configuration file from the file server, the IP address of the file server, the DHCP client interface name, and the number of times the retry process occurred.
Using System Log Files to Monitor Zero Touch Provisioning in Junos OS Using DHCPv6 Options
Purpose
System log files provide information on the state of the auto-upgrade process, lists of bound and unbound DHCP client interfaces, IP addresses of file servers, names and locations of image and configuration files, and successful and failed attempts at fetching configuration and image files.
Action
Use the information in the following system log files to monitor the auto-upgrade process.
Auto Image Upgrade: Tried [2] attempts to fetch junos-vmhost-install
-20.2.tgz file from server 2001:db8::1 through et-0
/0/0:2. Summary: "fetch-secure: https://[2001:*: Connection refused". To retry
[4] times.


Auto Image Upgrade: Tried [4] attempts to fetch junos-vmhost-install
-20.2.tgz file from server 2001:db8::1 through et-0
/0/0:2. Summary: "fetch-secure: https://[2001:*: Connection refused". To retry
[2] times.

Auto Image Upgrade: Tried [6] attempts to fetch junos-vmhost-install-
20.2.tgz file from server 2001:db8::1 through et-0
/0/0:2. Summary: "fetch-secure: https://[2001:*: Connection refused". To retry
[0] times.
Meaning
These system log files indicate that there were six failed attempts to fetch the image file from the file server, the IP address of the file server, the DHCPv6 client interface name, and the number of times the retry process occurred.
Using the show dhcp client binding Command
Purpose
Issue the show dhcp client binding command to display DHCP
client binding information
Action
Issue the show dhcp client binding command to display the IP
address of the DHCP client, the hardware address of the DHCP client, number of
seconds in which the DHCP client’s IP address lease expires, state of the DHCP
client IP address in the binding table, and the name of the interface that has
active client bindings.
show dhcp client binding
user@device# show dhcp client binding
IP address        Hardware address   Expires     State      Interface
10.0.0.0           00:22:83:2a:db:dc  0           SELECTING  irb.0
10.6.6.13          00:22:83:2a:db:dd  49201       BOUND      vme.0
10.0.0.0           00:22:83:2a:db:df  0           SELECTING  xe-0/0/0.0
10.0.0.0           00:22:83:2a:db:e0  0           SELECTING  xe-0/0/1.0
Meaning
The output of this command shows that there is one client interface that is bound, and that there are three interfaces that are receiving DHCP offers from the DHCP server.
Using the show dhcpv6 client binding Command
Purpose
Issue the show dhcpv6 client binding command to display DHCP
client binding information
Action
Issue the show dhcp6 client binding command to display the IP
address of the DHCPv6 client, the hardware address of the DHCPv6 client, number
of seconds in which the DHCPv6 client’s IP address lease expires, state of the
DHCPv6 client IP address in the binding table, and the name of the interface
that has active client bindings.
show dhcpv6 client binding
user@device# show dhcpv6 client binding
IP/prefix                   Expires    State           ClientType       Interface         Client DUID
2001:db8::10                            57          SELECTING  STATEFUL      em0.0            LL0x3-54:4b:8c:d3:a2:34
2001:db8::10                            46          SELECTING  STATEFUL      em2.0            LL0x3-54:4b:8c:d3:a2:35
2001:db8::10                            38          SELECTING  STATEFUL      et-0/0/0:0.0     LL0x3-54:4b:8c:d3:a2:3b
2001:db8::10                            530         BOUND      STATEFUL      et-0/0/0:1.0     LL0x3-54:4b:8c:d3:a2:3c
Meaning
The output of this command shows that there is one client interface that is bound, and that there are three interfaces that are receiving DHCPv6 offers from the DHCP server.
Using the show dhcp client statistics Command
Purpose
Issue the show dhcp client statistics command to display DHCP
client statistics.
Action
Issue the show dhcp client statistics command to display DHCP
client statistics, such as the number of packets dropped, and the number DHCP
and BOOTP messages sent and received.
show dhcp client statistics
user@device# show dhcp client statistics
Packets dropped:
    Total                      14
    Send error                 14
Messages received:
    BOOTREPLY                  5
    DHCPOFFER                  1
    DHCPACK                    4
    DHCPNAK                    0
    DHCPFORCERENEW             0
Messages sent:
    BOOTREQUEST                6751
    DHCPDECLINE                0
    DHCPDISCOVER               6747
    DHCPREQUEST                4
    DHCPINFORM                 0
    DHCPRELEASE                0
    DHCPRENEW                  0
    DHCPREBIND                 0
Meaning
The output of this command displays how many packets were dropped with errors, the number of BOOTREPLY and DHCPOFFER messages that were received, and the number of BOOTREQUEST and DHCPREQUEST messages that were sent.
Using the show dhcpv6 client statistics Command
Purpose
Issue the show dhcpv6 client statistics command to display
DHCPv6 client statistics.
Action
Issue the show dhcpv6 client statistics command to display
DHCPv6 client statistics, such as the number of packets dropped, and the number
of DHCPv6 messages sent and received.
show dhcpv6 client statistics
user@device# show dhcpv6 client statistics
Dhcpv6 Packets dropped:
    Total               20323
    Bad Send            7580
    Bad Options         12743

Messages received:
    DHCPV6_ADVERTISE           13
    DHCPV6_REPLY               109
    DHCPV6_RECONFIGURE         0

Messages sent:
    DHCPV6_DECLINE             0
    DHCPV6_SOLICIT             879
    DHCPV6_INFORMATION_REQUEST 0
    DHCPV6_RELEASE             0
    DHCPV6_REQUEST             9
    DHCPV6_CONFIRM             0
    DHCPV6_RENEW               61
    DHCPV6_REBIND              41
Meaning
The output of this command displays how many packets were dropped with errors, and the number of DHCPV6 messages that were received and sent.
Change History Table
Feature support is determined by the platform and release you are using. Use Feature Explorer to determine if a feature is supported on your platform.