ON THIS PAGE
Installing the QRadar Pulse App
Use the QRadar Assistant app to install the QRadar Pulse app archive on your QRadar computer.
Before you install the app, ensure that QRadar meets the minimum memory (RAM) requirements. QRadar Pulse requires 350 MB of free memory from the application pool of memory. If QRadar Pulse fails to install, then your application pool does not have enough free memory to run the app. Consider adding an App Host to your QRadar deployment.
QRadar 7.3.0 and 7.3.1 use an App Node, which is an unmanaged host, that is dedicated to running apps. Provision an App Node to provide extra storage, memory, and CPU resources for your apps without impacting the processing capacity of your QRadar Console. For more information, see Juniper Secure Analytics Administration Guide..
QRadar 7.3.2 or later use an App Host, which is a managed host, that is dedicated to running apps. App Hosts provide extra storage, memory, and CPU resources for your apps without impacting the processing capacity of your QRadar Console. For more information, see Juniper Secure Analytics Administration Guide.
Choose one of the following methods to download your app:
If the QRadar Assistant app is configured on QRadar, use the instructions from QRadar Assistant App Guide to install QRadar Pulse.
If the QRadar Assistant app is not configured, download the QRadar Pulse app archive from the IBM Security App Exchange onto your local computer. You must have an IBM ID to access the App Exchange.
If you downloaded the app from the App Exchange, complete the following steps:
On the QRadar Console, click Admin >Extensions Management.
In the Extension Management window, click Add and select the app archive that you want to upload to the console.
Select the Install immediately check box.
Note:You might have to wait several minutes before your app becomes active.
To preview the contents of an app after it is added and before it is installed, select it from the list of extensions, and click More Details. Expand the folders to view the individual content items in each group.
When the installation is complete, clear your browser cache and refresh the browser window to see the Pulse tab.
After you install QRadar Pulse, it is displayed as a capability in the User Roles page on the Admin tab. To use the app, a QRadar administrator must assign the app, and any other capabilities that it requires, to a user role. For more information, see Installing the QRadar Pulse App.
Supported Browsers for QRadar Pulse
For the dashboards and widget charts in dashboard items to work properly, you must use a supported web browser.
The following table lists the supported of web browsers:
Web browser |
Supported versions |
|---|---|
Mozilla Firefox |
Latest |
Google Chrome |
Latest |
Microsoft Edge |
Latest |
Your graphics card and browser must support WebGL for parts of the threat globe to render properly. To test if your browser supports WebGL, go to WebGL (https://get.webgl.org/). If you see a spinning cube on the web page, your browser supports WebGL.
The following image indicates a web browser that supports WebGL. 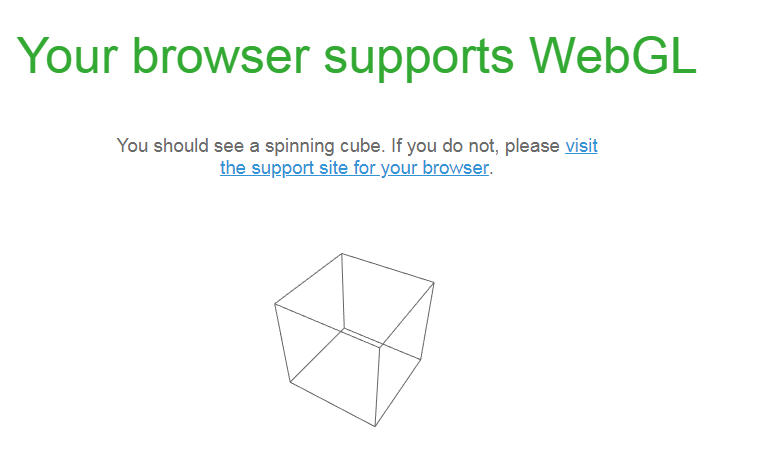
Minimum QRadar Product Versions for QRadar Pulse
Before you install QRadar Pulse, ensure that the versions of QRadar Pulse and QRadar products are compatible.
QRadar Pulse version |
Minimum QRadar versions |
|---|---|
2.1.0 or later |
QRadar 7.3.0 (Fix Pack 6) or later QRadar Community Edition 7.3.1 Note:
For optimal performance, increase the memory on the QRadar appliance to 350 MB. |
1.1.0 (Threat Globe GA) |
All versions of QRadar 2014.8, except for 2014.8 software update 9. Users of 2014.8 fix pack 9 can upgrade to 2014.8 fix pack 10. QRadar 7.3.0 software update 4 (with a workaround) and later QRadar 7.3.1 Tip:
For optimal performance, limit the number of distinct user role and permission combinations that have access to QRadar Pulse to no more than 6. |
The default metric dashboard items work in QRadar 7.3.0 (Fix Pack 6) or later. If you're using QRadar Pulse 1.1.0 or earlier on QRadar 2014.8 or versions earlier than 7.3.0 (Fix Pack 6), when you upgrade QRadar Pulse, some dashboards and dashboard items might not render properly. Upgrade to QRadar 7.3.0 (Fix Pack 6) or later.
Assigning User Capabilities for QRadar Pulse
After you install QRadar Pulse, it is displayed as a capability in User Roles on the Admin tab. To use the app, a QRadar administrator must assign the app, and any other capabilities that it requires, to a user role.
Non-administrators can work with data that is limited to the restrictions set in their security profile, if permitted by their user role, but they cannot configure QRadar Pulse. Users are limited to 100 dashboards and 800 dashboard items each. Capabilities are sets of permissions that user roles have.
Security profiles are different than user roles. Security profiles define which networks, log sources, and domains that a user can access. For more information, see the Security Profiles section in the Juniper Secure Analytics Administration Guide. Security profiles or user roles that are overly restrictive can result in data not appearing.
Click User Roles in the User Management section on the Admin tab.
From the list of available user roles, select the user role that you want to assign the app to.
Select the check box for QRadar Pulse, and then select the check boxes for these capabilities: Offenses, Log Activity, Pulse - Dashboard, and Pulse - Threat Globe, and then click Save.
Tip:To restrict a user role to seeing offense data but not associated events or flows, select the Offenses check box and clear the following check boxes below it:
Assign Offenses to Users
Manage Offense Closing Reasons
Maintain Custom Rules
View Custom Rules
On the Admin tab, click Deploy Changes.
Configuring the Threat Globe Dashboard
If you use QRadar Pulse 2.1.6 or later on QRadar 7.3.1 or later, the 3D Threat Globe uses the MaxMind GeoIP database that is installed with QRadar for IP address geolocation. You can configure Threat Globe to use a different MaxMind GeoIP database, configure default values for IP addresses that can't be mapped in the database, and specify playback intervals and delays for displayed items.
Events are supported in Threat Globe. Flows are not supported.
Open the Admin settings:
In QRadar 7.3.0 or earlier, click the Admin tab. In QRadar 7.3.1 and later, click the navigation menu icon, and then click Admin to open the admin tab.
In the Apps section, click the Threat Globe Configuration icon.
Configure default values for IP addresses that can't be mapped in the MaxMind GeoIP database. The MaxMind database is an IP geolocation database that determines the country, subdivisions, city, and postal codes that are associated with IP addresses worldwide.
Setting
Action
Description
Default latitude and longitude
Specify the default latitude and longitude to display for events with private or internal Source or Destination IP addresses.
These coordinates determine how events that don't map to specific longitudes and latitudes from the database are displayed on the threat globe. For example, you might specify the location of your company headquarters, or the location where most of your network resources are located.
Default country and city
Specify the default country and city in the page that opens when you hover over events on the threat globe in the Offense details page.
These coordinates determine how events that don't map to specific longitudes and latitudes from the database are displayed.
Default two-character code
Specify a default two-character country code that is displayed when you hover over a path in the flow diagram in the "Offense details" page of the Threat Globe.
Specify the playback intervals and delays for the timeline graph, event rate chart, and other displayed items. For more information, see Threat Globe real-time delays.
Setting
Description
Default value
Realtime delay
The time (in seconds) from when QRadar collects events to when they're visualized in the threat globe.
10 minutes
Interval to show on event rate chart
The time (in seconds) visualized by the event rate chart for the rate of events collected by QRadar.
60 seconds
Maximum fetched events per offense
A higher number of events affects app performance.
100 events
Maximum offenses considered
If data fails to load, reduce this value. A higher number of offenses might affect performance.
N/A
On the Admin tab, click Deploy Changes.
In the QRadar Pulse configuration page, click the MaxMind GeoIP City database link to download a city database onto your hard disk, decompress the tar.gz file, and then browse to its location to upload the *.mmdb file to QRadar Pulse. You can download a country database by using the same link, but the city isn't displayed in the app.
Note:QRadar Pulse uses the following order of precedence to find the geographical locations:
In QRadar 7.3.1 or later, looks at the network hierarchy.
Checks the MaxMind database in QRadar Pulse.
Checks the MaxMind database in QRadar 7.3.1 or later.
Checks the QRadar Pulse configuration screen to verify that the latitude and longitude are properly set.
Click Save.
The fields are validated and any errors are displayed for you to fix before the configuration is completed.
The following example shows a completed configuration.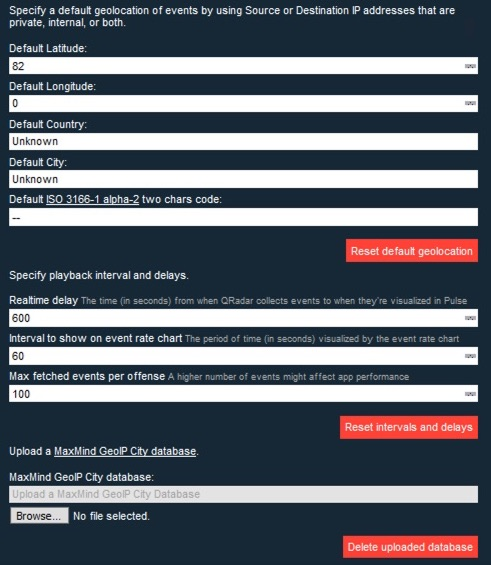
After you complete the configuration, the 3D Threat Globe is displayed.
Threat Globe Real-time Delays
The Threat Globe uses real-time delays to specify the time (in seconds) from when QRadar collects events to when they're visualized in the Threat Globe. The default is 10 minutes.
You can configure the delay by changing the option, but in most cases, this option is best left at the default value. If the delay is too short, the Threat Globe might not keep up, especially when you have many users. If the delay is too long, the Threat Globe displays events too far away from real time.
The Threat Globe includes the offenses that fall between a timeframe, which is determined by the start time and last updated time. When your browser initially loads the Threat Globe, this timeframe's length is the timeline interval of 15 minutes + 6 minutes = 21 minutes. After this initial timeframe, subsequent timeframes are 5 minutes.
To optimize the Threat Globe for caching, requests that are made within 5 minutes are grouped and reused. For example, assume you installed the Threat Globe, and the first time you accessed the app was at 9 AM. Then, within 5 minutes of accessing the Threat Globe for the first time, you opened up another 100 Threat Globe screens. The Threat Globe would display the same information on every screen, which is typically ideal for a security operations center. This grouping of requests and the real-time delay determines the starting point of the timeframe.
Upgrading QRadar Pulse
To take advantage of new capabilities, defect fixes, and updated workflows, upgrade to new versions of QRadar Pulse. Use the Extensions Management tool in QRadar to upgrade your app, or use the QRadar Assistant app to upgrade. You must be an administrator to upgrade to new versions of the app.
You must have an IBM ID to access the App Exchange.
Choose one of the following methods to download your app:
If the QRadar Assistant app is configured on QRadar, use the instructions from QRadar Assistant App Guide to install QRadar Pulse.
If the QRadar Assistant app is not configured, download the QRadar Pulse app archive from the IBM Security App Exchange onto your local computer. You must have an IBM ID to access the App Exchange.
If you downloaded the app from the App Exchange, complete the following steps:
On the QRadar Console, click Admin >Extensions Management.
In the Extension Management window, click Add and select the app archive that you want to upload to the console.
Select the Install immediately check box.
Note:You might have to wait several minutes before your app becomes active.
To preview the contents of an app after it is added and before it is installed, select it from the list of extensions, and click More Details. Expand the folders to view the individual content items in each group.
On the page that prompts you to update the current app version, leave the Replace existing items option selected, and click Install. After the installation is finished, a message displays at the bottom of the page to inform you of any template updates provided from the upgrade.
To load the updated templates, click the message link, or expand the dashboard list in the upper left corner of the page and click New Dashboard, and then click Templates.
Note:You might need to refresh the browser.
On the Browse Templates page, click Update for each template you want to load into QRadar.
Note:If you upgrade from QRadar Pulse V1.1.0 and go to the Threat Globe dashboard, you might see a message telling you that the authorized services token and the MaxMind GeoIP database are missing for the Threat Globe to work. Follow the instructions in the configuration topic: Installing the QRadar Pulse App.
If the upgrade failed, see Troubleshooting QRadar Pulse.
If the upgrade succeeded, see Installing the QRadar Pulse App.
Installing Content Extensions to Use in QRadar Pulse
Administrators download content extensions that contain customized QRadar Pulse dashboard templates from the IBM Security App Exchange. For example, the content extension for compliance with EU General Data Protection Regulation (GDPR) has a specific dashboard that can help you monitor compliance with the regulation.
You must have an IBM ID to download the content extension.
If the QRadar Assistant app is configured on QRadar, use the instructions from QRadar Assistant App Guide to download content extensions.
If the QRadar Assistant app is not configured, download the QRadar Pulse app archive from the IBM Security App Exchange onto your local computer.
Log in to QRadar, and then click Admin >Extensions Management.
On the Extensions Management page, click Add.
On the Add a New Extension page, browse to select the content extension compressed file that you want to upload to the console.
Select the Install immediately check box, and click Add >Install.
In the content extension page that displays the changes to occur after installation, keep the Replace existing items check box selected and then click Install.
Tip:If you're updating a content extension, keep the same check box selected.
Review the installation summary of new or updated reference data elements, click OK, and then close the Extensions Management page.
On the Admin tab, click Deploy Changes.
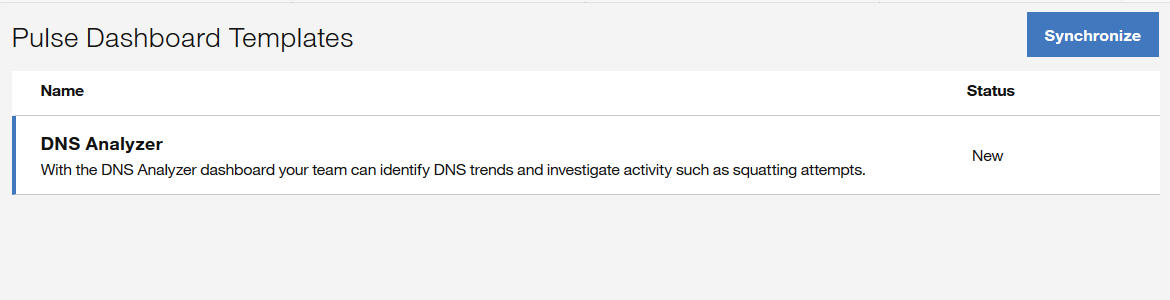
Synchronizing Dashboard Templates from Content Extensions
Administrators synchronize dashboard templates that are included in content extensions or apps. For example, the QRadar DNS Analyzer app contains a dashboard that helps SOC analysts identify DNS trends and investigate suspicious activities such as squatting attempts. After the dashboard templates are synchronized, users can use the dashboards in their own workspace.
A content extension with a QRadar Pulse database must be installed. For more information, see Installing the QRadar Pulse App.
On the Admin tab, go to Apps >Pulse - Dashboard and click the Pulse - Dashboard app icon.
On the Pulse Dashboard Templates page, click Synchronize to set the new or updated dashboard content in QRadar Pulse, and then close the page.
Uninstalling QRadar Pulse
Administrators use the Extensions Management tool in QRadar to uninstall an app.
To minimize disruption, notify your non-administrative users before you uninstall the app. Users who logged in to QRadar before you remove the app see a blank dashboard and error message when they go to the Pulse dashboard tab. Users must refresh their browsers to clear the Pulse tab from view.
On the Admin tab, in the System Configuration section, click Extensions Management.
On the INSTALLED tab in the Extension Management page, select the QRadar Pulse app and click Uninstall.
When you uninstall an app, it is removed from the system. If you want to reinstall it, you must install it again.