ON THIS PAGE
Install and Configure Junos Device Manager for CSDS
Use this configuration example to install and configure Junos Device Manager (JDM) for vSRX orchestration in Connected Security Distributed Services (CSDS) topology.
Junos Device Manager (JDM) is a Linux container that orchestrates vSRX Virtual Firewalls for services layer in Connected Security Distributed Services (CSDS) topology. This configuration example demonstrates how to install and configure JDM for vSRX orchestration.
When you install and configure JDM, it also sets up the Junos Node Unifier (JNU) for CSDS. The same configuration for JDM also sets up JNU, provided you've not configured JNU yet. If you've already configured JNU, you can still run the commands in this example as the system ensures that the existing JNU configurations remain unchanged. If you have a single JNU controller in your topology, we've indicated the steps that you can ignore. After the installation and configuration of JDM, the configuration adds both JDM and vSRX Virtual Firewalls as JNU satellites.
|
Reading Time |
Less than an hour |
|
Configuration Time |
Less than two hours |
Example Prerequisites
|
Hardware requirements |
|
|
Software requirements |
|
|
Hardware requirements |
|
|
Software requirements |
|
-
Ensure you've installed Ubuntu OS on baremetal host server with the specified software and hardware requirements. See JDM Components for CSDS
-
Ensure you understand the modifications that the JDM installation is set to apply on the host server. See Understand vSRX Orchestration with JDM for CSDS.
-
Ensure your host server has a management IP address.
-
Ensure you’ve completed basic configuration of MX Series and the nodes can communicate with each other over the management network.
Before You Begin
|
Understand JDM for CSDS |
Configure JDM to orchestrate the life cycle management of the vSRX Virtual Firewalls. Use JDM only when you plan to include vSRX Virtual Firewalls in your CSDS architecture. You require JNU to configure JDM. JDM is the satellite and uses the MX Series controller for its configuration. See Junos Device Manager for CSDS |
|
Know more |
|
|
Learn more |
Functional Overview
|
Ubuntu host server |
Ubuntu host server is a baremetal server for hosting JDM container and vSRX Virtual Firewalls spawned by JDM. This node is not a JNU satellite. |
|
JDM container |
JDM is a Linux Container (LXC) that runs in the host to perform vSRX orchestration. The jnud process runs in JDM. JDM is a JNU satellite node. |
|
vSRX Virtual Firewall |
JDM spawns the vSRX Virtual Firewalls for CSDS services plane. The jnud process runs in the firewall. vSRX Virtual Firewall is a JNU satellite node. |
|
JNU controller |
Even though the JNU controller doesn't belong to the JDM components, you still require the JNU controller for installing and configuring JDM. The MX Series acts as the controller. |
|
Primary verification tasks |
Verify the following:
|
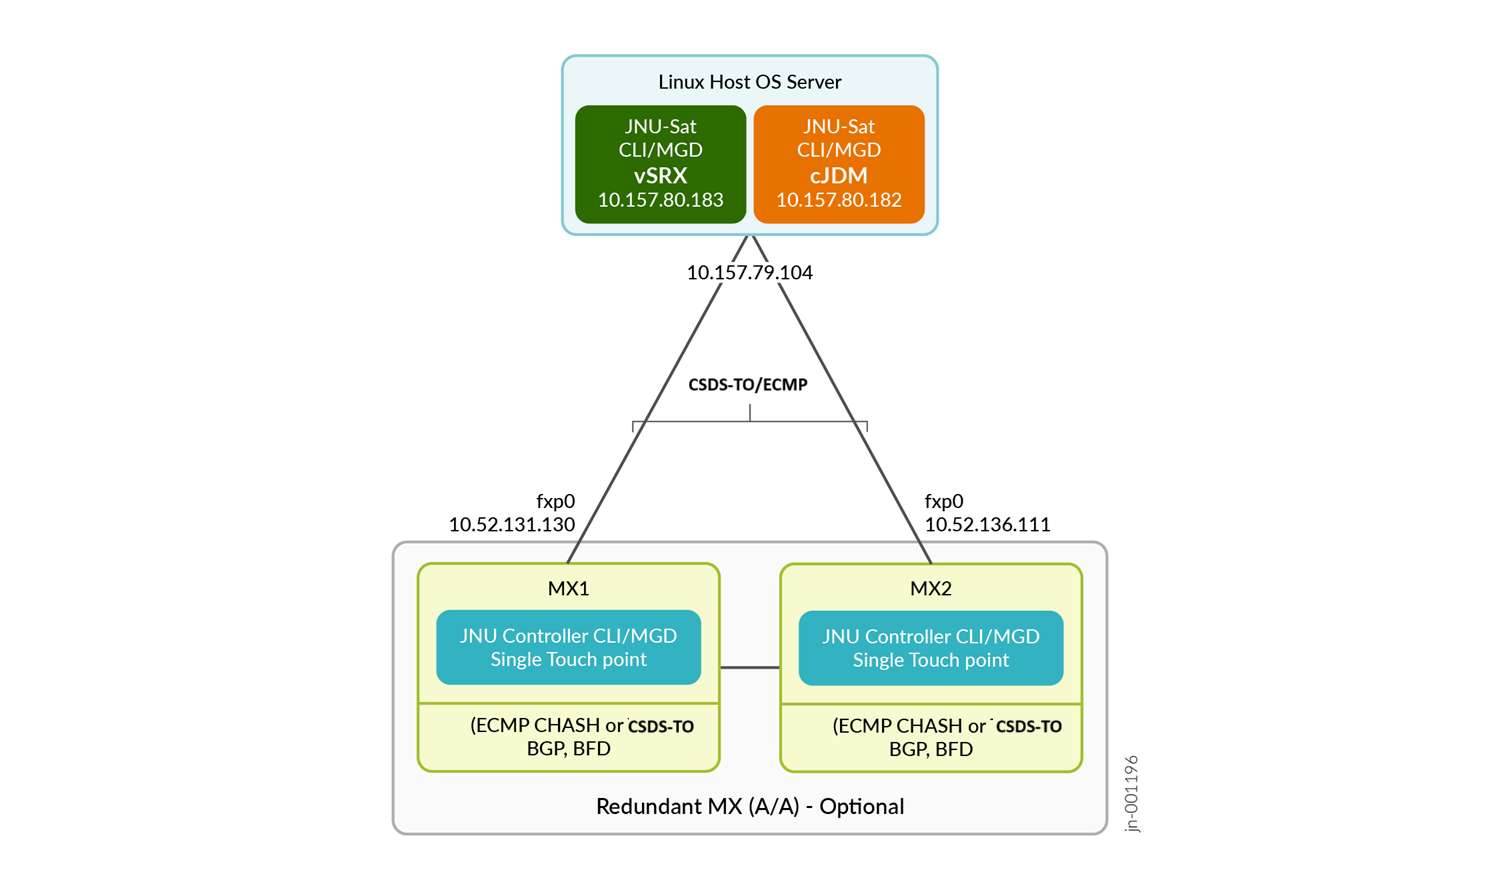
Topology Overview
|
Hostname |
Role |
Function |
|---|---|---|
|
MX1 |
JNU controller |
JNU controller serves as a CLI touchpoint for all network devices in the JNU topology.
|
|
MX2 |
JNU controller (second controller) |
This serves as a second the controller for high availability.
|
|
Ubuntu host server |
Baremetal server |
The baremetal server hosts JDM and vSRX Virtual Firewalls. This host is not part of JNU topology.
|
|
JDM |
JNU satellite |
Node in JNU topology that creates vSRX Virtual Firewall.
|
|
vSRX1 |
JNU satellite |
Node in JNU topology that you can manage using the JNU Controller.
|
The nodes use fxp0 management interface for communication between
the controller and the satellites.
Topology Illustration
Step-By-Step Controller Configuration on MX1
Ensure you meet the following prerequisites:
-
Download the following software from the Juniper Networks Support portal:
-
Search for Connected Security Distributed Services Architecture to download the CSDS CLI Install software package (
csds-jdm-jdm-<release-number>.x86_64.deb). -
vSRX Virtual Firewall KVM image (
junos-vsrx3-x86-64-24.4.qcow2)
-
-
Enable NETCONF and SSH services.
[edit]
user@mx1# set system services netconf ssh
user@mx1# set system services ssh
user@mx1# commit
Configure JNU controller on MX1 and install JDM on the host. Run the following steps.
Step-By-Step Controller Configuration on MX2
Ensure you meet the following prerequisites:
-
Ignore the controller configuration on MX2 if you have a single controller in your JNU topology.
-
Ensure that you have configured MX1.
-
Enable NETCONF and SSH services.
[edit]
user@mx2# set system services netconf ssh
user@mx2# set system services ssh
user@mx2# commit
Configure JNU controller on MX2 and synchronize with the other controller. Run the following steps.
Verification
This section provides a list of show commands that you can use to verify the feature in this example. Run these commands from the controller in operational mode.
| Command | Verification Task |
|---|---|
|
show version device-list jdm-satellite-ip |
Verify the JDM's version. |
|
show system cpu| memory| network| storage device-list jdm-satellite-ip |
Verify the infrastructure (CPU, memory, network and storage) details of JDM. |
|
show virtual-network-functions device-list jdm-satellite-ip |
Verify the virtual network function (VNF) status on JDM. |
|
show chassis jnu satellites |
Verify the satellite nodes synchronization in JNU topology. |
|
show configuration chassis jnu-management |
Verify the nodes in JNU topology. |
|
show version device-list satellite-ip |
Verify that you are able to run the satellite's (vSRX Series Virtual Firewall) operational commands from the controller. |
|
set chassis satellite satellite-ip |
Verify that you are able to configure the satellite's (vSRX Series Virtual Firewall) using the configuration commands from the controller. |
- Verify Satellite Version
- Verify Satellite Infrastructure Details
- Verify Satellite VNF Status
- Verify JNU Nodes Synchronization
- Verify Nodes in JNU Topology
- Verify the Satellite's Operational Commands from the Controller
- Verify the Satellite's Configuration Commands from the Controller
Verify Satellite Version
Purpose
Run the command to check version of the satellite.
Action
From operational mode, run
the
command show version device-list
jdm-satellite-ip
on the controllers, MX1 or MX2.
user@mx1> show version device-list 10.157.80.182
--------------------------------------------------------------------
Hostname: jdm
Model: csds_jdm
Family: junos-qfx
JDM package version : 24.4-R1.9
Host Software [Ubuntu 22.04.4 LTS]
JDM container Software [Ubuntu 22.04 LTS]
JDM daemon jdmd [Version: 24.4R1.9-secure]
Meaning
The controller displays the JDM satellite's version details.
Verify Satellite Infrastructure Details
Purpose
Run the commands to fetch CPU, memory, network and storage details of JDM.
Action
From operational mode, run
the
command show system network storage device-list
jdm-satellite-ip
on
the controllers, MX1 or MX2.
user@mx1> show system network device-list 10.157.80.182
Physical Interfaces
---------------------------------------------------------------------------------------------------------------------------------------------
Name     Index MTU     Hardware-address  Rcvd Bytes   Rcvd Packets Rcvd Error Rcvd Drop Trxd Bytes   Trxd Packets Trxd Error Trxd Drop Flags
-------- ----- ------- ----------------- ------------ ------------ ---------- --------- ------------ ------------ ---------- --------- ------
eno1     2             ac:1f:6b:db:9a:98 96917714533  382476745    0          2552      1434989121   13207569     0          0

Per VNF Interface Statistics
---------------------------------------------------------------------------------------------------------------------------------------------------------
Interface                  Source        MAC Address        Rcvd Bytes   Rcvd packets Rcvd Error Rcvd Drop Trxd bytes   Trxd Packets Trxd Error Trxd Drop
-------------------------- ------------- -----------------  ------------ ------------ ---------- --------- ------------ ------------ ---------- ---------
VNF name: vnf0
macvtap23                  eno1          52:54:00:48:58:1f  11130730973  95294125     13453      13453     106174583    297660       0          0

JDM Interface Statistics
-------------------------------------------------------------------------------------------------------------------------------------------
Name     Index MTU   Hardware-address  Rcvd Bytes   Rcvd Packets Rcvd Error Rcvd Drop Trxd Bytes   Trxd Packets Trxd Error Trxd Drop Flags
-------- ----- ----- ----------------- ------------ ------------ ---------- --------- ------------ ------------ ---------- --------- ------
bme1     433   1500  52:54:00:a1:f2:32 5222992      95044        0          0         315130       1876         0          0
jmgmt0   435   1500  52:54:00:d8:19:eb 1126420395   9211539      0          14        55015        1016         0          0
Similarly, you can run the following commands on JDM:
-
show system cpu device-list jdm-satellite-ip -
show system memory device-list jdm-satellite-ip -
show system storage device-list jdm-satellite-ip
Meaning
The controller displays the JDM satellite's CPU, memory, network and storage details.
Verify Satellite VNF Status
Purpose
Run the command to check VNF status of the satellite. Though the
device-list option shows the JDM IP address, you'll not
see the output of JDM as it doesn't have VNFs.
Action
From operational mode, run
the
command show virtual-network-functions device-list
jdm-ip-address
on
the controllers, MX1 or MX2.
user@mx1> show virtual-network-functions device-list 10.157.80.182
--------------------------------------------------------------------
ID       Name                                              State      Liveness
--------------------------------------------------------------------------------
113      vnf0                                              Running    alive
Meaning
The controller lists the satellite's running and liveliness status. If the status of the VNF is running and liveliness is unavailable, wait until the MX controller extracts the vSRX Virtual Firewall public keys.
Verify JNU Nodes Synchronization
Purpose
Run the command to check that JDM and vSRX Virtual Firewalls are synchronized with the controller. Both the controllers, MX1 and MX2, list the satellites that you add. Satellites push their schema to the controller during the initial synchronization. Although JDM is added as a satellite, JDM doesn’t send its configuration to the controller during the initial synchronization, unlike the other satellites.
Action
From operational mode, run show chassis jnu satellites
command on the MX1 or MX2 controller to verify that the satellites are added
to the controllers.
user@mx1> show chassis jnu satellites
Satellite            Alive      Model      Version
-----------------------------------------------------
10.157.80.182        up         jdm        24.4-R1.9
10.157.80.183        up         vSRX       24.4R1.9
Meaning
The controller lists the satellite's name, status, model, and Junos OS version. It takes approximately 5-6 minutes for synchronization per controller per satellite.
Verify Nodes in JNU Topology
Purpose
Run the command on the controllers to know the details of nodes in JNU topology.
Action
From operational mode, run show configuration chassis
jnu-management command on the MX1 or MX2 controllers to verify
the nodes in JNU topology.
user@mx1> show configuration chassis jnu-management
mode feature-rich;
satellite 10.157.80.182 {
    model jdm;
    version 24.4-R1.9;
}
satellite 10.157.80.183 {
    model vSRX;
    version 24.4R1.9;
}
user jnuadmin;
other-controller 10.52.136.111;
Meaning
The command shows the details of the controller and the satellite nodes.
Verify the Satellite's Operational Commands from the Controller
Purpose
Run the satellite's (vSRX Virtual Firewall) operational commands on the controller.
Action
From
the controller's operational mode,
run
the show version device-list
satellite-name satellite's operational
command.
user@mx1> show version device-list 10.157.80.183

10.157.80.183
--------------------------------------------------------------------
Hostname: vnf0
Model: vSRX
Family: junos-es
Junos: 24.4R1.9
Meaning
The command shows the details of the vSRX Virtual Firewall's Junos OS version. You can run the satellite's other operational commands from the controller.
Verify the Satellite's Configuration Commands from the Controller
Purpose
Run the satellite's (vSRX Virtual Firewall) configuration commands from the controller. Note that JDM is a non-configurable satellite.
Action
From the controller's configuration mode, run the satellite's configuration
command set
snmp
description "Monitor
vSRX".
This SNMP description configuration serves as an example to demonstrate how
to configure the satellite from the MX controller.
[edit]
user@mx1# edit chassis satellite 10.157.80.183
[edit chassis satellite 10.157.80.183]
user@mx1# set snmp description "Monitor vSRX"
user@mx1# top commit
Perform top commit operation to commit the configuration command on the satellite.
Meaning
The configuration schema of the satellite is available in the controller. The command configures SNMP description for the satellite being managed. You can run the satellite's other configuration commands from the controller.
Appendix 1: Set Commands on All Devices
Set command output on all devices.
Set Commands on MX1
set groups re0 interfaces fxp0 unit 0 family inet address 10.52.131.130/8 master-only
set groups re0 interfaces fxp0 unit 0 family inet address 10.52.136.131/8
set groups re1 interfaces fxp0 unit 0 family inet address 10.52.136.132/8
set groups re1 interfaces fxp0 unit 0 family inet address 10.52.131.130/8 master-only
set system commit synchronize
set system login user jnuadmin uid 2001
set system login user jnuadmin class super-user
set system login user jnuadmin authentication ssh-rsa "$ABC123c1r0"
set system login user jnuadmin authentication ssh-rsa "$ABC123c1r1"set system services netconf ssh
set system csds node-instance 0 host-ip 10.157.79.104
set system csds node-instance 0 ip-prefix-range 10.157.80.182-184/19
set system csds node-instance 0 gateway-ip 10.157.64.1
set chassis redundancy graceful-switchover
set chassis jnu-management mode feature-rich
set chassis jnu-management user jnuadmin
set chassis jnu-management other-controller 10.52.136.111
set routing-options nonstop-routing
Set Commands on MX2
set groups re0 interfaces fxp0 unit 0 family inet address 10.52.136.111/8 master-only
set groups re1 interfaces fxp0 unit 0 family inet address 10.52.136.112/8
set groups re1 interfaces fxp0 unit 0 family inet address 10.52.136.113/8
set groups re1 interfaces fxp0 unit 0 family inet address 10.52.136.111/8 master-only
set system commit synchronize
set system login user jnuadmin uid 2001
set system login user jnuadmin class super-user
set system login user jnuadmin authentication ssh-rsa "$ABC123c2r0”
set system login user jnuadmin authentication ssh-rsa "$ABC123c2r1”
set system services netconf ssh
set chassis redundancy graceful-switchover
set chassis jnu-management mode feature-rich
set chassis jnu-management user jnuadmin
set chassis jnu-management other-controller 10.52.131.130
set routing-options nonstop-routing
Appendix 2: Show Configuration Output on All Devices
Show command output on all devices.
Show Command on MX1
user@mx1# show chassis jnu-management
mode feature-rich;
satellite 10.157.80.183 {
    model vSRX;
    version 24.4R1.9;
}
satellite 10.157.80.182 {
    model jdm;
    version 24.4-R1.9;
}
user jnuadmin;
other-controller 10.52.131.130;
Show Command on MX2
user@mx2# show chassis jnu-management
mode feature-rich;
satellite 10.157.80.183 {
    model vSRX;
    version 24.4R1.9;
}
satellite 10.157.80.182 {
    model jdm;
    version 24.4-R1.9;
}
user jnuadmin;
other-controller 10.52.136.111;
Appendix 3: Commands to Delete JNU Satellites
Ensure that you know the CSDS instance ID for the vSRX Series Virtual Firewall and the JDM satellites that you plan to delete.
To delete all the satellites, first remove the vSRX Series Virtual Firewalls, followed by the JDM. You can delete an existing vSRX Series Virtual Firewall and add a new one without deleting JDM. Note that you must delete all firewalls running on the host server before you can delete the JDM.
To delete the satellites, run the following steps: