Configure Junos Node Unifier for CSDS
Use this configuration example to configure Junos Node Unifier (JNU) for unified management of network devices in your Connected Security Distributed Services (CSDS) topology.
Junos Node Unifier (JNU) provides unified command line interface (CLI) view of all the nodes present in Connected Security Distributed Services (CSDS) topology. The JNU controller and the JNU satellite communicate over the management network. In this configuration example, you'll see how to configure JNU with dual controllers. If you've one JNU controller in your JNU topology, we've indicated steps that you can skip. Note that the controllers have dual Routing Engines (RE), re0 and re1, to continue forwarding packets, even if one RE fails.
|
Reading Time |
Less than an hour |
|
Configuration Time |
Less than an hour |
Example Prerequisites
|
Hardware requirements |
|
|
Software requirements |
|
Ensure you’ve completed basic configuration of MX Series and SRX Series Firewalls, and the nodes can communicate with each other over the management network.
Before You Begin
|
Understand JNU for CSDS |
Configure JNU to manage the network devices in the Connected Security Distributed Services (CSDS) architecture using a single touchpoint management solution. You can perform the following tasks using JNU:
|
|
Know more |
Functional Overview
|
JNU controller |
The JNU controller node presents the unified CLI view of multiple network devices as a centralized entity, adding the devices as JNU satellites. This node runs jnud process to present unified user experience and uses remote procedure calls (RPC) to communicate with JNU satellites. |
|
JNU satellites |
JNU satellites operate under the control of the JNU controller. These nodes run security services. The jnud process also runs in the satellites. |
|
Primary verification tasks |
Verify the following:
|
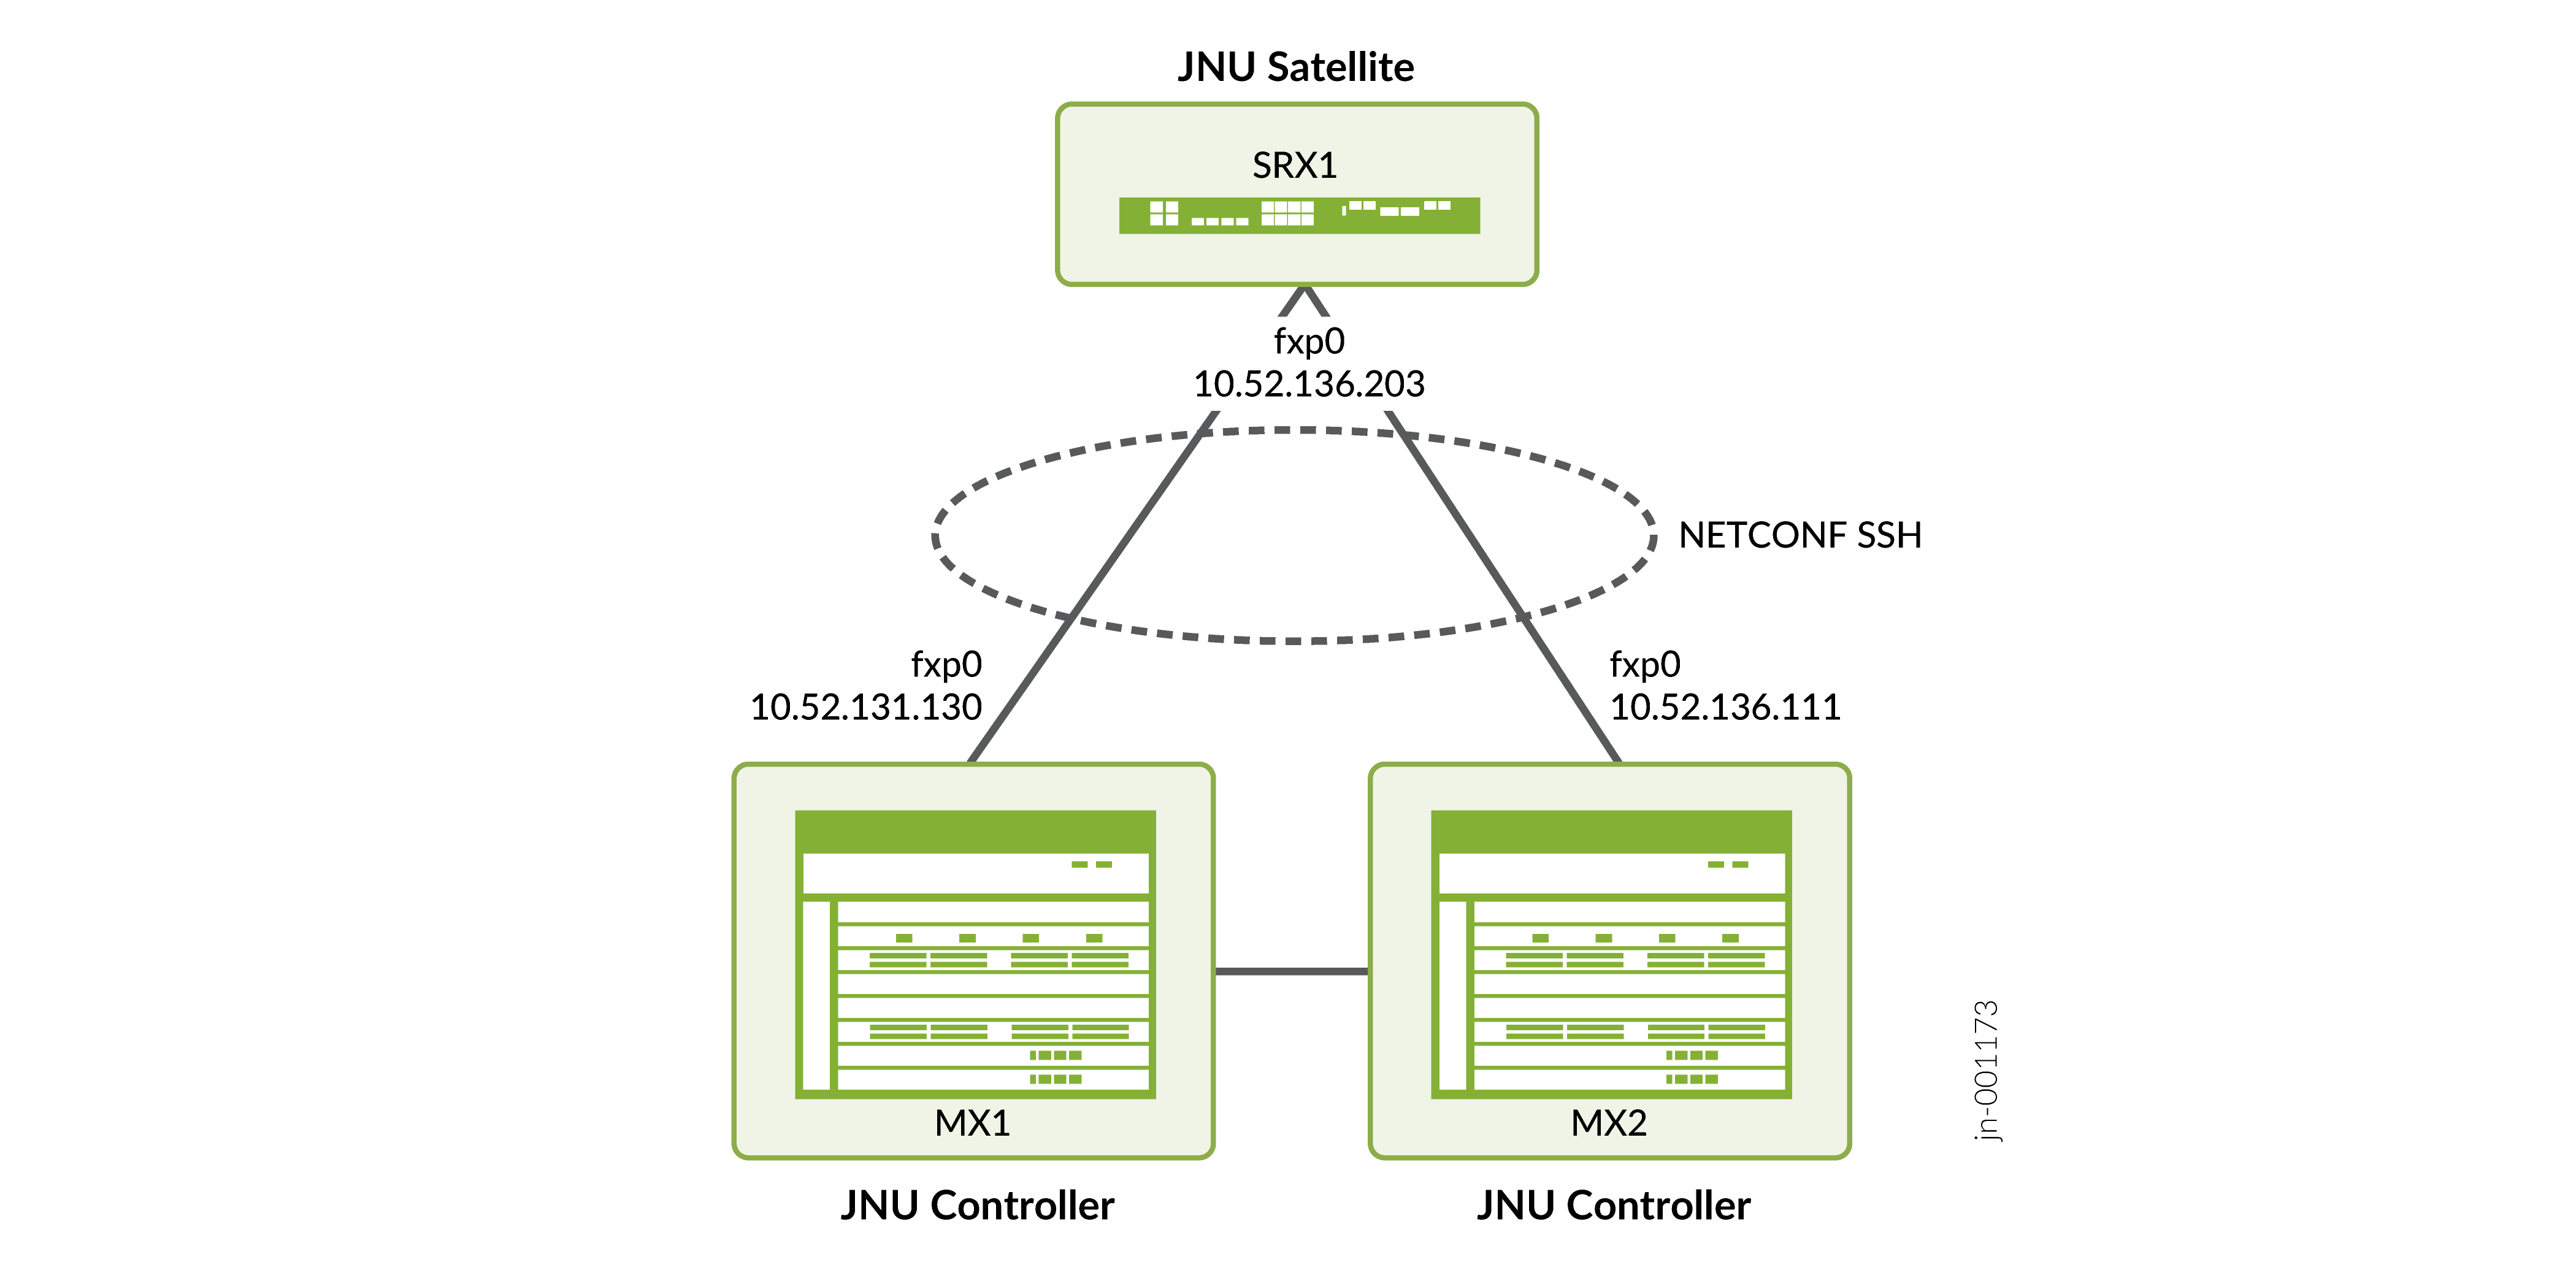
Topology Overview
|
Hostname |
Role |
Function |
|---|---|---|
|
MX1 |
JNU controller |
Serves as a CLI touchpoint for all network devices in the JNU topology.
|
|
MX2 |
JNU controller (second controller) |
Serves as a second controller for high availability
|
|
SRX1 |
JNU satellite |
Node in JNU topology that you can manage using the JNU controller.
For every new satellite, use a unique IP address. |
The nodes use fxp0 management interface for communication between
controller and satellites.
Topology Illustration
Step-By-Step Prerequisite Configuration on MX1, MX2, and SRX1
Enable SSH and NETCONF services on MX1, MX2, and SRX1.
[edit]
user@mx1# set system services ssh
user@mx1# set system services netconf ssh
Ensure SSH keys are available on MX1, MX2, and SRX before configuring the JNU controller. You can generate SSH keys manually or use the auto-generated ones.
Follow steps a to d to manually generate SSH keys on the MX Series routers and the SRX Series Firewalls. Generate these custom SSH keys separately for re0 and re1 on MX Series. Run these steps on every MX Series REs and SRX Series Firewalls.
Note that when you use the command
request jnu role controller
                                invoke-on all-routing-engines
on the controller andrequest jnu role satelliteon the satellite during JNU configuration, Junos actively checks for custom SSH keys in /var/db/jnu/.ssh. If keys are missing, these commands generate new ones. If keys exist, the commands do not overwrite them.On each of the controller REs and satellites run the following steps.
In this example topology, run the following steps on MX1 re0, MX1 re1, MX2 re0, MX2 re1, and SRX1. If you have a single controller, run these steps for MX1 re0, MX1 re1, and SRX1:
At the shell prompt, create a directory to store SSH keypair.
user@host:~# mkdir -p /var/db/jnu/.ssh
Create authentication keypair for SSH.
user@host:~# echo 'y' | ssh-keygen -t rsa -f /var/db/jnu/.ssh/id_rsa -N "" -b 2048
In this configuration, we created the keys with RSA 2048-bit encryption. We support only RSA-based encryption.
Get the public key.
user@host:~# cat /var/db/jnu/.ssh/id_rsa.pub
"$ABC123c1r0"
(Only for controllers) On the controller, to generate SSH keys on the other RE, run the following command in operational mode to login to the other RE, and repeat step 1 and 2. Ignore this step for the satellite:
user@host> request routing-engine login other-routing-engine
Note the public keys that you generate to configure the JNU nodes. In the example topology, following are the public keys for MX1 re0, MX1 re1, MX2 re0, MX2 re1, and SRX1.
-
$ABC123c1r0is the public key of MX1 re0. -
$ABC123c1r1is the public key of MX1 re1. -
$ABC123c2r0is the public key of MX2 re0. -
$ABC123c2r1is the public key of MX2 re1. -
$ABC123is the public key of SRX1.
Step-By-Step Controller Configuration on MX1
Ensure SSH keypair on MX1 re0, MX1 re1, MX2 re0, MX2 re1, and SRX1 are available and you've noted their public keys.
Configure JNU controller on MX1. Run the following steps.
Step-By-Step Controller Configuration on MX2
Ensure SSH keypair on MX1 re0, MX1 re1, MX2 re0, MX2 re1, and SRX1 are available and you've noted their public keys.
Configure JNU controller on MX2. Run the following steps.
Step-By-Step Satellite Configuration on SRX1
Before configuring the satellites, ensure you've configured the controllers. Ensure SSH keypair on SRX1 is available and you've noted its public key.
Configure JNU satellite on SRX1. Run the following steps. Repeat these steps for every satellite in your topology and adjust the configuration as per your topology.
Verification
This section provides a list of show commands that you can use to verify the feature in this example.
| Command | Verification Task |
|---|---|
|
show chassis jnu satellites |
Verify JNU nodes synchronization. |
|
show configuration chassis jnu-management |
Verify nodes in JNU topology. |
Verify JNU Nodes Synchronization
Purpose
Run the command to verify that the SRX1 is synchronized. The command also shows the JDM and vSRX Virtual Firewalls if they are present in your JNU topology. Both the controllers, MX1 and MX2, list the satellite that you add. Satellites push their schema to the controller during the initial synchronization.
Action
From operational mode, run show chassis jnu satellites
command on MX1 and MX2 controller to verify that the satellites are added to
the controllers.
user@mx1> show chassis jnu satellites
Satellite            Alive      Model      Version
-----------------------------------------------------
10.52.130.203        up         SRX4600       24.4I-20241106.0.1958
user@mx2> show chassis jnu satellites
Satellite            Alive      Model      Version
-----------------------------------------------------
10.52.130.203        up         SRX4600       24.4I-20241106.0.1958
Meaning
Controller lists the satellite's name, status, model, and Junos OS version. It approximately takes 5-6 minutes per controller per satellite for synchronization.
Verify Nodes in JNU Topology
Purpose
Run the command on the controllers and satellite to know the details of nodes in JNU topology.
Action
From operational mode, run show configuration chassis
jnu-management command on MX1, MX2 and SRX1 to verify the nodes
in JNU topology.
user@mx1> show configuration chassis jnu-management
mode feature-rich;
satellite 10.52.130.203 {
    model SRX4600;
    version 24.4I-20241106.0.1958;
}
user jnuadmin;
other-controller 10.52.136.111;user@mx2> show configuration chassis jnu-management
mode feature-rich;
satellite 10.52.130.203 {
model SRX4600;
version 24.4I-20241106.0.1958;
}
user jnuadmin;
other-controller 10.52.131.130;user@srx1> show configuration chassis jnu-management mode feature-rich; satellite-name 10.52.130.203; user jnuadmin; controller [ 10.52.131.130 10.52.136.111 ];
Meaning
The command shows the details of the controller and the satellite nodes.
Appendix 1: Set Commands on All Devices
Set command output on all devices.
Set Commands on MX1
set groups re0 interfaces fxp0 unit 0 family inet address 10.52.131.130/8 master-only
set groups re0 interfaces fxp0 unit 0 family inet address 10.52.136.131/8
set groups re1 interfaces fxp0 unit 0 family inet address 10.52.136.132/8
set groups re1 interfaces fxp0 unit 0 family inet address 10.52.131.130/8 master-only
set groups global system root-authentication encrypted-password “$ABC123”
set groups global system login user remote uid 2000
set groups global system login user remote class super-user
set groups global system services netconf ssh
set groups global system services ssh root-login allow
set system commit synchronize
set system login user jnuadmin uid 2001
set system login user jnuadmin class super-user
set system login user jnuadmin authentication ssh-rsa "$ABC123c1r0"
set system login user jnuadmin authentication ssh-rsa "$ABC123c1r1"
set system login user jnuadmin authentication ssh-rsa "$ABC123"
set system services netconf ssh
set system ports console log-out-on-disconnect
set chassis redundancy graceful-switchover
set chassis jnu-management mode feature-rich
set chassis jnu-management user jnuadmin
set chassis jnu-management other-controller 10.52.136.111
set routing-options nonstop-routing
Set Commands on MX2
set groups re0 interfaces fxp0 unit 0 family inet address 10.52.136.111/8 master-only
set groups re1 interfaces fxp0 unit 0 family inet address 10.52.136.112/8
set groups re1 interfaces fxp0 unit 0 family inet address 10.52.136.113/8
set groups re1 interfaces fxp0 unit 0 family inet address 10.52.136.111/8 master-only
set groups global system root-authentication encrypted-password “$ABC123”
set groups global system login user remote uid 2000
set groups global system login user remote class super-user
set groups global system services netconf ssh
set groups global system services ssh root-login allow
set system commit synchronize
set system login user jnuadmin uid 2001
set system login user jnuadmin class super-user
set system login user jnuadmin authentication ssh-rsa "$ABC123"
set system login user jnuadmin authentication ssh-rsa "$ABC123c2r0”
set system login user jnuadmin authentication ssh-rsa "$ABC123c2r1”
set system services netconf ssh
set system ports console log-out-on-disconnect
set chassis redundancy graceful-switchover
set chassis jnu-management mode feature-rich
set chassis jnu-management user jnuadmin
set chassis jnu-management other-controller 10.52.131.130
set routing-options nonstop-routing
Set Commands on SRX1
set groups member0 interfaces fxp0 unit 0 family inet address 10.52.130.203/8
set groups global system root-authentication encrypted-password "$ABC123”
set groups global system login user remote uid 2000
set groups global system login user remote class super-user
set groups global system services netconf ssh
set groups global system services ssh root-login allow
set system host-name shanv1r
set system login user jnuadmin uid 2001
set system login user jnuadmin class super-user
set system login user jnuadmin authentication ssh-rsa “$ABC123c1r0”
set system login user jnuadmin authentication ssh-rsa “$ABC123c1r1”
set system login user jnuadmin authentication ssh-rsa “$ABC123c2r0”
set system login user jnuadmin authentication ssh-rsa “$ABC123c2r1”
set system services netconf ssh
set system ports console log-out-on-disconnect
set chassis jnu-management mode feature-rich
set chassis jnu-management satellite-name 10.52.130.203
set chassis jnu-management user jnuadmin
set chassis jnu-management controller 10.52.136.111
set chassis jnu-management controller 10.52.131.130
Appendix 2: Show Configuration Output on All Devices
Show command output on all devices.
Show Command on MX1
user@mx1# show chassis jnu-management
Nov 07 23:21:42
mode feature-rich;
satellite 10.52.130.203 {
    model SRX4600;
    version 24.4I-20241106.0.1958;
}
user jnuadmin;
other-controller 10.52.131.130;
Show Command on MX2
user@mx2# show chassis jnu-management
Nov 07 23:21:47
mode feature-rich;
satellite 10.52.130.203 {
    model SRX4600;
    version 24.4I-20241106.0.1958;
}
user jnuadmin;
other-controller 10.52.136.111;
Show Command on SRX1
user@srx1# show chassis jnu-management
mode feature-rich;
satellite-name 10.52.130.203;
user jnuadmin;
controller [ 10.52.136.111 10.52.131.130 ];