Return Procedures for the PTX10004 Chassis or Components
Return Procedure Overview
If you need to return a PTX10004 router or a PTX10004 component to Juniper Networks for repair or replacement, follow these steps:
For more information about return and repair policies, see the customer support page at https://www.juniper.net/support/guidelines.html.
Locate the Serial Number on a PTX10004 Router or Component
If you want to return a router or component to Juniper Networks for repair or replacement, you must locate the serial number of the router or component. You must provide the serial number to the Juniper Networks Technical Assistance Center (JTAC) when you contact them to obtain an RMA. See Contact Customer Support to Obtain a Return Materials Authorization for a PTX10004 Router or Component.
If the router is operational and you can access the CLI, you can list serial numbers for the router and for some components with a CLI command. If you don’t have access to the CLI or if the serial number for the component doesn’t appear in the command output, you can locate the serial number ID label on the router or component.
If you want to find the serial number ID label on a component, you need to remove the component from the router chassis, for which you must have the required parts and tools available.
- List the PTX10004 Chassis and Component Details Using the CLI
- Locate the Chassis Serial Number ID Label on a PTX10004
- Locate the Serial Number ID Label on a PTX10004 Power Supply
- Locate the Serial Number ID Labels on PTX10004 Fan Trays and Fan Tray Controllers
- Locate the Serial Number ID Labels on PTX10004 Routing and Control Boards
- Locate the Serial Number ID Labels on a PTX10004 Line Card
- Locate the Serial Number ID Labels on a PTX10004 Switch Interface Board
List the PTX10004 Chassis and Component Details Using the CLI
To list the PTX10004 chassis and the components and their serial
numbers, use the show chassis hardware CLI operational
mode command. See the following example and the related output.
user@device> show chassis hardware
Hardware inventory:
Item             Version  Part number  Serial number     Description
Chassis                                EL409             JNP10004 [PTX10004]
Midplane 0       REV 09   750-099025   BCBH2295          Midplane 4
FPM 0            REV 02   711-086964   BCBF8510          Front Panel Display
PSM 0            Rev 03   740-069994   1F219340457       JNP10K 5500W AC/HVDC Po                                            wer Supply Unit
PSM 1            Rev 03   740-069994   1F219340458       JNP10K 5500W AC/HVDC Po                                            wer Supply Unit
Routing Engine 0          BUILTIN      BUILTIN           JNP10K-RE1-E
CB 0             REV 19   750-079562   BCBJ6711          Control Board
CB 1             REV 19   750-079562   BCBJ6721          Control Board
FPC 3            REV 31   750-093524   BCBD9284          JNP10K-LC1201
  CPU            REV 07   711-072984   BCBD3758          JNP10K-LC1201 PMB Board
  PIC 0                   BUILTIN      BUILTIN           JNP10K-36QDD-LC-PIC
    Xcvr 0       REV 01   740-061405   1ECQ1445065       QSFP-100GBASE-SR4-T2
    Xcvr 1       REV 01   740-067443   QI2902BC          QSFP+-40G-SR4
    Xcvr 2       REV 01   720-087757   1J1C46A438069     QSFP56-DD-400G-CR8-CU-2                                                         1M
    Xcvr 3       REV 01   720-088939   1P1C48A45118R     QSFP56-DD-400G-CR8-CU-2                                                        .5M
    Xcvr 4       REV 01   740-058734   1ECQ144608L       QSFP-100GBASE-SR4
    Xcvr 5       REV 01   740-061405   1ECQ15140J6       QSFP-100GBASE-SR4-T2
    Xcvr 6       REV 01   740-061408   1F2CQ5A4440KC     QSFP-100G-CWDM4
    Xcvr 7       REV 01   740-061408   1F2CQ5A4440WZ     QSFP-100G-CWDM4
    Xcvr 8       REV 01   720-087757   1J1C46A438066     QSFP56-DD-400G-CR8-CU-2M
    Xcvr 9       REV 01   720-087757   1J1C46A438092     QSFP56-DD-400G-CR8-CU-2M
    Xcvr 10      REV 01   740-067442   1ACP133009J       QSFP+-40G-SR4
    Xcvr 11      REV 01   740-061001   1RC4251600U       QSFP28-100G-CU3M
    Xcvr 12      REV 01   720-087757   1J1C46A438062     QSFP56-DD-400G-CR8-CU-2M
    Xcvr 13      REV 01   720-087757   1J1C46A438076     QSFP56-DD-400G-CR8-CU-2M
    Xcvr 14      REV 01   720-087757   1J1C46A438098     QSFP56-DD-400G-CR8-CU-2M
    Xcvr 15      REV 01   720-087757   1J1C46A438086     QSFP56-DD-400G-CR8-CU-2M
    Xcvr 16      REV 01   740-067443   QJ510316          QSFP+-40G-SR4
    Xcvr 17      REV 01   740-085354   1W1CZDA443003     QSFP56-DD-4X100G-FR
    Xcvr 18      REV 01   720-087757   1J1C46A438047     QSFP56-DD-400G-CR8-CU-2M
    Xcvr 19      REV 01   740-032986   QD371878          QSFP+-40G-SR4
    Xcvr 20      REV 01   720-087757   1J1C46A438084     QSFP56-DD-400G-CR8-CU-2M
    Xcvr 21      REV 01   720-087757   1J1C46A438091     QSFP56-DD-400G-CR8-CU-2M
    Xcvr 22      REV 01   740-058734   1ECQ144608J       QSFP-100GBASE-SR4
    Xcvr 24      REV 01   740-061001   1RC42516034       QSFP28-100G-CU3M
    Xcvr 26      REV 01   720-087757   1J1C46A438097     QSFP56-DD-400G-CR8-CU-2M
    Xcvr 27      REV 01   720-087757   1J1C46A438080     QSFP56-DD-400G-CR8-CU-2M
    Xcvr 28      REV 01   740-067442   1ACP135301R       QSFP+-40G-SR4
    Xcvr 29      REV 01   740-067443   QJ1400W2          QSFP+-40G-SR4
    Xcvr 30      REV 01   720-087757   1J1C46A438083     QSFP56-DD-400G-CR8-CU-2M
    Xcvr 31      REV 01   740-061001   1RC4251602J       QSFP28-100G-CU3M
    Xcvr 34      REV 01   720-088939   1J1C48A450057     QSFP56-DD-400G-CR8-CU-2.5M
    Xcvr 35      REV 01   720-088939   1J1C48A450004     QSFP56-DD-400G-CR8-CU-2.5M
  MEZZ 0         REV 09   711-084968   BCBD9368          JNP10K-LC1201 MEZZ Board
SIB 0            REV 06   750-094060   BCBH4883          SIB-JNP10004
FTC 0            REV 16   750-086270   BCBD9805          Fan Controller 4
FTC 1            REV 16   750-086270   BCBD9770          Fan Controller 4
Fan Tray 0       REV 04   760-099039   BCBH2782          Fan tray 4
Fan Tray 1       REV 04   760-099039   BCBJ3212          Fan tray 4
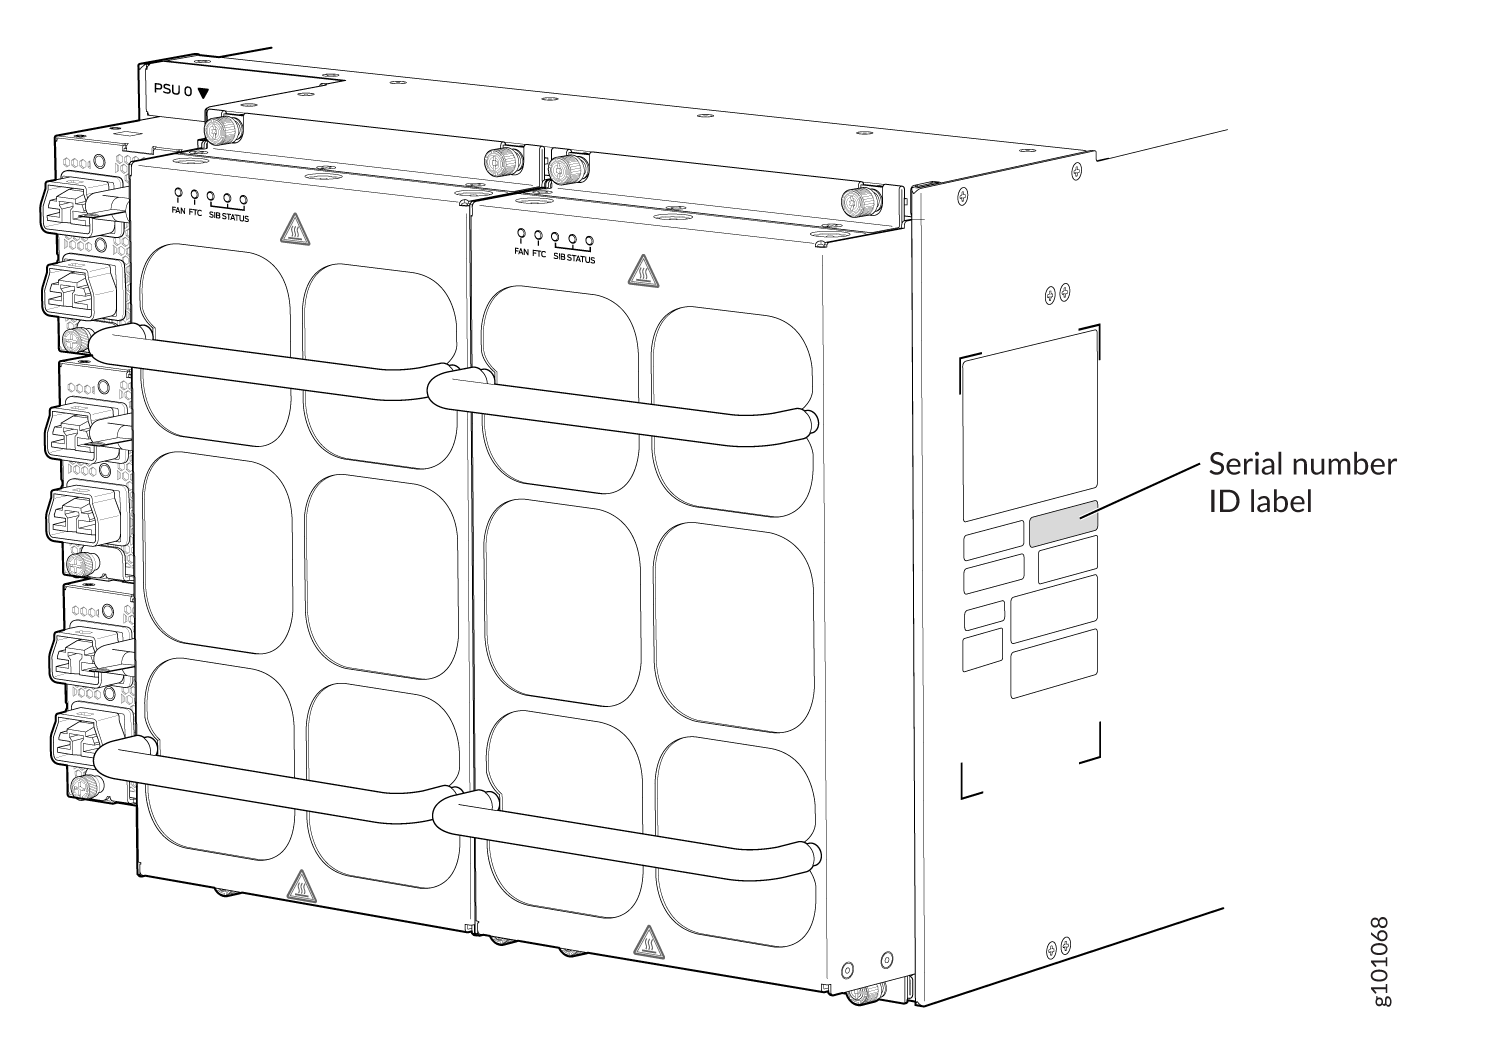
Locate the Chassis Serial Number ID Label on a PTX10004
The serial number ID label is located on a label on the left side as you face the front of the chassis. See Figure 1 for the location on a PTX10004.
Locate the Serial Number ID Label on a PTX10004 Power Supply
The power supplies installed in a PTX10004 are field-replaceable units (FRUs). For each FRU, you must remove the FRU from the router chassis to see the FRU serial number ID label.
-
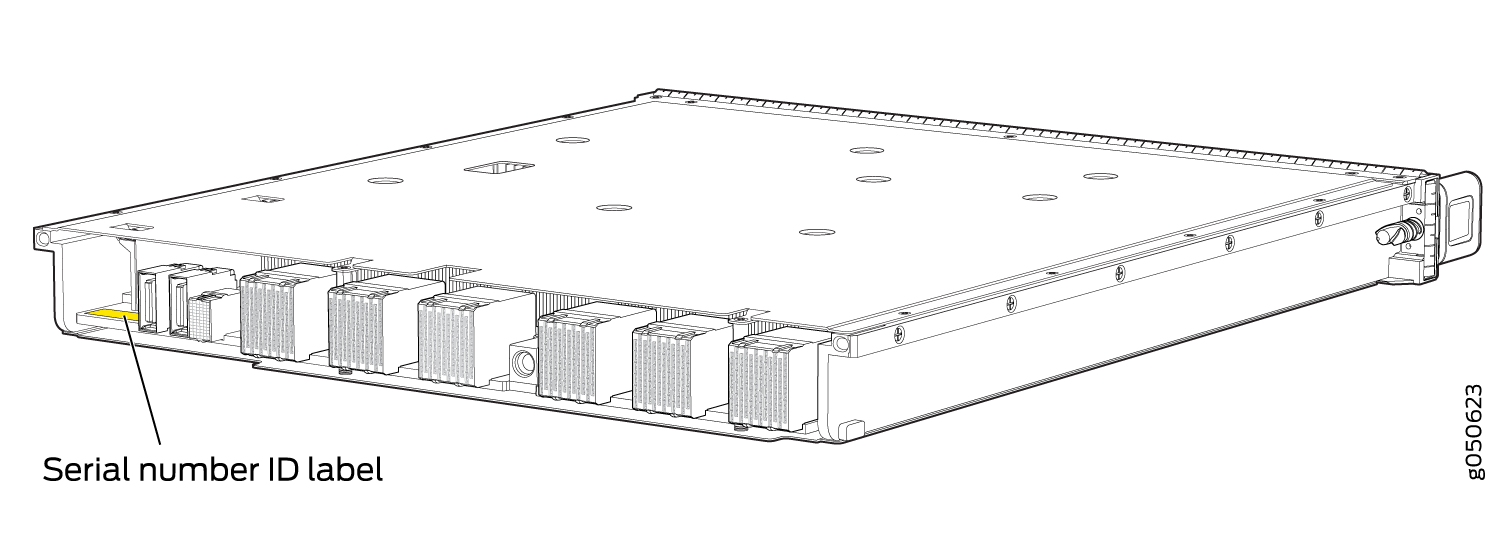
JNP10K-PWR-AC3 power supply—The serial number ID label is on the right side of the power supply. See Figure 2.
Figure 2: JNP10K-PWR-AC3 Power Supply Serial Number Location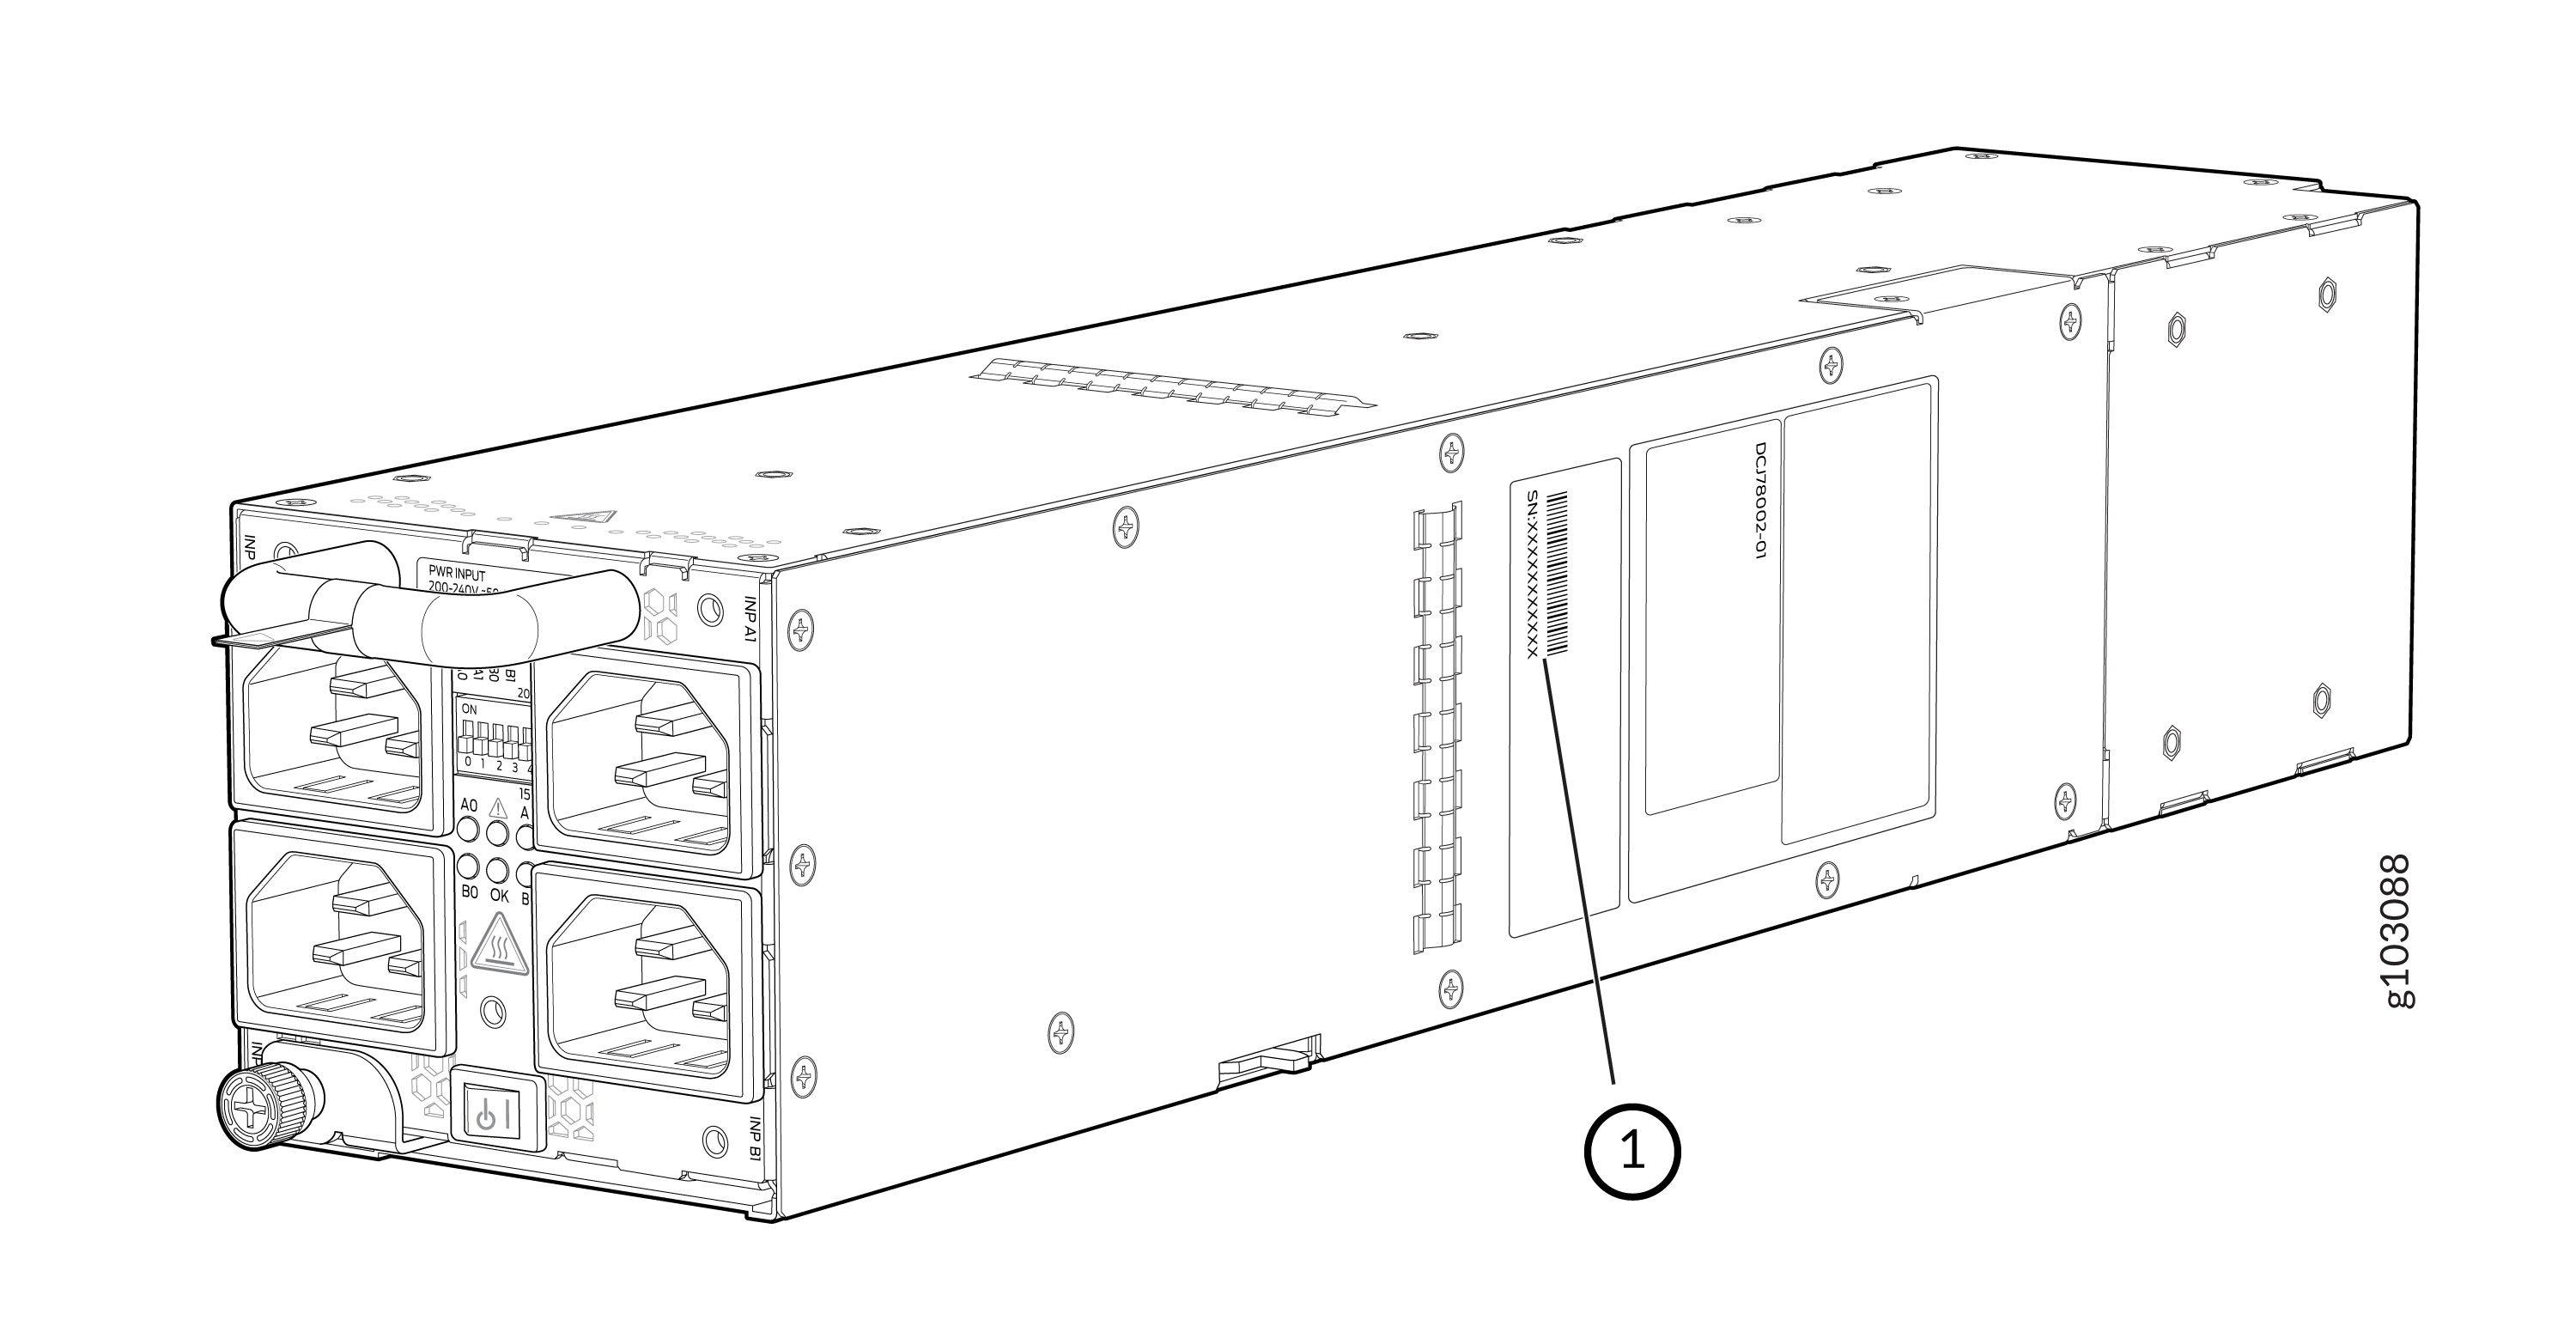 1—
1—Serial number ID label
-
JNP10K-PWR-AC2 power supply—The serial ID label is on the right side of the power supply. See Figure 3.
Figure 3: JNP10K-PWR-AC2 Power Supply Serial Number Location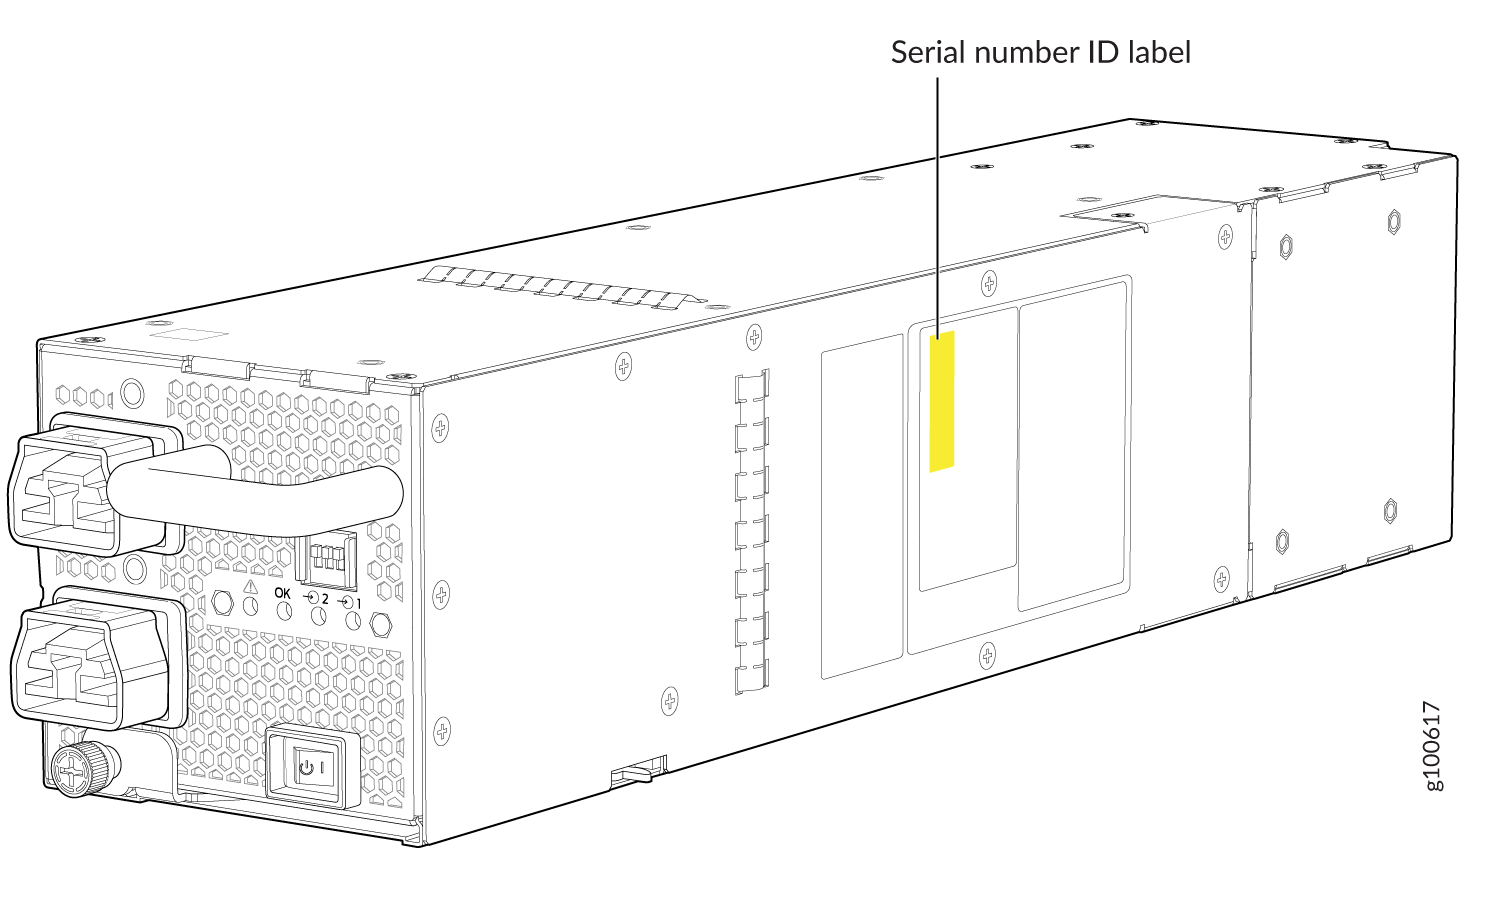
-
JNP10K-PWR-DC3 power supply—The serial number ID label is on the right side of the power supply. See Figure 4.
Figure 4: JNP10K-PWR-DC3 Power Supply Serial Number Location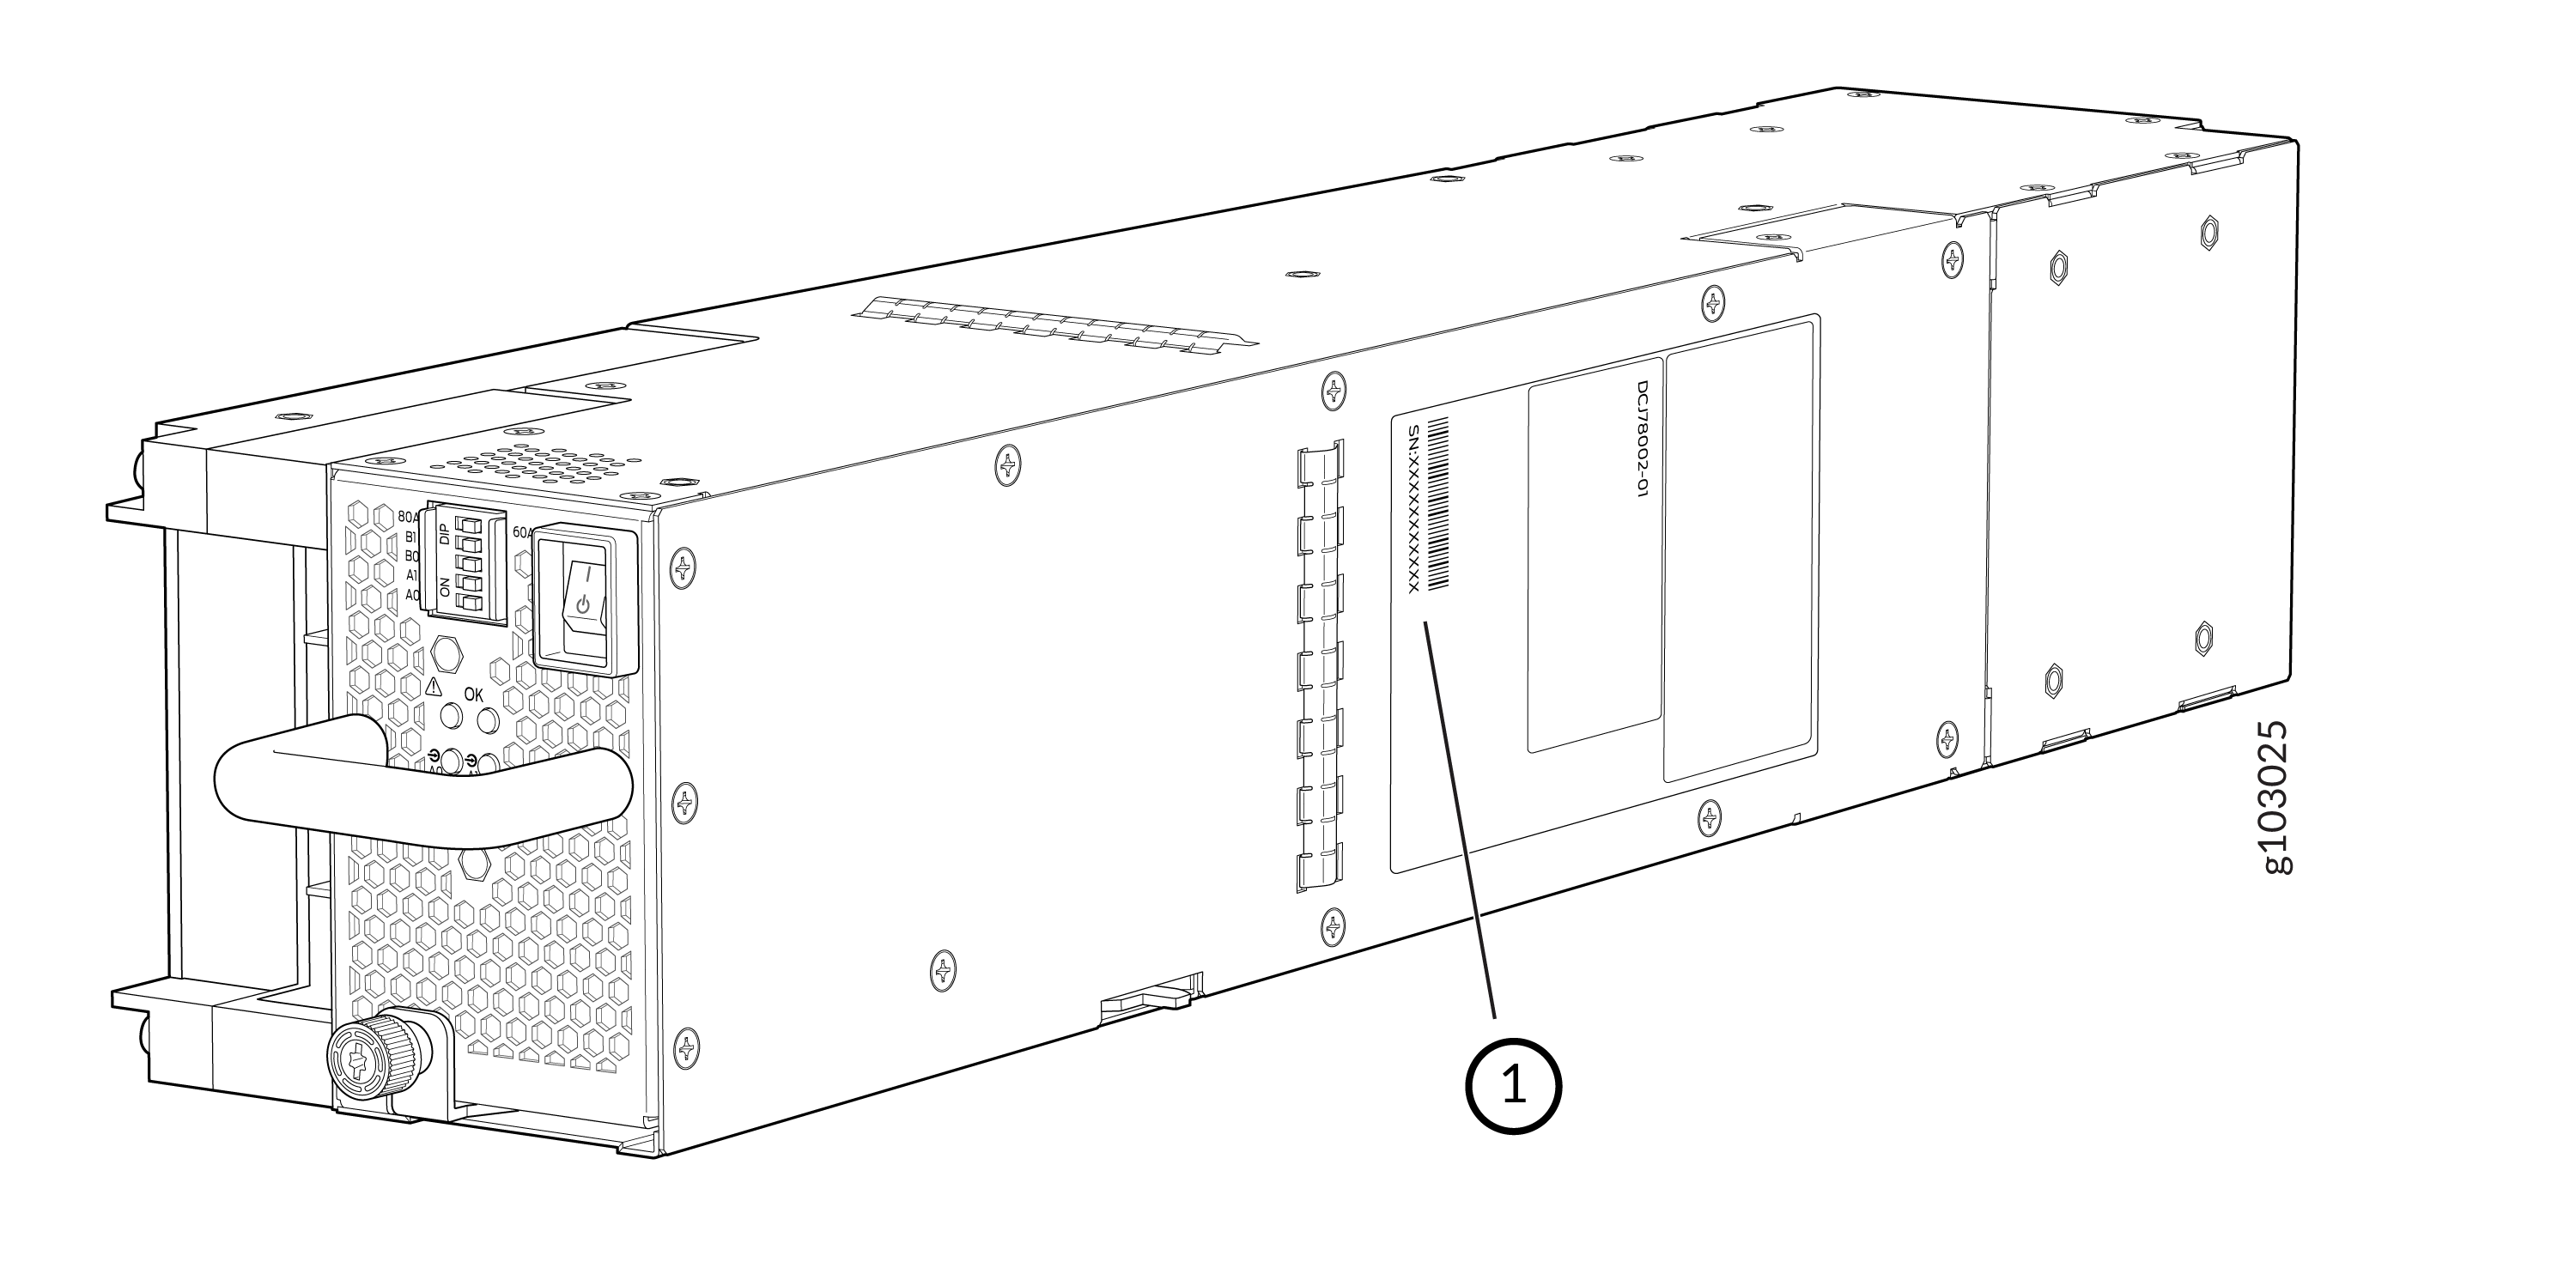 1—
1—Serial number ID label
-
JNP10K-PWR-DC2 power supply—The serial number ID label is on the left side of the power supply. See Figure 5.
Figure 5: JNP10K-PWR-DC2 Power Supply Serial Number Location
-
JNP10K-PWR-AC3H power supply—The serial number ID label is on the right side of the power supply. See Figure 6.
Figure 6: JNP10K-PWR-AC3H Power Supply Serial Number Location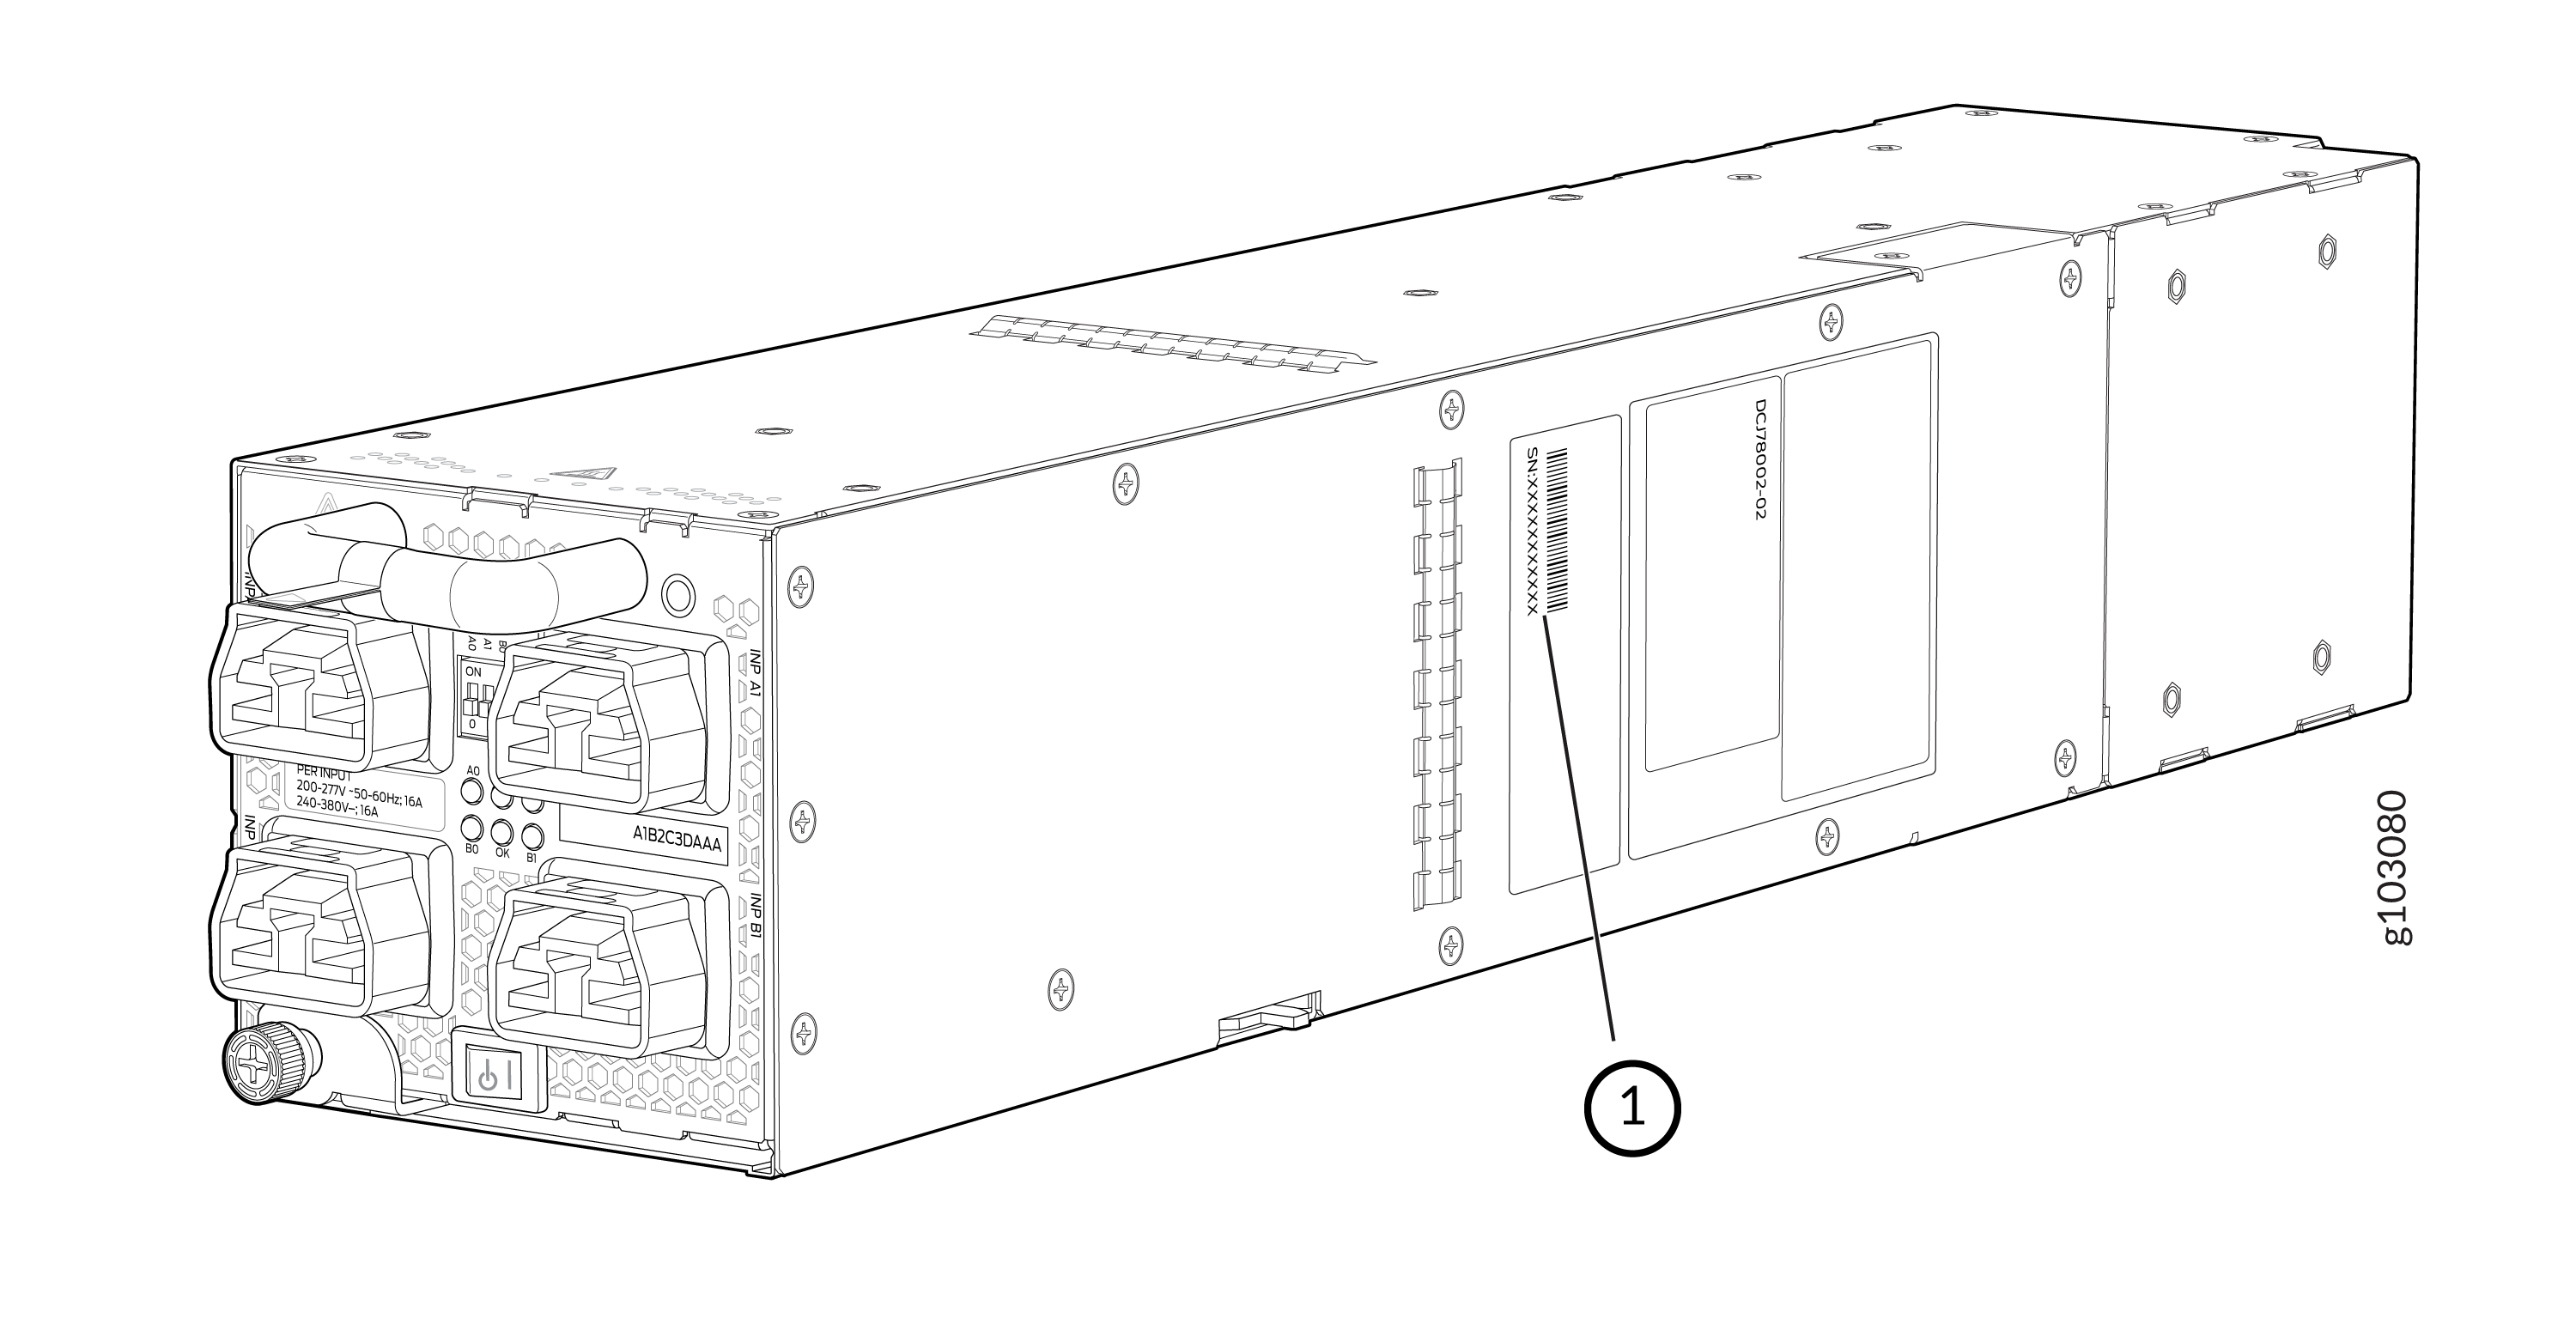 1—
1—Serial number ID label
Locate the Serial Number ID Labels on PTX10004 Fan Trays and Fan Tray Controllers
The two fan trays and their associated fan tray controllers installed in a PTX10004 are field-replaceable units (FRUs). For each FRU, you must remove the FRU from the router chassis to see the FRU serial number ID label.
-
Fan tray–The serial number ID label for the fan tray (JNP10004-FAN2) is located on the inside of the fan tray at the base of the fan tray Control Board. See Figure 7.
Figure 7: PTX10004 Fan Tray Serial Number Location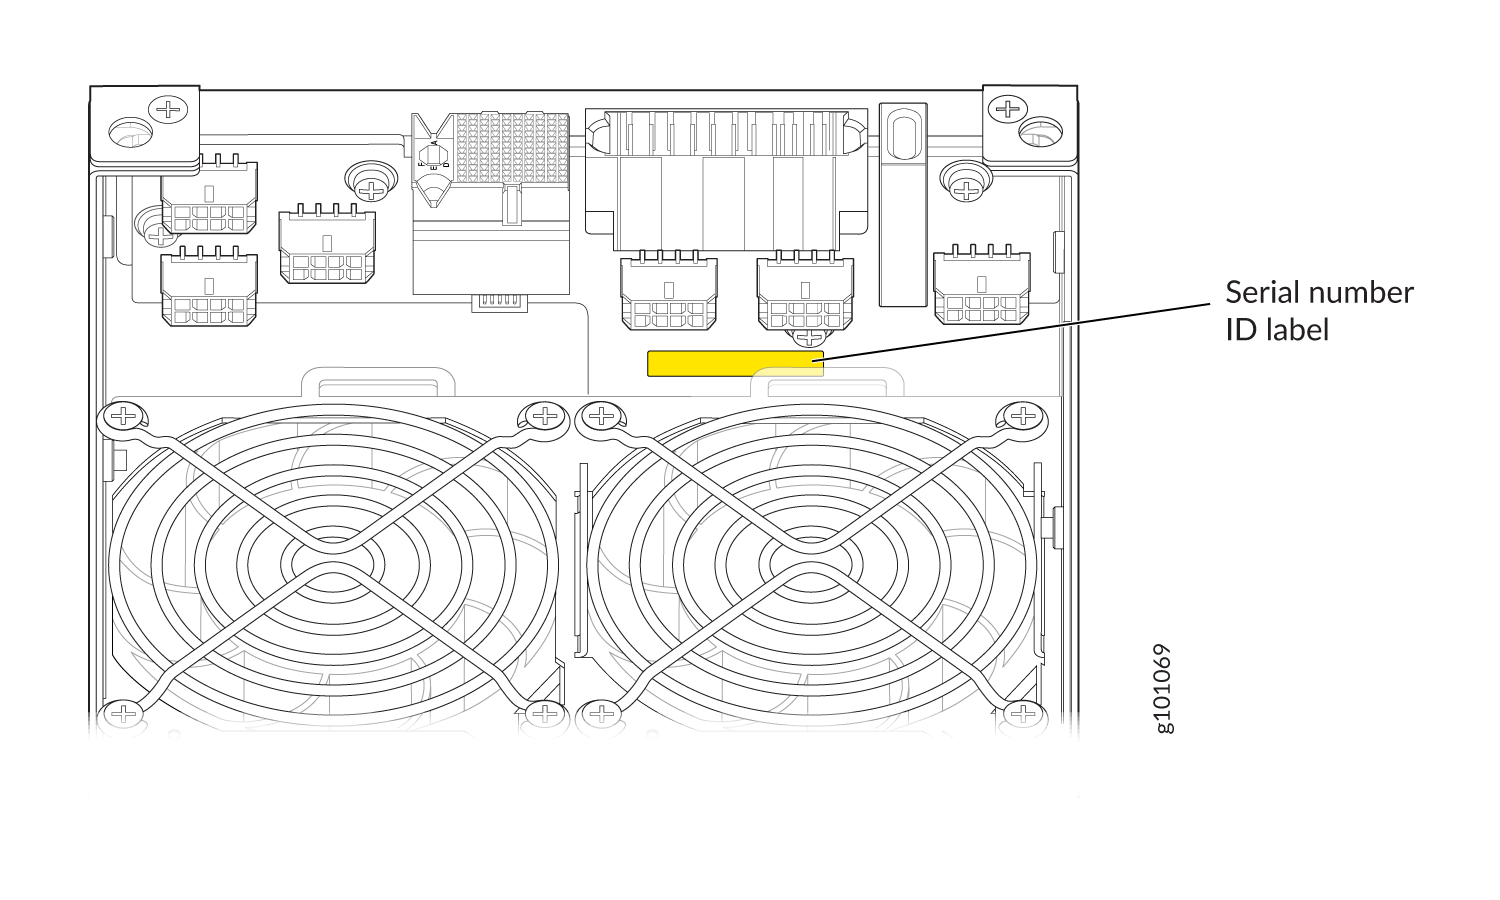
-
Fan tray controller–The serial number ID label for the fan tray controller (JNP10004-FTC2) is located on the top of the fan tray controller. See Figure 8.
Figure 8: PTX10004 Fan Tray Controller Serial Number Location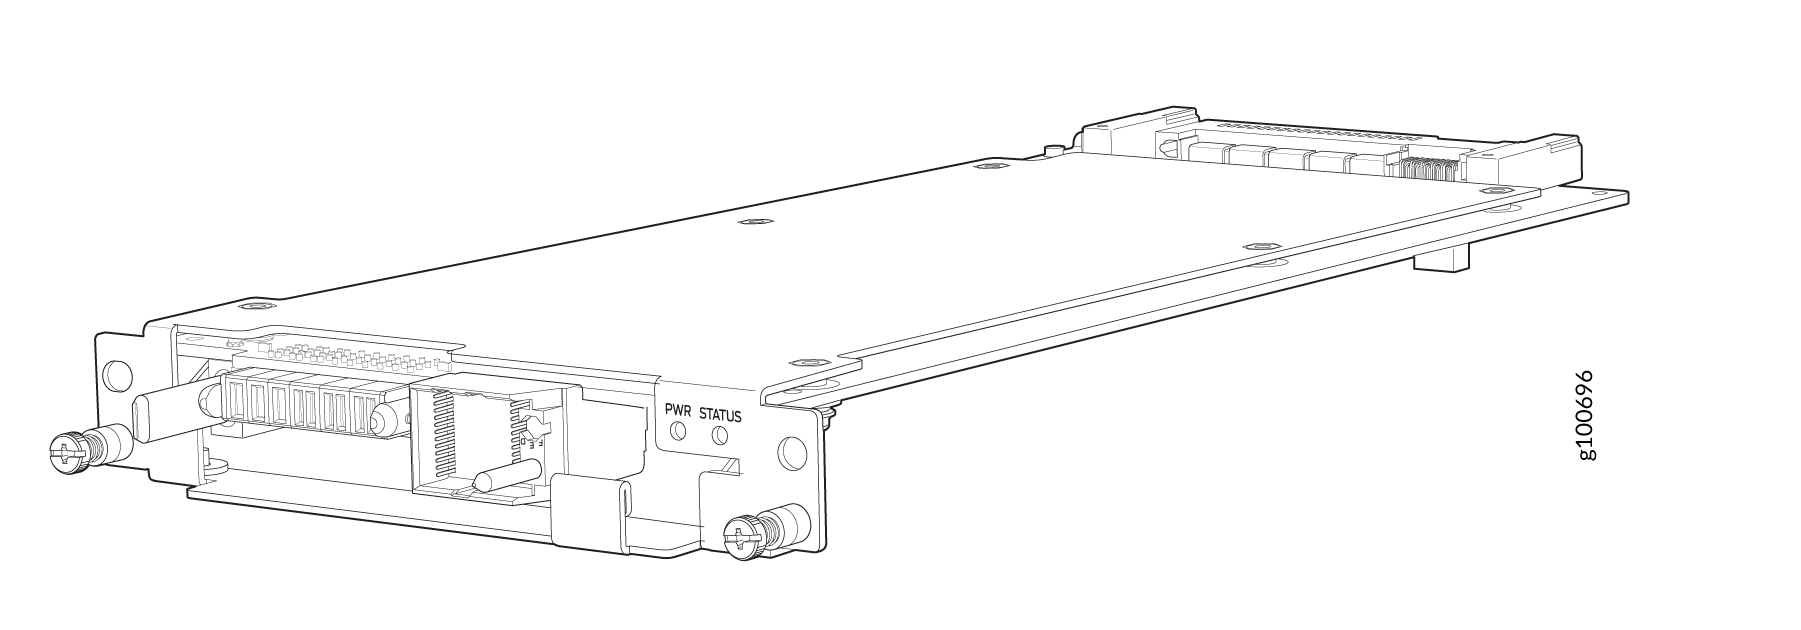
Locate the Serial Number ID Labels on PTX10004 Routing and Control Boards
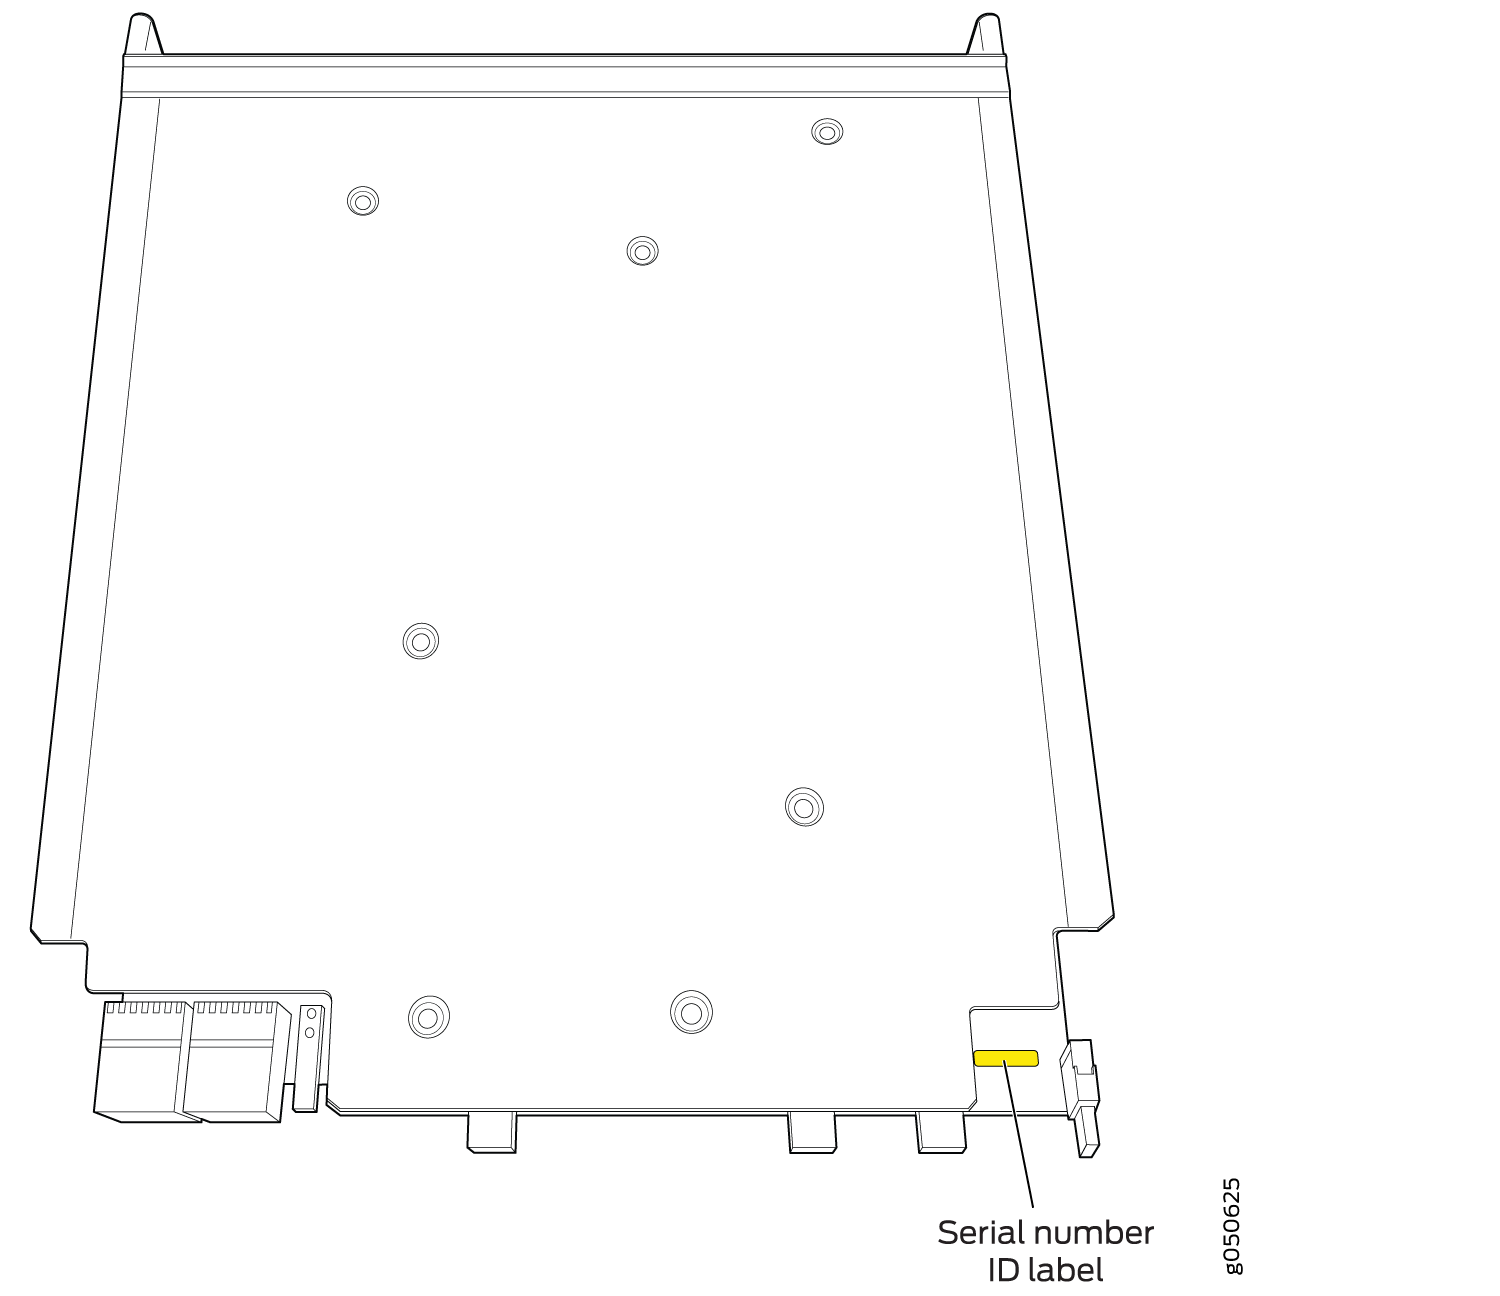
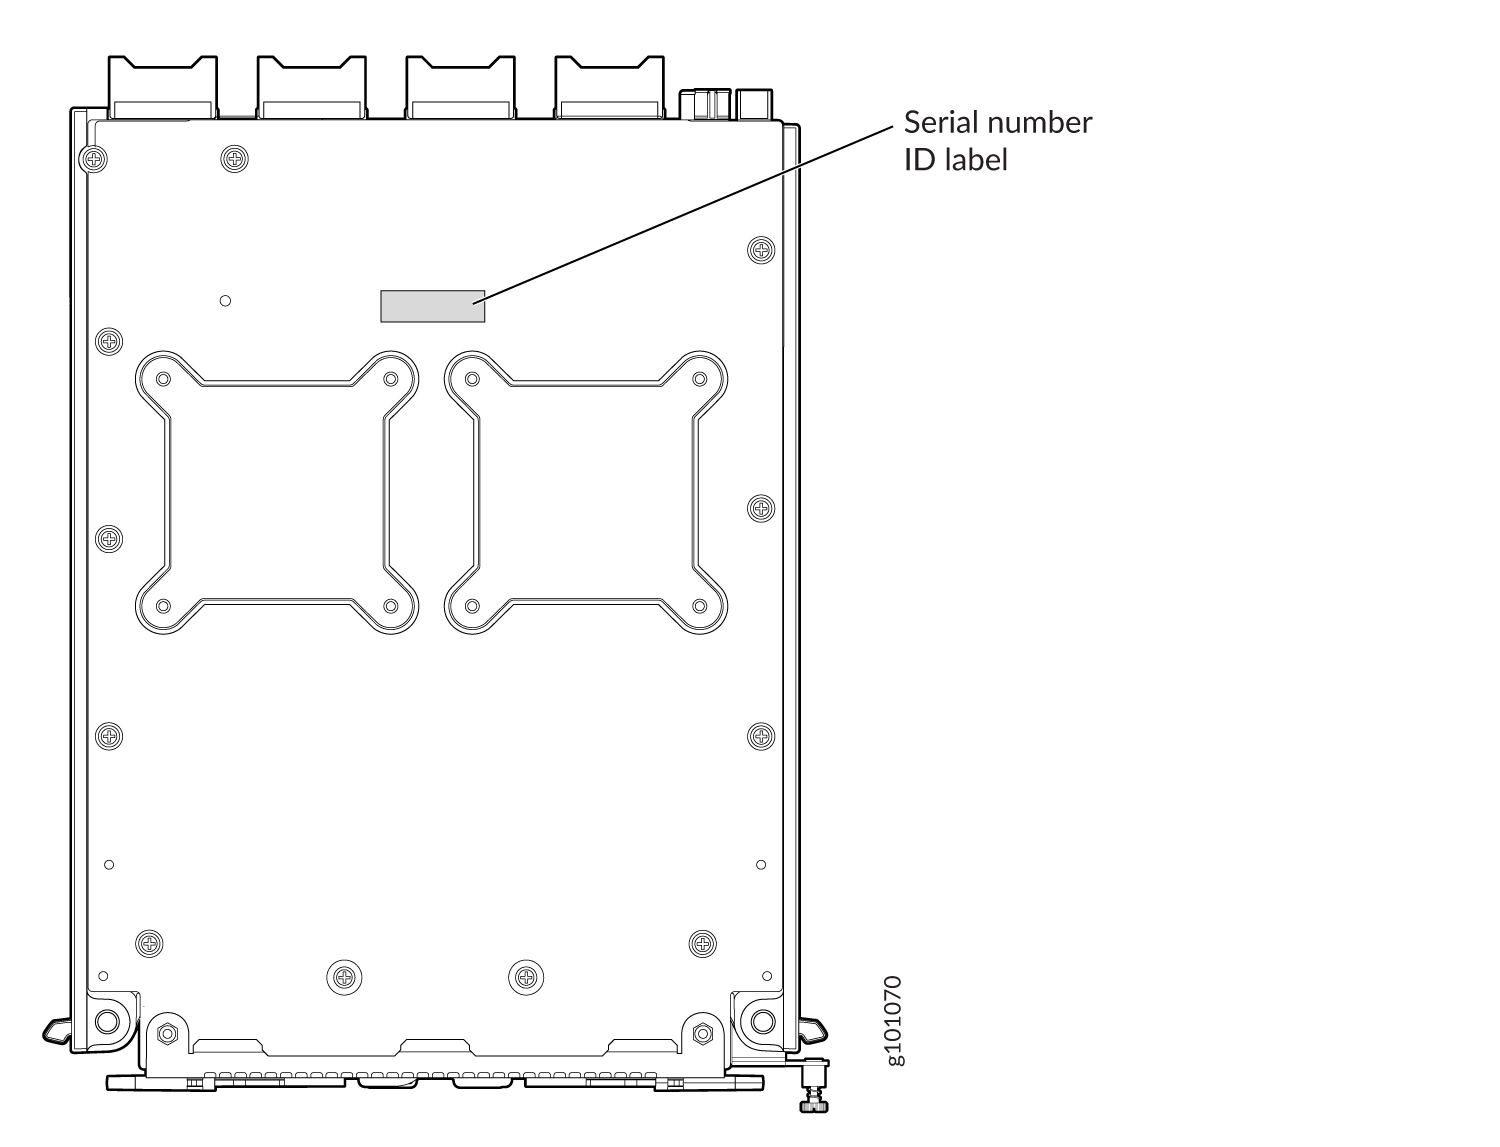
The serial number ID label for a Routing and Control Board (RCB) is located on the connector end of the unit. See Figure 9.
Locate the Serial Number ID Labels on a PTX10004 Line Card
The serial number ID label for a line card is located on the connector end of the card (see Figure 10).
Locate the Serial Number ID Labels on a PTX10004 Switch Interface Board
The serial number ID label for a Switch Interface Board (SIB) is located on the side of the board. See Figure 11.
Contact Customer Support to Obtain a Return Materials Authorization for a PTX10004 Router or Component
If you want to return a PTX10004 router or component to Juniper Networks for repair or replacement, you must first obtain a Return Materials Authorization (RMA) from the Juniper Networks Technical Assistance Center (JTAC).
After locating the serial number of the device or component you want to return, open a service request with Juniper Networks Technical Assistance Center (JTAC) on the Web or by telephone.
For instructions on locating the serial number of the device or component you want to return, see the following device instructions:
Before you request an RMA from JTAC, be prepared to provide the following information:
-
Your existing service request number, if you have one
-
Serial number of the component
-
Your name, organization name, telephone number, fax number, and shipping address
-
Details of the failure or problem
-
Type of activity being performed on the device when the problem occurred
-
Configuration data displayed by one or more
showcommands
You can contact JTAC 24 hours a day, seven days a week on the Web or by telephone:
-
Service Request Manager: https://support.juniper.net/support/
-
Telephone: +1-888-314-JTAC (+1-888-314-5822), toll-free in the USA, Canada, and Mexico
For international or direct-dial options in countries without toll-free numbers, see https://www.juniper.net/support/requesting-support.html.
If you are contacting JTAC by telephone, enter your 12-digit service request number followed by the pound (#) key for an existing case, or press the star (*) key to be routed to the next available support engineer.
The support representative validates your request and issues an RMA number for return of the component.
See Also
How to Pack a PTX10004 Router or Component for Shipping
Follow this procedure if you want to return a PTX10004 chassis or router component to Juniper Networks for repair or replacement.
Before you pack a PTX10004 router or router component:
-
Ensure that you have taken the necessary precautions to prevent electrostatic discharge (ESD) damage. See Prevention of Electrostatic Discharge Damage.
-
Pack your chassis or component using one of these materials:
-
Use the packing material from the replacement chassis or component
-
Retrieve the original shipping carton and packing materials
-
Contact your JTAC representative if you do not have these materials, to learn about approved packing materials. See Contact Customer Support to Obtain a Return Materials Authorization for a PTX10004 Router or Component.
Ensure that you have the following parts and tools available:
-
ESD grounding strap.
-
Electrostatic bag, one for each component.
-
If you want to returnthe chassis:
-
A 13/32-in. or 10-mm open-end or socket wrench to install the bracket bolts on the chassis and shipping pallet
-
An appropriate screwdriver for the mounting screws used on your rack
-
How to Pack a PTX10004 Chassis for Shipping
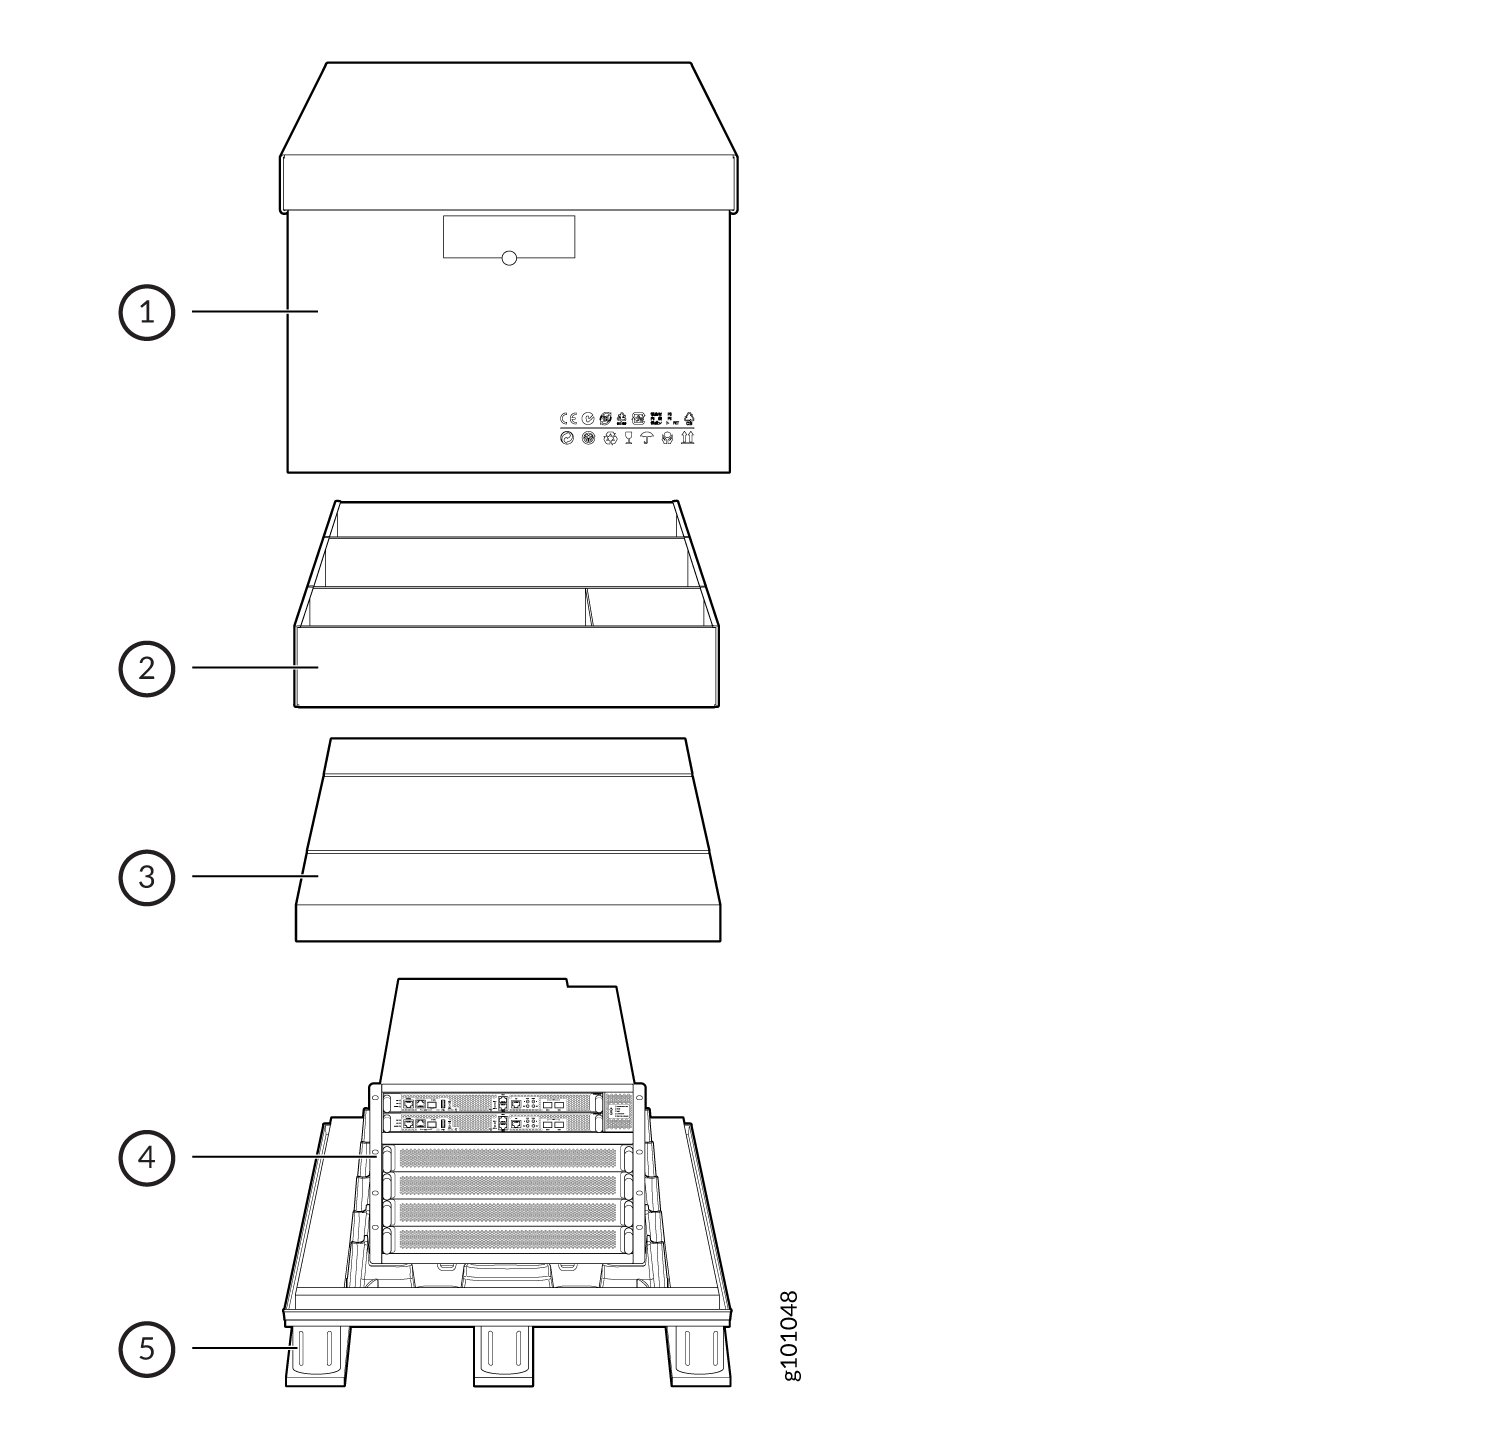
The PTX10004 is shipped in a cardboard box that has a two-layer wooden pallet base with foam cushioning between the layers. The router chassis is bolted to the pallet base with four pallet fasteners, two on each side of the chassis. See Figure 12 for the stacking configuration of the PTX10004.
To pack a PTX10004 for shipping:
-
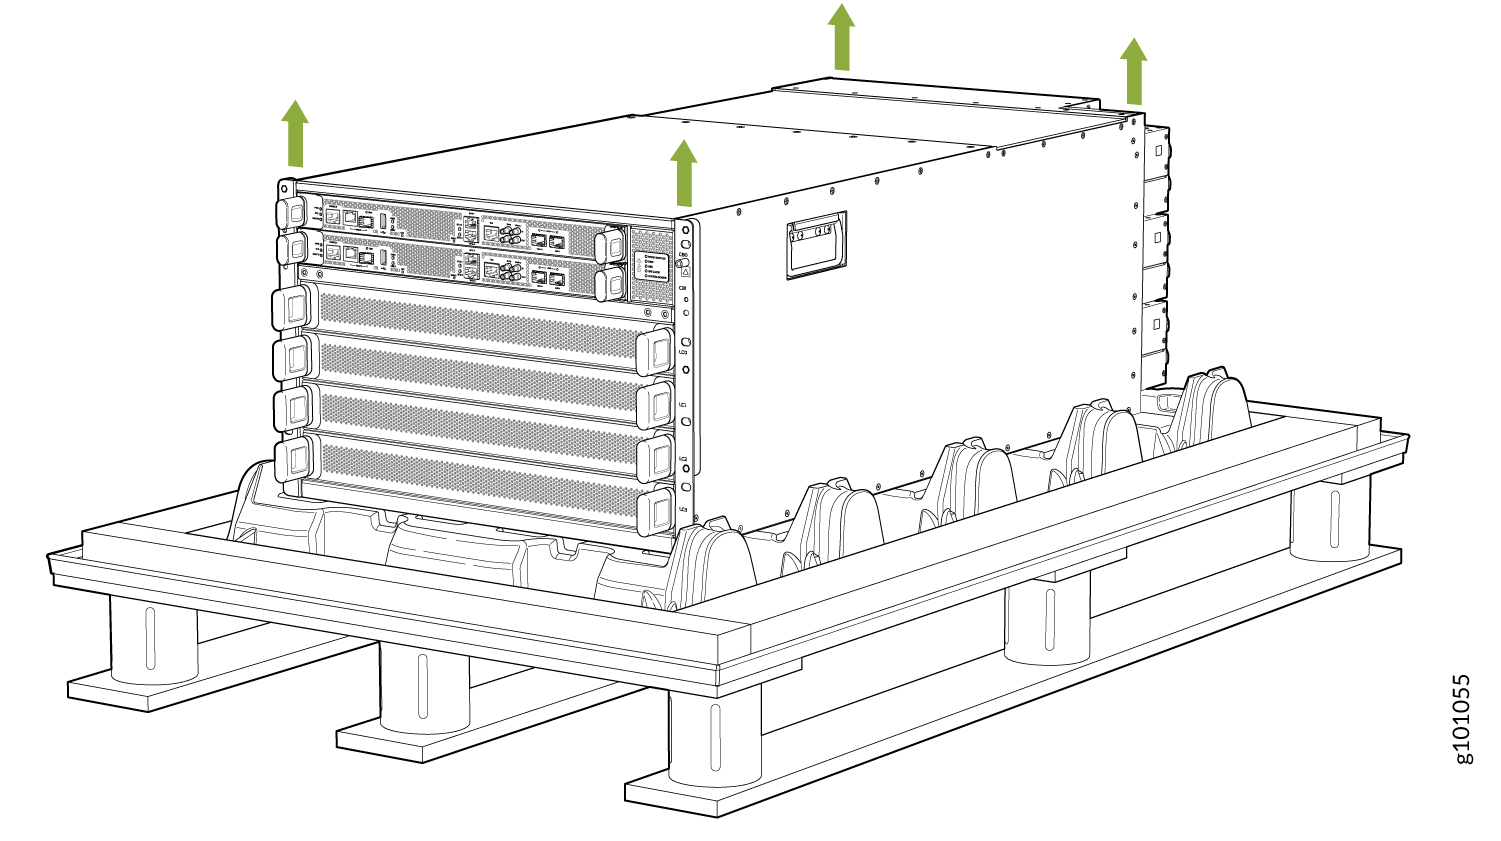
Attach the cardboard box to the wooden pallet by screwing
two screws into each of the four pallet fasteners. See Figure 13.
Figure 13: Attach the PTX10004 to the Pallet
How to Pack PTX10004 Components for Shipping
Before you begin to pack a router component, ensure that you have the following parts and tools available:
-
Antistatic bag, one for each component
-
Electrostatic discharge (ESD) grounding strap
Do not stack router components. Return individual components in separate boxes if they do not fit together on one level in the shipping box.
To pack and ship PTX10004 components:
- Place individual FRUs in antistatic bags.
- Use the original packing materials if they are available. If the original packing materials are not available, ensure that the component is adequately packed to prevent damage during transit. The packing material you use must be able to support the weight of the component.
- Ensure that the components are adequately protected with packing materials and packed so that the pieces are prevented from moving around inside the carton.
- Close the top of the cardboard shipping box and seal it with packing tape.
- Write the RMA number on the exterior of the box to ensure proper tracking.