BGP MED属性
AS内の出口点を決定するMED属性を理解する
BGP多重出口識別子(MED、またはMULTI_EXIT_DISC)は非推移的な属性であり、インターネット全体には伝播されず、隣接する自律システム(AS)にのみ伝播されます。MED属性はオプションであり、常にBGPアップデートとともに送信されるとは限りません。MEDの目的は、他のASが特定のプレフィックスに到達するためにASに入る方法に影響を与えることです。
MED属性には、 メトリックと呼ばれる値があります。出口点を決定する際の他のすべての要素が等しい場合、メトリックが最も低い出口点が優先されます。
MEDが外部BGPリンク経由で受信されると、内部リンクを介してAS内の他のBGP対応デバイスに伝達されます。
ルートが BGP から学習され、すでに MED メトリックが関連付けられている場合、または設定ファイルで MED メトリックを設定した場合、BGP 更新メッセージには MED メトリックが含まれます。
MEDメトリックは、以下の一般ルールに従ってルートとともにアドバタイズされます。
-
より具体的なメトリックは、より具体的でないメトリックを上書きします。つまり、グループ固有のメトリックはグローバルBGPメトリックを上書きし、ピア固有のメトリックはグローバルBGPまたはグループ固有のメトリックを上書きします。
-
ルーティングポリシーで定義されたメトリックは、
metric-outステートメントで定義されたメトリックを上書きします。 -
メトリックが定義されている場合、ルートで受信したメトリックが上書きされます。
-
受信したルートにMEDメトリックが関連付けられていない場合、およびメトリック値を明示的に設定しない場合、メトリックはアドバタイズされません。メトリック値を明示的に設定しない場合、アクティブなルートをアドバタイズする際、MED値はゼロ(0)に相当します。
ホスト間のホップ数ではなく AS パスが BGP ルート選択の主要な基準であるため、ピア AS に複数の接続を持つ AS は、複数の同等の AS パスを持つことができます。ルーティングテーブルに隣接するAS内の同じホストへのルートが2つ含まれている場合、各ルートに割り当てられたMEDメトリックによって、転送テーブルに含めるルートを決定できます。割り当てたMEDメトリックによって、AS内の特定の出口点を通過するトラフィックを強制できます。
図1は、MEDメトリックを使用してルート選択を決定する方法を示しています。
図1は、ルーターC およびDへの2つの別々のBGPリンクによって接続されたAS 1とAS 2を示しています。AS 1のホスト EはルーターC の近くにあります。 ホストFもAS 1のホストFはルーターDの 近くにあります。ASパスは同一のため、各ホストにはルーターCと ルーターDの2つのルートが存在します。ルーターCを介してホスト Eに向かうすべてのトラフィックを強制するために、AS 1のネットワーク管理者は各ルーターのMEDメトリックを出口点でホスト Eに割り当て ます。10のMEDメトリックは、ルーターC を経由するホスト Eへのルートに割り当てられ、20のMEDメトリックは、ルーターD を経由するホスト Eへのルートに割り当てられます。AS 2のBGPルーターは、転送テーブルに対して低いMEDメトリックを使用するルートを選択します。
デフォルトでは、同じピアASを持つルートのMEDのみが比較されます。ただし、 表 1 に示すルーティングテーブルのパス選択オプションを設定することで、さまざまな方法で MED を比較することができます。MEDオプションは相互に排他的ではなく、組み合わせて設定することも、個別に設定することもできます。MEDオプションを有効にするには、ネットワーク全体で統一的に設定する必要があります。設定したMEDオプションまたはオプションによって、選択されるルートが決まります。そのため、MEDオプションを設定する前に、ネットワークの優先ルートを慎重に評価することをお勧めします。
| オプション(名前) |
機能 |
使用する |
|---|---|---|
| 常にMED( |
異なるASにあるピアからのパスのMEDが、ルート選択プロセスで常に比較されることを確認します。 |
ネットワークに参加しているすべての企業が MED を設定するための統一ポリシーに同意している場合に便利です。例えば、2つのISPが共有するネットワークでは、MED値を正しく設定するには、特定のパスが適切なパスであることに両者が同意する必要があります。 |
| MEDへのIGPコストの追加( |
パス選択のMED値を比較する前に、BGPネクストホップ宛先へのIGPルートのコストをMEDに追加します。 このオプションは、ルーターのMED値を置き換えますが、IGPメトリックの比較には影響しません。その結果、MED-plus-IGP比較後に複数のルートが同じ値を持ち、ルート選択が続行されている場合、IGPルートメトリックも、MED値に追加され、選択プロセスの早い段階で比較されたとしても、比較されます。 |
ダウンストリームASが、複数のAS間で受信される特定のルートの完全なコストを必要とする場合に便利です。 |
| Cisco IOSの非決定論的動作( |
Cisco IOS ソフトウェアの非決定的な動作を指定します。
|
非決定的な動作により、システムがパス間の MED を適切に比較できない場合があるため、このオプションを設定しないことを推奨します。 |
関連項目
例:AS内の出口点を決定するMED属性の設定
この例では、BGP更新メッセージでアドバタイズする複数出口識別子(MED)メトリックを設定する方法を示しています。
要件
この例を設定する前に、デバイスの初期化以外の特別な設定は必要ありません。
概要
BGP更新メッセージでアドバタイズするMEDメトリックを直接設定するには、 metric-out ステートメントを含めます。
metric-out (metric | minimum-igp offset | igp delay-med-update | offset);
metric は、ピアに送信されたすべてのルートのプライマリメトリックです。これは、0 から 4,294,967,295 (232 – 1) の範囲 の値です。
以下のオプション設定もサポートされています。
minimum-igp—BGPネクストホップに到達するために、内部ゲートウェイプロトコル(IGP)で計算された最小メトリック値にメトリックを設定します。新しく計算されたメトリックが最小メトリック値よりも大きい場合、メトリック値は変更されません。新しく計算されたメトリックが低い場合、メトリック値はその値まで下げられます。igp—IGPで計算された最新のメトリック値にメトリックを設定し、BGPネクストホップに到達します。delay-med-update—MED値が増加したときにMEDアップデートの送信を遅らせます。igpステートメントを設定する際には、delay-med-updateステートメントを含めます。MED が低いか、ルートに関連付けられた別の属性が変更されていない限り、更新の送信を遅延させるデフォルトの間隔は 10 分です。デフォルトの間隔を変更するには、[edit routing-options]階層レベルでmed-igp-update-interval minutesステートメントを含めます。offset—IGPで計算されたメトリック値から使用されるメトリックを増減するoffset値を指定します。メトリック値は、指定された値だけオフセットされます。offset値が正の場合、IGPで計算されたメトリック(igpまたはigp-minimumのいずれかを指定)が増加します。offset値が負の場合、IGPで計算されたメトリック(igpまたはigp-minimumのいずれかを指定して)は減少します。offsetは、-231 から231 – 1の範囲の値を指定できます。調整された指標が0を下回 ったり、232 – 1を超え たりすることは決してできないことに注意してください。
図2 は、内部ピアセッションと、隣接する自律システム(AS)への複数の出口ポイントを持つ典型的なネットワークを示しています。
 を持つ典型的なネットワーク
デバイスR4には、アドバタイズされたプレフィックスをシミュレートするように設定された複数のループバックインターフェイスがあります。追加のループバック インターフェイス アドレスは、44.44.44.44/32 および 144.144.144.144/32 です。この例では、MED値30をデバイスR3に、MED値20をデバイスR2にアドバタイズするようにデバイスR4を設定する方法を示しています。これにより、AS 123 のすべてのデバイスが、デバイス R2 を経由して AS 4 に到達するパスを優先します。
設定
CLIクイックコンフィグレーション
この例をすばやく設定するには、以下のコマンドをコピーしてテキストファイルに貼り付け、改行を削除して、ネットワーク構成に合わせて必要な詳細を変更してから、コマンドを [edit] 階層レベルのCLIにコピー&ペーストします。
デバイスR1
set interfaces fe-1/2/0 unit 1 family inet address 12.12.12.1/24
set interfaces fe-1/2/1 unit 2 family inet address 13.13.13.1/24
set interfaces lo0 unit 1 family inet address 192.168.1.1/32
set protocols bgp group internal type internal
set protocols bgp group internal local-address 192.168.1.1
set protocols bgp group internal export send-direct
set protocols bgp group internal neighbor 192.168.2.1
set protocols bgp group internal neighbor 192.168.3.1
set protocols ospf area 0.0.0.0 interface lo0.1 passive
set protocols ospf area 0.0.0.0 interface fe-1/2/0.1
set protocols ospf area 0.0.0.0 interface fe-1/2/1.2
set policy-options policy-statement send-direct term 1 from protocol direct
set policy-options policy-statement send-direct term 1 then accept
set routing-options autonomous-system 123
set routing-options router-id 192.168.1.1
デバイスR2
set interfaces fe-1/2/0 unit 3 family inet address 12.12.12.2/24
set interfaces fe-1/2/1 unit 4 family inet address 24.24.24.2/24
set interfaces lo0 unit 2 family inet address 192.168.2.1/32
set protocols bgp group internal type internal
set protocols bgp group internal local-address 192.168.2.1
set protocols bgp group internal export send-direct
set protocols bgp group internal neighbor 192.168.1.1
set protocols bgp group internal neighbor 192.168.3.1
set protocols bgp group external type external
set protocols bgp group external export send-direct
set protocols bgp group external peer-as 4
set protocols bgp group external neighbor 24.24.24.4
set protocols ospf area 0.0.0.0 interface lo0.2 passive
set protocols ospf area 0.0.0.0 interface fe-1/2/0.3
set protocols ospf area 0.0.0.0 interface fe-1/2/1.4
set policy-options policy-statement send-direct term 1 from protocol direct
set policy-options policy-statement send-direct term 1 then accept
set routing-options autonomous-system 123
set routing-options router-id 192.168.2.1
デバイスR3
set interfaces fe-1/2/0 unit 5 family inet address 13.13.13.3/24
set interfaces fe-1/2/1 unit 6 family inet address 34.34.34.3/24
set interfaces lo0 unit 3 family inet address 192.168.3.1/32
set protocols bgp group internal type internal
set protocols bgp group internal local-address 192.168.3.1
set protocols bgp group internal export send-direct
set protocols bgp group internal neighbor 192.168.1.1
set protocols bgp group internal neighbor 192.168.2.1
set protocols bgp group external type external
set protocols bgp group external export send-direct
set protocols bgp group external peer-as 4
set protocols bgp group external neighbor 34.34.34.4
set protocols ospf area 0.0.0.0 interface lo0.3 passive
set protocols ospf area 0.0.0.0 interface fe-1/2/0.5
set protocols ospf area 0.0.0.0 interface fe-1/2/1.6
set policy-options policy-statement send-direct term 1 from protocol direct
set policy-options policy-statement send-direct term 1 then accept
set routing-options autonomous-system 123
set routing-options router-id 192.168.3.1
デバイスR4
set interfaces fe-1/2/0 unit 7 family inet address 24.24.24.4/24
set interfaces fe-1/2/1 unit 8 family inet address 34.34.34.4/24
set interfaces lo0 unit 4 family inet address 192.168.4.1/32
set interfaces lo0 unit 4 family inet address 44.44.44.44/32
set interfaces lo0 unit 4 family inet address 144.144.144.144/32
set protocols bgp group external type external
set protocols bgp group external export send-direct
set protocols bgp group external peer-as 123
set protocols bgp group external neighbor 34.34.34.3 metric-out 30
set protocols bgp group external neighbor 24.24.24.2 metric-out 20
set policy-options policy-statement send-direct term 1 from protocol direct
set policy-options policy-statement send-direct term 1 then accept
set routing-options autonomous-system 4
set routing-options router-id 192.168.4.1
デバイスR1の設定
ステップバイステップの手順
次の例では、設定階層のさまざまなレベルに移動する必要があります。CLIのナビゲーションについては、『Junos OS CLIユーザーガイド』の「設定モードでのCLIエディタの使用」を参照してください。
デバイスR1を設定するには:
インターフェイスを設定します。
[edit interfaces fe-1/2/0 unit 1]
user@R1# set family inet address 12.12.12.1/24
[edit interfaces fe-1/2/1 unit 2]
user@R1# set family inet address 13.13.13.1/24
[edit interfaces lo0 unit 1]
user@R1# set family inet address 192.168.1.1/32
BGPを設定します。
[edit protocols bgp group internal]
user@R1# set type internal
user@R1# set local-address 192.168.1.1
user@R1# set export send-direct
user@R1# set neighbor 192.168.2.1
user@R1# set neighbor 192.168.3.1
OSPFを設定します。
[edit protocols ospf area 0.0.0.0]
user@R1# set interface lo0.1 passive
user@R1# set interface fe-1/2/0.1
user@R1# set interface fe-1/2/1.2
直接ルートを受け入れるポリシーを設定します。
このシナリオの他の有用なオプションは、OSPFまたはローカルルートで学習したルートを受け入れることかもしれません。
[edit policy-options policy-statement send-direct term 1]
user@R1# set from protocol direct
user@R1# set then accept
ルーターIDと自律システム(AS)番号を設定します。
[edit routing-options]
user@R1# set autonomous-system 123
user@R1# set router-id 192.168.1.1
結果
設定モードから、 show interfaces、 show policy-options、 show protocols、 show routing-options コマンドを入力して設定を確認します。出力に意図した設定が表示されない場合は、この例の手順を繰り返して設定を修正します。
user@R1# show interfaces
fe-1/2/0 {
    unit 1 {
        family inet {
            address 12.12.12.1/24;
        }
    }
}
fe-1/2/1 {
    unit 2 {
        family inet {
            address 13.13.13.1/24;
        }
    }
}
lo0 {
    unit 1 {
        family inet {
            address 192.168.1.1/32;
        }
    }
}
user@R1# show policy-options
policy-statement send-direct {
    term 1 {
        from protocol direct;
        then accept;
    }
}
user@R1# show protocols
bgp {
    group internal {
        type internal;
        local-address 192.168.1.1;
        export send-direct;
        neighbor 192.168.2.1;
        neighbor 192.168.3.1;
    }
}
ospf {
    area 0.0.0.0 {
        interface lo0.1 {
            passive;
        }
        interface fe-1/2/0.1;
        interface fe-1/2/1.2;
    }
}
user@R1# show routing-options
autonomous-system 123;
router-id 192.168.1.1;
デバイスの設定が完了したら、設定モードから commit を入力します。
デバイスR2の設定
ステップバイステップの手順
次の例では、設定階層のさまざまなレベルに移動する必要があります。CLIのナビゲーションについては、『Junos OS CLIユーザーガイド』の「設定モードでのCLIエディタの使用」を参照してください。
デバイスR2を設定するには:
インターフェイスを設定します。
[edit interfaces fe-1/2/0 unit 3]
user@R2# set family inet address 12.12.12.21/24
[edit interfaces fe-1/2/1 unit 4]
user@R2# set family inet address 24.24.24.2/24
[edit interfaces lo0 unit 2]
user@R2# set family inet address 192.168.2.1/32
BGPを設定します。
[edit protocols bgp group internal]
user@R2# set type internal
user@R2# set local-address 192.168.2.1
user@R2# set export send-direct
user@R2# set neighbor 192.168.1.1
user@R2# set neighbor 192.168.3.1
[edit protocols bgp group external]
user@R2# set type external
user@R2# set export send-direct
user@R2# set peer-as 4
user@R2# set neighbor 24.24.24.4
OSPFを設定します。
[edit protocols ospf area 0.0.0.0]
user@R2# set interface lo0.2 passive
user@R2# set interface fe-1/2/0.3
user@R2# set interface fe-1/2/1.4
直接ルートを受け入れるポリシーを設定します。
このシナリオの他の有用なオプションは、OSPFまたはローカルルートで学習したルートを受け入れることかもしれません。
[edit policy-options policy-statement send-direct term 1]
user@R2# set from protocol direct
user@R2# set then accept
ルーターIDと自律システム(AS)番号を設定します。
[edit routing-options]
user@R2# set autonomous-system 123
user@R2# set router-id 192.168.2.1
結果
設定モードから、 show interfaces、 show policy-options、 show protocols、 show routing-options コマンドを入力して設定を確認します。出力に意図した設定が表示されない場合は、この例の手順を繰り返して設定を修正します。
user@R2# show interfaces
fe-1/2/0 {
    unit 3 {
        family inet {
            address 12.12.12.2/24;
        }
    }
}
fe-1/2/1 {
    unit 4 {
        family inet {
            address 24.24.24.2/24;
        }
    }
}
lo0 {
    unit 2 {
        family inet {
            address 192.168.2.1/32;
        }
    }
}
user@R2# show policy-options
policy-statement send-direct {
    term 1 {
        from protocol direct;
        then accept;
    }
}
user@R2# show protocols
bgp {
    group internal {
        type internal;
        local-address 192.168.2.1;
        export send-direct;
        neighbor 192.168.1.1;
        neighbor 192.168.3.1;
    }
    group external {
        type external;
        export send-direct;
        peer-as 4;
        neighbor 24.24.24.4;
    }
}
ospf {
    area 0.0.0.0 {
        interface lo0.2 {
            passive;
        }
        interface fe-1/2/0.3;
        interface fe-1/2/1.4;
    }
}
user@R2# show routing-options
autonomous-system 123;
router-id 192.168.2.1;
デバイスの設定が完了したら、設定モードから commit を入力します。
デバイスR3の設定
ステップバイステップの手順
次の例では、設定階層のさまざまなレベルに移動する必要があります。CLIのナビゲーションについては、『Junos OS CLIユーザーガイド』の「設定モードでのCLIエディタの使用」を参照してください。
デバイスR3を設定するには:
インターフェイスを設定します。
[edit interfaces fe-1/2/0 unit 5]
user@R3# set family inet address 13.13.13.3/24
[edit interfaces fe-1/2/1 unit 6]
user@R3# set family inet address 34.34.34.3/24
[edit interfaces lo0 unit 3]
user@R3# set family inet address 192.168.3.1/32
BGPを設定します。
[edit protocols bgp group internal]
user@R3# set type internal
user@R3# set local-address 192.168.3.1
user@R3# set export send-direct
user@R3# set neighbor 192.168.1.1
user@R3# set neighbor 192.168.2.1
[edit protocols bgp group external]
user@R3# set type external
user@R3# set export send-direct
user@R3# set peer-as 4
user@R3# set neighbor 34.34.34.4
OSPFを設定します。
[edit protocols ospf area 0.0.0.0]
user@R3# set interface lo0.3 passive
user@R3# set interface fe-1/2/0.5
user@R3# set interface fe-1/2/1.6
直接ルートを受け入れるポリシーを設定します。
このシナリオの他の有用なオプションは、OSPFまたはローカルルートで学習したルートを受け入れることかもしれません。
[edit policy-options policy-statement send-direct term 1]
user@R3# set from protocol direct
user@R3# set then accept
ルーターIDと自律システム(AS)番号を設定します。
[edit routing-options]
user@R3# set autonomous-system 123
user@R3# set router-id 192.168.3.1
結果
設定モードから、 show interfaces、 show policy-options、 show protocols、 show routing-options コマンドを入力して設定を確認します。出力に意図した設定が表示されない場合は、この例の手順を繰り返して設定を修正します。
user@R3# show interfaces
fe-1/2/0 {
    unit 5 {
        family inet {
            address 13.13.13.3/24;
        }
    }
}
fe-1/2/1 {
    unit 6 {
        family inet {
            address 34.34.34.3/24;
        }
    }
}
lo0 {
    unit 3 {
        family inet {
            address 192.168.3.1/32;
        }
    }
}
user@R3# show policy-options
policy-statement send-direct {
    term 1 {
        from protocol direct;
        then accept;
    }
}
user@R3# show protocols
bgp {
    group internal {
        type internal;
        local-address 192.168.3.1;
        export send-direct;
        neighbor 192.168.1.1;
        neighbor 192.168.2.1;
    }
    group external {
        type external;
        export send-direct;
        peer-as 4;
        neighbor 34.34.34.4;
    }
}
ospf {
    area 0.0.0.0 {
        interface lo0.3 {
            passive;
        }
        interface fe-1/2/0.5;
        interface fe-1/2/1.6;
    }
}
user@R3# show routing-options
autonomous-system 123;
router-id 192.168.3.1;
デバイスの設定が完了したら、設定モードから commit を入力します。
デバイスR4の設定
ステップバイステップの手順
次の例では、設定階層のさまざまなレベルに移動する必要があります。CLIのナビゲーションについては、『Junos OS CLIユーザーガイド』の「設定モードでのCLIエディタの使用」を参照してください。
デバイスR4を設定するには:
インターフェイスを設定します。
[edit interfaces fe-1/2/0 unit 7]
user@R4# set family inet address 24.24.24.4/24
[edit interfaces fe-1/2/1 unit 8]
user@R4# set family inet address 34.34.34.4/24
[edit interfaces lo0 unit 4]
user@R4# set family inet address 192.168.4.1/32
user@R4# set family inet address 44.44.44.44/32
user@R4# set family inet address 144.144.144.144/32
デバイスR4には、アドバタイズされたプレフィックスをシミュレートするための複数のループバックインターフェイスアドレスがあります。
直接ルートを受け入れるポリシーを設定します。
このシナリオの他の有用なオプションは、OSPFまたはローカルルートで学習したルートを受け入れることかもしれません。
[edit policy-options policy-statement send-direct term 1]
user@R4# set from protocol direct
user@R4# set then accept
BGPを設定します。
[edit protocols bgp group external]
user@R4# set type external
user@R4# set export send-direct
user@R4# set peer-as 123
ネイバーデバイスR3のMED値30を、ネイバーデバイスR2のMED値20を設定します。
[edit protocols bgp group external]
user@R4# set neighbor 34.34.34.3 metric-out 30
user@R4# set neighbor 24.24.24.2 metric-out 20
この設定により、自律システム(AS)123(デバイスR1、デバイスR2、デバイスR3がメンバー)は、デバイスR2を通過してAS 4に到達するパスを優先します。
ルーターIDとAS番号を設定します。
[edit routing-options]
user@R4# set autonomous-system 4
user@R4# set router-id 192.168.4.1
結果
設定モードから、 show interfaces、 show policy-options、 show protocols、 show routing-options コマンドを入力して設定を確認します。出力に意図した設定が表示されない場合は、この例の手順を繰り返して設定を修正します。
user@R4# show interfaces
fe-1/2/0 {
    unit 7 {
        family inet {
            address 24.24.24.4/24;
        }
    }
}
fe-1/2/1 {
    unit 8 {
        family inet {
            address 34.34.34.4/24;
        }
    }
}
lo0 {
    unit 4 {
        family inet {
            address 192.168.4.1/32;
             address 44.44.44.44/32;
             address 144.144.144.144/32;
        }
    }
}
user@R4# show policy-options
policy-statement send-direct {
    term 1 {
        from protocol direct;
        then accept;
    }
}
user@R4# show protocols
bgp {
    group external {
        type external;
        export send-direct;
        peer-as 123;
        neighbor 34.34.34.3 {
            metric-out 30;
        }
        neighbor 24.24.24.2 {
            metric-out 20;
        }
    }
}
user@R4# show routing-options
autonomous-system 4;
router-id 192.168.4.1;
デバイスの設定が完了したら、設定モードから commit を入力します。
検証
設定が正常に機能していることを確認します。
デバイスR1からデバイスR4へのアクティブパスの確認
目的
アクティブパスがデバイスR2を通過することを確認します。
アクション
動作モードから、 show route protocol bgp コマンドを入力します。
user@R1> show route protocol bgp
inet.0: 13 destinations, 19 routes (13 active, 0 holddown, 0 hidden)
+ = Active Route, - = Last Active, * = Both

12.12.12.0/24       [BGP/170] 3d 22:52:38, localpref 100, from 192.168.2.1
                      AS path: I
                    > to 12.12.12.2 via fe-1/2/0.1
13.13.13.0/24       [BGP/170] 3d 03:15:16, localpref 100, from 192.168.3.1
                      AS path: I
                    > to 13.13.13.3 via fe-1/2/1.2
24.24.24.0/24       [BGP/170] 3d 22:52:38, localpref 100, from 192.168.2.1
                      AS path: I
                    > to 12.12.12.2 via fe-1/2/0.1
34.34.34.0/24       [BGP/170] 3d 03:15:16, localpref 100, from 192.168.3.1
                      AS path: I
                    > to 13.13.13.3 via fe-1/2/1.2
44.44.44.44/32     *[BGP/170] 01:41:11, MED 20, localpref 100, from 192.168.2.1
                      AS path: 4 I
                    > to 12.12.12.2 via fe-1/2/0.1
144.144.144.144/32 *[BGP/170] 00:08:13, MED 20, localpref 100, from 192.168.2.1
                      AS path: 4 I
                    > to 12.12.12.2 via fe-1/2/0.1
192.168.2.1/32      [BGP/170] 3d 22:52:38, localpref 100, from 192.168.2.1
                      AS path: I
                    > to 12.12.12.2 via fe-1/2/0.1
192.168.3.1/32      [BGP/170] 3d 03:15:16, localpref 100, from 192.168.3.1
                      AS path: I
                    > to 13.13.13.3 via fe-1/2/1.2
192.168.4.1/32     *[BGP/170] 01:41:11, MED 20, localpref 100, from 192.168.2.1
                      AS path: 4 I
                    > to 12.12.12.2 via fe-1/2/0.1
意味
アスタリスク(*)は、優先パスがデバイスR2を経由していることを示しています。パス選択の理由は MED 20 として記載されています。
デバイスR4がルートを正しく送信していることの確認
目的
デバイスR4がデバイスR2に値20、デバイスR3に値30の更新メッセージを送信していることを確認します。
アクション
動作モードから、 show route advertising-protocol bgp 24.24.24.2 コマンドを入力します。
user@R4> show route advertising-protocol bgp 24.24.24.2
inet.0: 11 destinations, 13 routes (11 active, 0 holddown, 0 hidden)
  Prefix                  Nexthop              MED     Lclpref    AS path
* 24.24.24.0/24           Self                 20                 I
* 34.34.34.0/24           Self                 20                 I
* 44.44.44.44/32          Self                 20                 I
* 144.144.144.144/32      Self                 20                 I
* 192.168.4.1/32          Self                 20                 I
user@R4> show route advertising-protocol bgp 34.34.34.3
inet.0: 11 destinations, 13 routes (11 active, 0 holddown, 0 hidden)
  Prefix                  Nexthop              MED     Lclpref    AS path
* 24.24.24.0/24           Self                 30                 I
* 34.34.34.0/24           Self                 30                 I
* 44.44.44.44/32          Self                 30                 I
* 144.144.144.144/32      Self                 30                 I
* 192.168.4.1/32          Self                 30                 I
意味
MED列は、デバイスR4が2つの外部BGP(EBGP)ネイバーに正しいMED値を送信していることを示しています。
例:ルート フィルターを使用した MED の設定
この例では、ルート フィルターを使用して、BGP 更新メッセージでアドバタイズする複数出口識別子(MED)メトリックを変更するポリシーを設定する方法を示します。
要件
この例を設定する前に、デバイスの初期化以外の特別な設定は必要ありません。
概要
BGP更新メッセージでアドバタイズされたMEDメトリックを変更するルートフィルターポリシーを設定するには、ポリシーアクションに metric ステートメントを含めます。
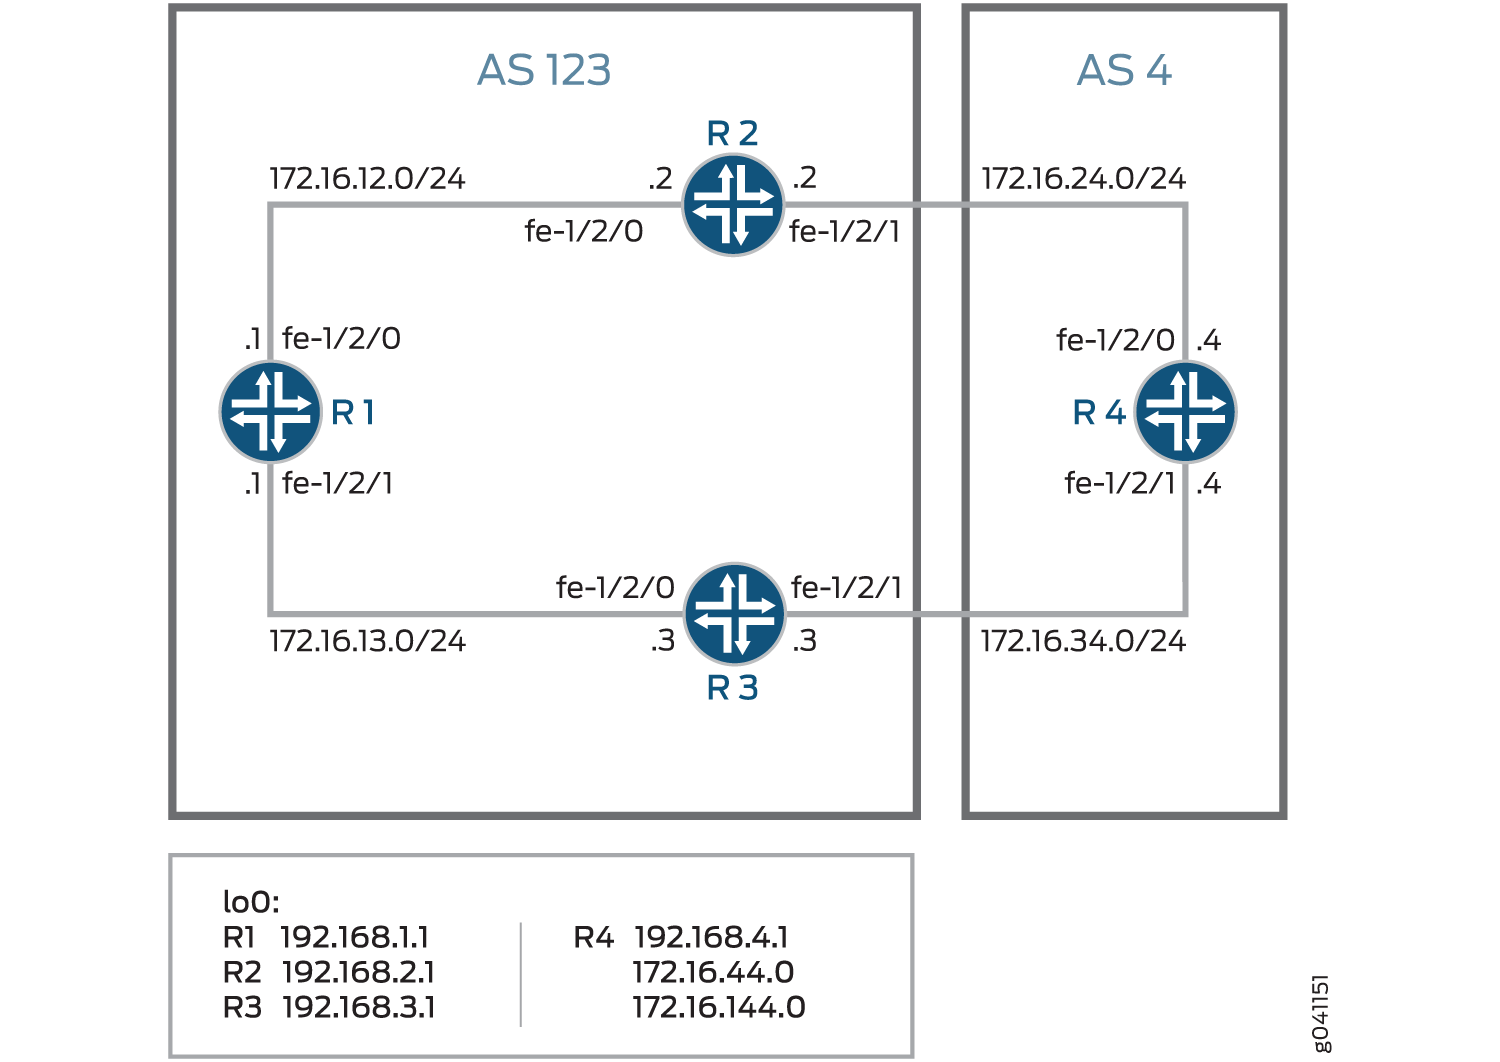
図3 は、内部ピアセッションと、隣接する自律システム(AS)への複数の出口点を持つ典型的なネットワークを示しています。

デバイスR4には、アドバタイズされたプレフィックスをシミュレートするように設定された複数のループバックインターフェイスがあります。追加のループバック インターフェイス アドレスは、172.16.44.0/32 および 172.16.144.0/32 です。この例では、172.16.144.0以外のすべてのルートについて、デバイスR3にMED値30をアドバタイズするようにデバイスR4を設定する方法を示しています。172.16.144.0の場合、MED値10がデバイス3にアドバタイズされます。MED値20は、ルートプレフィックスに関係なく、デバイスR2にアドバタイズされます。
設定
CLIクイックコンフィグレーション
この例をすばやく設定するには、以下のコマンドをコピーしてテキストファイルに貼り付け、改行を削除して、ネットワーク構成に合わせて必要な詳細を変更してから、コマンドを [edit] 階層レベルのCLIにコピー&ペーストします。
デバイスR1
set interfaces fe-1/2/0 unit 1 family inet address 172.16.12.1/24
set interfaces fe-1/2/1 unit 2 family inet address 172.16.13.1/24
set interfaces lo0 unit 1 family inet address 192.168.1.1/32
set protocols bgp group internal type internal
set protocols bgp group internal local-address 192.168.1.1
set protocols bgp group internal export send-direct
set protocols bgp group internal neighbor 192.168.2.1
set protocols bgp group internal neighbor 192.168.3.1
set protocols ospf area 0.0.0.0 interface lo0.1 passive
set protocols ospf area 0.0.0.0 interface fe-1/2/0.1
set protocols ospf area 0.0.0.0 interface fe-1/2/1.2
set policy-options policy-statement send-direct term 1 from protocol direct
set policy-options policy-statement send-direct term 1 then accept
set routing-options autonomous-system 123
set routing-options router-id 192.168.1.1
デバイスR2
set interfaces fe-1/2/0 unit 3 family inet address 172.16.12.2/24
set interfaces fe-1/2/1 unit 4 family inet address 172.16.24.2/24
set interfaces lo0 unit 2 family inet address 192.168.2.1/32
set protocols bgp group internal type internal
set protocols bgp group internal local-address 192.168.2.1
set protocols bgp group internal export send-direct
set protocols bgp group internal neighbor 192.168.1.1
set protocols bgp group internal neighbor 192.168.3.1
set protocols bgp group external type external
set protocols bgp group external export send-direct
set protocols bgp group external peer-as 4
set protocols bgp group external neighbor 172.16.24.4
set protocols ospf area 0.0.0.0 interface lo0.2 passive
set protocols ospf area 0.0.0.0 interface fe-1/2/0.3
set protocols ospf area 0.0.0.0 interface fe-1/2/1.4
set policy-options policy-statement send-direct term 1 from protocol direct
set policy-options policy-statement send-direct term 1 then accept
set routing-options autonomous-system 123
set routing-options router-id 192.168.2.1
デバイスR3
set interfaces fe-1/2/0 unit 5 family inet address 172.16.13.3/24
set interfaces fe-1/2/1 unit 6 family inet address 172.16.34.3/24
set interfaces lo0 unit 3 family inet address 192.168.3.1/32
set protocols bgp group internal type internal
set protocols bgp group internal local-address 192.168.3.1
set protocols bgp group internal export send-direct
set protocols bgp group internal neighbor 192.168.1.1
set protocols bgp group internal neighbor 192.168.2.1
set protocols bgp group external type external
set protocols bgp group external export send-direct
set protocols bgp group external peer-as 4
set protocols bgp group external neighbor 172.16.34.4
set protocols ospf area 0.0.0.0 interface lo0.3 passive
set protocols ospf area 0.0.0.0 interface fe-1/2/0.5
set protocols ospf area 0.0.0.0 interface fe-1/2/1.6
set policy-options policy-statement send-direct term 1 from protocol direct
set policy-options policy-statement send-direct term 1 then accept
set routing-options autonomous-system 123
set routing-options router-id 192.168.3.1
デバイスR4
set interfaces fe-1/2/0 unit 7 family inet address 172.16.24.4/24
set interfaces fe-1/2/1 unit 8 family inet address 172.16.34.4/24
set interfaces lo0 unit 4 family inet address 192.168.4.1/32
set interfaces lo0 unit 4 family inet address 172.16.44.0/32
set interfaces lo0 unit 4 family inet address 172.16.144.0/32
set protocols bgp group external type external
set protocols bgp group external export send-direct
set protocols bgp group external peer-as 123
set protocols bgp group external neighbor 172.16.34.3 export med-10
set protocols bgp group external neighbor 172.16.34.3 export med-30
set protocols bgp group external neighbor 172.16.24.2 metric-out 20
set policy-options policy-statement med-10 from route-filter 172.16.144.0/32 exact
set policy-options policy-statement med-10 then metric 10
set policy-options policy-statement med-10 then accept
set policy-options policy-statement med-30 from route-filter 0.0.0.0/0 longer
set policy-options policy-statement med-30 then metric 30
set policy-options policy-statement med-30 then accept
set policy-options policy-statement send-direct term 1 from protocol direct
set policy-options policy-statement send-direct term 1 then accept
set routing-options autonomous-system 4
set routing-options router-id 192.168.4.1
デバイスR1の設定
ステップバイステップの手順
次の例では、設定階層のさまざまなレベルに移動する必要があります。CLIのナビゲーションについては、『Junos OS CLIユーザーガイド』の「設定モードでのCLIエディタの使用」を参照してください。
デバイスR1を設定するには:
デバイスインターフェイスを設定します。
[edit interfaces fe-1/2/0 unit 1]
user@R1# set family inet address 172.16.12.1/24
[edit interfaces fe-1/2/1 unit 2]
user@R1# set family inet address 172.16.13.1/24
[edit interfaces lo0 unit 1]
user@R1# set family inet address 192.168.1.1/32
BGPを設定します。
[edit protocols bgp group internal]
user@R1# set type internal
user@R1# set local-address 192.168.1.1
user@R1# set export send-direct
user@R1# set neighbor 192.168.2.1
user@R1# set neighbor 192.168.3.1
OSPFを設定します。
[edit protocols ospf area 0.0.0.0]
user@R1# set interface lo0.1 passive
user@R1# set interface fe-1/2/0.1
user@R1# set interface fe-1/2/1.2
直接ルートを受け入れるポリシーを設定します。
このシナリオの他の有用なオプションは、OSPFまたはローカルルートで学習したルートを受け入れることかもしれません。
[edit policy-options policy-statement send-direct term 1]
user@R1# set from protocol direct
user@R1# set then accept
ルーターIDと自律システム(AS)番号を設定します。
[edit routing-options]
user@R1# set autonomous-system 123
user@R1# set router-id 192.168.1.1
結果
設定モードから、 show interfaces、 show protocols、 show policy-options、 show routing-options コマンドを入力して設定を確認します。出力に意図した設定が表示されない場合は、この例の手順を繰り返して設定を修正します。
user@R1# show interfaces
fe-1/2/0 {
    unit 1 {
        family inet {
            address 172.16.12.1/24;
        }
    }
}
fe-1/2/1 {
    unit 2 {
        family inet {
            address 172.16.13.1/24;
        }
    }
}
lo0 {
    unit 1 {
        family inet {
            address 192.168.1.1/32;
        }
    }
}
user@R1# show protocols
bgp {
    group internal {
        type internal;
        local-address 192.168.1.1;
        export send-direct;
        neighbor 192.168.2.1;
        neighbor 192.168.3.1;
    }
}
ospf {
    area 0.0.0.0 {
        interface lo0.1 {
            passive;
        }
        interface fe-1/2/0.1;
        interface fe-1/2/1.2;
    }
}
user@R1# show policy-options
policy-statement send-direct {
    term 1 {
        from protocol direct;
        then accept;
    }
}
user@R1# show routing-options
autonomous-system 123;
router-id 192.168.1.1;
デバイスの設定が完了したら、設定モードから commit を入力します。
デバイスR2の設定
ステップバイステップの手順
次の例では、設定階層のさまざまなレベルに移動する必要があります。CLIのナビゲーションについては、『Junos OS CLIユーザーガイド』の「設定モードでのCLIエディタの使用」を参照してください。
デバイスR2を設定するには:
デバイスインターフェイスを設定します。
[edit interfaces fe-1/2/0 unit 3]
user@R2# set family inet address 172.16.12.21/24
[edit interfaces fe-1/2/1 unit 4]
user@R2# set family inet address 172.16.24.2/24
[edit interfaces lo0 unit 2]
user@R2# set family inet address 192.168.2.1/32
BGPを設定します。
[edit protocols bgp group internal]
user@R2# set type internal
user@R2# set local-address 192.168.2.1
user@R2# set export send-direct
user@R2# set neighbor 192.168.1.1
user@R2# set neighbor 192.168.3.1
[edit protocols bgp group external]
user@R2# set type external
user@R2# set export send-direct
user@R2# set peer-as 4
user@R2# set neighbor 172.16.24.4
OSPFを設定します。
[edit protocols ospf area 0.0.0.0]
user@R2# set interface lo0.2 passive
user@R2# set interface fe-1/2/0.3
user@R2# set interface fe-1/2/1.4
直接ルートを受け入れるポリシーを設定します。
このシナリオの他の有用なオプションは、OSPFまたはローカルルートで学習したルートを受け入れることかもしれません。
[edit policy-options policy-statement send-direct term 1]
user@R2# set from protocol direct
user@R2# set then accept
ルーターIDと自律システム(AS)番号を設定します。
[edit routing-options]
user@R2# set autonomous-system 123
user@R2# set router-id 192.168.2.1
結果
設定モードから、 show interfaces、 show protocols、 show policy-options、 show routing-options コマンドを入力して設定を確認します。出力に意図した設定が表示されない場合は、この例の手順を繰り返して設定を修正します。
user@R2# show interfaces
fe-1/2/0 {
    unit 3 {
        family inet {
            address 172.16.12.2/24;
        }
    }
}
fe-1/2/1 {
    unit 4 {
        family inet {
            address 172.16.24.2/24;
        }
    }
}
lo0 {
    unit 2 {
        family inet {
            address 192.168.2.1/32;
        }
    }
}
user@R2# show protocols
bgp {
    group internal {
        type internal;
        local-address 192.168.2.1;
        export send-direct;
        neighbor 192.168.1.1;
        neighbor 192.168.3.1;
    }
    group external {
        type external;
        export send-direct;
        peer-as 4;
        neighbor 172.16.24.4;
    }
}
ospf {
    area 0.0.0.0 {
        interface lo0.2 {
            passive;
        }
        interface fe-1/2/0.3;
        interface fe-1/2/1.4;
    }
}
user@R2# show policy-options
policy-statement send-direct {
    term 1 {
        from protocol direct;
        then accept;
    }
}
user@R2# show routing-options
autonomous-system 123;
router-id 192.168.2.1;
デバイスの設定が完了したら、設定モードから commit を入力します。
デバイスR3の設定
ステップバイステップの手順
次の例では、設定階層のさまざまなレベルに移動する必要があります。CLIのナビゲーションについては、『Junos OS CLIユーザーガイド』の「設定モードでのCLIエディタの使用」を参照してください。
デバイスR3を設定するには:
デバイスインターフェイスを設定します。
[edit interfaces fe-1/2/0 unit 5]
user@R3# set family inet address 172.16.13.3/24
[edit interfaces fe-1/2/1 unit 6]
user@R3# set family inet address 172.16.34.3/24
[edit interfaces lo0 unit 3]
user@R3# set family inet address 192.168.3.1/32
BGPを設定します。
[edit protocols bgp group internal]
user@R3# set type internal
user@R3# set local-address 192.168.3.1
user@R3# set export send-direct
user@R3# set neighbor 192.168.1.1
user@R3# set neighbor 192.168.2.1
[edit protocols bgp group external]
user@R3# set type external
user@R3# set export send-direct
user@R3# set peer-as 4
user@R3# set neighbor 172.16.34.4
OSPFを設定します。
[edit protocols ospf area 0.0.0.0]
user@R3# set interface lo0.3 passive
user@R3# set interface fe-1/2/0.5
user@R3# set interface fe-1/2/1.6
直接ルートを受け入れるポリシーを設定します。
このシナリオの他の有用なオプションは、OSPFまたはローカルルートで学習したルートを受け入れることかもしれません。
[edit policy-options policy-statement send-direct term 1]
user@R3# set from protocol direct
user@R3# set then accept
ルーターIDと自律システム(AS)番号を設定します。
[edit routing-options]
user@R3# set autonomous-system 123
user@R3# set router-id 192.168.3.1
結果
設定モードから、 show interfaces、 show protocols、 show policy-options、 show routing-options コマンドを入力して設定を確認します。出力に意図した設定が表示されない場合は、この例の手順を繰り返して設定を修正します。
user@R3# show interfaces
fe-1/2/0 {
    unit 5 {
        family inet {
            address 172.16.13.3/24;
        }
    }
}
fe-1/2/1 {
    unit 6 {
        family inet {
            address 172.16.34.3/24;
        }
    }
}
lo0 {
    unit 3 {
        family inet {
            address 192.168.3.1/32;
        }
    }
}
user@R3# show protocols
bgp {
    group internal {
        type internal;
        local-address 192.168.3.1;
        export send-direct;
        neighbor 192.168.1.1;
        neighbor 192.168.2.1;
    }
    group external {
        type external;
        export send-direct;
        peer-as 4;
        neighbor 172.16.34.4;
    }
}
ospf {
    area 0.0.0.0 {
        interface lo0.3 {
            passive;
        }
        interface fe-1/2/0.5;
        interface fe-1/2/1.6;
    }
}
user@R3# show policy-options
policy-statement send-direct {
    term 1 {
        from protocol direct;
        then accept;
    }
}
user@R3# show routing-options
autonomous-system 123;
router-id 192.168.3.1;
デバイスの設定が完了したら、設定モードから commit を入力します。
デバイスR4の設定
ステップバイステップの手順
次の例では、設定階層のさまざまなレベルに移動する必要があります。CLIのナビゲーションについては、『Junos OS CLIユーザーガイド』の「設定モードでのCLIエディタの使用」を参照してください。
デバイスR4を設定するには:
デバイスインターフェイスを設定します。
[edit interfaces fe-1/2/0 unit 7]
user@R4# set family inet address 172.16.24.4/24
[edit interfaces fe-1/2/1 unit 8]
user@R4# set family inet address 172.16.34.4/24
[edit interfaces lo0 unit 4]
user@R4# set family inet address 192.168.4.1/32
user@R4# set family inet address 172.16.44.0/32
user@R4# set family inet address 172.16.144.0/32
デバイスR4には、アドバタイズされたプレフィックスをシミュレートするための複数のループバックインターフェイスアドレスがあります。
直接ルートを受け入れるポリシーを設定します。
このシナリオの他の有用なオプションは、OSPFまたはローカルルートで学習したルートを受け入れることかもしれません。
[edit policy-options policy-statement send-direct term 1]
user@R4# set from protocol direct
user@R4# set then accept
BGPを設定します。
[edit protocols bgp group external]
user@R4# set type external
user@R4# set export send-direct
user@R4# set peer-as 123
2つのMEDポリシーを設定します。
[edit policy-options]
set policy-statement med-10 from route-filter 172.16.144.0/32 exact
set policy-statement med-10 then metric 10
set policy-statement med-10 then accept
set policy-statement med-30 from route-filter 0.0.0.0/0 longer
set policy-statement med-30 then metric 30
set policy-statement med-30 then accept
2つのEBGPネイバーを設定し、2つのMEDポリシーをデバイスR3に適用し、MED値20をデバイスR2に適用します。
[edit protocols bgp group external]
user@R4# set neighbor 172.16.34.3 export med-10
user@R4# set neighbor 172.16.34.3 export med-30
user@R4# set neighbor 172.16.24.2 metric-out 20
ルーターIDと自律システム(AS)番号を設定します。
[edit routing-options]
user@R4# set autonomous-system 4
user@R4# set router-id 192.168.4.1
結果
設定モードから、 show interfaces、 show protocols、 show policy-options、 show routing-options コマンドを入力して設定を確認します。出力に意図した設定が表示されない場合は、この例の手順を繰り返して設定を修正します。
user@R4# show interfaces
fe-1/2/0 {
    unit 7 {
        family inet {
            address 172.16.24.4/24;
        }
    }
}
fe-1/2/1 {
    unit 8 {
        family inet {
            address 172.16.34.4/24;
        }
    }
}
lo0 {
    unit 4 {
        family inet {
            address 192.168.4.1/32;
            address 172.16.44.0/32;
            address 172.16.144.0/32;
        }
    }
}
user@R4# show protocols
bgp {
    group external {
        type external;
        export send-direct;
        peer-as 123;
        neighbor 172.16.24.2 {
            metric-out 20;
        }
        neighbor 172.16.34.3 {
            export [ med-10 med-30 ];
        }
    }
}
user@R4# show policy-options
policy-statement med-10 {
    from {
        route-filter 172.16.144.0/32 exact;
    }
    then {
        metric 10;
        accept;
    }
}
policy-statement med-30 {
    from {
        route-filter 0.0.0.0/0 longer;
    }
    then {
        metric 30;
        accept;
    }
}
policy-statement send-direct {
    term 1 {
        from protocol direct;
        then accept;
    }
}
user@R4# show routing-options
autonomous-system 4;
router-id 192.168.4.1;
デバイスの設定が完了したら、設定モードから commit を入力します。
検証
設定が正常に機能していることを確認します。
デバイスR1からデバイスR4へのアクティブパスの確認
目的
アクティブパスがデバイスR2を通過することを確認します。
アクション
動作モードから、 show route protocol bgp コマンドを入力します。
user@R1> show route protocol bgp
inet.0: 13 destinations, 19 routes (13 active, 0 holddown, 0 hidden)
+ = Active Route, - = Last Active, * = Both

172.16.12.0/24       [BGP/170] 4d 01:13:32, localpref 100, from 192.168.2.1
                      AS path: I
                    > to 172.16.12.2 via fe-1/2/0.1
172.16.13.0/24       [BGP/170] 3d 05:36:10, localpref 100, from 192.168.3.1
                      AS path: I
                    > to 172.16.13.3 via fe-1/2/1.2
172.16.24.0/24       [BGP/170] 4d 01:13:32, localpref 100, from 192.168.2.1
                      AS path: I
                    > to 172.16.12.2 via fe-1/2/0.1
172.16.34.0/24       [BGP/170] 3d 05:36:10, localpref 100, from 192.168.3.1
                      AS path: I
                    > to 172.16.13.3 via fe-1/2/1.2
172.16.44.0/32     *[BGP/170] 00:06:03, MED 20, localpref 100, from 192.168.2.1
                      AS path: 4 I
                    > to 172.16.12.2 via fe-1/2/0.1
172.16.144.0/32 *[BGP/170] 00:06:03, MED 10, localpref 100, from 192.168.3.1
                      AS path: 4 I
                    > to 172.16.13.3 via fe-1/2/1.2
192.168.2.1/32      [BGP/170] 4d 01:13:32, localpref 100, from 192.168.2.1
                      AS path: I
                    > to 172.16.12.2 via fe-1/2/0.1
192.168.3.1/32      [BGP/170] 3d 05:36:10, localpref 100, from 192.168.3.1
                      AS path: I
                    > to 172.16.13.3 via fe-1/2/1.2
192.168.4.1/32     *[BGP/170] 00:06:03, MED 20, localpref 100, from 192.168.2.1
                      AS path: 4 I
                    > to 172.16.12.2 via fe-1/2/0.1
意味
出力は、デバイスR4がアドバタイズするルートへの優先パスが、172.16.144.0/32以外のすべてのルートでデバイスR2を経由していることを示しています。172.16.144.0/32 の場合、優先パスはデバイス R3 を経由します。
デバイスR4がルートを正しく送信していることの確認
目的
デバイスR4がデバイスR2に値20、デバイスR3に値30の更新メッセージを送信していることを確認します。
アクション
動作モードから、 show route advertising-protocol bgp コマンドを入力します。
user@R4> show route advertising-protocol bgp 172.16.24.2
inet.0: 11 destinations, 13 routes (11 active, 0 holddown, 0 hidden)
  Prefix                  Nexthop              MED     Lclpref    AS path
* 172.16.24.0/24           Self                 20                 I
* 172.16.34.0/24           Self                 20                 I
* 172.16.44.0/32          Self                 20                 I
* 172.16.144.0/32      Self                 20                 I
* 192.168.4.1/32          Self                 20                 I
user@R4> show route advertising-protocol bgp 172.16.34.3
inet.0: 11 destinations, 13 routes (11 active, 0 holddown, 0 hidden)
  Prefix                  Nexthop              MED     Lclpref    AS path
* 172.16.24.0/24           Self                 30                 I
* 172.16.34.0/24           Self                 30                 I
* 172.16.44.0/32          Self                 30                 I
* 172.16.144.0/32      Self                 10                 I
* 192.168.4.1/32          Self                 30                 I
意味
MED列は、デバイスR4が2つのEBGPネイバーに正しいMED値を送信していることを示しています。
例:コミュニティを使用したMEDの設定
特定のコミュニティからのすべてのルートに対して、複数出口識別子(MED)メトリックを20に 設定します。
[edit]
routing-options {
    router-id 10.0.0.1;
    autonomous-system 23;
}
policy-options {
    policy-statement from-otago {
        from community otago;
        then metric 20;
    }
    community otago members [56:2379 23:46944];
}
protocols {
    bgp {
        import from-otago;
        group 23 {
            type external;
            peer-as 56;
            neighbor 192.168.0.1 {
                traceoptions {
                    file bgp-log-peer;
                    flag packets;
                }
                log-updown;
            }
        }
    }
}
例:MEDパス属性とIGPメトリックを関連付け、MED更新を遅らせる
この例では、複数出口識別子(MED)パス属性を内部ゲートウェイプロトコル(IGP)メトリックに関連付け、MED属性の更新を遅らせるタイマーを設定する方法を示します。
要件
この例を設定する前に、デバイスの初期化以外の特別な設定は必要ありません。
概要
BGPは、内部BGP(IBGP)ルートのネクストホップのIGP距離に基づいて、ルートのMED属性をアドバタイズするように設定できます。IGPメトリックにより、内部ルーティングが管理設定に従って最短パスをたどることができます。導入によっては、IGP最短パスの知識を、隣接する自律システム(AS)の外部BGP(EBGP)ピアに通信することが理想的な場合があります。これにより、これらのEBGPピアは、可能な限り最短パスを使用してASにトラフィックを転送できます。
EBGPピアから学習したルートは、通常、直接接続されたインターフェイス上にネクストホップがあるため、IGP値はゼロに等しくなります。ゼロはアドバタイズされる値です。BGPピアがローカルシステムにネクストホップ解決の実行を必要とするサードパーティのネクストホップ(IBGP設定、コンフェデレーションピア内の設定、または multihop ステートメントを含むEBGP設定)を送信する場合、IGPメトリックはゼロ以外の値になります。このようなシナリオでは、 metric-out minimum-igp または metric-out igp オプションを含めることで、MED値をIGPメトリックに関連付けることが理にかなっている場合があります。
MEDをIGPメトリックに関連付けることの欠点は、ネットワーク内にIGPが不安定な場合に過剰なルートアドバタイズのリスクがあることです。MEDアップデートの遅延を設定することで、このようなシナリオでルートアドバタイズメントを減らすメカニズムが提供されます。この遅延は、ネクストホップのIGPメトリックが変化したときにMEDの更新を遅くすることで機能します。このアプローチでは、タイマーを使用してMEDの更新を定期的にアドバタイズします。タイマーが終了すると、 metric-out igp delay-updates が設定されたルートのMED属性が、ネクストホップの現在のIGPメトリックに更新されます。BGP対応デバイスは、MED属性が変更されたルートのアドバタイズメントを送信します。
delay-updatesオプションは、MEDの更新を抑制する必要があるBGPグループ(またはピア)を特定します。MEDアップデートのアドバタイズ時間は、デフォルトで10分に設定されています。routing-options設定に med-igp-update-interval ステートメントを含めることで、間隔を最大600分まで増やすことができます。
ノンストップアクティブルーティング(NSR)を有効にしていて、スイッチオーバーが発生した場合、スイッチオーバーが発生するとすぐに、遅延したMEDアップデートがアドバタイズされることがあります。
metric-out igpオプションを設定すると、IGPメトリックがIBGPピアへのIGPコストを直接追跡します。IGPコストが下がると、アドバタイズされたMED値も下がります。逆に、IGPコストが上昇すると、MED値も上昇します。
metric-out minimum-igpオプションを設定すると、IBGPピアへのIGPコストが下がった場合にのみ、アドバタイズされたMED値が変更されます。IGPコストが増加しても、MED値には影響しません。ルーターは、ルーティングプロセス(rpd)が再起動されるまで、最低IGPコストを監視して記憶します。BGPピアは、MEDが以前にアドバタイズされた値よりも低い場合、ルートに関連付けられた別の属性が変更された場合、またはBGPピアがルート更新リクエストに応答している場合にのみ、更新を送信します。
この例では、OSPF設定の metric ステートメントを使用して、IGPメトリックが変更されると、設定された遅延間隔後にMEDも変更されることを示しています。OSPFメトリックの範囲は1から65,535です 。
図4は、サンプルトポロジーを示しています。
 を遅らせるトポロジー
この例では、デバイスR1によってアドバタイズされるMED値は、AS 1で実行されているIGPに関連付けられています。デバイス R1 によってアドバタイズされる MED 値は、AS 2 がトラフィックを AS AS 1 に転送するときの隣接 AS(AS 2)の決定に影響を与えます。
設定
CLIクイックコンフィグレーション
この例をすばやく設定するには、以下のコマンドをコピーしてテキストファイルに貼り付け、改行を削除して、ネットワーク構成に合わせて必要な詳細を変更してから、コマンドを [edit] 階層レベルのCLIにコピー&ペーストします。
デバイスR1
               set interfaces fe-1/2/0 unit 2 description R1->R2


               set interfaces fe-1/2/0 unit 2 family inet address 10.0.0.1/30


               set interfaces fe-1/2/1 unit 7 description R1->R4


               set interfaces fe-1/2/1 unit 7 family inet address 172.16.0.1/30


               set interfaces lo0 unit 1 family inet address 192.168.0.1/32


               set protocols bgp group internal type internal


               set protocols bgp group internal local-address 192.168.0.1


               set protocols bgp group internal export send-direct


               set protocols bgp group internal neighbor 192.168.0.2


               set protocols bgp group internal neighbor 192.168.0.3


               set protocols bgp group external type external


               set protocols bgp group external metric-out igp delay-med-update


               set protocols bgp group external export send-direct


               set protocols bgp group external peer-as 2


               set protocols bgp group external neighbor 172.16.0.2


               set protocols ospf area 0.0.0.0 interface fe-1/2/0.2 metric 600


               set protocols ospf area 0.0.0.0 interface lo0.1 passive


               set policy-options policy-statement send-direct term 1 from protocol direct


               set policy-options policy-statement send-direct term 1 then accept


               set routing-options med-igp-update-interval 12


               set routing-options router-id 192.168.0.1


               set routing-options autonomous-system 1
デバイスR2
               set interfaces fe-1/2/0 unit 1 description R2->R1


               set interfaces fe-1/2/0 unit 1 family inet address 10.0.0.2/30


               set interfaces fe-1/2/1 unit 4 description R2->R3


               set interfaces fe-1/2/1 unit 4 family inet address 10.0.2.2/30


               set interfaces lo0 unit 2 family inet address 192.168.0.2/32


               set protocols bgp group internal type internal


               set protocols bgp group internal local-address 192.168.0.2


               set protocols bgp group internal export send-direct


               set protocols bgp group internal neighbor 192.168.0.1


               set protocols bgp group internal neighbor 192.168.0.3


               set protocols ospf area 0.0.0.0 interface fe-1/2/0.1


               set protocols ospf area 0.0.0.0 interface fe-1/2/1.4


               set protocols ospf area 0.0.0.0 interface lo0.2 passive


               set policy-options policy-statement send-direct term 1 from protocol direct


               set policy-options policy-statement send-direct term 1 then accept


               set routing-options router-id 192.168.0.2


               set routing-options autonomous-system 1
デバイスR3
               set interfaces fe-1/2/0 unit 3 description R3->R2


               set interfaces fe-1/2/0 unit 3 family inet address 10.0.2.1/30


               set interfaces fe-1/2/1 unit 5 description R3->R5


               set interfaces fe-1/2/1 unit 5 family inet address 172.16.0.5/30


               set interfaces lo0 unit 3 family inet address 192.168.0.3/32


               set protocols bgp group internal type internal


               set protocols bgp group internal local-address 192.168.0.3


               set protocols bgp group internal export send-direct


               set protocols bgp group internal neighbor 192.168.0.1


               set protocols bgp group internal neighbor 192.168.0.2


               set protocols bgp group external type external


               set protocols bgp group external export send-direct


               set protocols bgp group external peer-as 2


               set protocols bgp group external neighbor 172.16.0.6


               set protocols ospf area 0.0.0.0 interface fe-1/2/0.3


               set protocols ospf area 0.0.0.0 interface lo0.3 passive


               set policy-options policy-statement send-direct term 1 from protocol direct


               set policy-options policy-statement send-direct term 1 then accept


               set routing-options router-id 192.168.0.3


               set routing-options autonomous-system 1
デバイスR4
               set interfaces fe-1/2/0 unit 8 description R4->R1


               set interfaces fe-1/2/0 unit 8 family inet address 172.16.0.2/30


               set interfaces fe-1/2/1 unit 9 description R4->R5


               set interfaces fe-1/2/1 unit 9 family inet address 10.0.4.1/30


               set interfaces fe-1/2/2 unit 13 description R4->R6


               set interfaces fe-1/2/2 unit 13 family inet address 172.16.0.9/30


               set interfaces lo0 unit 4 family inet address 192.168.0.4/32


               set protocols bgp group internal type internal


               set protocols bgp group internal local-address 192.168.0.4


               set protocols bgp group internal export send-direct


               set protocols bgp group internal neighbor 192.168.0.5


               set protocols bgp group external type external


               set protocols bgp group external export send-direct


               set protocols bgp group external neighbor 172.16.0.10 peer-as 3


               set protocols bgp group external neighbor 172.16.0.1 peer-as 1


               set protocols ospf area 0.0.0.0 interface fe-1/2/1.9


               set protocols ospf area 0.0.0.0 interface lo0.4 passive


               set policy-options policy-statement send-direct term 1 from protocol direct


               set policy-options policy-statement send-direct term 1 then accept


               set routing-options router-id 192.168.0.4


               set routing-options autonomous-system 2
デバイスR5
               set interfaces fe-1/2/0 unit 6 description R5->R3


               set interfaces fe-1/2/0 unit 6 family inet address 172.16.0.6/30


               set interfaces fe-1/2/1 unit 10 description R5->R4


               set interfaces fe-1/2/1 unit 10 family inet address 10.0.4.2/30


               set interfaces fe-1/2/2 unit 11 description R5->R8


               set interfaces fe-1/2/2 unit 11 family inet address 172.16.0.13/30


               set interfaces lo0 unit 5 family inet address 192.168.0.5/32


               set protocols bgp group internal type internal


               set protocols bgp group internal local-address 192.168.0.5


               set protocols bgp group internal export send-direct


               set protocols bgp group internal neighbor 192.168.0.4


               set protocols bgp group external type external


               set protocols bgp group external export send-direct


               set protocols bgp group external neighbor 172.16.0.5 peer-as 1


               set protocols bgp group external neighbor 172.16.0.14 peer-as 3


               set protocols ospf area 0.0.0.0 interface fe-1/2/1.10


               set protocols ospf area 0.0.0.0 interface lo0.5 passive


               set policy-options policy-statement send-direct term 1 from protocol direct


               set policy-options policy-statement send-direct term 1 then accept


               set routing-options router-id 192.168.0.5


               set routing-options autonomous-system 2
デバイスR6
               set interfaces fe-1/2/0 unit 14 description R6->R4


               set interfaces fe-1/2/0 unit 14 family inet address 172.16.0.10/30


               set interfaces fe-1/2/1 unit 15 description R6->R7


               set interfaces fe-1/2/1 unit 15 family inet address 10.0.6.1/30


               set interfaces lo0 unit 6 family inet address 192.168.0.6/32


               set protocols bgp group internal type internal


               set protocols bgp group internal local-address 192.168.0.6


               set protocols bgp group internal export send-direct


               set protocols bgp group internal neighbor 192.168.0.7


               set protocols bgp group internal neighbor 192.168.0.8


               set protocols bgp group external type external


               set protocols bgp group external export send-direct


               set protocols bgp group external peer-as 2


               set protocols bgp group external neighbor 172.16.0.9 peer-as 2


               set protocols ospf area 0.0.0.0 interface fe-1/2/1.15


               set protocols ospf area 0.0.0.0 interface lo0.6 passive


               set policy-options policy-statement send-direct term 1 from protocol direct


               set policy-options policy-statement send-direct term 1 then accept


               set routing-options router-id 192.168.0.6


               set routing-options autonomous-system 3
デバイスR7
               set interfaces fe-1/2/0 unit 16 description R7->R6


               set interfaces fe-1/2/0 unit 16 family inet address 10.0.6.2/30


               set interfaces fe-1/2/1 unit 17 description R7->R8


               set interfaces fe-1/2/1 unit 17 family inet address 10.0.7.2/30


               set interfaces lo0 unit 7 family inet address 192.168.0.7/32


               set protocols bgp group internal type internal


               set protocols bgp group internal local-address 192.168.0.7


               set protocols bgp group internal export send-direct


               set protocols bgp group internal neighbor 192.168.0.6


               set protocols bgp group internal neighbor 192.168.0.8


               set protocols ospf area 0.0.0.0 interface fe-1/2/0.16


               set protocols ospf area 0.0.0.0 interface fe-1/2/1.17


               set protocols ospf area 0.0.0.0 interface lo0.7 passive


               set policy-options policy-statement send-direct term 1 from protocol direct


               set policy-options policy-statement send-direct term 1 then accept


               set routing-options router-id 192.168.0.7


               set routing-options autonomous-system 3
デバイスR8
               set interfaces fe-1/2/0 unit 12 description R8->R5


               set interfaces fe-1/2/0 unit 12 family inet address 172.16.0.14/30


               set interfaces fe-1/2/1 unit 18 description R8->R7


               set interfaces fe-1/2/1 unit 18 family inet address 10.0.7.1/30


               set interfaces lo0 unit 8 family inet address 192.168.0.8/32


               set protocols bgp group internal type internal


               set protocols bgp group internal local-address 192.168.0.8


               set protocols bgp group internal export send-direct


               set protocols bgp group internal neighbor 192.168.0.6


               set protocols bgp group internal neighbor 192.168.0.7


               set protocols bgp group external type external


               set protocols bgp group external export send-direct


               set protocols bgp group external peer-as 2


               set protocols bgp group external neighbor 172.16.0.13 peer-as 2


               set protocols ospf area 0.0.0.0 interface fe-1/2/1.18


               set protocols ospf area 0.0.0.0 interface lo0.8 passive


               set policy-options policy-statement send-direct term 1 from protocol direct


               set policy-options policy-statement send-direct term 1 then accept


               set routing-options router-id 192.168.0.8


               set routing-options autonomous-system 3
デバイスR1の設定
ステップバイステップの手順
次の例では、設定階層のさまざまなレベルに移動する必要があります。CLIのナビゲーションについては、『Junos OS CLIユーザーガイド』の「設定モードでのCLIエディタの使用」を参照してください。
デバイスR1を設定するには:
-
インターフェイスを設定します。
[edit interfaces fe-1/2/0 unit 2] user@R1# set description R1->R2 user@R1# set family inet address 10.0.0.1/30 [edit interfaces fe-1/2/1 unit 7] user@R1# set description R1->R4 user@R1# set family inet address 172.16.0.1/30 [edit interfaces lo0 unit 1] user@R1# set family inet address 192.168.0.1/32 -
IBGPを設定します。
[edit protocols bgp group internal] user@R1# set type internal user@R1# set local-address 192.168.0.1 user@R1# set export send-direct user@R1# set neighbor 192.168.0.2 user@R1# set neighbor 192.168.0.3 -
EBGPを設定します。
[edit protocols bgp group external] user@R1# set type external user@R1# set export send-direct user@R1# set peer-as 2 user@R1# set neighbor 172.16.0.2 -
MED値をIGPメトリックに関連付けます。
[edit protocols bgp group external] user@R1# set metric-out igp delay-med-updatedelay-med-updateオプションを含めると、MEDアップデートのデフォルトは10分です。delay-med-updateオプションを除外すると、MEDの更新はIGPメトリックが変更された直後に行われます。 -
(オプション)MEDアップデートのアップデート間隔を設定します。
[edit routing-options]
user@R1# set med-igp-update-interval 12
10分から600分までの間隔を設定できます。
-
OSPFを設定します。
[edit protocols ospf area 0.0.0.0]
user@R1# set interface fe-1/2/0.2 metric 600
user@R1# set interface lo0.1 passive
ここでは、
metricステートメントを使用して、IGPメトリックが変更されたときに何が起こるかを示します。 -
直接ルートを受け入れるポリシーを設定します。
このシナリオの他の有用なオプションは、OSPFまたはローカルルートで学習したルートを受け入れることかもしれません。
[edit policy-options policy-statement send-direct term 1] user@R1# set from protocol direct user@R1# set then accept -
ルーターIDと自律システム(AS)番号を設定します。
[edit routing-options]
user@R1# set router-id 192.168.0.1
user@R1# set autonomous-system 1
結果
設定モードから、 show interfaces、 show policy-options、 show protocols、 show routing-options コマンドを入力して設定を確認します。出力に意図した設定が表示されない場合は、この例の手順を繰り返して設定を修正します。
user@R1# show interfaces
fe-1/2/0 {
    unit 2 {
        description R1->R2;
        family inet {
            address 10.0.0.1/30;
        }
    }
}
fe-1/2/1 {
    unit 7 {
        description R1->R4;
        family inet {
            address 172.16.0.1/30;
        }
    }
}
lo0 {
    unit 1 {
        family inet {
            address 192.168.0.1/32;
        }
    }
}
user@R1# show policy-options
policy-statement send-direct {
    term 1 {
        from protocol direct;
        then accept;
    }
}
user@R1# show protocols
bgp {
    group internal {
        type internal;
        local-address 192.168.0.1;
        export send-direct;
        neighbor 192.168.0.2;
        neighbor 192.168.0.3;
    }
    group external {
        type external;
        metric-out igp delay-med-update;
        export send-direct;
        peer-as 2;
        neighbor 172.16.0.2;
    }
}
ospf {
    area 0.0.0.0 {
        interface fe-1/2/0.2 {
            metric 600;
        }
        interface lo0.1 {
            passive;
        }
    }
}
user@R1# show routing-options
med-igp-update-interval 12;
router-id 192.168.0.1;
autonomous-system 1;
デバイスの設定が完了したら、設定モードから commit を入力します。ネットワークの必要に応じて、トポロジー内の他のデバイスで設定手順を繰り返します。
検証
設定が正常に機能していることを確認します。
BGPアドバタイズメントの確認
目的
デバイスR1がデバイスR4に対して、IGPメトリックを反映したBGP MED値をアドバタイズしていることを確認します。
アクション
動作モードから、 show route advertising-protocol bgp コマンドを入力します。
user@R1> show route advertising-protocol bgp 172.16.0.2
inet.0: 19 destinations, 33 routes (19 active, 0 holddown, 0 hidden)
  Prefix                  Nexthop              MED     Lclpref    AS path
* 10.0.0.0/30             Self                 0                  I
* 172.16.0.0/30           Self                 0                  I
* 172.16.0.4/30           Self                 601                I
* 192.168.0.1/32          Self                 0                  I
意味
MED列の601値は、設定されたOSPFメトリックを反映するようにMED値が更新されたことを示しています。
OSPFメトリックが変更されたときにMED値が変化することの検証
目的
OSPFメトリックを700に上げると、この変更を反映するようにMED値が更新されます。
アクション
設定モードから、 set protocols ospf area 0 interface fe-1/2/0.2 metric 700 コマンドを入力します。
user@R1# set protocols ospf area 0 interface fe-1/2/0.2 metric 700
user@R1# commit
12分(設定された遅延時間)待機後、動作モードから show route advertising-protocol bgp コマンドを入力します。
user@R1> show route advertising-protocol bgp 172.16.0.2
inet.0: 19 destinations, 33 routes (19 active, 0 holddown, 0 hidden)
  Prefix                  Nexthop              MED     Lclpref    AS path
* 10.0.0.0/30             Self                 0                  I
* 172.16.0.0/30           Self                 0                  I
* 172.16.0.4/30           Self                 701                I
* 192.168.0.1/32          Self                 0                  I
意味
MED列の701値は、設定されたOSPFメトリックを反映するようにMED値が更新されたことを示しています。
最小igp設定のテスト
目的
igp ステートメントではなく minimum-igp ステートメントを使用するように設定を変更します。OSPFメトリックを増加させると、MED値は変更されませんが、OSPFメトリックを減少させると、MED値には新しいOSPFメトリックが反映されます。
アクション
設定モードから、 igp ステートメントを削除し、 minimum-igp ステートメントを追加して、OSPFメトリックを増やします。
user@R1# delete protocols bgp group external metric-out igp
user@R1# set protocols bgp group external metric-out minimum-igp
user@R1# set protocols ospf area 0 interface fe-1/2/0.2 metric 800
user@R1# commit
動作モードから、 show route advertising-protocol bgp コマンドを入力して、MED値が変化しないことを確認します。
user@R1> show route advertising-protocol bgp 172.16.0.2
inet.0: 19 destinations, 33 routes (19 active, 0 holddown, 0 hidden)
  Prefix                  Nexthop              MED     Lclpref    AS path
* 10.0.0.0/30             Self                 0                  I
* 172.16.0.0/30           Self                 0                  I
* 172.16.0.4/30           Self                 701                I
* 192.168.0.1/32          Self                 0                  I
設定モードから、OSPFメトリックを下げます。
user@R1# set protocols ospf area 0 interface fe-1/2/0.2 metric 20
user@R1# commit
動作モードから、 show route advertising-protocol bgp コマンドを入力して、MED値が変化することを確認します。
user@R1> show route advertising-protocol bgp 172.16.0.2
inet.0: 19 destinations, 33 routes (19 active, 0 holddown, 0 hidden)
  Prefix                  Nexthop              MED     Lclpref    AS path
* 10.0.0.0/30             Self                 0                  I
* 172.16.0.0/30           Self                 0                  I
* 172.16.0.4/30           Self                 21                 I
* 192.168.0.1/32          Self                 0                  I
意味
minimum-igpステートメントが設定されている場合、より短いパスが使用可能な場合にのみMED値が変更されます。