Router Installation Using OTP
If you are installing SSR Version 6.3.x, use the Universal ISO Installation process.
The Session Smart Router has a software-driven framework for rapid and dynamic deployment of network nodes across the enterprise using One Touch Provisioning (OTP). The software has been developed to enable automated deployment across a large set of scenarios, including simple, repeatable branch deployments and dynamic, scalable data center/cloud deployments. The solution may be deployed with minimal configuration using the default SSR installation process, or customized and integrated with 3rd party tools.
An important aspect of the OTP solution is its flexibility. When the product is deployed using the standard SSR images, many customers appreciate the simplicity of enabling an enterprise-wide SessionSmart™ routing fabric without investing additional time to customize the deployment. Rapid deployment of session-enabled routing, security and network visibility is the key objective.
In this deployment model, the SSR node is deployed into the production environment with no site-specific configuration during shipment of units and initial on-line state. A site configuration file is directed via the SSR for initial provisioning.
Software Delivery Options
The simplest deployment of the OTP solution is highly automated and leverages just two components, the Conductor and at least one SSR. For many customers, the SSR platform is ordered and delivered as a pre-integrated, off-the-shelf solution through the Juniper SSR partner network. An image leveraging QuickStart provisioning can also be deployed into a VM or cloud environment, though consideration must be made to the mechanism of injecting the file. Virtual environments may be better suited for cloud automation tools to assist in automated, dynamic deployment.
The OTP installation process produces a Router installed with SSR software set to factory defaults. Upon completing the OTP installation process, the default behavior is to provision the device to be configured with a DHCP client on the first ethernet port and DHCP server listening on all other ports. A user then connects to the SSR via ethernet cable and use the QuickStart file generated by the Conductor to finalize the SSR configuration. After performing the QuickStart operation, the SSR will have connectivity to its Conductor and can download the latest configuration (if necessary) and begin operation. These defaults can be changed to suit your needs.
QuickStart Provisioning
Basic configuration parameters are encoded within an encrypted file. For each node, a custom file can be exported from the Conductor and minimally contains the following configuration encoded parameters:
- WAN IP address, subnet mask and gateway
- Conductor IP address
- Asset ID
Disk Cloning
Disk Cloning allows you to create a generic router platform image that can be used to perform multiple installations quickly and efficiently. After the initial ISO installation and power off, the platform is generic and can be cloned to a disk to create a copy of that platform.
When using cloned images, an identical hardware platform must be used. Create a new disk image for each hardware variation.
The cloned platform disk is then used to install the filesystem and SSR software on any number of other identical hardware platforms.
The general process for disk cloning is as follows:
- The platform is installed using an ISO image which powers down on success.
- Use Clonezilla or other Live USB to make a copy of the platform.
- Distribute the cloned disk using USB, multicast, or other technique.
- Start each platform after installation.
- Allow each platform to bootstrap and then reboot.
- Verify the platform validation report.xs
Before you Begin
Before beginning the Router installation, you must have a Conductor operationally deployed and reachable by the router.
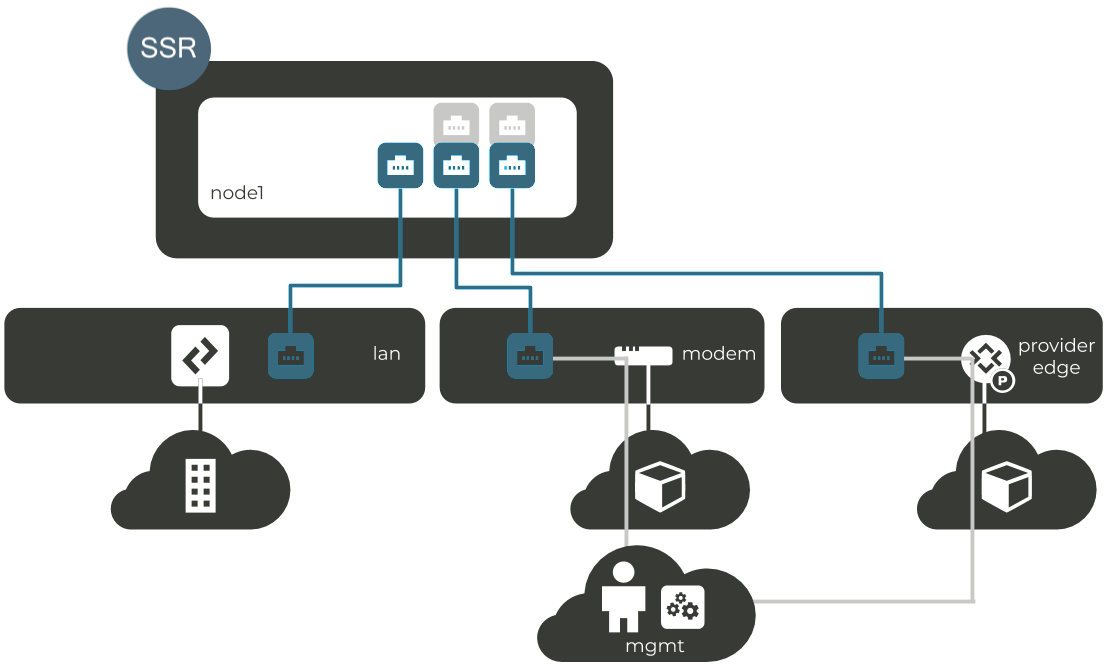
This diagram is one possible topology for a standalone SSR deployed at the edge of the network.
Installing SSR Using One Touch Provisioning (OTP)
To install the Router using the OTP workflow, use the arrow keys to select the OTP Install Routing Software option (Serial or VGA Console).

Not all hardware has video support. Booting to the serial console 115200 baud is the default, and is automatically selected after 30 seconds. When using the serial console, the terminal size is 80x25 - anything smaller may result in abnormal navigation behavior.
Selecting the wrong type of console (Serial or VGA) may result in garbled characters being displayed, and if left to continue will result in an incorrect installation. If the wrong console is selected, reboot the target system and select the correct line for the target hardware.
SSR System via Serial Console
Use this option when running on hardware with no video chipset. It uses /dev/ttyS0 115200 baud as the serial console for interacting with the installer. For serial console issues please refer to Serial Console Troubleshooting.
SSR System with VGA Console
Use this option when running on hardware that has onboard graphics chipsets. This installs the SSR using the GUI installer.
SSR Installation
This installation process is an automated workflow which does not require user interaction after selecting and initiating the OTP menu option. The system will power off after installation.
Bootstrapping
After the initial installation and poweroff, the system is generic - it has no specific configuration. Once the platform is started again, an automated script performs bootstrapping of the platform. This script is a single run service unit that executes once during the first bootup, and automatically performs the following steps:
1. Configure Hostname and Salt Minion Identifier
The hostname and salt minion identifier are set to the same value during the bootstrapping process.
If the system serial number is provisioned (seen by dmidecode --string system-serial-number) this value will be used. Otherwise use the first MAC address found in the format of: mac-<address>
2. Configure the SSR and Network Interfaces
The Bootstrapper sets the SSR configuration via the QuickStart file found in one of the following locations:
-
The root of an attached USB drive. i.e.
/bootstrap.quickstart. The USB drive MUST be named "BOOTSTRAP" in all caps. -
In
/etc/128technology/bootstrap.quickstart.
If no file source is present in either location, the Bootstrapper executes HTTP GET requests to the following endpoints to download the QuickStart File from a server. The REST response is explained in REST details.
http://quickstart.128t-bootstrap.local/quickstart/<identifier>http://192.168.128.128/quickstart/<identifier>
The <identifier> is the minion-id as determined by the algorithm discussed in Configure Hostname and Salt Minion Identifier. Typically, it is the system serial number.
If none of the above are successful, the OTP defaults are used. This configures the DHCP client on the first ethernet port and a DHCP server listening on all other ports.
3. Enable the SSR and Salt-Minion Service
The quickstart file configures and enables the SSR and the associated salt-minion service.
4. Write a Result Report
Once the platform is rebooted after bootstrapping, the bootstrap validation report can be found at the root filesystem (/root/128T-bootstrap.txt) containing details about the steps taken. The /root/128T-bootstrap.json file contains the same information in JSON format. The report contains a message that includes additional details for each step.
Shown below is the location of the bootstrap report as well as an example of the contents.
[root@sn123456789 ~]# cat /root/128T-bootstrap.txt
+--------------------+--------+---------------------------------+
| Label              | Result | Message                         |
+--------------------+--------+---------------------------------+
| Minion ID          | True   | mac-000000                      |
| Hostname           | True   | mac-000000                      |
| Clock Sync         | True   |                                 |
| Initialize 128T    | True   | node.Router                     |
| Enable 128T        | True   |                                 |
| Enable salt-minion | True   |                                 |
| Factory Defaults   | True   | http://192.168.0.100/quickstart |
| Ifgcfg files       | True   |                                 |
+--------------------+--------+---------------------------------+
5. Reboot
After reboot, the SSR service will be configured and running.
It is important to note that after the OS installation the dhclient is configured across all network interfaces until the platform has completed Bootstrapping.
Change the Default Passwords after Installation
The following user accounts and passwords are created during the ISO installation process:
| Username | Password |
|---|---|
| root | 128tRoutes |
| t128 | 128tRoutes |
Change these passwords immediately. Use the passwd command from the UNIX window.
[t128@test-router ~]$ passwd
Changing password for user t128
Changing password for t128
(current)UNIX password:
New password:
Retype new password:
passwd: all authentication tokens updated successfully.
[t128@test-router ~]$ su -
Password:
[root@test-router ~]# passwd
Changing password for user root.
New password:
Retype new password:
passwd: all authentication tokens updated successfully.
[root@test-router ~]#
Scriptlets
In addition to the above steps, the Bootstrap utility supports executing pre- and post- scriptlets on a USB drive for further customization of the platform. The scriptlets will be executed as the first and last steps in the bootstrap process.
The names and locations for the scriptlets are:
- If scriptlet exists at the root of USB drive and is called “/pre-bootstrap”, it will be the first step. Otherwise use /etc/128technology/pre-bootstrap.
- If scriptlet exists at the root of USB drive and is called “/post-bootstrap”, it will be the last step. Otherwise use /etc/128technology/post-bootstrap.
The scriptlets must have executable permissions to be executed properly.
Any stdout/stderr output generated from the scriptlets is logged in /var/log/128T-bootstrap/<scriptlet-name>-scriptlet.log.
Bootstrapping Flow Chart
The diagram below shows the procedure the Bootstrap utility follows during the first bootup of the platform after the ISO installation completes.
QuickStart File via REST
If no bootstrap file is present on the USB device or disk, the Bootstrapper will execute HTTP GET requests in an attempt to download the QuickStart file from a server.
The server must respond to the HTTP GET request with valid JSON data that is of format:
{
  “quickstart”: “<quickstart-file-contents>”,
  “password”: “this-is-my-password”
}
The response must be URL-encoded, otherwise the client will not decode the data correctly.
The password data within the JSON is required if the QuickStart file was encrypted when exported from the Conductor.
Testing
The Bootstrap utility provides an entry point to test your QuickStart Server. By executing the command below, the client makes requests to URLs and attempts to download and decode the QuickStart file. It will NOT apply the QuickStart to the platform - only test the process.
$ bootstrap128t rest-test -i <test-identifier>
Or, if you want to test a specific url:
$ bootstrap128t rest-test -i <test-identifier> --url <a-fully-qualified-url>
Additional Considerations with Strict Host Key Checking
If a router is configured for strict inter-router host-key-checking (set to yes), but does not have accept-new configured, it will be necessary to manually provision the new conductor key prior to migrating the router to the conductor. This will require the administrator to retrieve the host key of each node of the new conductor and configure this in the router.
On the conductor, identify the key for each node using the command show system connectivity host-keys node all.
From the router PCLI, provision each conductor key using the following command:
create system connectivity known-hosts node <node> <conductor address> ssh-rsa <key> <comment>
<node>is the router node. The key should be added on each router node in an HA pair.<conductor address>is the conductor address. This should be added for each conductor address of an HA conductor pair.<key>is theKeyretrieved from the previous step.<comment>is an option that can be used to identify the key; for exampleConductor1.
The following example manually configures the key to the conductor node 192.168.1.13:
create system connectivity known-hosts router RTR_EAST_COMBO node combo-east-1 [192.168.1.13]:930 ssh-rsa <public key contents>
For additional information, see create system connectivity known-hosts.
See Enable Strict Host Key Checking for configuration information.