Installing a PAYG Mist-managed Router in AWS
This guide describes the process for deploying a PAYG (Pay As You Go) Mist-managed instance through AWS. When installed as an AWS image, SSR Version 6.x supports Mist-managed routers. The installation and deployment process consists of the following steps:
- Selecting the AMI.
- Deploying the Session Smart Router.
Proceed to the next section Selecting the AMI.
Selecting the AMI
There are different AMIs (images) available for the Juniper Session Smart Networking Platform offering:
-
Private: For cases where there is no access to the SSR repositories (no internet connection) from the AWS environment where the software will be deployed, a Private Offer can be issued to your AWS account via the AWS Marketplace. To request access to a private offer, refer to Requesting access to a Private offer for additional information.
-
Hourly: This provides a free trial period for 30 days and an hourly software cost after the trial expires. This plan is recommended for Proof of Concepts and Trials only. Software upgrades and deployments outside of the cloud, (on premises) require a token. The software can not be purchased via the marketplace. Refer to the Session Smart Networking Platform (PAYG) offering.
Once you have selected the AMI that suits the needs of your deployment, proceed to the Session Smart Router Deployment to deploy a Session Smart Router.
Requesting Access to a Private Offer
There is no software cost associated with deploying the Private image, the cost of running the EC2 instance is the only cost (AWS compute cost). Please also note that software upgrades and deployments outside of the cloud (e.g., on premises) will not be possible without a token.
To request access to a Private offer:
- Locate the account ID of the AWS account where the deployment of the software is going to take place:
- Open the AWS Console.
- On the right at the top of the screen, click on the downward arrow next to your username, and the account ID will be displayed.
- Make a note of your account ID.
- Contact your Juniper Networks Sales representative and provide:
- The Account ID of the AWS account that will be used for the deployment.
- The version of the Session Smart Networking software. Your Juniper Sales representative will assist you if you don't know the version you need for your deployment.
-
Your Juniper Sales representative will email you the private offer.
-
When you receive the email containing the private offer, open it and review / accept the terms and conditions.
Session Smart Router Deployment
Use the following steps to deploy a Mist-managed Session Smart Router in AWS.
Requirements
The following infrastructure must exist in your AWS account:
- A VPC where the Session Smart Router will be deployed.
- The existing VPC is segmented with the following subnets. The role of each subnet is described below.
- Public Subnet: This subnet must provide connectivity to enable communication with external/remote SSR peers. For Mist-managed deployments, this subnet should also provide access to the Mist cloud infrastructure.
- Private Subnet: This subnet must provide connectivity to internal workloads within the cloud.
- Enable enhanced network with ENA for maximum throughput performance. For SSR routers, execute the following command from your local computer
aws ec2 modify-instance-attribute --instance-id instance_id --ena-support
Please note that deploying Mist-managed Session Smart Routers is limited to deployments within the cloud. If you also require the deployment of an on-premises SSR, please contact your Juniper sales representative.
Deployment
A Session Smart Router can be deployed manually via the AWS Console or using AWS CLI commands. This section describes both methods. Choose the method that better suits your needs.
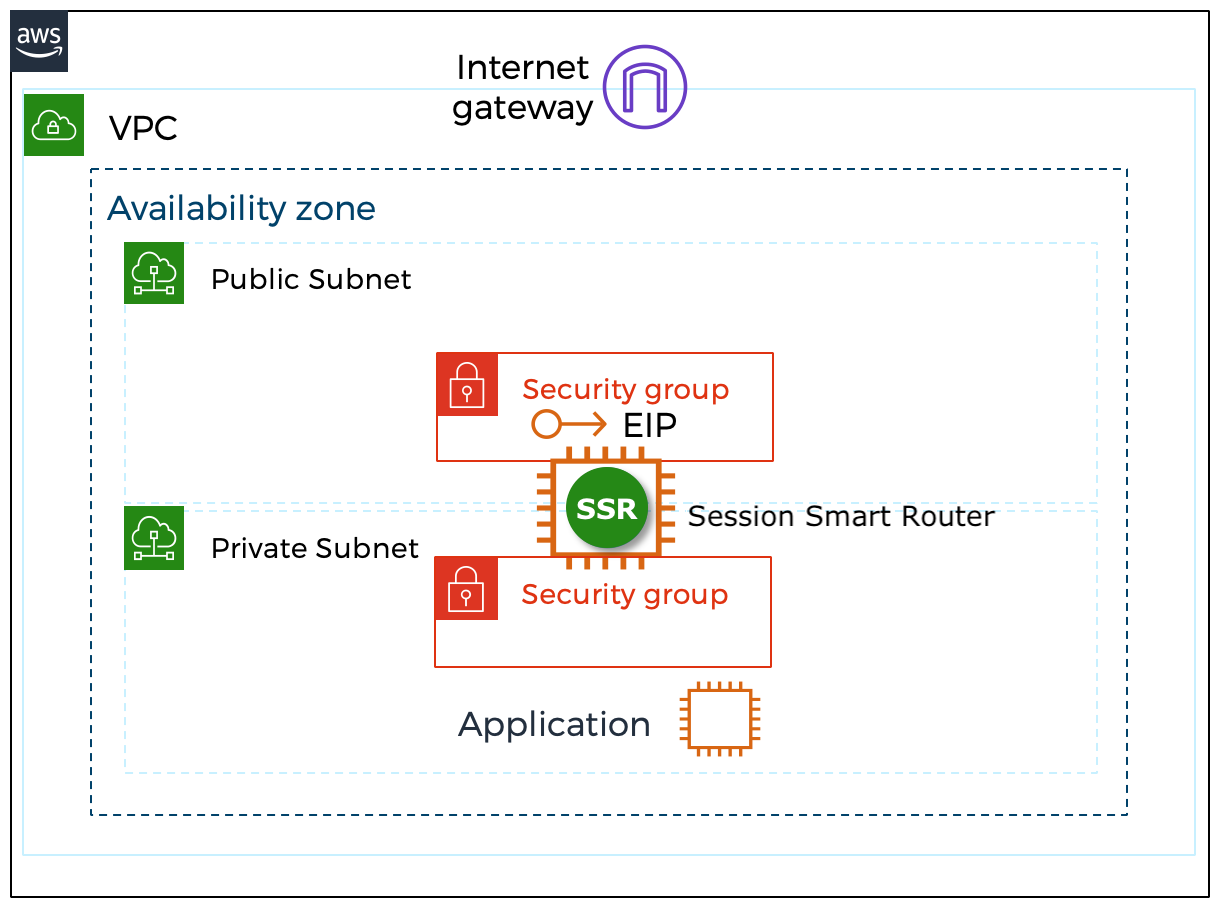
When deploying the Session Smart Router using the templates referenced in this section, the following infrastructure elements are created automatically to assist with the deployment process:
- EC2 instance using a Session Smart image available in the marketplace. When selecting a platform for deployment, Juniper recommends the use of an AWS EC2 instance size c5.xlarge, or larger.
- The router is deployed with appropriate network interfaces.
- Each network interface has a network security group associated. The network security groups are configured in accordance with the requirements to deploy a fabric with Session Smart Networking software.
- The public and management interfaces have a unique and static public IP address associated.
The following image shows the infrastructure elements deployed:
Using the AWS Console
To deploy the Session Smart Networking software via the AWS Console:
- Click on the Session Smart Networking Platform offering selected during the previous section Selecting the AMI.
- Click on the Continue to Subscribe button and accept the terms and conditions.
- Click on the Continue to Configuration button.
- In the Fulfillment Option drop down box select CloudFormation Template, select the template Juniper Session Smart Router and select the desired region.
- Click on the Continue to Launch button.
- In the Choose Action box, select Launch CloudFormation and click on the button Launch.
- Answer the following questions to launch the deployment of an SSR. For a description of the parameters of the template, please refer to Launch the Template.
- What name do you want to give the instance?
- Provide it in the Stack name field (for example: SSR_1_Router).
- Where do you want to deploy it?
- Select the VPC in the region.
- Select the public, private, and management subnets within the VPC.
- Which Mist organization is going to manage it? Provide the registration code for the Mist organization.
- Who is going to be the administrator?
- Select the IAM user key.
- Click the Next button.
- Click on the Create stack button to launch the deployment.

Once the deployment completes, information is provided in the Outputs tab, and the non-interactive, Zero Touch Provisioning (ZTP) method is triggered. After the VM is deployed, an additional 2-3 minutes are required before the ZTP process initializes. When the ZTP process is ready, there will be an asset in the Mist inventory to be associated with the router configuration.
Using the AWS CLI
To deploy the Session Smart Networking software via the AWS CLI:
- Click on the Session Smart Networking Platform offering selected during the previous section Selecting the AMI.
- Click on the Continue to Subscribe button and accept the terms and conditions.
- Click on the Continue to Configuration button.
- In the Fulfillment Option drop down box select CloudFormation Template, select the template Juniper Session Smart Router and select the desired region.
- Click on the Continue to Launch button.
- In the Choose Action box, select Launch CloudFormation and click on the button Launch.
- Copy to the clipboard the URL of the template located in the field Amazon S3 URL.
Launch the deployment with the corresponding AWS CLI commands making use of the S3 URL of the template identified previously. For a description of the parameters of the template, please refer to Launch the Template.
Mist-Managed Setup
Once the EC2 instance is launched with the correct registration-code, the device will self-onboard to the appropriate Mist organization. The process can take up to 5 minutes. The device is visible as Unassigned in the Mist organization once onboarding is complete.
If the device does not show up in the Mist organization after 5 minutes, ssh into the instance.
-
Log into the pcli, run
su adminand thenshow mist. -
If that does not show the device, drop back to the linux shell and look at the journal for the bootstrapper:
-
journalctl -u 128T-hardware-bootstrapper
And the Mist agent:
journalctl -u 128T-mist-agent
Network Interfaces Layout
The Session Smart Router Template deploys an EC2 instance for the SSR with two network interfaces. The template attaches the network interfaces to the EC2 instance in the following order: Public, and Private. The network interfaces to be used in Mist configuration are as follows:
| Network Interface Name | Subnet | Mist Config Name |
|---|---|---|
| eth1 | Public | ge-0/0/0 |
| eth2 | Private | ge-0/0/1 |
Interface Tagging
In addition to using the cloud formation template, the admin can tag the interface with the key SSR-ROLE. The possible values are as follows:
| Tag Value | Meaning |
|---|---|
| WAN | Interface is marked as WAN for onboarding purposes and is assumed to have connectivity to Mist cloud infrastructure. |
| LAN | Interface is marked as LAN and is assumed to be used as a private network for internal workflows. |
The EC2 instance must be assigned the IAM role containing the ec2_describeNetwork permission to leverage the interface tagging.
Cloud-init Onboarding
When launching an AWS EC2 instance using automation the following user-data section can be leveraged to setup the onboarding data for the instance.
#cloud-config
write_files:
  - path: /etc/128T-hardware-bootstrapper/onboarding-config.json
    content: |
      { "name": "<router-name>", "registration-code": "<regcode>", "ssr-version": "<6.3.0>", "mode": "mist-managed", "cloud-provider": "aws"}
| Option | Meaning |
|---|---|
| name | The name of the router to use for Mist onboarding. By default, the instance name will be used. |
| registration-code | The Mist registration used for adoption of the EC2 instance to a Mist organization. |
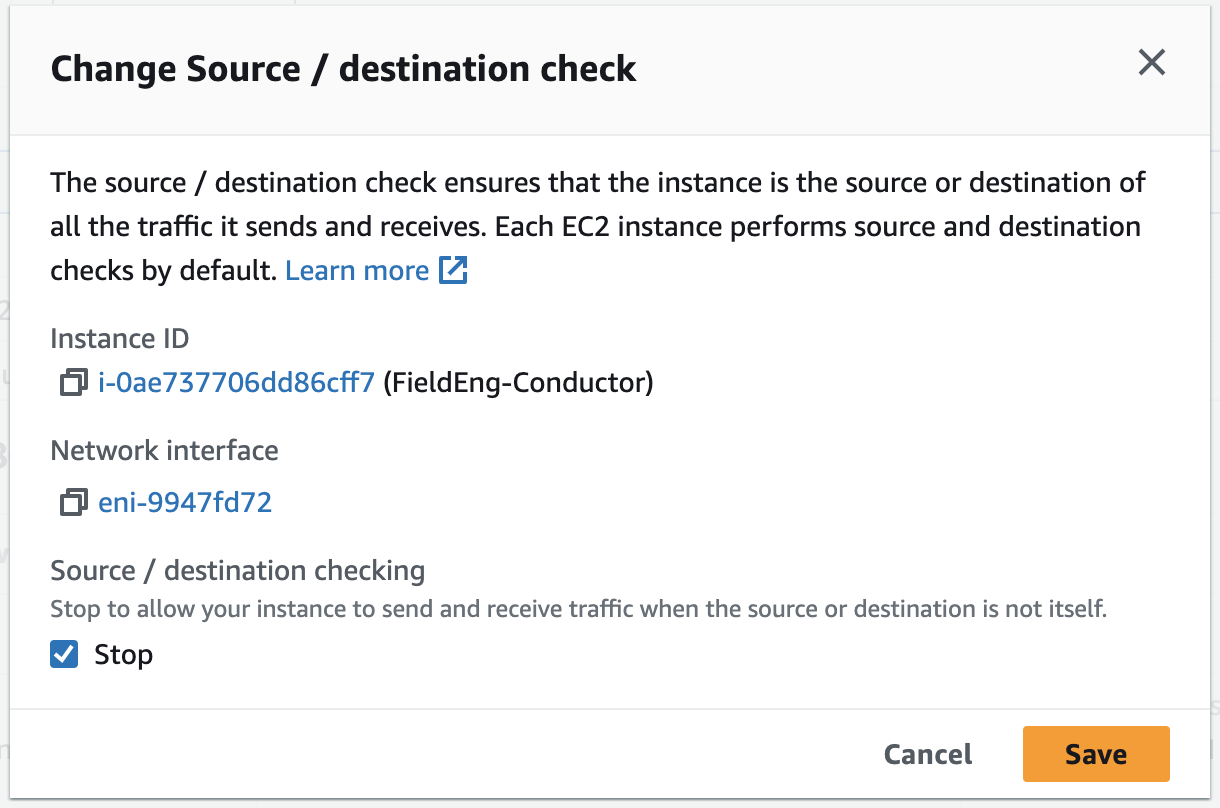
Source / Destination Check
Disabling Source / Destination checking allows the SSR AWS instance to send and receive traffic when it is not the source or destination. This feature is enabled by default. Perform the following steps to disable Source / Destination checking.
- On the Instances page, select the Launch Instances dropdown.
- Select Networking.
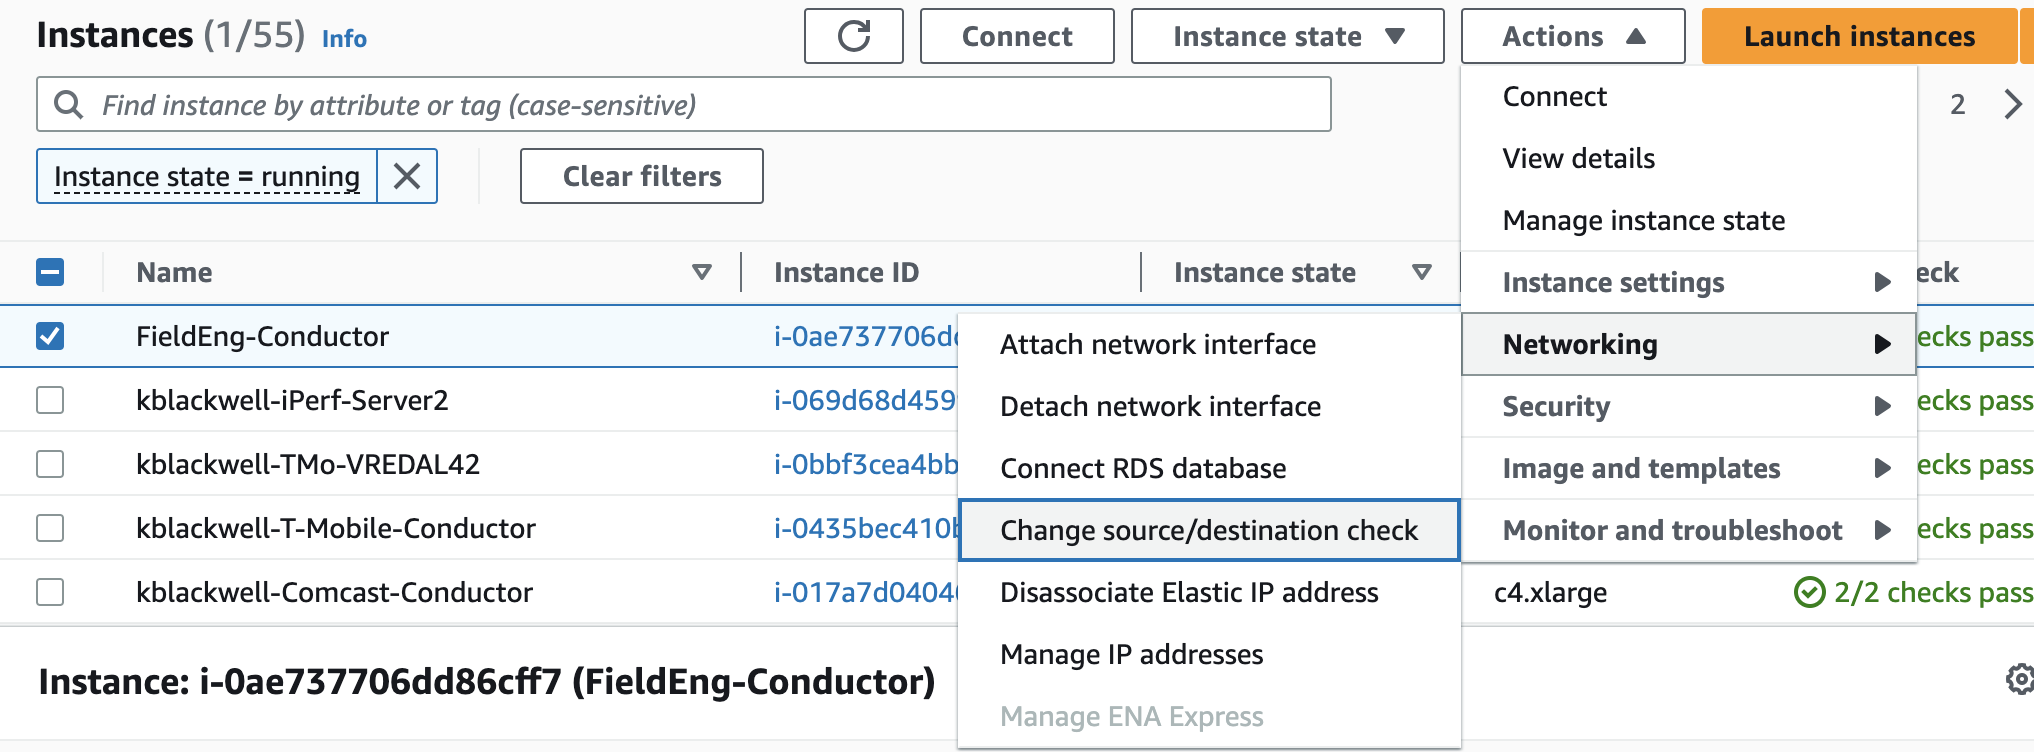
- From the pull out menu, select Change source/destination check.
- In the Change Source / Destination Check window, select Stop, and Save.
Launch the Template
This section describes the parameters to complete the template to deploy a Mist-managed SSR, as well as how to launch it using the portal, or programmatically.
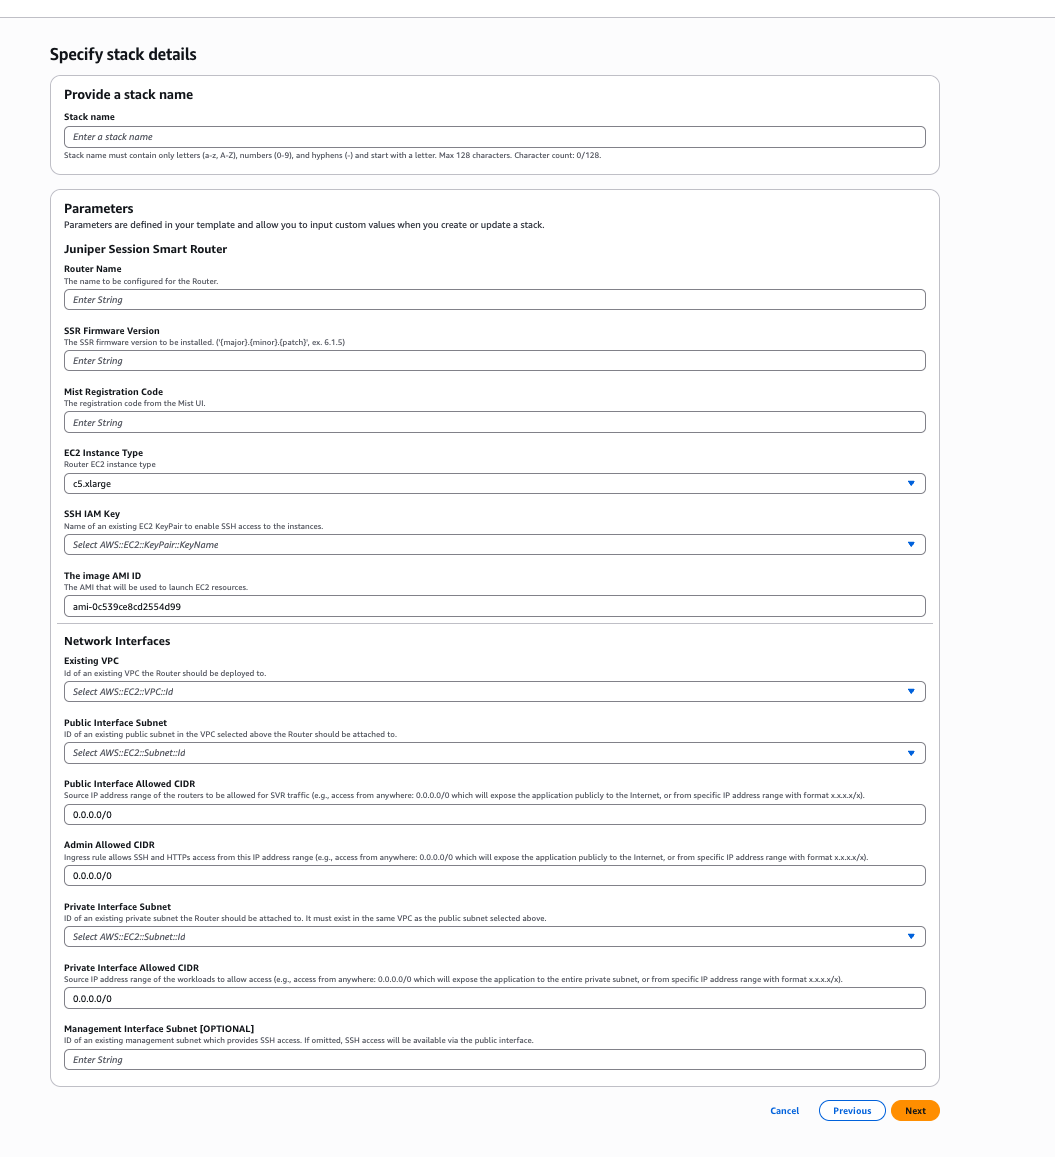
A description of the parameters of the template are listed in the following table:
| Parameter | Description |
|---|---|
| Stack name | Fill out the Instance Name field to provide a name to the VM for the Mist-managed router. |
| VPC ID | ID of the existing VPC where the Mist-managed router is going to be deployed. |
| Public Subnet ID | ID of the public subnet within the VPC. |
| Public Subnet Allowed CIDR | The IP CIDR range of the endpoints allowed to originate traffic to the Router's public interface in the public subnet. |
| Private Subnet ID | ID of the private subnet within the VPC. |
| Private Subnet Allowed CIDR | The IP CIDR range of the endpoints allowed to originate traffic to the Router's private interface in the private subnet. |
| Admin Allowed CIDR | The IP CIDR range of the endpoints allowed to SSH to the EC2 instance as well as login to the Router's GUI. |
| Registration Code | The Mist registration used for adoption of the EC2 instance to a Mist organization. |
| Instance size | Size of the EC2 instance. |
| Key Name | IAM user key (SSH public key) to login to the EC2 instance (Linux) via SSH. |
AWS Console
- Go to the Session Smart Networking Platform offering following the steps described in the section Selecting the AMI.
- Click on the Continue to Subscribe button and accept the terms and conditions.
- Click on the Continue to Configuration button.
- In the Fulfillment Option drop down box select CloudFormation Template, select the template Juniper Session Smart Router and select the desired region.
- Click on the Continue to Launch button.
- In the Choose Action box, select Launch CloudFormation and click on the button Launch.
- Click the Next button.
- Fill out the template. Review the section above to understand the parameters of the template.
- Continue clicking the Next button.
- Click Create Stack to start the deployment.
Once the deployment of the template is complete, information about the new router deployment is provided in the Output tab.
The information listed in the Outputs tab is the following:
- Instance ID of the Router EC2 instance.
- Public IP address of the public interface for administration purposes.
- SSH command to login to the Linux VM. Please continue to the end of this section below for more information regarding the credentials to login.
When logging to the Linux instance via SSH use t128 as the username and the SSH public key of the IAM user provided in the template.
AWS CLI
Alternatively, it is possible to launch the template programmatically. Please adjust the content of the JSON file below to match the input of each template.
Create the parameters file router.parameters.json with the following command:
vi router.parameters.json
Paste the following JSON content. Please adjust the values to your specific environment:
{
  "StackName": "<instance name>",
  "VpcId": "<ID of the VPC>",
  "PublicSubnet": "<ID of the public subnet within the VPC>",
  "PublicSubnetAllowedCidr": "0.0.0.0/0",
  "PrivateSubnet": "<ID of the public subnet within the VPC>",
  "PrivateSubnetAllowedCidr": "0.0.0.0/0",
  "AdminAllowedCidr": "0.0.0.0/0",
  "RegistrationCode": "<Registration code>",
  "InstanceType": "c5.xlarge",
  "KeyName": "<username>"
}
- Go to the Session Smart Networking Platform offering following the steps described in the section Selecting the AMI.
- Click on the Continue to Subscribe button and accept the terms and conditions.
- Click on the Continue to Configuration button.
- In the Fulfillment Option drop down box select CloudFormation Template, select the template Juniper Session Smart Router and select the desired region.
- Click on the Continue to Launch button.
- In the Choose Action box, select Launch CloudFormation and click on the button Launch.
- Copy to the clipboard the URL of the template located in the field Amazon S3 URL.
Launch the template running the following command:
aws ec2 create-launch-template \
  --launch-template-name <template-file> \
  --launch-template-data file://router.parameters.json
When logging to the Linux instance via SSH use t128 as the username and the SSH public key of the IAM user provided in the template.
If a template of the Bring Your Own License image was used, SSH to the EC2 instance using t128 as the username as indicated in the SSHLogin field. Launch the software installation process with the command sudo install-ssr.
If a template from a Private or Hourly image was used, you can login to the application via HTTPs as indicated in the HTTPSLogin fields respectively, the username is admin and the password is 128Tadmin.
Deploying a Router without Templates
- Launch a web browser and navigate to https://aws.amazon.com/
- Login to AWS with your account.
note
If you do not have an account, click Create an AWS Account to register.
- Click EC2 Dashboard and select your deployment region from the drop down list.
- Click Launch Instance.
- On the Step 1: Choose an Amazon Machine Image (AMI) page, select the Amazon Marketplace tab and enter Session Smart Networking in the search bar.
- Locate the SSR image and click Select.
- On the Step 2: Choose and Instance Type page, choose an instance type.
- On the Step 3: Configure Instance Details page, click Subnet and select the desired subnet and retain the default values for the other fields.
note
If the desired subnet is not listed, click Create New Subnet to create one.
- Click Next: Add Storage.
Select Yes, I want to continue with this change and click Next.note
The You have changed your network setting window may appear.
- On the Step 4: Add Storage page, ensure the size is 128 GB (default value).
- Click Next: Add Tags. See Interface Tagging for additional tag configuration information.
- On the the Step 5: Add Tags page, click Add Tags.
- Click inside the Key column and select Name. Under the Value column enter the name for your instance.
- Click Next: Configure Security Group.
- On the Step 6: Configure Security Group page, click select an existing security group and choose one from the list.
note
If the desired security group is not listed you can create your own by selecting Create a new security group and following the prompts.
- Expand the Advanced Details and scroll down to the User data section. To onboard the router to the desired Mist organization, you can add cloud-init user-data using the steps in the Cloud-init Onboarding section.
- Select Review and Launch.
- In the Boot from General Purpose window, select Continue and then click Next.
- On the Step 7: Review Instance Launch page, click Launch to finalize the instance.
- In the Select an existing key pair or create a new key pair dialog box, select Choose an existing key pair and select the desired key pair from the list.
note
If the desired key pair is not listed click Create a new key pair, enter a name in the Key pair name field and click Download Key Pair.
- Check the acknowledgment check box and then click Launch Instances.
- On the Launch Status page, click View Instances.
- Record the instances IP address.
- Launch a command window prompt.
- Enter the IP address of the instance.
- When prompted by the installer, press the Enter key to select Begin.
Configuring a Default Route to an Internet Gateway
If the EC2 instance deployed for the Session Smart software does not have access to the Internet, verify a default route to an Internet Gateway exists:
- From the main toolbar, click Services to expand the Services list and select VPC.
- From the VPC Dashboard pane, click Your VPCs.
- From the VPC Dashboard pane, click Route Tables and then Create Route Table.
- In the Create Route Table dialog box, enter the following information and click Yes, Create.
- Name Tag: Enter a name for your route table
- VPC: Using the dropdown list, select the VPC to associate with the route table
- From the VPC Dashboard pane, select Internet Gateways and click Create Internet Gateway.
- In the Create Internet Gateway dialog box, enter an Internet Gateway name in the Name Tag field and click Yes, Create.
- On the Internet Gateways page, click Attach to VPC and assign the Internet Gateway to your VPC.
- From the VPC Dashboard pane, select Route Tables and click Edit.
- Click Add Another Route.
- In the 0.0.0.0/0 row, click the empty cell under the Target column and the local name automatically appears as a selectable option.
- Select it and click Save.