
Deploy Juniper Security Director Using VMware vSphere
This topic guides you through the Juniper Security Director VM deployment using VMware vSphere.
Before You Begin
-
If you are not familiar using VMware vSphere, see VMware Documentation and select the appropriate VMware vSphere versions.
-
To learn about the size of the VM, see Hardware Requirements.
-
You must have 4 dedicated IP addresses and ensure that you have access to SMTP, NTP, and DNS servers, see Software Requirements.
Note:If the deployment is a regulated/air-gapped environment, ensure that the VM also has access to signatures.juniper.net for IDP/Applications Signatures download.
-
Only IPv4 is supported for OVA deployment. We do not provide support for IPv6.
Step 1: Download the OVA and the Software Bundle
-
Download the Juniper Security Director OVA (.ova file) from Software Downloads page to a webserver or your local machine. To avoid connectivity issues, download the OVA directly to your local machine.
- Download the
Juniper Security Director Software Bundle (.tgz file) to your local machine
from Software Downloads page and then transfer the file to your
staging server.
A staging server is an intermediate server where the software bundle is downloaded and is accessible from the VM.
Host the upgrade bundle on a staging server that is reachable by the Juniper Security Director VM. The VM supports bundle downloads through SCP, HTTP, or HTTPS when using a CA‑signed certificate. Self‑signed HTTPS certificates are not supported.
For SCP downloads, provide the staging server’s username, password, IP address or FQDN, and the file path.
For HTTP or HTTPS downloads, provide the file path to the upgrade bundle.
Step 2: Deploy the VM
-
Open the vSphere Client.
-
Right-click the inventory object that is a valid parent object of a VM and select Deploy OVF Template.
Figure 1: Deploy OVF Template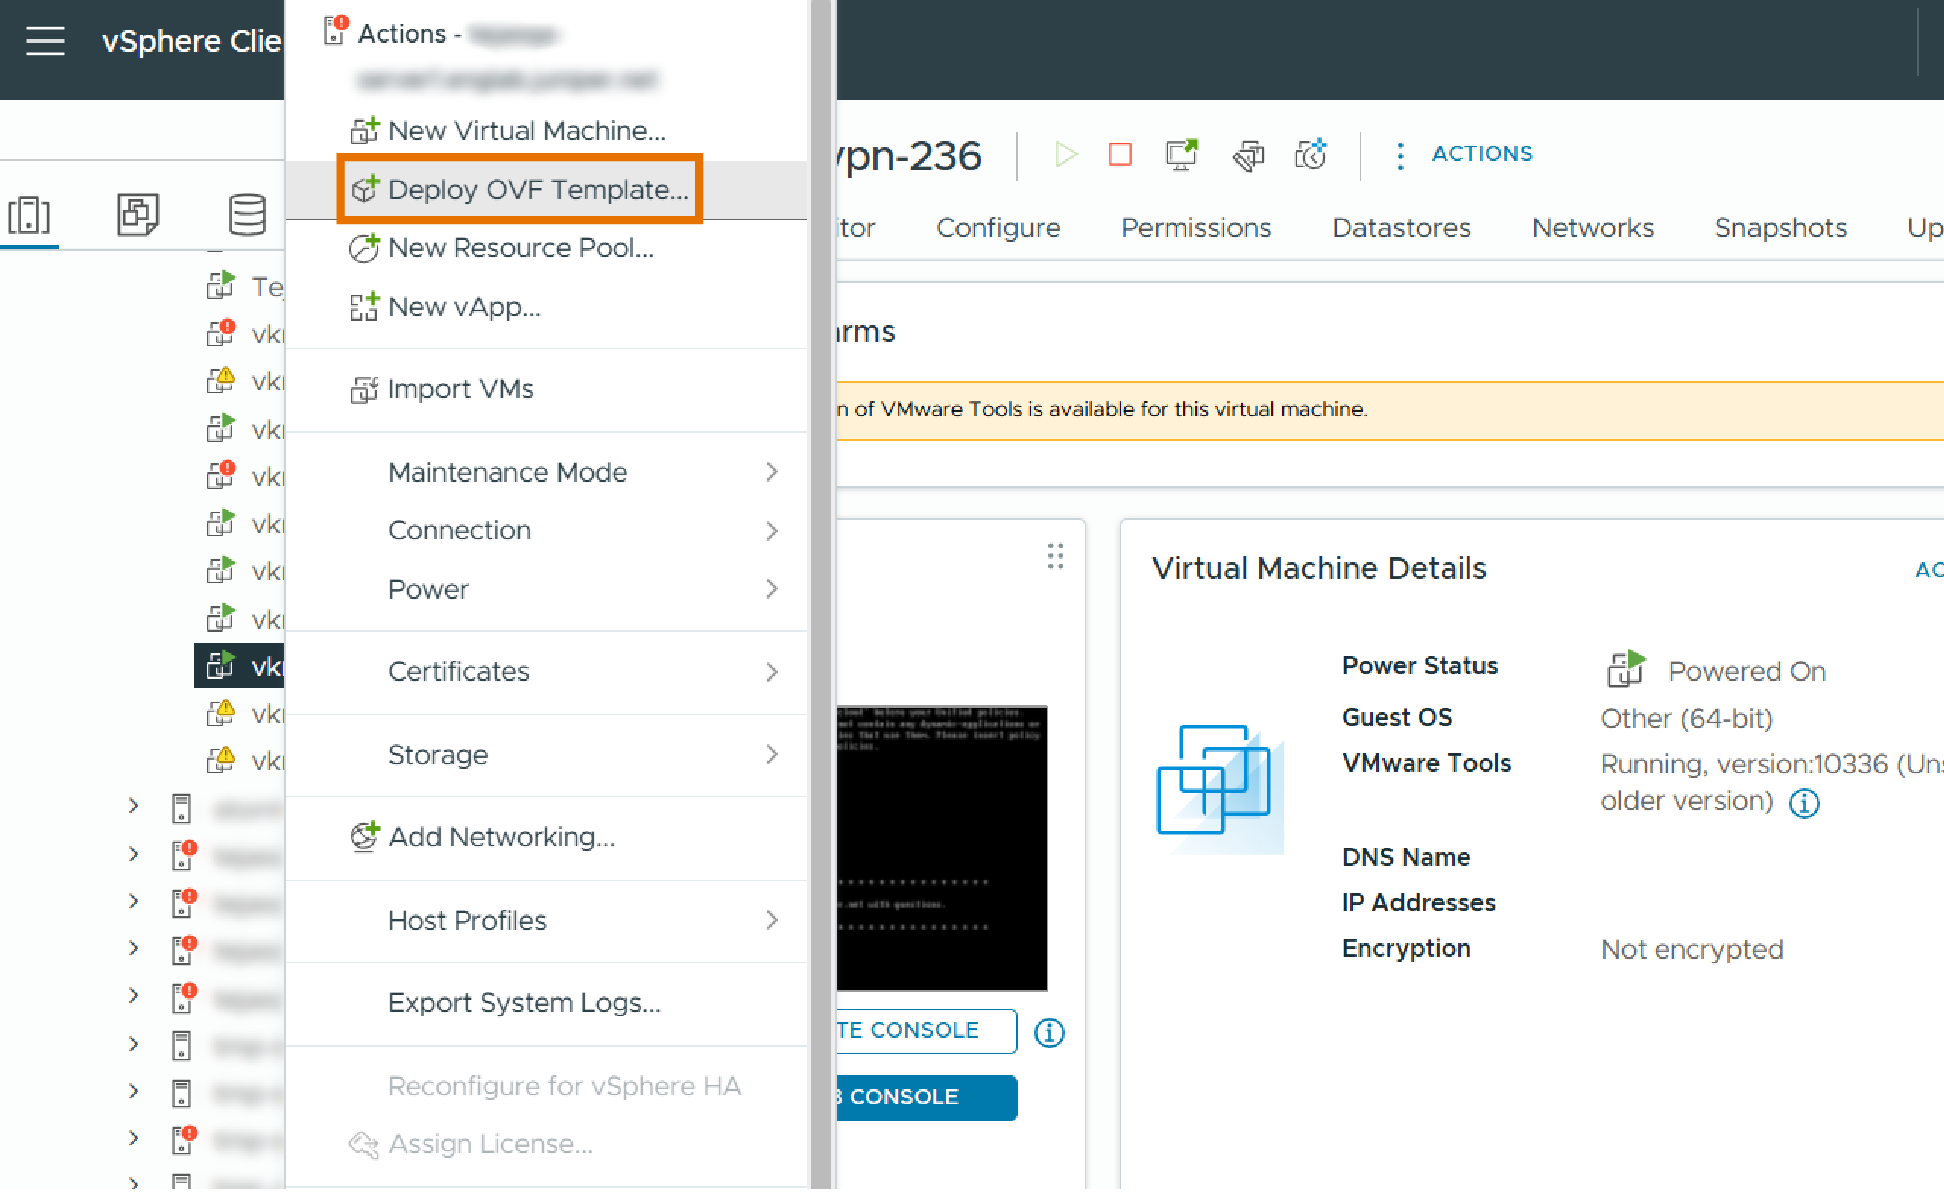
-
On the Select an OVF template page:
-
Enter the webserver OVA URL, where you have downloaded the OVA. The system might warn you about source verification. Click Yes.
Ensure that firewall rules do not block image access from the vSphere cluster.
-
Select the Local file option and click UPLOAD FILES to choose the OVA file from your local machine.
Figure 2: Select or Upload OVF File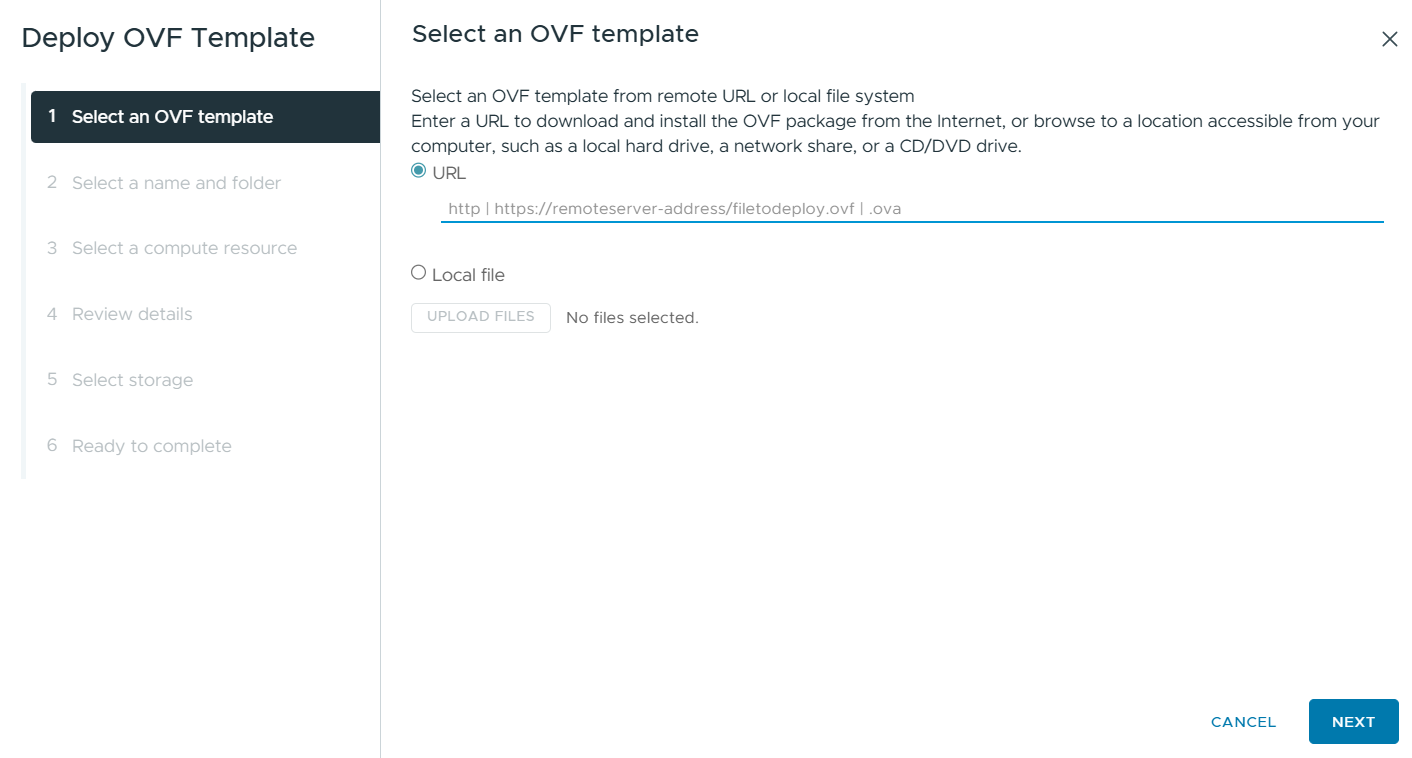
-
-
On the Select a name and folder page, enter the VM name and select the location for the VM.
-
On the Select a compute resource page, select the compute resource for the host on which the VM will be deployed.
-
On the Review details page, review the details of the resources to be provisioned.
On the License agreements page, select the check box to accept the license agreements.
-
On the Select storage page, select the storage for the configuration and the virtual disk format. We recommend you to use virtual disk format as Thick provision and select storage with at least 1.5 TB of capacity.
Note:We do not recommend thin provisioning. If you choose thin provisioning and the actual disk space available is low, the system might encounter problems once the disk is full.
-
On the Select networks page, select the network to configure IP allocation for static addressing.
-
On the Customize template page, configure Juniper Security Director on-premise OVA parameters.
Note: Prepare all details for the Custom template page in advance. The OVF template will timeout after 6 to 7 minutes.Figure 3: Customize OVF Template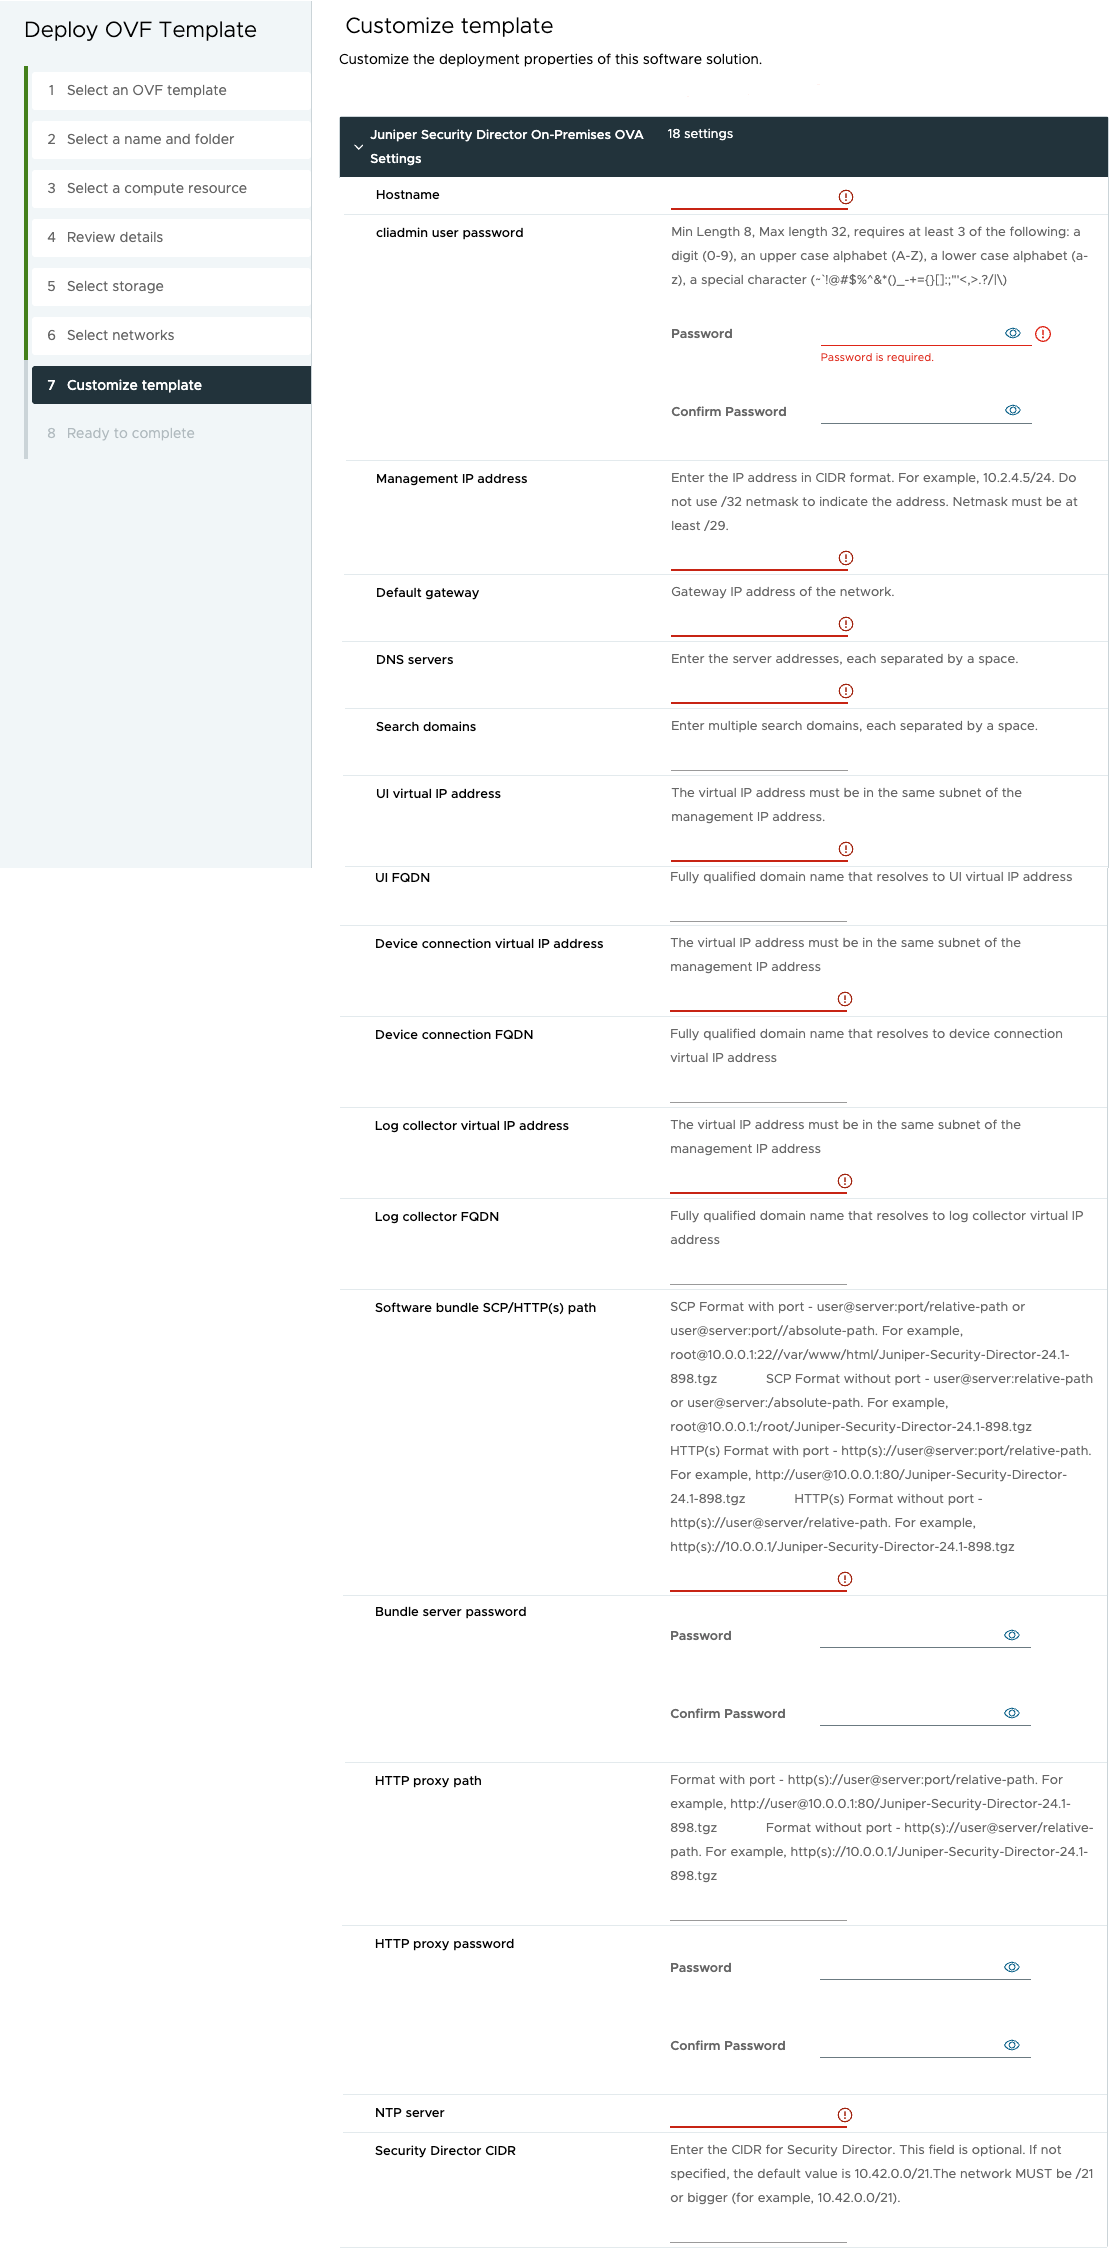
You can edit the virtual IP addresses and fully qualified domain names (FQDNs) for UI, device connection, and log collector at a later time. For more information, see Edit System Details.
Note:-
The cliadmin user password field does not strictly validate password requirements. However, during the installation process, the system enforces strict validations and rejects the password that does not meet the specified requirements, causing installation failure. To avoid issues during installation, ensure that the password meets these criteria:
-
Must be at least 8 characters long and not more than 32 characters.
-
Must not be dictionary words.
-
Must include at least three of the following:
-
Numbers (0-9)
-
Uppercase letters (A-Z)
-
Lowercase letters (a-z)
-
Special characters (~!@#$%^&*()_-+={}[];:"'<,>.?/|\)
-
-
-
UI FQDN, Device Connection FQDN, and Log Collector FQDN fields are optional. However, we highly recommend you to use Fully Qualified Domain Name (FQDN). Ensure that the FQDN is:
-
Valid and follows the domain naming conventions.
-
Complete, including the domain and subdomain details.
-
Resolvable, that is, DNS can correctly map the FQDN to an IP address.
An incorrect FQDN results in issues that require re-installation of the VM.
If the IP addresses are incorrect, you won't be able to start an SSH connection to the VM. You can only access the VM through the web portal.
-
The Software bundle SCP/HTTP(s) path refers to the location of the Juniper Security Director software bundle (.tgz file) on your staging server. Make sure you have downloaded the Juniper Security Director Software Bundle (.tgz file) to your local machine from Juniper Software Downloads page and transferred it to your staging server. The staging server serves as an intermediary to store and make the software bundle accessible to the VM. The staging server must support software bundle download from the Juniper Security Director VM through SCP, HTTP, or HTTPS when using a CA‑signed certificate. Self‑signed HTTPS certificates are not supported. Before deploying the VM, ensure you have:
For SCP downloads—the staging server’s username, password, IP address or FQDN, and the file path.
For HTTP or HTTPS downloads—the software bundles file path.
The Security Director CIDR is the IP address range that Kubernetes uses for internal service and pod networking when deploying and running Juniper Security Director on-premises services.
Default value—10.42.0.0/21
Requirement—The CIDR must be /21 or larger. For example, 10.42.0.0/21, 10.42.0.0/20
The Security Director CIDR must not overlap with the VM management subnet. Overlapping ranges can cause routing and IP conflicts between the Kubernetes network and the VM management network.
-
-
On the Ready to complete page, review all the details and if required, go back and edit the VM parameters. These network parameters cannot be changed from the VM configuration after successful installation. However, network parameters can be changed from the CLI. Click Finish to begin the OVA deployment.
You can monitor the OVA deployment progress status in the Recent Tasks window at the bottom of your screen till it is 100% complete. The Status column shows the deployment complete percentage.
Congratulations! Now the OVA deployment is complete.
-
(Optional) Once you've deployed the OVA, create a snapshot of the VM. Snapshot is useful if you need to rollback after the software bundle automatically installs.
To create a snapshot:
Select the VM.
In the Actions menu, navigate to .
The Take Snapshot window is displayed.
Enter a name and description for the snapshot.
Click Create.
A snapshot of the VM is created.
-
Click the triangle icon (
 ) next to the VM name to power
on the VM.Note:
) next to the VM name to power
on the VM.Note:By default, the VM is deployed using the smallest resource configuration, as detailed in Option 1 in Hardware Requirements. Adjust the resources to match other resource configurations using the VMware Edit VM settings.
For a successful installation, the resource allocation must match Hardware Requirements.
For instructions to modify the VM configuration in VMware vSphere, see Modify VM Configuration Using VMware vSphere.
Once the VM powers on, navigate to the Summary tab and click LAUNCH WEB CONSOLE to monitor the software bundle installation status.
Avoid performing any operation on the console until the installation is complete.
You can view the installation progress on the console. After the installation is complete, the console displays Successfully installed software bundle on the cluster and the VM reboots.
A successful installation requires approximately 30 minutes. If the installation lasts longer, check the Web console for potential errors. You can ssh to the VM IP using the cliadmin user and the password you configured during the OVA deployment. Then, use the show bundle install status command to check the installation status. See Verify and Troubleshoot.
To check the parameters, power off the VM, then navigate to Configure and click vApp options. If the parameters are incorrect, deploy the OVA again with correct parameters.
Congratulations! The software bundle installation is now complete.