Connect a Switch to Mist Cloud Through a Proxy Server Using CloudX
Follow this workflow to connect an EX Series switch to the Mist cloud by using a proxy server.
Juniper CloudX Overview
Juniper CloudX, integrated natively into Junos OS, is an advanced architecture that ensures faster and secure communication between Juniper switches and the Mist cloud. It is responsible for creating a secure connection between switches and the Mist cloud. CloudX-enabled switches can be monitored and managed by cloud services.
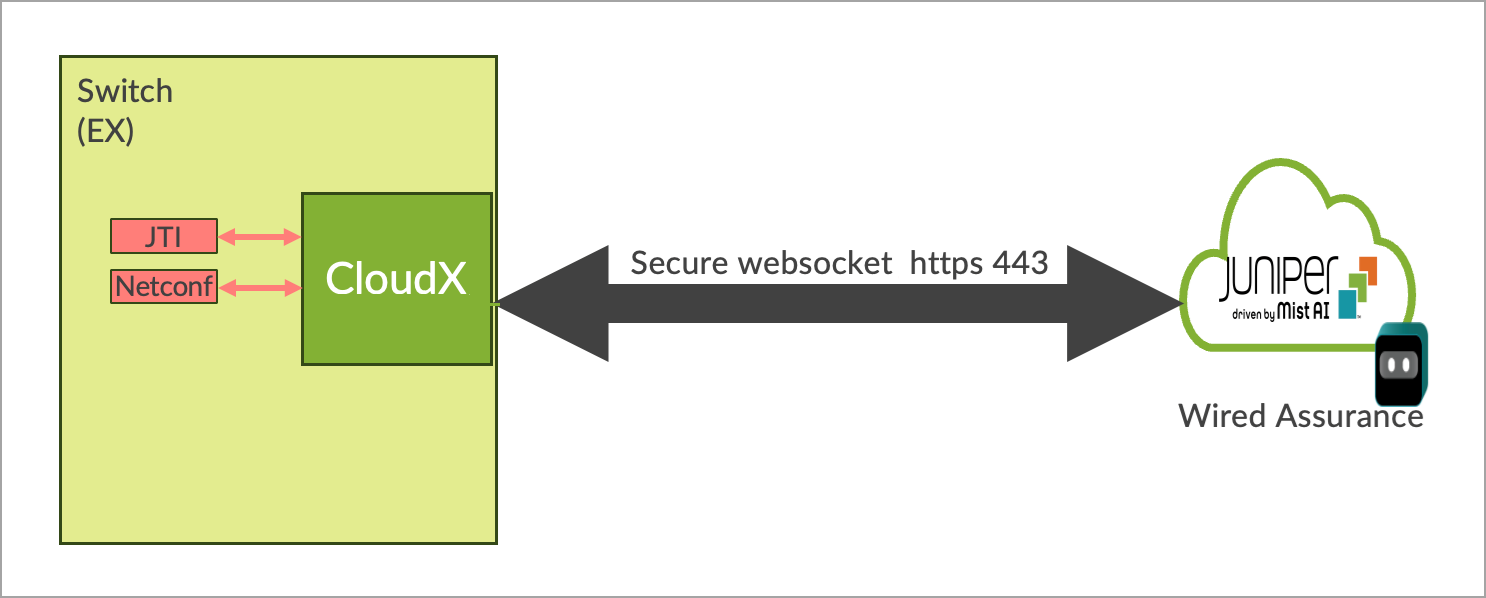
CloudX applies to both new and existing switches. It enables new switches to communicate directly over HTTPS 443 when onboarded to Mist cloud through ZTP. For the existing switches that are connected to the Mist cloud through TCP port 2200, enabling CloudX will transition their connection to CloudX with no impact on the data plane. For switches to connect and communicate using CloudX over TCP 443, the following firewall port must be opened: jma-terminator.[xx].mist.com(TCP 443). The variable [xx] should be replaced by the environment name.
Benefits of CloudX:
- Keeps the data on the cloud up to date. Events are sent to the cloud every 10-15 seconds and stats are updated every 60 seconds.
- Leverages the Junos Telemetry Interface (JTI), which ensures asynchronous and faster communication by bypassing any polling from the cloud to the switch.
- Enables switches to connect to the cloud over HTTPS port 443, like Mist APs. You do not need to open any non-standard ports on the firewall.
- Enables switches to communicate with the Mist cloud through a proxy server. You can either statically define a proxy server or send proxy server details dynamically through DHCP Option 43. For more information, see Connect a Switch to Mist Cloud Through a Proxy Server Using CloudX.
- Offers packet capture for switches on the Mist Cloud. You can initiate packet capture on a single switch port or a range of ports. You can leverage the on-demand packet capture feature in Mist to view transit traffic or control traffic. For more information, refer to Enable Packet Capture on a Switch.
Availability of CloudX
The following table lists the platforms that support CloudX in different Junos releases. The table lists multiple Junos versions for each platform. Different variants within each platform are also supported. So, the EX4100-F variant of the EX4100 Series is also supported. We recommend that you upgrade the switch to a Junos suggested release for the CloudX support.
For CloudX to work, you must ensure that the firewall port toward jma-terminator.xx.mist.com is open and SSL decryption is disabled on the firewall. For more information, refer to Juniper Mist Firewall Ports and IP Addresses for Firewall Configuration. To check if your switch is communicating with Mist cloud by using CloudX, refer to the steps listed in Troubleshooting Juniper CloudX. If you don't see CloudX enabled on your switch even after upgrading it to a supported Junos release, contact Juniper support.
|
Platforms |
Supported Junos Release |
CloudX Availability |
|---|---|---|
|
EX2300/EX3400 |
23.4R2-S4 and above 24.2R1-S2 and above |
Generally Available |
| EX4000 |
24.4R1 and above 24.4R1-S2 and above |
Generally Available |
|
EX4400/EX4100 |
22.4R2-S1 and above 22.4R3 and above 23.4R2 and above 24.2R1 and above |
Generally Available |
|
EX4650/QFX5120 |
23.4R2-S4 and above 24.2R1-S2 and above |
Generally Available |
|
Note:
|
||
If you face any issues with CloudX, you can troubleshoot it by following the steps listed in Troubleshooting Juniper CloudX.
Connect a Switch to Mist Cloud Through a Dynamic Proxy Server
Before you connect the switch to the Mist cloud through a dynamic proxy server, ensure that the following prerequisites are met:
-
The switch is onboarded to the Mist cloud using the claim code or activation code.
-
The switch is running a CloudX-supported Junos version. For more information, see Juniper CloudX Overview.
-
The DHCP server is able to hand out the proxy server information (through Option 43) and other elements such as IP Address, DNS, and default route.
-
The switch can reach the HTTP proxy server over an IP network.
-
The HTTP proxy server can redirect traffic to the Mist cloud. This example shows how to configure the proxy server:
To connect a switch to Mist cloud through a dynamic proxy server:
Connect a Switch to Mist Cloud Through a Static Proxy Server
If a switch cannot receive the proxy information through DHCP, you can configure it with a static proxy server through which the switch can connect to the Mist cloud. In this case, the DHCP server does not hand out the proxy server information through Option 43.
Before you connect the switch to the Mist cloud through a static proxy server, ensure that the following prerequisites are met:
-
The switch is onboarded to the Mist cloud using the claim code or activation code.
-
The switch has the configuration management option enabled in Mist. If not, you will need to use the switch CLI to configure the proxy server.
-
The switch is running the Junos version 21.4R3-S4, 22.4R2-S1, or later.
-
The local DHCP server is able to hand out IP address, DNS, default route, or statically defined route on the switch. This process involves staging the switch before establishing the cloud connectivity. If this prerequisite is met, the switch will be able to reach the HTTP proxy server over an IP network.
To connect a switch to Mist cloud through a static proxy server:
-
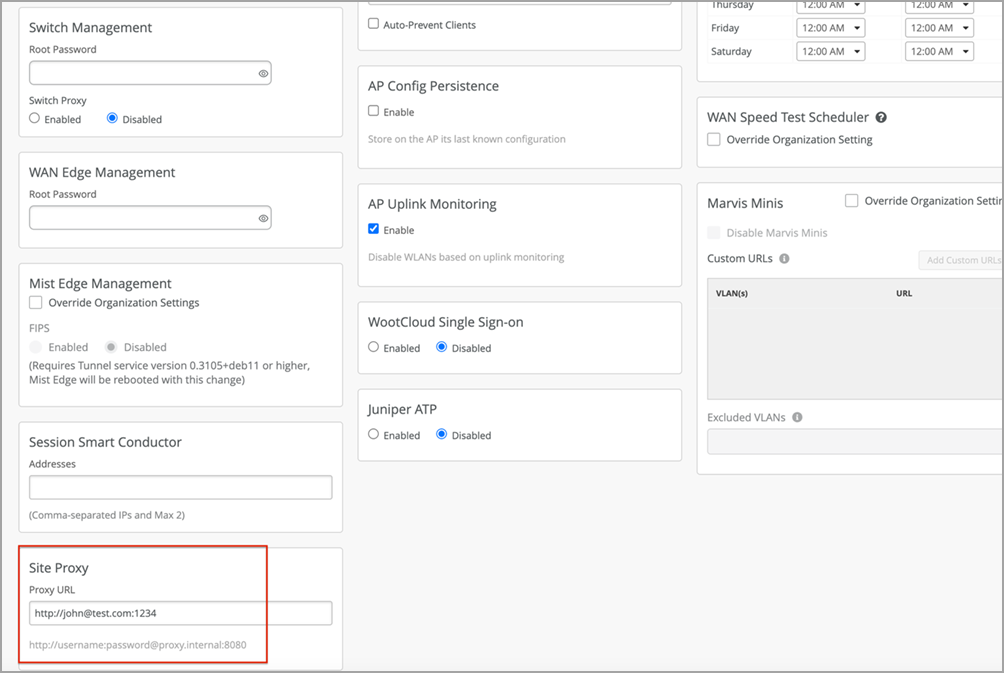
On the Site Proxy tile of the site configuration page, configure the proxy
information, as shown below: