Use Postman to Get Started with Webhooks
Postman is a platform that is designed to make it easy to work with APIs. This topic walks you through how to use Postman for webhooks.
Postman is an API platform you can use for most everything API related, including configuring, testing, and receiving webhooks. This topic covers how to set up Postman for webhooks related tasks. Webhooks allow you to receive data as events occur.
Postman Setup
To use Postman, you can use the Postman website or download the Postman application as described in Download Postman.
If you already have a Postman account set up, skip ahead to Create a Webhook Using the Postman API Collection.
- Sign in to Postman (or create an account) from the Postman website or application.
- Once your account is created, you get access to your workspace. This is where you can save your API calls and configure your environment to interact with the Mist API.
Create Your Environment
A postman environment allows you to store variables in a profile that you can reuse across multiple API calls and collections. You must create an environment and define variables before you begin making API calls in Postman.
If you already have a Postman environment set up including variables, skip ahead to Create a Webhook Using the Postman API Collection.
-
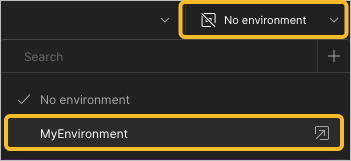
Apply the environment to your Postman workspace by navigating to the
Environment drop-down menu in the top right corner of the page,
then select your newly created environment.
Create a Webhook Using the Postman API Collection
Now that you have set up Postman your collection, it's time to create a webhook. You can use the Postman API Collection to do this.
-
Expand the Postman API Collection and navigate to
Webhooks > Create a
webhook. Follow the on screen prompts as they appear.
-
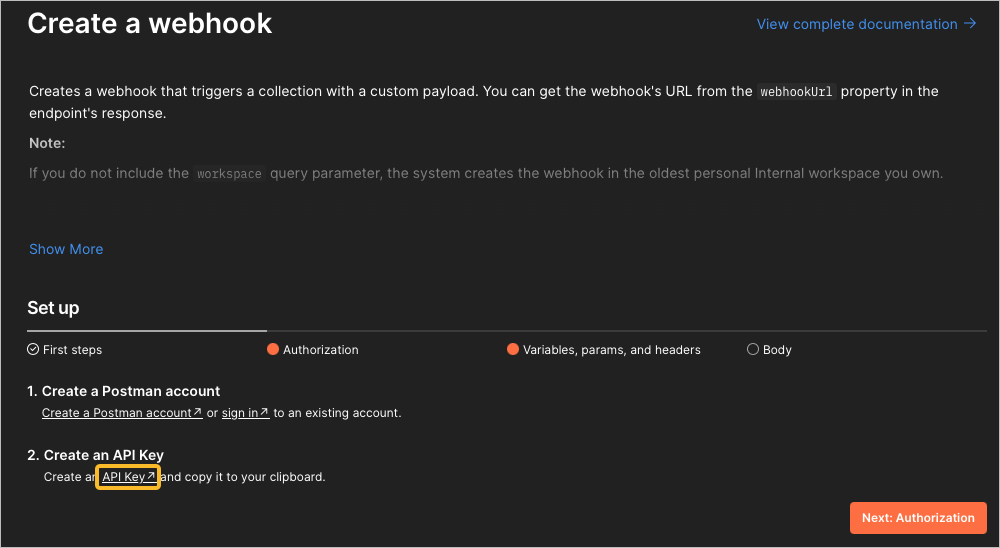
Create an API Key by clicking the
API Key link. This brings you to the
API keys page. Click the
Generate API Key button in the top-right
corner. Store the key somewhere safe upon creation.
-
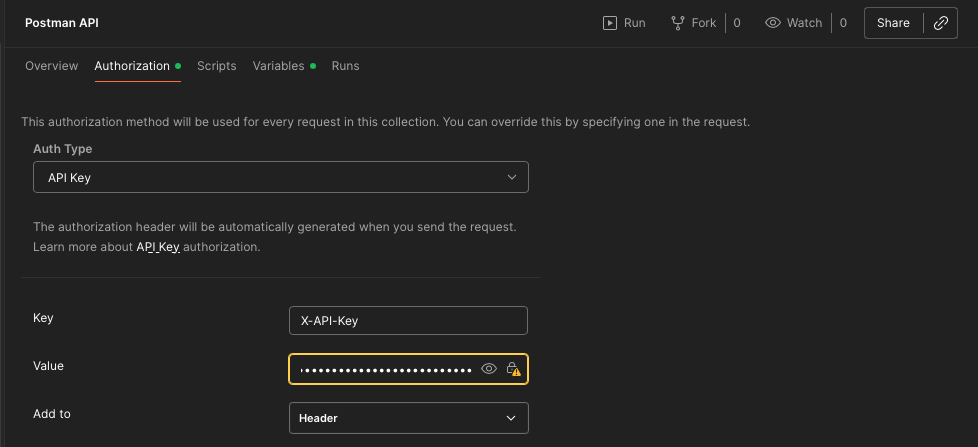
Complete Authorization by entering in your API Key information.
Click the Edit Auth in Collection button.
Paste your key into the value field.
-
From the left menu, navigate back to
Webhooks > Create a
wehook. Click Next: Variables, params,
and headers. Enter the following variables:
workspaceId You can obtain your workspace ID by hovering over your workspace name in the top-left corner of Postman, then click the copy button to the right of the ID that appears in the window. webhookName Give your webhook a descriptive name. collectionUid Enter the ID of your collection (not the ID of the Postman API collection). To do this, select your personal collection, then click the Info icon on the right ride of the screen, then copy the ID from the ID field. Otherwise, you may receive a 400 Bad Requesterror when sending the webhook.environmentUid You can find your environment ID by navigating to your environment, then click the Info icon on the right ride of the screen. Copy the ID from the ID field. baseUrl The API endpoint for requests. https://api.getpostman.comis the base URL by default.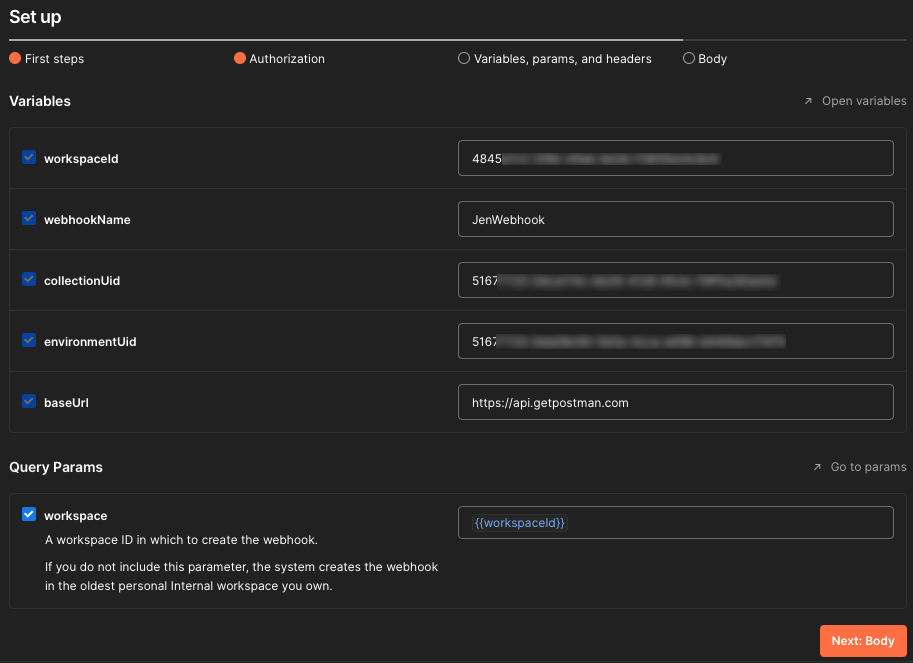
-
Create an API Key by clicking the
API Key link. This brings you to the
API keys page. Click the
Generate API Key button in the top-right
corner. Store the key somewhere safe upon creation.
-
Select Send to request your webhook.
You should receive a
200 OKresponse code indicating that the request was successful.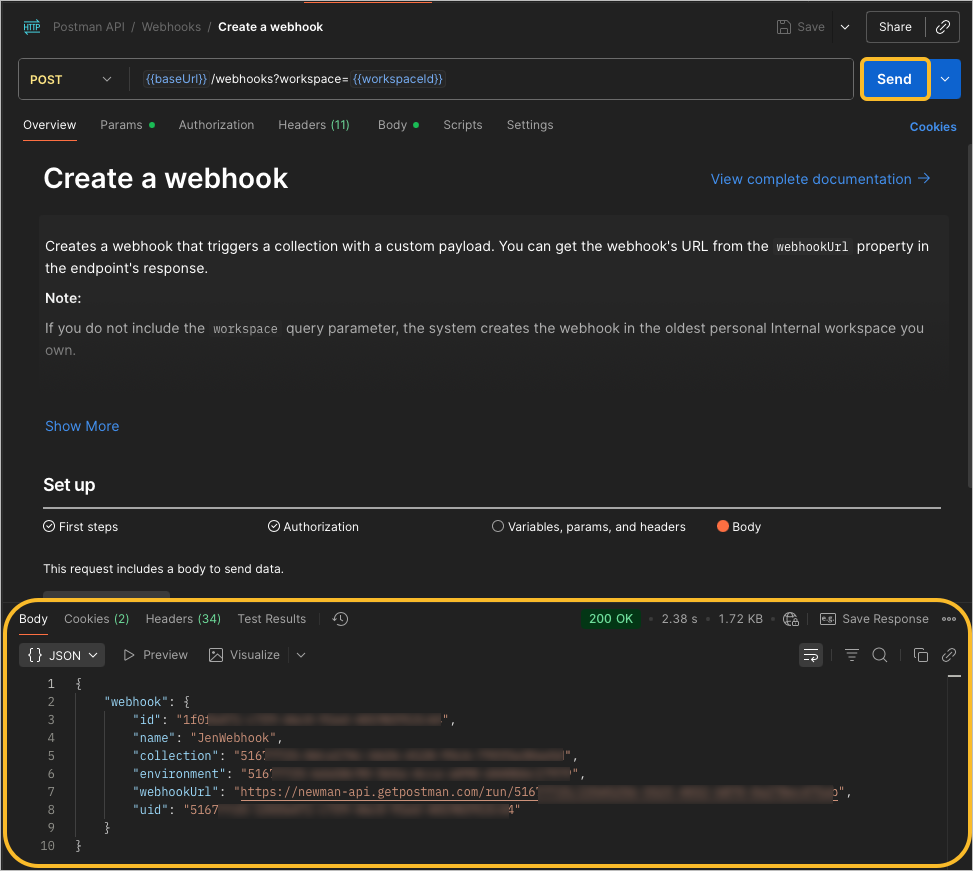
If you did not receive a response, select the Console button in the bottom left corner of Postman to gather more information about the sent request and received response. Study the HTML response code to understand why you received the response. Below are some example error codes:
-
Error 404—This means that the endpoint URL does not exist. Validate that your{{host}}variable is configured properly. For example, an additional/in the URL would result in anError 404response code. -
Error 401—This means that you are not authorized to send the API call. Review the response of the Mist API to understand what is not setup properly. Validate that your{{apitoken}}variable is configured properly.
For more information about HTML response codes, see REST API HTTP Response Codes.
-
Optionally Import the Mist API Collection
Juniper Mist has a list of Postman API calls that you can import directly into your Postman workspace. This list is maintained and matches what the API documentation lists.
- Navigate to the Juniper Mist Postman collections page and select the Mist Systems's Public Workspace collection.
- Once the collection is opened, click on Fork as described in Fork collections and environments in Postman. This enables you to create a copy of the collection in your own workspace and still receive updates when the main collection is updated.
- In the top left corner of Postman, you should see that the collection has now been forked into your workspace. Expand the collection and its subsections to see how the API calls are organized.
How to Use Webhooks in Postman (Video)
Let's learn how to create a Postman webhook. The first thing you'll need is a collection to run. I'm using this collection here called Postman API Webhook Demo.
I also have the components that I'll need to create the webhook and call it, but it's not important that these elements be in the same collection you're trying to run. Let's start by creating the webhook. This endpoint is provided by the Postman API.
There's some information that you'll need and you can read the documentation to find all those elements. But I'm going to be sending a post call with this body that includes a webhook name and a collection ID. The collection ID is for the collection I want to run, which is actually this same collection containing this request.
Let's hit send, and if we get a 200 OK, we can see that we get a webhook URL. This is the URL that you'll hit to call your webhook. When I hit send, I'm looking under the tests tab.
I actually wrote a little bit of code to set a webhook URL programmatically so that I don't have to copy that URL to my clipboard. Now we can move on to this next call, a post to call the webhook. Going to that webhook URL that we just created.
And I'm going to send a payload, which is a JSON object that says, ahoy, matey. And when I send it, I'm going to be calling the webhook, triggering this collection run. Let's hit send.
And it's 200 OK. Well, how do I know that it's really OK? A Postman webhook behind the scenes is actually a monitor. So if we go to the monitors, we can see that I created a webhook called hooky.
And here is that run. And if I select this collection run and scroll down, I can see this is the collection that ran. In fact, just one request called echo the payload.
If I want to drill down deeper, I can tab over to console, and I can see that I have some console statements where I'm saying hello from the pre-request script and hello from the test script. Let's take a look at what I actually ran by calling my webhook. Return a collections.
The thing that I was running was this request here called echo the payload. This is just Postman's echo service echoing back what I give it. And if I go under the pre-request script, you can see that I'm able to access the payload sent through that webhook using globals.previous request.
And here's that log statement from the pre-request script. And the reason why the entire collection didn't run, if you can guess, I'll go to the tests tab, is because I terminated the request using Postman set next request. So in this instance, I only ran the very first request in this collection using my webhook.