Help us improve your experience.

Let us know what you think.

Do you have time for a two-minute survey?


Assign a Role to a Device

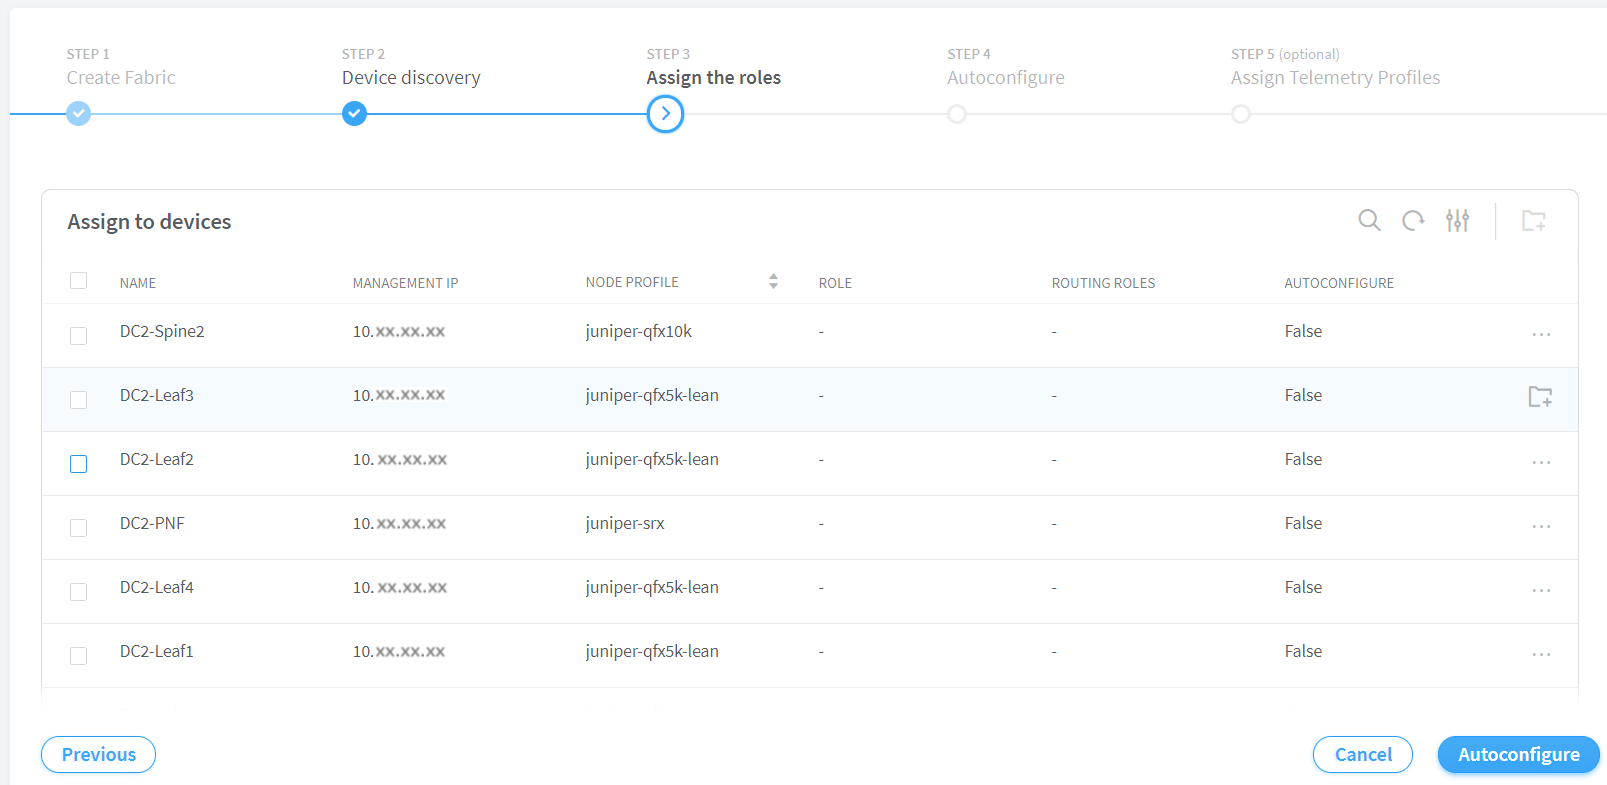
After you have completed the steps provided in the Discover a Device topic, you can assign roles to the devices from the Assign the Roles page.

Figure 1: Assign the Roles Page Screenshot of network configuration interface showing Step 3 Assign the roles in setting up a network fabric. Table lists devices with their names, masked management IPs, node profiles, and roles unassigned. Routing roles and autoconfigure are also unassigned. Progress bar at top indicates Step 3. Options at bottom include Previous, Cancel, and Autoconfigure.

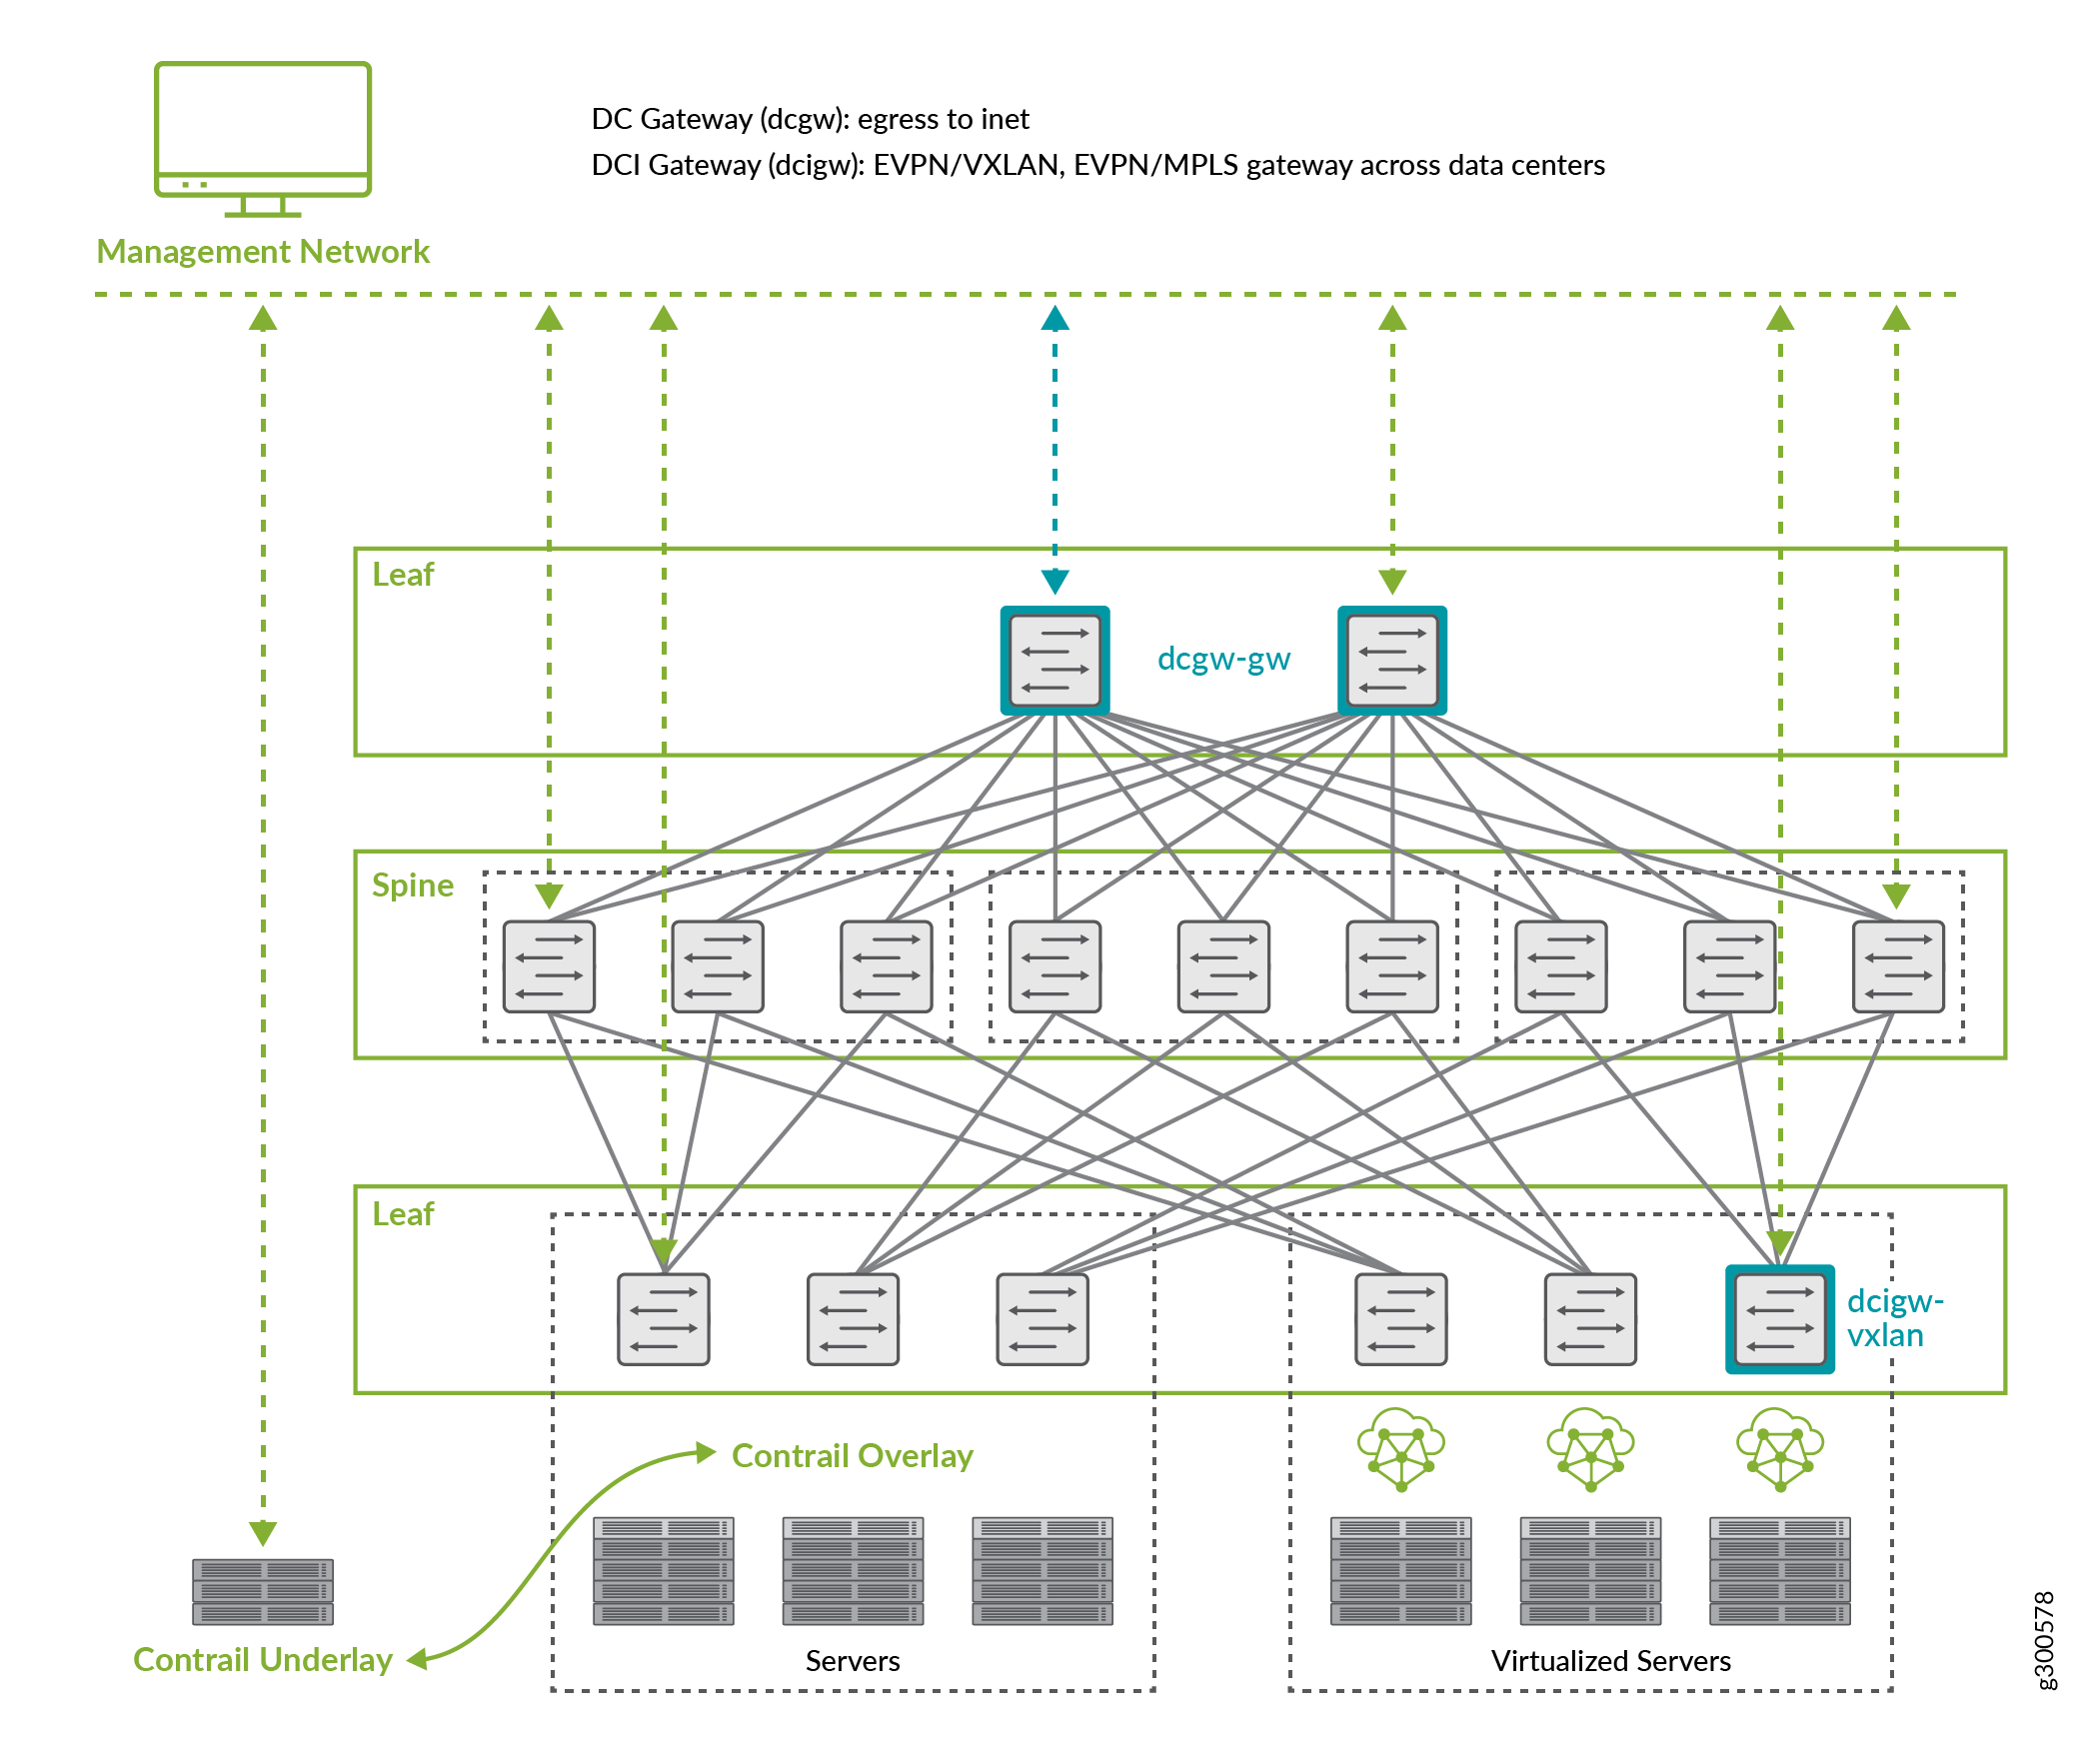
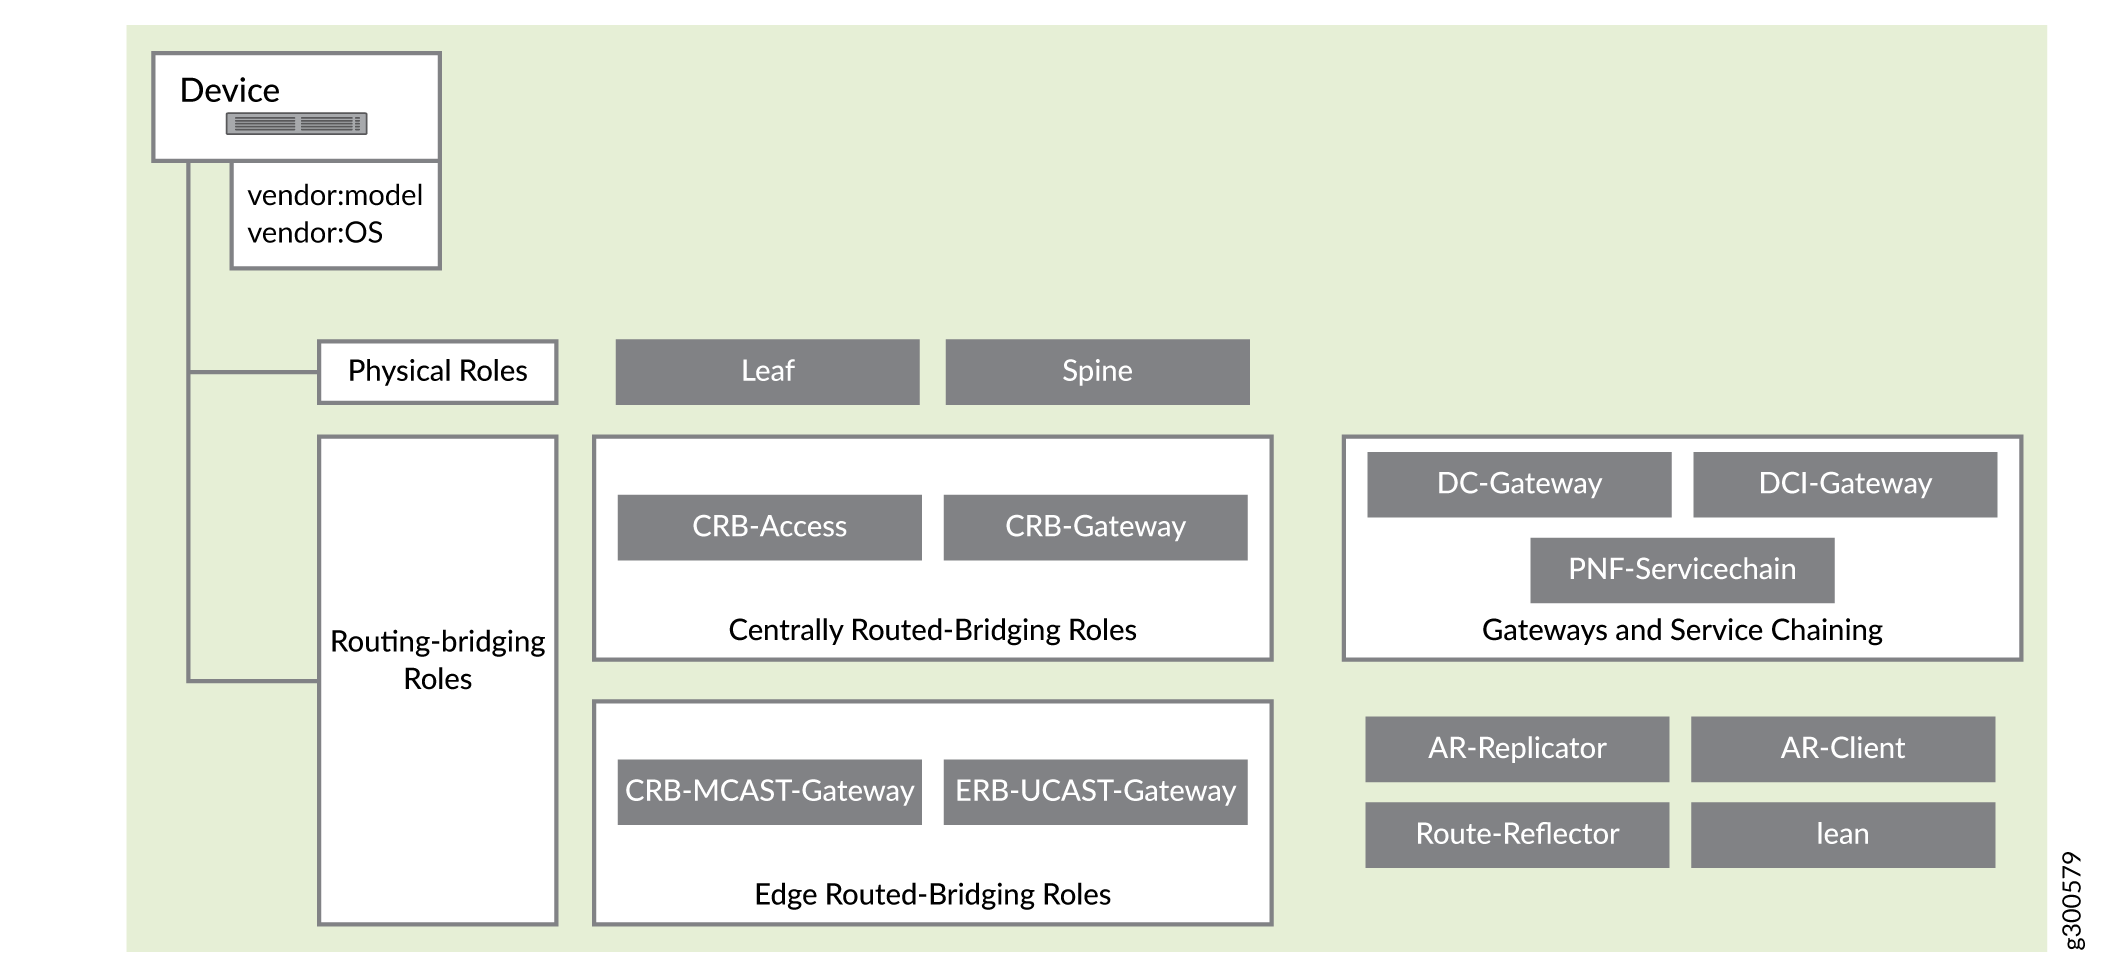
Contrail Networking uses tags to identify functions that various devices in a DC fabric can provide. Contrail Networking uses the following roles to tag devices:

Physical roles

A physical role determines whether a device can act as a leaf, spine, or physical network function (PNF).

Routing-bridging roles

These roles are specific to a set of capabilities that a device can deliver in a data center fabric with EVPN-VXLAN.

Figure 2: Sample Data Center Topology Network architecture diagram illustrating a data center design with management network, DC gateway, spine and leaf layers, Contrail overlay and underlay, and servers emphasizing scalability, redundancy, and communication.

For more information on supported hardware platforms, associated node profiles and roles, see Contrail Networking Supported Hardware Platforms and Associated Roles And Node Profiles.

Figure 3: Supported Physical Roles and Routing-Bridging Roles Hierarchical classification of network device roles categorized into physical roles like Leaf and Spine, routing-bridging roles including CRB-Access and ERB-UCAST-Gateway, gateways such as DC-Gateway and DCI-Gateway, and specialized functions like Route-Reflector and AR-Replicator.

Steps to Assign Roles to Devices

You can assign roles to a device, or assign roles to multiple devices of the same node profile.

  1. Follow these steps to assign a role to a device.
    1. From the Assign to devices table, select the device you want to assign a role to by selecting the check box next to the device name.
    2. Click the Assign icon at the end of the row to assign roles. See Figure 4.
      Figure 4: Assign a Role to a Device Assign roles interface showing a table with columns Name, Management IP, Node Profile, Role, Routing Roles, and Autoconfigure. Two devices listed: DC2-Spine2 with node profile juniper-qfx10k and DC2-Leaf3 with node profile juniper-qfx5k-lean. Management IPs partially obscured, Role and Routing Roles empty, Autoconfigure set to False for both devices. DC2-Leaf3 is selected, Assign Role icon highlighted to assign a role to the selected device.

    Follow these steps to assign roles to multiple devices of the same node profile.

    1. From the assign to devices table, select the devices you want to assign a role to by selecting the check box next to the device name.
    2. Click Assign roles to devices of same node profile as shown in Figure 5.
      Figure 5: Assign Role to Multiple Devices Assign roles to devices interface showing table with columns Name, Management IP, Node Profile, Role, Routing Roles, and Autoconfigure. Devices DC2-Spine2, DC2-Leaf3, and DC2-Leaf2 listed with Node Profiles juniper-qfx10k and juniper-qfx5k-lean. Role and Routing Roles columns empty. Autoconfigure set to False. Tooltip guides assigning roles to devices with same Node Profile. Orange arrow points to role assignment icon.

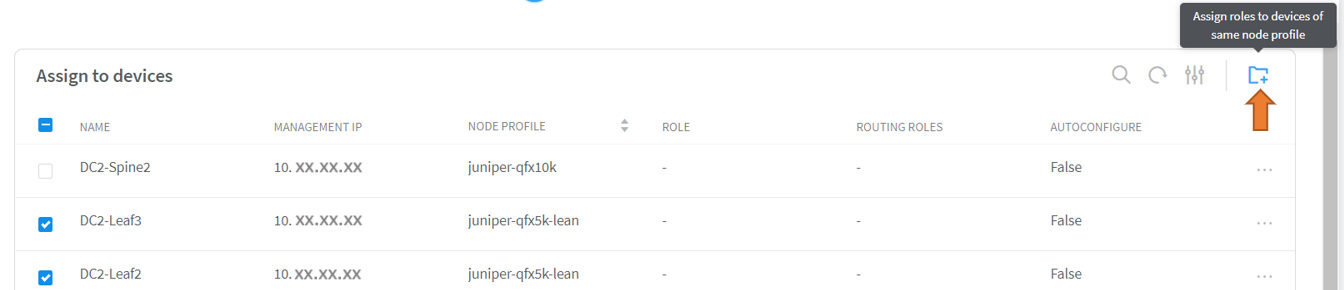
    The Assign role to devices pop-up is displayed.

  2. You can now assign physical roles and routing-bridging roles.
    1. Select a physical role from the Physical Role list.

      For example, select spine role.

    2. Select a routing-bridging role from the Routing Bridging Roles list.

      For example, select CRB-Gateway role. You can select more than one routing-bridging role.

      For more information on supported hardware platforms, associated node profiles and roles, see Contrail Networking Supported Hardware Platforms and Associated Roles And Node Profiles.

    3. Click Assign to confirm selection.
  3. Click Autoconfigure to initiate the auto-configuration job.

    The Autoconfigure page is displayed.

The Autoconfigure progress bar on the Discovered devices page displays the progress of the auto-configuration job. Once the auto-configuration job is completed, click Next. The Assign Telemetry Profiles page is displayed.

For more information on assigning telemetry profiles, see Assign Telemetry Profiles.