ON THIS PAGE
Maintaining the PTX5000 DC Power System
Maintaining the PTX5000 DC Power System
Purpose
For optimum performance, verify the condition of the power distribution units (PDUs), power supply modules (PSMs), DC power cables, and grounding cables.
Action
On a regular basis:
Periodically inspect the site to ensure that the grounding and DC power cables connected to the PTX5000 are securely in place and that no moisture is accumulating near the PTX5000. To review grounding and site wiring requirements for the PTX5000, see PTX5000 Chassis Grounding Cable and Lug Specifications and Site Electrical Wiring Guidelines.
Check the status of the PDUs by issuing the
show chassis environment pducommand.Make sure that the DC power cables are arranged so that they do not obstruct access to other router components.
Routinely check the status LEDs on the PDU and PSM faceplates and the craft interface to verify that the power system is functioning normally.
During normal operation of the 60-A and 120-A DC PDU and PSM:
The green PDU OK LEDs light to indicate that the PDUs are functioning normally.
Each green DC IN LED on a 60-A DC PDU lights when the input is receiving source DC power.
Each green –48 V 120 A LED on a 120-A DC PDU lights when the input is receiving source DC power.
Each SW ON LED on a 60-A DC PDU lights when the input power switch is on.
Each CB ON LED on a 120-A DC PDU lights when the circuit breaker is on.
The green INPUT OK LED on a power supply module lights when the PSM is receiving voltage.
The green OUTPUT OK LED on a power supply module lights when the circuit breaker on the PDU is on.
During normal operation of the High Capacity DC PDU and PSM:
The green PDU OK LEDs light to indicate that the PDUs are functioning normally.
Each green PSM LED, PSM_0 through PSM_7 on a PDU, lights when the input is receiving appropriate source DC power.
The green INPUT1 OK LED on a power supply module lights when the input 1 of the PSM is receiving voltage.
The green INPUT2 OK LED on a power supply module lights when the input 2 of the PSM is receiving voltage.
The green OUTPUT OK LED on a power supply module lights when power supply output is functioning normally.
For more information about the PDU and PSM LEDs, see PTX5000 DC Power Distribution Unit LEDs and PTX5000 DC Power Supply Module LEDs.
Check the red and yellow alarm LEDs and the LCD display on the craft interface. PDU and PSM failure or removal triggers an alarm that causes one or both of the LEDs to light and an error message to appear on the LCD display. You can display the associated error messages by issuing the following CLI command:
user@host> show chassis alarms
For a list of possible alarm messages, see Troubleshooting the PTX5000 Power System.
The power system requires an unobstructed airflow at both the front and rear of the chassis. Periodically check the site to ensure that both the air intake at the bottom front of the chassis and the exhaust from the PSM faceplates are unobstructed.
To check the power usage in watts for all PDUs and PSMs, issue the
show chassis powercommand .Chassis Power Input(V) Used(W) Total Power 3810 PDU 0 3810 PSM 0 Input 1 54 331 PSM 1 Input 1 54 661 PSM 2 Input 1 54 1432 PSM 3 Input 1 54 1386Issue the
show chassis power detailcommand to check the power usage in watts for hardware components such as FPCs, fan trays, Routing Engine and Control Board, and SIB, CCG, and craft interface.user@host> show chassis power detail Chassis Power Used(W) Total Power 4890 PDU 0 2447 PSM 0 1292 PSM 1 702 PSM 2 210 PSM 3 243 PDU 1 2443 PSM 0 1291 PSM 1 685 PSM 2 196 PSM 3 271 Item Used(W) Fan Tray 0 194 Fan Tray 1 482 Fan Tray 2 488 RE0/CB0 107 RE1/CB1 108 SIB/CCG/FPD 63 FPC 0 0 FPC 1 0 FPC 2 0 FPC 3 0 FPC 4 0 FPC 5 0 FPC 6 8 FPC 7 0
Replacing a PTX5000 60-A DC PDU
Removing a PTX5000 60-A DC PDU
The PTX5000 has two redundant, load-sharing PDUs. Each PDU is hot-insertable and hot-removable. The PDU weighs 60 lb (27.2 kg). Each input power tray weighs 1.6 lb (0.7 kg).
To remove a 60-A DC PDU:
- Remove each input power tray from the PDU.Figure 1: Removing the 60-A Input Power Tray
 Note:
Note:It is not necessary to remove the power cables from the input power trays when you are replacing the PDU.
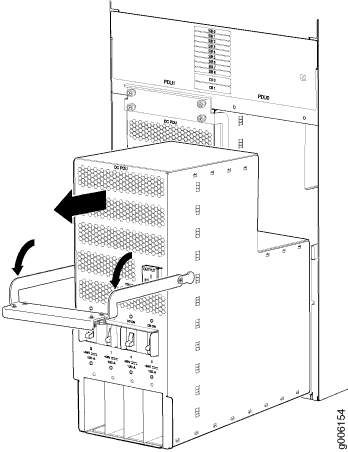
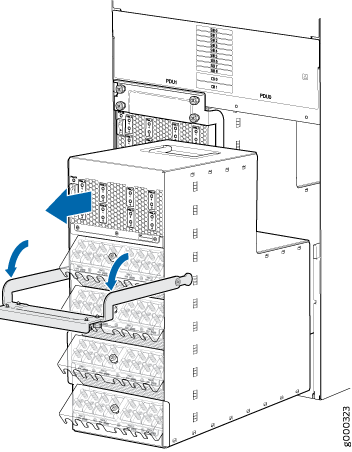
- Grasp the handle on the PDU faceplate and pull firmly
down toward you. Slide the PDU halfway out of the chassis (see Figure 2).Figure 2: Removing a 60-A DC PDU
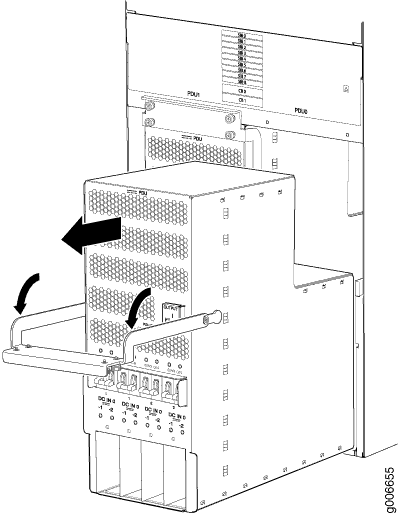
Do not touch the power connectors on the rear of the PDU. They can contain dangerous voltages.
Each PDU weighs approximately 60 lb (27.2 kg). Be prepared to support the full weight of the PDU as you remove it from the PTX5000.
Do not leave a PDU slot empty for more than a short time while the PTX5000 is operational. For proper airflow, the PDU must remain in the chassis or a blank panel must be used in an empty slot.
Installing a PTX5000 60-A DC PDU
Each PDU weighs approximately 60 lb (27.2 kg). The input power tray weighs 1.6 lb (0.7 kg). To install a PDU:

Replacing a PTX5000 60-A DC PDU Power Cable
Removing a PTX5000 60-A DC PDU Power Cable
Each 60-A DC PDU has eight input power trays. Each input power tray is hot-insertable and hot-removable, and weighs 1.6 lb (0.7 kg).
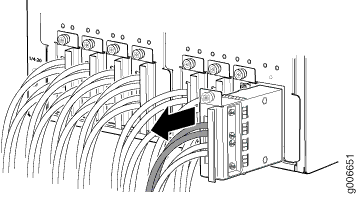
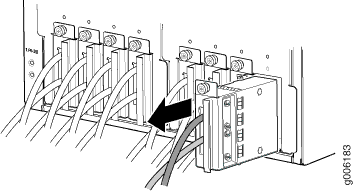
To remove a 60-A DC power cable (see Figure 6):
- Remove the input power tray from the PDU.Figure 5: Removing the Input Power Tray

Installing a PTX5000 60-A DC PDU Power Cable
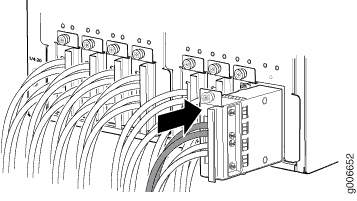
To install a 60-A DC power cable:
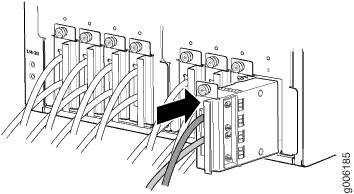
- Insert the input power tray into the PDU.Figure 7: Installing a 60-A Input Power Tray
Replacing a PTX5000 120-A DC PDU
Removing a PTX5000 120-A DC PDU
The PTX5000 has two redundant, load-sharing PDUs. Each PDU is hot-insertable and hot-removable. The PDU weighs 60 lb (27.2 kg). Each input power tray weighs 1.6 lb (0.7 kg).
To remove a PDU:
- Remove each input power tray from the PDU.Figure 10: Removing a 120-A Input Power Tray
 Note:
Note:It is not necessary to remove the power cables from the input power trays when you are replacing the PDU.
- Grasp the handle on the PDU faceplate and pull firmly
down toward you. Slide the PDU halfway out of the chassis (see Figure 11).Figure 11: Removing a 120-A DC PDU
Do not touch the power connectors on the rear of the PDU. They can contain dangerous voltages.
Each PDU weighs approximately 60 lb (27.2 kg). Be prepared to support the full weight of the PDU as you remove it from the PTX5000.
Do not leave a PDU slot empty for more than a short time while the PTX5000 is operational. For proper airflow, the PDU must remain in the chassis or a blank panel must be used in an empty slot.
Installing a PTX5000 120-A DC PDU
Each PDU weighs approximately 60 lb (27.2 kg). The input power tray weighs 1.6 lb (0.7 kg). To install a PDU:

Replacing a PTX5000 120-A DC PDU Power Cable
Removing a PTX5000 120-A DC PDU DC Power Cable
Each PDU has eight input power trays. Each input power tray is hot-insertable and hot-removable, and weighs 1.6 lb (0.7 kg).
To remove a DC power cable:
- Remove the input power tray from the PDU.Figure 14: Removing the Input Power Tray
Installing a PTX5000 120-A DC PDU Power Cable
To install a DC power cable:
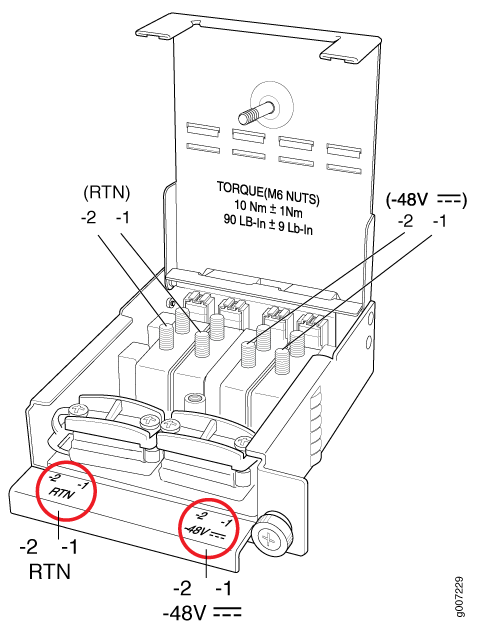
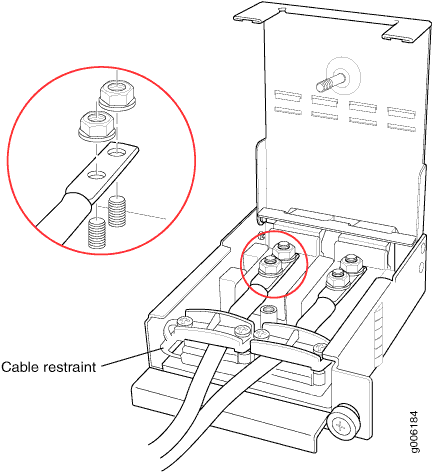
- Attach the negative (–) DC source power cable lug
to the –48V (input) terminal, located on
the right.
Use a 7/16-in. (11-mm) nut driver to tighten the nut.
CAUTION:You must use an appropriate torque-controlled tool to tighten the nuts. Applying excessive torque damages the terminal studs and power supply. The maximum torque that may be applied to this nut is 99 lb-in. (11 Nm).
CAUTION:You must ensure that power connections maintain the proper polarity. The power source cables might be labeled (+) and (–) to indicate their polarity. There is no standard color coding for DC power cables. The color coding used by the external DC power source at your site determines the color coding for the leads on the power cables that attach to the terminal studs on each power supply.
CAUTION:All inputs on the DC PDU in slot PDU0 must be powered by dedicated power feeds derived from feed A, and all inputs on the DC PDU in slot PDU1 must be powered by dedicated power feeds derived from feed B. This configuration provides the commonly deployed A/B feed redundancy for the system.
Figure 16: Connecting the DC Source Power Cable Lugs to a 120-A Input Power Tray - Insert the input power tray into the PDU.Figure 17: Installing a 120-A Input Power Tray
Replacing a PTX5000 60-A or 120-A DC PSM
Removing a PTX5000 60-A or 120-A DC PSM
To remove a 60-A or 120-A DC PSM:
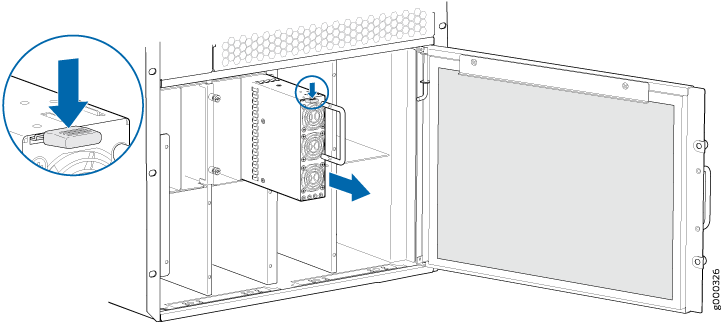
- Place one hand underneath the PSM to support it and slide
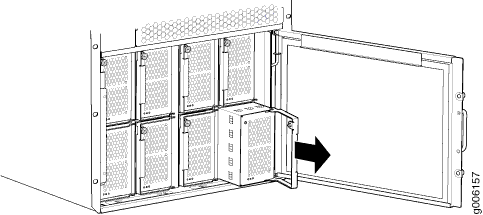
it completely out of the chassis.Figure 18: Removing a PSM
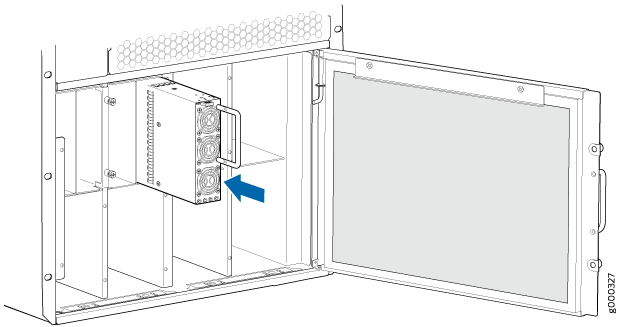
Installing a PTX5000 60-A or 120-A DC PSM
Each DC PSM weighs approximately 10.6 lb (4.8 kg). To install a 60-A or 120-A DC PSM:
- Using both hands, slide the PSM into the chassis until you feel resistance .
- Actuate the ejector handle to insert the PSM into the chassis.
- Tighten the captive screw on the PSM.
- Verify that the INPUT OK LED on the PSM faceplate is lit steadily, indicating that the PSM is receiving power.
- Verify that the OUTPUT OK LED on the PSM faceplate is lit steadily.
Replacing a PTX5000 High Capacity DC PDU
Removing a PTX5000 High Capacity DC PDU
The PTX5000 has two redundant, load-sharing PDUs. Each PDU is hot-insertable and hot-removable. The High Capacity DC PDU weighs 64.5 lb (29.3 kg) without PSMs.
To remove a High Capacity DC PDU:
- Move the power switch to the standby (
 ) position. Note:
After powering off a PDU, you must wait at least 60 seconds before turning it back on.
- Grasp the handle on the PDU faceplate and pull firmly
down toward you. Slide the PDU halfway out of the chassis (see Figure 19).Figure 19: Removing a High Capacity DC PDU
Do not touch the power connectors on the rear of the PDU. They can contain dangerous voltages.
Each PDU weighs approximately 64.5 lb (29.3 kg). Be prepared to support the full weight of the PDU as you remove it from the PTX5000.
Do not leave a PDU slot empty for more than a short time while the PTX5000 is operational. For proper airflow, the PDU must remain in the chassis or a blank panel must be used in an empty slot.
Installing a PTX5000 High Capacity DC PDU
Each High Capacity DC PDU without the PSMs weighs approximately 64.5 lb (29.3 kg). To install a PDU:
- Verify that power switch on the PDU is in the standby
() position.
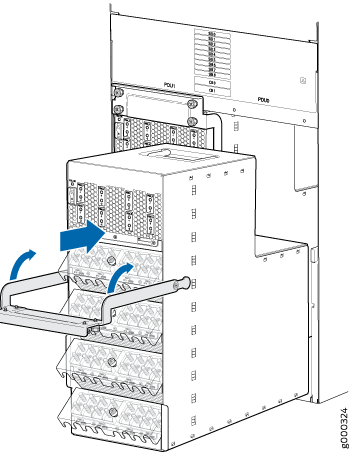
- Using both hands, slide the PDU into the chassis until
you feel resistance (see Figure 20).Figure 20: Installing a High Capacity DC PDU
Replacing a PTX5000 High Capacity DC PSM
Removing a PTX5000 High Capacity DC PSM
To remove a High Capacity DC PSM:
- Place one hand underneath the PSM to support it and slide
it completely out of the chassis.Figure 21: Removing a High Capacity DC PSM
Installing a PTX5000 High Capacity DC PSM
The High Capacity DC PSMs are smaller in dimensions compared to the first-generation PSMs. So, you must install the PSM sleeves to install the High Capacity DC PSMs in the chassis. See Installing the High Capacity PSM Sleeves for details. Each High Capacity DC PSM weighs approximately 10.1 lb (4.6 kg).
To install a High Capacity DC PSM:
- Using both hands, slide the PSM into the chassis until
you feel resistance.Figure 22: Installing a High Capacity DC PSM