Help us improve your experience.

Let us know what you think.

Do you have time for a two-minute survey?


Upgrading the PTX5000 to a High Capacity Power System

Upgrading to the High Capacity AC Power System

Before you upgrade a PTX5000 to the High Capacity AC power system from a normal-capacity power system:

  • Ensure that the No Redundant Power for System alarm is not displayed when you run the show chassis alarms operational-mode CLI command.

    If the No Redundant Power for System alarm is displayed, see Understanding Normal-Capacity Power System Power Zones for more information about PTX5000 redundancy and power zones for normal-capacity PSMs. Modify your hardware configuration so that the PTX5000 power system is redundant. Once redundant power is configured and the alarm is no longer displayed, you can begin the upgrade procedure.

  • Ensure that the PTX5000 is running Junos OS release 14.1R2 or a later 14.1 release, or Junos OS release 14.2 or later.

Note:

If you are upgrading from normal-capacity Delta or Wye AC PDUs, you must begin this procedure with the left PDU when viewed from the rear of the chassis (labeled PDU1 on the chassis).

Note:

You cannot do a smooth upgrade from normal-capacity Delta or Wye AC PDUs to High Capacity Single-Phase AC PDU.

To upgrade to the High Capacity AC power system:

  1. Attach an electrostatic discharge (ESD) grounding strap to your bare wrist, and connect the strap to one of the ESD points on the chassis.
  2. Remove the existing power supply modules (PSMs) from one of the power distribution units (PDUs). See Replacing a PTX5000 60-A or 120-A DC PSM or Replacing a PTX5000 Normal-Capacity AC PSM for details, depending on your existing configuration.

    Removing the PSMs raises the following alarms:

    • No Redundant Power for FPC 0-7

    • No Redundant Power for Rear Chassis

    • No Redundant Power for Fan 0-2

  3. Remove the PDU from which PSMs have been removed. See one of the following topics for details, depending on your existing configuration:
  4. Install a High Capacity AC PDU. See Replacing a PTX5000 High Capacity Delta AC PDU or Replacing a PTX5000 High Capacity Wye AC PDU or Replacing a PTX5000 High Capacity Single-Phase AC PDU for details, depending on the type of High Capacity PDUs you are installing.
  5. Install the High Capacity PSM sleeve into the PTX5000. See Installing the High Capacity PSM Sleeves for details.
  6. Install the PSMs in the new PDU and power on the PDU. See Replacing a PTX5000 High Capacity AC PSM for details.

    Now there are two different types of PDUs in the chassis, resulting in the Mix of PDUs alarm being raised. And there are two different types of PSMs in the chassis, resulting in the Power Manager Non Operational alarm being raised. However, as long as the PDU is operational, one PDU and associated PSMs can fulfill the power requirements of the PTX5000. In this configuration, the No Redundant Power for System alarm is not displayed when you run the show chassis alarms command.

    CAUTION:

    Do not replace other FRUs or perform online operations during the PDU upgrade procedure to ensure a smooth upgrade of the power system.

  7. Repeat Step 2 through Step 6 to replace the second PDU with a High Capacity AC PDU.
  8. Run the show chassis alarms command to verify that the Mix of PDUs, Power Manager Non Operational, and No Redundant Power for System alarms are not active.
  9. Run the show chassis hardware command to verify that the PDUs and PSMs are connected.
  10. Run the show chassis environment pdu slot-number command to check the state of the upgraded PDUs and PSMs.

    The following example shows output for High Capacity PDU 0.

Upgrading to the High Capacity DC Power System

Before you upgrade a PTX5000 to the High Capacity DC power system from a normal-capacity power system:

  • Ensure that the No Redundant Power for System alarm is not displayed when you run the show chassis alarms operational-mode CLI command.

    If the No Redundant Power for System alarm is displayed, see Understanding Normal-Capacity Power System Power Zones for more information about PTX5000 redundancy and power zones for normal-capacity PSMs. Modify your hardware configuration so that the PTX5000 power system is redundant. Once redundant power is configured and the alarm is no longer displayed, you can begin the upgrade procedure.

  • Ensure that the PTX5000 is running Junos OS release 14.1 or later.

To upgrade to the High Capacity DC power system:

  1. Attach an electrostatic discharge (ESD) grounding strap to your bare wrist, and connect the strap to one of the ESD points on the chassis.
  2. Remove the existing power supply modules (PSMs) from one of the power distribution units (PDUs). See Replacing a PTX5000 60-A or 120-A DC PSM for details.

    Removing the PSMs raises the following alarms:

    • No Redundant Power for FPC 0-7

    • No Redundant Power for Rear Chassis

    • No Redundant Power for Fan 0-2

  3. Remove the PDU from which PSMs have been removed and install a High Capacity DC PDU. See Replacing a PTX5000 High Capacity DC PDU for details.
  4. Install the High Capacity PSM sleeve into the PTX5000. See Installing the High Capacity PSM Sleeves for details.
  5. Install the PSMs in the new PDU and power on the PDU. See Replacing a PTX5000 High Capacity DC PSM for details.

    Now there are two different types of PDUs in the chassis, resulting in the Mix of PDUs alarm being raised. And there are two different types of PSMs in the chassis, resulting in the Power Manager Non Operational alarm being raised. However, as long as the PDU is operational, one PDU and associated PSMs can fulfill the power requirements of the PTX5000. In this configuration, the No Redundant Power for System alarm is not displayed when you run the show chassis alarms command.

    CAUTION:

    Do not replace other FRUs or perform online operations during the PDU upgrade procedure to ensure a smooth upgrade of the power system.

  6. Repeat Step 2 through Step 5 to replace the second PDU with a High Capacity DC PDU.
  7. Run the show chassis alarms command to verify that the Mix of PDUs, Power Manager Non Operational, and No Redundant Power for System alarms are not active.
  8. Run the show chassis hardware command to verify that the PDUs and PSMs are connected.
    Note:

    The High Capacity DC PDU and PSM are displayed as Gen2 DC PDU and Gen2 DC PSM in the command output (which is truncated).

  9. Run the show chassis environment pdu slot-number command to check the state of the upgraded PDUs and PSMs.

    The following example shows output for High Capacity PDU 0.

Installing the High Capacity PSM Sleeves

The High Capacity AC and DC PSMs are smaller than the AC PSMs and 60-A or 120-A DC PSMs. Eight High Capacity AC or DC PSMs can be installed in a PTX5000. You must insert the PSM metal sleeves, provided with the High Capacity power system upgrade kit, in front of the PTX5000 router chassis before installing the PSMs. To install the PSM sleeve, you require the following tools and parts:

  • Electrostatic discharge (ESD) grounding wrist strap (not provided)

  • Phillips (+) screwdriver, number 1 (not provided)

  • PSM sleeve and bracket—eight for each chassis (provided)

    Note:

    Each PSM sleeve can house two PSMs.

  • PSM slot label—two for each chassis (provided)

To install the High Capacity AC and DC PSM sleeve assembly:

  1. Attach an ESD grounding strap to your bare wrist and connect the strap to one of the ESD points on the chassis.
  2. Remove the existing PSMs from the chassis. See Replacing a PTX5000 60-A or 120-A DC PSM and Replacing a PTX5000 Normal-Capacity AC PSM for details.
  3. Take out the PSM sleeve assembly from the upgrade kit and remove the bracket by using a number 1 Phillips (+) screwdriver.
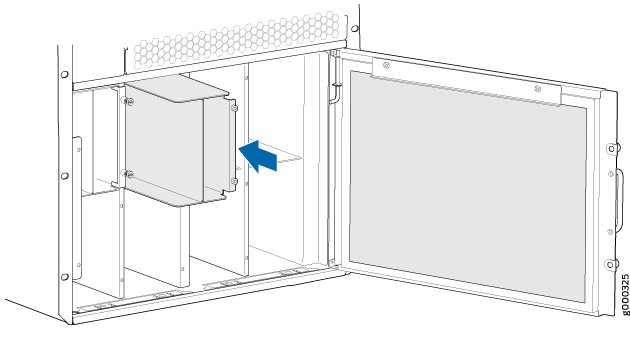
  4. Insert the sleeve into one of the empty PSM slots and push the sleeve in until it is flush against the side of the chassis (see Figure 1).
    Figure 1: Inserting High Capacity PSM SleeveInserting High Capacity PSM Sleeve
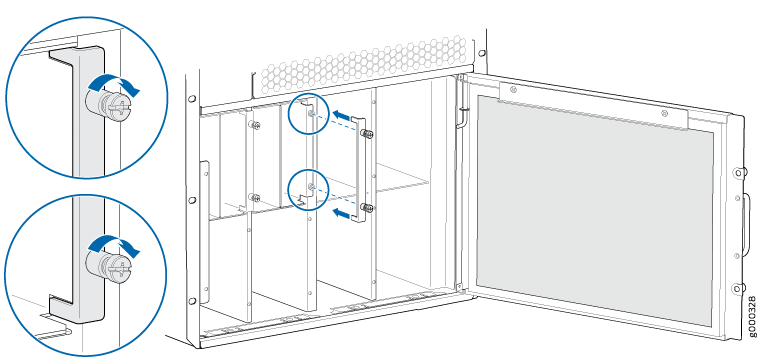
  5. Align and fix the sleeve bracket tabs in to the slots at the top and bottom of the sleeve (see Figure 2).
    Figure 2: Fixing PSM Sleeve BracketFixing PSM Sleeve Bracket
  6. Fasten the sleeve bracket screws into the chassis by using a number 1 Phillips (+) screwdriver.
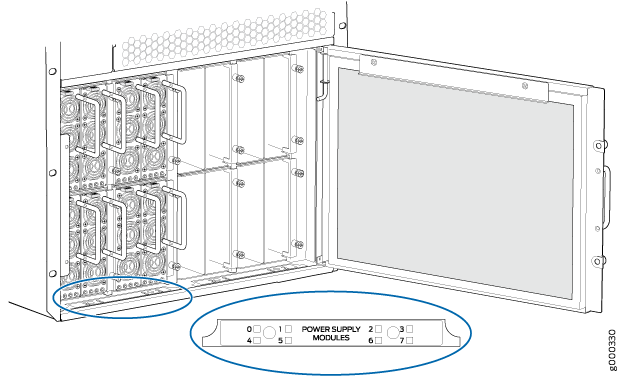
  7. Remove the old PSM slot label. You can lift a corner and peel off the label.
  8. Remove the sticker liner from the new PSM slot label and apply it to the chassis, centered over the screws.
    Figure 3: Applying New PSM Slot LabelApplying New PSM Slot Label
  9. Repeat these steps for the other sleeve assemblies.