Connecting the PTX5000 to External Devices
Tools and Parts Required to Connect the PTX5000 to External Devices
To connect the PTX5000 to external devices, you need the following tools and parts:
2.5-mm flat-blade (–) screwdriver for the alarm relay contacts
Electrostatic discharge (ESD) grounding wrist strap (provided in the accessory kit)
See Also
Connecting the PTX5000 to a Management Console or Auxiliary Device
Attach one or more management console or auxiliary devices to the Routing Engine ports on each Control Board for management and service operations (see Figure 1).
To connect the cables to a management console or auxiliary device:
- Attach an electrostatic discharge (ESD) grounding strap to your bare wrist, and connect the strap to one of the ESD points on the chassis.
- If necessary, turn off the power to the console or auxiliary device.
- Plug one end of a copper cable with RJ-45 connectors into the CONSOLE or AUXILIARY port on the Control Board in slot CB0. This port connects to the Routing Engine installed into the Control Board in slot CB0.
- Attach the other end of the cable to the console or auxiliary device.
- Plug one end of another copper cable with RJ-45 connectors into the CONSOLE or AUXILIARY port on CB1. This port connects to the Routing Engine installed into the control in slot CB1.
- Attach the other end of the cable to the console or auxiliary device.
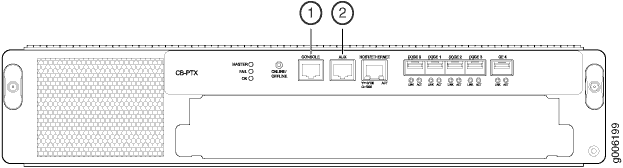
1 — Console port | 2 — Auxiliary port |
See Also
Connecting the PTX5000 to a Management Ethernet Device
To connect the Routing Engines in a PTX5000 to a network for management of the PTX5000, connect a UTP Category 5 Ethernet cable with an RJ-45 connector to the HOST/ETHERNET port on a Control Board.
For PTX5000 routers with two host subsystems, we recommend that you connect both Control Boards to a network. One cable is provided in the accessory box. To connect another cable to the HOST/ETHERNET port on the other Control Board, you must provide an additional cable.
To connect a cable to a network device:
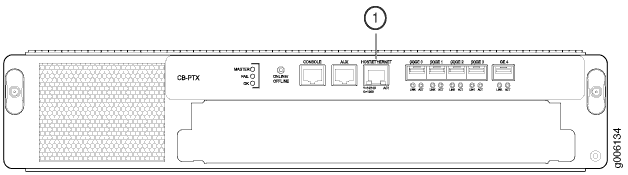
1 — HOST/ETHERNET port |
See Also
Connecting the PTX5000 to an External Alarm-Reporting Device
To connect an external device to an alarm relay contact on the craft interface:
See Also
Connecting the PTX5000 to an External Clocking Device
To connect the PTX5000 to one or two external clocking devices, connect a cable with RJ-48 connectors to the BITS A or BITS B port on the CCG.
See Also
Connecting PIC Cables to the PTX5000
The PTX5000 supports PICs that use various kinds of network cable, including multimode and single-mode fiber-optic cable. For information about the type of cable used by each PIC, see the PTX Series Interface Module Reference.
You connect PICs to the network by plugging in network cable. To connect cable to the PICs (see Figure 4):
