Help us improve your experience.

Let us know what you think.

Do you have time for a two-minute survey?


Converting an MX2000 Router Between AC and DC Power

Warning:

Before performing power procedures, ensure that power is removed from the AC or DC circuit. To ensure that all power is off, locate the circuit breaker on the panel board that services the AC or DC circuit, switch the circuit breaker to the off position, and tape the switch handle of the circuit breaker in the off position.

Note:

A system cannot operate with a mix of AC and DC power supplies.

To convert an MX2000 router between AC and DC power or HVAC/HVDC power, you must completely power off the system, remove the power distribution modules (PDMs), remove the power supplies, and then adjust the AC/DC setting as described here.

  1. Power off the router. See Powering Off the AC-Powered or Universal HVAC/HVDC-Powered MX2000 Router or Powering Off the DC-Powered or DC-Powered (240 V China) MX2000 Router.
  2. Switch off the dedicated customer-site circuit breakers to the PDMs being removed. Make sure that the voltage across the power source cord is 0 V and that there is no chance that the cord might become active during the removal process.
  3. Attach an electrostatic discharge (ESD) grounding strap to your bare wrist, and connect the strap to one of the ESD points on the chassis.
  4. Remove the PDMs. Depending on your configuration, see:
  5. Remove the Power Supply Modules (PSMs). See Removing an MX2000 AC Power Supply Module or Removing an MX2000 Router DC Power Supply Module (-48 V), Replacing an MX2000 DC Power Supply Module (240 V China), Replacing an MX2000 High-Voltage Second-Generation Universal (HVAC/HVDC) Power Supply Module .
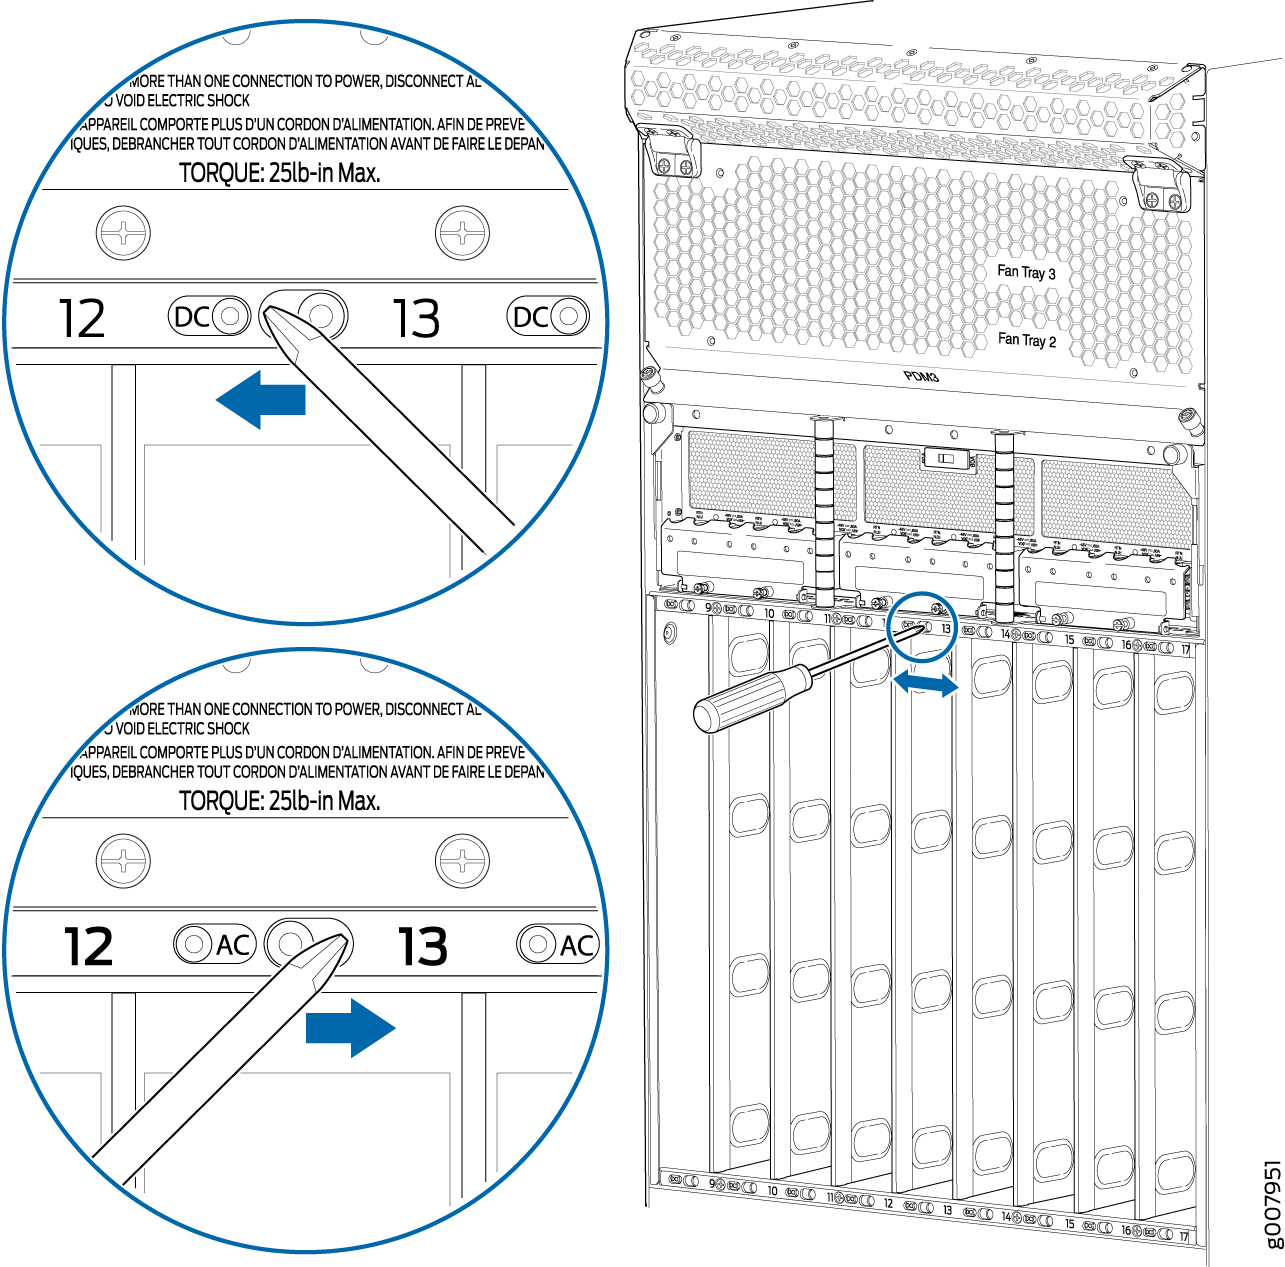
  6. Remove the adjustment bar locking screws shown in Figure 1 using a Phillips screw driver. There are eight screws per PSM.
    Note:

    The AC/DC settings and the screw locations are the same for MX2008, MX2010, and MX2020 routers.

    Figure 1: Removing the MX2000 Router Adjustment Bar Locking ScrewsRemoving the MX2000 Router Adjustment Bar Locking Screws
    Note:

    If you are switching from AC PDMs or 48-V DC PDMs to high-voltage universal (HVAC/HVDC) PDMs, they work with either AC or DC bar setting and no mechanical change is needed. You can skip steps 6 to 8.

    The 240 VDC China PDMs and PSMs require setting the locking bars to the DC position as described below.

  7. Insert a screw driver into each adjustment slot and slide the adjustment bar to the right for DC configurations or to the left for AC configurations. Refer to Figure 2.
    Figure 2: Changing the AC and DC Setting on an MX2000 RouterChanging the AC and DC Setting on an MX2000 Router
  8. Reinstall the screws removed in step 6 and tighten them. Apply between 7 lb-in (0.8 Nm) and 9 lb-in. (1.01 Nm) of torque to each screw.
  9. Install the PSMs. See Installing MX2000 Router DC Power Supply Modules (-48 V), Installing MX2000 Router AC Power Supply Modules, Replacing an MX2000 High-Voltage Second-Generation Universal (HVAC/HVDC) Power Supply Module , or Replacing an MX2000 DC Power Supply Module (240 V China).
  10. Install the PDMs. Depending on your configuration, see:
  11. Switch on the dedicated customer-site circuit breaker.
    Note:

    The circuit breaker might bounce back to the off position if you move the breaker too quickly.

  12. Verify that the LED on each PDM is lit steadily green.
  13. Turn the power switch to the on (|) position for the PSMs that will be powered by the installed PDMs.