Returning the MX10008 Chassis or Components
Returning a Router or Component for Repair or Replacement
If you need to return an MX10008 router, or an MX10016 router, or a component to Juniper Networks for repair or replacement, follow this procedure:
For more information about return and repair policies, see the customer support page at https://www.juniper.net/support/guidelines.html.
Locating the Serial Number on an MX10008 Router or Component
If you are returning a router or component to Juniper Networks for repair or replacement, you must locate the serial number of the router or component. You must provide the serial number to the Juniper Networks Technical Assistance Center (JTAC) when you contact them to obtain a Return Materials Authorization (RMA). See Contacting Customer Support to Obtain a Return Materials Authorization for a Router or Component.
If the router is operational and you can access the command-line interface (CLI), you can list serial numbers for the router and for some components with a CLI command. If you do not have access to the CLI or if the serial number for the component does not appear in the command output, you can locate the serial number ID label on the router or component.
If you want to find the serial number ID label on a component, you need to remove the component from the router chassis, for which you must have the required parts and tools available.
- Listing the Chassis and Component Details Using the CLI
- Locating the Chassis Serial Number ID Label on an MX10008
- Locating the Serial Number ID Labels on MX10008 Power Supplies
- Locating the Serial Number ID Labels on MX10008 Fan Trays and Fan Tray Controllers
- Locating the Serial Number ID Labels on MX10008 Routing and Control Boards
- Locating the Serial Number ID Labels on an MX10008 Line Card
- Locating the Serial Number ID Labels on an MX10008 Switch Fabric Board (SFB)
Listing the Chassis and Component Details Using the CLI
To list the MX10008 chassis and the components and their serial
numbers, use the show chassis hardware CLI operational
mode command.
user@device> show chassis hardware
Hardware inventory:
Item Version Part number Serial number Description
Chassis AF218 JNP10008 [MX10008]
Midplane REV 05 750-071974 CAGY2639 Midplane 8
Routing Engine 0 BUILTIN BUILTIN RE X10
Routing Engine 1 BUILTIN BUILTIN RE X10
CB 0 REV 05 750-079562 CAJX5293 Control Board
CB 1 REV 03 750-079562 CAJS5123 Control Board
FPC 0 REV 04 750-084779 CAKR7006 JNP10K-LC2101
CPU REV 05 750-073391 CAKG1690 LC 2101 PMB
PIC 0 BUILTIN BUILTIN 4xQSFP28 SYNCE
Xcvr 0 REV 01 740-064669 8543 QSFP28-LPBK
Xcvr 1 REV 01 740-064669 8500 QSFP28-LPBK
Xcvr 2 REV 01 740-064669 8493 QSFP28-LPBK
Xcvr 3 REV 01 740-064669 8506 QSFP28-LPBK
PIC 1 BUILTIN BUILTIN 4xQSFP28 SYNCE
Xcvr 0 REV 01 740-064669 8490 QSFP28-LPBK
Xcvr 1 REV 01 740-064669 8494 QSFP28-LPBK
Xcvr 2 REV 01 740-064669 8497 QSFP28-LPBK
Xcvr 3 REV 01 740-064669 8488 QSFP28-LPBK
PIC 2 BUILTIN BUILTIN 4xQSFP28 SYNCE
Xcvr 0 REV 01 740-064669 8496 QSFP28-LPBK
Xcvr 1 REV 01 740-064669 8499 QSFP28-LPBK
Xcvr 2 REV 01 740-064669 8547 QSFP28-LPBK
Xcvr 3 REV 01 740-064669 8491 QSFP28-LPBK
PIC 3 BUILTIN BUILTIN 4xQSFP28 SYNCE
Xcvr 0 REV 01 740-064669 8489 QSFP28-LPBK
Xcvr 1 REV 01 740-064669 8498 QSFP28-LPBK
Xcvr 2 REV 01 740-064669 8522 QSFP28-LPBK
Xcvr 3 REV 01 740-064669 8542 QSFP28-LPBK
PIC 4 BUILTIN BUILTIN 4xQSFP28 SYNCE
Xcvr 0 REV 01 740-064669 8519 QSFP28-LPBK
Xcvr 1 REV 01 740-064669 8541 QSFP28-LPBK
Xcvr 2 REV 01 740-064669 8495 QSFP28-LPBK
Xcvr 3 REV 01 740-064669 8518 QSFP28-LPBK
PIC 5 BUILTIN BUILTIN 4xQSFP28 SYNCE
Xcvr 0 REV 01 740-064669 8492 QSFP28-LPBK
Xcvr 1 REV 01 740-064669 8544 QSFP28-LPBK
Xcvr 2 REV 01 740-064669 8546 QSFP28-LPBK
Xcvr 3 REV 01 740-064669 8545 QSFP28-LPBK
FPC 1 REV 04 750-084779 CAKR7008 JNP10K-LC2101
CPU REV 05 750-073391 CAKR1015 LC 2101 PMB
PIC 0 BUILTIN BUILTIN 4xQSFP28 SYNCE
Xcvr 0 REV 01 740-064669 54582 QSFP28-LPBK
Xcvr 1 REV 01 740-064669 54655 QSFP28-LPBK
Xcvr 2 REV 01 740-064669 54589 QSFP28-LPBK
Xcvr 3 REV 01 740-064669 54611 QSFP28-LPBK
PIC 1 BUILTIN BUILTIN 4xQSFP28 SYNCE
Xcvr 0 REV 01 740-064669 54661 QSFP28-LPBK
Xcvr 1 REV 01 740-064669 54604 QSFP28-LPBK
Xcvr 2 REV 01 740-064669 54618 QSFP28-LPBK
Xcvr 3 REV 01 740-064669 54662 QSFP28-LPBK
PIC 2 BUILTIN BUILTIN 4xQSFP28 SYNCE
Xcvr 0 REV 01 740-064669 54654 QSFP28-LPBK
Xcvr 1 REV 01 740-064669 54602 QSFP28-LPBK
Xcvr 2 REV 01 740-064669 54594 QSFP28-LPBK
Xcvr 3 REV 01 740-064669 54645 QSFP28-LPBK
PIC 3 BUILTIN BUILTIN 4xQSFP28 SYNCE
Xcvr 0 REV 01 740-064669 54607 QSFP28-LPBK
Xcvr 1 REV 01 740-064669 54634 QSFP28-LPBK
Xcvr 2 REV 01 740-064669 54576 QSFP28-LPBK
Xcvr 3 REV 01 740-064669 54657 QSFP28-LPBK
PIC 4 BUILTIN BUILTIN 4xQSFP28 SYNCE
Xcvr 0 REV 01 740-064669 54580 QSFP28-LPBK
Xcvr 1 REV 01 740-064669 54665 QSFP28-LPBK
Xcvr 2 REV 01 740-064669 54651 QSFP28-LPBK
Xcvr 3 REV 01 740-064669 54658 QSFP28-LPBK
PIC 5 BUILTIN BUILTIN 4xQSFP28 SYNCE
Xcvr 0 REV 01 740-064669 54660 QSFP28-LPBK
Xcvr 1 REV 01 740-064669 54616 QSFP28-LPBK
Xcvr 2 REV 01 740-064669 54666 QSFP28-LPBK
Xcvr 3 REV 01 740-064669 54656 QSFP28-LPBK
FPC 2 REV 04 750-084779 CAKN5712 JNP10K-LC2101
CPU REV 05 750-073391 CAKN1558 LC 2101 PMB
PIC 0 BUILTIN BUILTIN 4xQSFP28 SYNCE
Xcvr 0 REV 01 740-058734 1ECQ120306G QSFP-100GBASE-SR4
Xcvr 1 REV 01 740-058734 1ECQ120401P QSFP-100GBASE-SR4
Xcvr 2 REV 01 740-058734 1ECQ1210021 QSFP-100GBASE-SR4
Xcvr 3 REV 01 740-058734 1ECQ120801J QSFP-100GBASE-SR4
PIC 1 BUILTIN BUILTIN 4xQSFP28 SYNCE
Xcvr 0 REV 01 740-058734 1ECQ120307V QSFP-100GBASE-SR4
Xcvr 1 REV 01 740-058734 1ECQ120400V QSFP-100GBASE-SR4
Xcvr 2 REV 01 740-058734 1ECQ120304X QSFP-100GBASE-SR4
Xcvr 3 REV 01 740-058734 1ECQ120301B QSFP-100GBASE-SR4
PIC 2 BUILTIN BUILTIN 4xQSFP28 SYNCE
Xcvr 0 REV 01 740-058734 1ECQ120800B QSFP-100GBASE-SR4
Xcvr 1 REV 01 740-058734 1ECQ1203011 QSFP-100GBASE-SR4
Xcvr 2 REV 01 740-058734 1ECQ120308B QSFP-100GBASE-SR4
Xcvr 3 REV 01 740-058734 1ECQ120307F QSFP-100GBASE-SR4
PIC 3 BUILTIN BUILTIN 4xQSFP28 SYNCE
Xcvr 0 REV 01 740-058734 1ECQ112108Y QSFP-100GBASE-SR4
Xcvr 1 REV 01 740-058734 1ECQ120304V QSFP-100GBASE-SR4
Xcvr 2 REV 01 740-058734 1ECQ1204019 QSFP-100GBASE-SR4
Xcvr 3 REV 01 740-058734 1ECQ1209028 QSFP-100GBASE-SR4
PIC 4 BUILTIN BUILTIN 4xQSFP28 SYNCE
Xcvr 0 REV 01 740-058734 1ECQ120307X QSFP-100GBASE-SR4
Xcvr 1 REV 01 740-058734 1ECQ1203090 QSFP-100GBASE-SR4
Xcvr 2 REV 01 740-058734 1ECQ120800G QSFP-100GBASE-SR4
Xcvr 3 REV 01 740-058734 1ECQ11180EV QSFP-100GBASE-SR4
PIC 5 BUILTIN BUILTIN 4xQSFP28 SYNCE
Xcvr 0 REV 01 740-058734 1ECQ1121090 QSFP-100GBASE-SR4
Xcvr 1 REV 01 740-058734 1ECQ1203091 QSFP-100GBASE-SR4
Xcvr 2 REV 01 740-058734 1ECQ120303F QSFP-100GBASE-SR4
Xcvr 3 REV 01 740-058734 1ECQ120400W QSFP-100GBASE-SR4
FPC 3 REV 04 750-084779 CAKR7020 JNP10K-LC2101
CPU REV 05 750-073391 CAKJ2876 LC 2101 PMB
PIC 0 BUILTIN BUILTIN 4xQSFP28 SYNCE
Xcvr 0 REV 01 740-058734 1ECQ120900E QSFP-100GBASE-SR4
Xcvr 1 REV 01 740-058734 1ECQ120306T QSFP-100GBASE-SR4
Xcvr 2 REV 01 740-058734 1ECQ120306A QSFP-100GBASE-SR4
Xcvr 3 REV 01 740-058734 1ECQ120800R QSFP-100GBASE-SR4
PIC 1 BUILTIN BUILTIN 4xQSFP28 SYNCE
Xcvr 0 REV 01 740-058734 1ECQ11180DG QSFP-100GBASE-SR4
Xcvr 1 REV 01 740-058734 1ECQ120306Z QSFP-100GBASE-SR4
Xcvr 2 REV 01 740-058734 1ECQ120905A QSFP-100GBASE-SR4
Xcvr 3 REV 01 740-058734 1ECQ120303Z QSFP-100GBASE-SR4
PIC 2 BUILTIN BUILTIN 4xQSFP28 SYNCE
Xcvr 0 REV 01 740-058734 1ECQ120902C QSFP-100GBASE-SR4
Xcvr 1 REV 01 740-058734 1ECQ120309X QSFP-100GBASE-SR4
Xcvr 2 REV 01 740-058734 1ECQ1209045 QSFP-100GBASE-SR4
Xcvr 3 REV 01 740-058734 1ECQ120308G QSFP-100GBASE-SR4
PIC 3 BUILTIN BUILTIN 4xQSFP28 SYNCE
Xcvr 0 REV 01 740-058734 1ECQ120901Y QSFP-100GBASE-SR4
Xcvr 1 REV 01 740-058734 1ECQ120307T QSFP-100GBASE-SR4
Xcvr 2 REV 01 740-058734 1ECQ11210AL QSFP-100GBASE-SR4
Xcvr 3 REV 01 740-058734 1ECQ11180DF QSFP-100GBASE-SR4
PIC 4 BUILTIN BUILTIN 4xQSFP28 SYNCE
Xcvr 0 REV 01 740-058734 1ECQ120308H QSFP-100GBASE-SR4
Xcvr 1 REV 01 740-058734 1ECQ120303B QSFP-100GBASE-SR4
Xcvr 2 REV 01 740-058734 1ECQ120309H QSFP-100GBASE-SR4
Xcvr 3 REV 01 740-058734 1ECQ1203085 QSFP-100GBASE-SR4
PIC 5 BUILTIN BUILTIN 4xQSFP28 SYNCE
Xcvr 0 REV 01 740-058734 1ECQ120307J QSFP-100GBASE-SR4
Xcvr 1 REV 01 740-058734 1ECQ120800J QSFP-100GBASE-SR4
Xcvr 2 REV 01 740-058734 1ECQ11180E8 QSFP-100GBASE-SR4
Xcvr 3 REV 01 740-058734 1ECQ11180ED QSFP-100GBASE-SR4
FPC 4 REV 04 750-084779 CAKN5702 JNP10K-LC2101
CPU REV 05 750-073391 CAKJ2856 LC 2101 PMB
PIC 0 BUILTIN BUILTIN 4xQSFP28 SYNCE
Xcvr 0 REV 01 740-058734 1ECQ120902P QSFP-100GBASE-SR4
Xcvr 1 REV 01 740-058734 1ECQ120900M QSFP-100GBASE-SR4
Xcvr 2 REV 01 740-058734 1ECQ11200ZL QSFP-100GBASE-SR4
Xcvr 3 REV 01 740-058734 1ECQ1209014 QSFP-100GBASE-SR4
PIC 1 BUILTIN BUILTIN 4xQSFP28 SYNCE
Xcvr 0 REV 01 740-058734 1ECQ120901K QSFP-100GBASE-SR4
Xcvr 1 REV 01 740-058734 1ECQ12030C2 QSFP-100GBASE-SR4
Xcvr 2 REV 01 740-058734 1ECQ120902T QSFP-100GBASE-SR4
Xcvr 3 REV 01 740-058734 1ECQ120305P QSFP-100GBASE-SR4
PIC 2 BUILTIN BUILTIN 4xQSFP28 SYNCE
Xcvr 0 REV 01 740-058734 1ECQ1209051 QSFP-100GBASE-SR4
Xcvr 1 REV 01 740-058734 1ECQ120900X QSFP-100GBASE-SR4
Xcvr 2 REV 01 740-058734 1ECQ120306Y QSFP-100GBASE-SR4
Xcvr 3 REV 01 740-058734 1ECQ1209010 QSFP-100GBASE-SR4
PIC 3 BUILTIN BUILTIN 4xQSFP28 SYNCE
Xcvr 0 REV 01 740-058734 1ECQ120307P QSFP-100GBASE-SR4
Xcvr 1 REV 01 740-058734 1ECQ1209011 QSFP-100GBASE-SR4
Xcvr 2 REV 01 740-058734 1ECQ120901G QSFP-100GBASE-SR4
Xcvr 3 REV 01 740-058734 1ECQ1203079 QSFP-100GBASE-SR4
PIC 4 BUILTIN BUILTIN 4xQSFP28 SYNCE
Xcvr 0 REV 01 740-058734 1ECQ120901D QSFP-100GBASE-SR4
Xcvr 1 REV 01 740-058734 1ECQ1209017 QSFP-100GBASE-SR4
Xcvr 2 REV 01 740-058734 1ECQ1209021 QSFP-100GBASE-SR4
Xcvr 3 REV 01 740-058734 1ECQ120902R QSFP-100GBASE-SR4
PIC 5 BUILTIN BUILTIN 4xQSFP28 SYNCE
Xcvr 0 REV 01 740-058734 1ECQ11200XW QSFP-100GBASE-SR4
Xcvr 1 REV 01 740-058734 1ECQ1203066 QSFP-100GBASE-SR4
Xcvr 2 REV 01 740-058734 1ECQ120307E QSFP-100GBASE-SR4
Xcvr 3 REV 01 740-058734 1ECQ120900K QSFP-100GBASE-SR4
FPC 5 REV 04 750-084779 CAKR7031 JNP10K-LC2101
CPU REV 05 750-073391 CAKJ2861 LC 2101 PMB
PIC 0 BUILTIN BUILTIN 4xQSFP28 SYNCE
Xcvr 0 REV 01 740-058734 1ECQ120309D QSFP-100GBASE-SR4
Xcvr 1 REV 01 740-058734 1ECQ120308J QSFP-100GBASE-SR4
Xcvr 2 REV 01 740-058734 1ECQ1203057 QSFP-100GBASE-SR4
Xcvr 3 REV 01 740-058734 1ECQ120309K QSFP-100GBASE-SR4
PIC 1 BUILTIN BUILTIN 4xQSFP28 SYNCE
Xcvr 0 REV 01 740-058734 1ECQ11180EG QSFP-100GBASE-SR4
Xcvr 1 REV 01 740-058734 1ECQ11210AA QSFP-100GBASE-SR4
Xcvr 2 REV 01 740-058734 1ECQ120401L QSFP-100GBASE-SR4
Xcvr 3 REV 01 740-058734 1ECQ1203093 QSFP-100GBASE-SR4
PIC 2 BUILTIN BUILTIN 4xQSFP28 SYNCE
Xcvr 0 REV 01 740-058734 1ECQ1208019 QSFP-100GBASE-SR4
Xcvr 1 REV 01 740-058734 1ECQ1209038 QSFP-100GBASE-SR4
Xcvr 2 REV 01 740-058734 1ECQ1203069 QSFP-100GBASE-SR4
Xcvr 3 REV 01 740-058734 1ECQ120308D QSFP-100GBASE-SR4
PIC 3 BUILTIN BUILTIN 4xQSFP28 SYNCE
Xcvr 0 REV 01 740-058734 1ECQ120900H QSFP-100GBASE-SR4
Xcvr 1 REV 01 740-058734 1ECQ1204016 QSFP-100GBASE-SR4
Xcvr 2 REV 01 740-058734 1ECQ12030AA QSFP-100GBASE-SR4
Xcvr 3 REV 01 740-058734 1ECQ120903T QSFP-100GBASE-SR4
PIC 4 BUILTIN BUILTIN 4xQSFP28 SYNCE
Xcvr 0 REV 01 740-058734 1ECQ120309B QSFP-100GBASE-SR4
Xcvr 1 REV 01 740-058734 1ECQ11180F1 QSFP-100GBASE-SR4
Xcvr 2 REV 01 740-058734 1ECQ11180EJ QSFP-100GBASE-SR4
Xcvr 3 REV 01 740-058734 1ECQ1209013 QSFP-100GBASE-SR4
PIC 5 BUILTIN BUILTIN 4xQSFP28 SYNCE
Xcvr 0 REV 01 740-058734 1ECQ120308N QSFP-100GBASE-SR4
Xcvr 1 REV 01 740-058734 1ECQ120309G QSFP-100GBASE-SR4
Xcvr 2 REV 01 740-058734 1ECQ121001W QSFP-100GBASE-SR4
Xcvr 3 REV 01 740-058734 1ECQ120308W QSFP-100GBASE-SR4
FPC 6 REV 04 750-084779 CAKN5708 JNP10K-LC2101
CPU REV 05 750-073391 CAKN1560 LC 2101 PMB
PIC 0 BUILTIN BUILTIN 4xQSFP28 SYNCE
Xcvr 0 REV 01 740-058734 1ECQ121002B QSFP-100GBASE-SR4
Xcvr 1 REV 01 740-058734 1ECQ1203099 QSFP-100GBASE-SR4
Xcvr 2 REV 01 740-058734 1ECQ120307Z QSFP-100GBASE-SR4
Xcvr 3 REV 01 740-058734 1ECQ1210034 QSFP-100GBASE-SR4
PIC 1 BUILTIN BUILTIN 4xQSFP28 SYNCE
Xcvr 0 REV 01 740-058734 1ECQ1203064 QSFP-100GBASE-SR4
Xcvr 1 REV 01 740-058734 1ECQ11180HC QSFP-100GBASE-SR4
Xcvr 2 REV 01 740-061409 1GCQA231090 QSFP-100GBASE-LR4-T2
Xcvr 3 REV 01 740-061409 1GCQA2380AW QSFP-100GBASE-LR4-T2
PIC 2 BUILTIN BUILTIN 4xQSFP28 SYNCE
Xcvr 0 REV 01 740-061409 1GCQA23200V QSFP-100GBASE-LR4-T2
Xcvr 1 REV 01 740-061409 1GCQA2280GV QSFP-100GBASE-LR4-T2
Xcvr 2 REV 01 740-061409 1GCQA22804D QSFP-100GBASE-LR4-T2
Xcvr 3 REV 01 740-061409 1GCQA22813P QSFP-100GBASE-LR4-T2
PIC 3 BUILTIN BUILTIN 4xQSFP28 SYNCE
Xcvr 0 REV 01 740-061409 1GCQA23204M QSFP-100GBASE-LR4-T2
Xcvr 1 REV 01 740-061409 1GCQA2280LW QSFP-100GBASE-LR4-T2
Xcvr 2 REV 01 740-061409 1GCQA2310CM QSFP-100GBASE-LR4-T2
Xcvr 3 REV 01 740-061409 1GCQA23801F QSFP-100GBASE-LR4-T2
PIC 4 BUILTIN BUILTIN 4xQSFP28 SYNCE
Xcvr 0 REV 01 740-061409 1GCQA2380PB QSFP-100GBASE-LR4-T2
Xcvr 1 REV 01 740-061409 1GCQA229044 QSFP-100GBASE-LR4-T2
Xcvr 2 REV 01 740-058734 1ECQ120309F QSFP-100GBASE-SR4
Xcvr 3 REV 01 740-058734 1ECQ120801D QSFP-100GBASE-SR4
PIC 5 BUILTIN BUILTIN 4xQSFP28 SYNCE
Xcvr 0 REV 01 740-058734 1ECQ120305G QSFP-100GBASE-SR4
Xcvr 1 REV 01 740-058734 1ECQ1203084 QSFP-100GBASE-SR4
Xcvr 2 REV 01 740-058734 1ECQ1204017 QSFP-100GBASE-SR4
Xcvr 3 REV 01 740-058734 1ECQ11210NP QSFP-100GBASE-SR4
FPC 7 REV 04 750-084779 CAKR7009 JNP10K-LC2101
CPU REV 05 750-073391 CAKR1004 LC 2101 PMB
PIC 0 BUILTIN BUILTIN 4xQSFP28 SYNCE
Xcvr 0 REV 01 740-058734 1ECQ120309E QSFP-100GBASE-SR4
Xcvr 1 REV 01 740-058734 1ECQ1203092 QSFP-100GBASE-SR4
Xcvr 2 REV 01 740-058732 1BTQA21807H QSFP-100GBASE-LR4
Xcvr 3 REV 01 740-058732 1BTQA2180H4 QSFP-100GBASE-LR4
PIC 1 BUILTIN BUILTIN 4xQSFP28 SYNCE
Xcvr 0 REV 01 740-058732 1BTQA21807B QSFP-100GBASE-LR4
Xcvr 1 REV 01 740-058732 1BTQA21808P QSFP-100GBASE-LR4
Xcvr 2 REV 01 740-058732 1BTQA21807F QSFP-100GBASE-LR4
Xcvr 3 REV 01 740-058732 1BTQA2180GH QSFP-100GBASE-LR4
PIC 2 BUILTIN BUILTIN 4xQSFP28 SYNCE
Xcvr 0 REV 01 740-058732 1BTQA21807J QSFP-100GBASE-LR4
Xcvr 1 REV 01 740-058732 1BTQA2180GK QSFP-100GBASE-LR4
Xcvr 2 REV 01 740-058732 1BTQA21807S QSFP-100GBASE-LR4
Xcvr 3 REV 01 740-058732 1BTQA218079 QSFP-100GBASE-LR4
PIC 3 BUILTIN BUILTIN 4xQSFP28 SYNCE
Xcvr 0 REV 01 740-058732 1BTQA2180H9 QSFP-100GBASE-LR4
Xcvr 1 REV 01 740-058732 1BTQA2180GS QSFP-100GBASE-LR4
Xcvr 2 REV 01 740-058732 1BTQA2180GM QSFP-100GBASE-LR4
Xcvr 3 REV 01 740-058732 1BTQA21807A QSFP-100GBASE-LR4
PIC 4 BUILTIN BUILTIN 4xQSFP28 SYNCE
Xcvr 0 REV 01 740-058732 1BTQA21807E QSFP-100GBASE-LR4
Xcvr 1 REV 01 740-058732 1BTQA218088 QSFP-100GBASE-LR4
Xcvr 2 REV 01 740-058732 1BTQA2180H3 QSFP-100GBASE-LR4
Xcvr 3 REV 01 740-058732 1BTQA21807R QSFP-100GBASE-LR4
PIC 5 BUILTIN BUILTIN 4xQSFP28 SYNCE
Xcvr 0 REV 01 740-058732 1BTQA2180KN QSFP-100GBASE-LR4
Xcvr 1 REV 01 740-058732 1BTQA21807G QSFP-100GBASE-LR4
Xcvr 2 REV 01 740-061412 1HTQ521000N QSFP-100G-CWDM4
Xcvr 3 REV 01 740-061412 1HTQ5209020 QSFP-100G-CWDM4
FPD Board REV 07 711-054687 CAGY2459 Front Panel Display
PEM 0 REV 02 740-073146 1EDL62503RK Power Supply AC
PEM 1 REV 02 740-073146 1EDL631051X Power Supply AC
PEM 2 REV 02 740-073146 1EDL73104YE Power Supply AC
PEM 3 REV 02 740-073146 1EDL62503AL Power Supply AC
PEM 4 REV 02 740-073146 1EDL62102EE Power Supply AC
PEM 5 REV 02 740-073146 1EDL625036K Power Supply AC
FTC 0 REV 03 750-072657 CAGY3565 Fan Controller 8
FTC 1 REV 03 750-072657 CAGY3562 Fan Controller 8
Fan Tray 0 REV 04 760-072656 CAHC8375 Fan Tray 8
Fan Tray 1 REV 04 760-072656 CAHC8372 Fan Tray 8
SFB 0 REV 28 750-072655 ACPR2589 Switch Fabric 8
SFB 1 REV 03 750-072655 CAGY3066 Switch Fabric 8
SFB 2 REV 28 750-072655 ACPP8485 Switch Fabric 8
SFB 3 REV 07 750-072655 ACNL2260 Switch Fabric 8
SFB 4 REV 01 750-072655 ACPN5048 Switch Fabric 8
SFB 5 REV 03 750-072655 CAGY3050 Switch Fabric 8
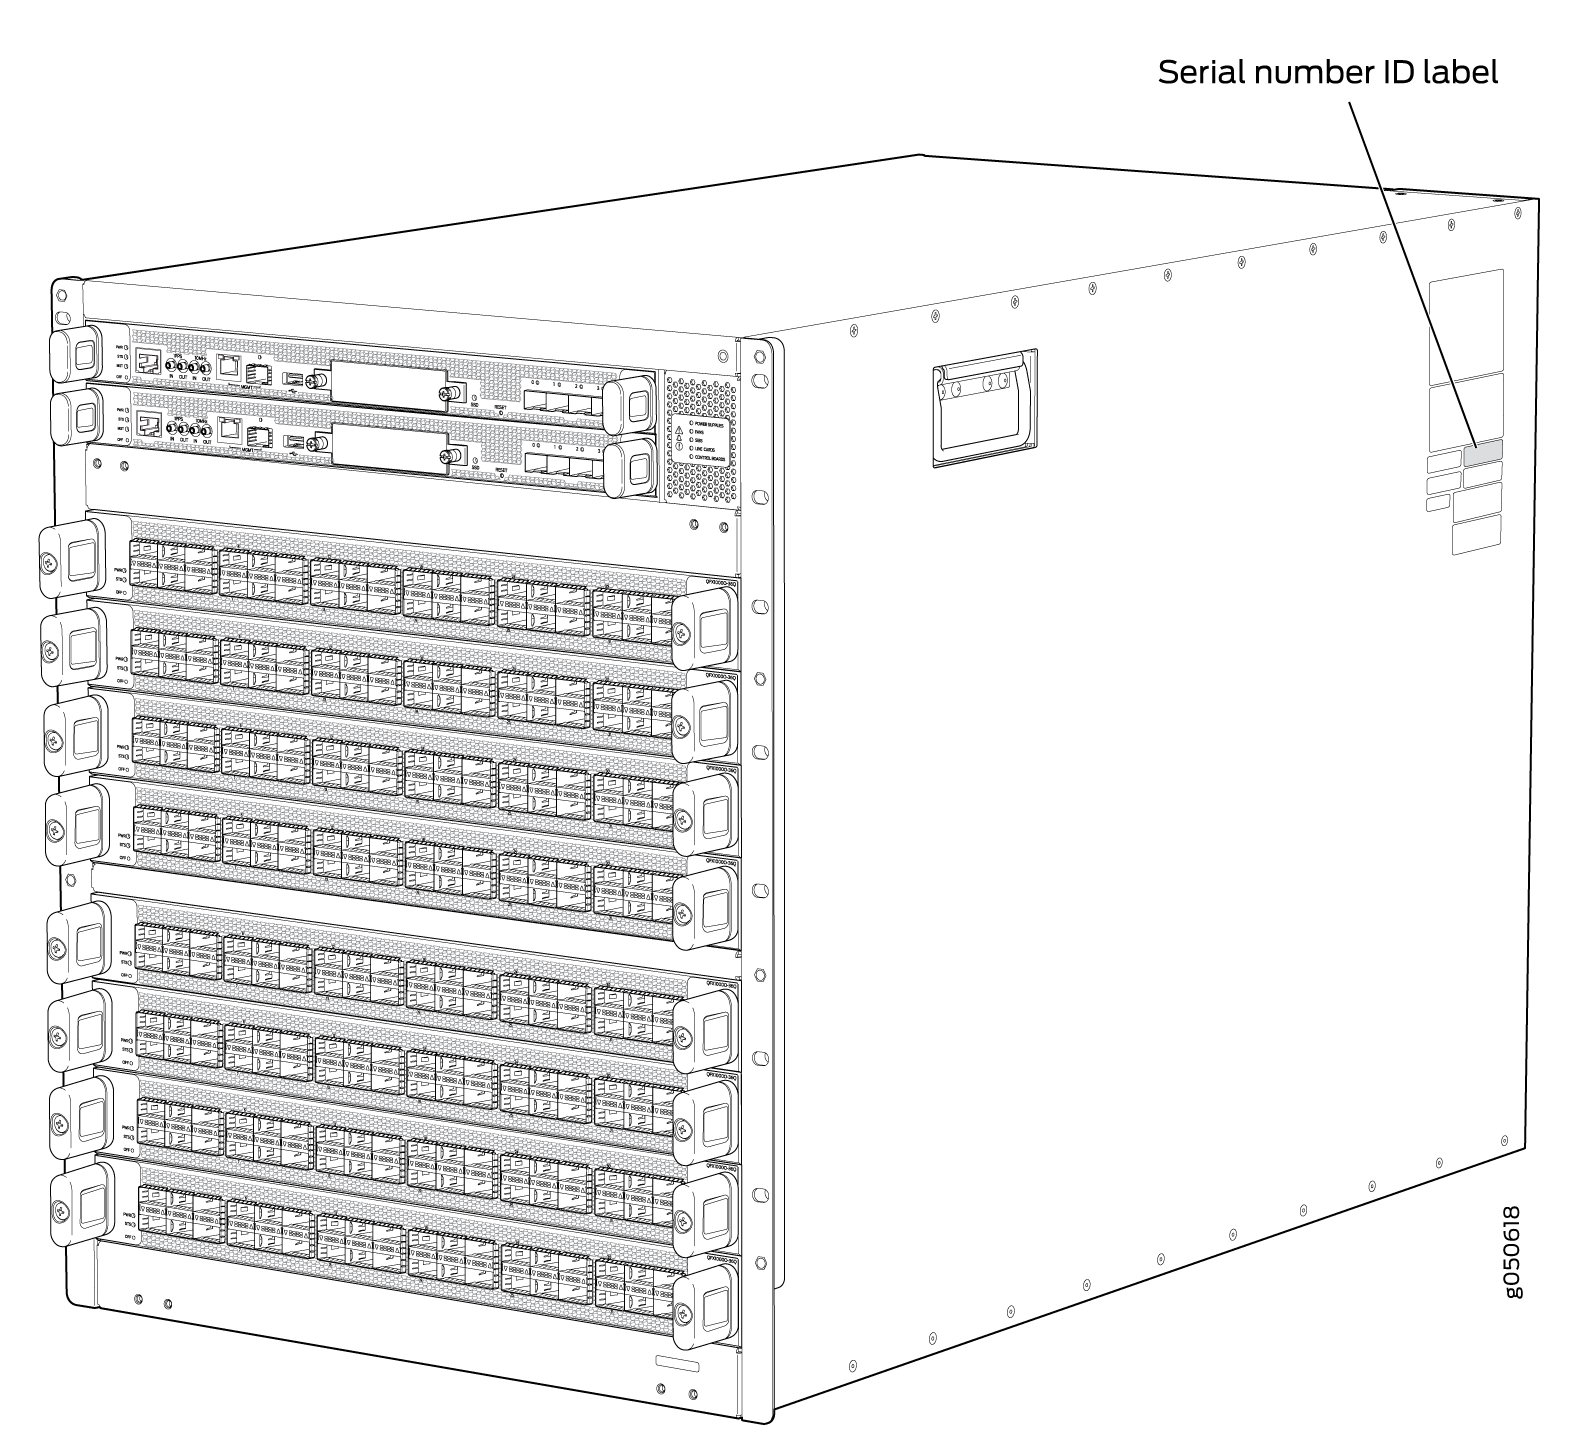
Locating the Chassis Serial Number ID Label on an MX10008
The serial number ID label is located on a label on the right side of the chassis. See Figure 1 for the location on an MX10008 .
Locating the Serial Number ID Labels on MX10008 Power Supplies
The power supplies installed in an MX10008 are field-replaceable units (FRUs). For each FRU, you must remove the FRU from the router chassis to see the FRU serial number ID label.
-
JNP10K-PWR-AC3 power supply—The serial number ID label is on the right side of the power supply. See Figure 2.
Figure 2: JNP10K-PWR-AC3 Power Supply Serial Number Location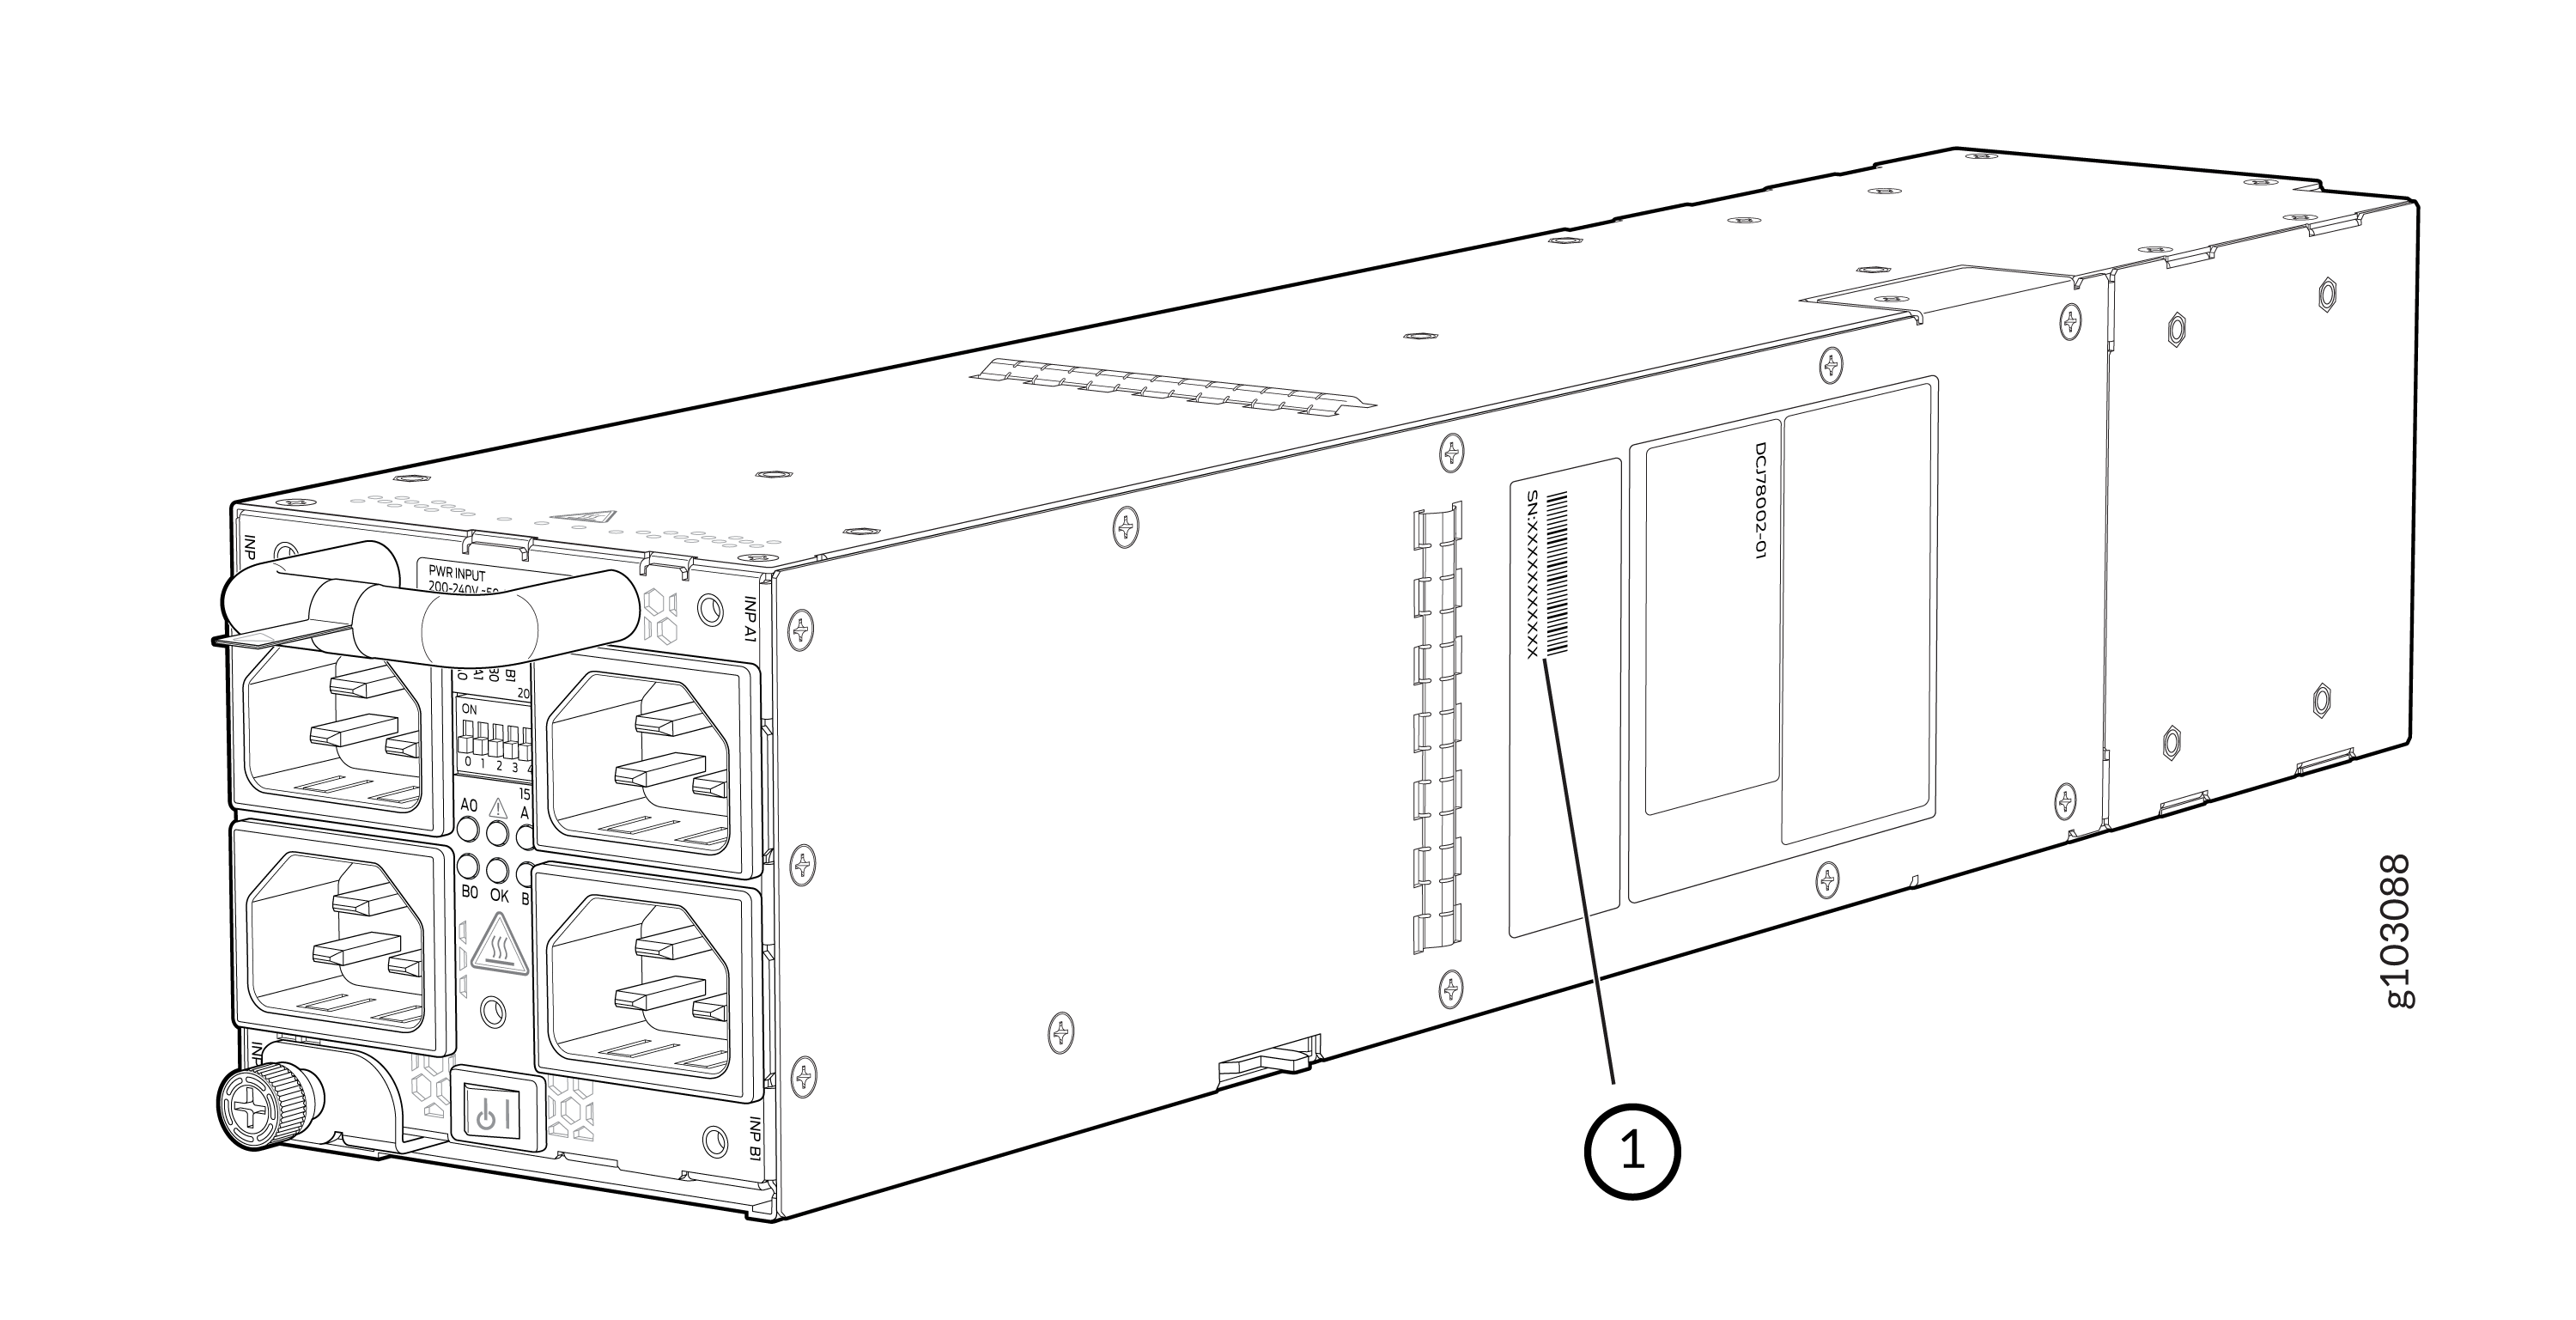 1—
1—Serial number ID label
-
JNP10K-PWR-DC3 power supply—The serial number ID label is on the right side of the power supply. See Figure 3.
Figure 3: JNP10K-PWR-DC3 Power Supply Serial Number Location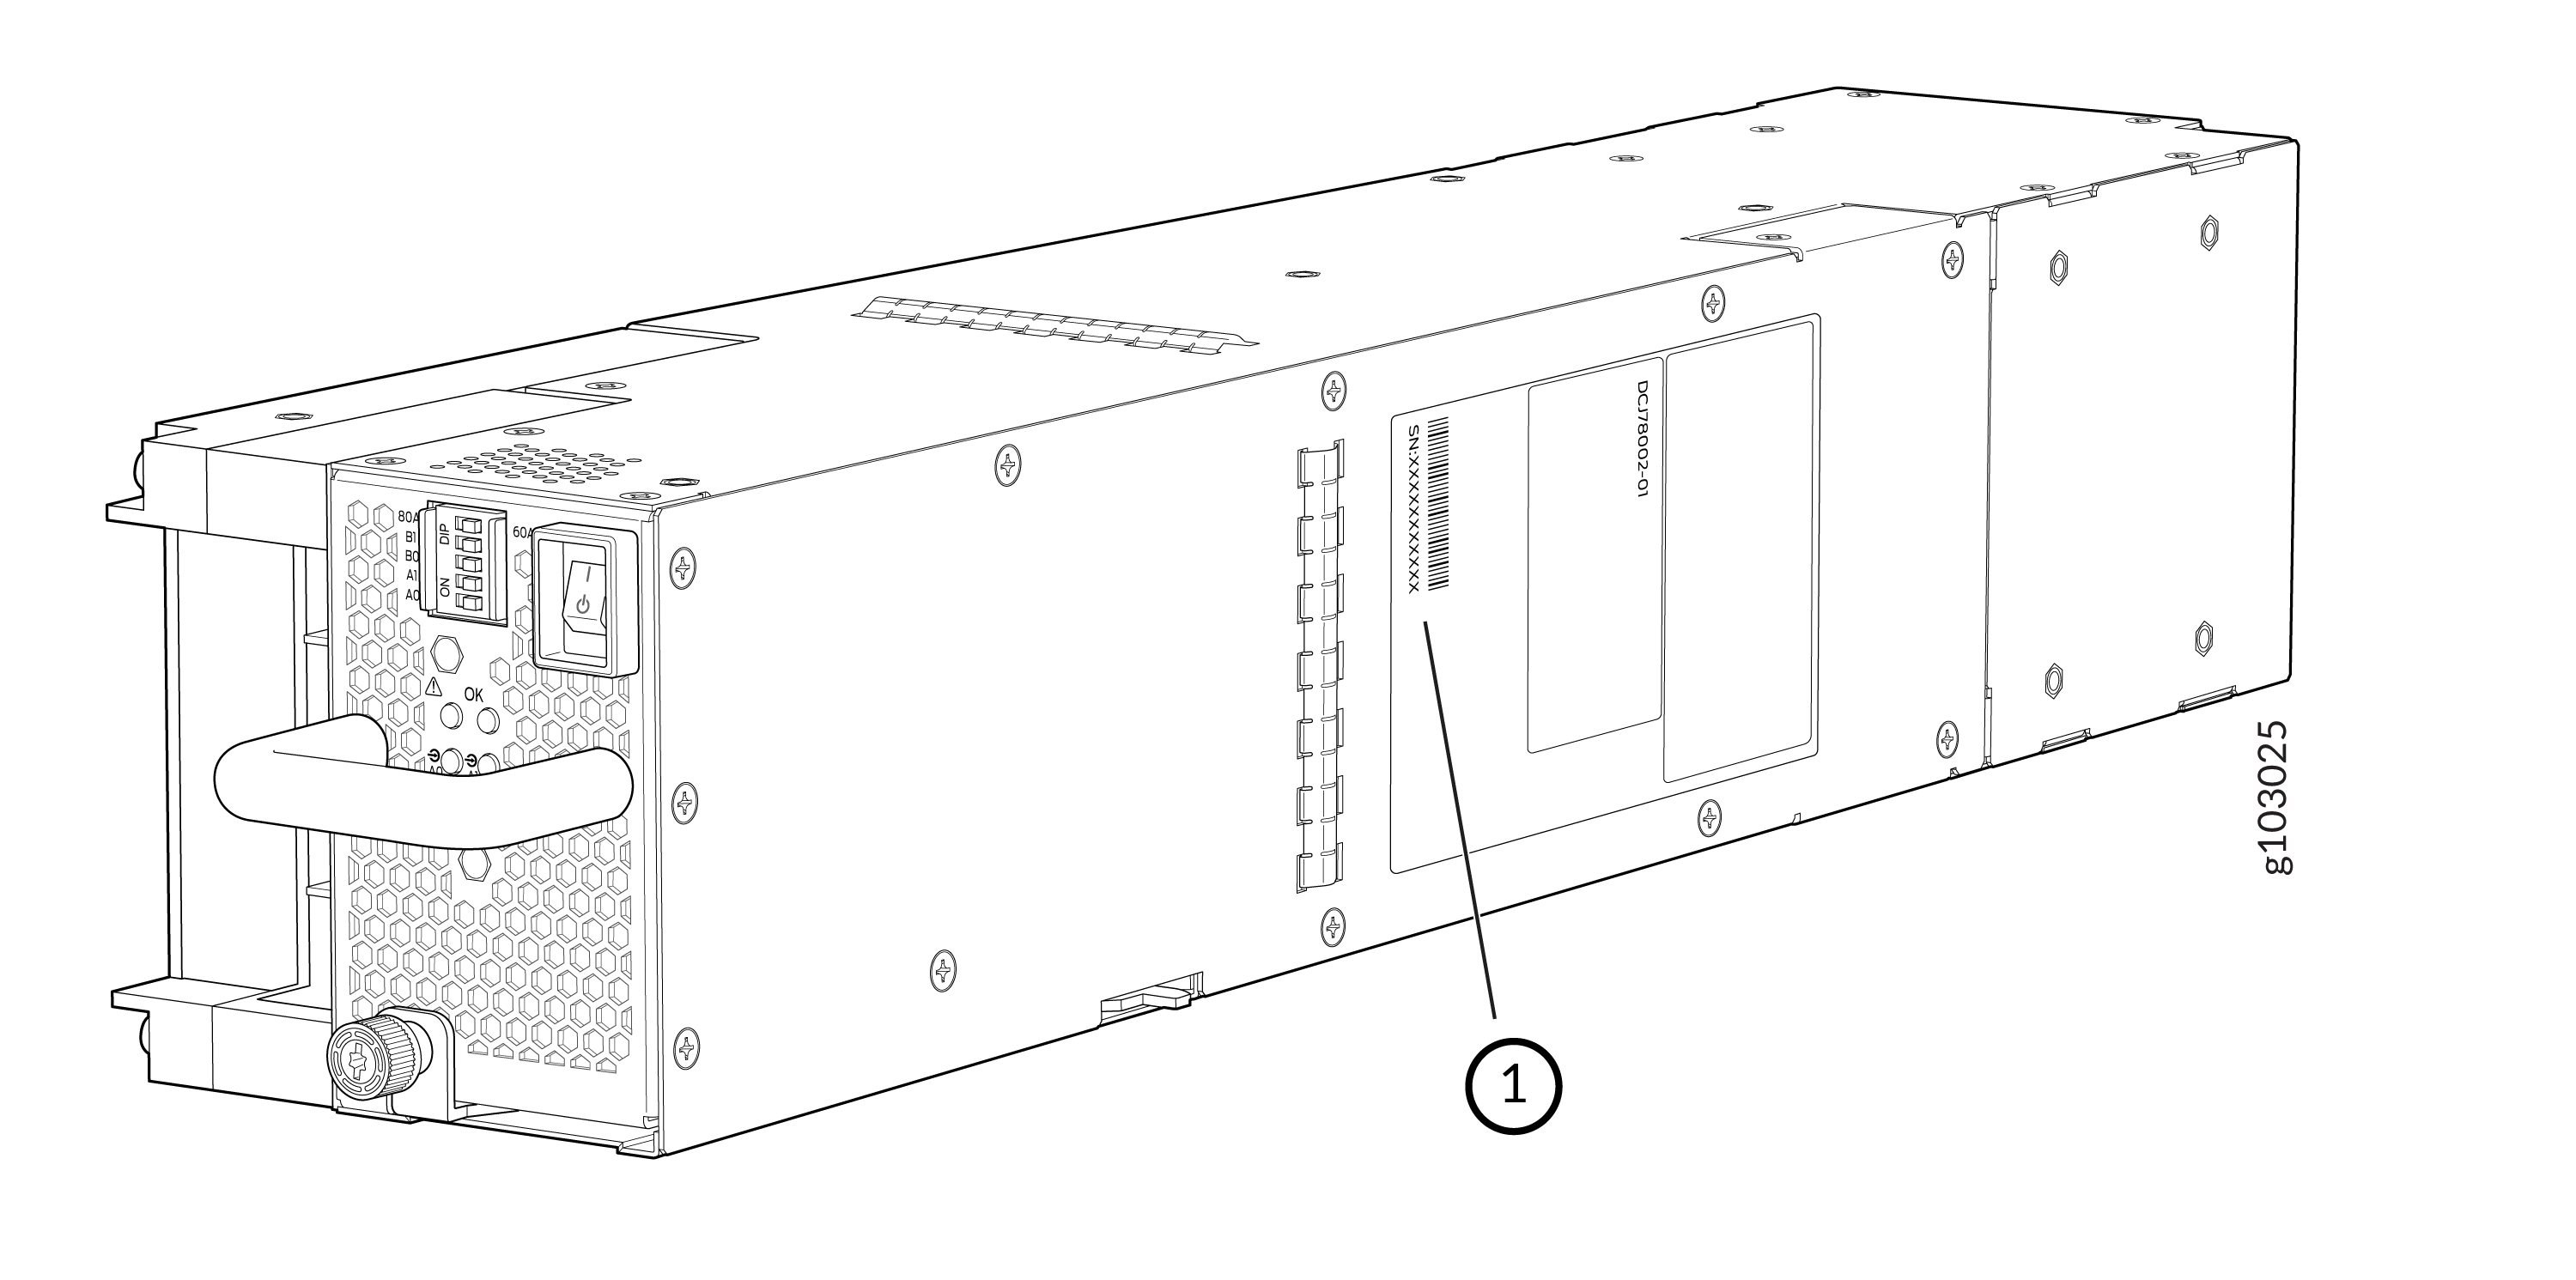 1—
1—Serial number ID label
-
JNP10K-PWR-AC3H power supply—The serial number ID label is on the right side of the power supply. See Figure 4.
Figure 4: JNP10K-PWR-AC3H Power Supply Serial Number Location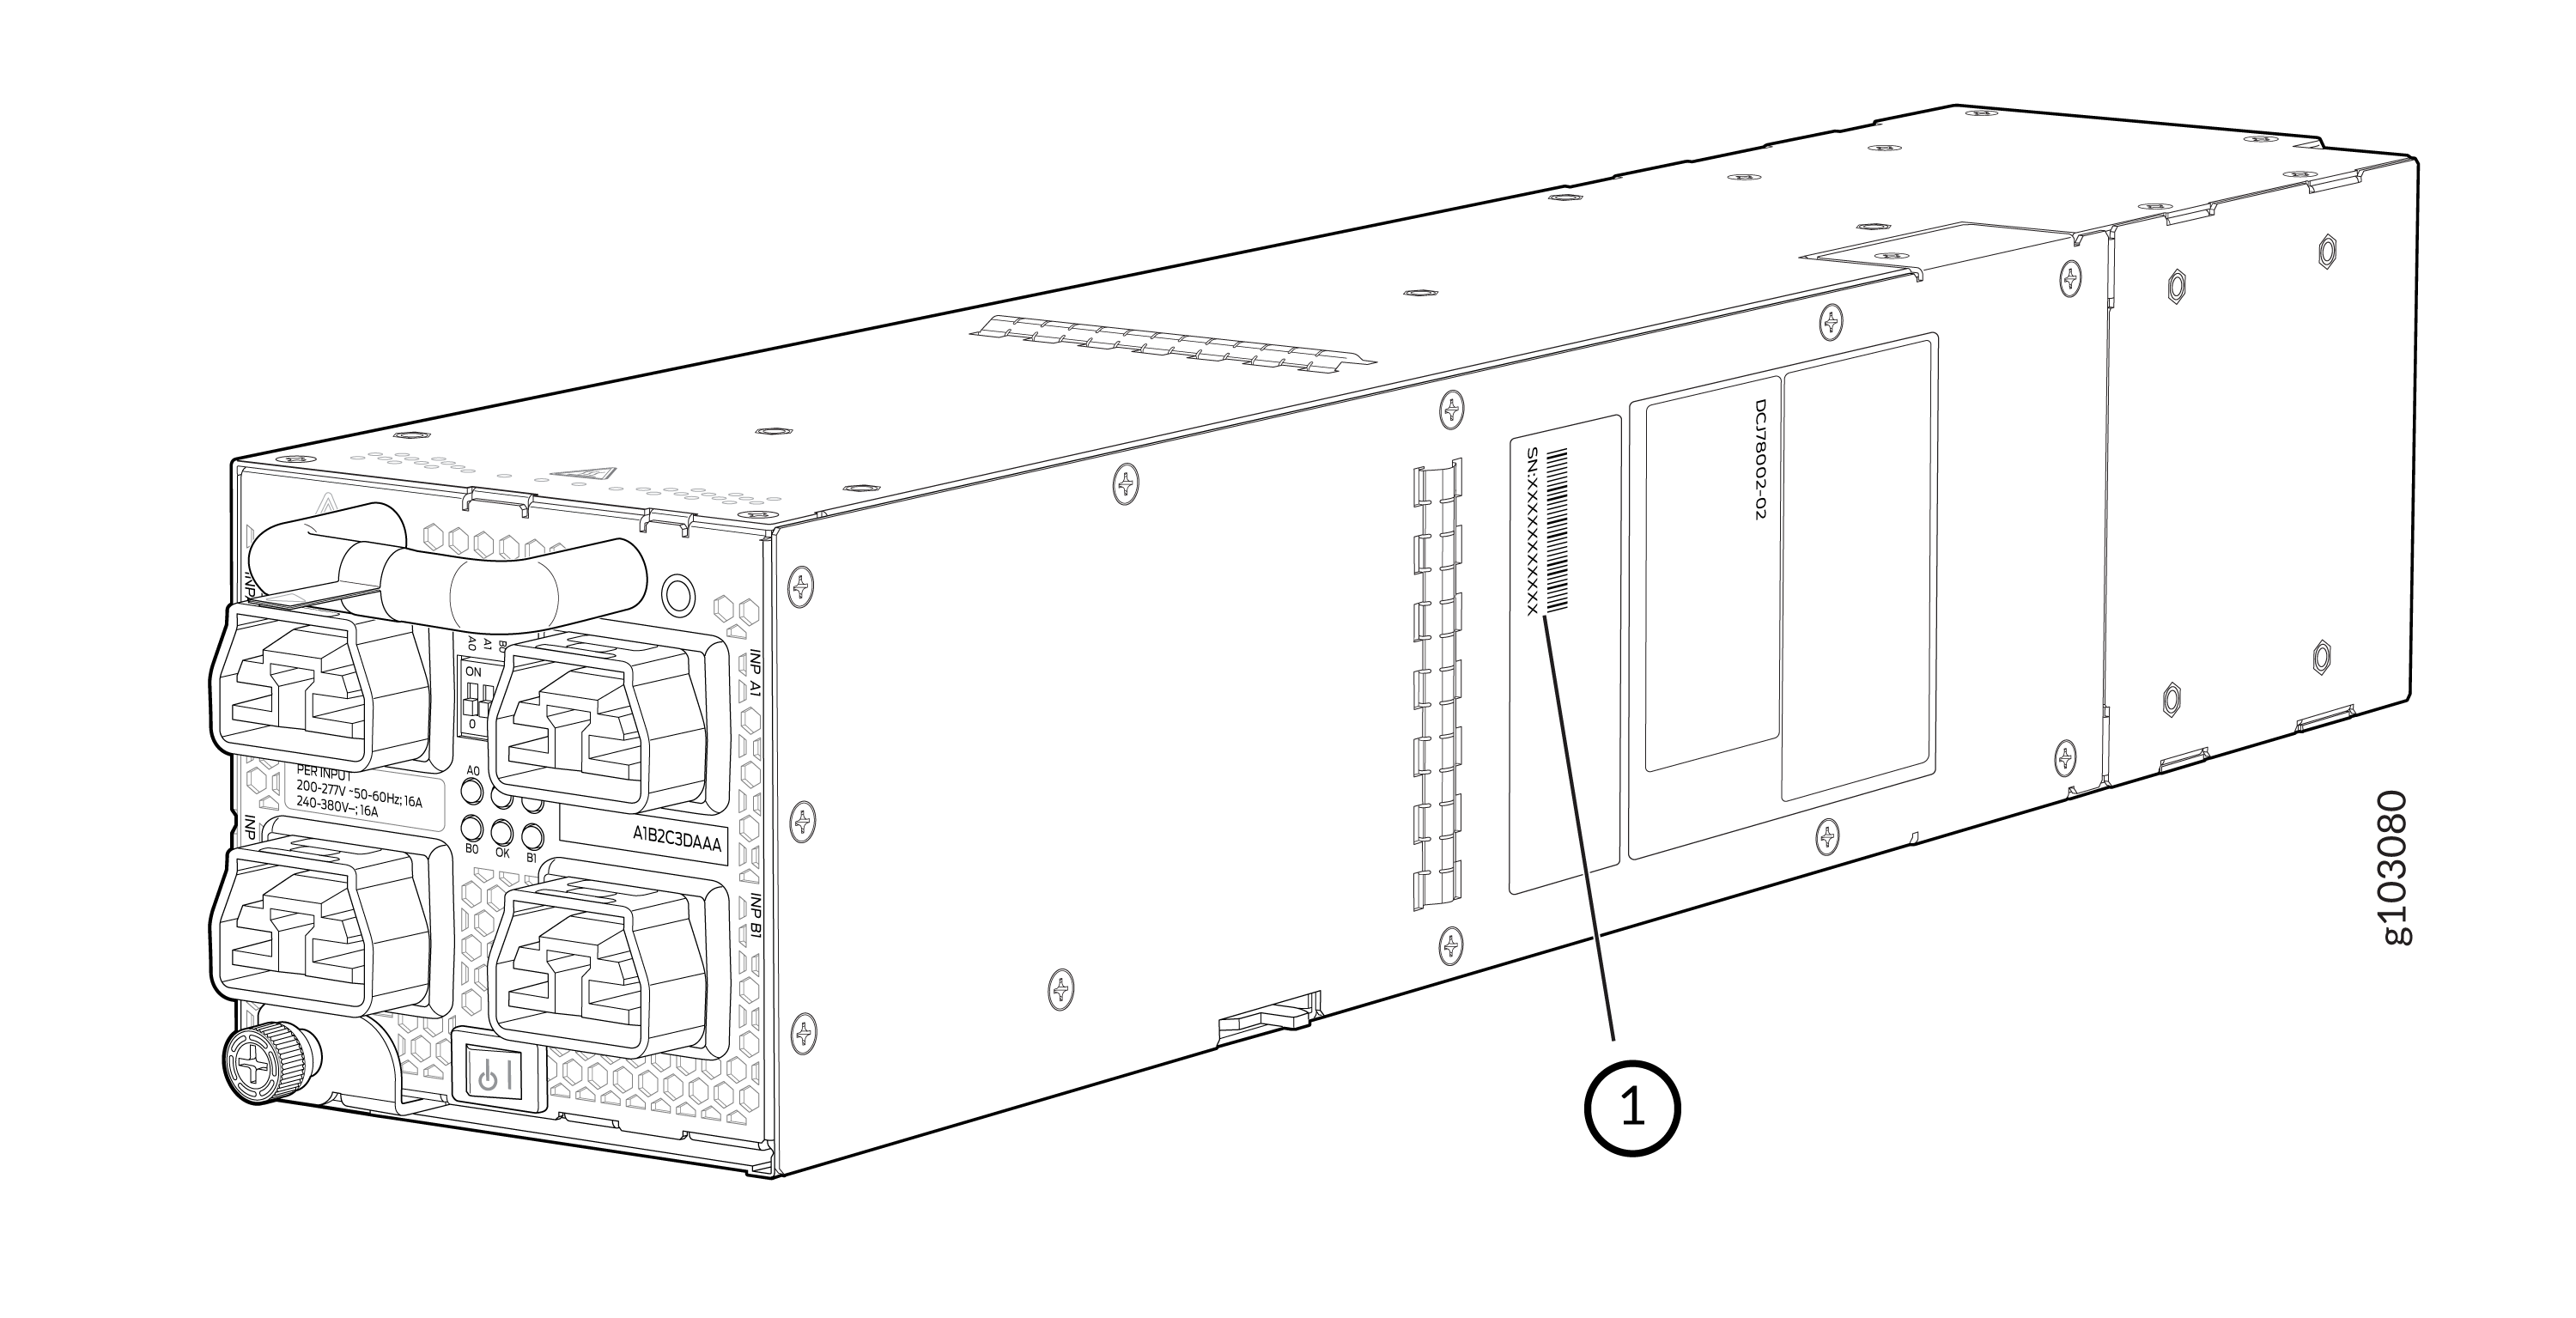 1—
1—Serial number ID label
-
JNP10K-PWR-AC2 power supply—The serial ID label is on the right side of the power supply. See Figure 5.
Figure 5: JNP10K-PWR-AC2 Power Supply Serial Number Location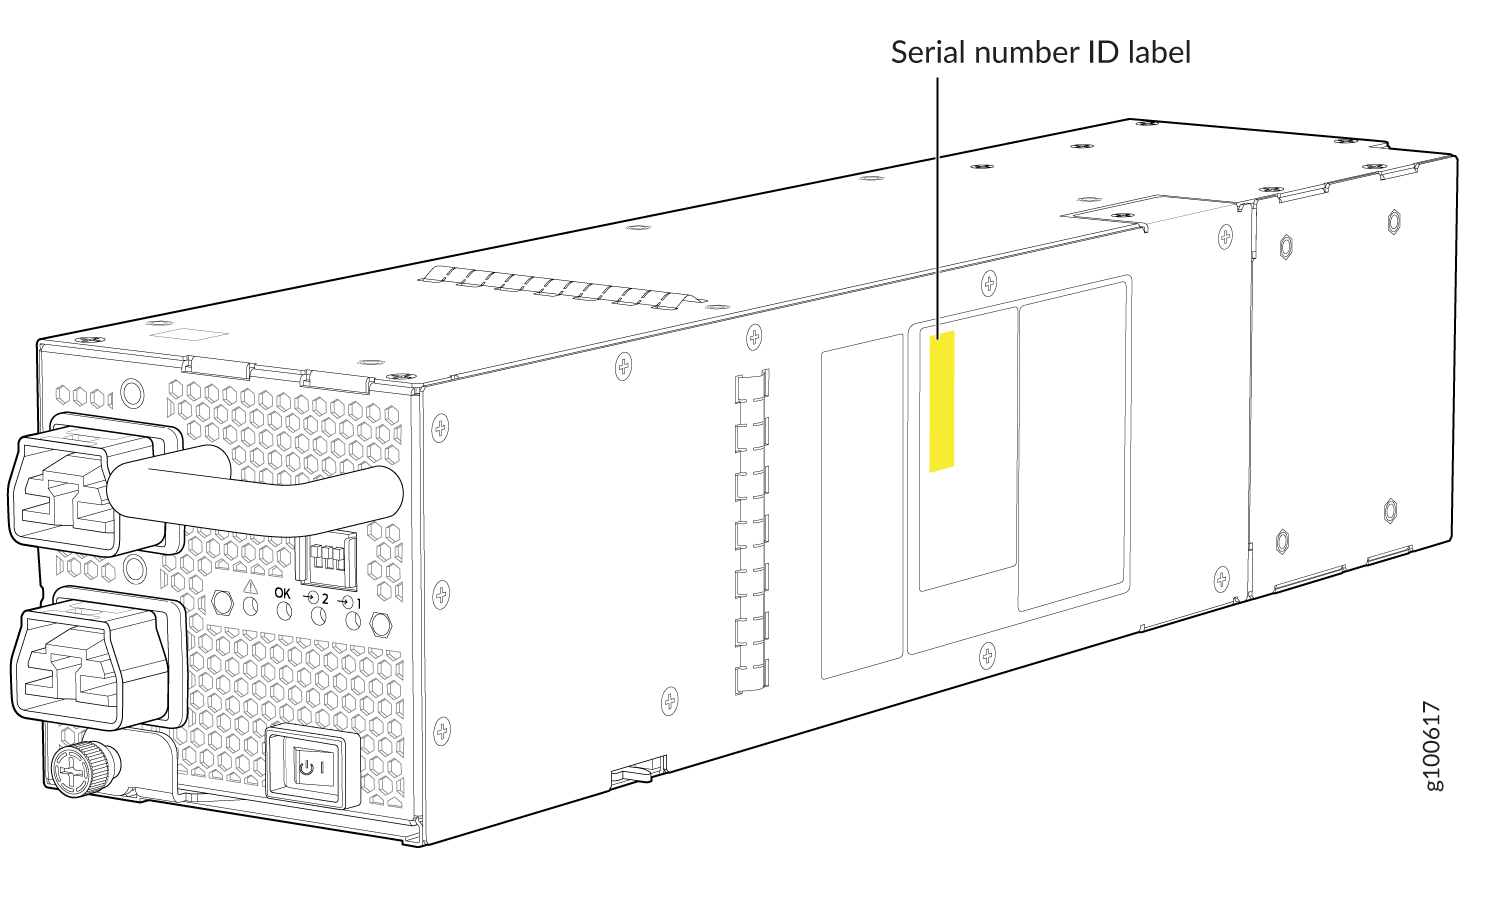
-
JNP10K-PWR-DC2 power supply—The serial number ID label is on the left side of the power supply. See Figure 6.
Figure 6: JNP10K-PWR-DC2 Power Supply Serial Number Location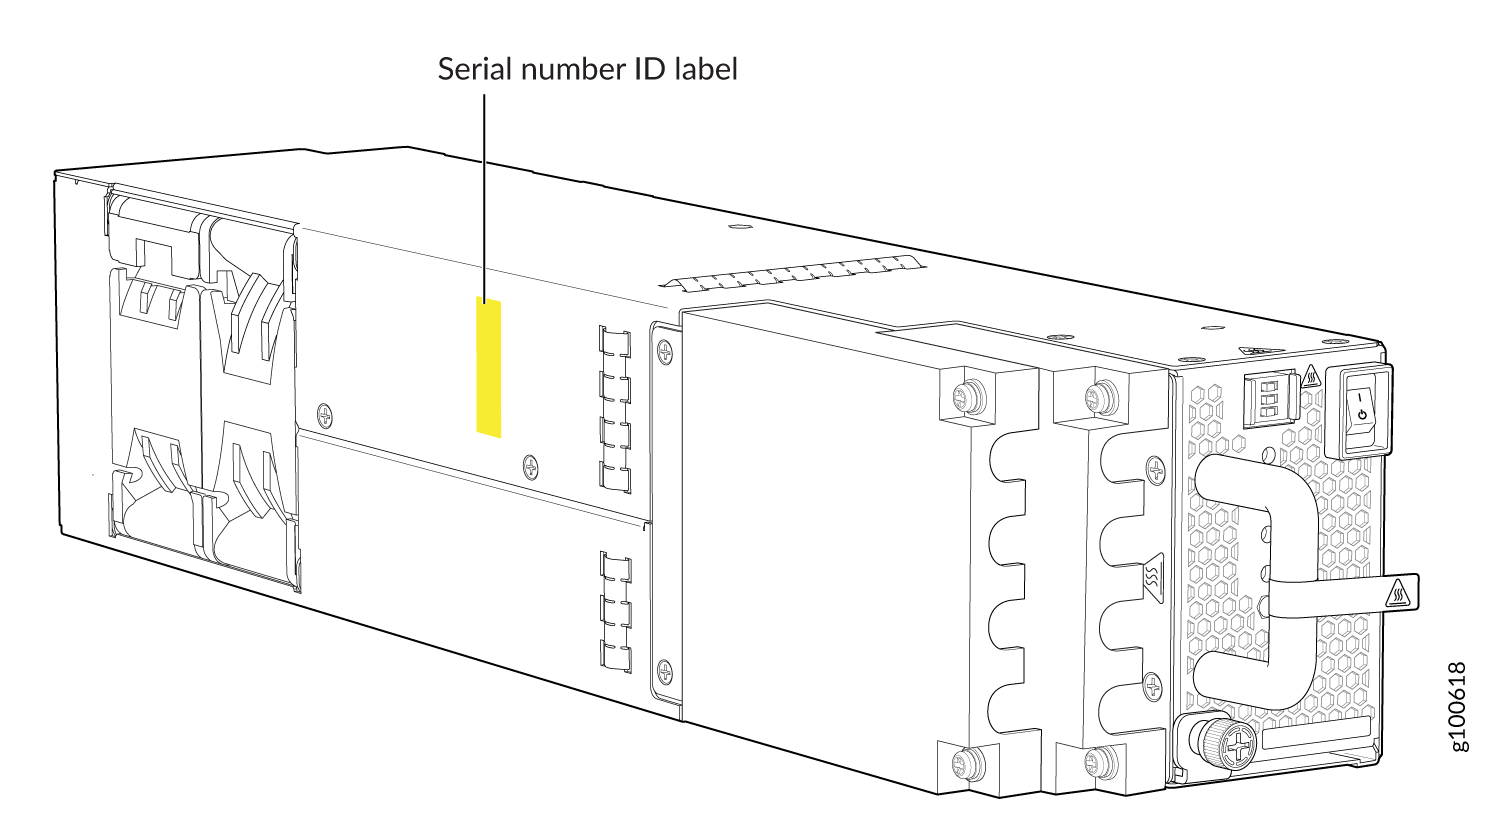
-
JNP10K-PWR-AC power supply—The serial number ID label is on the right side of the power supply. See Figure 7.
Figure 7: JNP10K-PWR-AC Power Supply Serial Number Location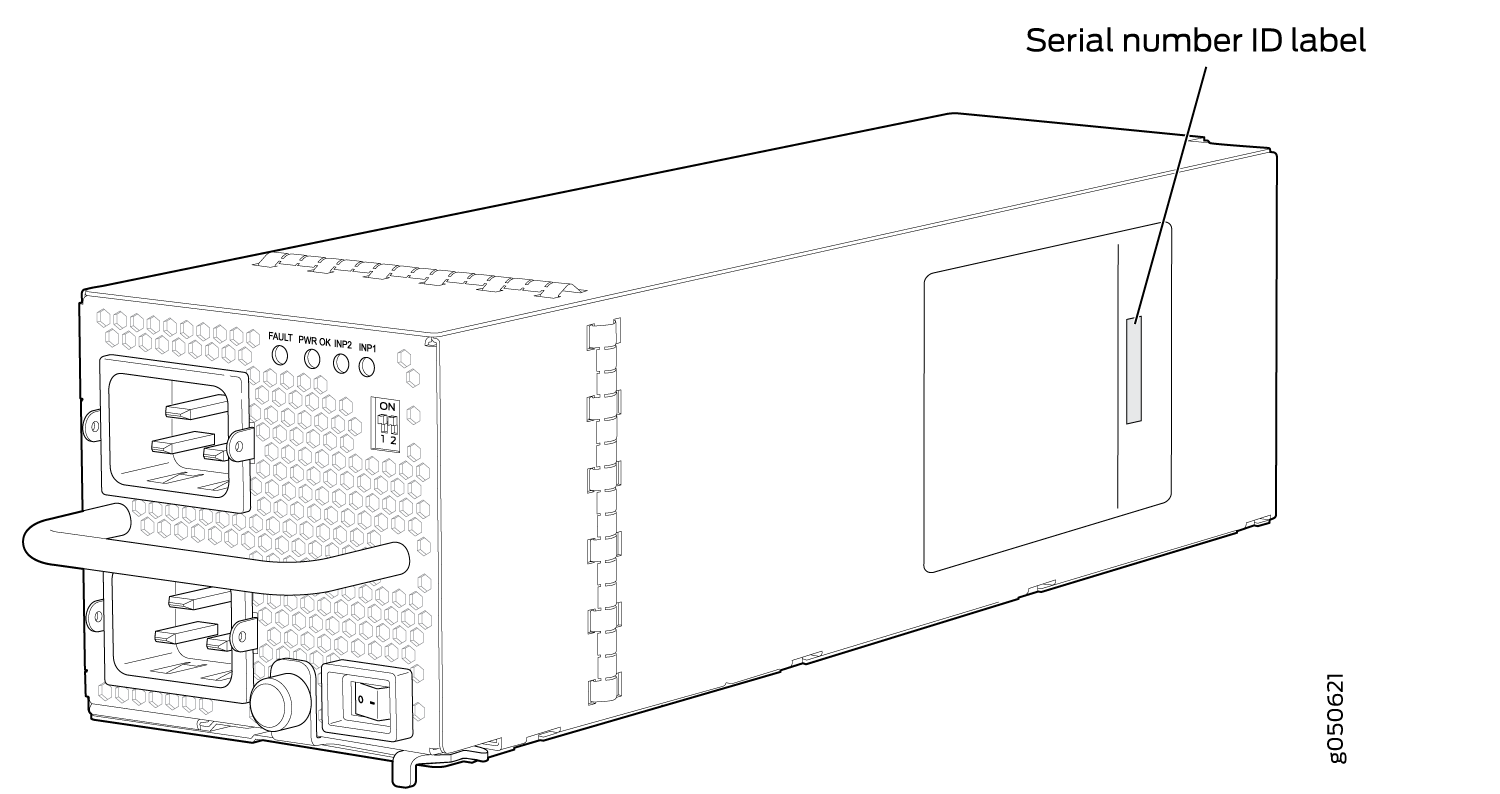
-
JNP10K-PWR-DC power supply—The serial number ID label is on the left side of the power supply. See Figure 8.
Figure 8: JNP10K-PWR-DC Power Supply Serial Number Location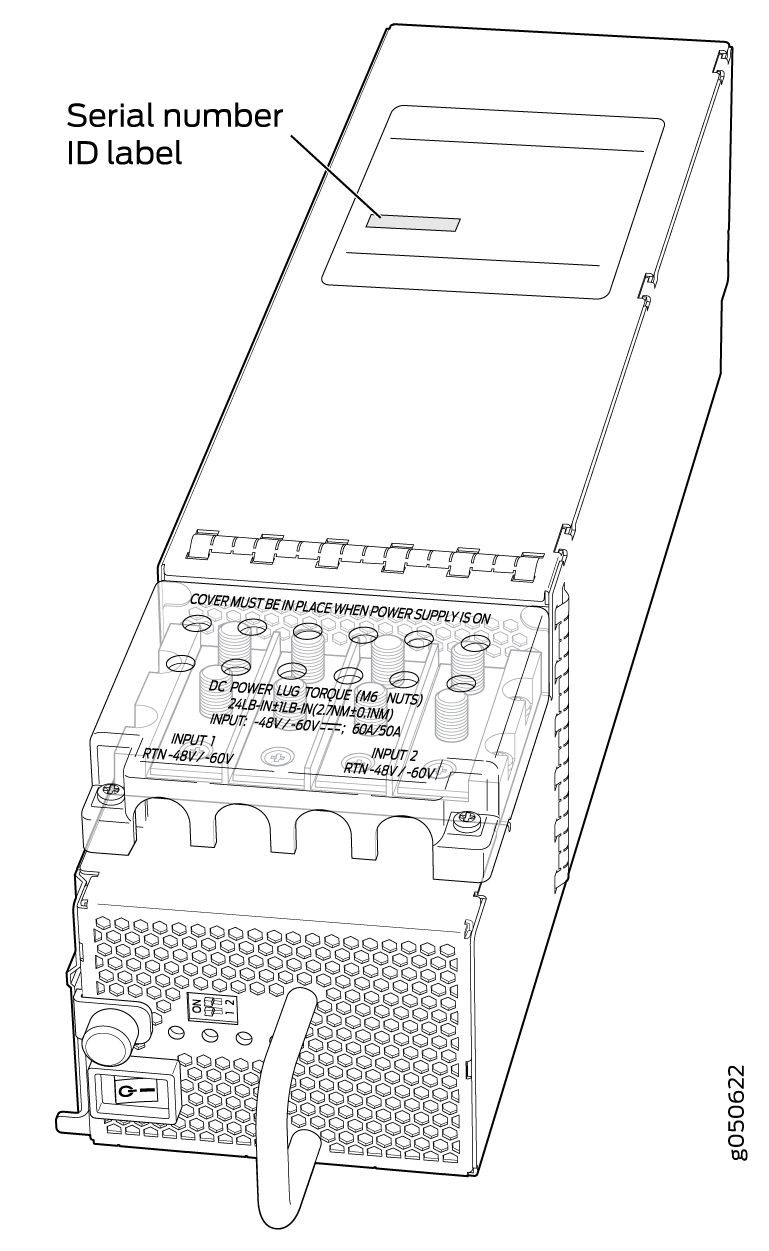
Locating the Serial Number ID Labels on MX10008 Fan Trays and Fan Tray Controllers
The two fan trays and their associated fan tray controllers installed in an MX10008 are field-replaceable units (FRUs). For each FRU, you must remove the FRU from the router chassis to see the FRU serial number ID label.
-
Fan tray–The serial number ID label for both fan tray models (JNP10008-FAN and JNP10008-FAN2) is located on the inside of the fan tray at the base of the fan tray control board. See Figure 9.
Figure 9: MX10008 Fan Tray Serial Number Location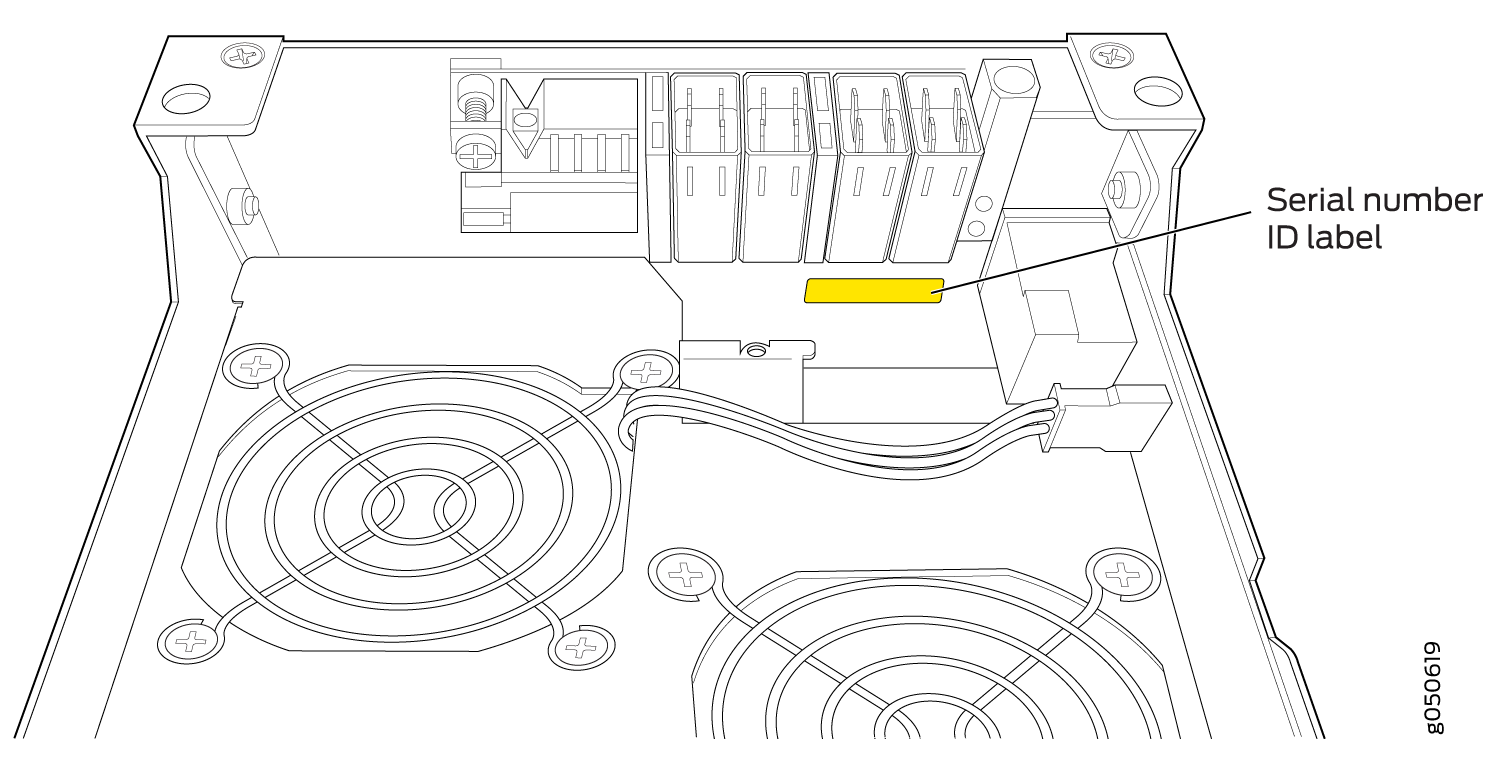
-
Fan tray controller–The serial number ID label for both fan tray controller models (JNP10008-FAN-CTRL and JNP10008-FTC2) is located on the top of the fan tray controller. See Figure 10.
Figure 10: MX10008 Fan Tray Controller Serial Number Location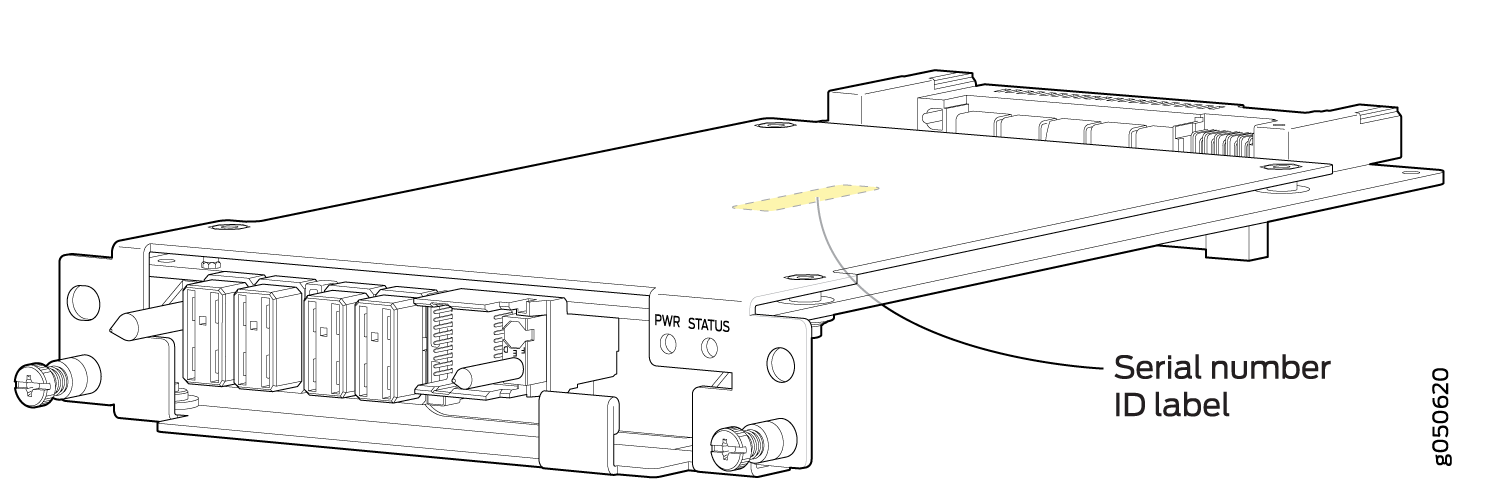
Locating the Serial Number ID Labels on MX10008 Routing and Control Boards
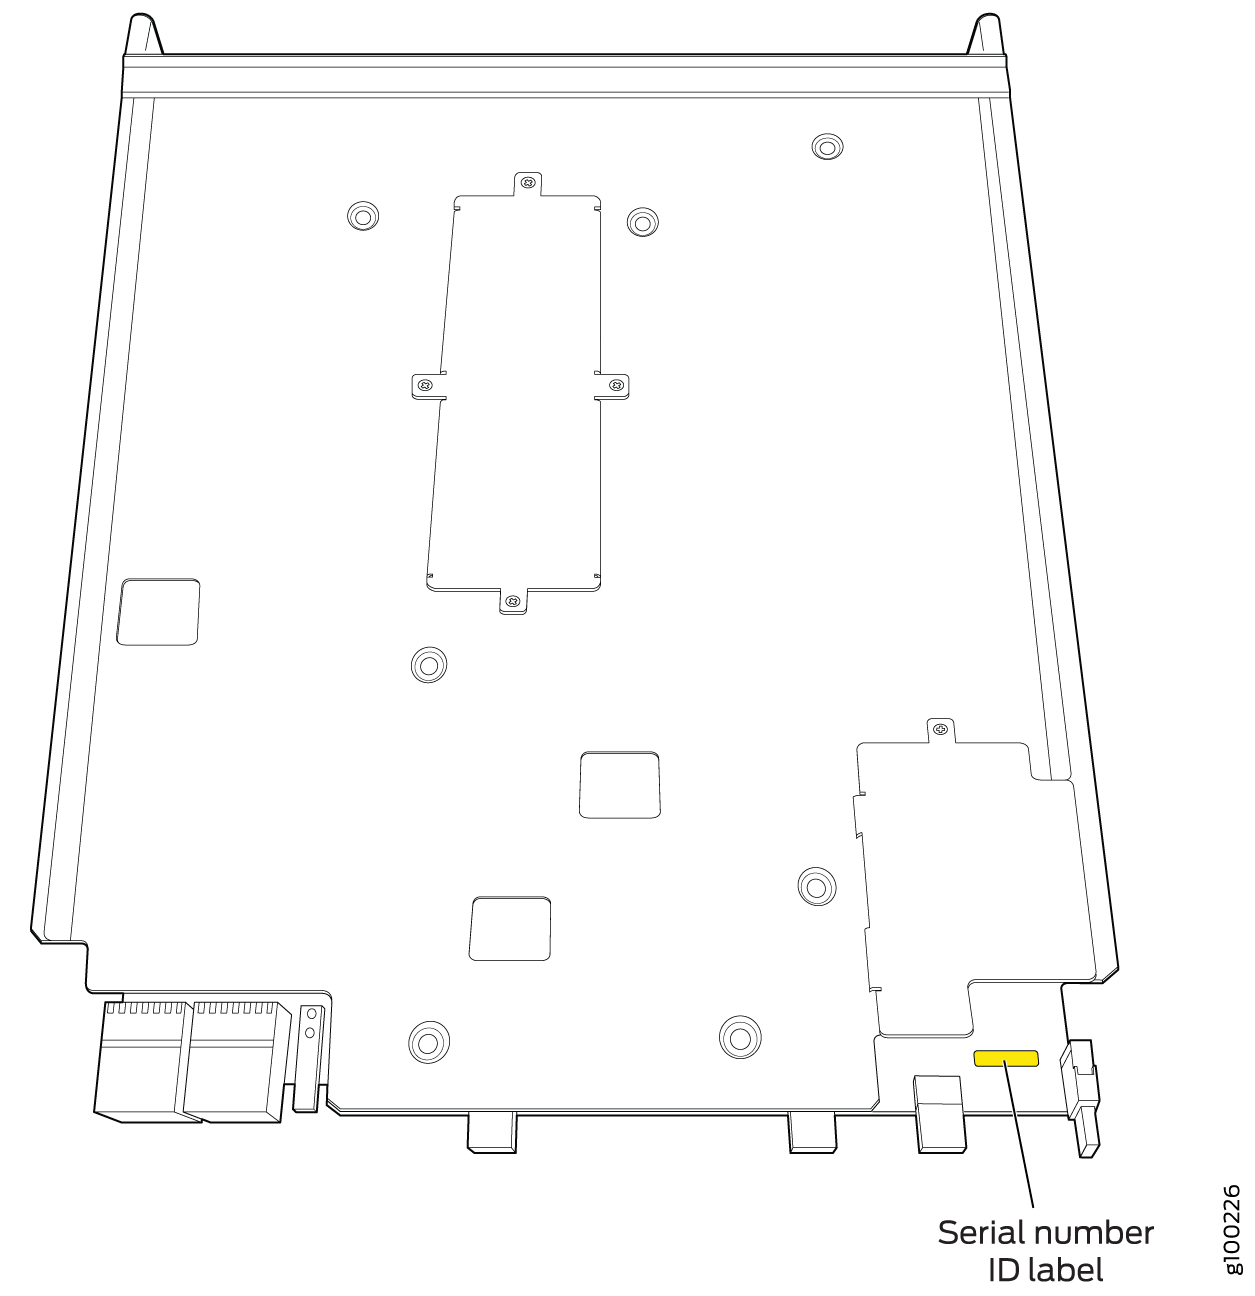
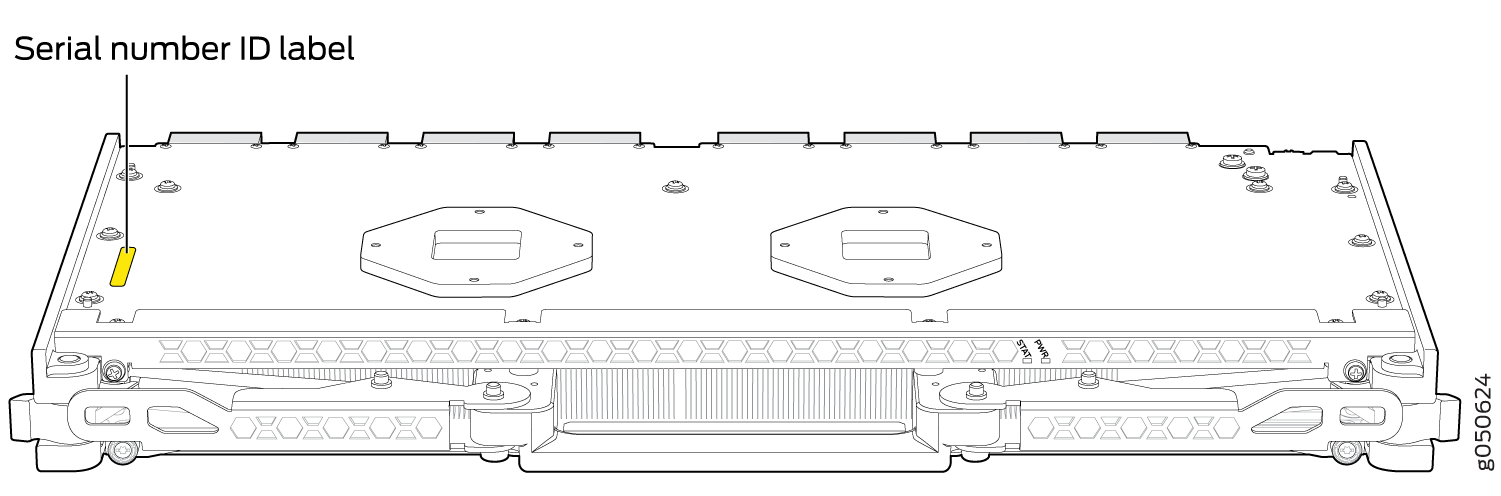
The serial number ID label for an RCB is located on the connector end of the unit. See Figure 11.
Locating the Serial Number ID Labels on an MX10008 Line Card
The serial number ID label for a line card is located on the connector end of the card. See Figure 12.
Locating the Serial Number ID Labels on an MX10008 Switch Fabric Board (SFB)
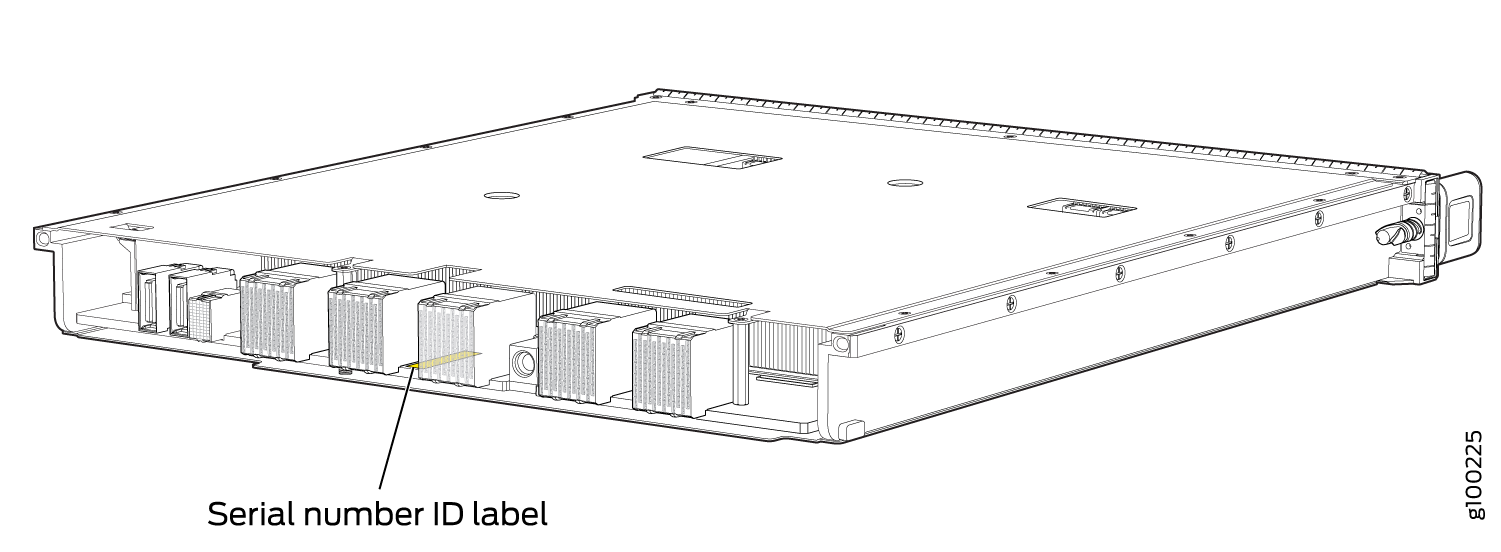
The serial number ID label for an SFB is located on the PC board. See Figure 13.
Contacting Customer Support to Obtain a Return Materials Authorization for a Router or Component
If you are returning a MX10008 router or component to Juniper Networks for repair or replacement, you must first obtain a Return Materials Authorization (RMA) from the Juniper Networks Technical Assistance Center (JTAC).
After locating the serial number of the device or component you want to return, open a service request with Juniper Networks Technical Assistance Center (JTAC) on the Web or by telephone.
For instructions on locating the serial number of the device or component you want to return, see the following device instructions:
Before you request an RMA from JTAC, be prepared to provide the following information:
Your existing service request number, if you have one
Serial number of the component
Your name, organization name, telephone number, fax number, and shipping address
Details of the failure or problem
Type of activity being performed on the device when the problem occurred
Configuration data displayed by one or more
showcommands
You can contact JTAC 24 hours a day, seven days a week on the Web or by telephone:
Service Request Manager: https://support.juniper.net/support/
Telephone: +1-888-314-JTAC (+1-888-314-5822), toll-free in the USA, Canada, and Mexico
For international or direct-dial options in countries without toll-free numbers, see https://www.juniper.net/support/requesting-support.html.
If you are contacting JTAC by telephone, enter your 12-digit service request number followed by the pound (#) key for an existing case, or press the star (*) key to be routed to the next available support engineer.
The support representative validates your request and issues an RMA number for return of the component.
Packing an MX10008 Router or Component for Shipping
Follow this procedure if you are returning an MX10008 chassis or component to Juniper Networks for repair or replacement.
Before you pack an MX10008 or component:
Ensure that you have taken the necessary precautions to prevent electrostatic discharge (ESD) damage. See Prevention of Electrostatic Discharge Damage.
Pack your chassis or component using one of these materials:
Use the packing material from the replacement chassis or component
Retrieve the original shipping carton and packing materials
Contact your JTAC representative if you do not have these materials, to learn about approved packing materials. See Contact Customer Support.
Ensure that you have the following parts and tools available:
ESD grounding strap.
Electrostatic bag, one for each component.
If you are returning the chassis:
A 13/32-in. or 10-mm open-end or socket wrench to install the bracket bolts on the chassis and shipping pallet
An appropriate screwdriver for the mounting screws used on your rack.
This topic covers:
Packing an MX10008 Chassis for Shipping
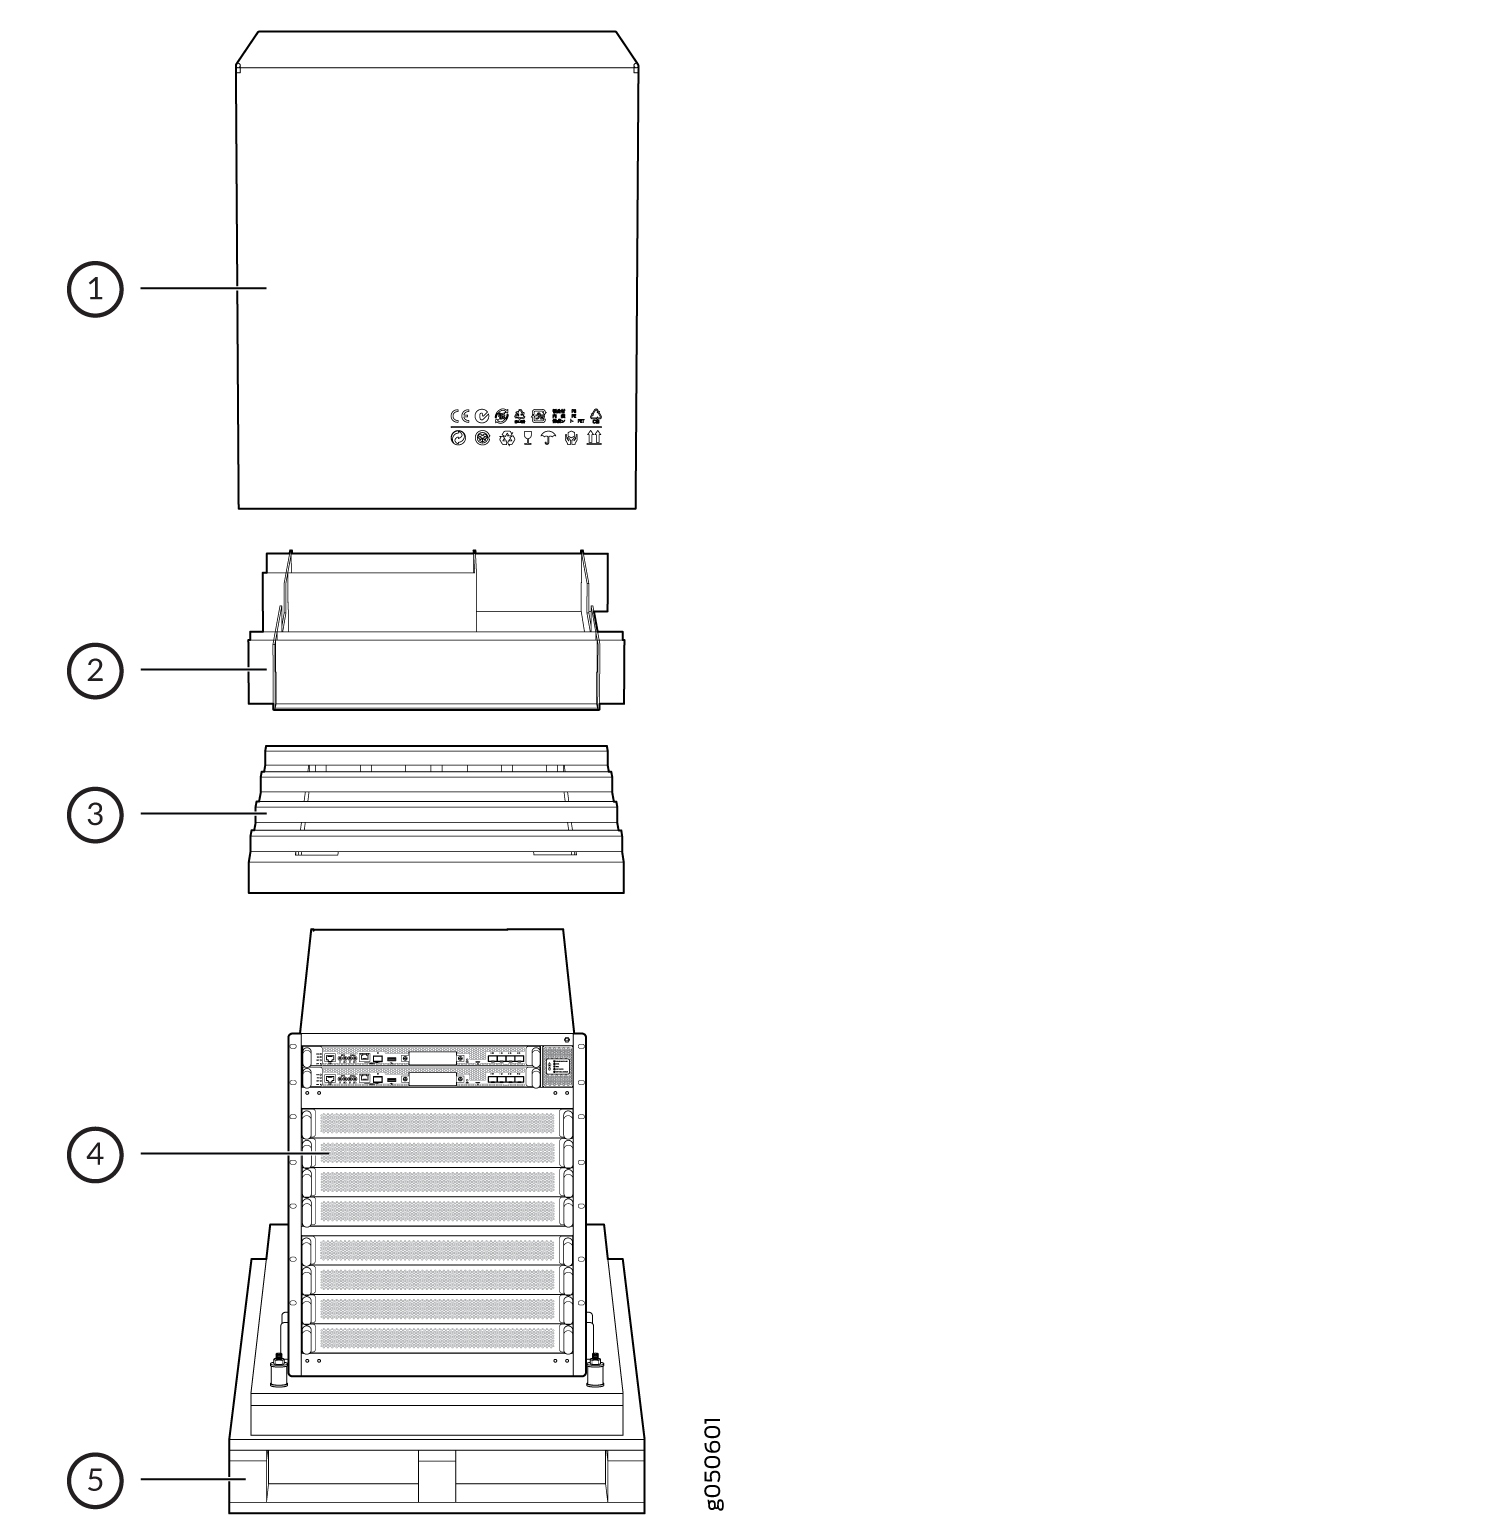
The MX10008 is shipped in a cardboard box that has a two-layer wooden pallet base with foam cushioning between the layers. The router chassis is bolted to the pallet base with four pallet fasteners, two on each side of the chassis. See Figure 14 for the stacking configuration of the MX10008 .
To pack an MX10008 for shipping:
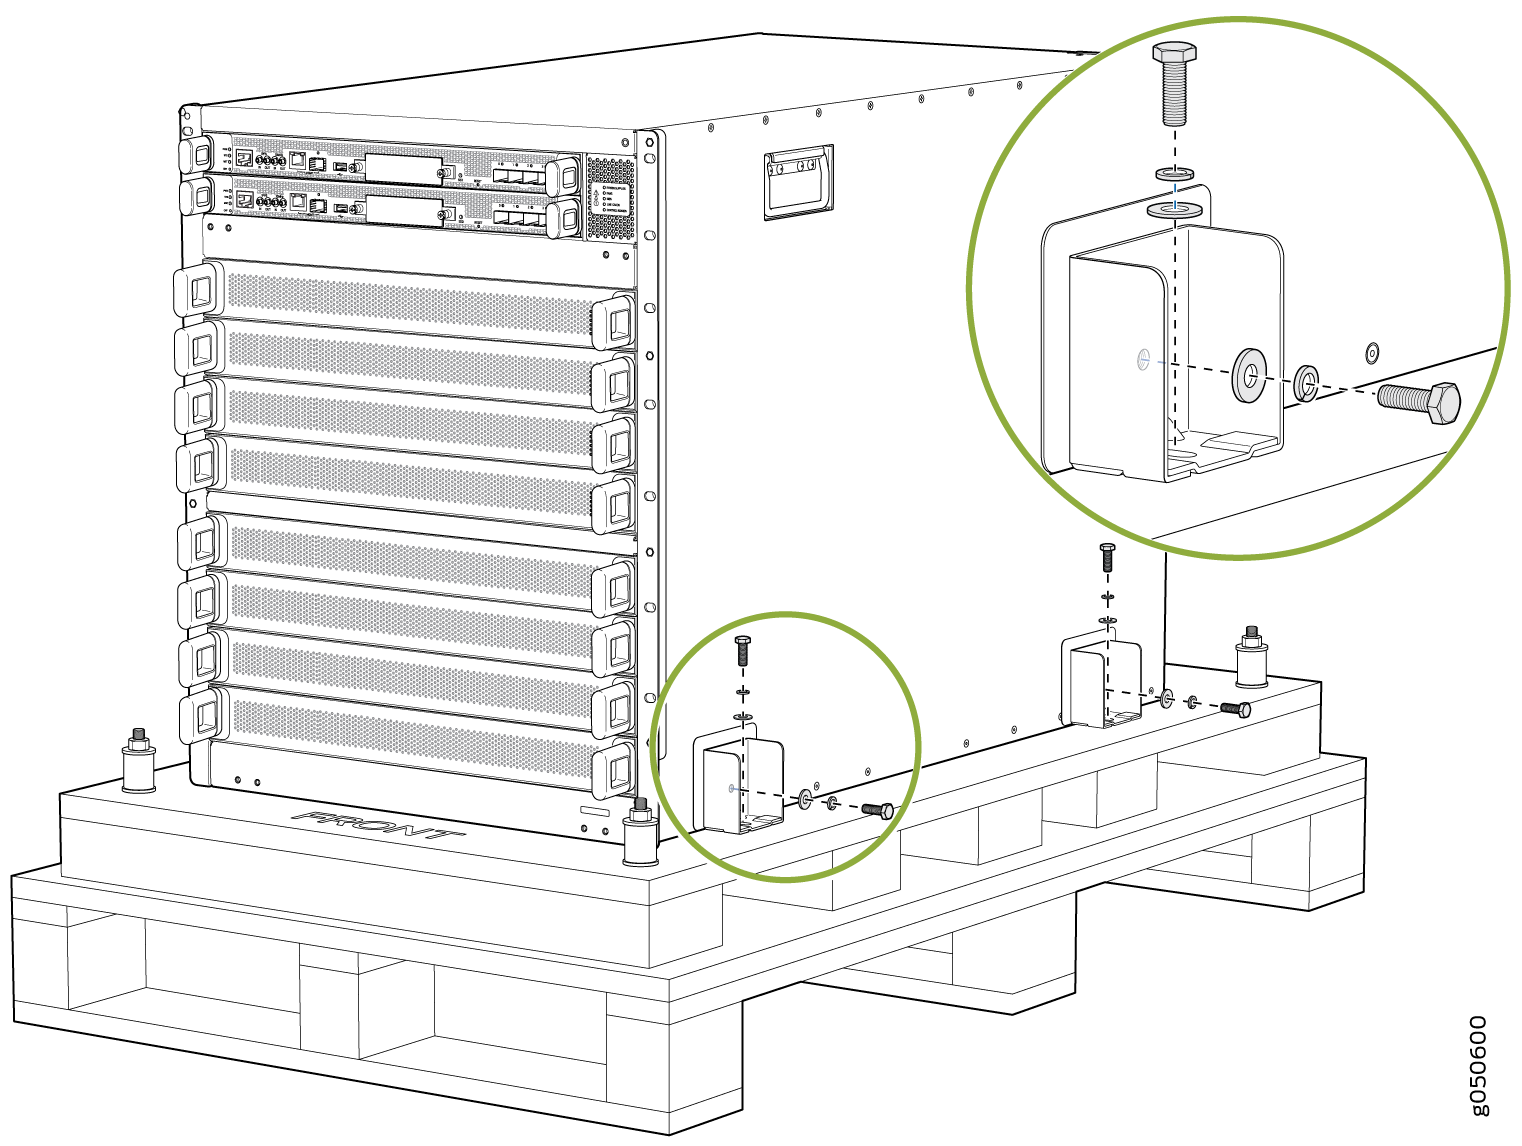
- Attach the cardboard box to the wooden pallet by screwing
two screws into each of the four pallet fasteners. See Figure 15.Figure 15: Attaching the MX10008 to the Pallet
Packing MX10008 Components for Shipping
Before you begin packing a router component, ensure that you have the following parts and tools available:
Antistatic bag, one for each component
Electrostatic discharge (ESD) grounding strap
Do not stack router components. Return individual components in separate boxes if they do not fit together on one level in the shipping box.
To pack and ship MX10008 components:
- Place individual FRUs in antistatic bags.
- Use the original packing materials if they are available. If the original packing materials are not available, ensure the component is adequately packed to prevent damage during transit. The packing material you use must be able to support the weight of the component.
- Ensure that the components are adequately protected with packing materials and packed so that the pieces are prevented from moving around inside the carton.
- Close the top of the cardboard shipping box and seal it with packing tape.
- Write the RMA number on the exterior of the box to ensure proper tracking.