Returning an EX9204 Chassis or Components
Returning an EX9200 Switch or Component for Repair or Replacement
If you need to return a switch or hardware component to Juniper Networks for repair or replacement, follow this procedure:
For more information about return and repair policies, see the customer support page at https://www.juniper.net/support/guidelines.html .
Locating the Serial Number on an EX9204 Switch or Component
If you are returning a switch or hardware component to Juniper Networks for repair or replacement, you must locate the serial number of the switch or component. You must provide the serial number to the Juniper Networks Technical Assistance Center (JTAC) when you contact them to obtain Return Materials Authorization (RMA). See Contact Customer Support to Obtain Return Material Authorization.
If the switch is operational and you can access the command-line interface (CLI), you can list serial numbers for the switch and for some components with a CLI command. If you do not have access to the CLI or if the serial number for the component does not appear in the command output, you can locate the serial number ID label on the physical switch or component.
If you want to find the serial number on the physical switch component, you will need to remove the component from the switch chassis, for which you must have the required parts and tools available. See Installing and Removing EX9204 Switch Hardware Components.
- Listing the Switch and Components Details with the CLI
- Locating the Serial Number ID Label on an EX9200 Switch Chassis
- Locating Serial Number ID Labels on FRU Components
Listing the Switch and Components Details with the CLI
To list the switch and switch components and their serial numbers,
use the show chassis hardware CLI command:
The following output lists the switch components and serial numbers for an EX9204 switch:
user@switch> show chassis hardware
Hardware inventory:
Item             Version  Part number  Serial number     Description
Chassis                                JN120B897RFC      EX9204
Midplane         REV 07   760-021404   ACAW7831          EX9204-BP
FPM Board        REV 05   760-021392   CAAJ1734          Front Panel Display
PEM 0            Rev 10   740-029970   QCS1247U0H0       PS 1.4-2.52kW; 90-264V
AC in
PEM 2            Rev 10   740-029970   QCS1247U0J4       PS 1.4-2.52kW; 90-264V
AC in
Routing Engine 0 REV 07   740-031116   9009119035        RE-S-EX9200-1800X4
Routing Engine 1 REV 07   740-031116   9009118521        RE-S-EX9200-1800X4
CB 0             REV 15   750-031391   CAAT6717          EX9200-SCBE
CB 1             REV 15   750-031391   CAAT6839          EX9200-SCBE
FPC 1            REV 21   750-049611   CAAS4804          EX9200 32x10G SFP
  CPU            REV 08   711-035209   CAAS2701          HMPC PMB 2G
  PIC 0                   BUILTIN      BUILTIN           8X10GE SFPP
    Xcvr 0       REV 01   740-030658   AD1041A06ET       SFP+-10G-USR
    Xcvr 1       REV 01   740-021308   063152A00725      SFP+-10G-SR
    Xcvr 2       REV 01   740-021308   063152A00831      SFP+-10G-SR
    Xcvr 3       REV 01   740-030658   AD1041A06C1       SFP+-10G-USR
    Xcvr 4       REV 01   740-030658   AD1146A05LG       SFP+-10G-USR
    Xcvr 5       REV 01   740-030658   AD0946A02F9       SFP+-10G-USR
    Xcvr 6       REV 01   740-030658   AD0946A0311       SFP+-10G-USR
    Xcvr 7       REV 01   740-030658   AD0946A01JG       SFP+-10G-USR
  PIC 1                   BUILTIN      BUILTIN           8X10GE SFPP
    Xcvr 0       REV 01   740-030658   AD0946A02PN       SFP+-10G-USR
    Xcvr 1       REV 01   740-030658   AD1146A05M2       SFP+-10G-USR
    Xcvr 2       REV 01   740-030658   AD1146A04G2       SFP+-10G-USR
    Xcvr 3       REV 01   740-030658   AD1146A04KB       SFP+-10G-USR
    Xcvr 4       REV 01   740-021308   09T511102673      SFP+-10G-SR
    Xcvr 5       REV 01   740-030658   AD0951A02TH       SFP+-10G-USR
    Xcvr 6       REV 01   740-021308   063152A01121      SFP+-10G-SR
    Xcvr 7       REV 01   740-030658   AD1041A06FB       SFP+-10G-USR
  PIC 2                   BUILTIN      BUILTIN           8X10GE SFPP
    Xcvr 0       REV 01   740-030658   AD1146A05LZ       SFP+-10G-USR
    Xcvr 1       REV 01   740-021308   063152A00712      SFP+-10G-SR
    Xcvr 2       REV 01   740-021308   UFQ0780           SFP+-10G-SR
    Xcvr 3       REV 01   740-021308   AME0MCL           SFP+-10G-SR
    Xcvr 4       REV 01   740-030658   AD0946A02AD       SFP+-10G-USR
    Xcvr 5       REV 01   740-021308   063152A00862      SFP+-10G-SR
    Xcvr 6       REV 01   740-021308   063152A00909      SFP+-10G-SR
    Xcvr 7       REV 01   740-021308   AMF06MK           SFP+-10G-SR
  PIC 3                   BUILTIN      BUILTIN           8X10GE SFPP
    Xcvr 0       REV 01   740-030658   AD0928A00MJ       SFP+-10G-USR
    Xcvr 1       REV 01   740-030658   AD0950A010F       SFP+-10G-USR
    Xcvr 2       REV 01   740-021308   AJP0NRC           SFP+-10G-SR
    Xcvr 3       REV 01   740-030658   AD0946A01HT       SFP+-10G-USR
    Xcvr 4       REV 01   740-021308   063152A00055      SFP+-10G-SR
    Xcvr 5       REV 01   740-021308   AD0902E000Z       SFP+-10G-SR
    Xcvr 6       REV 01   740-021308   AJQ0Q6J           SFP+-10G-SR
    Xcvr 7       REV 01   740-030658   AD0946A01AM       SFP+-10G-USR
FPC 2            REV 21   750-049611   CAAS4821          EX9200 32x10G SFP
  CPU            REV 08   711-035209   CAAS2710          HMPC PMB 2G
  PIC 0                   BUILTIN      BUILTIN           8X10GE SFPP
    Xcvr 5       REV 01   740-021308   063152A01111      SFP+-10G-SR
    Xcvr 6       REV 01   740-021308   09T511107580      SFP+-10G-SR
    Xcvr 7       REV 01   740-021308   063152A00823      SFP+-10G-SR
  PIC 1                   BUILTIN      BUILTIN           8X10GE SFPP
    Xcvr 5       REV 01   740-030658   AD0946A01WM       SFP+-10G-USR
    Xcvr 6       REV 01   740-030658   AD1146A04JS       SFP+-10G-USR
    Xcvr 7       REV 01   740-030658   AD0939A02GC       SFP+-10G-USR
  PIC 2                   BUILTIN      BUILTIN           8X10GE SFPP
    Xcvr 5       REV 01   740-021308   AMG05CG           SFP+-10G-SR
    Xcvr 6       REV 01   740-021308   AD0927A0022       SFP+-10G-SR
    Xcvr 7       REV 01   740-030658   AD0946A02F2       SFP+-10G-USR
  PIC 3                   BUILTIN      BUILTIN           8X10GE SFPP
    Xcvr 5       REV 01   740-021308   AMG0EC8           SFP+-10G-SR
    Xcvr 6       REV 01   740-030658   AD0946A01K7       SFP+-10G-USR
    Xcvr 7       REV 01   740-030658   AD0946A01Z7       SFP+-10G-USR
Fan Tray 0       REV 01   710-030216   CAAH2572          Enhanced Fan Tray
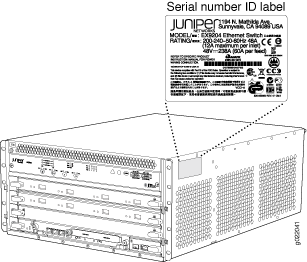
Locating the Serial Number ID Label on an EX9200 Switch Chassis
The serial number ID label is located on the side of the chassis on an EX9204 switch. See Figure 1.
Locating Serial Number ID Labels on FRU Components
The power supplies, fan tray, Routing Engine modules (RE modules), Switch Fabric module (SF module), and line cards installed in an EX9200 switch are field-replaceable units (FRUs). For each of these FRUs, you must remove the FRU from the switch chassis to see the FRU’s serial number ID label.
-
AC Power supply—The serial number ID label is on the top of the AC power supply. See Figure 2. Also see Removing an AC Power Supply from an EX9204 Switch.
Figure 2: Location of the Serial Number ID Label on an AC Power Supply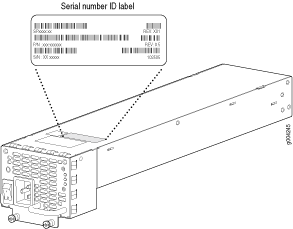
-
DC Power supply—The serial number ID label is on the top of the DC power supply (see Figure 3). Also see Removing a DC Power Supply from an EX9204 Switch.
Figure 3: Location of the Serial Number ID Label on a DC Power Supply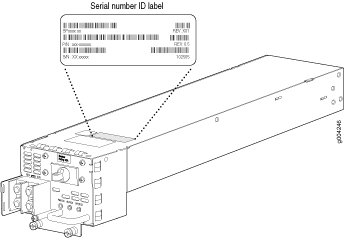
-
SF module—The serial number is located on the right side of the top of the SF module (see Figure 4). See Removing an SF Module from an EX9200 Switch.
Figure 4: Location of the Serial Number ID Label on the SF Module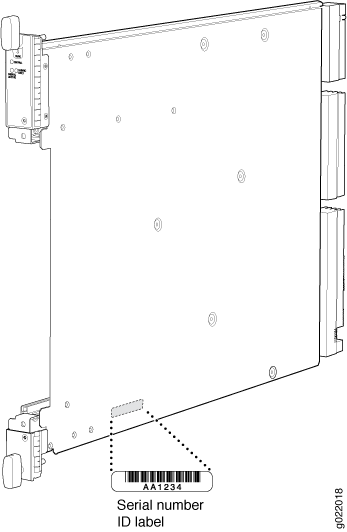
-
RE module— The serial number label is located on the left side of the top of the RE module (see Figure 5). See Removing an RE Module from an EX9200 Switch.
Figure 5: Location of the Serial Number ID Label on the RE Module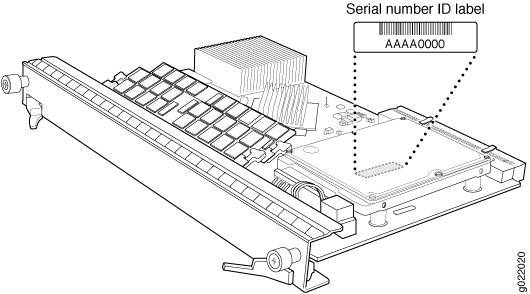
Contact Customer Support to Obtain a Return Material Authorization
If you need to return a device or hardware component to Juniper Networks for repair or replacement, obtain an RMA number from JTAC. You must obtain an RMA number before you attempt to return the component.
After locating the serial number of the device or hardware component you want to return, open a service request with the JTAC on the Web or by telephone.
Before you request an RMA number from JTAC, be prepared to provide the following information:
-
Your existing service request number, if you have one
-
Serial number of the component
-
Your name, organization name, telephone number, fax number, and shipping address
-
Details of the failure or problem
-
Type of activity being performed on the device when the problem occurred
-
Configuration data displayed by one or more
showcommands
You can contact JTAC 24 hours a day, seven days a week, on the Web or by telephone:
-
Service Request Manager: https://support.juniper.net/support
-
Telephone: +1-888-314-JTAC (+1-888-314-5822), toll free in U.S., Canada, and Mexico
For international or direct-dial options in countries without toll free numbers, see https://support.juniper.net/support.
If you are contacting JTAC by telephone, enter your 12-digit service request number followed by the pound (#) key for an existing case, or press the star (*) key to be routed to the next available support engineer.
The support representative validates your request and issues an RMA number for return of the component.
Packing an EX9200 Switch or Component
If you are returning an EX9200 switch or component to Juniper Networks for repair or replacement, pack the item as described in this topic.
Before you begin packing the switch or component, ensure you have:
Followed all the steps listed in Contact Customer Support to Obtain Return Material Authorization.
Retrieved the original shipping carton and packing materials. Contact your JTAC representative if you do not have these materials, to learn about approved packing materials. See Contact Customer Support to Obtain Return Material Authorization.
Ensure you understand how to prevent electrostatic discharge (ESD) damage. See Prevention of Electrostatic Discharge Damage.
Ensure that you have the following parts and tools available:
An ESD wrist strap
Packing an EX9200 Switch
If you need to transport the switch to another location or return the switch to Juniper Networks, you need to pack the switch securely in its original packaging to prevent damage during transportation.
To pack the switch for shipment:
Packing EX9200 Switch Components for Shipping
Before you begin packing a switch component, ensure that you have the following parts and tools available:
Antistatic bag, one for each component
An ESD wrist strap
To pack EX9200 switch components, follow the instructions here.
Do not stack switch components. Return individual components in separate boxes if they do not fit together on one level in the shipping box.
To pack EX9200 switch components:
Place individual components in antistatic bags.
Use the original packing materials if they are available. If the original packing materials are not available, ensure the component is adequately packed to prevent damage during transit. The packing material you use must be able to support the weight of the component.
Ensure that the components are adequately protected by wrapping them well with packing materials. Pack the component in an oversized box (if the original box is not available) with extra packing material around the unit so that the component is prevented from moving around inside the box.
Securely tape the box closed.
Write the RMA number on the exterior of the box to ensure proper tracking.