이 페이지의 내용
Mist Cloud에 스위치 온보딩
새 스위치를 클레임하거나 이전에 구축한 스위치를 조직에 도입하려면 다음 단계를 따르십시오. 스위치가 이미 Mist 클라우드에 온보딩되어 있는 경우 이 단계를 무시하십시오.
Wired Assurance는 Junos Flex 이미지를 지원하지 않습니다. 호환성을 보장하려면 스위치가 표준(비 Flex) Junos 이미지를 실행하고 있는지 확인하십시오. 스위치를 업그레이드할 때는 표준 Junos 이미지만 구축되도록 하는 Mist 클라우드를 통해 업그레이드하는 것이 좋습니다.
주니퍼 Mist 클라우드를 통해 스위치를 구성하고 관리하려면 스위치를 조직에 온보딩해야 합니다.
그린필드 또는 브라운필드 스위치를 Mist에 온보딩할 수 있습니다.
-
그린필드 - 새로운 클라우드 지원 스위치. 클라우드 지원 디바이스의 섀시에는 QR 코드 또는 클레임 코드가 있으며, 이를 스캔하면 주니퍼 Mist 포털에서 신속하게 디바이스를 온보딩할 수 있습니다.
-
브라운필드 - 클라우드 지원은 아니지만 Mist에서 계속 지원하는 기존의 서비스 중(브라운필드) 스위치. 이 스위치에는 QR 코드가 첨부되어 있지 않습니다. 클라우드 지원은 아니지만 Mist에서 계속 지원되는 디바이스의 경우, 디바이스를 온보딩(채택)하려면 스위치에서 로컬로 일부 Junos CLI 명령을 입력해야 합니다.
주니퍼 스위치는 SSH 연결(TCP 포트 2200) 을 사용하여 주니퍼 Mist 클라우드로 텔레메트리 업데이트를 전송합니다. 주니퍼 Mist 포털에서는 브라운필드 스위치를 채택할 때와 공공 서비스 설비 메뉴에서 스위치에 대한 원격 셸을 열 때도 SSH를 사용합니다. 또한 스위치 구성 페이지의 추가 CLI 명령 섹션에 사용자 지정 CLI 구성을 포함하는 경우 이러한 명령은 SSH를 통해 스위치에 푸시됩니다.
서비스 거부 공격이나 기타 가능한 SSH 공격의 가능성을 방지하기 위해 스위치에서 연결당 연결 및/또는 세션의 상한을 구성할 수 있습니다. 주니퍼 EX 및 QFX 시리즈 스위치의 경우 ssh max-sessions-per-connection 의 기본값은 10입니다. 다음과 같은 Junos 명령을 실행하여 변경할 수 있습니다.
[edit system services ssh] set connection-limit <number>
스위치 온보딩 전제 조건
스위치를 온보딩하기 전에:
-
Wired Assurance 구독 및 주니퍼 Mist 포털에 대한 로그인 자격 증명이 있는지 확인합니다. Mist를 시작하려면 빠른 시작: Mist의 지침을 따르십시오.
-
필요한 스위치 관리자 역할이 할당되어 있는지 확인합니다. 자세한 내용은 스위치 관리자 역할 요구 사항을 참조하십시오.
-
스위치가 Mist Wired Assurance에서 지원되는지 확인합니다. 지원되는 스위치 모델 및 소프트웨어 버전을 보려면 유선 네트워크에 대한 하드웨어 및 소프트웨어 요구 사항을 참조하십시오.
-
스위치가 DNS 서버(NTP 서버도 권장됨)에 연결되어 있고 인터넷을 통해 주니퍼 Mist 클라우드 아키텍처에 연결할 수 있는지 확인합니다.
-
클라우드와 스위치 사이에 방화벽이 있는 경우 TCP 포트 2200에서 스위치의 관리 포트로의 아웃바운드 액세스를 허용합니다.
그린필드 스위치 온보딩
컴퓨터를 사용하여 하나 이상의 그린필드 클라우드 지원 스위치를 온보딩하거나 휴대폰을 사용하여 단일 스위치를 온보딩할 수 있습니다. 단일 스위치를 Mist 클라우드에 온보딩하는 가장 쉬운 방법은 Mist AI 모바일 앱을 사용하는 것입니다. 여러 개의 클라우드 지원 스위치를 함께 온보딩하려면 주니퍼 Mist 포털을 사용하고 구매 주문서에 연결된 활성화 코드를 입력합니다.
그린필드 스위치를 온보딩하려면 빠른 시작: Mist를 사용하는 클라우드 레디 EX 및 QFX 스위치의 지침을 따르십시오.
빠른 데모를 보려면 다음 비디오를 시청하십시오.
Onboarding a Greenfield CloudReady EX switch is simple. In your inventory page, find the Switches tab. Click on Claim Switches.
Type in your switch's unique claim code, which can be found near the QR code at the front of the switch. Alternatively, you can also enter an activation code, which pulls all your newly purchased Juniper hardware from one order, rather than adding individual switch codes. Add and check for your desired settings, such as site assignment and configuration management.
Click Claim, and the switch has been added to the site. The EX3400 has been added. In the site view, you should see the switch appropriately assigned.
Notice that red indicates the switch is offline, but will turn green once it comes online. The switch is cloud-managed and accounted for as part of the health metrics above.
브라운필드 스위치 온보딩
스위치 채택 옵션을 사용하여 클라우드 지원이 아니거나 QR 코드가 없는 브라운필드 스위치를 온보딩합니다. 브라운필드 스위치를 채택하면 Mist에서 관리하도록 할 수 있습니다(권장), 즉, 기존 구성은 Mist 콘솔의 설정으로 대체됩니다. 또는 Mist가 스위치를 관리하지 않도록 선택할 수 있으며, 이 경우 기존 구성이 그대로 유지되며 클라우드 및 텔레메트리에 연결하기 위한 몇 가지 새로운 설정이 추가됩니다. 비관리형 스위치는 독특합니다. Mist 콘솔에서 구성한 구성은 적용되지 않으며, 템플릿이나 사이트 변수 사용이나 매니지드 디바이스에서 사용할 수 있는 기타 편의 기능의 이점을 누릴 수 없습니다. 또한 스위치에서 수행된 후속 구성은 Mist에 "알려지지 않아" 있으므로 CLI에 경고 메시지를 설정하여 해당 스위치가 Mist 환경의 일부임을 나타내거나 충돌하지 않도록 구성을 변경할 수 있는 사용자를 제한할 수 있습니다.
Mist가 스위치를 관리하는 경우, 즉 온보딩할 때 Mist로 구성 관리 옵션을 선택한 경우 스위치를 채택하기 전에 기존 Junos OS 구성을 백업해야 합니다. 스위치에 연결하고 CLI에 로그온한 다음 Junos에서 명령을 실행 request system configuration rescue save 하여 현재 활성 구성 및 설치별 매개 변수를 저장합니다.
하드웨어에서 Mist 클레임 코드를 사용하기 이전에 오래된 vJunos 스위치 또는 레거시 디바이스와 같은 가상 디바이스의 경우 클레임이 아닌 채택해야 합니다. VM이 이전에 Global02와 같은 한 환경에서 클레임된 경우 다른 환경 또는 조직의 인벤토리 또는 설치 기반에서 사용하지 못할 수 있습니다(MAC 주소가 여전히 원래 환경에 연결되어 있을 수 있기 때문입니다.) 원래 환경에서 디바이스를 해제하거나 가상 디바이스를 다시 만들어야 새 가상 MAC가 생성됩니다.
아래 절차에서는 주니퍼 Mist 포털과 Junos OS CLI를 사용하는 스위치에 대한 구성을 변경합니다. 두 환경 모두에 로그인할 수 있는지 확인합니다.
관리되지 않는 스위치는 여전히 Mist 클라우드와의 연결을 유지하기 위해 Mist로부터 구성을 받습니다. 여기에는 효율적인 통계 수집을 위한 시스템 스크립트 및 확장, 디바이스의 효율적인 로깅을 위한 시스템 syslog 설정, 클라우드 통신을 위한 'mist'라는 사용자 계정이 포함됩니다.
브라운필드 스위치를 Mist 클라우드에 온보딩하는 방법:
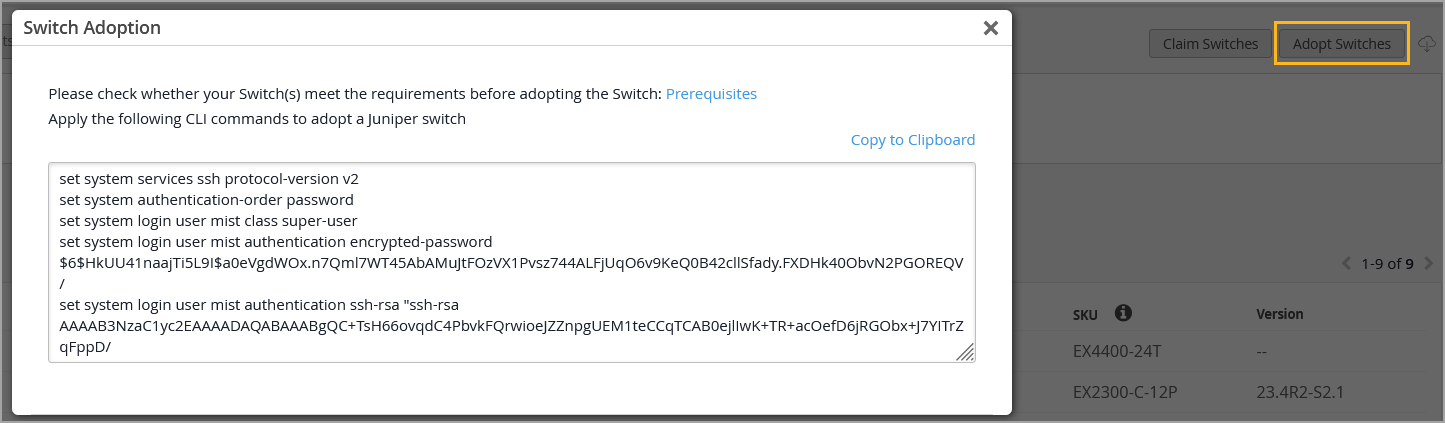
- 표시되는 페이지 상단에서 스위치를 선택한 다음 오른쪽 상단 모서리에 있는 스위치 채택 버튼을 클릭하여 상호 운용성에 필요한 Junos OS CLI 명령을 생성합니다. 이 명령은 주니퍼 Mist 사용자 계정을 생성하고 TCP 포트 2200을 통해 주니퍼 Mist 클라우드에 대한 SSH 연결을 생성합니다(스위치 연결은 관리 인터페이스에서 시작되며 구성 설정 및 텔레메트리 데이터 전송에 사용됨).
빠른 데모를 보려면 다음 비디오를 시청하십시오.
Adopting switches for brownfield environments only takes a few steps. In Organization, look for the Inventory tab and toggle to Switches. Click on Adopt Switches.
This brings up a clipboard of CLI commands to copy and paste into the console of a switch. Put in the config and commit it in the switch. Ensure that TCP port 2200 is open to the internet.
This allows for the switch to communicate with the Juniper Mist cloud. Check that it is connected properly by entering Show System Connection to see an established TCP session. Going back to the dashboard, you can see the EX switch online and fully cloud-managed.
Templates will also be inherited when you enable Configuration Management. Don't forget to save. Now you're good to go.
Adopting an EX switch to the Juniper Mist cloud from a brownfield environment is a straightforward process. Now you have the power and simplicity of a cloud-managed solution for your EX switches.